Skip to content
grilledflavors.com
  • Home
  • Appetizers
  • Desserts
  • Salads
  • Breakfast
  • Dinner
  • Privacy Policy
  • Contact
  • About

Chef Nate

Texas Sheet Cake Cookies Delightful Treat Recipe

December 23, 2025September 17, 2025 by Chef Nate
- 1 cup unsalted butter, softened - 2 cups granulated sugar - 2 large eggs - 1 teaspoon vanilla extract - 1 cup all-purpose flour - 1/2 cup unsweetened cocoa powder - 1 teaspoon baking soda - 1/2 teaspoon salt - 1 cup buttermilk - 1 1/2 cups semi-sweet chocolate chips - 1 cup chopped pecans (optional) You need about 15 minutes to prep. The total cooking time is 12 minutes. So, the whole process takes about 27 minutes. This recipe makes 24 delicious cookies. Perfect for sharing with friends and family! {{ingredient_image_1}} First, you need to preheat your oven to 350°F (175°C). This helps your cookies bake evenly. While the oven heats, line two baking sheets with parchment paper. This keeps the cookies from sticking and makes cleanup easy. In a large mixing bowl, add 1 cup of softened unsalted butter. Next, mix in 2 cups of granulated sugar. Use a hand mixer or a whisk to cream them together until it's light and fluffy. This step makes your cookies soft and tasty. Now, add 2 large eggs, one at a time. Mix well after each egg. Finally, stir in 1 teaspoon of vanilla extract. This adds a nice flavor to your cookies. In another bowl, you will whisk together dry ingredients. Add 1 cup of all-purpose flour, 1/2 cup of unsweetened cocoa powder, 1 teaspoon of baking soda, and 1/2 teaspoon of salt. Whisk until the mixture is smooth and even. This step is important because it helps your cookies rise and taste great. Now, it’s time to combine everything. Gradually add the dry mix to the wet mix. Alternate with 1 cup of buttermilk, starting and ending with the dry mix. Mix until just combined. Do not overmix! Next, fold in 1 1/2 cups of semi-sweet chocolate chips and 1 cup of chopped pecans if you like. Using a tablespoon or a cookie scoop, drop cookie dough balls onto the prepared baking sheets. Leave about 2 inches of space between each ball. Bake in your preheated oven for 10-12 minutes. The edges should set, but the centers need to stay soft. Once baked, let the cookies cool on the sheets for 5 minutes before moving them to a wire rack. This step helps them firm up nicely. Enjoy your Texas Sheet Cake Cookies! To get the best texture in your Texas Sheet Cake Cookies, start with softened butter. This makes the dough light and fluffy. Cream the butter and sugar well. You want a nice, airy mix. Next, be careful when adding the flour mixture. Mix just until combined. Overmixing can make the cookies tough. Store your cookies in an airtight container. This keeps them soft and fresh. You can add a slice of bread in the container too. The bread helps keep the cookies moist. If you need to store them longer, freeze the cookies. Wrap them well in plastic wrap and place them in a freezer bag. They can last up to three months. Decorating your cookies can be fun and easy. After they cool, use powdered sugar for a simple touch. You can also drizzle melted chocolate on top. For a fancy look, add some chopped nuts on the chocolate. This adds flavor and crunch. Enjoy your creative process and make each cookie special! Pro Tips Chill the Dough: For thicker cookies, chill the dough in the refrigerator for about 30 minutes before baking. This prevents spreading and gives a chewier texture. Use Quality Chocolate: Opt for high-quality semi-sweet chocolate chips to enhance the flavor of your cookies. A richer chocolate will make a noticeable difference. Don’t Overbake: Keep an eye on the cookies as they bake. They should look slightly underbaked in the center; they will continue to set as they cool. Experiment with Nuts: Try using different types of nuts, such as walnuts or almonds, for a unique twist. Toasting them beforehand will also amplify their flavor. {{image_2}} You can change the flavor by adding different nuts. Pecans are classic, but walnuts work well too. Almonds can add a nice crunch and flavor. Chop them into small pieces before mixing them in. Just one cup of chopped nuts adds texture and taste. It makes each bite a little more exciting. Chocolate is key to these cookies. You can try different types of chocolate for a twist. Use milk chocolate chips for a sweeter cookie. Dark chocolate chips give a rich flavor. You can even mix white chocolate chips with semi-sweet for a fun look. Each swap changes the taste and makes it your own. If you need to avoid gluten, you can still enjoy these cookies. Swap the all-purpose flour with a gluten-free flour blend. Look for one that contains xanthan gum for the best results. Make sure all other ingredients are gluten-free too. This way, everyone can enjoy these tasty treats without worry. You should store Texas Sheet Cake Cookies in an airtight container. This keeps them fresh. Make sure they cool completely before you store them. Place parchment paper between layers if stacking. They will stay good for about one week. Yes, you can freeze Texas Sheet Cake Cookies. First, let them cool fully. Then, wrap each cookie in plastic wrap. Place them in a freezer bag or container. They will keep well for up to three months. Just thaw them at room temperature before enjoying. If you don’t have buttermilk, don’t worry! You can make a quick substitute. Mix one cup of regular milk with one tablespoon of vinegar or lemon juice. Let it sit for five minutes. This will give you a similar tangy flavor. You can also use plain yogurt or sour cream mixed with water. Texas sheet cake has a rich history that began in the Lone Star State. Many believe it started in the early 20th century. It quickly became a popular dessert at gatherings. The cake is known for its moist texture and chocolatey goodness. People love to enjoy it at birthdays, holidays, and potlucks. The cookies take this classic and make it easy to grab and eat. Texas sheet cake cookies offer a delightful mix of flavors. Key ingredients include: - 1 cup unsalted butter, softened - 2 cups granulated sugar - 2 large eggs - 1 teaspoon vanilla extract - 1 cup all-purpose flour - 1/2 cup unsweetened cocoa powder - 1 teaspoon baking soda - 1/2 teaspoon salt - 1 cup buttermilk - 1 1/2 cups semi-sweet chocolate chips - 1 cup chopped pecans (optional) These ingredients create a rich chocolate flavor. The nuts add a nice crunch. The buttermilk makes the cookies soft and tender. Every bite is a treat for your taste buds. These cookies shine when paired with a glass of milk or coffee. The creamy milk balances the rich chocolate. A hot cup of coffee brings out the flavors too. For serving, arrange the cookies on a large platter. Dust them lightly with powdered sugar for a touch of elegance. These cookies are perfect for sharing at any event or just enjoying at home. Texas sheet cake cookies bring a tasty twist to a classic dessert. We covered the full recipe, tips for texture, and fun variations. These cookies are simple and delicious. You can store them easily and even freeze them for later. Explore different nuts or chocolate types to customize your batch. Remember, the history of this cake adds to its charm. With these tips, you can bake a perfect treat every time. Dive into the world of cookies and enjoy the sweet flavors of Texas!

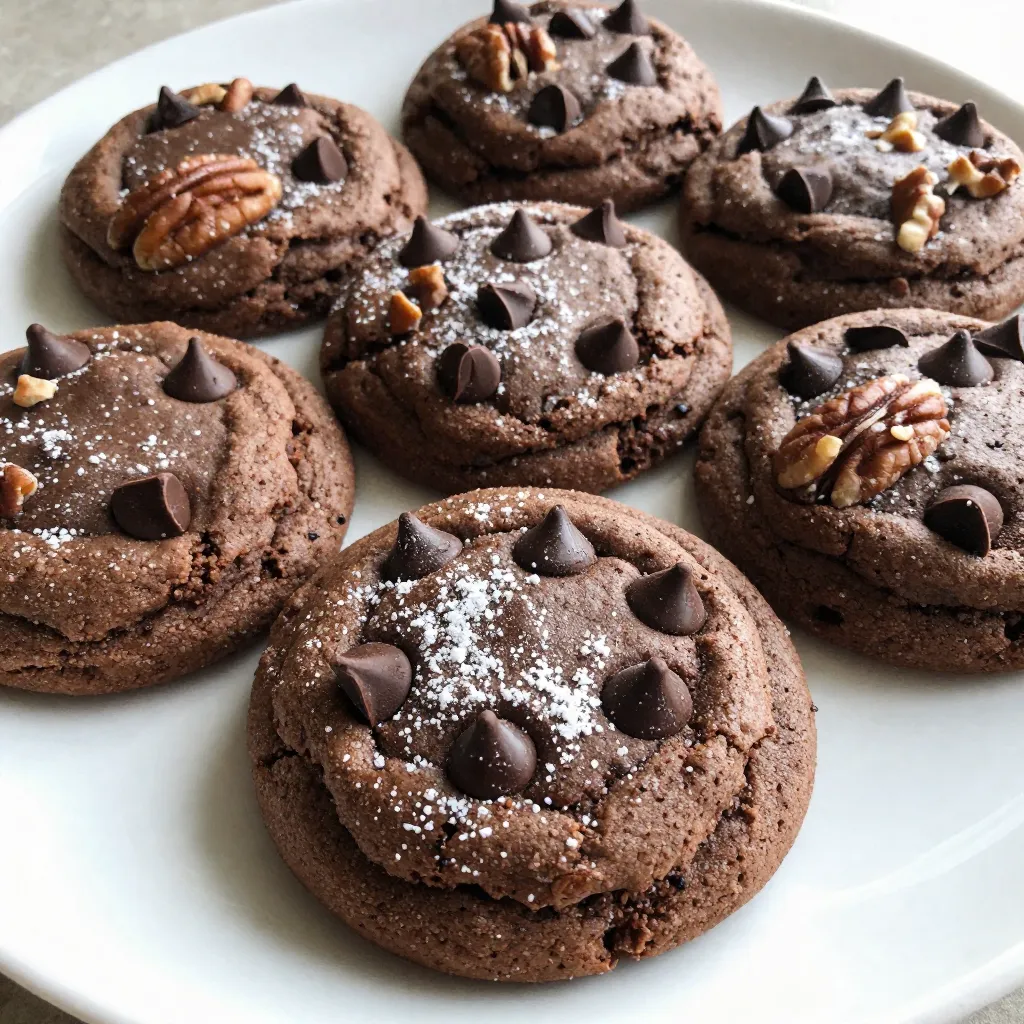
If you love Texas sheet cake, you’re going to adore these Texas Sheet Cake Cookies! This recipe combines the rich flavors of the classic cake into a chewy cookie. With …

Read more

Categories Desserts

Pesto Mozzarella Stuffed Meatballs Flavorful Dinner Dish

December 26, 2025September 15, 2025 by Chef Nate
- 1 pound ground beef - 1 cup breadcrumbs - 1/4 cup grated Parmesan cheese - 1/4 cup fresh basil, chopped - 1 egg - 1 teaspoon garlic powder - 1 teaspoon onion powder - Salt and pepper to taste - 1 cup basil pesto - 1 cup small mozzarella balls (bocconcini) - Olive oil for frying - 1 jar marinara sauce - 1/2 pound ground pork - Large mixing bowl - Skillet - Spoon or spatula - Measuring cups and spoons - Baking sheet (for cooling) - Serving plate Gather these ingredients and tools before you start. This way, you keep the cooking process smooth. The required ingredients create a classic flavor. The optional ground pork adds richness. Use fresh basil for the best taste. Mozzarella balls give that gooey surprise inside each meatball. Olive oil helps achieve a perfect golden crust. {{ingredient_image_1}} To start, grab a large mixing bowl. In this bowl, combine 1 pound of ground beef and, if you want, 1/2 pound of ground pork. Add 1 cup of breadcrumbs, 1/4 cup of grated Parmesan cheese, and 1/4 cup of chopped fresh basil. Next, crack in 1 egg, then sprinkle in 1 teaspoon of garlic powder and 1 teaspoon of onion powder. Season with salt and pepper to taste. Mix everything gently but well. You want it combined, not overworked. Now, take about a tablespoon of your meat mixture. Flatten it in your palm. Place a small mozzarella ball in the center. Wrap the meat around it, sealing it completely. It should look like a little ball. Repeat this process until you use all the meat mixture. You should end up with about 12 to 15 meatballs. Each one is a tasty surprise! Next, heat some olive oil in a large skillet over medium heat. Once the oil is hot, carefully add the stuffed meatballs. Make sure not to overcrowd the pan. Cook them for about 8 to 10 minutes, turning them occasionally. You want them browned on all sides. After they’re browned, transfer the meatballs to a saucepan with warmed marinara sauce. Let them simmer for 10 more minutes. This helps all the flavors mix and the cheese melts just right. Serve them hot, and enjoy! To make the best meatballs, you need the right mix. Start with equal parts ground beef and pork for great flavor. If you skip the pork, use all beef. Adding breadcrumbs helps keep the meatballs soft. Mix in grated Parmesan and fresh basil for extra taste. Don't overmix the meat; just combine until it’s smooth. Use your hands to form meatballs. Take about a tablespoon of mixture and flatten it in your palm. Place a mozzarella ball in the center and wrap the meat around it. Seal it well to avoid leaks. Aim for a smooth surface for even cooking. When cooking, heat the olive oil until it shimmers. This shows it's hot enough. Fry the meatballs in batches. If you overcrowd the pan, they won’t brown well. Cook them until they are crispy on the outside. Let them simmer in the marinara sauce to soak up more flavor. One common mistake is overmixing the meat. This makes tough meatballs. Another mistake is not sealing the mozzarella inside. If you do not seal them well, the cheese can leak out while cooking. Watch the heat closely. Cooking on too high heat can burn the outside while leaving the inside raw. Use medium heat for best results. Also, avoid skipping the simmering step. This helps the meatballs stay moist and lets the flavors meld. For a beautiful presentation, use a large serving plate. Arrange the meatballs in a circle or in a pile. Drizzle some olive oil over them for shine. Garnish with fresh basil leaves for color. You can also drizzle extra pesto on top for a pop of green. Serve with marinara sauce on the side for dipping. Pair the meatballs with spaghetti or a fresh salad for a complete meal. Consider adding garlic bread to make it even more special. Pro Tips Use Fresh Ingredients: Always opt for fresh basil and high-quality mozzarella for the best flavor and texture in your meatballs. Don’t Overmix the Meat: Mixing the meat too much can result in tough meatballs. Combine just until ingredients are evenly incorporated. Control the Heat: Cooking the meatballs over medium heat allows them to brown properly without burning. Turn them gently to ensure even cooking. Freeze for Later: You can freeze uncooked meatballs for up to three months. Just thaw and cook when you're ready for a quick meal. {{image_2}} You can use different meats for your meatballs. Ground turkey or chicken works well. These options make the dish lighter. If you want a richer flavor, use ground lamb. You can mix meats too. For example, combine beef and pork. This gives you a tasty blend of flavors. If you need a gluten-free meal, swap breadcrumbs for gluten-free ones. You can use almond flour too. It gives a nice texture without gluten. For low-carb options, try using grated zucchini. This keeps the meatballs moist while cutting carbs. You can also serve them with cauliflower rice instead of pasta. Serve your meatballs in fun ways. Try them in a sub sandwich with marinara and cheese. This makes a great meatball sandwich! You can also top them on a salad for a fresh meal. For an Italian twist, pair them with polenta. Drizzle extra pesto on top for added flavor. These ideas keep each meal exciting and new! After your tasty meal, let the meatballs cool down. Place them in an airtight container. This keeps them fresh. If you have sauce, store it separately. You can keep leftovers in the fridge for up to three days. To heat them up, choose the oven or the microwave. For the oven, preheat it to 350°F. Place meatballs on a baking sheet and cover them with foil. Heat for about 15 minutes. If using a microwave, put a few on a plate. Heat for 1-2 minutes, checking to avoid overcooking. Freezing is a great option for meal prep. First, let the meatballs cool completely. Place them in a single layer on a baking sheet. Freeze for about 1-2 hours until firm. Then, transfer them to a freezer bag. Remove as much air as possible. They can last for up to three months in the freezer. Yes, you can make the meatballs ahead of time. Once formed, place them on a tray. Cover them with plastic wrap and store them in the fridge for up to 24 hours. This way, you can save time when you are ready to cook. You can use ground turkey, chicken, or even plant-based meat. These options work well and keep the meatballs tasty. Choose what suits your diet best. Just keep the same amount for the recipe. Check the meatballs for a golden-brown color. They should cook for about 8-10 minutes in the skillet. You can also cut one in half. The inside should be no longer pink. If you have a meat thermometer, the center should reach 165°F. You’ve learned how to make tasty stuffed meatballs from scratch. We covered key ingredients, helpful tools, and steps for prepping and cooking. Tips and tricks can help you avoid common mistakes. You’ll also enjoy fun variations and storage tips for leftovers. Remember, cooking is fun and creative. Don’t be afraid to tweak recipes and make them your own. With practice, you’ll master perfect meatballs every time. Enjoy sharing your delicious creations with family and friends!

Looking for a dinner option that bursts with flavor? You’ve found it! Pesto Mozzarella Stuffed Meatballs are not only delicious, but they also bring joy to any table. Imagine a …

Read more

Categories Dinner

One-Pot Tomato Spinach Chicken Pasta Easy Weeknight Meal

October 19, 2025September 8, 2025 by Chef Nate
- 2 boneless, skinless chicken breasts, diced - 2 cups cherry tomatoes, halved - 3 cups fresh spinach, chopped - 2 cups penne pasta - 3 cups chicken broth - 2 tablespoons olive oil - 3 cloves garlic, minced - 1 teaspoon Italian seasoning - Salt and pepper to taste - Fresh basil leaves for garnish - Grated Parmesan cheese (optional) This recipe serves four people. You will need: - 2 boneless, skinless chicken breasts, diced into bite-sized pieces. - 2 cups cherry tomatoes, cut in half for sweetness and color. - 3 cups fresh spinach, chopped to add flavor and nutrition. - 2 cups penne pasta, which holds the sauce well. - 3 cups chicken broth for richness. - 2 tablespoons of olive oil to sauté the chicken and garlic. - 3 cloves of garlic, minced for a strong aroma. - 1 teaspoon of Italian seasoning for a blend of flavors. - Salt and pepper to taste, to enhance all the flavors. - Fresh basil leaves for garnishing, adding freshness. - Grated Parmesan cheese (optional) for a creamy finish. {{ingredient_image_1}} First, heat the olive oil in a large pot on medium heat. Add the diced chicken breasts. Season them with salt, pepper, and Italian seasoning. Sear the chicken until it's browned, about 5-7 minutes. This step gives your chicken great flavor. Next, add the minced garlic to the pot. Sauté it for about one minute until it smells nice. Then, stir in the halved cherry tomatoes and the chicken broth. Bring this mixture to a boil. The tomatoes add sweetness and depth to the dish. Once boiling, add the penne pasta. Stir well to mix everything together. Then, reduce the heat to a simmer. Cover the pot and cook for about 10-12 minutes. Stir occasionally to stop the pasta from sticking. You want the pasta to be al dente, which means it's firm but not hard. After the pasta is cooked, add the chopped spinach. Mix it in until it wilts, which takes about 2-3 minutes. Taste the dish and adjust the seasoning with more salt or pepper if needed. Let it sit for a few minutes to thicken slightly. Serve hot, garnished with fresh basil leaves and a sprinkle of grated Parmesan cheese if you like. Enjoy this easy weeknight meal! To ensure your pasta is cooked al dente, follow these steps: - Use plenty of water to boil the pasta. This helps it cook evenly. - Stir the pasta often while it cooks. This keeps it from sticking together. - Check the pasta a minute or two before the cooking time ends. It should be firm but not hard. For the chicken, here are some tips to avoid overcooking: - Cut the chicken into small, even pieces. This helps them cook faster. - Cook the chicken until it is golden brown. This should take about 5-7 minutes. - Use a meat thermometer to check the chicken's doneness. It should reach 165°F. To make your dish stand out, think about these creative plating ideas: - Use a large bowl to serve the pasta. This makes it look inviting. - Twirl the pasta on a fork before placing it on the plate. This adds height. - Arrange the spinach and tomatoes on top for a colorful finish. For garnishes, consider these options to enhance flavor: - Fresh basil leaves add a nice touch. They also bring a fresh aroma. - A sprinkle of grated Parmesan cheese can boost the taste. If you like, add this just before serving. Here are some suggestions for spices you can add: - Red pepper flakes give a nice kick. Start with a pinch and adjust to taste. - A dash of lemon juice adds brightness. This works well with the tomatoes. If you want alternatives for Parmesan cheese, try these: - Nutritional yeast adds a cheesy flavor and is dairy-free. - Crumbled feta cheese can give a salty taste. It pairs well with spinach. Pro Tips Cut Chicken Evenly: Ensure that the chicken is diced into uniform pieces so that they cook evenly throughout the dish. Quick Garlic Flavor: Sautéing the garlic for just a minute before adding other ingredients helps to release its aromatic flavor without burning it. Fresh Spinach Addition: Add the spinach at the end of cooking to retain its vibrant color and nutrients, ensuring it wilts just enough to maintain its fresh texture. Cheese Variations: Experiment with different types of cheese such as feta or mozzarella for a unique flavor twist that complements the dish. {{image_2}} You can switch the chicken for shrimp or sausage. Shrimp cooks fast and adds a fresh taste. Just toss it in during the last few minutes of cooking. Sausage gives a hearty flavor. Slice it and brown it first, then follow the same steps. For a vegetarian option, use chickpeas or tofu. They soak up flavors well. Add them with the tomatoes and broth. This way, you keep the dish filling and tasty. You can use different pasta shapes. Try fusilli, farfalle, or even spaghetti. Each shape holds the sauce differently. This makes the dish fun and unique each time. If you need gluten-free pasta, look for options made from rice or quinoa. They cook well and taste great. Just check the box for cooking time. For a creamier sauce, add heavy cream or cream cheese. This gives the dish a rich, smooth texture. Stir it in after the pasta cooks. You can also add different vegetables. Bell peppers, zucchini, or mushrooms work well. Just chop them and add them with the garlic. They add color and extra nutrients to your meal. Store your leftovers in an airtight container. Make sure to let the pasta cool first. This helps keep it fresh. You can keep it in the fridge for up to three days. When you plan to eat it, check for any signs of spoilage before reheating. To freeze, use a freezer-safe container. Divide the pasta into meal-sized portions. It’s best to freeze it without the garnishes. You can freeze it for up to three months. When ready to eat, thaw it overnight in the fridge before reheating. Reheat the pasta on the stove for best results. Add a splash of chicken broth to keep it moist. Stir gently over low heat until warmed through. You can also microwave it for 1-2 minutes. Stir halfway through to heat evenly. Adjust seasoning if needed before serving. This recipe takes about 30 minutes. You will spend 10 minutes to prep and 20 minutes to cook. It is quick and easy, perfect for a weeknight meal. Yes, you can make this dish ahead of time. Cook it fully, then cool it down. Store it in an airtight container in the fridge for up to three days. When ready to eat, reheat it on the stove or in the microwave. You can serve this dish with a fresh green salad or garlic bread. A light vinaigrette pairs well with the pasta. You might also add roasted vegetables for a hearty side. Yes, dried herbs work well too. Use about one-third the amount of dried herbs compared to fresh. Dried Italian seasoning is a good choice. It adds great flavor but may lack some freshness. This recipe for One-Pot Tomato Spinach Chicken Pasta covers the key steps and ingredients. You learned about main and extra ingredients, exact measurements, and cooking instructions. Helpful tips for cooking and storing ensure your dish comes out perfectly each time. Variations offer tasty options for different diets and preferences. With this knowledge, you can now create a delicious meal that impresses. Enjoy cooking and sharing your beautiful dish!

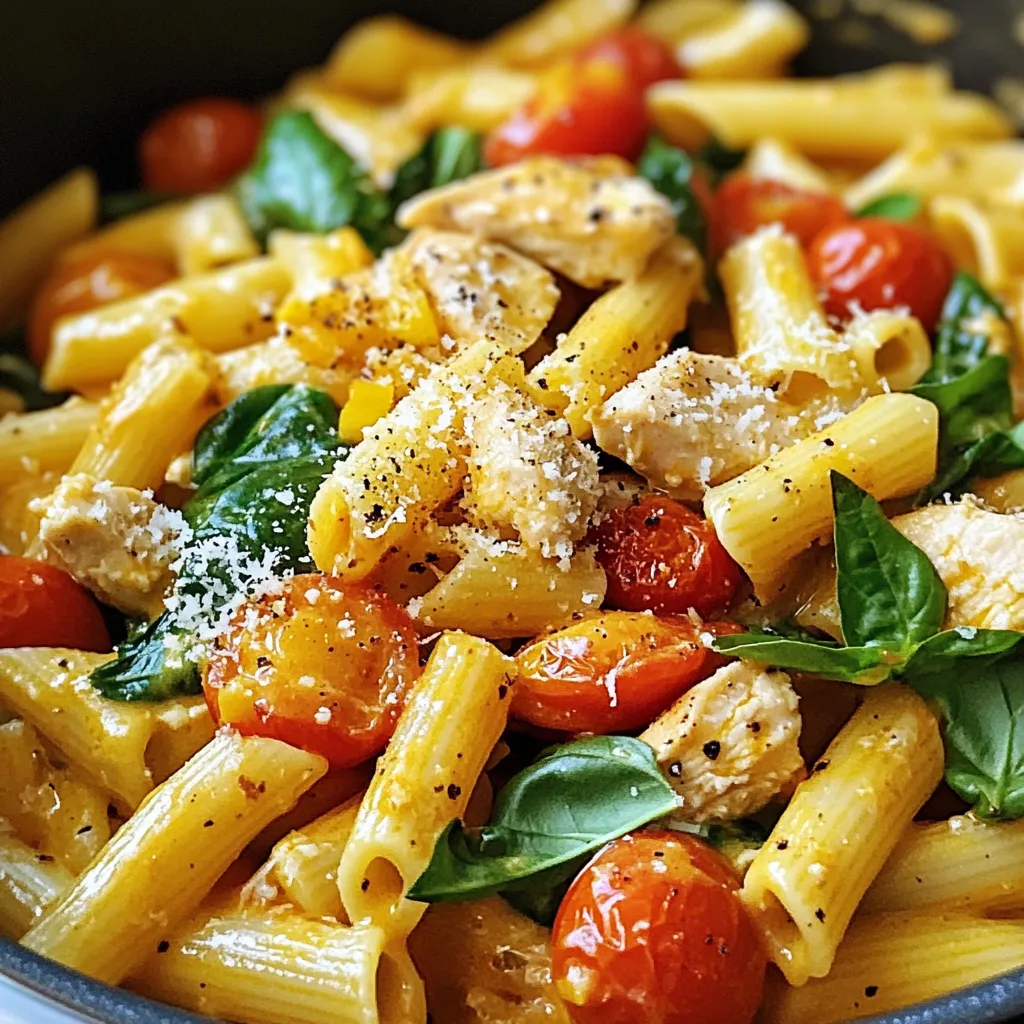
Looking for a quick, tasty dinner idea? This One-Pot Tomato Spinach Chicken Pasta is your answer. With just a handful of fresh ingredients and a simple cooking method, you’ll have …

Read more

Categories Dinner

Chocolate Dipped Pretzel Rods Delightful Easy Treat

December 19, 2025September 7, 2025 by Chef Nate
The fun starts with gathering the right ingredients. You will need: - 10 pretzel rods - 1 cup semi-sweet chocolate chips - 1 tablespoon coconut oil - 1/2 cup crushed nuts (like almonds or peanuts) - 1/2 cup colorful sprinkles - Sea salt (optional) These ingredients are simple but create a tasty treat. The pretzel rods give a nice crunch, while the chocolate adds sweetness. Coconut oil helps the chocolate melt smoothly. Crushed nuts and sprinkles make the pretzels look fun and festive. Sea salt adds a nice touch if you like sweet and salty flavors. Gather everything you need, and you’re ready to make these delightful chocolate-dipped pretzel rods! {{ingredient_image_1}} Start by getting your area ready. Line a baking sheet with parchment paper. This will keep your pretzel rods from sticking. Make sure you have all your ingredients close by. It helps to have a clean space to work in. Next, we need to melt the chocolate. Grab a microwave-safe bowl. Add the semi-sweet chocolate chips and the coconut oil. Heat it in the microwave for 30 seconds. Take it out and stir. Repeat this until it is smooth. Be sure not to overheat it. If you do, the chocolate will burn. Now it’s time to dip the pretzel rods. Hold a rod by one end and dip it into the melted chocolate. Coat about two-thirds of the rod. Let the extra chocolate drip back into the bowl. This keeps the dip from being too thick. While the chocolate is still wet, it's time for toppings. Roll the dipped part in crushed nuts or colorful sprinkles. You can also add a sprinkle of sea salt for a sweet and salty treat. This adds both flavor and fun to your pretzel rods. After dipping, place the pretzel rods on the lined baking sheet. Repeat this with all the rods. Make sure they are spaced out. This helps keep them from sticking together. Let the pretzel rods set for about 30 minutes. You can place them at room temperature or in the fridge. Once the chocolate is firm, serve them on a platter. You can also wrap them for gifts. Enjoy these sweet treats at parties or any fun gathering! To melt chocolate well, start with good chocolate chips. I like semi-sweet chocolate chips best for this treat. Mix in a bit of coconut oil to make it smooth and shiny. Use a microwave-safe bowl. Heat the chocolate in 30-second bursts. Stir the chocolate between each burst. This helps to avoid burning. Your chocolate should be melted and smooth after about 1-2 minutes. When dipping, hold the pretzel rod by one end. Dip about two-thirds of the rod into the melted chocolate. Allow extra chocolate to drip back into the bowl. This keeps the coat light and neat. If your chocolate is thick, reheat it a bit. This makes dipping easier. Make sure to work quickly. The chocolate sets fast, so add toppings right away. Get creative with decorations! Use crushed nuts for a crunchy topping. Try colorful sprinkles for a fun look. You can also use mini chocolate chips for extra chocolate flavor. For a salty-sweet mix, sprinkle some sea salt. If it's a holiday, match your colors or shapes to the theme. You can even drizzle more chocolate on top for a fancy touch. Pro Tips Use Quality Chocolate: For the best flavor, opt for high-quality chocolate chips. They melt better and provide a richer taste. Experiment with Toppings: Don’t hesitate to try different toppings like crushed pretzels, coconut flakes, or even mini marshmallows for a fun twist. Cooling Time Matters: Allow the chocolate to set at room temperature for a glossy finish. Refrigerating can cause the chocolate to dull. Gift-Worthy Presentation: Package your pretzel rods in clear cellophane bags tied with a ribbon for an attractive gift or party favor. {{image_2}} You can switch up the chocolate for your pretzel rods. Try dark chocolate for a rich taste. Milk chocolate is sweet and creamy, perfect for kids. White chocolate adds a lovely, sweet touch. Each type brings its own flavor, so feel free to mix and match. Toppings can change your pretzel rods completely. Use crushed cookies for a fun crunch. Mini marshmallows add a soft, sweet bite. Try dried fruit for a chewy texture. You can even drizzle more chocolate on top. Be creative! Make your pretzel rods match the season or event. For Halloween, use orange and black sprinkles. At Christmas, try red and green colors, or drizzle white chocolate like snow. For birthdays, match the colors to the theme. These themed rods make great party treats! Store your chocolate-dipped pretzel rods in an airtight container. This keeps them fresh and tasty. Make sure to separate layers with parchment paper. It prevents them from sticking together. You can place the container in a cool, dry place. Avoid heat and sunlight. These can make the chocolate melt or lose its shine. Chocolate-dipped pretzel rods last about one week at room temperature. If you keep them in the fridge, they can last up to two weeks. However, the chocolate may lose some smoothness in the fridge. For the best taste, eat them fresh within the first few days. Gift packaging can make your treats more special. Use clear cellophane bags to show off the colorful sprinkles. Tie them with a ribbon for a nice touch. You can also place them in a pretty box. Add a note or tag to make it personal. This adds charm and makes your gift stand out. Yes, you can use white chocolate. It gives a sweet and creamy taste. Just melt it like you would with semi-sweet chocolate. The process is the same. You still get that fun pretzel crunch. Chocolate-dipped pretzel rods last about a week at room temperature. Keep them in an airtight container. If you store them in the fridge, they can last longer. Just make sure they are well-sealed. Yes, you can freeze them! Wrap each pretzel rod in plastic wrap. Then, place them in a freezer-safe bag. They can stay fresh for up to three months. Just thaw them at room temperature before serving. You can use many toppings! Here are some ideas: - Crushed cookies - Mini chocolate chips - Toasted coconut - Dried fruit bits - Different types of sprinkles Get creative and mix flavors! Making chocolate-dipped pretzel rods is easy and fun. You need just a few ingredients and simple steps. Start with pretzel rods, melt chocolate, and choose your favorite toppings. I shared tips for the best results and creative ideas for special times. Store them well to keep them fresh. Enjoy your tasty treats and share them with friends. Keep experimenting with flavors and toppings. The sky is the limit!

Craving a sweet and salty snack? Chocolate Dipped Pretzel Rods are the perfect solution! They’re easy to make and fun to customize, whether you’re hosting a party or just treating …

Read more

Categories Desserts

Spicy Maple Glazed Salmon Deliciously Flavorful Dish

December 22, 2025September 5, 2025 by Chef Nate
- 4 salmon fillets (6 oz each) Salmon is the star of this dish. Choose fillets that are fresh and firm. The skin adds flavor and helps keep the fish moist while cooking. - 1/4 cup pure maple syrup - 2 tablespoons soy sauce (or tamari for gluten-free) - 1 tablespoon Dijon mustard - 1-2 tablespoons sriracha (adjust for spice preference) - 2 cloves garlic, minced - 1 teaspoon grated fresh ginger - Salt and pepper to taste - 1 tablespoon olive oil This glaze brings the heat and sweetness. The maple syrup adds a rich flavor. Soy sauce adds depth, while Dijon mustard gives a nice tang. Sriracha gives the kick. Garlic and ginger boost the taste even more. - Fresh cilantro or green onions for garnish These fresh herbs add color and flavor. Cilantro gives a fresh twist, while green onions add crunch. Use them to elevate your dish’s look and taste. {{ingredient_image_1}} Start by making the spicy maple glaze. In a small bowl, whisk together these ingredients: - 1/4 cup pure maple syrup - 2 tablespoons soy sauce - 1 tablespoon Dijon mustard - 1-2 tablespoons sriracha - 2 cloves garlic, minced - 1 teaspoon grated fresh ginger Mix until smooth and all is combined. This glaze packs a punch with sweet and spicy flavors. Next, get your salmon ready. Pat the fillets dry with paper towels. Season both sides with salt and pepper. Heat 1 tablespoon of olive oil in a large, oven-safe skillet over medium-high heat. Once the oil is hot, add the salmon fillets skin-side down. Sear them for about 3-4 minutes. You want the skin to get crispy and golden. Now it's time to bake the salmon. Carefully flip the fillets over and pour the spicy maple glaze over them. Make sure each fillet is well-coated. Transfer the skillet to your preheated oven set at 400°F (200°C). Bake for 8-10 minutes. The salmon should be cooked through and flake easily with a fork. Once done, remove the skillet from the oven. Let the salmon rest for a couple of minutes. Serve warm and drizzle any leftover glaze on top. Garnish with fresh cilantro or green onions for a pop of color. Enjoy your flavorful dish! To get the best glaze, mix the right ingredients. Use pure maple syrup for sweetness. Combine it with soy sauce for saltiness. Add Dijon mustard for a tangy kick. Sriracha brings heat. Adjust the sriracha to fit your taste. Mix in minced garlic and grated ginger for depth. Whisk until smooth. Coat your salmon well for flavor in every bite. Salmon cooks quickly, so watch it closely. First, sear it skin-side down for crispy texture. Cook for 3-4 minutes until the skin is golden brown. Flip it gently to avoid breaking the fillet. Bake it in the oven for 8-10 minutes. Check for doneness by using a fork. The salmon should flake easily. If it flakes, it’s done. You can cook salmon in many ways. Searing gives a crispy skin and rich flavor. Baking is easy and keeps it moist. Broiling is great for a quick, charred finish. Grilling adds a smoky taste. Choose the method that suits your meal best. Each way can highlight that spicy maple glaze. Pro Tips Use Fresh Ingredients: Fresh salmon, garlic, and ginger will enhance the flavor of the glaze significantly. Always try to use the freshest ingredients available. Adjust the Spice Level: The amount of sriracha can be adjusted according to your spice tolerance. Start with less and add more if you prefer it spicier. Let it Rest: Allow the salmon to rest for a couple of minutes after baking. This helps retain the moisture and enhances the overall taste. Garnish for Flavor: Fresh cilantro or sliced green onions not only add color but also a burst of flavor. Don’t skip this step for a complete dish. {{image_2}} You can adjust the spice in this dish easily. If you like it mild, use less sriracha. Start with one tablespoon. For a medium heat, use the full two tablespoons. If you want a real kick, add even more sriracha. Just remember, you can always add more spice, but you can’t take it back once it's in. You can swap ingredients to fit your diet. For a gluten-free option, use tamari instead of soy sauce. If you’re avoiding sugar, try a sugar-free maple syrup. You can also replace salmon with other fish like trout or chicken. Both work well with the spicy maple glaze. You don’t have to bake the salmon if you prefer another method. You can grill the salmon for a smoky flavor. Just watch it closely so it doesn’t dry out. You can also pan-sear it until it’s crispy, then finish cooking in the oven. Each method gives you a tasty, unique dish. After you enjoy your spicy maple glazed salmon, store leftovers in an airtight container. Keep it in the fridge for up to three days. Make sure the salmon cools down before sealing it tightly. This helps maintain its flavor and texture. You can freeze the salmon if you want to save it for later. Wrap it tightly in plastic wrap or aluminum foil. Place it in a freezer-safe bag to prevent freezer burn. It will stay fresh for up to three months. When you're ready to eat, let it thaw in the fridge overnight. To reheat your salmon, use the oven or stovetop for best results. Set the oven to 300°F (150°C) and place the salmon on a baking sheet. Heat for about 10-15 minutes until it warms up. If using the stovetop, place it in a pan on low heat for a few minutes. This keeps the salmon moist and tasty. Avoid using the microwave, as it can dry out the fish. You can tell when salmon is done by checking its color and texture. Cooked salmon turns a light pink and flakes easily with a fork. Use a food thermometer. The internal temperature should reach 145°F (63°C). If you don't have a thermometer, try the fork test. Gently poke the fish. If it separates easily, it's ready. Yes, you can use frozen salmon. Just remember to thaw it first. Place it in the fridge overnight or use the cold water method. Seal the fish in a bag and submerge it in cold water. This method takes about an hour. Pat it dry before cooking. This helps the glaze stick better. There are many great sides to pair with this dish. Here are some tasty options: - Steamed broccoli - Roasted asparagus - Quinoa salad - Garlic mashed potatoes - Brown rice - Mixed green salad Each of these sides brings different flavors and textures. They also complement the sweet and spicy notes of the salmon. Enjoy mixing and matching to find your favorite combo! This article covered the key elements of making spicy maple glazed salmon. We discussed ingredients, preparation, and cooking methods. I shared tips to achieve the ideal glaze and avoid overcooked salmon. You can explore various spice levels and ingredient swaps to fit your needs. Storing tips ensure your delicious salmon remains fresh. Cooking salmon can be simple and fun, so I hope this guide inspires you to try it. Enjoy your cooking journey and savor every bite of this tasty dish!

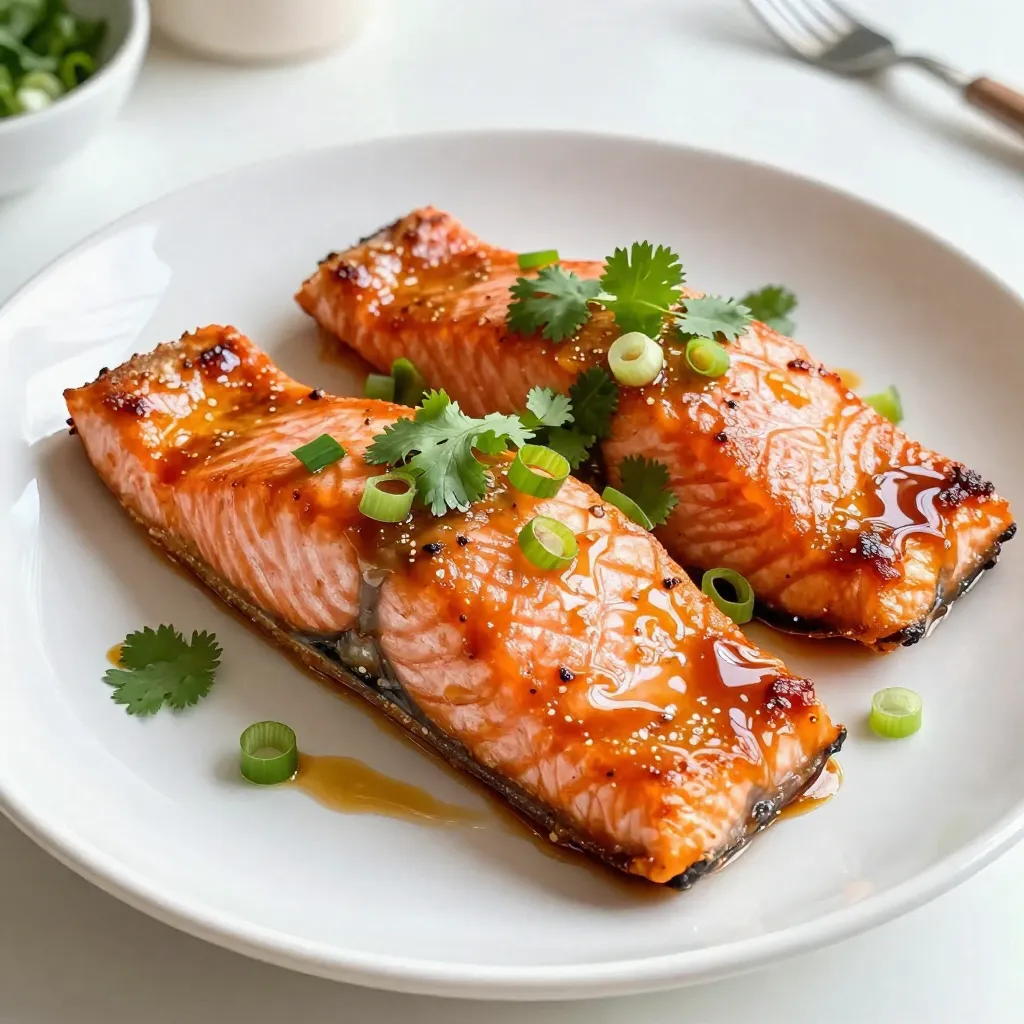
If you’re craving a dish that balances sweet and spicy perfectly, look no further! My Spicy Maple Glazed Salmon is packed with bold flavors that will impress anyone at your …

Read more

Categories Dinner

Crockpot Chicken Tortellini Simple and Hearty Meal

October 20, 2025September 5, 2025 by Chef Nate
- 1 pound boneless, skinless chicken breasts - 2 cups frozen cheese tortellini - 4 cups chicken broth - 1 cup heavy cream The main ingredients in Crockpot Chicken Tortellini are simple yet vital. Chicken breasts give the dish its protein. Frozen cheese tortellini adds a creamy, cheesy flavor. Chicken broth keeps everything moist and flavorful. Heavy cream brings richness to the meal, making it feel comforting. - 1 teaspoon Italian seasoning - 1/2 teaspoon salt - 1/4 teaspoon black pepper Seasonings enhance the flavor of this dish. Italian seasoning brings a mix of herbs that scream comfort. Salt helps to balance the flavors, while black pepper adds just a hint of heat. These seasonings are essential for bringing life to the chicken and broth. - 1 cup baby spinach, roughly chopped - 1 cup diced tomatoes (canned or fresh) - 1 medium onion, finely chopped - 3 cloves garlic, minced - Grated Parmesan cheese, for serving - Fresh basil, for garnish (optional) Additional ingredients create layers of flavor. Spinach adds color and nutrients. Diced tomatoes bring a fresh taste and a pop of color. Onion and garlic build a strong base flavor. When you top the dish with Parmesan and basil, it becomes a feast for the eyes and the palate. {{ingredient_image_1}} Adding Chicken and Vegetables First, I put one pound of boneless, skinless chicken breasts into the crockpot. Then, I add one medium onion, finely chopped, and three cloves of minced garlic. Next, I toss in one cup of diced tomatoes. This can be fresh or canned. After that, I pour in four cups of chicken broth. Seasoning the Mixture To season, I sprinkle in one teaspoon of Italian seasoning, half a teaspoon of salt, and a quarter teaspoon of black pepper. I stir everything together well. This mix creates a strong base for our dish. Low vs. High Cooking Times I cover the crockpot and set it to cook. If I want to take my time, I choose low for six hours. If I’m in a hurry, I select high for three hours. Either way, the chicken will be tender and ready to shred. Shredding the Chicken Once the chicken is cooked, I use two forks to shred it right in the crockpot. This keeps all those tasty juices in the mix. Adding Tortellini and Cream Next, I add two cups of frozen cheese tortellini and one cup of heavy cream. I stir gently to mix everything. Then, I cover the pot again and let it cook on high for an extra 30 minutes. This step allows the tortellini to cook through. Incorporating Spinach Finally, I stir in one cup of chopped baby spinach. I let it wilt for about five minutes. This adds a nice pop of color and nutrition to the dish. Now, it’s ready to serve! Best Practices for Shredding Chicken Shredding chicken in the crockpot is easy. After cooking, use two forks. Grab one fork to hold the chicken in place. Use the other fork to pull apart the meat. This makes nice, thin pieces. Make sure to do this while the chicken is still hot. It shreds better this way. Avoiding Overcooked Tortellini To avoid overcooked tortellini, add them at the right time. Stir in frozen tortellini about 30 minutes before the cooking ends. This gives them enough time to cook. Check them after 20 minutes to see if they are tender. This way, you keep their perfect shape and texture. Garnishing with Herbs and Cheese Serving your dish with fresh herbs is a great idea. Sprinkle parsley or basil on top for color. Grated Parmesan cheese adds flavor and richness. Use a light hand with the cheese for a nice balance. This makes your meal look inviting. Pairing with Side Dishes Crockpot chicken tortellini pairs well with many sides. Try a simple green salad for freshness. Crusty bread complements the creamy soup. You can also serve it with roasted vegetables for extra nutrition. Choose sides that you enjoy to make the meal complete. Gluten-Free Options If you need gluten-free options, choose gluten-free tortellini. Many stores sell these now. Check the label to make sure they fit your needs. You can also use rice or quinoa for a different take on the dish. Dairy-Free Alternatives To make this dish dairy-free, swap heavy cream for coconut milk. The flavor will change, but it remains creamy. You can also skip the cheese or use a dairy-free option. This way, everyone can enjoy the meal without worry. Pro Tips Use Fresh Ingredients: Whenever possible, opt for fresh vegetables and herbs to enhance the flavor of your dish. Adjust Seasoning: Always taste your dish before serving and adjust the seasoning according to your preference for the best flavor. Cook Tortellini Separately: For a firmer texture, consider cooking the tortellini separately and adding them just before serving. Pair with Bread: Serve with crusty bread or garlic bread to soak up the creamy sauce for a complete meal experience. {{image_2}} Alternative Proteins You can switch chicken for turkey or even shrimp. Both options add a new taste. For a veggie twist, try chickpeas or lentils. They cook well and soak up flavors. Vegetable Additions Add more veggies to boost nutrition. Carrots, zucchini, or bell peppers work great. Just chop them up and toss them in. You can even use frozen mixed veggies for ease. Spicy Version Want some heat? Add red pepper flakes or diced jalapeños. They bring a nice kick to the dish. You can also use spicy sausage for extra flavor. Herb-Infused Options Fresh herbs can make a big difference. Try adding thyme or rosemary for a fragrant touch. You can also mix in some parsley or dill before serving for freshness. Casserole Style For a cozy casserole, bake it in a dish after cooking. Top it with cheese, then bake until bubbly. This gives a nice crust and adds flavor. Soup Style If you prefer a soup, just add extra broth. This makes it more liquidy and hearty. Serve it in bowls with crusty bread on the side for dipping. - Proper Storage Containers: Use airtight containers to keep your meal fresh. Glass or plastic containers work well. Make sure they are clean and dry before use. - Shelf Life: Your leftovers can last in the fridge for about 3 to 4 days. After that, the taste and quality may drop. - How to Freeze and Reheat: To freeze, let the dish cool completely. Then, portion it into freezer-safe bags or containers. Remove as much air as you can before sealing. To reheat, thaw in the fridge overnight. - Best Practices for Quality Retention: For best taste, use the dish within 2 to 3 months. Label your containers with the date. This helps track freshness. - Microwave vs. Stovetop Methods: The microwave is quick but may not heat evenly. For stovetop, add a splash of broth to a pan and heat over medium. Stir often. - Tips for Maintaining Flavor and Texture: Add a bit of cream or cheese when reheating. This keeps the dish creamy and flavorful. Avoid high heat to prevent overcooking. To cook tortellini in a crockpot, you should add it after the chicken is done. This way, the tortellini cooks just right. You should cook on high for 30 minutes. This ensures they are tender but not mushy. Stir them gently into the creamy broth. For the best result, ensure that the chicken is fully shredded before adding the tortellini. This keeps everything well mixed. The timing is important, so set a timer. If you check on them, do so gently. Yes, you can use fresh tortellini. However, you need to change the cooking time. Fresh tortellini cooks faster than frozen. Add it to the crockpot during the last 10 to 15 minutes of cooking. This way, they will hold their shape and flavor. Cooking them too long can turn them mushy. Watch for the cooking instructions to ensure they are done. Taste them to check for doneness. If they are soft and warm, they are ready to serve. You can serve this dish with a variety of sides. Crusty bread is a great choice. It helps to soak up the creamy broth. A fresh green salad adds a nice crunch. Consider a simple side of steamed veggies as well. If you like, top the dish with grated Parmesan cheese. Fresh basil can enhance the flavor, too. These toppings can make your meal more special. Enjoy it with family and friends for a comforting dinner. In this post, we explored how to make delicious Crockpot Chicken Tortellini. We covered key ingredients like chicken, cheese tortellini, and spices. I shared easy step-by-step instructions for cooking and tips for serving. You can even adjust the recipe for different dietary needs. Remember, cooking should be fun and flexible. Enjoy trying new flavors and variations. Your modified dish can become a family favorite!

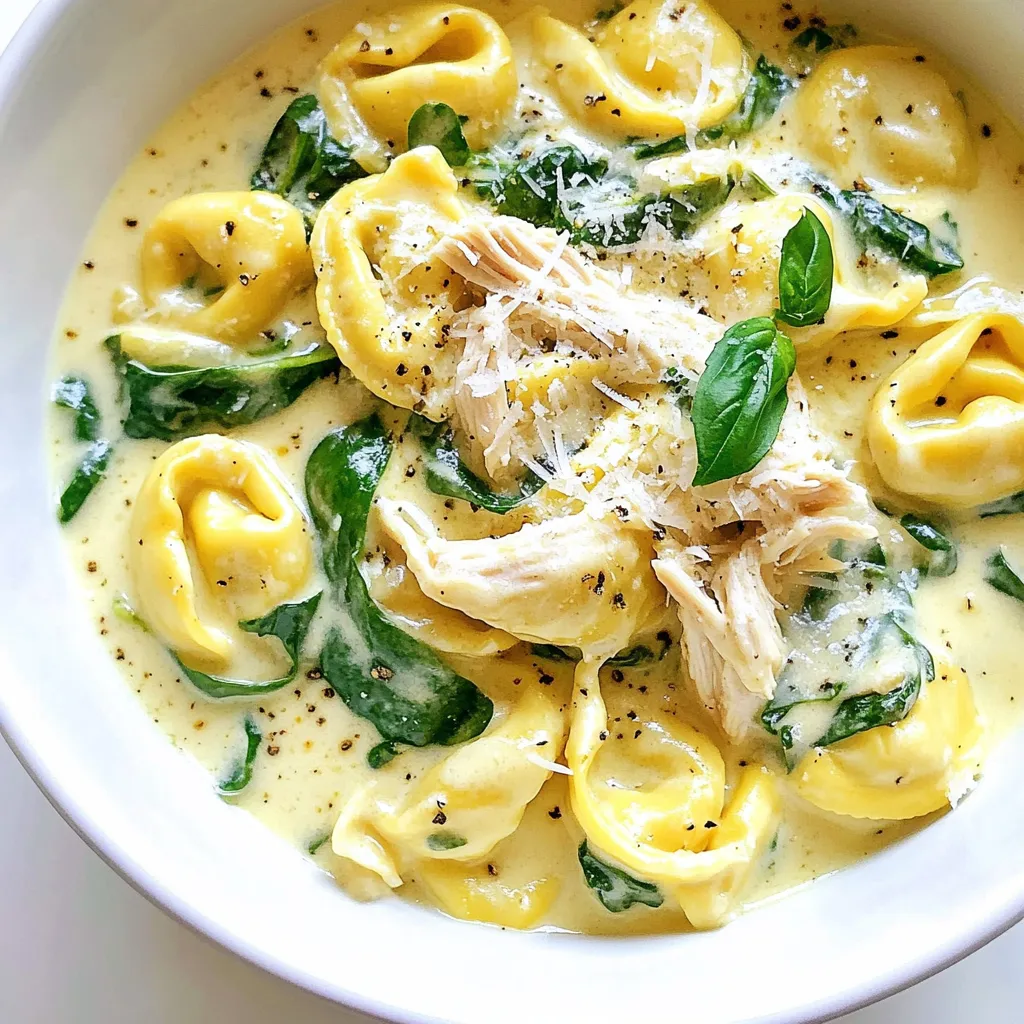
If you crave a meal that’s simple yet hearty, look no further than Crockpot Chicken Tortellini. With just a few key ingredients like chicken, cheese tortellini, and creamy broth, you …

Read more

Categories Dinner

Baked Parmesan Crusted Cod Tasty and Simple Dish

November 16, 2025August 31, 2025 by Chef Nate
- 4 cod fillets (about 6 oz each) I use fresh cod fillets for the best taste. They have a mild flavor and flaky texture. You can also use frozen fillets, but make sure to thaw them first. - 1 cup grated Parmesan cheese This cheese adds a rich, savory flavor. Use fresh grated Parmesan for a stronger taste. Pre-grated cheese works too, but it lacks the same depth. - 1 cup panko breadcrumbs Panko is light and crispy. It creates a nice crunch on the fish. You can find it in most grocery stores. - 2 tablespoons olive oil Olive oil helps the breadcrumbs stick. It also adds a bit of rich flavor to the dish. - 2 cloves garlic, minced Fresh garlic gives a wonderful aroma and taste. You can use garlic powder if you prefer a milder flavor. - 1 teaspoon dried oregano Oregano adds an earthy note to the crust. You can swap it for other herbs like thyme or basil. - 1 teaspoon paprika This spice brings a subtle warmth and color to the dish. You can use smoked paprika for a bolder flavor. - Salt and pepper to taste Seasoning the fish well enhances all the flavors. Adjust to your liking for the best results. - Fresh parsley, chopped (for garnish) Parsley adds a pop of color and freshness. It’s a great finishing touch for your cod. - Lemon wedges (for serving) Lemon brightens up the dish. Squeeze it over the cod just before eating for an extra zing. {{ingredient_image_1}} 1. Preheating the oven Start by preheating your oven to 375°F (190°C). This step is key for even cooking. 2. Mixing the coating ingredients In a medium bowl, mix these ingredients: - 1 cup grated Parmesan cheese - 1 cup panko breadcrumbs - 2 cloves garlic, minced - 1 teaspoon dried oregano - 1 teaspoon paprika - 2 tablespoons olive oil - Salt and pepper to taste Stir until the crumbs look crumbly and coated with oil. 3. Preparing the cod fillets Pat the 4 cod fillets dry with a paper towel. Season both sides with salt and pepper for flavor. 1. Arranging cod on the baking sheet Place the seasoned cod fillets on a lined baking sheet. Space them out to allow heat to circulate. 2. Applying the Parmesan crust Generously top each fillet with the Parmesan and panko mixture. Press the mixture down firmly to make it stick. 3. Monitoring baking time and temperature Bake the cod for 15-20 minutes. Check that the internal temperature reaches 145°F (63°C). The crust should turn golden brown, giving a nice crunch. To get a great crust on your cod, texture is key. The panko breadcrumbs give it a nice crunch. Mix them well with Parmesan cheese and olive oil. This blend should feel crumbly but stick together. When you press it onto the fish, it should stay put. Seasoning the cod is also very important. Dry the fillets first. This helps the seasoning stick better. Use salt and pepper generously. This simple step can boost the flavor of the fish. You can switch up the ingredients to suit your taste. Try adding lemon zest or fresh herbs like basil or thyme to the crust. They can add fresh flavors to your dish. If you have dietary needs, there are options. For a gluten-free option, use gluten-free breadcrumbs. You can also swap Parmesan with a dairy-free cheese. These changes can help you enjoy this dish while meeting your needs. Pro Tips Fresh Cod is Best: Always opt for fresh cod fillets if possible. Frozen cod can be used, but ensure it is fully thawed and patted dry for the best texture. Customize the Crust: Feel free to add your favorite herbs or spices to the Parmesan and panko mixture for a unique flavor twist. Check for Doneness: Use a thermometer to check the internal temperature of the cod. It should reach 145°F (63°C) for safe consumption. Serve with Sides: Pair this dish with a fresh salad or steamed vegetables to balance the richness of the Parmesan crust. {{image_2}} You can make this dish even better with some simple tweaks. Adding herbs or spices to the mixture gives it a new taste. Try adding thyme or basil for a fresh twist. You can also use garlic powder or a dash of cayenne for some heat. Changing the cheese can also bring a new flavor. Instead of Parmesan, use aged cheddar for a sharp kick. Feta cheese works well too, adding a salty touch. Mixing different cheeses can make your dish more exciting. Baked Parmesan crusted cod pairs well with many sides. A fresh salad with greens and tomatoes is a great choice. You can add a light vinaigrette for extra flavor. Roasted vegetables, like broccoli or asparagus, also complement the fish nicely. For grains, serve the cod with rice or quinoa. Both grains soak up flavors well and add a nice texture. A side of couscous can work too, making the meal feel even more special. To keep your baked Parmesan crusted cod fresh, use proper sealing. Place the cod in an airtight container. You can also wrap it tightly in plastic wrap or aluminum foil. Be sure to refrigerate it right away. This will help keep it safe and tasty. The recommended shelf life for leftovers is about 3 days in the fridge. If you want to keep it longer, consider freezing it. In the freezer, it can last up to 3 months. Just make sure to label the container with the date. When you are ready to enjoy your leftovers, reheating is key. To keep the cod from drying out, use the oven. Preheat it to 350°F (175°C). Place the cod on a baking sheet. Cover it loosely with foil to keep moisture in. Heat for about 10 to 15 minutes. You can also use a microwave if you are short on time. Just be careful not to overcook it. Heat in short bursts, checking the cod often. The goal is to reach an internal temperature of 145°F (63°C) for safe eating. Enjoy your delicious leftovers! Can I use frozen cod fillets? Yes, you can use frozen cod fillets. Just thaw them before cooking. Place them in the fridge overnight for best results. If you’re in a hurry, you can run cold water over them. Make sure to pat them dry before seasoning. How do I know when the cod is properly cooked? The cod is done when it flakes easily with a fork. You can also check the internal temperature. It should reach 145°F (63°C). The crust should look golden brown and crispy. If it’s not there yet, give it a few more minutes. What can I substitute for Panko breadcrumbs? You can use regular breadcrumbs if you don’t have panko. They won’t be as crunchy but will still taste great. Crushed crackers or cornflakes can also work. Just make sure to season them for extra flavor. This article covered how to make Baked Parmesan Crusted Cod, from ingredients to cooking tips. You learned about the key ingredients and how to prepare and bake the cod. The tips for getting the perfect crust and variations for flavor make this dish fun and flexible. Remember to store leftovers well and reheat them to keep their taste great. Enjoy this tasty recipe, and impress your family with your cooking skills!

Looking for a dinner idea that’s both tasty and easy? Baked Parmesan Crusted Cod is your answer! With just a few simple ingredients, you can create a dish that impresses …

Read more

Categories Dinner

Cinnamon Roll French Toast Bites Irresistible Treat

October 8, 2025August 29, 2025 by Chef Nate
- 1 can of refrigerated cinnamon roll dough (8 rolls) - 2 large eggs - 1/2 cup milk - 1 teaspoon vanilla extract - 1 teaspoon ground cinnamon - 1 tablespoon maple syrup - 1 tablespoon butter (for greasing) - Optional: Powdered sugar for dusting To make Cinnamon Roll French Toast Bites, you need simple ingredients. The key is the cinnamon roll dough. It gives you that warm, sweet flavor. Eggs and milk create a rich custard. Vanilla and cinnamon add depth, while maple syrup brings sweetness. Butter helps with greasing. - Baking dish - Whisk - Mixing bowl - Knife or pizza cutter You will need a few kitchen tools. A baking dish holds your bites while they bake. A whisk mixes your eggs and milk smoothly. A mixing bowl is where all the magic begins. A knife or pizza cutter helps you cut the cinnamon rolls easily. These tools make the process fun and easy! {{ingredient_image_1}} - Preheat the oven to 375°F (190°C). - Open the can of cinnamon roll dough. Separate the rolls and cut each into four pieces. This gives you bite-sized chunks. - In a large bowl, whisk together 2 large eggs, 1/2 cup milk, 1 teaspoon vanilla extract, 1 teaspoon ground cinnamon, and 1 tablespoon maple syrup. Mix well until everything is combined. - Add the cinnamon roll pieces to this egg mixture. Gently toss to coat each piece evenly. Ensure every bite gets that sweet, spiced flavor. - Grease a baking dish with 1 tablespoon of butter. Then, transfer the coated cinnamon roll pieces into the dish. Spread them out so they bake evenly. - Bake in the preheated oven for about 15-20 minutes. Check for doneness by looking for a golden brown color. The bites should be cooked through and puffy. To get the best flavor, coat the cinnamon roll bites evenly. After cutting the dough, toss the pieces gently in the egg mixture. This ensures each bite has a sweet, rich taste. Oven times can vary. Start checking your bites around 15 minutes. Look for a golden brown color on top. If they need more time, check every few minutes until done. These bites are great with toppings. Try maple syrup for a sweet touch. You can also add whipped cream for extra creaminess. A dusting of powdered sugar makes them look fancy. Pair these bites with your favorite drinks. Coffee always works well with sweet dishes. You can also serve them with milk for a classic combination. Want to switch it up? Try making chocolate chip cinnamon roll bites. Just add chocolate chips to the egg mixture. They melt into gooey goodness. If you like less sweetness, cut back on the maple syrup. You can also swap it for a sugar substitute. This way, you can enjoy these bites while meeting your taste. Pro Tips Use fresh ingredients: Make sure your eggs and milk are fresh for the best flavor and texture in your French toast bites. Watch the baking time: Keep an eye on the bites as they bake; every oven is different, and you want them to be golden brown without burning. Experiment with toppings: Feel free to get creative with toppings like chopped nuts, chocolate chips, or fresh fruits to enhance the flavor. Make it ahead: You can prepare the cinnamon roll pieces and egg mixture a few hours in advance; just combine and bake when you're ready to serve. {{image_2}} To store leftover cinnamon roll bites, let them cool first. Place the bites in an airtight container. This helps keep them fresh. You can also use a resealable plastic bag. Make sure to squeeze out any air. This method keeps them from becoming soggy. If you want to freeze the bites, wait until they cool. Arrange them in a single layer on a baking sheet. Pop them in the freezer for about an hour. This step prevents them from sticking together. Once frozen, transfer the bites to an airtight container or freezer bag. Make sure to label it with the date. To reheat frozen bites, take them out of the freezer and let them thaw in the fridge overnight. You can warm them in the oven at 350°F for about 10 minutes. This method keeps them soft and tasty. Cinnamon roll bites last about three days in the fridge. If you freeze them, they can last up to three months. Be sure to check for any signs of freezer burn before using them. These simple steps keep your bites fresh and delicious! Cinnamon Roll French Toast Bites are a tasty treat. Each serving has about 300 calories. Here's how the calories break down: - Carbohydrates: 40g - Proteins: 8g - Fats: 12g This treat gives you energy from carbs and a bit of protein. The fats come from eggs and the cinnamon roll dough. You can make this dish lighter if you want. Here are some simple swaps: - Use whole wheat cinnamon roll dough for more fiber. - Replace whole milk with almond or oat milk to cut calories and fats. - Try reducing maple syrup by half for less sugar. These changes keep the yum factor while making it a bit healthier. Enjoy your bites guilt-free! Yes, you can prepare these bites ahead of time. Start by mixing the egg mixture and cutting the cinnamon rolls. You can combine these in a baking dish and cover it with plastic wrap. Store it in the fridge for up to 24 hours. When you are ready to bake, just remove it from the fridge and bake as usual. This saves time in the morning and allows you to enjoy warm bites right away. If you need a milk substitute, there are great options. Almond milk works well and has a nice flavor. You can also use oat milk for a creamier texture. Soy milk is another good choice that adds protein. Just make sure the substitute is unsweetened to keep the taste balanced. You’ll still get delicious bites with these alternatives. To check if your bites are done, look for a golden brown color on top. The edges should be firm, and a toothpick inserted in the center should come out clean. Baking takes about 15-20 minutes, but ovens vary. Keep an eye on them to avoid over-baking. Once they are golden and set, they are ready to enjoy! In this post, we explored how to make tasty Cinnamon Roll French Toast Bites. We covered all the required ingredients, kitchen tools, and made it easy with step-by-step instructions. I shared tips to perfect your bites and ideas for storage and serving. Remember, you can adjust the sweetness or try fun variations like chocolate chip. These bites are simple and delicious. Enjoy making them for breakfast or brunch with loved ones!

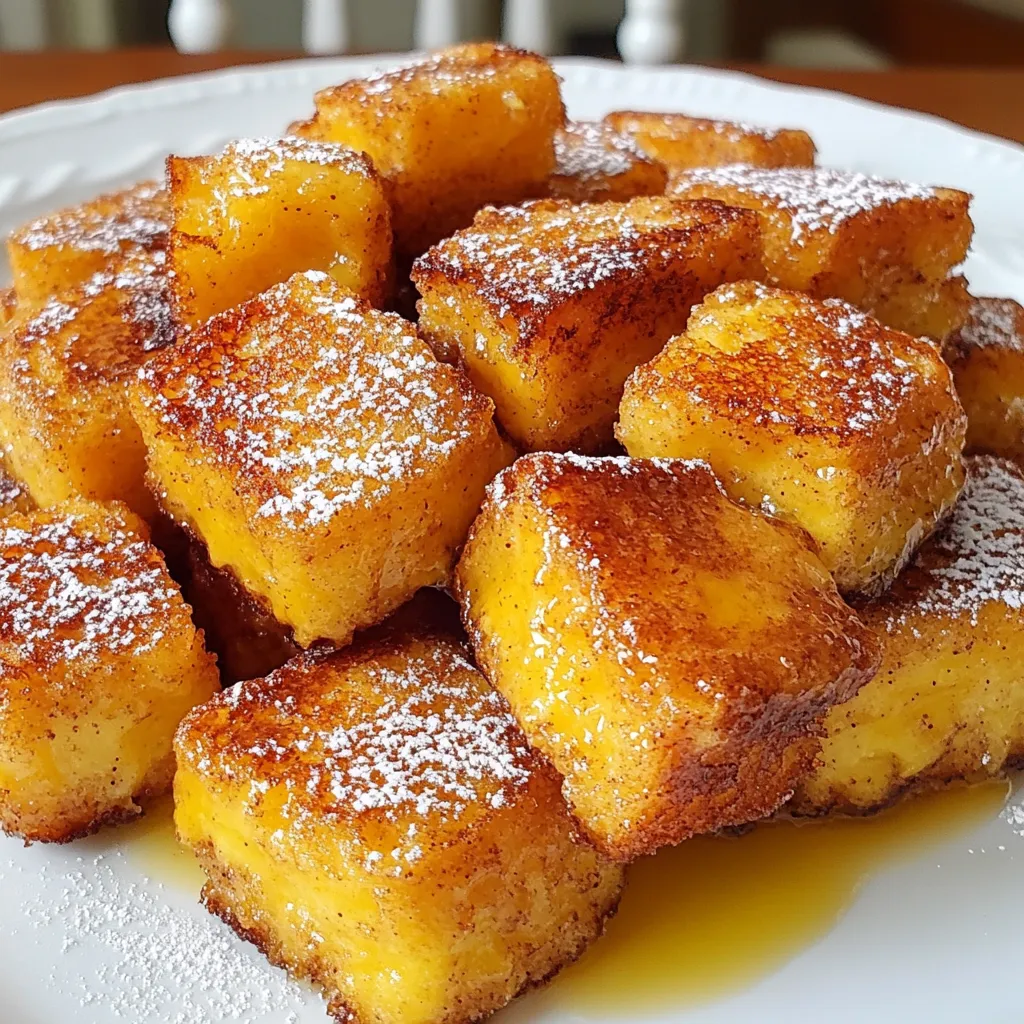
Imagine waking up to the sweet smell of cinnamon rolls combined with the comfort of French toast. That’s exactly what my Cinnamon Roll French Toast Bites offer! This easy recipe …

Read more

Categories Breakfast

Vegan Lentil Mushroom Stew Hearty and Healthy Meal

October 19, 2025August 27, 2025 by Chef Nate
- 1 cup green or brown lentils - 2 tablespoons olive oil - 1 medium onion, diced - 3 cloves garlic, minced - 2 carrots, diced - 2 celery stalks, diced - 8 oz cremini mushrooms, sliced - 1 teaspoon dried thyme - 1 teaspoon smoked paprika - 4 cups vegetable broth - 1 can (14 oz) diced tomatoes - 2 cups kale, chopped - Salt and black pepper to taste - Fresh parsley for garnish Gather these fresh ingredients to make a hearty vegan lentil mushroom stew. Lentils are the star here. They are packed with protein and fiber, making the stew filling. Olive oil adds richness, while onion and garlic provide a base of flavor. Carrots and celery bring sweetness and crunch. Cremini mushrooms add depth and earthiness. Thyme and smoked paprika infuse the dish with warmth. Vegetable broth and diced tomatoes create a tasty liquid base. Finally, kale adds nutrition and color. Be sure to have salt and pepper on hand to season to your liking. Fresh parsley makes a beautiful garnish. Enjoy creating this healthy meal! {{ingredient_image_1}} - Start by rinsing 1 cup of green or brown lentils under cold water. This helps remove any dirt. - Next, dice 1 medium onion, 2 carrots, and 2 celery stalks. Mince 3 cloves of garlic and slice 8 oz of cremini mushrooms. This makes the cooking easier. - In a large pot, heat 2 tablespoons of olive oil over medium heat. Add the diced onion and sauté for about 5 minutes until it becomes soft. - Then, stir in the minced garlic and cook for another minute. You want the kitchen to smell great! - Add the diced carrots and celery to the pot, sautéing for another 5 minutes. This makes the veggies tender. - Now, incorporate the sliced mushrooms and cook for about 4-5 minutes. Watch them brown and release their moisture. - Sprinkle in 1 teaspoon of dried thyme and 1 teaspoon of smoked paprika. Stir to mix the spices with the vegetables. - Pour in 4 cups of vegetable broth next. Add the rinsed lentils and 1 can of diced tomatoes with juice. Bring this mix to a boil. - Reduce the heat to low and let it simmer for 30-35 minutes. The lentils should be tender after this time. - Stir in 2 cups of chopped kale during the last 5 minutes of cooking. This adds color and nutrition. - Season with salt and black pepper to taste. Adjust to your liking! - Finally, remove the stew from heat and let it rest for a few minutes. This allows the flavors to blend. - Serve the stew hot in deep bowls. Garnish with freshly chopped parsley for a pop of color. - Pair it with crusty bread for a hearty meal. Enjoy the warmth and flavors! To check if your lentils are done, taste a few. They should be soft but not mushy. If they need more time, simmer a bit longer. To adjust flavors, start with salt and pepper. Taste your stew often. If it lacks depth, add a splash of soy sauce or a hint of vinegar. For leftovers, store your stew in airtight containers. It will last about four days in the fridge. To reheat, place the stew in a pot over medium heat. Stir often until hot. You can also microwave it, but stir halfway for even heating. To prep meals, make the stew in advance. It tastes even better the next day! For freezing, let the stew cool first. Then, pack it in freezer-safe containers. It stays good for up to three months in the freezer. Thaw overnight in the fridge before reheating. Pro Tips Use Fresh Herbs: Incorporating fresh herbs like thyme or parsley right before serving enhances the flavor profile of your stew. Make Ahead: This stew tastes even better the next day! Make a larger batch and store it in the fridge for quick meals throughout the week. Customize Your Veggies: Feel free to add other vegetables like bell peppers or zucchini to the stew for added nutrients and flavor. Perfect Consistency: If you prefer a thicker stew, blend a portion of the lentils and broth before returning it to the pot. {{image_2}} You can switch out veggies in this stew. Try bell peppers for carrots or zucchini for celery. Each swap adds a new flavor. You can also use different herbs. Basil or oregano work well in place of thyme. Want more heat? Add a pinch of red pepper flakes or chopped jalapeños. These will give the stew a spicy kick. For umami flavor, mix in a splash of soy sauce or a spoon of miso. These options deepen the taste. If you need a gluten-free option, make sure to check your vegetable broth. Most brands are gluten-free. For a low-sodium version, use low-sodium broth. You can skip added salt to keep it healthy. Store your leftover stew in airtight containers. Glass or BPA-free plastic works best. In the fridge, the stew lasts for about 4 to 5 days. Make sure it cools before sealing the container. To freeze the stew, ladle it into freezer-safe containers. Leave some space at the top for expansion. Seal tightly and label with the date. It can last for up to 3 months in the freezer. To thaw, place it in the fridge overnight or use the microwave. To reheat, the best method is on the stove. Pour the stew into a pot and warm it over low heat. Stir often to prevent sticking. You can also reheat it in the microwave. Use a microwave-safe bowl and heat in short bursts, stirring in between. This keeps the flavors fresh and tasty. Can I use dried lentils instead of canned? Yes, you can use dried lentils. Rinse one cup of dried lentils and add them to the pot with the broth. They will cook as the stew simmers. What can I substitute for kale? You can use spinach or Swiss chard. Both will add nice color and nutrients to the stew. Is this stew high in protein? Yes, this stew is high in protein. Lentils provide a great source of protein, making it a filling meal. Are the ingredients gluten-free? Yes, all the ingredients in this stew are gluten-free. Just ensure your vegetable broth is labeled gluten-free. How do I thicken the stew? To thicken the stew, mash some lentils with a fork. You can also add a bit of cornstarch mixed with water. Can this recipe be doubled? Yes, you can easily double the recipe. Just use a larger pot for cooking. This stew recipe is a great way to use simple ingredients for delicious meals. You learned how to cook lentils, prepare veggies, and create a filling dish. You can even adjust flavors or swap out ingredients to fit your needs. Remember, you can store leftovers and enjoy them later. No matter how you make it, this stew is healthy and satisfying. Enjoy your cooking journey, and let it bring warmth to your table!

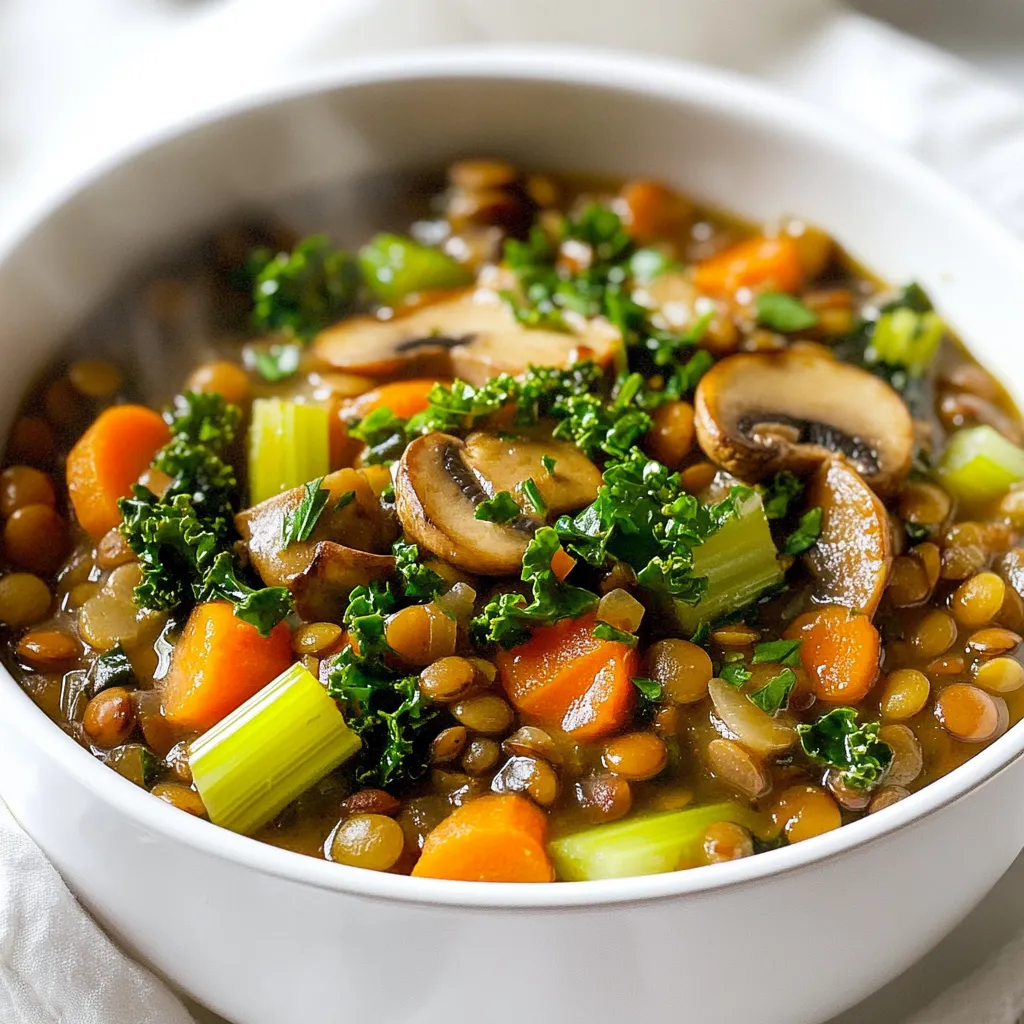
Craving a delicious, hearty meal? My Vegan Lentil Mushroom Stew is the perfect choice! Packed with lentils, fresh veggies, and rich flavors, it’s not only healthy, but also easy to …

Read more

Categories Dinner

Spinach Mushroom Feta Egg Muffins Easy and Tasty Recipe

December 25, 2025August 26, 2025 by Chef Nate
- Eggs and Dairy - 6 large eggs - 1/4 cup milk (or milk alternative) - 1/2 cup feta cheese, crumbled - Vegetables - 1 cup fresh spinach, chopped - 1 cup mushrooms, diced (button or cremini) - Seasonings - 1/4 teaspoon garlic powder - 1/4 teaspoon onion powder - Salt and pepper to taste - Optional Add-ins - You can add cooked bacon or herbs like parsley for extra flavor. - Consider using different cheeses like cheddar or goat cheese. These ingredients come together to make tasty muffins. The eggs provide protein, while the spinach and mushrooms add nutrients. Feta brings a nice salty bite. You can always swap or add ingredients based on your taste. Just keep the base the same for best results. {{ingredient_image_1}} Preheating the Oven Start by preheating your oven to 350°F (175°C). This step gets your oven ready for baking. It ensures that your muffins cook evenly and turn out just right. Sautéing the Vegetables In a skillet, add a splash of olive oil over medium heat. Once the oil is warm, toss in your diced mushrooms. Cook them for about 3-4 minutes until they soften. Next, add the chopped spinach to the skillet. Cook for another 2-3 minutes until the spinach wilts. This process brings out the flavors and makes the veggies tender. Remove the skillet from heat and let the mix cool slightly. Whisking the Egg Mixture In a large mixing bowl, crack open the 6 eggs. Use a whisk to blend the eggs until smooth. Next, pour in the 1/4 cup of milk. Add the garlic powder, onion powder, salt, and pepper. Whisk everything together until mixed well. Finally, gently stir in the sautéed mushroom and spinach mix, along with the crumbled feta. Make sure each bite has a bit of everything. Filling the Muffin Tin Grab your greased muffin tin. Pour the egg mixture into each cup, filling them about 3/4 full. This allows space for the muffins to rise while baking. Baking Time and Temperature Place the muffin tin in your preheated oven. Bake the muffins for 18-20 minutes. Check for doneness; they should be set and lightly golden on top. Cool Down Process Once baked, remove the muffin tin from the oven. Let the muffins cool in the tin for about 5 minutes. This makes it easier to take them out without breaking. After cooling, gently remove each muffin and serve warm. Preventing Soggy Muffins To keep your muffins firm, ensure you cook the mushrooms well. Sauté them until they are soft but not watery. Let the spinach wilt without excess moisture. A dry filling helps avoid sogginess. Tips for Even Cooking Fill the muffin cups equally to ensure they cook at the same rate. Use an ice cream scoop for uniformity. Check the muffins about halfway through baking. Rotate the pan for even heat distribution. Enhancing Flavor with Herbs Fresh herbs can elevate your muffins. Try adding chopped parsley or dill to the egg mixture. A pinch of red pepper flakes can add a nice kick. Experiment with flavors that excite your taste buds. Best Muffin Tins Choose non-stick or silicone muffin tins. They help with easy muffin removal. You can also use regular tins with cooking spray to prevent sticking. Recommended Cooking Utensils Have a whisk for blending eggs and a spatula for mixing ingredients. A sharp knife makes chopping veggies quick and easy. A large mixing bowl is essential for combining all your ingredients. Optional Tools for Meal Prep Consider having a food processor to chop veggies quickly. An egg timer can help you keep track of baking time. Meal prep containers are great for storing leftovers and enjoying muffins later. Pro Tips Fresh Ingredients: Use fresh spinach and mushrooms for the best flavor and texture in your egg muffins. Egg Whisking: Whisk the eggs thoroughly to incorporate air, which will make your muffins light and fluffy. Feta Alternatives: If you prefer a different cheese, try goat cheese or cheddar for a unique twist on flavor. Storage Tips: Store leftovers in an airtight container in the fridge for up to 4 days, or freeze for longer shelf life. {{image_2}} Vegetarian Options These muffins are great for vegetarians. They already use eggs and veggies. You can add more vegetables like bell peppers or zucchini. This boosts the flavor and nutrition. You can also try different cheeses like cheddar or mozzarella for more taste. Gluten-Free Substitutes To make this dish gluten-free, ensure all your ingredients are gluten-free. Most fresh veggies and eggs are fine. The recipe does not use flour, so you are good to go! If you want a bit of a crunch, try adding gluten-free breadcrumbs on top before baking. Dairy-Free Alternatives For a dairy-free version, swap out the feta cheese. You can use nutritional yeast for a cheesy flavor. Almond milk or oat milk can replace regular milk. This keeps the muffins creamy and tasty without any dairy. Adding Different Cheeses Cheese can change the taste of your muffins. Try goat cheese for a tangy kick. You could also add pepper jack for a spicy twist. Mixing cheeses can create a rich flavor and a fun texture. Incorporating Other Vegetables Feel free to mix in other veggies! Broccoli, kale, or roasted red peppers work well. Just ensure they are chopped small to fit in the muffin. This way, you can change the flavor and make it more colorful. Spicing it Up Want a kick? Add a pinch of cayenne or red pepper flakes to the egg mix. This gives your muffins some heat. You can also use fresh herbs like thyme or basil for added freshness. A little seasoning goes a long way! - Refrigeration Tips: Once your muffins cool, place them in an airtight container. They stay fresh in the fridge for up to four days. This way, you can enjoy them for breakfast or a snack later. Make sure to label the container with the date. - Freezing Instructions: To keep them longer, freeze the muffins. Wrap each muffin in plastic wrap, then place them in a freezer bag. You can freeze them for up to three months. When you want one, just take it out and let it thaw in the fridge overnight. - Best Methods to Reheat Muffins: For best results, reheat your muffins in the oven. Preheat it to 350°F (175°C) and place the muffins on a baking sheet. Heat for about 10 minutes. This method keeps them fluffy and warm. You can also use the microwave. Heat for about 30 seconds, but be careful not to overdo it. - Keeping Muffins Moist: To keep the muffins moist while reheating, cover them with a damp paper towel. This step helps to trap steam and prevents them from drying out. Enjoy your warm, tasty muffins just like fresh! Can I make these muffins ahead of time? Yes, you can make these muffins ahead of time. They store well in the fridge for a few days. Just reheat them before serving. This makes them a great option for busy mornings. How long do Spinach Mushroom Feta Egg Muffins last? These muffins can last up to a week in the fridge. If you want them to last longer, freeze them. They will keep well in the freezer for about three months. Can I customize the fillings? Absolutely! You can add other veggies or proteins. Try bell peppers, zucchini, or even cooked bacon. Just remember to keep the egg mixture balanced. What is the nutritional value per muffin? Each muffin has around 100 calories, 7 grams of protein, and 6 grams of fat. The feta adds flavor and nutrients, while spinach packs in vitamins. Are these muffins suitable for meal prep? Yes, they are perfect for meal prep! You can make a big batch on the weekend. Store them in individual containers for easy grab-and-go meals. How can I make these muffins healthier? To make them healthier, consider using egg whites or a milk alternative. You can also add more veggies to boost fiber and cut down on calories. You can now create tasty Spinach Mushroom Feta Egg Muffins at home. We covered ingredients like eggs, veggies, and seasonings. I shared a simple step-by-step guide for prepping and baking. Plus, I offered tips to keep them fluffy and flavorful. With variations for different diets, these muffins fit everyone's needs. Storing leftovers is easy too. They make a great meal prep option. Enjoy making and sharing these tasty muffins!

Are you craving a quick, healthy, and delicious breakfast? Spinach Mushroom Feta Egg Muffins are the perfect choice! These tasty muffins pack a punch of flavor and nutrition, making them …

Read more

Categories Breakfast
Older posts
Newer posts
← Previous Page1 … Page9 Page10 Page11 … Page108 Next →

GRILLED FLAVORS

where delicious ideas come to life, from stovetop to backyard. Warm, simple, and always satisfying. 🍽️✨

PAGES

Home About Contact Privacy Policy Terms & Conditions Cookie Policy GDPR Policy Copyright Policy Disclaimer

CATEGORIES

Appetizers Desserts Salads Breakfast Dinner

Contact

  • Pinterest
  • Mail
Copyright © 2026 Grilled Flavors. All rights reserved.