Skip to content
grilledflavors.com
  • Home
  • Appetizers
  • Desserts
  • Salads
  • Breakfast
  • Dinner
  • Privacy Policy
  • Contact
  • About

Chef Nate

Award Winning White Chicken Chili Flavorful Delight

October 17, 2025March 13, 2025 by Chef Nate
- 1 lb chicken breast, cooked and shredded - 1 can (15 oz) white beans (like Great Northern or Cannellini), drained - 1 can (4 oz) chopped green chilies - 1 medium onion, diced - 3 cloves garlic, minced - 1 tsp ground cumin - 1 tsp chili powder - 1/2 tsp smoked paprika - 4 cups chicken broth - 1 cup heavy cream - 1/2 cup sour cream - 1 cup corn kernels (fresh or frozen) - 2 tbsp olive oil - Salt and pepper to taste - Fresh cilantro and lime wedges for garnish Each ingredient brings a special taste. You can use rotisserie chicken for quick prep. If you want beans, feel free to swap with black beans or pinto beans. Green chilies add a nice kick, but you can use jalapeños for more heat. If you don't have chicken broth, vegetable broth works too. For a dairy-free version, use coconut cream instead of heavy cream and sour cream. To boost the flavor, use fresh garlic instead of pre-minced. Fresh herbs, like cilantro, add brightness at the end. Using smoked paprika gives a rich, deep taste. Squeeze fresh lime juice before serving for a zesty lift. Don't skip the salt; it enhances all the flavors. For extra creaminess, try adding a bit more sour cream or cream. {{ingredient_image_1}} Gather all your ingredients first. This makes cooking easier. Here’s what you need: - 1 lb chicken breast, cooked and shredded - 1 can (15 oz) white beans, drained - 1 can (4 oz) chopped green chilies - 1 medium onion, diced - 3 cloves garlic, minced - 1 tsp ground cumin - 1 tsp chili powder - 1/2 tsp smoked paprika - 4 cups chicken broth - 1 cup heavy cream - 1/2 cup sour cream - 1 cup corn kernels - 2 tbsp olive oil - Salt and pepper to taste - Fresh cilantro and lime wedges for garnish Make sure your chicken is cooked and shredded. This helps it blend well in the chili. Dice the onion and mince the garlic. Drain the beans to remove excess liquid. Set everything aside for easy access. Heat 2 tablespoons of olive oil in a large pot over medium heat. Add the diced onion and sauté for about 5 minutes. You want the onion to turn translucent. Next, stir in the minced garlic for one minute. This step releases a nice aroma. Now, add the shredded chicken, white beans, green chilies, cumin, chili powder, and smoked paprika. Season with salt and pepper. Stir well to combine all the flavors. Pour in the chicken broth and bring the mix to a gentle boil. Lower the heat and let it simmer for 20 minutes. This allows the flavors to meld beautifully. After 20 minutes, stir in the corn, heavy cream, and sour cream. Mix until everything is well combined. Let it simmer for another 10 minutes. Check the seasoning and adjust with salt and pepper as needed. Serve the chili hot in bowls. Garnish with fresh cilantro and lime wedges. The lime adds a bright flavor. This chili pairs well with crusty bread or tortilla chips. Enjoy it with family and friends for a warm meal. I often see people skip the sauté step. Sautéing the onion and garlic builds flavor. Make sure not to rush this part. Cooking the onion until it is soft is key. Also, avoid adding all the cream at once. This can cause the chili to become too rich. Instead, add it slowly and taste as you go. Lastly, be careful with salt. Always taste before adding more. To make your chili extra creamy, use more heavy cream. You can also mix in cream cheese for richness. Another trick is to blend some of the white beans. This adds creaminess without changing the taste. For a lighter option, use Greek yogurt instead of sour cream. It gives the same tang with less fat. Want to boost the flavor? Add more spices! A pinch of cayenne pepper brings heat. You can also try adding a splash of lime juice for brightness. If you like it smoky, increase the smoked paprika. Fresh cilantro adds a bright taste when served. Don’t forget to adjust according to your taste buds! Pro Tips Use Rotisserie Chicken: For a quicker preparation, use store-bought rotisserie chicken instead of cooking your own. It adds great flavor and saves time! Adjust the Spice Level: If you prefer a spicier chili, add diced jalapeños or a pinch of cayenne pepper to the mix. Adjust according to your taste! Add Extra Creaminess: For an even creamier texture, consider adding an additional 1/2 cup of heavy cream or a splash of cream cheese when mixing in the sour cream. Garnish for Freshness: Always garnish with fresh cilantro and lime wedges just before serving to enhance the flavor and presentation of your chili. {{image_2}} You can enjoy a tasty vegetarian version of this chili. Simply replace the chicken with more beans. Use two cans of white beans instead of one. Add extra veggies like bell peppers, zucchini, or even spinach. These add color and nutrients. Keep the broth and spices the same for flavor. If you love heat, spice up your chili! Add diced jalapeños or serrano peppers. Mix these in when you cook the onion and garlic. You can also increase the chili powder. A pinch of cayenne pepper adds a nice kick too. Adjust the amount to suit your taste. Using a slow cooker makes this dish even easier. Start by sautéing the onion and garlic in a pan. Then, transfer them to the slow cooker. Add all the other ingredients, except for the cream and sour cream. Cook on low for 6 hours or high for 3 hours. Stir in the cream and sour cream just before serving. This method deepens the flavors and makes it super simple. Store any leftover white chicken chili in an airtight container. Make sure it cools down to room temperature first. This helps keep it fresh. Place it in the fridge where it can last for up to three days. When you want to enjoy it later, just take it out and check the smell and look before eating. You can freeze white chicken chili for longer storage. Use a freezer-safe container or heavy-duty freezer bags. Leave some space at the top for the chili to expand. Label the container with the date. It can stay frozen for up to three months. When ready to eat, move it to the fridge to thaw overnight. Reheat the chili on the stove for even heating. Pour it into a pot and heat it over medium heat. Stir often to prevent sticking. If it seems thick, add a splash of chicken broth or water. You can also use a microwave. Place it in a microwave-safe bowl and cover it. Heat in short bursts, stirring in between, until hot. Enjoy your warm, comforting chili! This chili wins awards due to its rich flavor and creamy texture. I blend spices like cumin and smoked paprika for depth. The combination of chicken, white beans, and green chilies creates a harmony of tastes. Each ingredient plays a key role in making it special. The heavy cream and sour cream add a luscious finish. It warms you up and satisfies your taste buds. People rave about this chili because it feels like a hug in a bowl. Yes, you can use canned chicken. It saves time and effort. Just drain and rinse the chicken before adding it. Canned chicken works well in this recipe. However, fresh cooked chicken has better texture and flavor. If you choose canned, make sure to adjust the cooking time. Stir it in during the last few minutes to heat through. To spice it up, add more chili powder or diced jalapeños. You can also use cayenne pepper for extra heat. A few dashes of hot sauce can add a nice kick too. Another option is to top it with sliced jalapeños or spicy cheese. Experiment with spices to find your perfect heat level. Just remember to balance the flavors so it stays delicious. In this post, I covered the key steps for making the best chili. We discussed essential ingredients, helpful tips, and variations to suit your taste. Remember the prep work and avoid common mistakes. These points will help you craft a dish everyone loves. Don’t shy away from experimenting, whether it’s making it creamier or adding spice. Enjoy your cooking adventures and make that chili your own.

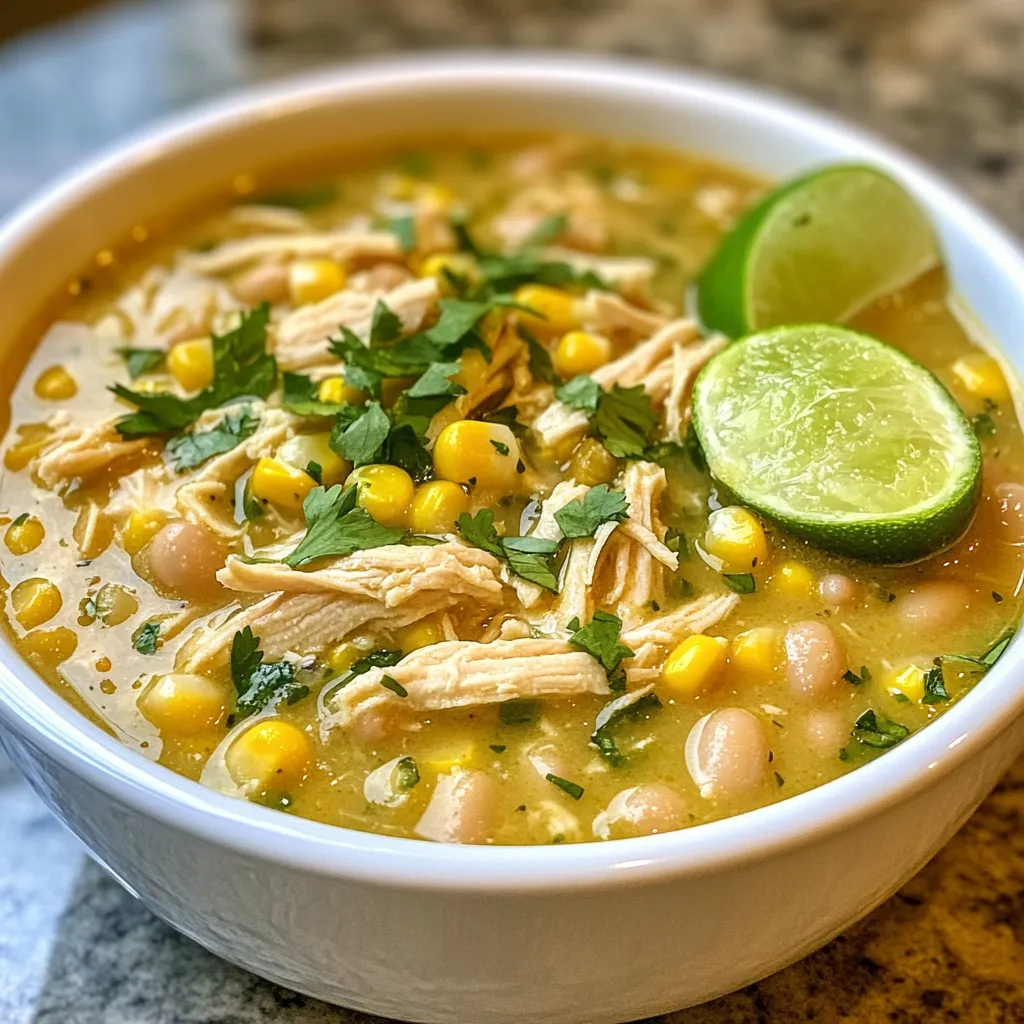
If you love comfort food, you’re in for a treat with this award-winning white chicken chili! This dish packs a punch of flavor and warmth that will have everyone asking …

Read more

Categories Dinner

Pumpkin Cheesecake Bars Delightful and Simple Recipe

October 31, 2025March 13, 2025 by Chef Nate
To make pumpkin cheesecake bars, you need a few simple ingredients. Here’s what you will need: - 1 ½ cups graham cracker crumbs - ½ cup unsalted butter, melted - 2 tablespoons sugar - 2 (8 oz) packages cream cheese, softened - ¾ cup sugar - 2 large eggs - 1 cup pumpkin puree - 1 teaspoon vanilla extract - 1 teaspoon ground cinnamon - ½ teaspoon ground nutmeg - ¼ teaspoon ground ginger - ¼ teaspoon salt Each ingredient plays a key role in creating the perfect flavor and texture. The graham cracker crumbs form a tasty crust, while the cream cheese provides creaminess. The pumpkin puree gives a warm and inviting flavor, and the spices add a lovely aroma. Using fresh ingredients will always yield the best results. Make sure your cream cheese is softened for easy mixing. This ensures a smooth filling without lumps. If you want to make these bars gluten-free, simply swap graham cracker crumbs with gluten-free crumbs. This way, everyone can enjoy this delicious treat! {{ingredient_image_1}} - Preheat oven to 350°F (175°C). - Line a 9x9 inch baking dish with parchment paper. This makes it easy to lift the bars out later. - Combine 1 ½ cups graham cracker crumbs, ½ cup melted butter, and 2 tablespoons sugar. - Mix until it looks crumbly. - Press the mixture evenly into the bottom of the baking dish. - Bake for 10 minutes, then take it out and let it cool slightly. - In a large bowl, beat 2 packages of softened cream cheese with ¾ cup sugar until it is smooth. - Add 2 large eggs, one at a time, mixing well after each. - Next, mix in 1 cup pumpkin puree, 1 teaspoon vanilla extract, 1 teaspoon ground cinnamon, ½ teaspoon ground nutmeg, ¼ teaspoon ground ginger, and ¼ teaspoon salt. - Blend until all ingredients are well combined and smooth. - Pour the pumpkin cheesecake mixture over the cooled crust. - Spread it evenly with a spatula. - Bake in the preheated oven for 30-35 minutes. Check for doneness by inserting a toothpick into the center. It should come out clean. - Let the bars cool at room temperature for about 1 hour. - After that, refrigerate them for at least 2 hours to firm up. - Once chilled, lift the parchment paper to remove the bars from the dish and slice into squares. To get the best texture, you need to properly soften your cream cheese. Take it out of the fridge at least 30 minutes before you start. This helps it mix smoothly with the sugar. If your cream cheese is cold, it can lead to lumps in your batter. Next, avoid overmixing the batter. Once you add the eggs, mix just enough to combine. Overmixing can make the bars too airy and cause them to crack while baking. For a delightful touch, you can garnish each bar with whipped cream. A sprinkle of cinnamon adds warmth and beauty. You can also serve these bars with a scoop of vanilla ice cream for a special treat. A cup of coffee or spiced tea pairs nicely with them too. One big mistake is not cooling the crust properly. Make sure to let it cool slightly before adding the filling. If you skip this step, the filling can become too runny. Another common error is overbaking the cheesecake bars. Keep an eye on them as they bake. They should be set in the center but still slightly jiggly. This ensures they remain creamy and delicious. Pro Tips Cool Completely: Make sure to allow the bars to cool completely at room temperature before refrigerating. This helps them set properly and enhances the texture. Use Fresh Spices: For the best flavor, consider using fresh ground spices instead of pre-ground. They can significantly elevate the taste of your cheesecake bars. Chill Longer: If you have the time, let the bars chill overnight. This allows the flavors to meld together beautifully and results in a firmer texture. Garnish Wisely: When serving, top with a dollop of whipped cream and a sprinkle of cinnamon or nutmeg for an extra touch of flavor and presentation. {{image_2}} You can easily change the taste of your pumpkin cheesecake bars. Try adding a drizzle of chocolate or caramel on top. It gives a sweet touch and makes the bars look fancy. You can also mix in nuts or chocolate chips into the filling. This adds a nice crunch and rich flavor. If you need a gluten-free option, use gluten-free graham cracker crumbs for the crust. This way, everyone can enjoy these tasty bars. For a vegan version, swap the cream cheese for a plant-based cream cheese. You can replace the eggs with flaxseed meal mixed with water. This keeps the bars creamy and delicious without using animal products. To change up the flavor, play with the spices. You can add cardamom or cloves for a new taste. If you want a fresh twist, use real pumpkin instead of canned puree. Just roast the pumpkin, then blend it until smooth. This gives your bars a fresh flavor and makes them even more special. To keep your pumpkin cheesecake bars fresh, store them in the refrigerator. Place the bars in an airtight container. If you prefer, you can also wrap them tightly with plastic wrap. This keeps them moist and tasty. If you want to freeze them, slice the bars first. Wrap each slice in plastic wrap, then place them in a freezer-safe bag. This method prevents freezer burn. You can enjoy these bars later on! In the fridge, these bars last about 5 to 7 days. Always check for any signs of spoilage. If you see mold or notice an off smell, it’s best to discard them. Signs that the bars have gone bad include a change in color or texture. If they feel sticky or slimy, do not eat them. If you want to enjoy your bars warm, you can safely reheat them. Use the microwave for quick warming. Place a slice on a microwave-safe plate and heat for about 10 to 15 seconds. Check that it is warm but not too hot. You can also reheat in the oven. Set the oven to 350°F (175°C) and warm for about 5 to 10 minutes. Enjoy them warm, and feel free to add a little whipped cream on top! To slice pumpkin cheesecake bars cleanly, first chill them well. After chilling, lift the bars out using the parchment paper. Use a sharp knife and dip it in hot water before cutting. Wipe the knife with a towel after each cut. This helps prevent the filling from sticking and ensures neat slices. For presentation, serve bars on dessert plates with whipped cream and a sprinkle of cinnamon. Yes, you can make these bars ahead of time. I recommend making them a day before you plan to serve them. This allows the flavors to blend well. After baking, cool them at room temperature, then refrigerate for at least two hours. You can keep them in the fridge for up to four days. If you want to freeze them, wrap each bar tightly in plastic wrap. They can last up to three months in the freezer. If you don’t have pumpkin puree, you can use butternut squash puree. It has a similar texture and flavor. Another option is to use sweet potato puree. Both are great alternatives. You can even make your own puree by roasting pumpkin or squash, then blending it until smooth. Just ensure any substitute is thick and not watery. Absolutely! If you prefer a different crust, you can try an oatmeal crust. Simply mix oats, butter, and brown sugar. Alternatively, you can use a cookie crust made from crushed gingersnaps or chocolate cookies. Each option gives the bars a unique flavor and texture. Just make sure the crust is firm enough to hold the filling. These pumpkin cheesecake bars use simple, tasty ingredients. We covered crust, filling, and baking steps. I shared tips for great texture and delicious garnishes. Variations let you mix things up, while storage info ensures freshness. Enjoy your baking adventure, and share these bars with friends! The joy of making and tasting these treats is all yours. Remember, practice makes perfect. Happy baking!

Are you ready to indulge in a creamy, spiced treat? These Pumpkin Cheesecake Bars are not only delicious but also super simple to make! With just a few ingredients and …

Read more

Categories Desserts

Beef and Sweet Potato Skillet Flavorful Dinner Recipe

October 26, 2025March 12, 2025 by Chef Nate
- 1 lb (450g) ground beef - 2 medium sweet potatoes, peeled and diced - 1 medium onion, finely chopped - 2 cloves garlic, minced - 1 bell pepper (red or yellow), diced - 1 cup corn kernels (fresh or frozen) - 1 teaspoon smoked paprika - 1 teaspoon cumin - ½ teaspoon chili powder - Salt and pepper to taste - 2 tablespoons olive oil - Fresh cilantro or parsley, for garnish These ingredients bring together a colorful mix of flavors. The ground beef gives a hearty base. Sweet potatoes add natural sweetness and nutrition. Onions and garlic provide a savory kick. Bell peppers add crunch and color. Corn brings sweetness and texture, while spices tie everything together. - 1 cup black beans (canned or cooked) - 1 cup diced zucchini or yellow squash - 1 teaspoon chili flakes for heat - ½ cup shredded cheese (cheddar or Monterey Jack) You can switch things up with these options. Black beans add protein and fiber. Zucchini or squash brings more veggies into the mix. Chili flakes can spice things up if you like heat. Cheese adds creaminess and richness. This dish is healthy and full of nutrients. Each serving offers: - Protein from beef for muscle health. - Fiber from sweet potatoes and corn for digestion. - Vitamins A and C from the bell pepper and sweet potatoes for skin health. - Healthy fats from olive oil to support heart health. Eating this meal means you get a balanced dinner. It’s tasty and good for you, making it a great choice for any night of the week. {{ingredient_image_1}} Start by gathering all your ingredients. You will need: - 1 lb ground beef - 2 medium sweet potatoes, peeled and diced - 1 medium onion, finely chopped - 2 cloves garlic, minced - 1 bell pepper, diced - 1 cup corn kernels - 1 teaspoon smoked paprika - 1 teaspoon cumin - ½ teaspoon chili powder - Salt and pepper to taste - 2 tablespoons olive oil - Fresh cilantro or parsley for garnish Make sure to wash the vegetables well. Dice everything into small, even pieces. This helps them cook evenly. Heat the olive oil in a large skillet over medium heat. Add the chopped onion. Sauté for 3-4 minutes until the onion is soft. Next, stir in the minced garlic and diced bell pepper. Cook this mix for another 2 minutes. You want it to smell great. Now, add the ground beef to the skillet. Use a spoon to break it apart. Cook until the beef is brown, which takes about 5-7 minutes. Season with salt, pepper, smoked paprika, cumin, and chili powder. Mix well. After the beef is brown, add the diced sweet potatoes and corn. Stir it all together. Cover the skillet with a lid and turn down the heat to medium-low. Let the sweet potatoes cook for 15-20 minutes. Stir occasionally. If the mix looks dry, add a splash of water. This will help steam the potatoes. When the sweet potatoes are tender, taste the dish. Adjust the seasoning if needed. Don’t forget to garnish with fresh cilantro or parsley before serving. You can serve this dish straight from the skillet for a cozy look. If you want a fancier touch, scoop servings onto individual plates. Add extra herbs on top for color. This dish works great for family dinners or casual get-togethers. Enjoy your flavorful meal! When picking sweet potatoes, look for firm ones. The skin should be smooth and free from wrinkles. Avoid any with soft spots or blemishes. Choose medium-sized sweet potatoes for even cooking. They will blend well with the beef and add great flavor. Start with a hot skillet. This helps the beef brown well. Use a wooden spoon to break it up as it cooks. Cook until it's no longer pink. This takes about 5 to 7 minutes. Don't rush it! Season the beef as it cooks. This allows the flavors to soak in. To boost flavor, add a dash of Worcestershire sauce while cooking the beef. This adds depth and richness. You can also sprinkle in some fresh herbs at the end. Cilantro or parsley adds brightness. For a bit of heat, add red pepper flakes. Just a pinch can make a big difference. Pro Tips Sweet Potato Selection: Choose firm, smooth sweet potatoes for the best texture and flavor. Avoid any with soft spots or blemishes. Ground Beef Variations: For a leaner option, use ground turkey or chicken instead of beef. Adjust seasonings to enhance the different flavors. One-Pan Cleanup: To make cleanup easier, line your skillet with parchment paper before cooking. This will help prevent sticking and make washing up a breeze. Flavor Boost: Add a splash of lime juice just before serving for a zesty kick that brightens the dish and enhances the overall flavors. {{image_2}} You can make a tasty vegetarian version of this dish. Instead of ground beef, use 1 can of black beans or lentils. Both options add protein and flavor. You can also add extra veggies like mushrooms or zucchini. These will keep the dish hearty and satisfying. If you need gluten-free options, all the ingredients in this recipe are naturally gluten-free. However, check your spices. Some can have hidden gluten. For a low-carb option, skip the sweet potatoes. Use cauliflower instead. It gives a nice texture and absorbs flavors well. To change the taste, try adding different spices. You can use Italian herbs for a fresh twist. Oregano and basil will brighten the dish. For a spicy kick, add diced jalapeños or a splash of hot sauce. If you want a sweeter note, mix in diced apples or a drizzle of honey. To store leftover Beef and Sweet Potato Skillet, let it cool first. Then, place it in an airtight container. This helps keep it fresh. You can store it in the fridge for up to three days. Make sure to label the container with the date. This way, you know when to eat it. Reheat your skillet in a pan over medium heat. Stir it often to heat evenly. You can also use a microwave. Place it in a microwave-safe bowl and cover it. Heat in short bursts, stopping to stir. This will keep the beef and sweet potatoes moist. If you want to freeze the skillet, use a freezer-safe container. Let it cool completely, then transfer it. Label the container with the date and name. You can freeze it for up to three months. When ready to eat, thaw it in the fridge overnight before reheating. Yes, you can use different meats. Ground turkey or chicken works well. You can also use diced beef or pork. Adjust cooking time as needed to ensure meat is fully cooked. Each meat gives a unique taste. Feel free to try what you like! If your sweet potatoes are not cooking fast, try these tips. First, make sure you cut them into small, even pieces. Smaller cubes cook faster. If they still need more time, add a splash of water to the skillet. This creates steam, helping them cook quicker. Keep the lid on to trap steam. Stir occasionally to ensure even cooking. Yes, you can prepare this dish ahead of time. Cook it as directed and let it cool. Then, store it in an airtight container in the fridge. It stays fresh for up to three days. When ready to eat, reheat it in a skillet on low heat. Add a splash of water if it seems dry. Enjoy your meal without the last-minute rush! This article covered the key ingredients and step-by-step instructions for your dish. We explored cooking tips, variations, and storage methods to help you succeed. Understanding these details makes cooking easier and more fun. You can mix and match ingredients to fit any diet. Try different flavors and see what you love best. With thoughtful prep and smart choices, your meal will shine. Enjoy the process and the tasty results!

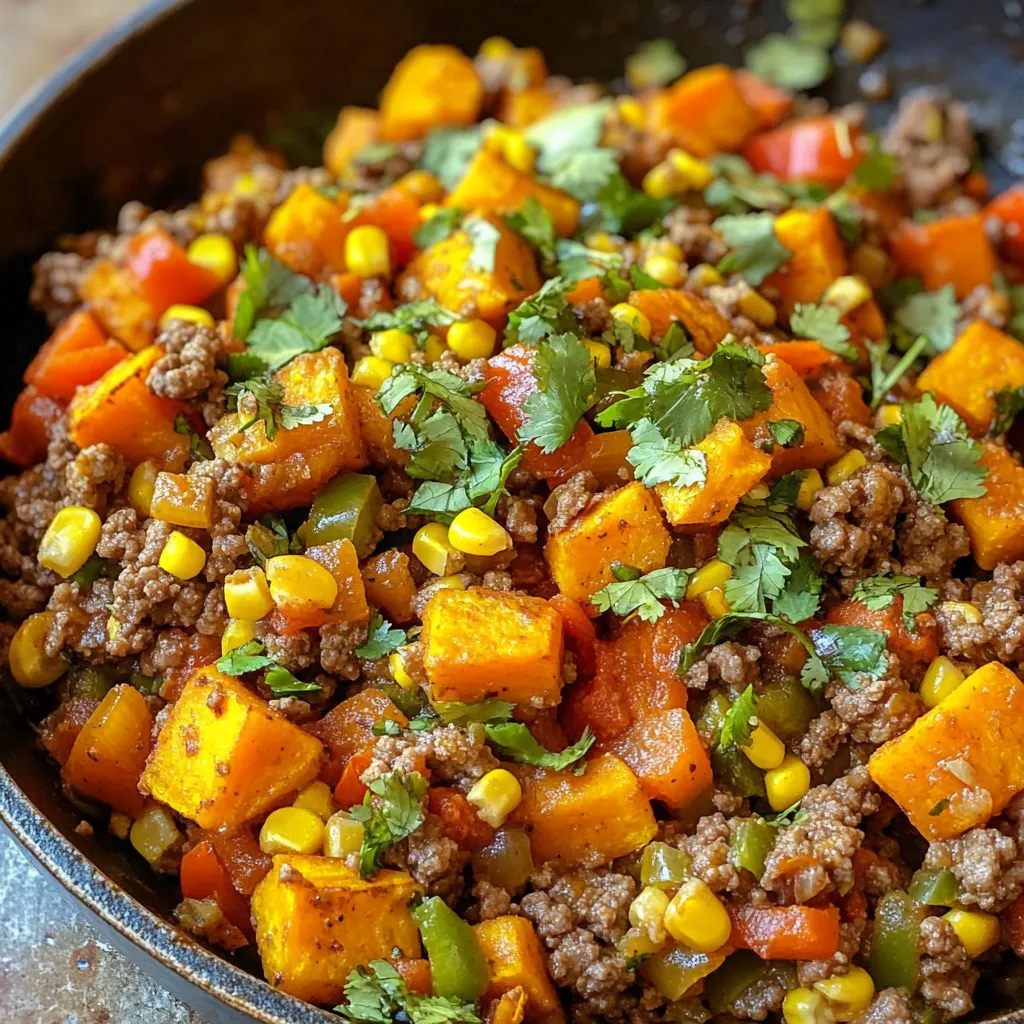
If you’re looking for a quick and tasty dinner, this Beef and Sweet Potato Skillet recipe is for you. Packed with flavor and nutrition, it’s perfect for busy nights. I’ll …

Read more

Categories Dinner

Buffalo Chicken Pasta Bake Easy and Flavorful Dish

October 8, 2025March 10, 2025 by Chef Nate
- 8 oz penne pasta - 2 cups shredded cooked chicken - 1 cup buffalo sauce - 1 cup cream cheese, softened - 1 cup shredded mozzarella cheese - 1/2 cup blue cheese crumbles - 1/2 cup chopped green onions - 1 tsp garlic powder - 1/2 tsp onion powder - Salt and pepper to taste - 1/4 cup chopped fresh parsley for garnish Gathering these ingredients sets the stage for a tasty meal. First, the penne pasta acts as the base. It holds all the flavors well. You need cooked chicken for protein. Using shredded chicken makes mixing easier. Buffalo sauce adds a spicy kick. Cream cheese gives a rich texture that blends smoothly. Mozzarella cheese melts beautifully, creating a gooey layer on top. Blue cheese crumbles add a tangy flavor that contrasts nicely. Chopped green onions provide a fresh, crisp bite. Garlic and onion powders enhance the overall taste. Finally, salt and pepper season the dish perfectly. Use fresh parsley for a vibrant finish. Each ingredient plays a key role in creating this dish. By choosing quality items, you ensure a delicious outcome. Enjoy the process of cooking and savor the flavors! {{ingredient_image_1}} - Preheat the oven to 350°F (175°C). - Cook the penne pasta until it is al dente. Follow the package directions for the best results. Drain the pasta and set it aside. - In a large bowl, combine the shredded chicken with buffalo sauce. Mix well until the chicken is coated in sauce. - Next, add the softened cream cheese, garlic powder, onion powder, and half of the mozzarella cheese. Stir until everything blends nicely. - Gently fold in the cooked pasta, blue cheese crumbles, and chopped green onions. Season with salt and pepper to taste. - Transfer this mixture to a greased 9x13 inch baking dish. Spread it out evenly. Then, sprinkle the remaining mozzarella cheese over the top. - Place the dish in the oven and bake for 20-25 minutes. Watch for the cheese to melt and bubble. - Once done, let it cool for a few minutes. Garnish with fresh parsley before serving. Enjoy the tasty blend of flavors! To keep your pasta al dente, follow these steps: - Cook penne pasta just until it's firm, about 1-2 minutes less than the package suggests. - Drain it and rinse with cold water to stop the cooking process. For buffalo sauces, I love these brands: - Frank's RedHot for a classic kick. - Anchor Bar for a thicker, richer taste. - Sweet Baby Ray’s for a sweeter twist. You can change the cheese for fun flavors: - Try cheddar for a sharper taste. - Use pepper jack for some heat. - Goat cheese adds a creamy texture. To get the best cheesiness: - Mix different cheeses together. - Add cheese in layers while baking for a melty goodness. To serve your dish attractively: - Use a bright baking dish to make it pop. - Serve straight from the dish for a homey feel. For garnishing ideas: - Sprinkle chopped parsley for a fresh touch. - Add extra green onions for color and crunch. - Drizzle more buffalo sauce around the plate for flair. Pro Tips Cook Pasta Al Dente: Make sure to cook the penne pasta just until al dente to avoid it becoming mushy during baking. Buffalo Sauce Adjustment: Adjust the amount of buffalo sauce according to your spice preference; you can add more for extra heat or reduce it for a milder dish. Use Leftover Chicken: This recipe is perfect for using up leftover rotisserie or grilled chicken, making it a convenient and tasty option. Garnish Wisely: Garnish with additional green onions and parsley just before serving to enhance the presentation and add freshness. {{image_2}} You can easily make this dish vegetarian. Instead of chicken, use plant-based proteins. Options like chickpeas or tofu work well. These choices soak up the buffalo sauce flavor nicely. You can also add more veggies for texture. Try bell peppers, spinach, or mushrooms. They add color and taste to your bake. Want extra heat? Switch up your hot sauce! Different brands have unique flavors. You can try a smoky chipotle sauce or a fiery habanero sauce. They all add a different twist to your dish. Pair your pasta bake with spicy side dishes too. Think jalapeño cornbread or spicy garlic bread for a kick. You don’t have to stick with penne pasta. Other pasta shapes work great too! Fusilli, rotini, or even shells can hold the sauce well. If you're gluten-free, use gluten-free pasta options. There are many brands that taste just as good. Just cook them according to the package. This way, everyone can enjoy this tasty dish! To store leftover Buffalo Chicken Pasta Bake, let it cool first. Then, place it in an airtight container. Make sure to seal it tightly to keep it fresh. It will last in the fridge for up to three days. You can also cover the dish with plastic wrap if you prefer. For freezing, use a freezer-safe container. Divide the pasta bake into portions for easy meals later. It’s best to freeze it within two hours of cooking. The dish can stay frozen for up to three months. To thaw, move it to the fridge overnight before reheating. Reheat your Buffalo Chicken Pasta Bake in the oven for the best texture. Preheat to 350°F (175°C) and cover the dish with foil. Heat for about 20 minutes until warm. You can also microwave it, but the oven keeps the cheese melty. Make sure it reaches 165°F (74°C) for safe eating. Yes, you can prepare this dish the night before. Here are some tips: - Cook the pasta and let it cool. - Mix the chicken and buffalo sauce in a bowl. - Combine the other ingredients in a separate bowl. - Store everything in the fridge and mix before baking. - Bake it in the morning or right before dinner. You have many great options for sides. Here are some ideas: - A simple green salad with a light dressing. - Garlic bread for a crunchy side. - Roasted vegetables for a healthy touch. - Coleslaw for a cool and crisp contrast. Yes, you can make this dish dairy-free. Here are some great options: - Use dairy-free cream cheese instead of regular cream cheese. - Swap mozzarella for a dairy-free cheese type. - Skip the blue cheese or use a dairy-free alternative. - Adjust the buffalo sauce to ensure it is dairy-free. This Buffalo Chicken Pasta Bake is a simple and tasty meal. We mixed cooked chicken, pasta, and buffalo sauce for great flavor. Using cream cheese and mozzarella makes it creamy and cheesy. You can customize with spices or different cheeses to fit your taste. Store leftovers properly and enjoy them later. Try this recipe for dinner tonight; it’s sure to please everyone! Enjoy cooking and sharing your delicious dish.

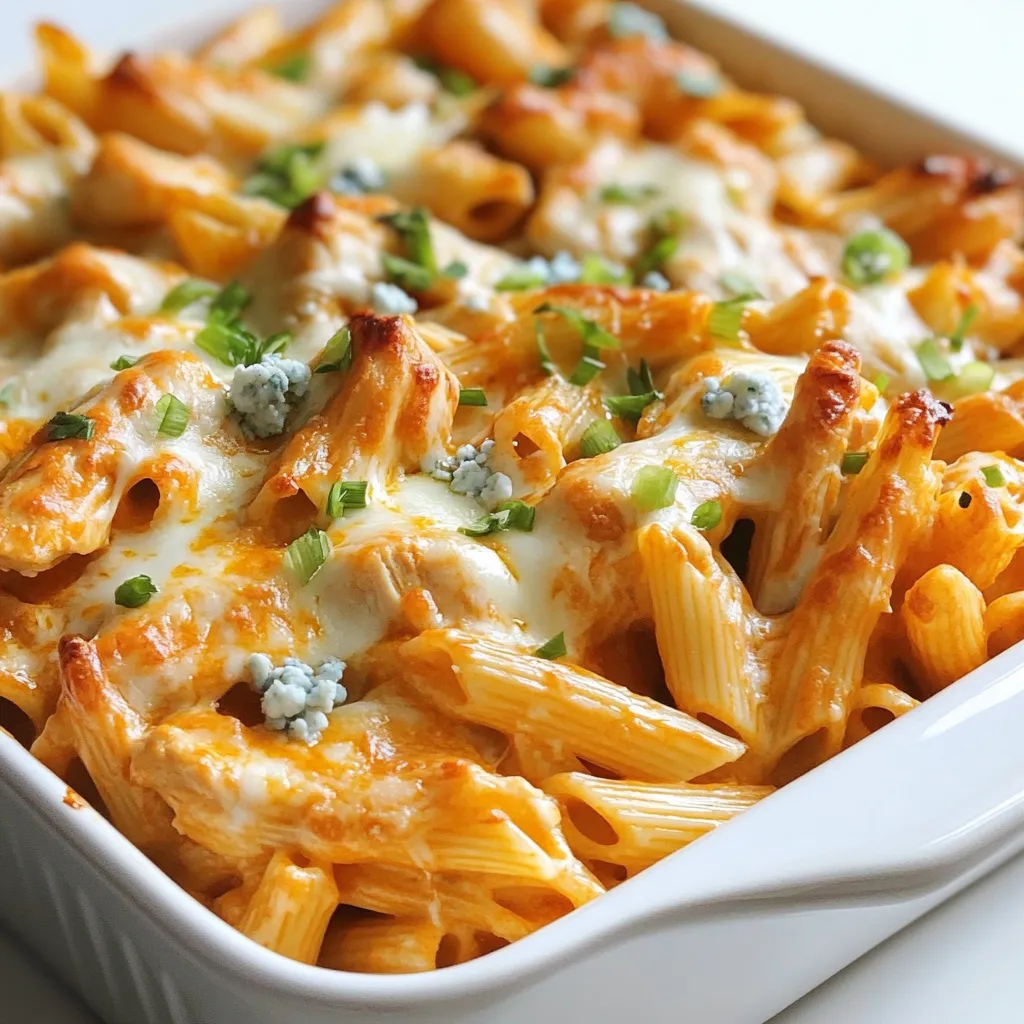
Looking for a quick and tasty dish that will impress your family? My Buffalo Chicken Pasta Bake is the perfect solution! This easy recipe combines penne pasta, shredded chicken, and …

Read more

Categories Dinner

Chocolate Dipped Coconut Macaroons Easy and Tasty Treat

November 16, 2025March 7, 2025 by Chef Nate
To make these tasty macaroons, gather the following items: - 2 ½ cups shredded unsweetened coconut - 1 cup sweetened condensed milk - 1 teaspoon vanilla extract - ¼ teaspoon salt - 1 cup dark chocolate chips - 1 tablespoon coconut oil - Sea salt flakes for garnish (optional) Using unsweetened coconut gives the macaroons a pure coconut flavor. Sweetened condensed milk adds sweetness and keeps them moist. Vanilla extract enhances the flavor and makes each bite better. The salt helps balance the sweetness. Dark chocolate chips add richness when you dip the macaroons. Coconut oil helps the chocolate melt smoothly and gives a nice shine. If you have allergies or preferences, you can make some changes: - Use sweetened coconut if you prefer a sweeter taste. - For dairy-free options, try using dairy-free chocolate chips. - If you can't have coconut, you could use almond flour instead of shredded coconut, but the texture will change. - For a nut-free version, check that your chocolate is nut-free as well. These easy adjustments allow everyone to enjoy these delicious treats! {{ingredient_image_1}} Start by preheating your oven to 325°F (160°C). This step is key to getting a nice golden color. Next, grab a mixing bowl. Add 2 ½ cups of shredded unsweetened coconut. To this, pour in 1 cup of sweetened condensed milk. Then, add 1 teaspoon of vanilla extract and ¼ teaspoon of salt. Mix everything well until it is fully combined. The mixture should be sticky and thick, perfect for forming the macaroons. Now, it's time to form the macaroons. Use your hands to shape small mounds, about 1.5 inches wide. Place them on a lined baking sheet. Be sure to space them about 1 inch apart. This space helps them bake evenly. Bake in your preheated oven for 20 to 25 minutes. Look for a nice golden brown color to know they are done. Once baked, remove them from the oven and let them cool completely on the sheet. Cooling is important, as it helps them hold their shape. While the macaroons cool, prepare the chocolate. Take 1 cup of dark chocolate chips and 1 tablespoon of coconut oil. Place them in a microwave-safe bowl. Microwave the bowl in 30-second intervals. Stir the mixture each time until it is smooth and melted. Be careful not to overheat. Once the macaroons are cool, dip the bottoms into the melted chocolate. Let any excess chocolate drip off before placing them back on the parchment paper. If you want, sprinkle sea salt flakes on top while the chocolate is still wet. This adds a nice touch of flavor. Finally, place the dipped macaroons in the fridge for 30 minutes to let the chocolate harden. To make great macaroons, follow these tips: - Use unsweetened coconut for a rich flavor. - Measure coconut and sweetened condensed milk accurately. - Mix the ingredients until just combined for a good texture. - Shape the macaroons into even mounds for uniform baking. - Give them space on the baking sheet to help them rise. - Bake until golden brown, but don’t overbake them. Melting chocolate is key for a smooth dip. Here’s how: - Use dark chocolate chips for a rich taste. - Add coconut oil to keep the chocolate smooth and shiny. - Microwave in short bursts of 30 seconds. - Stir between each burst to avoid burning the chocolate. - If you prefer, melt chocolate on a double boiler for more control. Serve your macaroons with style. Try these ideas: - Arrange them on a colorful platter for a beautiful display. - Drizzle extra melted chocolate over the top for flair. - Add some sea salt flakes on top for a sweet-salty mix. - Pair them with coffee or tea for a delightful treat. - Wrap them in clear bags for gifts or party favors. Pro Tips Use Fresh Coconut: For an even more intense coconut flavor, try using fresh grated coconut instead of shredded. Just ensure it is well-drained before mixing. Chill Before Dipping: Chilling the macaroons in the refrigerator for 10-15 minutes before dipping them into chocolate can help them hold their shape better. Experiment with Chocolate: Feel free to use milk chocolate or white chocolate instead of dark chocolate for a different flavor profile. Storage Tips: Store the finished Coconut Bliss Bites in an airtight container in the refrigerator for up to a week to maintain their freshness. {{image_2}} You can add fun flavors to your macaroons. Try mixing in almond or orange extracts. Just a teaspoon can change the taste. This little twist makes each bite exciting. If you like something fruity, try lemon zest. It adds a fresh kick! While dark chocolate is rich, you can switch it up. White chocolate makes a sweet contrast. Melt it just like dark chocolate for easy dipping. You can even mix both chocolates for a fun look. This way, you get the best of both worlds! Get creative with fillings! Add a dollop of peanut butter inside each macaroon. You can also sprinkle crushed nuts on top for crunch. Try drizzling caramel or chocolate on the finished macaroons. These small changes make your treats stand out. To keep your chocolate dipped coconut macaroons fresh, store them in an airtight container. Layer parchment paper between the macaroons to prevent sticking. Place the container in a cool, dry spot, away from sunlight. This method locks in moisture and flavor, ensuring tasty bites every time. You can freeze these macaroons for longer storage. First, let them cool completely. Then, place them in a single layer on a baking sheet. Freeze until firm, about an hour. After that, transfer them to a freezer-safe bag or container. Remove as much air as possible to avoid freezer burn. They last up to three months in the freezer. When stored properly, dipped macaroons stay fresh for about one week at room temperature. If kept in the fridge, they can last up to two weeks. Check for any signs of spoilage, like changes in texture or smell. Enjoy your sweet treats while they are at their best! Yes, you can use sweetened coconut. It will add more sugar to your macaroons. If you choose sweetened coconut, reduce the amount of sweetened condensed milk slightly. This helps balance the sweetness. Sweetened coconut gives a richer flavor. Just remember, it may change the texture a bit. Look for a golden brown color on the tops. This usually takes about 20 to 25 minutes. The edges might darken slightly too. If they look too pale, give them a few more minutes. Keep an eye on them to avoid burning. Remove them from the oven when they have a nice color. The best way to melt chocolate is in the microwave. Use a microwave-safe bowl and combine dark chocolate chips with coconut oil. Heat in 30-second bursts. Stir well between each burst. This helps the chocolate melt evenly. You can also use a double boiler if you prefer. Just be sure not to get water in the chocolate. This can make it seize up. We explored how to make delicious macaroons using simple steps and tasty ingredients. We learned about key ingredients, how to prepare and bake them, and creative ideas for flavors. I shared tips for perfecting your macaroons and how to store them well. Remember to experiment with flavors and toppings to make the recipe your own. With these insights, you are ready to impress your friends and family with your homemade treats. Enjoy the sweet rewards of your hard work!

Are you ready to satisfy your sweet tooth? Chocolate dipped coconut macaroons are the perfect mix of chewy and sweet, and they’re super easy to make. In this post, I’ll …

Read more

Categories Desserts

Brownie Batter Dip Irresistible Dessert Delight

December 24, 2025March 5, 2025 by Chef Nate
To make a tasty brownie batter dip, you will need: - 1 cup all-purpose flour - 1/2 cup unsweetened cocoa powder - 1 cup brown sugar - 1/2 cup granulated sugar - 1/2 cup unsalted butter, softened - 1 teaspoon vanilla extract - 1/4 teaspoon salt - 1 cup cream cheese, softened - 1/4 cup milk (add more if needed for consistency) - 1/2 cup chocolate chips - Assorted dippers (graham crackers, fruits, pretzels, etc.) For this dip, you will need a few basic tools: - Mixing bowls - Hand mixer - Whisk - Spatula - Serving bowl You can swap ingredients based on what you have: - Use whole wheat flour for a healthier choice. - Substitute coconut sugar for brown sugar for a unique taste. - If you want a dairy-free option, try vegan cream cheese and butter. - For a richer flavor, add extra chocolate chips or nuts. - You can replace milk with a plant-based milk for a different twist. These tips help you create your perfect brownie batter dip! {{ingredient_image_1}} Start by gathering your ingredients. In a large mixing bowl, add the softened butter and cream cheese. Use a hand mixer and beat them on medium speed. Mix until the mixture is smooth and creamy. This step is key for a great texture. Next, add the brown sugar and granulated sugar. Pour in the vanilla extract too. Continue mixing until everything is well combined. In a separate bowl, whisk together the flour, cocoa powder, and salt. Make sure there are no clumps in the dry mix. Gradually add this dry mixture to your wet ingredients. Add a little bit at a time, mixing well after each addition. This helps to keep the batter smooth. Once combined, slowly pour in the milk. Mix until you reach a dip-like consistency. If it feels too thick, add more milk a bit at a time. To get the perfect dip, start with the right milk amount. If it seems thick, don't worry; just add more milk. Mixing gently helps keep the batter fluffy. After reaching your desired consistency, fold in the chocolate chips. Use a spatula to distribute them evenly. Finally, transfer the dip to a serving bowl. Chill it in the refrigerator for at least 30 minutes. This helps the flavors mix well and the dip set slightly. Enjoy your brownie batter dip with your favorite dippers! To make your brownie batter dip extra creamy, start with softened butter and cream cheese. Mixing them well at first is key. Use a hand mixer for best results. If the dip feels thick, add a bit more milk. This small change makes a big difference in texture. Mix your wet ingredients first, then add the dry ones. This method helps blend everything well. When adding the dry mix, do it slowly. Stir gently after each addition to avoid lumps. It’s important to keep the air in the mix for a light texture. For serving, use a fun bowl to hold the dip. A decorative bowl catches the eye. Top the dip with extra chocolate chips for a treat. Arrange assorted dippers like fruits, graham crackers, and pretzels around the bowl. This not only looks great but also makes it easy for guests to grab their favorites. Pro Tips Use Room Temperature Ingredients: Ensure that your butter and cream cheese are at room temperature for a smoother blend. This helps in achieving a creamy texture without lumps. Adjust Consistency Wisely: If your dip is too thick, add a splash of milk incrementally. Stir well after each addition until you reach your desired consistency. Chill for Best Flavor: Allow the dip to chill for at least 30 minutes before serving. This helps the flavors meld together and enhances the overall taste. Creative Dippers: Experiment with different dippers like sliced apples, strawberries, or even pretzels for a delightful contrast between sweet and salty. {{image_2}} Want to mix things up? You can add fun flavors to your brownie batter dip. Try adding 1/2 cup of creamy peanut butter for a nutty twist. This will make the dip rich and delicious. You can also stir in chopped nuts like walnuts or pecans for crunch. Just fold them in gently to keep the dip smooth. Looking for a lighter option? You can use Greek yogurt instead of cream cheese. This swap will give your dip a creamy texture with less fat. Use 1 cup of plain Greek yogurt and skip the butter. You can also reduce sugar by using a sugar substitute if you want. This way, you get a treat that’s yummy and a bit healthier. Seasonal flavors can make your brownie batter dip special. For fall, add 1 teaspoon of pumpkin spice for a warm, cozy taste. You can also mix in 1/2 cup of mashed pumpkin puree. This adds flavor and makes the dip thicker. In summer, try adding crushed fresh berries for a fruity twist. Each season brings a new way to enjoy this dessert delight. To store leftover brownie batter dip, place it in an airtight container. Cover it tightly to keep out air. This helps keep the dip fresh and delicious. Make sure to chill it in the fridge right after serving. If the dip feels too thick after chilling, add a splash of milk. Stir it gently until you reach your desired consistency. You can also microwave it briefly. Heat it in 10-second bursts, checking often to avoid overheating. In the fridge, brownie batter dip lasts about 5 days. If you want to keep it longer, freeze it. In the freezer, it stays fresh for up to 3 months. Just remember to thaw it in the fridge before serving. Yes, you can eat Brownie Batter Dip raw. The ingredients are safe to eat. I use softened cream cheese, butter, and sugars. These do not contain raw eggs, making it safe for you to enjoy. Just remember, it’s rich and sweet! You have many tasty options for dipping. Here are some great choices: - Fruits like strawberries, bananas, or apples - Pretzels for a salty crunch - Marshmallows for a fun twist - Cookies like vanilla wafers or chocolate chip Try mixing and matching for fun flavors! I recommend not leaving it out for more than two hours. After that, it may not stay fresh. If it’s a warm day, keep it chilled. Always return it to the fridge after serving to keep it safe. Yes, you can make Brownie Batter Dip ahead of time! I often prepare it the night before. Just store it in the fridge in an airtight container. The flavors will blend and taste even better the next day. When ready to serve, give it a quick stir! You learned how to make a tasty Brownie Batter Dip. We covered ingredients, tools, and tips. Steps showed you how to mix and serve it right. You can explore fun flavor variations, too. Plus, I shared ways to store leftovers. Try it out for your next party or snack. This dip is sure to please everyone! Enjoy creating this sweet treat and make it your own.

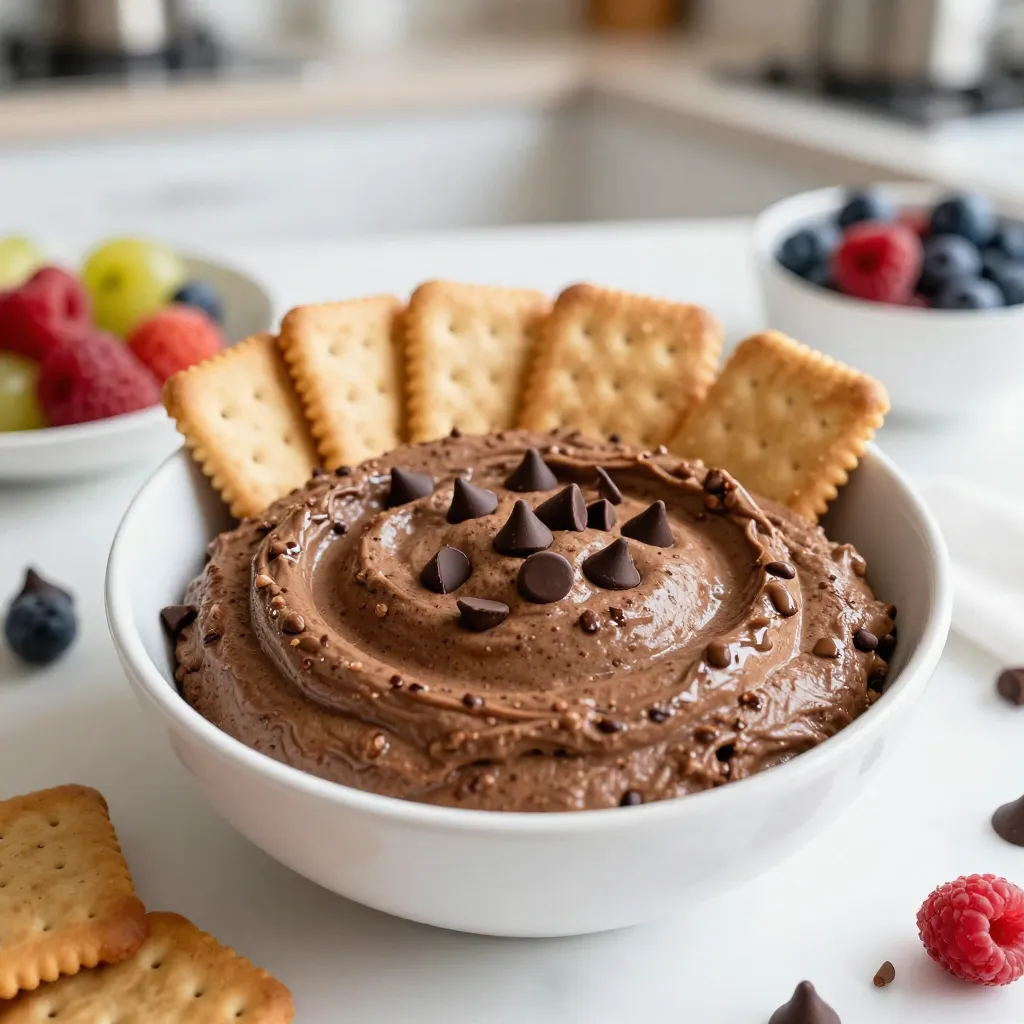
Are you ready to dive into a sweet treat that’s perfect for any gathering? Brownie Batter Dip is your answer! This creamy and rich dessert will have everyone coming back …

Read more

Categories Desserts

Ricotta Stuffed Peppers Flavorful and Easy Recipe

October 20, 2025March 4, 2025 by Chef Nate
To make ricotta stuffed peppers, you need fresh and simple ingredients. Here’s what you will need: - 4 large bell peppers (any color) - 1 cup ricotta cheese - 1/2 cup cooked quinoa - 1/2 cup chopped spinach (fresh or frozen, thawed) - 1/4 cup grated Parmesan cheese - 1 teaspoon garlic powder - 1 teaspoon Italian seasoning - Salt and pepper to taste - 1/2 cup marinara sauce (plus extra for serving) - Fresh basil leaves for garnish Each ingredient plays a key role in the flavor. The bell peppers add sweetness and crunch. Ricotta cheese brings a creamy texture that blends well with the other ingredients. Quinoa adds protein and a nice bite. Spinach gives a healthy touch, while Parmesan adds a savory depth. Garlic powder and Italian seasoning bring in aromatic flavors. Finally, marinara sauce ties everything together with its rich taste. When you gather these ingredients, you set the stage for a tasty dish. You can easily find all these items at your local grocery store. If you want to add your twist, think about other vegetables or spices you enjoy. Cooking should be fun and personal! {{ingredient_image_1}} - Preheat your oven to 375°F (190°C). - Cut the tops off the bell peppers and remove the seeds and membranes. Place them upright in a baking dish. - In a mixing bowl, combine: - 1 cup ricotta cheese - 1/2 cup cooked quinoa - 1/2 cup chopped spinach - 1/4 cup grated Parmesan cheese - 1 teaspoon garlic powder - 1 teaspoon Italian seasoning - Salt and pepper to taste Mix until smooth and well combined. - Spoon the ricotta mixture into each bell pepper, packing it down gently. - Pour 1/2 cup marinara sauce over the stuffed peppers. Make sure they are well coated. - Cover the baking dish with aluminum foil. Bake for 25 minutes. - Remove the foil and bake for another 10-15 minutes. The peppers should be tender and the cheese golden. - Let them cool for a few minutes before serving. - Garnish with fresh basil leaves and serve with extra marinara sauce on the side. To get soft and tender peppers, bake them right. Preheat your oven to 375°F (190°C). Place the peppers cut side up in a dish. Cover them with foil for the first 25 minutes. This keeps the steam inside, making them soft. After that, remove the foil and bake for another 10 to 15 minutes. This gives the cheese a nice golden touch and makes the peppers tender. While ricotta is delightful, you can mix in other cheeses too. Try mozzarella for a stretchy, gooey texture. Feta adds a nice tangy flavor. Goat cheese offers a creamy taste that pairs well. You can even blend in some sharp cheddar for extra richness. Feel free to experiment with flavors that you love. Serve your stuffed peppers with a side salad for a fresh crunch. Garlic bread also pairs well and adds heartiness. You can drizzle extra marinara sauce on top for more flavor. A sprinkle of fresh basil or parsley can brighten the dish. These small touches make your meal even more enjoyable. Pro Tips Choose Colorful Peppers: Using a mix of red, yellow, and green peppers not only adds visual appeal but also different flavor profiles. Make Ahead: Prepare the stuffed peppers in advance and store them in the refrigerator. Bake them just before serving for a quick meal. Extra Flavor: Add chopped sun-dried tomatoes or olives to the filling for an extra burst of flavor. Serve with a Side: Pair your stuffed peppers with a simple green salad or garlic bread for a complete meal. {{image_2}} You can make ricotta stuffed peppers vegetarian by using alternative proteins. Beans are a great choice. Black beans or chickpeas give good texture and protein. You can also add mushrooms for a rich, earthy flavor. Cook the mushrooms first to remove moisture. Mix them into the ricotta filling for extra depth. If you love meat, try adding ground meats. Ground beef or turkey works well. Cook the meat before mixing it with the ricotta. You can season it with spices like cumin or paprika. This adds a savory punch to your peppers. Just remember to adjust cooking times if you use raw meat. For those who enjoy heat, add jalapeños to the filling. Chop them finely and mix them in. This gives a nice kick to the dish. You can also use spicy marinara sauce instead of regular. It will make the whole meal more exciting. Just be careful not to overdo it if you don’t want it too spicy! To keep your ricotta stuffed peppers fresh, store them in an airtight container. Place a layer of plastic wrap on top before sealing. This keeps moisture in and odors out. You can also wrap each pepper in foil for extra protection. If you want to freeze them, place them in a freezer-safe bag. Squeeze out excess air before sealing to prevent freezer burn. To reheat your stuffed peppers, the oven is best. Preheat the oven to 350°F (175°C). Place the peppers in a baking dish with a splash of marinara sauce. Cover with foil to keep them from drying out. Heat for about 20 minutes or until warm. You can also use a microwave. Just place a pepper on a microwave-safe plate. Heat for 2-3 minutes or until hot, checking often. When stored correctly, ricotta stuffed peppers last about 3-4 days in the fridge. If frozen, they can last up to 3 months. Remember to label your containers with the date. This helps you keep track of how long they’ve been stored. Always check for signs of spoilage before eating. If they smell off or look strange, it's best to toss them. Yes, you can mix it up! Try using mozzarella or feta cheese. Both add great flavor. You can even blend cheeses for a unique taste. Just keep the ricotta as your base. It gives the filling a creamy texture. Look for a few key signs. The peppers should be tender but not mushy. The cheese on top should be slightly golden. You can also check the filling's warmth with a fork. If it is hot all the way through, they are ready to eat! Absolutely! You can prep the stuffed peppers a day in advance. Just store them in the fridge before baking. When you are ready, pop them in the oven. Add a few extra minutes to the bake time if they are cold. These stuffed peppers pair well with many sides. A simple green salad adds freshness. Garlic bread is also a great choice for dipping. You could even serve some extra marinara sauce on the side for added flavor. In this blog post, we explored how to make delicious stuffed bell peppers. You learned about the key ingredients, step-by-step instructions, and helpful tips. We also shared fun variations, storage advice, and answered common questions. These stuffed peppers are simple and tasty, making them perfect for your meals. Try using different cheese or add spices for a unique twist. Enjoy making these nutritious peppers that everyone will love!

Are you ready to create a dish that bursts with flavor and is super easy to make? My Ricotta Stuffed Peppers recipe is just what you need! With vibrant bell …

Read more

Categories Dinner

Healthy Sesame Chicken Flavorful and Nutritious Meal

October 22, 2025March 4, 2025 by Chef Nate
- 1 lb boneless, skinless chicken breast, cut into bite-sized pieces - 2 tablespoons sesame oil - 3 tablespoons low-sodium soy sauce - 2 tablespoons honey or maple syrup - 3 cloves garlic, minced - 1 tablespoon ginger, grated - 1 cup broccoli florets - 1 bell pepper, sliced (any color) - 1 carrot, julienned - 2 green onions, sliced - 2 tablespoons sesame seeds - Cooked brown rice or quinoa (for serving) These ingredients come together to create a tasty and healthy dish. Chicken breast gives you lean protein. The sesame oil adds a rich flavor and healthy fats. Low-sodium soy sauce keeps the salt down while still boosting taste. Honey or maple syrup gives a hint of sweetness. Garlic and ginger both add bold flavors and health benefits. Broccoli, bell pepper, and carrot ensure you get your veggies in. Finally, sesame seeds and green onions give a nice crunch and fresh taste. You can swap some ingredients for a lighter twist: - Use skinless turkey breast instead of chicken for fewer calories. - Replace sesame oil with olive oil for a different flavor profile. - Try coconut aminos in place of soy sauce for a soy-free option. - Use agave syrup instead of honey for a plant-based sweetener. - Add spinach or snap peas for more greens and color. These swaps can keep the dish healthy while offering new tastes. - Chicken breast: High in protein, low in fat. Great for muscle health. - Sesame oil: Contains healthy fats and antioxidants. Good for heart health. - Low-sodium soy sauce: Offers flavor with less sodium, helping manage blood pressure. - Honey or maple syrup: Natural sugars that provide energy. - Garlic: Known for boosting the immune system and lowering cholesterol. - Ginger: Aids digestion and has anti-inflammatory properties. - Broccoli: Packed with vitamins C and K, plus fiber for digestion. - Bell pepper: Rich in vitamin A and antioxidants, good for skin health. - Carrot: High in beta-carotene, which is great for vision. - Green onions: Low in calories and provide vitamin K and folate. - Sesame seeds: Full of calcium and healthy fats, great for bone health. - Brown rice or quinoa: Whole grains that offer fiber and help keep you full. Each ingredient adds its own health benefits, making this dish both tasty and nutritious. {{ingredient_image_1}} To start, grab a bowl and whisk together the sesame oil, soy sauce, honey, minced garlic, and grated ginger. This mix creates a tasty marinade. The sesame oil adds rich flavor, while the soy sauce brings saltiness. Honey or maple syrup gives a hint of sweetness. This mix is key to a great sesame chicken. Now, take your chicken pieces and place them in the marinade. Make sure each piece is well-coated. This step is important for flavor. Let the chicken marinate for at least 20 minutes. If you have time, refrigerate it for up to 2 hours. The longer it sits, the better the taste. You have two great options for cooking: a skillet or a wok. If you use a skillet, heat a bit more sesame oil over medium-high heat. Add the marinated chicken in a single layer. If you choose a wok, it will give you more space and heat evenly. Both methods work well, so pick what you have. After cooking the chicken for about 6-8 minutes, it's time to add veggies. Toss in the broccoli, bell pepper, and carrot. Stir-fry them for another 5-7 minutes. You want your vegetables to be tender but still crisp. In the last minute, sprinkle sesame seeds and sliced green onions on top. Toss everything together for a delicious finish. Serve your sesame chicken over brown rice or quinoa for a healthy meal. Enjoy! To get juicy chicken, start with fresh, high-quality meat. Cut the chicken into bite-sized pieces for even cooking. Marinating the chicken for at least 20 minutes helps lock in moisture. Use sesame oil in the marinade for a rich flavor. When cooking, don’t overcrowd the pan. This allows the chicken to brown nicely without steaming. Stir occasionally to ensure even cooking. Aim for a golden brown color on all sides. To boost flavor without adding calories, use fresh herbs and spices. Try adding chopped cilantro or basil for freshness. A splash of rice vinegar can add zing without extra fat. Lemon juice or lime juice also brightens the dish. If you want heat, add crushed red pepper flakes. These changes keep the taste exciting, while staying healthy. Remember, small tweaks can make a big difference in flavor. Meal prep makes weeknight cooking a breeze. Start by marinating the chicken in advance. You can even marinate it the night before. Cut and store vegetables like bell peppers and broccoli ahead of time. Keep them in airtight containers in the fridge. When ready to cook, everything is prepped and ready to go. Cook a larger batch of this sesame chicken. Store leftovers for lunch or dinner the next day. This saves time and keeps you on track with healthy eating. Pro Tips Marinate Longer for Flavor: For an even deeper flavor, marinate the chicken for a couple of hours or overnight in the fridge. This allows the spices and sauces to penetrate the meat better. Use Fresh Vegetables: Fresh vegetables not only enhance the taste but also the nutritional value of the dish. Choose vibrant and crisp veggies for the best texture. Adjust Sweetness to Taste: Depending on your preference, you can adjust the amount of honey or maple syrup in the marinade. Start with a little and add more if needed. Serve with a Side: This dish pairs wonderfully with steamed or sautéed greens, such as bok choy or spinach, for an extra nutrient boost and color on the plate. {{image_2}} You can switch chicken for turkey or tofu. Turkey has a similar taste and is lean. It is a great choice for a healthy meal. Tofu offers a plant-based option. It absorbs flavors well, making it tasty. Just cut the tofu into cubes and press it to remove water. Then marinate it just like chicken. Feel free to swap the vegetables based on what you have. Seasonal veggies add freshness and flavor. Try snap peas, zucchini, or mushrooms. You can even use asparagus in spring! Just remember to cut them into similar sizes for even cooking. Fresh herbs, like basil or cilantro, can also brighten the dish. You can change the sauce to create new flavors. For a spicy kick, add chili paste or sriracha. Want a sweeter touch? Use orange juice instead of honey. You can also try teriyaki sauce for a different taste. Each sauce brings its own unique twist to your healthy sesame chicken. Store any leftover healthy sesame chicken in an airtight container. Make sure it cools down first. Place it in the fridge. It will stay fresh for up to four days. You can freeze this dish for easy meals later. Use freezer-safe containers or bags. Make sure to leave some space at the top for expansion. The chicken can last up to three months in the freezer. When you're ready to eat, reheat your chicken on the stove. Use low to medium heat. Stir it often to heat evenly. You can also use the microwave. Heat in short bursts for one to two minutes. Check if it’s warm throughout before serving. Enjoy your tasty meal! No, this recipe is not gluten-free because it uses soy sauce. Most soy sauces contain gluten. To make it gluten-free, use tamari sauce instead. Tamari is a great substitute and tastes similar. Always check the label to ensure it is gluten-free. Yes, you can make this sesame chicken in advance. Simply marinate the chicken and store it in the fridge. You can keep it for up to two hours. If you want to prepare it longer ahead of time, cook the chicken and store it in the fridge. Reheat it when you are ready to eat. You can serve this dish with cooked brown rice or quinoa. Both are healthy options that add fiber. Steamed vegetables like green beans or snap peas also pair well. For a fresh touch, add a simple salad on the side. To make this dish spicier, add crushed red pepper flakes to the marinade. You can also use sriracha or chili paste. Start with a small amount and taste as you go. Adjust the heat to match your preference. Enjoy the extra kick! This blog covered how to make Healthy Sesame Chicken from scratch. We explored key ingredients, step-by-step cooking, and tips for a perfect dish. You learned about delicious variations and smart ways to store leftovers. Healthy meals can be easy and fun to create. Experiment with flavors and ingredients to suit your taste. Enjoy cooking and savor the benefits of a healthier dish!

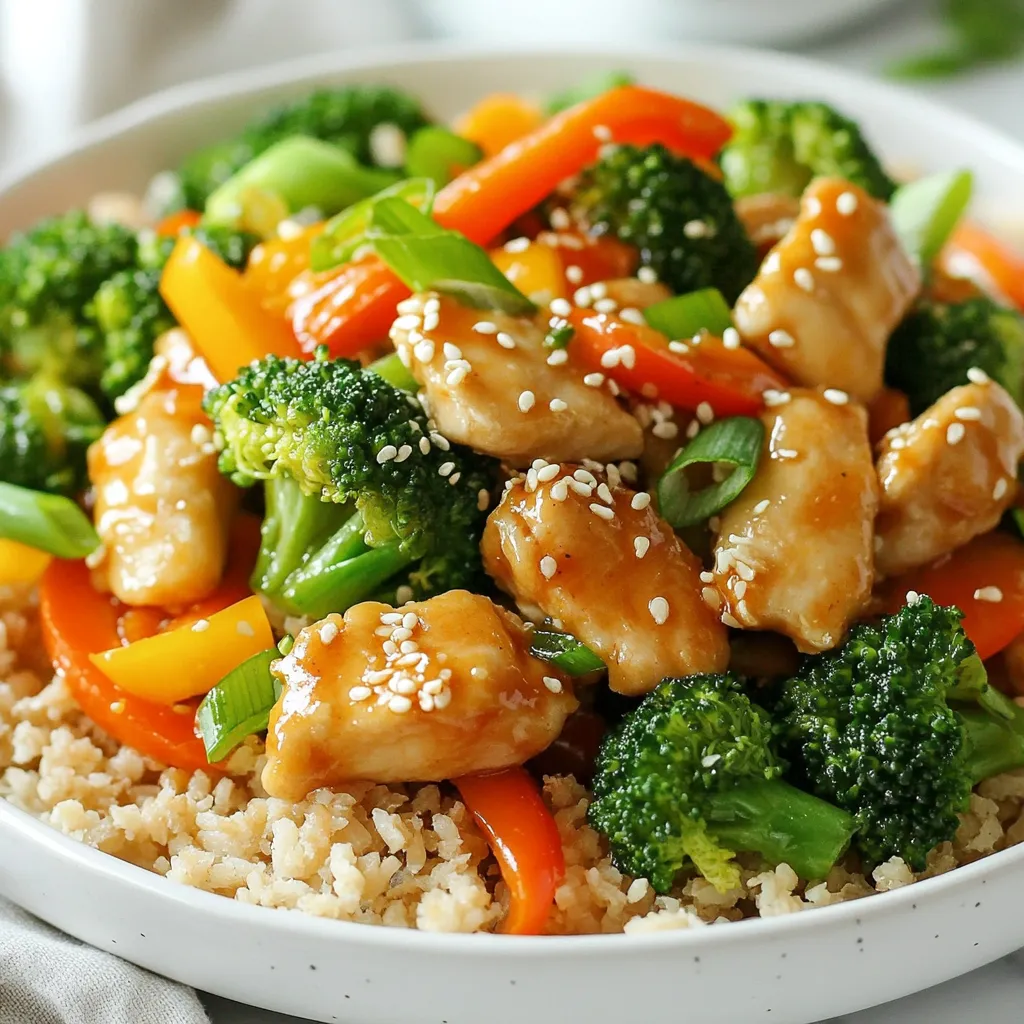
Looking for a tasty and healthy meal? You’ve found it! My Healthy Sesame Chicken is packed with flavor and nutrients. In this blog, I’ll guide you through simple steps to …

Read more

Categories Dinner

Spinach Artichoke Chicken Bake Flavorful and Easy Recipe

October 29, 2025February 28, 2025 by Chef Nate
To make a delicious spinach artichoke chicken bake, gather these key items: - 4 boneless, skinless chicken breasts - 1 cup frozen spinach, thawed and drained - 1 can (14 oz) artichoke hearts, drained and chopped - 1 cup cream cheese, softened - 1/2 cup sour cream - 1 cup shredded mozzarella cheese - 1/2 cup grated Parmesan cheese - 3 cloves garlic, minced - 1 teaspoon onion powder - 1 teaspoon garlic powder - Salt and pepper, to taste - 1 tablespoon olive oil - Fresh parsley, chopped for garnish (optional) You can enhance your dish with these optional ingredients: - 1/2 cup chopped bell peppers - 1 cup cooked and shredded chicken - 1/2 cup chopped sun-dried tomatoes - 1/2 teaspoon red pepper flakes for heat If you need to swap items, here are some great options: - Use fresh spinach instead of frozen; just wilt it in a pan. - Swap cream cheese with Greek yogurt for a lighter option. - Use cheddar cheese instead of mozzarella for a different flavor. - Replace artichoke hearts with mushrooms for a unique twist. These ingredients make the spinach artichoke chicken bake rich and tasty. You can mix and match based on what you have at home. Cooking should be fun and creative! {{ingredient_image_1}} Start by heating 1 tablespoon of olive oil in a large skillet over medium heat. While the oil heats, season 4 boneless, skinless chicken breasts with salt, pepper, onion powder, and garlic powder. This adds great flavor. Once the oil is hot, add the chicken breasts. Sear them for about 5 minutes on each side. You want them golden brown, but not fully cooked yet. When done, remove them from the skillet and set them aside. In a large mixing bowl, combine 1 cup of softened cream cheese, 1/2 cup of sour cream, and 1 cup of shredded mozzarella cheese. Add 1/2 cup of grated Parmesan cheese for a nice kick. Then, mix in 3 cloves of minced garlic, 1 cup of thawed and drained frozen spinach, and 1 can of drained and chopped artichoke hearts. Mix everything well. Taste it and add a pinch of salt and pepper as needed. This mixture should be creamy and full of flavor. Now, take a baking dish and lay the partially cooked chicken breasts inside. Spoon the creamy spinach and artichoke mixture over each chicken breast. Make sure they are fully covered. Preheat your oven to 375°F (190°C). Bake the dish for 25-30 minutes. Check that the chicken reaches an internal temperature of 165°F (75°C). You want the top to be golden and bubbly. Once baked, let it rest for 5 minutes. If you like, sprinkle fresh chopped parsley on top before serving. Enjoy this creamy and delicious meal! To get a nice sear on your chicken breasts, start with dry meat. Pat them with paper towels before cooking. This step helps create that golden crust. Heat your skillet over medium heat and add olive oil. Make sure the oil shimmers before adding the chicken. Season both sides with salt, pepper, onion powder, and garlic powder. Sear each side for about 5 minutes. Look for a nice brown color. Remember, they don't need to be fully cooked yet. You will finish cooking them in the oven. To get that creamy texture, use softened cream cheese. This makes it easy to mix. Combine it with sour cream, mozzarella, and Parmesan cheese. Mix these well with your spinach and artichokes. If your mixture feels too thick, add a splash of milk or cream. This will help it spread easily over the chicken. Taste and adjust the salt and pepper before spreading. This ensures every bite is flavorful and creamy. This dish pairs well with many sides. Try serving it with rice or quinoa for a hearty meal. A fresh green salad adds a nice crunch. You can also serve it with roasted vegetables for more color. If you want to keep it light, serve with steamed broccoli or green beans. For a fun touch, add crusty bread to soak up the creamy sauce. You can even top it with chopped fresh parsley for a pop of color and taste. Enjoy your meal! Pro Tips Tip Title: Use Fresh Spinach: If you have fresh spinach on hand, feel free to substitute it for frozen. Just be sure to sauté it until wilted before mixing it into the creamy sauce. Tip Title: Cheese Variations: Experiment with different types of cheese. Adding a bit of cream cheese with herbs or a sharp cheddar can elevate the flavor of the dish. Tip Title: Chicken Thickness: Ensure the chicken breasts are even in thickness for uniform cooking. If they are too thick, consider pounding them to an even thickness. Tip Title: Let It Rest: Allow the chicken to rest for a few minutes after baking. This will help retain the juices and enhance the overall flavor and moisture of the dish. {{image_2}} You can easily make this dish vegetarian. Just skip the chicken. Use extra artichokes and spinach instead. You can add mushrooms or bell peppers for more flavor. This makes a great meal for vegetarians. The creamy mixture still tastes amazing with just veggies. Feel free to mix in other veggies. Zucchini or sun-dried tomatoes work well. You can also add proteins like shrimp or tofu. If you like heat, add diced jalapeños. These variations keep the dish fun and fresh. For a low-carb twist, swap the chicken with cauliflower. Cauliflower rice or zucchini noodles can replace the chicken as well. You can use cream cheese and sour cream as is. This keeps the dish creamy and rich without the carbs. Enjoy a tasty meal that fits your diet! After enjoying your Spinach Artichoke Chicken Bake, store leftovers in an airtight container. Let the dish cool down to room temperature first. Place it in the fridge, where it will last for about three to four days. Always label your container with the date. This helps you keep track of how long it has been stored. To reheat your leftovers, you can use the oven or microwave. For the oven, preheat it to 350°F (175°C). Place the chicken bake in a baking dish and cover it with foil. Heat for about 15-20 minutes until warm. If you prefer the microwave, use a microwave-safe plate. Heat on medium power for 2-3 minutes. Check if it is heated through. If not, add more time in small intervals. You can freeze Spinach Artichoke Chicken Bake for longer storage. First, let it cool completely. Then, wrap it tightly in plastic wrap or aluminum foil. Place it in a freezer-safe bag or container. It can stay in the freezer for up to three months. To serve, thaw it in the fridge overnight. Reheat it in the oven or microwave as mentioned above. Enjoy the same great taste even after freezing! Yes, you can use fresh spinach. Use about 2 cups of fresh spinach. Cook it down in a skillet until wilted. Make sure to drain the excess water. This keeps your dish from being too watery. Check the internal temperature of the chicken. It should reach 165°F (75°C). You can also cut into the chicken. The meat should be white, not pink. Juices should run clear. These steps ensure your chicken is safe to eat. Serve this dish with rice, pasta, or a side salad. Garlic bread pairs well too. You can also make roasted vegetables for a healthy side. These options add variety and balance to your meal. This blog post covered all the key steps for making a tasty Spinach Artichoke Chicken Bake. We discussed the ingredients you need, how to prep and cook the dish, and tips for the best results. I also shared ways to customize the recipe and store your leftovers. Remember, cooking is fun! Don't be afraid to try new things. Enjoy your meal and share it with others. Happy cooking!

Are you ready to transform dinner into something delicious? This Spinach Artichoke Chicken Bake will impress your family without keeping you in the kitchen all night. With a creamy blend …

Read more

Categories Dinner

Chocolate Covered Strawberry Smoothie Delightful Treat

December 7, 2025February 28, 2025 by Chef Nate
Fresh strawberries are the star of this smoothie. Use one cup of hulled strawberries for the best flavor. Ripe, juicy strawberries make the drink sweet and tasty. A ripe banana adds creaminess and natural sweetness. It helps blend the other flavors well. You only need one banana for this recipe. Choose one cup of almond milk or any milk you like. Almond milk keeps it light and creamy. You can try oat milk or coconut milk for a twist. Cocoa powder gives the smoothie its rich chocolate taste. Use two tablespoons to ensure a deep, chocolaty flavor. It pairs perfectly with strawberries. Two tablespoons of Greek yogurt add smoothness and protein. This makes the smoothie extra creamy. You can also use dairy-free yogurt if you prefer. Add one tablespoon of honey or maple syrup for sweetness. Adjust it to your taste. A half teaspoon of vanilla extract gives a lovely aroma and taste. {{ingredient_image_1}} First, gather all your ingredients. You need: - 1 cup fresh strawberries, hulled - 1 ripe banana - 1 cup almond milk (or any milk of your choice) - 2 tablespoons cocoa powder - 2 tablespoons Greek yogurt - 1 tablespoon honey or maple syrup - 1/2 teaspoon vanilla extract - Ice cubes (optional) Wash the strawberries and remove the stems. Peel the banana and break it into pieces. This makes blending easier. Next, place the strawberries, banana, and almond milk into your blender. Add in the cocoa powder, Greek yogurt, honey or maple syrup, and vanilla extract. If you like your smoothie thick, add some ice cubes. Blend on high until the mixture is smooth and creamy. Make sure there are no lumps. This should take about 30 seconds. After blending, taste your smoothie. If it needs more sweetness, add a bit more honey or syrup. Blend again for a few seconds to mix it well. You can also add more milk if it’s too thick for your liking. Pour the smoothie into glasses. For a nice touch, garnish with whole strawberries on top or a sprinkle of cocoa powder. Enjoy your tasty chocolate covered strawberry smoothie right away! To find the best strawberries, look for bright red color. The berries should feel firm but not hard. Avoid any with bruises or soft spots. The fresher the strawberries, the better the taste. In season, strawberries are sweet and juicy, perfect for this smoothie. If you want a thicker smoothie, use ice cubes. You can add a little more Greek yogurt as well. Frozen strawberries are another great option. They make the drink cold and creamy. Blend until smooth for the best texture. Honey or maple syrup are great choices for sweetening. If you want less sugar, try using stevia or agave. You can also skip sweeteners or add a ripe banana for natural sweetness. Adjust the amount based on your taste. To ensure a smooth texture, blend in the right order. Start with the liquid first, then add fruits and powders. Blend on high speed for at least 30 seconds. Stop to scrape down the sides of the blender as needed. This will help mix everything evenly. Pro Tips Use Frozen Strawberries: For a creamier texture and a colder smoothie, consider using frozen strawberries instead of fresh ones. Sweetness Adjustment: Always taste your smoothie before serving. You can adjust the sweetness by adding more honey or maple syrup as needed. Vegan Option: To make this smoothie vegan, simply use maple syrup instead of honey and ensure your Greek yogurt is plant-based. Boost Nutritional Value: Add a handful of spinach or a scoop of protein powder for an extra nutritional boost without altering the flavor significantly. {{image_2}} You can boost your smoothie with protein powder. This makes it more filling. I like to use chocolate or vanilla protein powder. It blends well with the flavors. Just add one scoop to your mix before blending. While almond milk is great, you can try other milks too. Dairy milk, coconut milk, or oat milk all work well. Each one adds a unique taste. Choose the one you like best or have at home. You can mix in other fruits for fun flavors. Try blueberries or raspberries for a berry twist. Mango adds a tropical vibe. Just keep the amount similar to what the recipe calls for. To make this smoothie vegan, swap Greek yogurt for a plant-based option. You can use coconut yogurt or silken tofu. Also, use maple syrup instead of honey. This way, everyone can enjoy this tasty treat! If you have extra smoothie, pour it into an airtight container. Seal it well. Store it in the fridge for up to two days. Make sure to shake or stir it before drinking. The smoothie may separate in the fridge, but that's normal. You can freeze your smoothie too! Pour the smoothie into ice cube trays or freezer-safe bags. This is great for quick snacks. When you're ready to enjoy, blend the frozen cubes with a splash of milk for a fresh drink. It will taste just like the day you made it. To keep your smoothie tasty and smooth, avoid adding too much air. When blending, use a low speed at first. This will help mix the ingredients without making it too frothy. If you freeze it, use it within a month for the best flavor. Yes, you can use frozen strawberries. They will make your smoothie cold and thick. Just toss them in the blender like fresh ones. Frozen strawberries add a nice chill and blend well. To make this smoothie dairy-free, simply swap Greek yogurt for a dairy-free option. Use almond yogurt or coconut yogurt instead. This keeps your smoothie creamy without any dairy. A good substitute for Greek yogurt is regular yogurt or a dairy-free yogurt. You can try coconut yogurt or soy yogurt. Both options keep your smoothie smooth and tasty. Yes, you can make this smoothie ahead of time. Just blend and store it in the fridge. Enjoy it within one day for the best taste and freshness. A chocolate covered strawberry smoothie has about 250 calories per serving. This can change based on your sweetener choice and yogurt type. Check your ingredients for exact calorie counts. This blog post covered how to make a tasty chocolate-covered strawberry smoothie. We talked about fresh ingredients like strawberries and bananas, plus almond milk and cocoa powder. You learned the steps for blending, adjusting sweetness, and garnishing. I shared tips for choosing fruit and making your smoothie creamy. Remember, you can mix it up with different fruits or dairy-free options. Enjoy your smoothie, and don’t hesitate to change it to fit your taste!

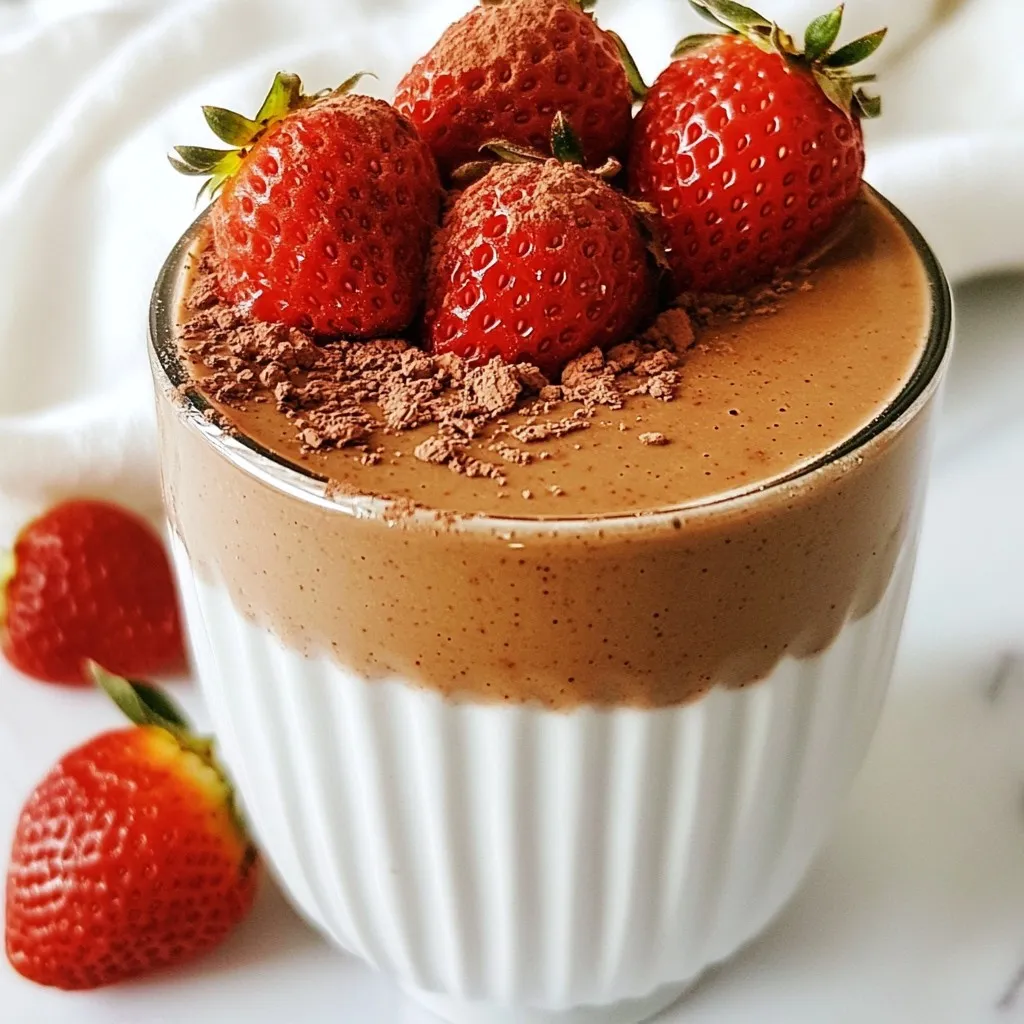
Indulging in a chocolate-covered strawberry smoothie is a feast for your senses. It’s rich, creamy, and easy to make. You need just a few fresh ingredients to whip up this …

Read more

Categories Desserts
Older posts
Newer posts
← Previous Page1 … Page99 Page100 Page101 … Page108 Next →

GRILLED FLAVORS

where delicious ideas come to life, from stovetop to backyard. Warm, simple, and always satisfying. 🍽️✨

PAGES

Home About Contact Privacy Policy Terms & Conditions Cookie Policy GDPR Policy Copyright Policy Disclaimer

CATEGORIES

Appetizers Desserts Salads Breakfast Dinner

Contact

  • Pinterest
  • Mail
Copyright © 2026 Grilled Flavors. All rights reserved.