Skip to content
grilledflavors.com
  • Home
  • Appetizers
  • Desserts
  • Salads
  • Breakfast
  • Dinner
  • Privacy Policy
  • Contact
  • About

Chef Nate

Baked Honey Mustard Chicken Savory and Simple Dish

October 19, 2025February 14, 2025 by Chef Nate
- 4 chicken breasts, boneless and skinless - 1/3 cup honey - 1/3 cup Dijon mustard - 2 tablespoons olive oil - 2 cloves garlic, minced - 1 teaspoon fresh thyme, chopped (or 1/2 teaspoon dried thyme) - 1 teaspoon paprika - Salt and pepper to taste - Fresh parsley for garnish The recipe calls for specific amounts. Here’s a quick guide: - Use 4 chicken breasts, about 1.5 pounds total. - For the honey and mustard, stick with 1/3 cup each. - Olive oil needs 2 tablespoons. - Use 2 cloves of garlic for a strong flavor. - Thyme can be fresh or dried; just adjust the amount. - Paprika adds a nice touch, and you can use more or less based on taste. - Season with salt and pepper as you like. If you want to switch up flavors, try these: - Swap Dijon mustard with yellow mustard for a milder taste. - Maple syrup works well if you want a different sweetener. - Use any fresh herb you like if thyme isn’t available. - You can use chicken thighs instead of breasts for a juicier dish. These tips will help you make the dish your own! {{ingredient_image_1}} - Preheating the oven: Start by preheating your oven to 375°F (190°C). This ensures even cooking. - Making the honey mustard mixture: In a medium bowl, whisk together 1/3 cup honey and 1/3 cup Dijon mustard. Add 2 tablespoons of olive oil, 2 minced garlic cloves, 1 teaspoon of fresh thyme (or 1/2 teaspoon dried), and 1 teaspoon paprika. Season with salt and pepper to your taste. Mix well until it is smooth and combined. - Coating the chicken: Take 4 boneless, skinless chicken breasts and place them in a baking dish. Pour the honey mustard mixture over the chicken, making sure to coat both sides well. - Covering and baking times: Cover the baking dish with aluminum foil. Bake for 25 minutes. After that, remove the foil and bake for another 15-20 minutes. The chicken should reach an internal temperature of 165°F (75°C). The glaze will bubble and look caramelized. - Resting the chicken: Once done, pull the baking dish from the oven. Let the chicken rest for about 5 minutes. This step keeps it juicy and tender. - Garnishing tips: Before serving, sprinkle fresh parsley on top. This adds color and flavor. Serve the chicken with a drizzle of sauce from the dish for extra taste. To keep your chicken juicy and tender, use the right cooking time. Bake the chicken for 25 minutes covered. Then, remove the foil and bake for 15-20 more minutes. This will help lock in moisture. Always let the chicken rest for 5 minutes after baking. This step makes a big difference in juiciness. To check for doneness, use a meat thermometer. Insert it into the thickest part of the chicken. The chicken should reach an internal temperature of 165°F (75°C). If you don’t have a thermometer, cut into the chicken. The juices should run clear, not pink. You can add herbs and spices to boost flavor. Fresh rosemary or sage works well with the honey mustard mix. A pinch of cayenne can add a nice kick. Consider adding a splash of lemon juice for brightness. For a different taste, try marinating the chicken in the honey mustard mix for an hour or overnight. This adds depth to the flavor. You could also use different mustards, like whole grain or spicy mustard, for a unique twist. Pro Tips Marinate for Extra Flavor: For a deeper flavor, marinate the chicken in the honey mustard mixture for at least 30 minutes, or even overnight in the refrigerator. Use Bone-in Chicken: For even juicier chicken, consider using bone-in, skin-on chicken thighs. Adjust the cooking time accordingly. Add a Kick: If you like a bit of heat, add a pinch of cayenne pepper or a splash of hot sauce to the honey mustard mixture. Perfect Pairing: This dish pairs wonderfully with sides like roasted sweet potatoes or a crisp green salad to balance the sweetness. {{image_2}} Mustard alternatives: You can swap Dijon mustard with yellow mustard or whole grain mustard. Each adds a different kick. Yellow mustard gives a milder taste. Whole grain mustard adds texture and depth. Honey substitutes: If you need a honey alternative, try maple syrup or agave nectar. Both sweeten the dish well. They may change the flavor slightly but still taste great. Slow cooker adaptation: To use a slow cooker, mix the honey mustard sauce as before. Place the chicken in the slow cooker and pour the sauce over it. Cook on low for 6-8 hours or high for 3-4 hours. This makes the chicken super tender. Grill versus oven method: You can also grill the chicken for a smoky flavor. Marinate the chicken in the honey mustard sauce for at least 30 minutes. Grill it over medium heat for about 6-7 minutes per side. The grilling adds a nice char and flavor. To keep your baked honey mustard chicken fresh, use airtight containers. Glass or plastic containers work well. Let the chicken cool to room temperature before sealing. Store the chicken in the fridge for up to four days. If you want to keep it longer, freeze it. Wrap each piece in plastic wrap, then put it in a freezer bag. This helps avoid freezer burn. Frozen chicken can last for up to three months. To reheat your chicken, the oven is best. Preheat it to 350°F (175°C). Place the chicken in a baking dish. Cover it with foil to keep moisture in. Heat for about 20 minutes. Check that the internal temperature is 165°F (75°C) before serving. You can also use a microwave. Place the chicken on a microwave-safe plate. Cover it loosely with a paper towel. Heat in short bursts, checking often. This keeps the chicken juicy and tasty. Avoid overcooking, as this can dry it out. How long should I bake chicken at 375°F? You should bake chicken at 375°F for about 40 to 45 minutes. Start with 25 minutes covered, then 15 to 20 minutes uncovered. Always check the chicken's internal temperature to reach 165°F for safety. Can I use bone-in chicken for this recipe? Yes, you can use bone-in chicken. Just adjust the cooking time. Bone-in chicken takes longer, about 50 to 60 minutes. Check the internal temperature to ensure it is cooked through. Is this recipe suitable for meal prep? Absolutely! This recipe is great for meal prep. You can make it ahead and store it in the fridge. It will stay fresh for up to four days. Can I make this dish ahead of time? Yes, you can prepare the chicken and the honey mustard mixture ahead of time. Just coat the chicken and store it in the fridge. Bake it when you are ready to serve. What sides pair well with baked honey mustard chicken? This dish pairs well with roasted vegetables, rice, or a fresh salad. You can also serve it with mashed potatoes for a hearty meal. How to adjust the recipe for more servings? To make more servings, simply double or triple the ingredients. Just ensure your baking dish can fit all the chicken. You may need to bake in batches if your dish is small. You learned how to make baked honey mustard chicken using simple ingredients. We covered everything from preparing the chicken to storing leftovers. This dish is easy to customize and perfect for any meal. You can try different flavors and cooking methods based on your taste. Remember, cooking should be fun and rewarding! Enjoy this delicious meal, and don't hesitate to experiment with variations. Happy cooking!

Are you ready to transform your dinner routine? Baked Honey Mustard Chicken is a savory and simple dish that combines rich flavors with easy prep. In this article, I’ll share …

Read more

Categories Dinner

Spicy Garlic Ramen Eggs Flavorful and Easy Recipe

October 30, 2025February 13, 2025 by Chef Nate
- 4 large eggs - 1/4 cup soy sauce - 2 tablespoons rice vinegar - 1 tablespoon sriracha sauce - 2 cloves garlic, minced - 1 teaspoon sesame oil - 1 green onion, finely chopped (for garnish) - Red pepper flakes (to taste) You can swap soy sauce with tamari for a gluten-free option. If you want less heat, use mild chili sauce instead of sriracha. For a tangy twist, try apple cider vinegar in place of rice vinegar. If you lack sesame oil, olive oil can work, but the flavor will change. - Small saucepan for boiling eggs - Bowl for ice bath - Mixing bowl for marinade - Plastic wrap for covering the eggs - Sharp knife for cutting the eggs - Serving plate to present your eggs This setup will make your cooking process smooth and simple. The right tools help you focus on flavor and fun. Enjoy your cooking! {{ingredient_image_1}} First, get a small saucepan. Place 4 large eggs in it. Cover the eggs with cold water. Turn the heat to medium and bring the water to a boil. Once it boils, cover the pan and turn off the heat. Let the eggs sit for 6-7 minutes. This time gives you soft-boiled eggs. While the eggs cook, you can prepare the marinade. In a bowl, mix together 1/4 cup soy sauce, 2 tablespoons rice vinegar, and 1 tablespoon sriracha sauce. Add 2 cloves of minced garlic and 1 teaspoon sesame oil to the bowl. Stir everything until it blends well. This marinade gives the eggs a spicy kick. When the eggs are done, transfer them to a bowl of ice water. This stops the cooking. Let them sit for about 5 minutes. After that, tap each egg gently on the countertop. Roll it lightly to crack the shell. Peel the eggs under running water to help remove the shell easily. Now, place the peeled eggs in a shallow dish. Pour the marinade over the eggs, making sure they are fully coated. Cover the dish with plastic wrap. Let the eggs marinate in the fridge for at least 30 minutes. For a deeper flavor, you can leave them for up to 4 hours. To serve, take the marinated eggs out of the dish. Cut each egg in half. Place the halves on a serving plate. Sprinkle chopped green onions on top and add red pepper flakes to taste. This adds heat and makes the dish beautiful. Enjoy your spicy garlic ramen eggs! To get the perfect soft-boiled egg, start with cold water. Place the eggs in a small pot and cover them with water. Heat the pot on medium until it boils. When it starts boiling, turn off the heat and cover the pot. Let the eggs sit for 6-7 minutes. This timing gives you a creamy yolk without being runny. You can test a few times to find your ideal time. Remember, the cooking time changes based on the egg size. Larger eggs may need a bit more time. Want to kick up the flavor? Try adding different spices or sauces. You can add more sriracha for heat or even a dash of hoisin sauce for sweetness. If you like garlic, use more minced garlic in the marinade. Some people enjoy adding a splash of lime juice for a zesty touch. Green onions are great for garnish, but you can also try sesame seeds or chopped cilantro. Make your spicy garlic ramen eggs look as good as they taste. After marinating, cut each egg in half. Place them on a nice plate. Sprinkle chopped green onions and red pepper flakes on top. For extra flair, you can serve them on a bed of greens or alongside ramen noodles. A drizzle of sesame oil can add a beautiful shine. Serve with chopsticks for an authentic touch! Pro Tips Perfect Egg Timing: For the best soft-boiled eggs, it’s crucial to stop the cooking process promptly. Use an ice bath immediately after boiling to lock in the perfect texture. Marination Time: Allowing the eggs to marinate for longer enhances the flavor. If you can, let them sit for up to 4 hours or even overnight for a richer taste. Customize the Heat: Adjust the amount of sriracha and red pepper flakes to your taste. If you prefer milder flavors, reduce the sriracha or use sweet chili sauce instead. Garnish with Freshness: Adding fresh herbs like cilantro or basil along with green onions can elevate the dish. Experiment with different garnishes for a unique twist. {{image_2}} You can change the heat in your ramen eggs. Want it hotter? Add more sriracha or red pepper flakes. You can also try chili oil for a different kick. If you prefer less heat, reduce the sriracha. You can also skip the red pepper flakes. This way, everyone can enjoy the eggs just how they like. Mix things up with other marinades. You can use teriyaki sauce instead of soy sauce. This adds a sweet twist. For a tangy flavor, try adding lime juice or apple cider vinegar. You can also add ginger to the marinade for a fresh taste. Experimenting with different flavors keeps it fun and tasty. Garnishes add color and flavor. Besides green onions, try sesame seeds for crunch. You can also use cilantro or parsley for a fresh touch. If you like a bit of sweetness, thinly slice radishes. These little changes can brighten up your dish and make it even more delightful. To store leftover ramen eggs, place them in an airtight container. Pour any leftover marinade over the eggs. This helps keep them moist and flavorful. Store the container in the fridge. Make sure to enjoy them within a few days for the best taste. You can freeze ramen eggs, but the texture may change. To freeze, place the eggs in a freezer-safe bag or container. Remove as much air as possible. When ready to use, thaw them in the fridge overnight. Avoid using a microwave, as this can make the eggs tough. Ramen eggs last about 3 to 4 days in the fridge. For best results, eat them within this time. Always check for any off smells before eating. If you notice anything unusual, it’s best to discard them. Storing them in their marinade helps keep them fresh longer. To peel soft-boiled eggs, start by tapping them gently on a hard surface. Roll the egg to crack the shell all around. Then, peel the shell off while running it under cool water. The water helps separate the shell from the egg, making it easier to remove. Yes, you can use this marinade for chicken, tofu, or fish. Just make sure to adjust the marinating time based on the protein you choose. For chicken, marinate for about 1-2 hours. For tofu, a shorter time of 30 minutes works well. This marinade adds great flavor! Marinated eggs can be stored in the fridge for up to 4 days. Keep them in an airtight container to maintain freshness. The longer they sit, the more flavor they absorb from the marinade, which is fantastic! Absolutely! To lower the spice level, reduce or skip the sriracha and red pepper flakes. You can still enjoy the garlic and soy sauce flavors without the heat. Experiment until you find the right balance for your taste buds! Now you know how to make perfect ramen eggs. We covered ingredients, substitutions, and tools you need. You learned step-by-step instructions and gained tips for the best eggs. You saw variations to try on flavors and garnishes. I also shared storage tips and answered common questions. With this guide, you can impress anyone with your cooking skills. Try making these tasty eggs today. Enjoy every bite!

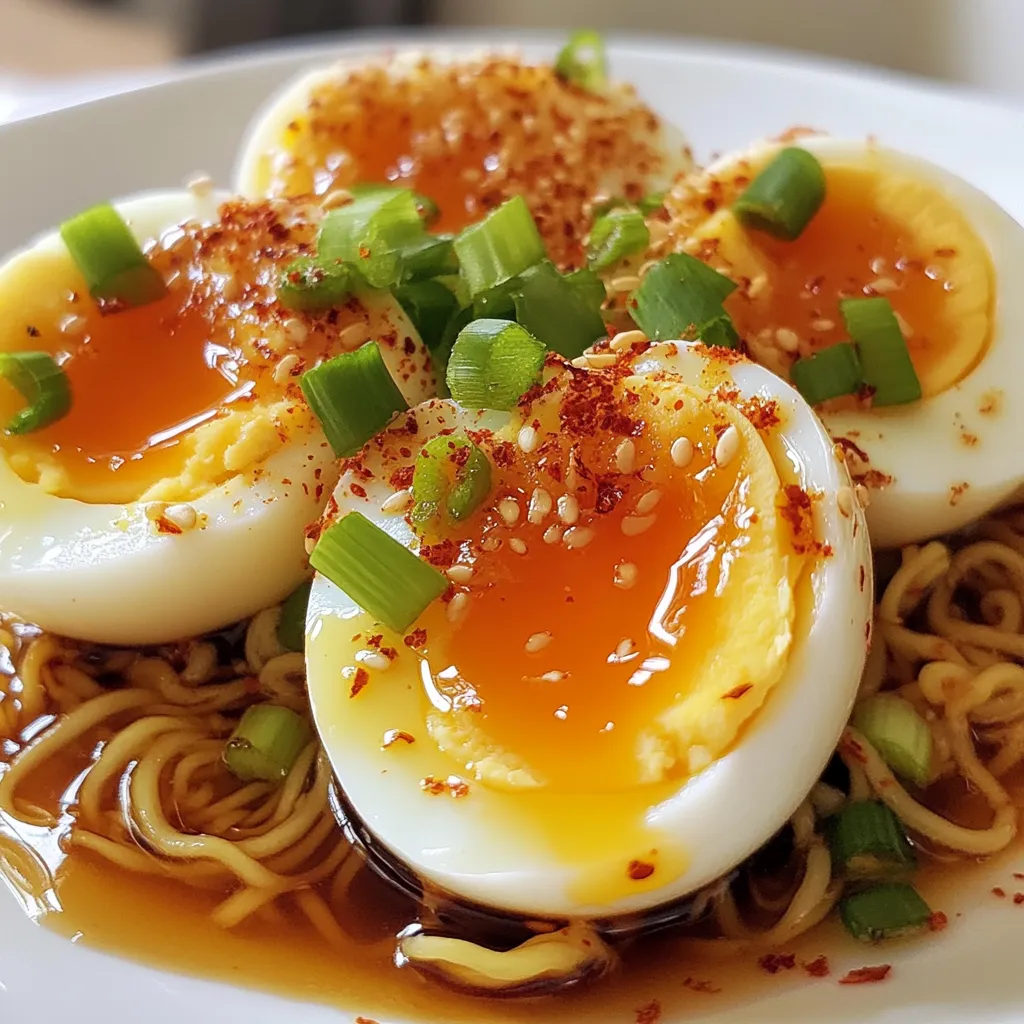
If you love ramen, you need to try spicy garlic ramen eggs. They add a burst of flavor to your bowl and are easy to make! In this recipe, I’ll …

Read more

Categories Appetizers

Tuscan White Bean Soup Delicious and Nourishing Meal

December 19, 2025February 12, 2025 by Chef Nate
- 2 cups canned white beans (cannellini or great northern), rinsed and drained - 1 medium onion, diced - 3 cloves garlic, minced - 2 medium carrots, diced - 2 celery stalks, diced - 4 cups vegetable broth - 2 cups chopped kale or spinach - 1 teaspoon dried thyme - 1 teaspoon dried rosemary - 1 bay leaf - 2 tablespoons olive oil - Salt and pepper to taste - Juice of 1 lemon - Fresh basil or parsley for garnish In Tuscan White Bean Soup, the beans are the star. You can choose either cannellini or great northern beans. Both are creamy and full of flavor. Canned beans save time and are easy to use. Next, fresh vegetables add crunch and taste. You need onion, garlic, carrots, and celery. The onion gives a sweet base, while garlic adds a strong aroma. Carrots and celery bring color and texture. For the broth, vegetable broth is best. It keeps the soup light. You will also need dried thyme, rosemary, and a bay leaf for flavor. These herbs add depth to the dish. Greens like kale or spinach bring nutrition. They cook down soft and blend well. A squeeze of lemon juice brightens the soup. It adds a fresh taste that balances the beans. Finally, garnish with fresh basil or parsley. This gives a pop of color and extra flavor. Each ingredient plays a role, making the soup both delicious and nourishing. {{ingredient_image_1}} To start, heat 2 tablespoons of olive oil in a large pot over medium heat. Once the oil is hot, add your diced onion, carrots, and celery. Sauté them for about 5-7 minutes. You want them soft but not brown. This step builds a great flavor base for the soup. Next, stir in 3 cloves of minced garlic. Cook it for another 1-2 minutes. This will add a rich aroma to your soup. Be careful not to burn the garlic; it can turn bitter. Now, it’s time to add the main ingredients. Dump in 2 cups of rinsed and drained white beans along with 4 cups of vegetable broth. Add 1 teaspoon of dried thyme, 1 teaspoon of dried rosemary, and 1 bay leaf. Stir everything well. Bring your mixture to a boil. Once it boils, reduce the heat to low. Let the soup simmer for 20-25 minutes. This allows the flavors to blend perfectly. After simmering, add 2 cups of chopped kale or spinach. Let it simmer for another 5-10 minutes. The greens should be tender but still bright. Before serving, remove the bay leaf. Stir in the juice of 1 lemon. Season your soup with salt and pepper to taste. Garnish with fresh basil or parsley for a fresh finish. Enjoy your warm bowl of Tuscan White Bean Soup! To boost flavor, focus on your seasonings. Dried thyme and rosemary work well in this soup. They add depth and warmth. Fresh herbs like basil or parsley can brighten the dish. Add them just before serving for the best taste. Achieving the right texture is key. Start by sautéing the onions, carrots, and celery until soft. This step builds a strong base. When you add the beans, mash some against the pot's side. This adds creaminess to the soup. One common mistake is overcooking the greens. If you add kale or spinach too early, they can become mushy. Add them near the end of cooking for a nice bite. Another mistake is skipping seasoning adjustments. Taste your soup as it cooks. This helps you find the right balance of salt and pepper. A splash of lemon juice at the end brightens the flavors. Pro Tips Use Fresh Herbs: Fresh herbs like basil or parsley can elevate the flavor of your soup significantly, adding a burst of freshness. Adjust Consistency: If you prefer a thicker soup, blend a portion of the beans before adding them to the pot for a creamier texture. Experiment with Greens: Feel free to substitute kale or spinach with other greens such as Swiss chard or collard greens for a different flavor profile. Make it Ahead: This soup tastes even better the next day, so consider making a batch in advance and storing it in the refrigerator. {{image_2}} You can add sausage or chicken for extra protein. Cook the meat first in the pot. Once it’s browned, add the onions, carrots, and celery. This adds great flavor and heartiness. Use Italian sausage for a spicy kick. Chicken breast works well too. Just shred it after cooking, and mix it back in. For a vegetarian or vegan twist, swap the broth. Use vegetable broth instead of chicken broth. You can also add more greens. Spinach or Swiss chard add nutrition and color. If you want a creamier soup, blend a portion of the beans. This makes the soup rich without dairy. Change the soup with the seasons. In summer, add zucchini or fresh tomatoes. These veggies keep the soup light and fresh. In fall, use butternut squash for sweetness. You can also switch herbs based on what’s fresh. Basil and parsley are great, but try sage or oregano for a new taste. To keep your Tuscan white bean soup fresh, store it in a sealed container. Make sure it cools first. Place the container in the fridge. It will last about 3 to 5 days. If you want to freeze the soup, use freezer-safe bags or containers. Leave some space at the top. The soup expands when frozen. It can last up to 3 months in the freezer. When reheating, do it slowly on the stove. Add a splash of broth or water. This keeps the soup from getting too thick. Stir often to blend the flavors. Enjoy your warm, tasty soup! You can use either cannellini or great northern beans. Cannellini beans are larger and creamier. They have a nutty flavor and soft texture. Great northern beans are smaller and milder. They hold their shape well, making them great for soups. Both beans work well, so choose what you prefer or have on hand. Yes, you can adapt this soup for a slow cooker. Start by sautéing the onion, carrots, and celery in a pan. This step adds depth to the soup. After that, transfer the sautéed veggies to the slow cooker. Add beans, broth, and seasonings. Cook on low for 6-8 hours or high for 3-4 hours. Stir in the greens just before serving, and enjoy! Yes, Tuscan White Bean Soup is very healthy. It is packed with fiber from the beans. Fiber helps with digestion and keeps you full. The vegetables add vitamins and minerals. Greens like kale or spinach offer antioxidants. Olive oil provides healthy fats. This soup is a great choice for a nourishing meal! This blog post shared how to make a delicious Tuscan White Bean Soup. We covered essential ingredients, step-by-step instructions, and helpful tips. I highlighted common mistakes to avoid for the best flavor. You can add meat or stick to vegan versions, based on your preference. Don’t forget to store leftovers correctly or freeze them for later. Now, you can enjoy a tasty and healthy meal, full of flavor and warmth. Dive into making your soup and savor the results!

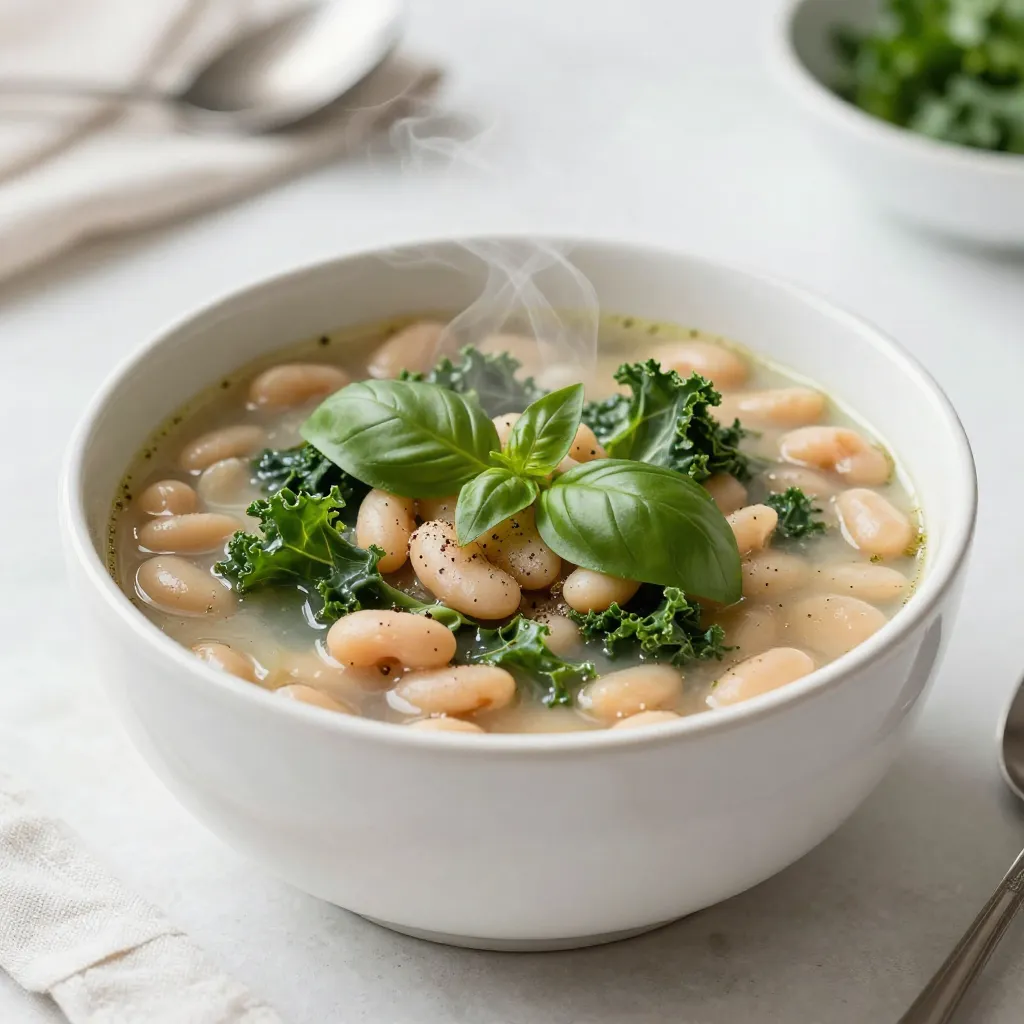
Are you looking for a warm, nourishing meal that’s easy to make? Tuscan White Bean Soup is your answer! This hearty dish combines creamy beans, fresh vegetables, and fragrant herbs. …

Read more

Categories Dinner

Garlic Herb Pull-Apart Bread Irresistible and Easy Recipe

November 16, 2025February 11, 2025 by Chef Nate
To make Garlic Herb Pull-Apart Bread, you need these key ingredients: - 3 cups all-purpose flour - 2 teaspoons active dry yeast - 1 teaspoon sugar - 1 teaspoon salt - 1 cup warm milk (about 110°F or 43°C) - 3 tablespoons unsalted butter, melted - 4 cloves garlic, minced - 1 tablespoon fresh parsley, chopped - 1 tablespoon fresh rosemary, chopped - 1 tablespoon fresh thyme, chopped - 1/2 teaspoon black pepper - Extra melted butter for brushing These ingredients work together to create a soft, flavorful bread. The flour gives the bread its structure. The yeast helps it rise, making it fluffy. You can add these ingredients for extra taste: - 1/4 cup grated Parmesan cheese - Additional fresh herbs like basil or chives Parmesan adds a rich, savory note. Fresh herbs boost the flavor and aroma. Feel free to mix and match herbs to suit your taste. If you don't have some ingredients, here are swaps you can use: - Use bread flour instead of all-purpose flour for a chewier texture. - Almond milk or oat milk can replace regular milk for a dairy-free option. - Any fresh herb can replace parsley, rosemary, or thyme. These substitutions allow you to customize the recipe while keeping it delicious. Always adjust cooking times based on your changes to ensure perfect results. {{ingredient_image_1}} To start, you must activate the yeast. In a small bowl, mix warm milk, sugar, and active dry yeast. Use milk that feels warm to your touch, about 110°F or 43°C. After mixing, let it sit for about 5-10 minutes. You want it to get frothy. This shows the yeast is alive and ready to work. Next, we make the dough. In a large mixing bowl, combine the all-purpose flour and salt. Once the yeast mixture is frothy, add it to the flour. Mix until a shaggy dough forms. Then, pour in the melted butter. Knead the dough for about 8-10 minutes. You want it to be smooth and elastic. If it feels sticky, add a bit more flour. After kneading, place the dough in a lightly greased bowl. Cover it with a kitchen towel and let it rise in a warm spot for about 1 hour. It should double in size. While it rises, prepare the garlic herb mixture. In a bowl, mix minced garlic, fresh herbs, black pepper, and Parmesan cheese. Once the dough has risen, punch it down. Divide it into small balls, about 1 inch each. Roll each ball in the garlic herb mixture to coat it well. Next, grease a bundt pan or a round cake pan. Layer the coated dough balls in the pan, stacking them on top of each other. Let the dough rise again for about 30 minutes. Now it’s time to bake. Preheat your oven to 375°F (190°C). Brush the top of the bread with melted butter. Bake for 25-30 minutes. The bread should turn golden brown and smell amazing. Once done, cool it in the pan for 10 minutes. Carefully turn it onto a serving platter. For extra flavor, brush it with more melted butter before serving. To get the best rise, keep your dough warm. Yeast loves heat. A sunny spot or a warm oven works well. Make sure your milk is warm, not hot. Hot milk can kill the yeast. Wait until your dough doubles in size. This can take about an hour. Patience is key! Use fresh herbs for great taste. The mix of garlic, parsley, rosemary, and thyme adds depth. You can also add grated cheese. Parmesan gives a lovely salty kick. Brush the bread with melted butter before baking. This adds flavor and helps it brown nicely. For extra crunch, sprinkle some coarse salt on top. Kneading helps develop gluten, making your bread chewy. Use a clean, floured surface to knead. Press down and fold the dough over itself. Keep kneading for about 8-10 minutes. The dough should feel smooth and elastic. If it sticks to your hands, add more flour. Don’t rush this step; it makes a big difference! Pro Tips Use Fresh Herbs: Fresh herbs can significantly enhance the flavor of your pull-apart bread. Consider using a mix of your favorites like basil or oregano along with the recommended herbs for a unique twist. Perfect Yeast Activation: Ensure your milk is warm but not too hot; around 110°F (43°C) is ideal. If the milk is too hot, it can kill the yeast, preventing the dough from rising. Flour for Kneading: Dust your work surface with flour while kneading to prevent sticking. However, avoid adding too much flour, as this can make the bread dense. Customize the Cheese: Feel free to experiment with different cheeses such as mozzarella or cheddar for a different flavor profile. Adding cheese will make the bread extra decadent! {{image_2}} You can make this bread even better by adding cheese. Try using mozzarella for a gooey center. Cheddar adds a sharp taste. Feta gives a nice tang. Use a mix of cheeses for more flavor. Just make sure to adjust the amount of garlic and herbs to match. Feel free to switch up the herbs in your bread. Basil and oregano work well for a pizza twist. Dill adds a fresh, vibrant taste. You can even use mint for a unique flavor. Mix and match to find your favorite combination. Just keep the total amount of herbs the same for best results. If you like some heat, add red pepper flakes to the garlic herb mix. This gives the bread a spicy kick. You can also use smoked paprika for a subtle warmth. Experiment with different spices, like cumin or coriander, to create your own blend. Just remember to taste as you go! To keep your leftover garlic herb pull-apart bread fresh, store it in an airtight container. You can also wrap it in plastic wrap or foil. This helps keep out air, which can make the bread dry. Store it at room temperature for up to three days. If you want to keep it longer, consider freezing. When you're ready to enjoy your leftover bread, reheating it is key to bringing back its fresh taste. Preheat your oven to 350°F (175°C). Place the bread on a baking sheet and cover it loosely with foil. Heat for about 10-15 minutes. This keeps the bread soft while warming it through. You can also microwave individual pieces for 15-20 seconds, but this may make the bread a bit chewy. Freezing is a great option if you have extra bread. Allow the bread to cool completely. Wrap it tightly in plastic wrap, then in aluminum foil. This double wrap prevents freezer burn. You can freeze the bread for up to three months. When you're ready to eat it, thaw the bread in the fridge overnight. Then reheat it in the oven for the best taste. You can serve this bread with many tasty sides. A small bowl of marinara sauce makes a great dip. Garlic butter also adds a rich flavor. You can pair it with soup or salad too. It matches well with Italian dishes like pasta. Add some fresh herbs on top for a nice touch. Yes, you can make this bread ahead of time. You can prepare the dough and let it rise. After the first rise, shape the dough and place it in the pan. Cover it and store it in the fridge overnight. When you're ready, let it rise for 30 minutes before baking. This saves time and still gives you fresh bread. To check if the bread is fully baked, look for a golden brown color. Tap the top gently; it should sound hollow. You can also use a toothpick. Insert it into the bread; it should come out clean. If you see dough on the toothpick, bake it a little longer. These methods ensure you have perfect Garlic Herb Pull-Apart Bread every time. You learned about making Garlic Herb Pull-Apart Bread. We covered the best ingredients, steps, and useful tips. You now know how to enhance flavor and try different variations. Proper storage keeps the bread fresh longer, and you can even reheat it easily. This bread is a fun treat for any meal. Enjoy the baking process and share your results with friends. You have the skills to make this dish a hit. Dive in and enjoy your delightful creation!

Are you ready to impress your family and friends with a simple yet delicious treat? This Garlic Herb Pull-Apart Bread is the answer! With its warm, buttery goodness and fragrant …

Read more

Categories Appetizers

Roasted Vegetable Soup Easy and Flavorful Recipe

October 15, 2025February 11, 2025 by Chef Nate
- 1 red bell pepper, chopped - 1 yellow bell pepper, chopped - 1 zucchini, diced - 1 eggplant, diced - 1 carrot, chopped - 1 onion, diced - 4 cloves garlic, minced - 1 teaspoon dried thyme - 1 teaspoon paprika - 4 cups vegetable broth - 2 tablespoons olive oil - Salt and pepper to taste - Fresh basil leaves for garnish When making roasted vegetable soup, fresh ingredients shine through. You want ripe, colorful veggies. Look for peppers with smooth skin and no blemishes. Zucchini should be firm, while eggplants feel slightly heavy. Choose carrots that snap easily and onions that feel solid. Fresh garlic smells strong and sweet. - Always check for firmness and color. - Seasonal veggies taste the best. In spring, use asparagus. In fall, add squash. - Add spices like cumin or curry for warmth. - For protein, toss in cooked beans or lentils. {{ingredient_image_1}} Start by washing all your fresh veggies. You want them clean and ready. Next, chop the red and yellow bell peppers into bite-sized pieces. Dice the zucchini and eggplant, and chop the carrot and onion. Mince the garlic. In a large bowl, mix your chopped vegetables. Drizzle two tablespoons of olive oil over them. Add one teaspoon of dried thyme, one teaspoon of paprika, and salt and pepper to taste. Toss everything well. Make sure all pieces are coated evenly. Preheat your oven to 425°F (220°C). This high heat helps caramelize the veggies. Spread the mixed vegetables onto a parchment-lined baking sheet. Make sure they are in a single layer. This helps them roast evenly. Roast the veggies for 25-30 minutes. They should be tender and lightly browned. Stir them halfway through for even cooking. The sweet aroma will fill your kitchen and make you hungry! Once the veggies are roasted, move them to a large pot. Pour in four cups of vegetable broth. Bring this mixture to a simmer for 10-15 minutes. This step helps blend the flavors nicely. For blending, an immersion blender works great. It keeps things easy and mess-free. If you want a smooth soup, blend everything until it’s creamy. If you prefer a chunkier texture, blend only half of it. This gives you a nice mix of smooth and chunky bits. Taste and adjust the seasoning as needed, then serve hot. Enjoy your delicious soup! To achieve caramelization, make sure your vegetables are in a single layer. This helps them cook evenly. I recommend using parchment paper on your baking sheet. It stops sticking and helps with cleanup. Roasting at 425°F (220°C) makes the edges crisp and brings out the natural sweetness. Avoiding sogginess is key. Don’t overcrowd the pan. If you pile too many veggies together, steam forms. This prevents that nice, roasted flavor you want. Adding lemon juice is a great way to brighten the soup. Citrus cuts through the richness and balances the flavors. You can squeeze in some fresh juice right before serving. Adjust spice levels to suit your taste. If you love heat, add red pepper flakes. For a milder soup, stick with the herbs in the recipe. Tasting as you go will help find the right balance. Roasted vegetable soup pairs well with crusty bread. A good slice of sourdough or a baguette works wonders. You can also serve it with a side salad for a complete meal. For creative garnishes, try a swirl of olive oil on top. Fresh basil leaves add a pop of color and flavor. A sprinkle of grated cheese can also add extra richness. Make it your own! Pro Tips Use Seasonal Vegetables: Select vegetables that are in season for the best flavor and nutrition. Blend for Texture: </strongAdjust the blending time based on your preference for a smooth or chunky soup. Flavor Boosting: Add a splash of lemon juice or a dash of hot sauce for an extra flavor kick. Storage Tips: This soup can be stored in the refrigerator for up to 5 days or frozen for later use. {{image_2}} You can easily make this soup vegan. Just use vegetable broth instead of chicken broth. This swap keeps the soup plant-based and tasty. To add protein, try adding lentils or chickpeas. Both options boost nutrition and flavor. To keep your soup gluten-free, check all labels. Ensure the broth and any toppings are free of gluten. You can sprinkle gluten-free croutons on top for a nice crunch. They add texture without any gluten risks. Change the veggies based on the season. In summer, use fresh tomatoes or corn. In fall, add squash or sweet potatoes. For special occasions, you might add herbs like rosemary or thyme. These small changes make the soup feel festive and fresh. Let the soup cool down completely before storing. This helps keep it fresh. Use airtight containers to keep out air and moisture. Glass jars work well, and you can also use plastic containers. Just make sure they are safe for the freezer if you plan to freeze. To freeze the soup, pour it into containers, leaving space at the top. The soup will expand as it freezes. It’s best to freeze the soup in single-serving portions. To reheat, take the container out of the freezer and let it thaw in the fridge overnight. You can also microwave it directly from frozen. Heat in short bursts, stirring in between. This ensures even heating. In the fridge, the soup stays fresh for about 3 to 4 days. Make sure to check for any signs of spoilage. If it smells sour or looks off, it’s best to throw it away. Always trust your senses; they can guide you well when it comes to food safety. Yes, you can use frozen vegetables. They are convenient and save time. Just make sure to thaw them before roasting. This helps them cook evenly. You may need to adjust roasting time since frozen veggies may release more water. Roasted vegetables are full of vitamins and minerals. They provide fiber, which helps digestion. Roasting brings out natural sugars, making them sweeter. This method also retains nutrients better than boiling. Overall, they make a tasty and healthy addition to your diet. To add some heat, try these tips: - Add crushed red pepper flakes while roasting. - Mix in fresh chili peppers when blending. - Stir in a splash of hot sauce after blending. Adjust the spice to fit your taste. Absolutely! This soup tastes even better the next day. You can make it and store it in the fridge. Just let it cool and place it in an airtight container. It will last up to five days. If your soup is too thick, add more broth or water. Stir it in gradually until you reach your desired consistency. Heat it back up on the stove after adding liquid. Adjust the seasoning after adding more liquid if needed. Yes, many brands offer low-sodium vegetable broth. You can also make your own at home. Use fresh vegetables, herbs, and spices without added salt. This allows you to control the sodium content in your soup. In this post, we covered all the essential steps to make delicious roasted vegetable soup. You learned about key ingredients, proper vegetable selection, and cooking techniques. We also shared tips for storage and creative variations to match your tastes. Remember, using fresh veggies makes a huge difference in flavor. Enjoy experimenting with spices and toppings! Make this soup your own by adjusting ingredients, and savor every spoonful. Happy cooking!

Looking for a warm, hearty dish that bursts with flavor? You’re in the right place! This roasted vegetable soup is not just easy to make; it’s packed with healthy goodness …

Read more

Categories Dinner

Vegan Chocolate Avocado Mousse Rich and Creamy Delight

November 24, 2025February 10, 2025 by Chef Nate
- 2 ripe avocados, peeled and pitted - 1/2 cup unsweetened cocoa powder - 1/4 cup maple syrup (adjust to sweetness preference) - 1/4 cup almond milk (or any non-dairy milk) - 1 teaspoon vanilla extract - A pinch of sea salt - Fresh berries (for garnish) - Mint leaves (for garnish) Each ingredient plays a key role in making this mousse rich and creamy. Avocados provide a smooth texture and healthy fats. They make the mousse creamy without dairy. Unsweetened cocoa powder gives it a deep chocolate flavor. Maple syrup adds natural sweetness, and you can adjust this to your taste. Almond milk helps blend everything smoothly and keeps it vegan. Vanilla extract enhances the chocolate flavor, while sea salt balances the sweetness. Fresh berries and mint leaves add color and freshness when you serve the mousse. You can easily swap ingredients if needed. Instead of avocados, you can use silken tofu for creaminess. If you prefer a different sweetener, try agave syrup or date syrup. For milk, soy or oat milk works well too. If you can't find cocoa powder, carob powder is a good alternative. Feel free to skip the mint and use other herbs or edible flowers for garnish. Experimenting with these substitutions keeps the mousse fun and tasty! {{ingredient_image_1}} First, gather all your ingredients. You will need ripe avocados, cocoa powder, maple syrup, almond milk, vanilla extract, and sea salt. Peel and pit the avocados. Cut them into chunks for easy blending. Place the avocado pieces in a food processor. Add the cocoa powder, maple syrup, almond milk, vanilla extract, and a pinch of sea salt. This mix gives the mousse its rich flavor. Now, blend the ingredients until smooth and creamy. Stop the processor and scrape down the sides often. This ensures everything mixes well. Taste the mousse after blending. If it needs more sweetness, add more maple syrup. Blend again until all is well combined. You want a rich, silky texture that melts in your mouth. Once blended, transfer the mousse into small bowls or glasses. Cover them and place them in the fridge. Chill for at least 30 minutes. This helps the mousse firm up and enhances the flavors. When you are ready to serve, add fresh berries on top. A sprig of mint adds color and freshness to your dessert. Enjoy your tasty vegan treat! When choosing avocados, look for a few key signs. First, check the color. A ripe avocado should be dark green or almost black. Next, gently squeeze the avocado. It should feel soft but not mushy. If it feels hard, it is not ripe yet. Also, check the stem area. If it pops off easily and you see green, it is ripe. If it is brown, the avocado is overripe. Pick ripe avocados for the best mousse. Sweetness can vary based on your taste. Start with 1/4 cup of maple syrup. Blend it into the mousse and taste it. If you want it sweeter, add more syrup, one tablespoon at a time. Blend after each addition. This way, you can find the perfect balance without making it too sweet. Remember, the chocolate flavor should shine through, so be careful with the sweetness. The right consistency makes the mousse rich and creamy. Start by blending the ripe avocados and cocoa powder well. If the mousse is too thick, add almond milk a little at a time. Blend until it is smooth and creamy. Scrape down the sides of the bowl as needed. This ensures all ingredients mix well. After blending, let the mousse chill for at least 30 minutes. This helps it firm up slightly, making it perfect for serving. Pro Tips Choose Ripe Avocados: Make sure your avocados are perfectly ripe for the best texture and flavor. They should be slightly soft to the touch but not mushy. Adjust Sweetness: Feel free to adjust the maple syrup to your taste. Start with the recommended amount and add more if you prefer a sweeter mousse. Chill for Better Flavor: Refrigerating the mousse not only firms it up but also enhances the flavors. Let it chill for at least 30 minutes before serving. Garnish Creatively: Use a variety of fresh berries and mint leaves to garnish your mousse, adding color and a fresh taste that complements the chocolate flavor. {{image_2}} You can change the flavor of your Vegan Chocolate Avocado Mousse in fun ways. Adding peanut butter gives it a nutty taste. Just blend in 2 tablespoons of creamy peanut butter. If you love coffee, try adding espresso. One shot of espresso will make it rich and bold. You can also add spices like cinnamon or chili powder for a unique twist. Just a pinch can make a big difference. There are many ways to serve this mousse. You can layer it in parfait glasses with fruit or granola. This makes it look fancy for guests. You can also use it as a filling for cakes or cupcakes. If you want a quick treat, serve it in small bowls or cups. This mousse is great for any dessert occasion. The right toppings can make your mousse even better. Fresh berries add a pop of color and sweetness. Try strawberries, raspberries, or blueberries. You can also sprinkle nuts on top for crunch. Chopped almonds or walnuts work well. For a tropical vibe, add coconut flakes. A dollop of non-dairy whipped cream also makes it creamy and rich. These toppings will impress your guests and delight your taste buds! To keep your vegan chocolate avocado mousse fresh, cover it tightly. Use plastic wrap or a lid. This prevents air from getting in and causing browning. Store it in the fridge. It’s best to enjoy it cold and creamy. If you have leftovers, eat them within two days for the best taste. You can freeze this mousse for later. First, place it in an airtight container. You can also use ice cube trays for single servings. This way, you can take out just what you need. When ready to eat, let it thaw in the fridge overnight. The mousse may lose some creaminess but will still taste great. This mousse lasts about 2-3 days in the fridge. After that, the flavor and texture may change. If you freeze it, it can last up to a month. Always check for any off smells before eating. Freshness is key for a delightful dessert experience. Yes, Vegan Chocolate Avocado Mousse is healthy. Avocados are rich in healthy fats and fiber. They help lower cholesterol and keep your heart strong. Cocoa powder adds antioxidants, which fight free radicals. Maple syrup gives a sweet touch without refined sugar. This mousse is a treat you can feel good about enjoying. Absolutely! You can make this mousse ahead of time. It keeps well in the fridge for up to three days. Just store it in an airtight container. This makes it perfect for parties or quick desserts. Just remember to add your toppings right before serving for the best look. Avocado adds creaminess to desserts without dairy. It also packs in nutrients like vitamins E, K, and C. This fruit helps you feel full longer, which can curb cravings. Plus, its mild flavor lets chocolate shine. Using avocados in desserts is a clever way to sneak in healthy ingredients while enjoying something sweet. This blog post guides you through making a delicious vegan chocolate avocado mousse. You learned about key ingredients, how to prepare, and blending techniques. Tips helped you pick ripe avocados and adjust sweetness for the best taste. Exploring variations and serving suggestions added fun to your dessert. Finally, we covered storage and longevity to keep your mousse fresh. Enjoy this creamy treat guilt-free and share the joy with others. It’s a simple yet satisfying way to indulge in dessert without sacrificing health.

Welcome to your new favorite dessert! Vegan Chocolate Avocado Mousse is rich, creamy, and wonderfully easy to make. With just a few simple ingredients, I’ll show you how to whip …

Read more

Categories Desserts

Avocado Tuna Salad Packed with Flavorful Freshness

December 19, 2025February 4, 2025 by Chef Nate
- 2 ripe avocados, diced - 1 can (5 oz) of tuna in water, drained - 1/2 cup cherry tomatoes, halved - 1/4 cup red onion, finely chopped - 1/4 cup cucumber, diced The main ingredients create a fresh and tasty salad. Ripe avocados add creaminess. Canned tuna provides protein and texture. Cherry tomatoes give sweetness and color. Red onion adds a nice crunch. Cucumber brings a refreshing bite. - 2 tablespoons mayonnaise or Greek yogurt - 1 tablespoon fresh lemon juice - 1 tablespoon Dijon mustard - 1 tablespoon fresh cilantro, chopped - Salt and pepper to taste The dressing can change your salad's taste. Mayonnaise or Greek yogurt makes it rich. Fresh lemon juice adds zing. Dijon mustard gives a slight kick. Cilantro adds a bright flavor. Salt and pepper help enhance all the tastes. - This recipe serves 2-3 people. - For a lovely presentation, serve in a hollowed avocado half. - You can also place it on a bed of greens. - Sprinkle extra cilantro on top for a fresh look. These tips help make your dish appealing and fun. Enjoy this salad as a light lunch or a side dish at dinner. {{ingredient_image_1}} - Mixing the base ingredients: Start by placing the diced avocados and drained tuna in a medium bowl. Gently mix them together. Be careful not to mash the avocado. It should remain chunky for the best texture. - Making the dressing: In a small bowl, whisk together mayonnaise or Greek yogurt, fresh lemon juice, Dijon mustard, chopped cilantro, salt, and pepper. Mix until smooth and creamy. - Combining salad and dressing: Pour the dressing over the avocado and tuna mix. Gently fold everything together. Ensure all the ingredients get a nice coating of the dressing. - Avoiding mashing the avocado: Use a fork instead of a spoon. This helps keep the avocado pieces intact. - Ensuring even coating with dressing: Mix slowly and gently. This keeps the salad light and fresh. - Adjusting seasoning to taste: After mixing, taste your salad. If needed, add more salt, pepper, or lemon juice. This makes the flavors pop. - Serving ideas: For a fun presentation, serve the salad in a hollowed-out avocado half. Or, place it on a bed of greens and sprinkle extra cilantro on top. This adds color and freshness. - Choosing ripe avocados: Look for avocados that feel soft but not mushy. They should give slightly when you press them. This means they are perfect for your salad. A ripe avocado adds creaminess and flavor. - Selecting quality canned tuna: Choose tuna packed in water for a lighter taste. Check for brands that are sustainably sourced. This ensures you get a fresh flavor and quality in every bite. - Best side dishes to accompany the salad: Serve your salad with whole-grain crackers or a light green salad. These sides enhance the meal without overpowering the flavors. You could also add some crunchy vegetables like carrots or snap peas for extra texture. - Wine or beverage suggestions: A chilled white wine, like Sauvignon Blanc, pairs well. If you prefer non-alcoholic drinks, try sparkling water with a lemon slice. Both options complement the freshness of the tuna salad. - Gluten-free options: This salad is naturally gluten-free. Enjoy it with gluten-free crackers or on lettuce wraps. This way, you can keep it light and healthy. - Low-calorie adjustments: Use Greek yogurt instead of mayonnaise for a lighter option. This swaps out calories while keeping the creaminess you love. Adjust the amount of dressing to control calories even more. Pro Tips Choose Ripe Avocados: Make sure your avocados are perfectly ripe for the best flavor and creamy texture. They should yield slightly to pressure when gently squeezed. Enhance with Spices: For a flavor boost, consider adding spices like cumin or smoked paprika to the dressing for an extra layer of complexity. Chill Before Serving: Allow the salad to chill in the refrigerator for about 30 minutes before serving. This helps the flavors meld together beautifully. Use Fresh Ingredients: Whenever possible, use fresh cilantro and other veggies. Fresh ingredients significantly enhance the overall taste and presentation of the salad. {{image_2}} You can make your avocado tuna salad even better with some healthy add-ins. Consider adding more veggies like: - Bell peppers, diced - Celery, chopped These add-ins boost crunch and flavor. You can also swap the protein. Try using: - Cooked chicken, shredded - Chickpeas, mashed These swaps add variety and keep it fresh. Want to spice things up? You can add heat with: - Jalapeños, diced - Hot sauce, to taste Both options give your salad a nice kick. For a fresh twist, try adding herbs like: - Basil, chopped - Parsley, chopped These herbs brighten the dish and enhance the taste. If you want to change the dressing, there are many options. You can substitute yogurt for: - Olive oil, for a lighter option - Hummus, for a creamy texture Adding spices can also enhance flavors. Try using: - Paprika, for a smoky taste - Cumin, for a warm flavor These alternatives keep the salad exciting and delicious. You can keep your Avocado Tuna Salad in the fridge for up to two days. After that, the avocados might turn brown and lose their creamy texture. To enjoy it at its best, eat it fresh. If you know you won't finish it, consider using less avocado in your mix. I do not recommend freezing Avocado Tuna Salad. Freezing changes the texture of the avocado, making it mushy. The tuna might not taste as fresh after thawing. It's best to enjoy this salad fresh. To keep your salad fresh, use airtight containers. Glass containers work well as they don't absorb smells. If using plastic, ensure it is BPA-free. A lid that seals tightly will keep the flavors in and the air out. Yes, you can make this salad ahead. To keep it fresh, follow these tips: - Prep ingredients separately: Store avocados, tuna, and veggies in different containers. - Mix just before serving: Combine everything right before you eat. This keeps the avocado green and tasty. - Use lemon juice: Squeeze fresh lemon juice on the avocado to slow browning. If you want a lighter option, Greek yogurt works great. Here are some other ideas: - Avocado: Mash it for a creamy texture. - Hummus: Adds flavor and is healthy. - Mustard: Use it alone or mix with yogurt for a tangy twist. Absolutely! Here are the benefits: - Quick and easy: You can whip it up in just 15 minutes. - Nutrient-rich: Packed with protein and healthy fats. - Versatile: Perfect for lunch or a light dinner. - Customizable: Add your favorite veggies or protein. Avocado tuna salad is simple, tasty, and healthy. You learned about key ingredients like ripe avocados and canned tuna. We went over easy steps, tips for mixing, and great serving suggestions. Don't forget the fun variations you can try. This salad is perfect for meal prep or quick meals. You can adjust flavors and add new ingredients based on your taste. Simple storage tips keep it fresh. Enjoy making this dish your own!

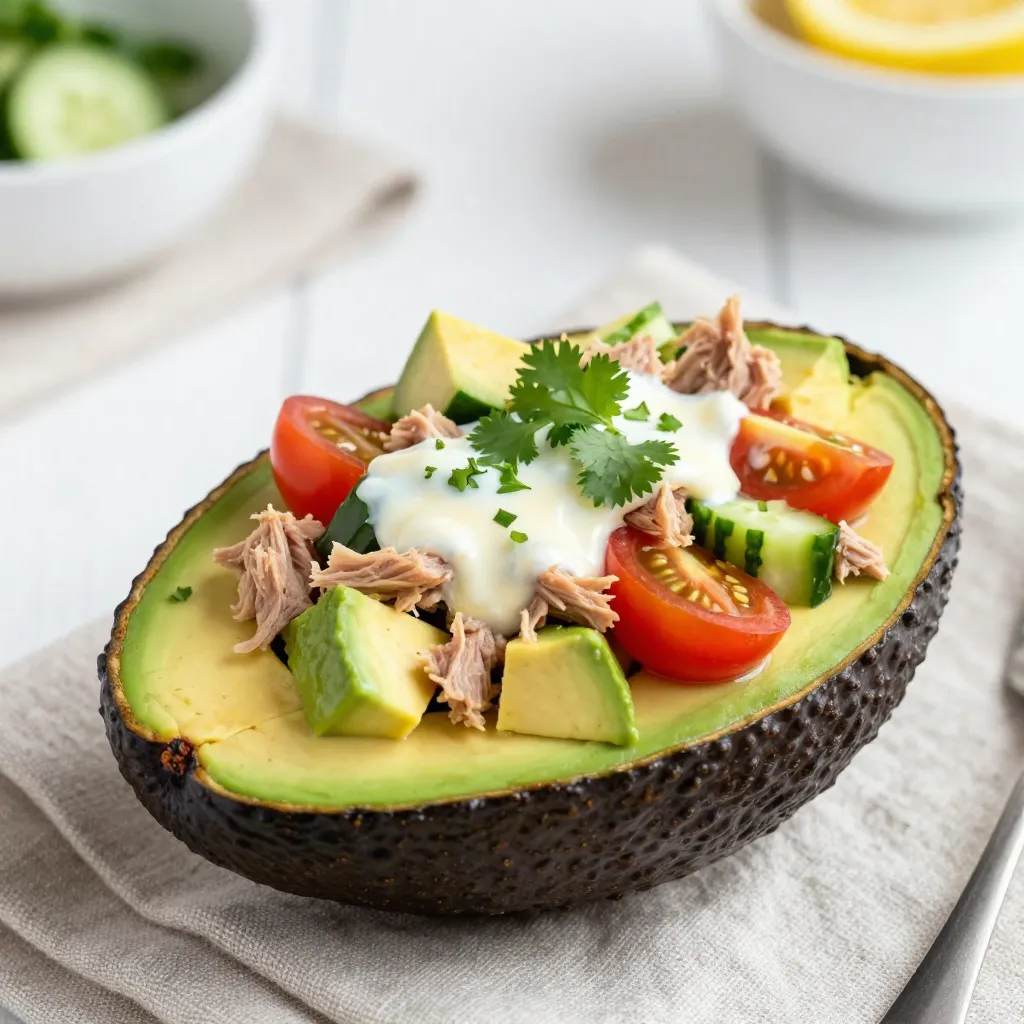
Looking for a fresh and tasty meal? My Avocado Tuna Salad is packed with flavor and nutrients! This easy recipe combines creamy avocados, rich tuna, and crisp veggies for a …

Read more

Categories Salads

Garlic Herb Roasted Carrots Tasty Side Dish Delight

November 24, 2025January 30, 2025 by Chef Nate
- 1 lb baby carrots (or regular carrots, peeled and cut into sticks) - 4 cloves garlic, minced - 2 tablespoons olive oil - 1 tablespoon fresh rosemary, chopped - 1 tablespoon fresh thyme, chopped - 1 teaspoon honey (optional for sweetness) - Salt and pepper to taste - Fresh parsley, chopped for garnish - Quantity of Each Ingredient: For this dish, use 1 pound of baby carrots or regular carrots. The garlic should be 4 cloves, and you’ll need 2 tablespoons of olive oil. Use 1 tablespoon each of fresh rosemary and thyme. Hints of sweetness come from 1 teaspoon of honey, which is optional. Season with salt and pepper to your taste. Lastly, garnish with fresh parsley for a pop of color. - Notes on Ingredient Substitutions: If you can’t find baby carrots, regular carrots work just fine. Just peel and cut them into sticks. For herbs, feel free to swap rosemary and thyme with other fresh herbs like dill or basil. If you want a vegan option, skip the honey or use agave syrup instead. {{ingredient_image_1}} - Recommended Temperature: Preheat your oven to 425°F (220°C). This high heat helps caramelize the carrots. - Importance of Preheating: Preheating makes sure the carrots roast evenly. It also enhances their flavor. - Instructions for Peeling and Cutting: If you use regular carrots, peel them first. Cut them into sticks about the same size as baby carrots. This ensures even cooking. - Mixing Ingredients in a Bowl: In a large bowl, mix the carrots, minced garlic, olive oil, chopped rosemary, and thyme. If you want a touch of sweetness, add honey. Season with salt and pepper. Toss until the carrots are well-coated. - Spreading Carrots on Baking Sheet: Line a baking sheet with parchment paper. Spread the carrots in a single layer. This helps them roast, not steam. - Cooking Time and Stirring Tips: Roast for 25-30 minutes. Stir the carrots halfway through to ensure even roasting. They should be tender and caramelized when done. Adjust seasoning if needed. Enjoy the rich flavor! Adjusting Seasoning Start with salt and pepper. These simple seasonings enhance the natural carrot taste. After roasting, taste the carrots. If they need more flavor, add a sprinkle of salt or pepper. Don't be shy about adjusting! Recommended Herbs for Flavor Enhancement I love using fresh herbs. Rosemary and thyme work great here. They bring a warm, earthy flavor. You can also try dill or oregano for something different. Try mixing different herbs to find your favorite blend. Tips for Caramelization Caramelization gives carrots a sweet, rich flavor. To achieve this, roast them at 425°F (220°C). This high heat helps them brown nicely. Make sure to spread them out on the baking sheet. Crowding the carrots can cause steaming instead of roasting. Best Practices for Even Roasting Stir the carrots halfway through cooking. This ensures they roast evenly. It also helps to flip them for a lovely golden color. Use a large baking sheet for better air flow. This way, every carrot gets that perfect roast! Garnishing Ideas Finish your dish with fresh parsley. It adds a nice pop of color and freshness. You can also sprinkle some feta cheese for a creamy touch. A squeeze of lemon juice brightens the flavors, too. Pairing with Other Dishes Garlic herb roasted carrots pair well with many meals. They go great with roasted chicken or grilled fish. Try them alongside a hearty grain salad for a full meal. The flavors mingle nicely, creating a delicious plate. Pro Tips Use Fresh Herbs: Fresh rosemary and thyme elevate the flavor of the carrots significantly compared to dried herbs. Customize Sweetness: Adjust the amount of honey to your taste; more honey will give a sweeter caramelization. Even Roasting: Stir the carrots halfway through roasting to ensure even cooking and caramelization on all sides. Garnish for Freshness: Adding fresh parsley at the end brightens up the dish and adds a pop of color. {{image_2}} You can switch up the carrots in this dish. Try using parsnips, sweet potatoes, or bell peppers. Each vegetable brings its own flavor and texture. For seasonal options, think about using squash in fall or asparagus in spring. These choices keep your meals fresh and fun. To add more excitement, think about spices. A pinch of cumin or paprika can give your carrots a warm kick. If you love heat, try adding red pepper flakes. You can also swap out honey for maple syrup or agave nectar. Each sweetener changes the taste just a bit. Experiment to find what you like best. If you want this dish vegan, skip the honey or use a vegan sweetener. It stays tasty without losing flavor. For allergy-friendly options, ensure you choose oils and herbs that fit your needs. Always check labels for hidden allergens. These small changes help everyone enjoy this dish. After enjoying your garlic herb roasted carrots, store leftovers properly. The best containers for storage are glass or plastic airtight containers. These keep the carrots fresh and tasty. You want to avoid using metal containers, as they can alter the flavor. Keep your cooked carrots in the fridge for about 3 to 5 days. If you want to store them longer, consider freezing. Just remember to place them in a freezer-safe container. This way, you can enjoy them later. To reheat your carrots, use the oven or microwave. For the oven, preheat it to 350°F (175°C). Place the carrots on a baking sheet and heat for about 10-15 minutes. This method helps keep the texture crisp and the flavor intact. If you use a microwave, place the carrots in a bowl. Cover the bowl with a microwave-safe lid or wrap. Heat in short bursts of 30 seconds, stirring in between. This method is quick but may soften the carrots more than the oven method. For both methods, add a little olive oil or a sprinkle of fresh herbs before reheating. This keeps the dish flavorful and fresh. Yes, you can use frozen carrots. Just remember that frozen carrots often have extra water. To keep them from becoming mushy, thaw the carrots first. Drain any excess water before mixing them with the olive oil and herbs. This way, you will get a nice roast. You can tell when the carrots are done by looking for a few signs. First, the carrots should be tender. You can check this by poking them with a fork. They should slide off easily. Second, look for a nice caramel color on the outside. This adds flavor and makes them look great. Yes, you can make this dish ahead of time. If you want to meal prep, roast the carrots and let them cool. Store them in an airtight container in the fridge. They will stay fresh for about three to four days. When you are ready to eat, just reheat them in the oven or microwave. Roasting carrots is simple and rewarding. We covered the best ingredients and measurements. I shared easy step-by-step instructions for roasting. You learned helpful tips for flavor and texture. The variations open up many fun ideas. Proper storage keeps your leftovers fresh and tasty. Try your favorite method to make these carrots shine. Enjoy delicious carrots that anyone can love.

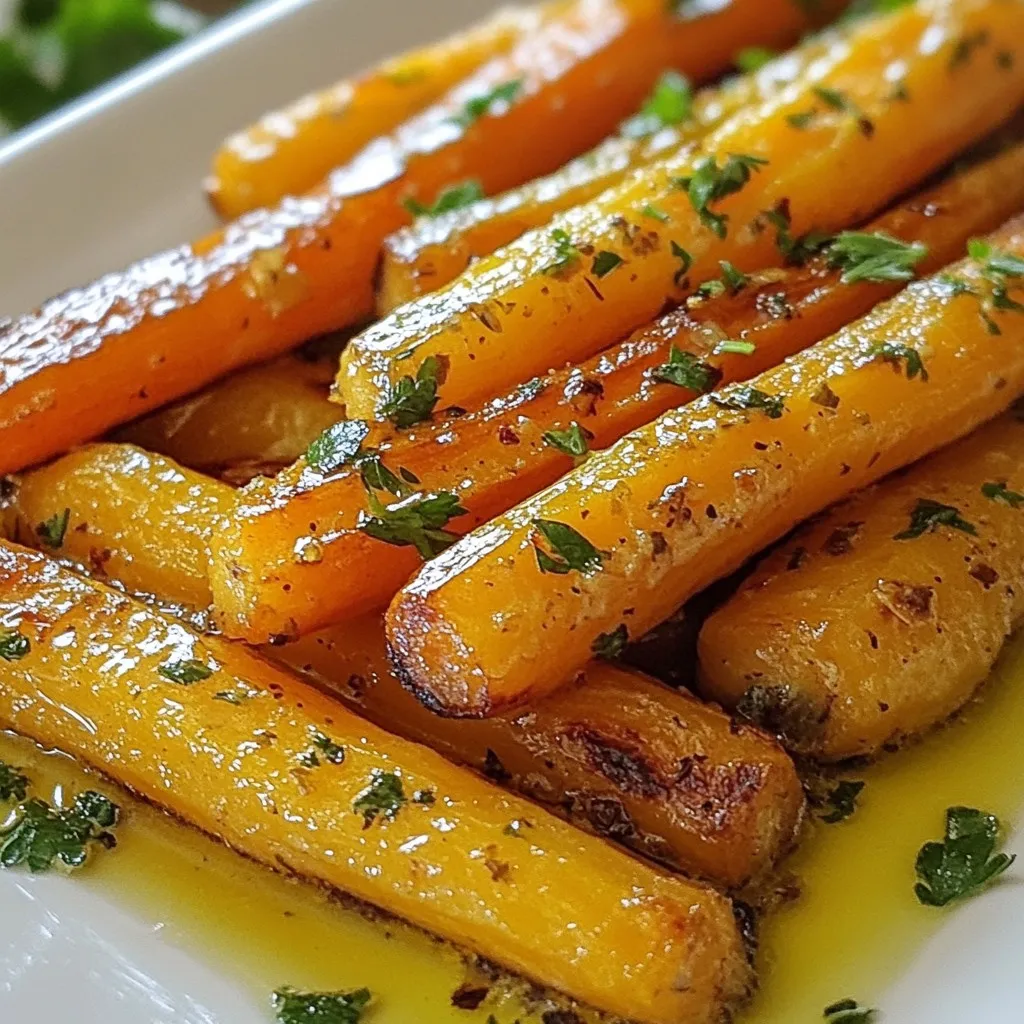
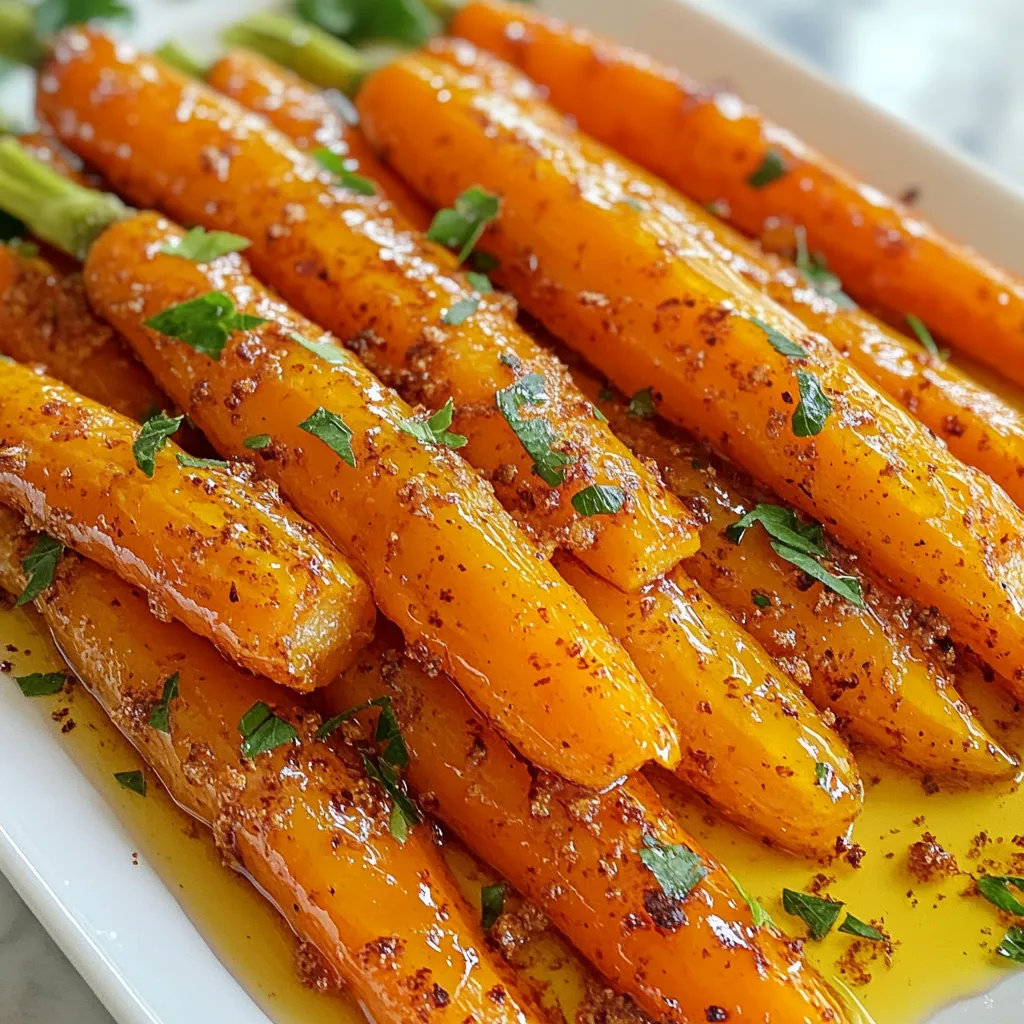
If you’re looking for a simple yet flavorful side dish, Garlic Herb Roasted Carrots are a must-try! With just a few ingredients, you can create a tasty treat that enhances …

Read more

Categories Dinner

Turmeric Golden Chicken Soup Comforting and Nourishing

October 31, 2025January 30, 2025 by Chef Nate
- 1 lb boneless chicken breast, diced - 1 tablespoon olive oil - 1 medium onion, chopped - 3 cloves garlic, minced - 1-inch piece fresh ginger, grated - 2 teaspoons ground turmeric - 1 teaspoon ground cumin - 1 teaspoon ground coriander - 4 cups chicken broth - 2 cups baby spinach - 1 cup carrots, sliced - 1 red bell pepper, chopped - 1 cup coconut milk - Salt and pepper to taste - Fresh cilantro, for garnish - Lemon wedges, for serving When picking chicken, look for fresh, boneless breasts. Organic or free-range chicken often tastes better. For the veggies, choose bright, firm produce. Fresh ginger and garlic pack a lot of flavor. In spices, seek out fresh turmeric and ground spices from trusted brands. They make a big difference in taste. Turmeric is the star here. It has curcumin, which fights inflammation. This can help with joint pain and digestion. Chicken provides protein, which is key for muscle health. Spinach adds iron and vitamins, boosting your energy. Carrots offer beta-carotene for eye health. Coconut milk gives creaminess and healthy fats. Each ingredient works together to nourish your body and support your health. {{ingredient_image_1}} 1. Start by heating olive oil in a large pot over medium heat. 2. Add the chopped onion and sauté for about 5 minutes. The onion should be soft and clear. 3. Next, stir in minced garlic and grated ginger. Cook for 1-2 minutes until you smell a nice aroma. 4. Now, add the diced chicken to the pot. Cook it for 5-7 minutes until it turns brown on all sides. 5. Sprinkle in the ground turmeric, cumin, and coriander. Stir well to coat the chicken and onions with spices. 6. Pour in 4 cups of chicken broth. Scrape any bits from the bottom of the pot. Bring this mixture to a boil. 7. Once boiling, lower the heat and add sliced carrots and chopped bell pepper. Let it simmer for 10 minutes. The veggies should be tender. 8. Stir in baby spinach and coconut milk. Heat this mix for another 3-5 minutes until warm. 9. Finally, season the soup with salt and pepper to taste. - Always use fresh spices for the best flavor. Old spices lose their taste. - Make sure not to crowd the pot when browning the chicken. This helps it cook evenly. - Use a wooden spoon to scrape the bottom of the pot. This adds more flavor to your soup. - Taste the soup before serving. Adjust salt and pepper to your liking. - If you have a gas stove, your soup may cook faster. Keep an eye on it. - On an electric stove, you may need to add a few extra minutes to the simmer time. - Always check the chicken for doneness. It should reach 165°F for safety. - Adjust heat levels as needed. High heat can boil the soup too quickly. When making turmeric golden chicken soup, small errors can change the taste. Here are some to watch for: - Not sautéing long enough: Sauté the onion until it’s soft. This builds flavor. - Skipping the spices: Always add spices like turmeric, cumin, and coriander early. They need time to bloom and develop their full flavor. - Overcooking the chicken: Cook the chicken just until it’s no longer pink. Overcooked chicken can become dry. To make your soup truly shine, consider these expert tips: - Use fresh ginger: Fresh ginger gives a brighter taste than dried. Grate it finely for the best flavor. - Opt for low-sodium broth: This lets you control the salt level. You can always add more if needed. - Add lemon zest: A little lemon zest enhances the soup’s brightness. It adds a lovely aroma too. Serve your turmeric golden chicken soup for a warming meal. Here are some great ideas: - Garnish with cilantro: Fresh cilantro adds color and a burst of flavor. - Include lemon wedges: Squeeze fresh lemon juice over the soup for a zesty kick. - Pair with crusty bread: A slice of warm bread makes a perfect side. It’s great for dipping! Pro Tips Use Fresh Spices: Always opt for fresh spices when possible. They enhance the flavor profile of your soup significantly compared to older, ground spices. Adjust Consistency: If you prefer a thicker soup, consider adding a tablespoon of cornstarch mixed with water towards the end of cooking. Marinate Chicken: For added flavor, marinate the diced chicken in turmeric, cumin, and a bit of salt for 30 minutes before cooking. Serve with Accompaniments: Enhance the dish by serving it with crusty bread or over a bed of rice for a more filling meal. {{image_2}} You can switch up the chicken for turkey if you want. Turkey breast works great in this soup. For a lighter option, use skinless chicken thighs. If you need a gluten-free choice, check that your broth is labeled gluten-free. You can also use vegetable broth for a different taste. Want to enhance the flavor? Try adding a bay leaf while cooking. A dash of cayenne can add some heat. For a zing, mix in a tablespoon of fish sauce. You can also add fresh herbs like basil or mint for a twist. To make this soup vegetarian or vegan, skip the chicken. Use chickpeas or lentils instead. These add protein and texture. Replace chicken broth with vegetable broth or water. You can still use coconut milk for creaminess. Add more veggies, like zucchini or mushrooms, for a hearty meal. After enjoying your Turmeric Golden Chicken Soup, store any leftovers in a safe way. First, let the soup cool to room temperature. Then, pour the soup into an airtight container. Make sure to leave some space at the top to let it expand. Seal it tightly and place it in the fridge. This will keep it fresh for about 3 to 4 days. When you're ready to enjoy your soup again, reheating it is simple. Pour the soup into a pot. Heat it on medium-low heat, stirring often. This helps avoid burning. If the soup seems thick, add a splash of water or broth. You want it nice and warm, not boiling. Taste it again for seasoning, and adjust if needed. If you want to keep the soup longer, freezing is a great option. Use a freezer-safe container or a heavy-duty freezer bag. Just like before, let the soup cool first. Then, fill the container, leaving some space for expansion. Label it with the date so you know when you made it. Your soup can last up to 3 months in the freezer. To thaw, just move it to the fridge overnight before reheating. Turmeric is a star in this soup. It has curcumin, which fights inflammation. This can help with pain and swelling in your body. Turmeric also supports your immune system. It can keep you healthy during cold months. Plus, it aids digestion, making meals easier on your tummy. Adding turmeric to your diet can boost your mood too. Overall, it makes this soup not just tasty, but also good for you. Yes, you can make this soup ahead of time. It stores well in the fridge. Just let it cool before putting it in a container. It lasts about three days. You can also freeze it for later. To freeze, use an airtight container. It can stay frozen for up to three months. When you're ready to eat, thaw it in the fridge overnight. Reheat it on the stove for the best taste. To spice up your soup, add crushed red pepper flakes or a pinch of cayenne. Start with a small amount, then taste it. If you want it milder, use less turmeric or skip the red pepper. You can also add more coconut milk to tone down the heat. Adjusting the spices lets you enjoy the soup just how you like it. This blog post covered key ingredients, step-by-step cooking, and helpful tips. You learned how to choose the best ingredients and avoid common mistakes. We discussed variations for diet needs and proper storage for leftovers. Now, you have all the tools to create a delicious and healthy soup. Enjoy trying new flavors and making it your own. Happy cooking!

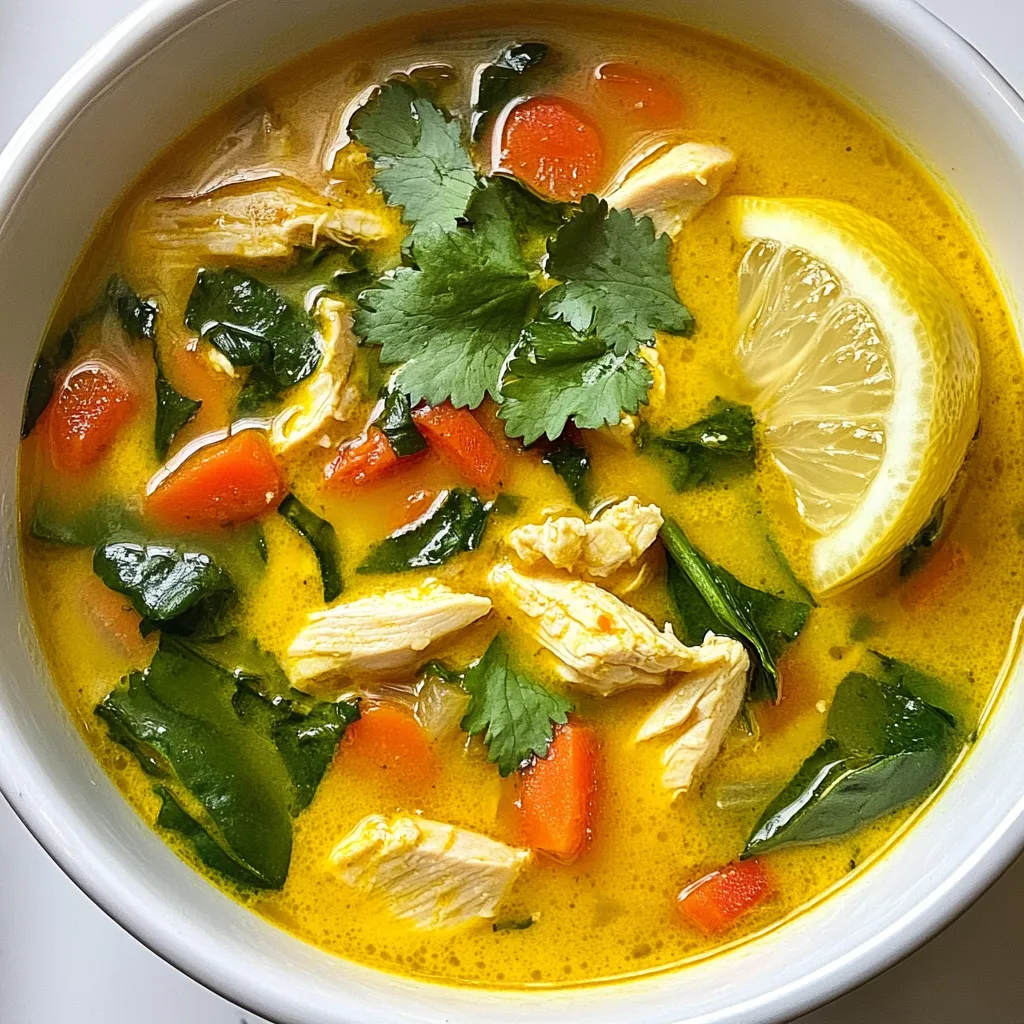
If you’re seeking a dish that warms both your heart and body, look no further than my Turmeric Golden Chicken Soup. This comforting and nourishing recipe is packed with health …

Read more

Categories Dinner

Maple Glazed Carrots Delicious and Easy Side Dish

October 30, 2025January 27, 2025 by Chef Nate
To make delicious maple glazed carrots, gather these key ingredients: - 1 pound baby carrots (or regular carrots, peeled and cut into sticks) - 3 tablespoons pure maple syrup - 2 tablespoons unsalted butter - 1 teaspoon ground cinnamon - 1 tablespoon fresh lemon juice - Salt and pepper to taste For a nice touch, consider these optional garnishes: - Fresh parsley, chopped - Toasted nuts, like walnuts or pecans I prefer fresh carrots for this recipe. They have a crisp texture and sweet flavor. Fresh carrots caramelize well, giving that perfect glaze. However, frozen carrots can work in a pinch. They save time and are convenient. Just remember to thaw them first. If you use frozen carrots, cook them a bit longer to get the right texture. {{ingredient_image_1}} First, gather all your ingredients. You need 1 pound of baby carrots or regular carrots, peeled and cut. You will also need 3 tablespoons of pure maple syrup, 2 tablespoons of unsalted butter, and 1 teaspoon of ground cinnamon. Add 1 tablespoon of fresh lemon juice, salt, and pepper to taste. Fresh parsley is optional for garnish. Start by melting the butter in a large skillet over medium heat. Once it melts, add the baby carrots. Sauté the carrots for about 5 minutes. Stir them occasionally. You want them to be slightly tender but not fully cooked. Next, pour the maple syrup over the carrots. Sprinkle in the ground cinnamon. Stir well to coat the carrots evenly. Cook for another 5 to 7 minutes. Stir occasionally until the carrots become glossy and caramelized. Check for your desired tenderness before removing them from heat. After that, add the fresh lemon juice. Stir it in to combine. Season with salt and pepper to taste. Transfer the glazed carrots to a serving dish. If you like, sprinkle chopped fresh parsley on top for a pop of color. Enjoy these sweet, tasty carrots as a perfect side dish! To get that perfect glaze on your carrots, start with fresh baby carrots. They cook faster and stay sweet. If you use regular carrots, cut them into small sticks. This helps them cook evenly. Melt your butter slowly. This adds a rich flavor. When you add the maple syrup, make sure to stir well. This coats each carrot evenly. Keep cooking until they shine and caramelize. Sautéing is key for these carrots. Use a large skillet and medium heat. This lets the carrots soften without burning. Always stir occasionally to keep them from sticking. After adding the maple syrup, watch them closely. You want them to be tender but not mushy. A splash of lemon juice brightens the taste. It balances the sweetness perfectly. One big mistake is overcooking the carrots. They should be tender but still have a bit of crunch. Another mistake is using too much salt. A pinch is enough to enhance the flavor. Lastly, don’t skip the lemon juice. It adds brightness. Without it, the dish can taste too sweet. Keep these tips in mind, and you’ll have a delicious side dish! Pro Tips Choose Fresh Carrots: For the best flavor and texture, select firm, brightly colored carrots. Fresh carrots will enhance the sweetness and overall presentation of your dish. Adjusting Sweetness: If you prefer a less sweet dish, reduce the amount of maple syrup or substitute with a touch of honey, which also pairs well with carrots. Cooking Time: Keep an eye on the cooking time; the exact duration may vary based on the size of your carrots. Test them with a fork to achieve your desired tenderness. Herb Variations: Experiment with different herbs such as thyme or dill instead of parsley for a unique flavor profile that complements the maple glaze. {{image_2}} You can swap baby carrots for other veggies. Try using parsnips, sweet potatoes, or bell peppers. Each veggie brings a unique taste and texture. Slice them into similar sizes for even cooking. The maple glaze works well with many root vegetables. You can mix and match for a colorful dish. Adding spices can change the flavor of your dish. Try nutmeg for warmth or ginger for zest. A pinch of cayenne pepper can add heat. You can even use herbs like thyme or rosemary for an earthy touch. Each option can transform your maple glazed carrots into a new experience. If you want a lighter version, use olive oil instead of butter. You can also reduce the maple syrup for less sweetness. Consider using a sugar-free syrup for a healthier choice. Adding a splash of orange juice can boost flavor without extra calories. These changes keep the dish tasty while making it healthier. After enjoying your maple glazed carrots, let them cool down first. Place them in an airtight container. Store the container in the fridge. These carrots can last for about three to five days. Just make sure they are sealed well to keep them fresh. When you're ready to eat the leftovers, reheating is simple. You can use a skillet or a microwave. In a skillet, add a splash of water. Heat over medium-low until warm. Stir occasionally to avoid burning. If using a microwave, place the carrots in a bowl. Cover it with a damp paper towel and heat for 1-2 minutes. Check and stir halfway through for even warming. You can freeze maple glazed carrots if you want to save them longer. First, let them cool completely. Place them in a freezer-safe bag or container. Remove as much air as you can before sealing. They will keep well for about three months. When you're ready to eat, thaw them in the fridge overnight. Reheat them in a skillet or microwave as mentioned before. Enjoy the sweet taste even days later! You can serve maple glazed carrots with many dishes. They pair well with roasted meats, like chicken or pork. You can also enjoy them alongside grilled fish or a hearty vegetable dish. For a cozy meal, serve them with mashed potatoes or rice. They add a nice sweet touch to any meal. Yes, you can use honey instead of maple syrup. Honey gives a different flavor but still tastes great. Just use the same amount as the maple syrup. If you want a lighter flavor, use a mild honey. It will blend well with the carrots and spices. To make this recipe vegan, replace the butter with a vegan alternative. You can use coconut oil or a plant-based butter. The rest of the ingredients remain the same. Ensure your maple syrup is pure and vegan-friendly. This way, you keep all the yummy flavors without using any animal products. In this blog post, we explored how to make delicious maple glazed carrots. We discussed the ingredients you need and tips for cooking. I shared ways to add your own twist and how to store leftovers. Remember, perfect glazing comes down to technique. Keep experimenting with flavors. Don’t forget to check the FAQs for serving ideas and substitutions. Enjoy creating your tasty dish!

Looking for a side dish that’s both tasty and simple? Maple glazed carrots are your answer! These sweet and savory treats bring color and flavor to your table. In this …

Read more

Categories Dinner
Older posts
Newer posts
← Previous Page1 … Page101 Page102 Page103 … Page108 Next →

GRILLED FLAVORS

where delicious ideas come to life, from stovetop to backyard. Warm, simple, and always satisfying. 🍽️✨

PAGES

Home About Contact Privacy Policy Terms & Conditions Cookie Policy GDPR Policy Copyright Policy Disclaimer

CATEGORIES

Appetizers Desserts Salads Breakfast Dinner

Contact

  • Pinterest
  • Mail
Copyright © 2026 Grilled Flavors. All rights reserved.