Skip to content
grilledflavors.com
  • Home
  • Appetizers
  • Desserts
  • Salads
  • Breakfast
  • Dinner
  • Privacy Policy
  • Contact
  • About

Chef Nate

Cranberry Orange Scones Flavorful Morning Delight

December 3, 2025January 27, 2025 by Chef Nate
To make these delightful scones, gather these simple ingredients: - 2 cups all-purpose flour - 1/2 cup granulated sugar - 1 tablespoon baking powder - 1/2 teaspoon salt - 1/2 cup unsalted butter, chilled and diced - 3/4 cup fresh cranberries, chopped (or dried cranberries) - 1 tablespoon orange zest - 1/2 cup heavy cream - 1 large egg - 1 teaspoon vanilla extract - Extra granulated sugar for sprinkling You can add a personal touch to your scones with these optional ingredients: - 1/2 cup chopped nuts (like walnuts or pecans) - 1/2 teaspoon cinnamon for warmth - 1/4 cup chocolate chips for sweetness - A drizzle of glaze made from powdered sugar and orange juice If you have dietary needs, try these substitutions: - Use whole wheat flour for a heartier scone. - Replace heavy cream with coconut cream for a dairy-free option. - Substitute the egg with a flaxseed meal mix (1 tablespoon flaxseed meal + 2.5 tablespoons water) for a vegan choice. - Use a sugar substitute to lower the sweetness without losing taste. These adjustments help you enjoy the scones while meeting your dietary goals. {{ingredient_image_1}} First, set your oven to 400°F (200°C). This heat helps the scones rise nicely. Next, grab a baking sheet and line it with parchment paper. This keeps the scones from sticking. It also makes cleanup easy. In a big bowl, whisk together the flour, sugar, baking powder, and salt. Make sure they mix well. This step is key for even flavor. The flour gives structure, while sugar adds sweetness. Baking powder helps the scones rise, and salt balances the flavors. In another bowl, whisk the heavy cream, egg, and vanilla extract. This mixture brings moisture and flavor. Next, pour this wet mix into the dry ingredients. Gently stir until just combined. Avoid overmixing; you want a slightly sticky dough. This dough will make soft and fluffy scones. Transfer the dough to a floured surface. Pat it into a disc about 1-inch thick. Now, you can cut the dough into 8 wedges. You can also use a round cutter for circular scones. Place the shaped scones on your lined baking sheet, leaving space between them. Brush the tops of the scones with a bit of extra cream. Then, sprinkle with some granulated sugar for sweetness. Bake in your preheated oven for 15-18 minutes. Look for a golden brown color on top. Once baked, let them cool on the sheet for a few minutes. After that, move them to a wire rack to cool completely. Enjoy the amazing smell as they bake! To get the best scone texture, keep these tips in mind: - Use cold butter. Cold butter helps create flaky layers. - Don’t overmix the dough. Mix until just combined for a tender scone. - Pat the dough gently. Use your hands to shape it, not a rolling pin. - Chill the dough. If possible, chill the shaped scones for 15 minutes before baking. These steps give you a light and airy scone. Here are some helpful tools for making cranberry orange scones: - Mixing bowls: Use a large bowl for dry and a smaller one for wet ingredients. - Pastry cutter: This tool helps blend the cold butter into the flour. - Baking sheet: A sturdy baking sheet ensures even baking. - Parchment paper: Line the sheet for easy cleanup and to prevent sticking. - Wire rack: Use this for cooling the scones after baking. Having the right tools makes baking easier and more fun. Cranberry orange scones taste great on their own. Try these ideas to enhance your experience: - Serve with butter: Spread a little butter on warm scones. - Add jam or cream: Pair with orange marmalade or clotted cream. - Enjoy with tea or coffee: These scones make a perfect treat with your morning drink. - Top with glaze: A simple icing made from powdered sugar and orange juice is delightful. These serving ideas bring out the best flavors in your scones. Enjoy your tasty morning treat! Pro Tips Chill Your Ingredients: Ensure the butter and cream are very cold before using. This helps create flaky layers in your scones. Don't Overmix: Mix the dough until just combined. Overmixing can lead to tough scones. Add More Zest: For a more pronounced citrus flavor, feel free to add more orange zest to the dough. Experiment with Add-Ins: Try adding nuts, chocolate chips, or different dried fruits to customize your scones. {{image_2}} Glazes can add a sweet touch to your scones. A simple glaze uses powdered sugar and orange juice. Mix them until smooth. Drizzle it on warm scones for a nice shine. You can also make a cream cheese glaze. Blend cream cheese, powdered sugar, and a splash of orange juice. This adds richness and flavor. You can switch fresh cranberries for dried ones. Dried cranberries offer a sweeter flavor. If you want a tart taste, stick with fresh. You can also swap orange zest with lemon zest for a different citrus kick. Use whole wheat flour instead of all-purpose flour for a healthier option. Adding spices can elevate your scones. A pinch of cinnamon or nutmeg gives warmth. You might also add chopped nuts for crunch. Walnuts or pecans work well with the cranberries. For a fun twist, mix in some chocolate chips. The sweetness pairs nicely with the tartness of the cranberries. To keep your scones fresh, place them in an airtight container. This helps prevent them from drying out. You can store them at room temperature for up to two days. If you want to keep them longer, consider refrigerating them. Just make sure they are sealed well to maintain moisture and flavor. If you have extra scones, freezing is a great option. First, let the scones cool completely. Then, wrap each scone in plastic wrap. After that, place them in a freezer bag or airtight container. They can last in the freezer for up to three months. When you're ready to enjoy, just thaw them in the fridge overnight. To reheat your scones, preheat your oven to 350°F (175°C). Place the scones on a baking sheet. Heat them for about 10 minutes. This method keeps them warm and soft. You can also use a microwave, but be careful. Heat them in short bursts to avoid making them tough. Enjoy your delicious scones fresh and warm! Yes, you can use frozen cranberries. They work well in scones. Just chop them while frozen. This keeps the scones moist and flavorful. However, fresh cranberries give a brighter taste. If you use frozen, expect a slight change in texture. To make the scones healthier, swap some flour for whole wheat flour. Use less sugar or a natural sweetener. You can also add oats for extra fiber. Replace heavy cream with Greek yogurt for a lighter option. These changes keep the scones tasty and nutritious. Serve cranberry orange scones warm from the oven. They pair well with butter or cream cheese. Add a drizzle of honey for sweetness. A hot cup of tea or coffee complements the scones perfectly. You can also serve them with fresh fruit for a lovely breakfast. Yes, you can prepare the dough ahead of time. Form the dough into a disc and wrap it tightly. Store it in the fridge for up to 24 hours. When ready, just slice and bake. This way, you can enjoy fresh scones with minimal effort! Cranberry orange scones are easy and fun to make. We covered the key ingredients, offered tips for texture, and shared ways to customize them. You can swap ingredients or add flavors to fit your taste. Proper storage and reheating help keep scones fresh. In the end, enjoy baking these scones and sharing them. They bring warmth and fun to any gathering. Your kitchen will smell amazing, and everyone will love the results!

Wake up your taste buds with these delightful Cranberry Orange Scones! Perfect for breakfast or brunch, these scones offer a zesty twist that will brighten any morning. I’ll guide you …

Read more

Categories Desserts

Crockpot Tuscan Chicken Flavorful Cooked Perfection

October 28, 2025January 27, 2025 by Chef Nate
- 4 boneless, skinless chicken breasts - 1 can (14 oz) diced tomatoes, with juice - 1 can (15 oz) garbanzo beans, rinsed and drained - 1 cup fresh spinach, roughly chopped - 1/2 cup sun-dried tomatoes, chopped - 1/2 cup ricotta cheese - 1/3 cup grated Parmesan cheese - 3 cloves garlic, minced - 1 teaspoon dried oregano - 1 teaspoon dried basil - Salt and pepper to taste - 2 tablespoons olive oil Each ingredient plays a key role in making this dish shine. The chicken provides protein and a tender base. Diced tomatoes add moisture and a fresh flavor. Garbanzo beans bring a nice texture and extra protein. Fresh spinach gives a pop of green and nutrients. Sun-dried tomatoes deepen the flavor with their sweetness. Ricotta cheese adds creaminess, while Parmesan gives a salty kick. Garlic, oregano, and basil make everything taste amazing. Olive oil helps everything cook well and adds richness. - Fresh basil leaves - Additional Parmesan cheese Adding fresh basil leaves on top gives a nice burst of color and flavor. Extra Parmesan cheese adds even more taste. These garnishes make your dish look fancy and inviting. {{ingredient_image_1}} - Season the chicken: Start by seasoning the chicken breasts. Use salt, pepper, oregano, and basil. This adds great taste. - Searing the chicken (optional): If you want more flavor, sear the chicken. Heat olive oil in a skillet over medium heat. Cook each side for 3-4 minutes until golden. This step is optional but tasty. - Transferring chicken to the crockpot: Once seasoned or seared, place the chicken in the crockpot. This is where all the magic happens. - Layering ingredients: Add the diced tomatoes and garbanzo beans on top of the chicken. Next, sprinkle the minced garlic and sun-dried tomatoes over everything. These layers build a wonderful flavor. - Adding spinach and ricotta: At the last 30 minutes of cooking, stir in the fresh spinach and dollops of ricotta cheese. This makes the dish creamy and bright. - Serving suggestions: Before serving, sprinkle grated Parmesan cheese on top. Garnish with fresh basil leaves for a nice touch. Serve it over creamy polenta or with garlic bread to enjoy every bit of the sauce. Choosing the right chicken I prefer using boneless, skinless chicken breasts for this recipe. They cook evenly and stay juicy. You can also use thighs if you want more flavor. Just remember to adjust cooking times as needed. Perfecting the seasoning Start by seasoning the chicken with salt, pepper, oregano, and basil. This gives it a great base flavor. I recommend tasting your dish as it cooks. Adjust the salt and pepper to your liking. Use fresh herbs when possible; they add brighter flavors. Ideal sides and accompaniments This dish pairs well with creamy polenta or garlic bread. Both soak up the tasty sauce. You can also serve it with a simple salad for freshness. Try adding a drizzle of olive oil on the salad for extra flavor. Presentation tips for serving For a beautiful plate, spoon the chicken and sauce over polenta. Top it with grated Parmesan and fresh basil leaves. This adds color and makes it look gourmet. A nice presentation impresses guests and makes the meal more enjoyable. Pro Tips Perfectly Seasoned Chicken: Ensure to season your chicken breasts generously with salt, pepper, and herbs to enhance flavor before cooking. Layering Ingredients: Layer your ingredients in the crockpot correctly, placing the chicken at the bottom to absorb the juices from the tomatoes and beans as they cook. Fresh Spinach Addition: Add fresh spinach in the last 30 minutes of cooking to retain its vibrant color and nutritional value. Serving Suggestions: Serve the dish over creamy polenta or with garlic bread to soak up the flavorful sauce for a complete meal experience. {{image_2}} If you want to change things up, you can swap the garbanzo beans for other beans. White beans or black beans work great too. They add a nice texture and flavor to the dish. You can also skip beans altogether if you prefer. Cheese is another fun area to play with. While ricotta cheese adds creaminess, you can try goat cheese or cream cheese instead. Both will give a different taste and texture. Parmesan is a classic choice, but you can also use Pecorino Romano for a sharper flavor. For those who love a kick, consider adding spices like red pepper flakes or cayenne. Just a pinch can make a big difference. You can also use fresh herbs like thyme or rosemary for added depth. If you want to add more veggies, try bell peppers or zucchini. They pair well with the chicken and add color to your dish. You can even throw in some mushrooms for an earthy flavor. Just remember to chop them up so they cook evenly. To keep your Crockpot Tuscan Chicken fresh, let it cool first. Store leftovers in the fridge within two hours. Use an airtight container to lock in flavors. This way, your meal stays tasty for up to four days. If you want to keep it longer, consider freezing. Just make sure to use a freezer-safe container. You can reheat your Tuscan Chicken in two ways: microwave or stovetop. For the microwave, place it in a bowl and cover it with a lid. Heat on medium for about two to three minutes. Stir halfway through to warm it evenly. If using the stovetop, place the chicken in a skillet over low heat. Add a splash of water to keep it moist. Stir gently for five to seven minutes until heated through. This method helps keep the flavors intact. Enjoy your meal as if it just came out of the crockpot! Can I use frozen chicken breasts? Yes, you can use frozen chicken breasts. Just add an extra hour to the cooking time. This will help ensure they cook through. Always check for an internal temperature of 165°F to be safe. How do I know when the chicken is done? The chicken is done when it is tender and reaches 165°F inside. You can check this with a meat thermometer. If you don’t have one, look for the chicken to shred easily with a fork. What to do if the chicken is dry? If your chicken turns out dry, it may have cooked too long. You can add a bit more liquid, like broth or sauce. This will help moisten the chicken. Using chicken thighs instead of breasts can also help keep it juicy. How to adjust for busy schedules? If you have a busy schedule, prep the chicken and veggies the night before. Store them in the fridge. In the morning, just toss everything into the crockpot. You can set it on low for 6 hours, and dinner will be ready when you get home. This blog shared easy steps for a tasty chicken dish using basic ingredients. We covered required items like chicken, tomatoes, and spices, plus cooking tips for success. I highlighted fun variations, serving ideas, and how to store leftovers well. Cooking should be fun and stress-free. With these tips, you can create delicious meals, even on busy days. Enjoy making this dish your own!

Are you ready to transform your weeknight dinners with a dish that’s both easy and delicious? My Crockpot Tuscan Chicken recipe brings together tender chicken, fresh veggies, and rich flavors …

Read more

Categories Dinner

Beef Ricotta Stuffed Shells Hearty Family Dinner Delight

October 29, 2025January 25, 2025 by Chef Nate
To make Beef Ricotta Stuffed Shells, gather these ingredients: - 18 large pasta shells - 1 pound ground beef - 1 cup ricotta cheese - 1 cup shredded mozzarella cheese, divided - 1/2 cup grated Parmesan cheese - 1/2 cup fresh spinach, chopped - 1 egg, beaten - 2 cups marinara sauce - 2 cloves garlic, minced - 1 teaspoon dried oregano - 1 teaspoon dried basil - Salt and pepper to taste - Fresh parsley, chopped (for garnish) Each ingredient plays a key role in the dish. The pasta shells hold the hearty filling. Ground beef adds protein and flavor. Ricotta cheese gives a creamy texture. Mozzarella and Parmesan add richness. Spinach brings a fresh taste. The egg helps bind the filling together. Marinara sauce adds a zesty kick. Garlic, oregano, and basil enhance the overall flavor. Using fresh spinach makes a big difference. It adds color and nutrients. Salt and pepper balance the flavors. Finally, fresh parsley gives a bright finish to the dish. This mix of flavors and textures creates a warm and inviting meal for your family. {{ingredient_image_1}} - Preheat the oven to 375°F (190°C). - Cook the pasta shells according to package instructions. - Drain and set aside to cool slightly. - Sauté minced garlic in olive oil. - Add and cook ground beef until browned. - Season with salt, pepper, oregano, and basil. - Mix cooled beef with ricotta, mozzarella, Parmesan, spinach, and egg. - Fill each pasta shell with the mixture. - Bake the stuffed shells covered for 25 minutes, then uncovered for 10-15 minutes until bubbly and golden. I love making Beef Ricotta Stuffed Shells. They bring warmth to the table. First, preheat your oven to 375°F (190°C). This is key for a nice bake. Next, cook the pasta shells as per the package. You want them al dente, not mushy. Once cooked, drain them and let them cool a bit. While the shells cool, let’s cook the filling. Heat some olive oil in a skillet over medium heat. Add minced garlic and sauté it until fragrant. Then, add the ground beef. Break it apart with a spoon. Cook it until it turns brown, about 5 to 7 minutes. Season it with salt, pepper, oregano, and basil. This mix gives the beef great flavor. After cooking, let the beef cool slightly. In a big bowl, mix the beef with ricotta, half the mozzarella, Parmesan, chopped spinach, and the beaten egg. Stir until everything is well combined. Now comes the fun part—filling the shells! Use a spoon to stuff each shell with the beef and cheese mix. They should be full, but not overflowing. Take a large baking dish and spread one cup of marinara sauce on the bottom. Place the stuffed shells in the dish. Pour the rest of the marinara sauce over the shells. Top with the remaining mozzarella cheese. Cover the dish with aluminum foil and bake it for 25 minutes. This keeps the moisture in. After that, remove the foil and bake for another 10 to 15 minutes. This helps the cheese get bubbly and golden. When it's done, garnish with fresh parsley. Now you have a hearty family dinner delight! - Ensure pasta shells are al dente. This gives them the right texture. - Let the beef mixture cool slightly before mixing in cheese and egg. This helps keep the filling creamy. - Serve with extra Parmesan on top for added flavor. - Pair with garlic bread for a tasty side. - Garnish with fresh parsley for a pop of color. - If the shells tear during filling, use a spoon to gently guide the filling in. - To keep stuffed shells from drying out while baking, cover them with foil until the end. This traps moisture inside. Pro Tips Cook Pasta Al Dente: Ensure that the pasta shells are cooked al dente to prevent them from becoming too soft when baked. Use Fresh Herbs: Fresh herbs can elevate the flavors in your filling; consider adding fresh oregano or basil for a vibrant taste. Customize the Filling: Feel free to add other ingredients like mushrooms or bell peppers to the beef and ricotta mixture for extra flavor and nutrition. Rest Before Serving: Let the stuffed shells sit for a few minutes after baking. This helps the filling set and makes them easier to serve. {{image_2}} You can easily swap ground beef for turkey or chicken. This change makes the dish lighter. You can also try different cheeses. Feta or cottage cheese can add a nice twist. They give a different flavor and texture to the filling. If you need a gluten-free option, use alternative pasta. There are many tasty gluten-free pasta types available. For a vegetarian option, replace the beef with mushrooms or lentils. Both choices add great flavor and protein to the dish. Add spices to boost flavor. A pinch of red pepper flakes can add heat. You can also try unique spices like smoked paprika or cumin. Adding vegetables can enhance the taste. Bell peppers or zucchini blend well and add color. This way, you make your meal even healthier and more delicious. To keep your Beef Ricotta Stuffed Shells fresh, store them in the refrigerator. Place them in an airtight container. You can also cover them tightly with plastic wrap. They will stay good for up to three days. For long-term storage, you can freeze them. Before freezing, let the dish cool completely. Wrap the dish in foil, then place it in a freezer-safe bag. This method helps prevent freezer burn. When you are ready to enjoy the leftovers, reheating is key. The best way to reheat is in the oven. Preheat the oven to 350°F (175°C). Place the stuffed shells in an oven-safe dish. Cover with foil to keep them moist. Heat for about 20 minutes or until they are warm. If you want gooey cheese, add a splash of marinara sauce on top before reheating. This keeps the cheese from drying out. Cooked Beef Ricotta Stuffed Shells last in the fridge for three to four days. If you freeze them, they can last for up to three months. When you are ready to eat, thaw them overnight in the fridge. After thawing, reheat them as mentioned above. This way, you’ll enjoy a meal that tastes fresh and delicious. Can I prepare stuffed shells in advance? Yes, you can prepare stuffed shells ahead of time. Just fill the shells and place them in your baking dish. Cover the dish and store it in the fridge for up to 24 hours. When ready to bake, just add a few extra minutes to the cooking time. What sides pair well with Beef Ricotta Stuffed Shells? Here are some great sides to serve: - Garlic bread - Mixed green salad - Roasted vegetables - Steamed broccoli How to avoid soggy shells? To avoid soggy shells, cook them al dente. This means they should still be firm when you take them out. Rinse the shells with cold water after cooking to stop the cooking process. Can I use homemade marinara sauce? Yes, homemade marinara sauce works great. It adds a fresh flavor to the dish. Just make sure it is thick enough to coat the shells without making them soggy. What can I use instead of ricotta cheese? You can use cottage cheese or cream cheese. For a lighter option, Greek yogurt works well too. Just blend it until smooth for the best texture. How to make the dish dairy-free? To make it dairy-free, use dairy-free ricotta or cashew cheese. You can also skip the cheese and add more spinach or mushrooms for texture. Making Beef Ricotta Stuffed Shells is simple and fun. We covered all the steps, from cooking the pasta to baking them to golden perfection. I shared tips for avoiding soggy shells and ways to modify the recipe based on your needs. Try different meats or make it vegetarian to fit your taste. Enjoy these tasty shells, whether for a dinner party or a cozy night in. Remember, good food brings everyone together. Happy cooking!

Are you ready to impress your family with an easy, tasty dinner? Beef Ricotta Stuffed Shells are the perfect dish for any night. This hearty meal combines savory ground beef, …

Read more

Categories Dinner

Chicken & Broccoli Stuffed Shells Tasty Dinner Recipe

October 7, 2025January 22, 2025 by Chef Nate
- 20 jumbo pasta shells - 1 cup cooked chicken, shredded - 1 cup broccoli florets, steamed and chopped The main stars of this dish are jumbo pasta shells, cooked chicken, and broccoli. The shells hold the filling well, making them ideal for this recipe. You can use any cooked chicken, but I love using rotisserie chicken for flavor and ease. Steamed and chopped broccoli adds a nice crunch and color. - 1 cup ricotta cheese - 1 cup shredded mozzarella cheese - 1/2 cup grated Parmesan cheese Cheese brings richness to these stuffed shells. I use ricotta for creaminess, mozzarella for melting, and Parmesan for a sharp taste. Feel free to mix and match cheeses based on your taste. - 1 cup marinara sauce - 1 teaspoon garlic powder - 1 teaspoon onion powder - Salt and pepper to taste Marinara sauce gives a nice base flavor. Garlic and onion powders add depth without overpowering the dish. Adjust the salt and pepper to your liking. You can even add your favorite herbs for extra flavor. {{ingredient_image_1}} 1. Preheat your oven to 375°F (190°C). This step helps cook the dish evenly. 2. Cook 20 jumbo pasta shells according to the package. Drain them and set aside. Make sure they are firm but not too hard. This will help them hold the filling well. 3. In a large bowl, mix 1 cup shredded chicken, 1 cup steamed and chopped broccoli, 1 cup ricotta cheese, half of the mozzarella, and 1/2 cup grated Parmesan cheese. Add 1 teaspoon garlic powder, 1 teaspoon onion powder, salt, and pepper. Stir until everything blends nicely. 1. Spread half of the marinara sauce evenly across the bottom of a 9x13 inch baking dish. This creates a tasty base for the shells. 2. Carefully fill each pasta shell with the chicken and broccoli mixture. Place the filled shells in the baking dish. Make sure they fit snugly but are not too crowded. 3. Pour the remaining marinara sauce over the stuffed shells. This adds flavor and keeps them moist. 4. Sprinkle the rest of the mozzarella cheese on top. This will melt into a bubbly layer of goodness. 1. Cover the baking dish with aluminum foil. Bake for 25 minutes. This keeps the moisture in and helps the flavors mix. 2. Remove the foil and bake for an additional 10 minutes. This step allows the cheese to bubble and turn golden brown. You will know it’s ready when you see that lovely color and smell the deliciousness. 3. Before serving, garnish with fresh chopped parsley. This adds a pop of color and a fresh taste. - Ensure pasta is al dente: Cook the jumbo shells until they are firm but not hard. This helps them hold their shape when you stuff them. Follow the package instructions and check them a minute early. - How to properly steam and chop broccoli: To keep broccoli bright and crunchy, steam it for about 3-4 minutes. Let it cool before chopping. This way, it adds a nice texture and color to the dish. - Adding spices or herbs for extra flavor: You can make these stuffed shells pop by adding a pinch of red pepper flakes or dried oregano. These spices give a warm, inviting taste that balances the creamy filling. - Recommended cheeses for richness: While I love mozzarella for its meltiness, adding a bit of provolone or fontina cheese can take the flavor to the next level. They add a rich, savory taste that makes every bite special. - Best sides to pair with Chicken & Broccoli Stuffed Shells: A fresh side salad or garlic bread works well. They add crunch and flavor, making the meal more complete. Consider a light vinaigrette to keep it refreshing. - Garnishing ideas for presentation: Sprinkle some fresh parsley on top right before serving. It adds a pop of color and a fresh taste. You can also drizzle a bit of extra marinara sauce around the plate for a beautiful look. Pro Tips Perfectly Cooked Pasta: Always cook your jumbo pasta shells al dente to prevent them from becoming mushy during baking. This will help retain their shape and texture when stuffed. Chicken Alternatives: If you don’t have cooked chicken on hand, rotisserie chicken is a great shortcut to save time. Just shred it and mix it into your cheese and broccoli filling. Flavor Boost: For extra flavor, add some chopped garlic or sautéed onions to the filling mixture. You can also experiment with different herbs like basil or thyme. Make Ahead: This dish can be assembled ahead of time! Prepare the stuffed shells and refrigerate them covered with foil. Just add an extra 10 minutes to the baking time when you're ready to cook. {{image_2}} You can switch up the protein in your stuffed shells easily. Using rotisserie chicken is a great choice. It saves time and adds flavor. Simply shred the chicken before mixing it with your other ingredients. For a vegetarian option, try spinach or tofu. Spinach adds nutrients and a nice color. If you use tofu, make sure to press it first to remove extra water. Then, crumble it into the mix. Both options keep the dish tasty and filling. The sauce can change the whole dish. Instead of marinara, try an Alfredo sauce. This creamy option will add richness to your meal. Pour it over the stuffed shells before baking for a comforting twist. Pesto is another fun choice. It brings a fresh, herby flavor. Mix it with your cheese and chicken filling for a unique taste. You can even drizzle it on top before serving for extra flair. Cheese is key in this recipe. If you want healthier options, consider using part-skim mozzarella. It cuts fat but keeps the flavor. For a lighter touch, low-fat ricotta also works well. If you're dairy-free, there are great alternatives. Look for vegan cheeses made from nuts or soy. They melt well and still give that cheesy goodness. Experiment with different types to find your favorite! To store your Chicken & Broccoli Stuffed Shells in the fridge, place them in an airtight container. This keeps the dish fresh and tasty. Make sure to cool them down first. You can keep the leftovers in the fridge for up to three days. You can freeze the stuffed shells before or after baking. If you freeze them before baking, wrap them tightly with plastic wrap and foil. This helps prevent freezer burn. If you freeze them after baking, let them cool fully first. For the best quality, eat them within two months. When ready to eat, thaw in the fridge overnight. Reheat in the oven at 350°F (175°C) until hot, about 20 minutes. To prepare ahead for busy days, make the filling and cook the shells in advance. Store them separately until you're ready to bake. This way, you save time on busy weeknights. Use meal prep containers that are freezer-safe and stackable. This makes it easy to store and organize your meals. Can I use whole wheat pasta shells? Yes, you can use whole wheat pasta shells. They add fiber and have a nutty flavor. Just cook them until al dente, like regular shells. How long can I keep the leftovers? You can keep leftovers in the fridge for up to three days. Store them in an airtight container. Reheat in the oven for best taste. Do I need to cook the chicken before adding it? Yes, you should cook the chicken first. Use shredded rotisserie chicken for quick prep. This adds flavor and ensures even cooking. What to do if my shells break during cooking? If your shells break, don’t worry. Use the broken pieces to fill the gaps in the baking dish. They will still taste great! Nutrition information per serving Each serving has about 400 calories. It includes protein from chicken and cheese, plus veggies from broccoli. Can this recipe be scaled for larger groups? Yes, you can easily scale this recipe. Just double the ingredients for more servings. Use a larger baking dish for the extra shells. This blog post showed how to make Chicken and Broccoli Stuffed Shells. We covered the main ingredients, including jumbo shells and various cheeses, and discussed seasonings to boost flavor. You learned step-by-step instructions for preparation, assembly, and baking. Remember, you can customize this dish by swapping proteins or sauces. Enjoy experimenting with different flavors and storage tips. Your stuffed shells will not only please family but also shine at any gathering. Happy cooking!

Looking for a cozy and delicious dinner idea? You’ll love these Chicken & Broccoli Stuffed Shells! This recipe combines jumbo pasta shells filled with tender chicken, fresh broccoli, and creamy …

Read more

Categories Dinner

Protein Chicken Parmesan Pasta Quick and Easy Recipe

October 28, 2025January 21, 2025 by Chef Nate
- 2 boneless, skinless chicken breasts - 1 cup whole wheat pasta (penne or fusilli) - 1 cup marinara sauce (preferably low-sugar) - 1/2 cup grated Parmesan cheese - 1/2 cup shredded mozzarella cheese The main ingredients for Protein Chicken Parmesan Pasta create a tasty and filling meal. The chicken gives you lean protein, while the whole wheat pasta adds healthy carbs. Marinara sauce brings in that rich tomato flavor, and the cheeses provide a creamy texture. - 1 teaspoon garlic powder - 1 teaspoon Italian seasoning - Salt and pepper to taste - 1 tablespoon olive oil Seasoning is key to making this dish pop. Garlic powder adds depth, and Italian seasoning gives a nice blend of herbs. Salt and pepper enhance all flavors. A little olive oil helps cook the chicken perfectly while keeping it moist. - Fresh basil leaves - Alternative cheese options Garnishes can elevate your dish. Fresh basil adds a burst of flavor and color. If you want to switch up the cheese, consider using low-fat or dairy-free options. This way, you can customize the dish to fit your taste or dietary needs. {{ingredient_image_1}} Seasoning the Chicken Start by seasoning your chicken breasts. Use garlic powder, Italian seasoning, salt, and pepper. Rub these spices on both sides. This step adds great flavor to the chicken. Cooking Technique Heat olive oil in a skillet over medium heat. Once hot, add the seasoned chicken. Cook for about 6-7 minutes on each side. The chicken should turn golden brown. Check that it reaches 165°F inside. After cooking, let it rest for a few minutes. Then slice it into thin strips. Boiling Method While cooking the chicken, bring a pot of salted water to a boil. Add the whole wheat pasta. Cook it according to package instructions. This usually takes about 8-10 minutes until it is al dente. Draining and Setting Aside After cooking, drain the pasta in a colander. Give it a shake to remove excess water. Set the drained pasta aside for later. Mixing Pasta with Marinara and Chicken In a large mixing bowl, combine the cooked pasta, marinara sauce, and sliced chicken. Stir well until the pasta is coated with the sauce. This mixture brings all the flavors together. Preparing for Baking Transfer the pasta mixture into a baking dish. Make sure it is spread evenly. This ensures even cooking when you bake. Preheating the Oven Preheat your oven to 350°F (175°C). This is important for baking the pasta evenly. Adding Cheese and Baking Sprinkle grated Parmesan and shredded mozzarella cheese over the top of the pasta mixture. This cheese will melt and create a delicious crust. Place the baking dish in the oven and bake for 15-20 minutes. Look for bubbly and golden cheese. Cooling and Garnishing Once baked, take the dish out and let it cool for a few minutes. This helps to avoid burns. If you like, garnish it with fresh basil leaves for a pop of color. Plating Tips When serving, use a large spoon to scoop out portions. Serve it warm and enjoy! This dish is a crowd-pleaser and perfect for any meal. Ensuring Proper Doneness To ensure your chicken is cooked well, check the temperature. Use a meat thermometer. It should reach 165°F. This keeps your chicken safe to eat. A good tip is to look for a golden brown color on both sides. If it looks pale, it may need more time. Resting Technique Always let your chicken rest after cooking. This helps keep it juicy. Let it sit for about five minutes. Cover it with foil to keep it warm. Resting allows the juices to settle back in the meat. Slicing too soon can make it dry. Achieving Al Dente Texture For perfect pasta, cook it until al dente. This means it should be firm to the bite. Follow the package instructions precisely. Usually, this takes about 8-10 minutes. Stir the pasta occasionally to prevent sticking. Timing with Chicken Start cooking your pasta when the chicken is almost done. This way, everything finishes at the same time. It keeps your meal hot and fresh. Just make sure to drain the pasta well before mixing it with the chicken and sauce. Additional Protein Sources You can boost protein in this dish easily. Consider adding beans or lentils. They mix well with the pasta and sauce. You can also add some cooked quinoa. It adds a nice texture and extra nutrition. Healthy Ingredient Swaps Swap regular pasta for whole grain or legume-based pasta. These options have more protein and fiber. You can also use low-fat cheese for fewer calories. Try adding more vegetables to your meal for added nutrients. Spinach, broccoli, or zucchini work great! Pro Tips Rest the Chicken: After cooking, let the chicken rest for a few minutes before slicing. This helps retain the juices, making the chicken more tender and flavorful. Use Fresh Ingredients: Opt for fresh basil and high-quality marinara sauce to enhance the overall flavor of your dish. Cook Pasta Al Dente: Ensure the pasta is cooked al dente for a perfect texture. It will continue to cook slightly while baking with the sauce and cheese. Experiment with Cheeses: Feel free to mix different cheeses, such as provolone or gouda, for a unique twist on the classic chicken parmesan flavor. {{image_2}} You can boost nutrition with easy vegetable add-ins. Spinach, zucchini, or broccoli work great. These veggies add color and taste. - Spinach: Add fresh or frozen spinach. Stir it in with the pasta and sauce. It wilts quickly and packs vitamins. - Zucchini: Slice zucchini into thin rounds or half-moons. Sauté it with the chicken for extra flavor. - Broccoli: Steam or blanch broccoli until tender. Mix it in before baking for a healthy crunch. Adjust your cooking time for these add-ins. If using fresh spinach, add it last. For zucchini or broccoli, cook them until soft before mixing. Cheese choices can change the flavor of your dish. You can try low-fat cheese or dairy-free options. - Low-fat Cheese Alternatives: Use part-skim mozzarella or low-fat Parmesan. They melt well and keep the dish lighter. - Dairy-free Options: Try vegan cheese made from nuts or soy. They can still give you a cheesy taste without dairy. Switching cheeses can help fit your diet needs. Just remember that melting times can vary. You can use different types of pasta for variety. Gluten-free pasta or whole grain options are great swaps. - Gluten-free Pasta Suggestions: Look for corn or rice pasta. These cook well and taste nice. - Other Whole Grain Options: Quinoa or brown rice pasta adds more fiber. They also have a different texture, which can be fun. Choosing the right pasta can make your meal even better. Try different shapes like rotini or shells for fun! - Storing leftovers is easy. Place any extra pasta in an airtight container. - Try to eat leftovers within three days for best taste. - If you want freshness, cool the dish before sealing it. - To freeze, let the dish cool completely. - Use a freezer-safe container. This keeps the pasta safe for up to three months. - Label the container with the date for easy tracking. - The oven works best for reheating. Preheat to 350°F (175°C). - Place the pasta in a dish, cover it with foil, and heat for 20 minutes. - If you use a microwave, heat in short bursts. Stir between intervals. - To keep texture, add a splash of marinara sauce before reheating. Prep time is about 15 minutes. Total cooking time is around 40 minutes. This includes cooking the chicken and pasta, plus baking everything together. You can have a tasty meal ready in less than an hour! Yes, you can use chicken thighs. They have more fat, which adds flavor. Make sure to adjust cooking time. Thighs usually take a few extra minutes to cook through. Always check that they reach 165°F to ensure they are safe to eat. You can serve this pasta with several sides. Here are some great options: - Garlic bread for a classic touch - Steamed vegetables like broccoli or green beans for health - Caesar salad for a crunchy side - Roasted zucchini or eggplant for added flavor These sides will complement the pasta well and make your meal even more satisfying! We explored how to make Protein Chicken Parmesan Pasta in detail. You learned about the main ingredients, seasonings, and optional garnishes that elevate the dish. I shared step-by-step instructions for preparing the chicken, cooking the pasta, and combining everything for baking. You also discovered tips for perfecting chicken, cooking pasta, and options for variations. Remember to store leftovers properly and use the reheating methods for the best taste. Enjoy creating your own protein-rich meal that suits your needs and preferences. Happy cooking!

Craving a tasty dish that’s high in protein and easy to make? Look no further! My Protein Chicken Parmesan Pasta combines juicy chicken with al dente pasta and savory sauce, …

Read more

Categories Dinner

Tuscan White Bean Soup Flavorful and Simple Recipe

October 31, 2025January 18, 2025 by Chef Nate
To make Tuscan white bean soup, you need the following ingredients: - 2 cans (15 oz each) cannellini beans, drained and rinsed - 1 tablespoon olive oil - 1 medium onion, finely chopped - 2 cloves garlic, minced - 2 carrots, diced - 2 celery stalks, diced - 4 cups vegetable broth - 1 cup diced tomatoes (canned or fresh) - 1 teaspoon dried thyme - 1 teaspoon dried oregano - 1 bay leaf - 2 cups kale, chopped (stems removed) - Salt and pepper to taste - Fresh parsley, chopped (for garnish) You can swap some ingredients to suit your taste. For example: - Beans: Use any white beans, like navy or great northern beans. - Vegetable broth: Chicken broth works well if you prefer. - Kale: Spinach or Swiss chard can replace kale. They add a nice touch too. - Olive oil: Avocado oil or butter can be used instead. I love using both fresh and canned ingredients in this soup. Canned beans save time and still taste great. Fresh vegetables add crunch and flavor. Here’s how I balance them: - Canned beans: They are soft and ready to go. Rinse them well before cooking. - Fresh vegetables: Use fresh onion, garlic, and carrots for the best taste. They bring life to the soup. - Fresh tomatoes: If you have them, use them for a bright flavor. Just chop and add! Choosing fresh or canned comes down to your needs. Both options create a tasty soup! {{ingredient_image_1}} First, gather your ingredients. You will need: - 2 cans (15 oz each) cannellini beans, drained and rinsed - 1 tablespoon olive oil - 1 medium onion, finely chopped - 2 cloves garlic, minced - 2 carrots, diced - 2 celery stalks, diced Start by heating the olive oil in a large pot over medium heat. Once the oil is hot, add the chopped onion, diced carrots, and diced celery. Stir these veggies for about 5 to 7 minutes. You want them to soften and smell great. Next, add the minced garlic to the pot. Sauté it for another minute, until it becomes fragrant. This step makes your soup smell amazing. Now it’s time to add the rest of your ingredients. Stir in: - 4 cups vegetable broth - 1 cup diced tomatoes (canned or fresh) - 1 teaspoon dried thyme - 1 teaspoon dried oregano - 1 bay leaf - 2 cans cannellini beans Bring this mixture to a boil. Once boiling, lower the heat and let it simmer for about 20 minutes. This allows all the flavors to blend together beautifully. After 20 minutes, it's time to add the chopped kale. Stir it into the soup and let it simmer for another 10 minutes. The kale should become tender, adding a nice green touch to your dish. Once the soup is done, season it with salt and pepper to taste. Don't forget to remove the bay leaf before serving. Serve your Tuscan white bean soup hot. Garnish each bowl with freshly chopped parsley on top. This adds a lovely color and flavor. Enjoy your homemade soup with some crusty bread for a complete meal! To make your Tuscan white bean soup shine, think about layering flavors. Start with a good olive oil. It adds richness from the start. Sauté your onion, carrots, and celery until soft. This builds a tasty base. Don't skip the garlic; it gives a lovely aroma. Try adding a splash of lemon juice or zest. It brightens the soup. You can also stir in some red pepper flakes for a kick. Fresh herbs such as basil or thyme can boost flavor too. Always taste your soup as you go. Adjust with salt and pepper to your liking. Texture matters in soup. You want it creamy but not too thick. Cannellini beans are perfect for this. They break down slightly when cooked, giving a nice creaminess. If you like a chunkier soup, mash half the beans before adding them back in. Add the kale near the end of cooking. It should be tender but still vibrant. If you want a smoother texture, blend part of the soup. Use an immersion blender for ease. This gives you a nice balance of smooth and chunky. This soup is great for meal prep. Make a big batch and store it. Let it cool before transferring to containers. It can stay fresh in the fridge for up to four days. For longer storage, freeze the soup. Use freezer-safe bags or containers. Leave some space for expansion. When you want to enjoy it, thaw the soup overnight in the fridge. Reheat it gently on the stove. Add a splash of water or broth if it’s too thick. Enjoy your delicious soup anytime! Pro Tips Use Fresh Ingredients: For the best flavor, opt for fresh vegetables and herbs whenever possible. Fresh kale and ripe tomatoes can elevate the soup significantly. Adjust the Consistency: If you prefer a creamier soup, you can blend a portion of the beans and broth together before adding them back to the pot. Enhance the Flavor: Adding a splash of lemon juice or a sprinkle of red pepper flakes before serving can brighten the flavors and add a bit of heat. Make it Ahead: This soup tastes even better the next day! Make a larger batch and store leftovers in the fridge for quick meals throughout the week. {{image_2}} You can add protein to Tuscan white bean soup for more heartiness. Here are great options: - Chicken: Cook shredded chicken in the soup. It adds flavor and texture. - Sausage: Brown Italian sausage and add it before simmering. It gives a nice kick. - Tofu: For a vegan option, use firm tofu. Cube it and add it with the beans. - Ham: Diced ham adds a smoky flavor. Toss it in with the veggies. While kale is popular, you can switch it up with other greens: - Spinach: Fresh spinach wilts quickly. Add it in the last few minutes of cooking. - Swiss chard: This has a mild flavor. Chop it up and use it like kale. - Collard greens: These add a hearty bite. Cook them a bit longer for tenderness. - Arugula: This gives a peppery taste. Stir it in right before serving. You can easily adjust this soup for different diets: - Gluten-free: Ensure your broth is gluten-free. - Vegan: Use vegetable broth and skip any meat. The beans are filling and rich. - Low-sodium: Use low-sodium broth and skip added salt. - Paleo: Stick to veggies and protein. Avoid grains and legumes if needed. Experimenting with these variations keeps the soup exciting and fresh! To store leftovers, let the soup cool first. Pour it into an airtight container. Make sure to leave some space at the top. This allows for expansion when it freezes. Seal the container tightly. You can keep it in the fridge for up to four days. Reheating is simple and quick. Pour the soup into a pot. Heat it on medium-low until warm. Stir it often to prevent sticking. You can also microwave it. Just place the soup in a microwave-safe bowl. Cover it loosely and heat for one to two minutes. Stir halfway through to heat evenly. Freezing the soup is a great way to save it for later. Use a freezer-safe container or heavy-duty freezer bags. Pour the cooled soup in, leaving space for expansion. Seal the bag or container tightly. Label it with the date. The soup can last in the freezer for up to three months. When you're ready to eat, thaw it overnight in the fridge or heat it straight from the freezer. Just add extra time for cooking. Tuscan White Bean Soup is a comforting dish. It features cannellini beans, fresh veggies, and herbs. This soup is hearty and full of flavor. The kale adds a nice touch of green. It’s perfect for chilly days or when you need a warm meal. Yes, you can use different beans! If you prefer, try using navy beans or great northern beans. Both will work well in this soup. Just make sure to drain and rinse them, like the cannellini beans. This keeps your soup healthy and tasty. The total time to make this soup is about 55 minutes. You spend about 15 minutes prepping the ingredients. The cooking time is around 40 minutes. This includes 20 minutes of simmering and 10 minutes after adding the kale. It’s easy and quick for a delicious meal. You learned how to make Tuscan White Bean Soup with fresh ingredients, clear steps, and helpful tips. Each section covered important details, like ingredient choices and cooking methods. You can adjust the recipe to fit your taste and dietary needs. Remember, you can store and reheat leftovers easily. Enjoy your soup, knowing you created something tasty and healthy. Use these tips to impress your family and friends. Happy cooking!

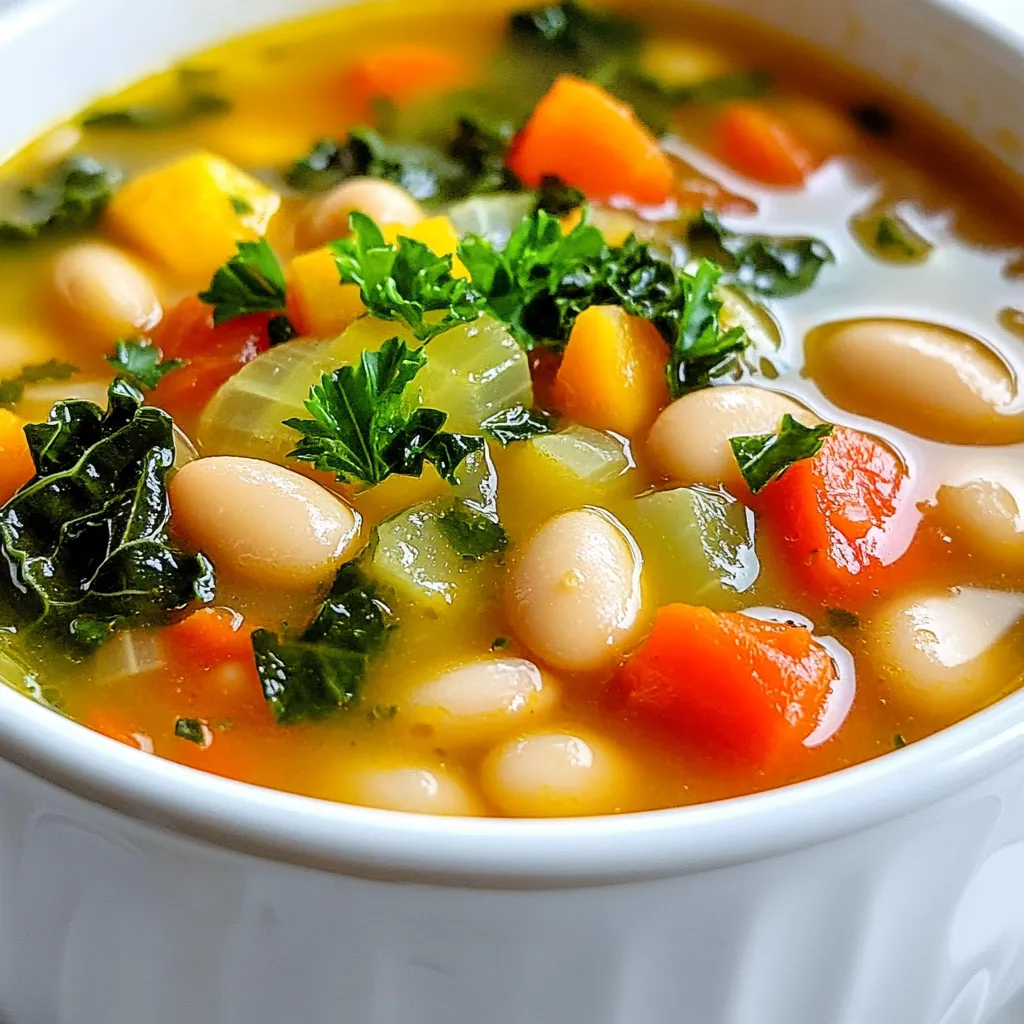
If you’re craving a warm, hearty meal that’s both simple and delicious, Tuscan White Bean Soup is a perfect choice. Packed with flavor and nutritious ingredients, this recipe will brighten …

Read more

Categories Dinner

Parmesan Crusted Tilapia Crisp and Flavorful Dish

December 24, 2025January 17, 2025 by Chef Nate
- 4 tilapia fillets - 1 cup grated Parmesan cheese - 1 cup panko bread crumbs - 2 teaspoons garlic powder - 1 teaspoon onion powder - 1 teaspoon dried oregano - ½ teaspoon salt - ½ teaspoon black pepper - 2 large eggs - 2 tablespoons olive oil - Lemon wedges for serving - Fresh parsley for garnish Gathering the right ingredients is key. For the main part, you need four tilapia fillets. They should be fresh or thawed if frozen. Next, grab one cup of grated Parmesan cheese. This cheese gives a great flavor and helps the crust stick. You will also need one cup of panko bread crumbs. These crumbs create a light and crunchy crust that makes this dish shine. For seasoning, you will need some garlic powder, onion powder, and dried oregano. Just two teaspoons of garlic powder and one teaspoon each of onion powder and oregano will enhance the taste. Add half a teaspoon of salt and black pepper to balance the flavors. To bind everything, you will use two large eggs. Beating the eggs helps the crumbs stick well to the fish. Finally, two tablespoons of olive oil will help with frying and add richness to the dish. To serve, I recommend lemon wedges. They add a fresh zing to the fish. A sprinkle of fresh parsley makes the dish look beautiful and adds a bit of color. Each ingredient plays a key role in making your Parmesan crusted tilapia crisp and flavorful. {{ingredient_image_1}} 1. Preheat your oven to 400°F (200°C). This helps the fish cook evenly. 2. Line a baking sheet with parchment paper or spray it with cooking spray. This prevents sticking. 3. In a shallow dish, combine the panko bread crumbs, grated Parmesan cheese, garlic powder, onion powder, dried oregano, salt, and black pepper. Mix until all dry ingredients blend well. 1. In another bowl, beat the two large eggs until they are mixed well. 2. Take each tilapia fillet and dip it into the egg wash. Ensure the entire fillet is coated. 3. Next, dredge the fillet in the breadcrumb and cheese mixture. Press lightly to make the crust stick well. 1. Heat the olive oil in a large skillet over medium heat. Wait until the oil is hot before adding fish. 2. Add the coated tilapia fillets to the skillet. Cook for about 2-3 minutes on each side. Look for a golden brown color. 3. Once browned, transfer the fillets to the prepared baking sheet. 4. Bake them in the oven for 10-12 minutes. The fish should flake easily with a fork and have a crispy crust. 5. Remove the baking sheet from the oven and let the fillets rest for a couple of minutes before serving. How to achieve a crispy crust To get that perfect crispy crust, use panko bread crumbs. They give a light crunch. Mix them with grated Parmesan cheese and spices. Dip the tilapia in the egg wash first. This helps the crust stick well. When frying, make sure the oil is hot. Fry each side for 2-3 minutes until golden brown. Baking the fillets after frying makes them even crispier. Best oil for frying tilapia I recommend using olive oil for frying. It adds a nice flavor. You can also use vegetable oil if you prefer. Just make sure the oil is hot before adding the fish. This helps seal in the moisture and keeps the fish tender. Ideas for side dishes Parmesan crusted tilapia pairs well with many sides. Try serving it with steamed broccoli or asparagus. A fresh salad with citrus dressing also works great. You can add rice or quinoa for a hearty meal too. Presentation tips for a beautiful plate To make your dish look stunning, drizzle some olive oil on the plate. Place the tilapia fillet in the center. Add lemon wedges on the side for color. A sprig of fresh parsley on top adds a nice touch. This simple plating makes the dish pop! Best practices for refrigeration Store any leftover tilapia in an airtight container. It will last for up to three days in the fridge. Make sure it cools down first before sealing. This keeps it fresh and safe to eat. Reheating tips for optimal taste To reheat, place the tilapia in the oven. Set it to 350°F (175°C) and bake for about 10 minutes. This helps keep the crust crispy. You can also use an air fryer for quick reheating. Just a few minutes will do! Pro Tips Fresh Ingredients: Always use fresh tilapia fillets for the best flavor and texture. Check for a mild smell and firm flesh when selecting fish. Perfect Crust: For an extra crispy crust, let the coated tilapia sit for about 5 minutes before cooking. This helps the breading adhere better. Flavor Variations: Feel free to experiment with different herbs and spices in the breading mix. Adding paprika or cayenne pepper can give a nice kick! Serving Suggestions: Pair the tilapia with a fresh salad or steamed vegetables for a complete meal. A tangy sauce like tartar or remoulade also complements the dish well. {{image_2}} You can add fun flavors to your Parmesan crust. Try mixing in dried herbs like thyme or basil. A pinch of red pepper flakes brings heat. For a fresh twist, use lemon zest in the crust. Cheese alternatives also work well. Instead of Parmesan, try cheddar or even a mix of Italian cheeses for a unique taste. Want a quicker cooking method? Use an air fryer! Preheat it to 400°F (200°C). Cook the fillets for about 8-10 minutes. You’ll still get that crispy crust. If you love grilled flavors, try grilling your tilapia. Brush it with olive oil and grill for 3-4 minutes on each side. The smokiness adds depth to the dish. If you need a gluten-free option, swap panko with crushed gluten-free crackers or almond flour. This keeps the crispy texture. For low-carb variations, use crushed pork rinds instead of breadcrumbs. It gives a nice crunch without the carbs. You can enjoy this dish while sticking to your diet! Each serving of Parmesan crusted tilapia has about 400 calories. This dish is rich in protein, with roughly 30 grams per serving. The fat content is around 20 grams, mainly from olive oil and cheese. Carbohydrates are about 25 grams, coming from the panko and seasonings. Tilapia is a great source of protein. It is low in calories and has healthy fats. Eating tilapia can help build and repair body tissues. Parmesan cheese adds flavor and calcium, essential for strong bones. Olive oil is a heart-healthy fat. It can lower bad cholesterol levels and provide antioxidants. For a balanced meal, serve one tilapia fillet per person. Pair it with vegetables or a salad to add fiber and vitamins. If you have special dietary needs, cut back on the cheese or oil. For a lighter option, serve half a fillet with more veggies. How long can I store leftover Parmesan Crusted Tilapia? You can store leftover Parmesan crusted tilapia in the fridge for up to 3 days. Make sure to place it in an airtight container. This helps keep the fish fresh and moist. When you are ready to eat it again, reheat gently in the oven or on the stove. Can I freeze cooked tilapia? Yes, you can freeze cooked tilapia. Wrap each fillet in plastic wrap and place it in a freezer bag. It can last for up to 2 months in the freezer. When you want to enjoy it, thaw in the fridge overnight and reheat as described above. What can I use instead of tilapia? If you want to try another fish, you can use cod or haddock. Both have a mild taste and flake well. They also work great with the Parmesan crust. You can even use chicken breasts if you prefer poultry. How to tell when tilapia is fully cooked? You can tell tilapia is fully cooked when it flakes easily with a fork. The flesh should turn from translucent to opaque. A safe internal temperature is 145°F (63°C). Use a meat thermometer for accuracy. What sides go well with Parmesan Crusted Tilapia? Parmesan crusted tilapia pairs well with many sides. Consider serving it with steamed vegetables, like broccoli or green beans. A light salad or wild rice also complements the dish nicely. Can I make this recipe ahead of time? You can prepare the crust and coat the tilapia ahead of time. Store the coated fillets in the fridge for up to 2 hours before cooking. This helps save time when you're ready to eat. Just remember to bake the fillets fresh for the best taste and texture. This blog post covered how to make Parmesan Crusted Tilapia. We explored ingredients like tilapia, cheese, and spices. I shared step-by-step instructions for preparation and cooking. You learned tips for a crispy crust and how to store leftovers. As you try this recipe, remember you can customize flavors and cooking methods. Enjoy your meal with lemon and fresh parsley! This dish is simple and tasty, making it perfect for any occasion.

If you crave a light, crispy, and savory meal, look no further than Parmesan Crusted Tilapia. This dish shines with a golden crust and packs a punch of flavor. You …

Read more

Categories Dinner

Buffalo Chicken Flatbread Flavorful and Easy Recipe

October 18, 2025January 16, 2025 by Chef Nate
To make Buffalo Chicken Flatbread, gather these key ingredients: - 1 large flatbread or naan - 1 cup cooked chicken, shredded - 1/2 cup buffalo sauce - 1/2 cup mozzarella cheese, shredded - 1/4 cup blue cheese crumbles (optional) - 1/4 cup ranch or blue cheese dressing - 1/4 cup green onions, sliced - Salt and pepper to taste - Olive oil for brushing These main ingredients combine to create a tasty, spicy dish that is loved by many. The flatbread acts as a perfect base, holding all the flavors together. The chicken, coated in buffalo sauce, gives it a nice kick. Feel free to get creative with more toppings! Here are a few ideas: - Fresh cilantro - Sliced jalapeños - Avocado - Different cheese blends like cheddar or pepper jack You can also swap out the ranch for other dressings. Consider using yogurt-based dressings for a lighter option. Each topping adds its own flavor and texture, making your flatbread unique. If you want to change things up, you can easily substitute ingredients: - Instead of flatbread, you can use pita bread or a tortilla. - Any cooked chicken works. You can use rotisserie chicken or leftover grilled chicken. - If you prefer a milder taste, use less buffalo sauce or a milder dressing. - For a dairy-free version, try vegan cheese or omit cheese altogether. These substitutes keep the dish flexible. You can adjust it to fit your taste or diet needs. {{ingredient_image_1}} To start, you will want to preheat your oven to 400°F (200°C). This step is key for a perfect bake. While your oven heats, prepare your baking sheet by lining it with parchment paper. This makes cleanup easy and helps prevent sticking. Next, take a mixing bowl and add 1 cup of shredded chicken. Pour in 1/2 cup of buffalo sauce. Mix these together well, so every piece of chicken gets coated. You can add salt and pepper to taste. This mix gives the chicken a spicy kick. Now, grab your flatbread or naan. Place it on the lined baking sheet. Use a brush to lightly coat the flatbread with olive oil. This will help it get nice and crispy when baking. Once your chicken is mixed and your flatbread is ready, it's time to layer. Spread the buffalo chicken evenly over the flatbread. This ensures every bite is full of flavor. Next, sprinkle 1/2 cup of shredded mozzarella cheese on top. If you like blue cheese, add 1/4 cup of blue cheese crumbles too. This adds a nice tangy flavor that pairs well with the buffalo sauce. Bake the flatbread in the oven for about 10 to 12 minutes. You want the cheese to be bubbly and the edges of the flatbread to turn golden brown. Keep an eye on it to prevent burning. Once baked, take the flatbread out and let it cool for a minute. Drizzle 1/4 cup of ranch or blue cheese dressing over the top. This adds creaminess that balances the heat from the buffalo sauce. For a fresh touch, sprinkle sliced green onions on top. They add color and a mild onion flavor. Slice the flatbread into pieces and serve it warm. For a great presentation, place the flatbread on a wooden board. Adding extra buffalo sauce and ranch dressing on the side makes for a fun dipping experience. If you have fresh cilantro, a sprinkle of that adds a nice pop of color. To make your Buffalo chicken flatbread pop, start with fresh ingredients. Use high-quality buffalo sauce for the best taste. You can mix in spices like garlic powder or smoked paprika for a kick. Brush the flatbread with olive oil before baking. This helps it get crispy and adds a nice flavor. Don't skimp on cheese; it melts into a gooey, tasty topping. For a zesty finish, drizzle ranch or blue cheese dressing after baking. One common mistake is overcooking the chicken. Make sure it is just heated through, not dry. Another error is using too much buffalo sauce. A half-cup is perfect; too much may make it soggy. Avoid using cold flatbread; let it come to room temperature for even baking. Lastly, don't forget to slice the green onions thinly. This helps them mix well and adds a fresh taste. You don’t need fancy tools to make this dish. A good mixing bowl is key to combining the chicken and sauce. A baking sheet lined with parchment paper makes cleanup simple. Use a sharp knife for slicing the flatbread and green onions. A basting brush helps evenly apply olive oil. Finally, an oven thermometer ensures your oven is at the right temperature for perfect baking. Pro Tips Use Fresh Ingredients: Freshly cooked chicken and high-quality buffalo sauce will elevate the flavor of your flatbread significantly. Customize Your Heat: Adjust the amount of buffalo sauce to match your heat preference. For a milder version, use less sauce or mix in some ranch dressing. Perfect Cheese Melt: For the best cheese melt, consider adding the mozzarella halfway through baking to prevent it from browning too quickly. Optimal Crispiness: Ensure your flatbread is brushed with olive oil to achieve a crispy texture. You can also bake it on a pizza stone for extra crunch. {{image_2}} You can change the flavor of your Buffalo chicken flatbread with different sauces. Try barbecue sauce for a sweet twist. A garlic sauce can add a nice touch, too. If you want heat, use spicy sriracha instead of buffalo sauce. For cheese, mozzarella is classic, but you can mix it up. Try pepper jack for a kick or gouda for its creamy texture. Each sauce and cheese choice brings its own unique taste to the flatbread. If you prefer a meatless option, you can easily adapt this recipe. Use roasted cauliflower or chickpeas instead of chicken. Toss them in buffalo sauce to keep that spicy flavor. You can also use grilled veggies like bell peppers and zucchini. These add great texture and taste. Make sure to add plenty of cheese or a vegan cheese for a creamy finish. This way, everyone can enjoy a tasty flatbread. Buffalo chicken flatbread can be as spicy or mild as you like. For a mild version, reduce the buffalo sauce. You can mix it with ranch dressing to tone down the heat. Adding more cheese can also help make it milder. On the other hand, if you love spice, add jalapeños or a dash of hot sauce to the top. You can even sprinkle crushed red pepper for an extra kick. Customize it to fit your taste! To keep your buffalo chicken flatbread fresh, let it cool first. Wrap the flatbread in plastic wrap or foil. You can also use an airtight container. Store it in the fridge for up to three days. This way, the flavors stay nice and bold. When you’re ready to eat, preheat your oven to 350°F (175°C). Place the flatbread on a baking sheet. Heat it for about 10 minutes. This will make the flatbread warm and crisp again. You can also use a microwave. Just heat for about 30 seconds to 1 minute. But be careful; the flatbread may get soft. If you want to save some for later, freezing works well. Wrap the flatbread tightly in plastic wrap, then foil. You can freeze it for up to three months. When you’re ready to eat, take it out and thaw in the fridge overnight. Then, reheat it in the oven for the best taste. Enjoy your leftovers! Buffalo chicken flatbread is a tasty dish. It combines soft flatbread with shredded chicken and spicy buffalo sauce. You also add cheese and toppings. The mix creates a savory and satisfying meal. It's great for sharing or as a snack. Yes, you can make buffalo chicken flatbread ahead of time. Prepare the chicken and sauce, then store them in the fridge. Just assemble the flatbread when you're ready to bake. This makes it easy for a quick meal later. Many restaurants serve buffalo chicken flatbread. You can find it at casual dining spots and pizzerias. Popular chains often have their own versions. Check local menus for unique takes on this tasty dish. Buffalo Chicken Flatbread is a fun meal to make at home. We covered the main ingredients, the cooking steps, and helpful tips. You can enhance flavors and avoid mistakes easily. Variations let you explore new tastes, like vegetarian or spicy options. Lastly, I shared how to store, reheat, and freeze leftovers. In conclusion, this dish is tasty and adaptable. Enjoy this easy recipe with friends and family.

If you’re craving a spicy, savory dish, Buffalo Chicken Flatbread is a must-try. This easy recipe combines tender chicken, zesty sauce, and fresh toppings on a crispy flatbread base. Whether …

Read more

Categories Appetizers

Italian Sausage Orzo Soup Hearty and Comforting Meal

October 15, 2025January 16, 2025 by Chef Nate
To make Italian sausage orzo soup, you need a few simple items. Here’s the list: - 1 pound Italian sausage (mild or spicy, based on preference) - 1 medium onion, diced - 2 cloves garlic, minced - 2 carrots, diced - 2 celery stalks, diced - 1 can (14.5 ounces) diced tomatoes, with juice - 6 cups chicken broth - 1 cup orzo pasta - 1 teaspoon dried oregano - 1 teaspoon dried basil - 1 bay leaf - Salt and pepper to taste - 2 cups fresh spinach - Grated Parmesan cheese for serving - Fresh parsley for garnish Each ingredient plays a key role in making this soup tasty. The Italian sausage brings rich flavor. Use mild sausage for a light taste or spicy for a kick. Fresh vegetables like onion, carrots, and celery add crunch and nutrition. Garlic enhances the aroma and taste. Canned tomatoes provide a tangy base. Chicken broth adds depth and warmth. Orzo pasta makes the soup hearty and filling. Dried herbs like oregano and basil bring in classic Italian flavors. Spinach adds color and health. Finally, Parmesan cheese and parsley garnish the soup, making it look great and taste even better. This soup is not just a meal; it’s a bowl of comfort. {{ingredient_image_1}} First, take a large pot or Dutch oven. Heat a little olive oil over medium heat. Add 1 pound of Italian sausage to the pot. You can choose mild or spicy sausage based on your taste. Cook the sausage for about 5-7 minutes. Use a spoon to break it up as it cooks. When it’s browned, remove it with a slotted spoon. Set it aside and keep the fat in the pot. Now, it’s time for the veggies! Add 1 diced onion, 2 diced carrots, and 2 diced celery stalks to the pot. Sauté these for about 5-6 minutes. You want the vegetables to soften. Then, stir in 2 minced garlic cloves. Cook for another 1-2 minutes until you smell the garlic’s wonderful aroma. Next, add the canned diced tomatoes (with juice) and 6 cups of chicken broth to the pot. Also, add the cooked sausage back in. Toss in 1 teaspoon of dried oregano, 1 teaspoon of dried basil, and 1 bay leaf. Bring this mixture to a boil. Once it bubbles, lower the heat to let it simmer. Add 1 cup of orzo pasta and cook for about 8-10 minutes. Stir it now and then to keep it from sticking. After the orzo is tender, remove the bay leaf. Stir in 2 cups of fresh spinach until it wilts, which takes about 2 minutes. Taste your soup and add salt and pepper as needed. Serve the soup hot. For a nice touch, top each bowl with grated Parmesan cheese and chopped fresh parsley. Enjoy this warm, hearty meal! Choosing the right Italian sausage makes a big difference. You can pick mild or spicy sausage. If you like heat, go for spicy. If you prefer a subtle taste, mild works best. Look for fresh sausage at your local market. Check the label for quality ingredients. Avoid sausages with too many fillers. A good sausage has a rich flavor that adds depth to the soup. Orzo cooks fast, so keep an eye on it. Add it to the pot only when the soup is boiling. Stir it often to stop it from sticking together. I suggest cooking it for just 8-10 minutes. Taste it to check if it's tender. If you cook it too long, it can turn mushy. You want each orzo piece to be firm and chewy. Fresh herbs bring life to your soup. I love adding fresh parsley and spinach right before serving. They add color and freshness. You can also try basil or dill for a twist. Use herbs that you enjoy. Always chop them finely to spread their flavor evenly. Adding herbs at the end keeps their taste bright and vibrant. Pro Tips Choose Your Sausage Wisely: If you enjoy a bit of heat, opt for spicy Italian sausage; otherwise, mild sausage works beautifully for a comforting flavor. Fresh Herbs Make a Difference: Whenever possible, use fresh basil instead of dried for a burst of flavor that elevates the soup. Don’t Overcook the Orzo: Keep an eye on the orzo as it cooks; overcooking can make it mushy. Aim for al dente for the best texture. Enhance with Lemon: A squeeze of fresh lemon juice right before serving adds a bright acidity that complements the richness of the soup. {{image_2}} You can boost nutrition by adding more veggies. Try bell peppers or zucchini. These add color and taste. You can also toss in green beans or peas. Just chop them small and add them when you sauté the other vegetables. This makes the soup even heartier and more filling. While orzo is great, you can switch it up! Try small shapes like ditalini or even elbow macaroni. If you prefer whole grain, use whole wheat pasta. Keep in mind that cooking times may change. Add the pasta in the last few minutes, just until it’s tender. You can easily make this soup vegetarian. Replace the Italian sausage with plant-based sausage. Use vegetable broth instead of chicken broth. Add more beans or lentils for protein. You can keep the same veggies too. This version is just as tasty and satisfying. After enjoying this Italian sausage orzo soup, you may have some left. To store it, let the soup cool to room temperature. Then, pour it into an airtight container. This keeps the flavors fresh. Place the container in the fridge. The soup will stay good for about 3 to 4 days. If you want to keep it longer, freezing is a great option. To freeze this soup, first cool it completely. Then, use freezer-safe bags or containers. Leave some space at the top. This allows for expansion when it freezes. Label the bags with the date and type of soup. The soup can last up to 3 months in the freezer. When you are ready to eat it, just thaw it overnight in the fridge. Reheating this soup is quick and easy. If it's in the fridge, just pour it into a pot. Heat it over medium heat until it’s hot. Stir it often to keep it from sticking. If reheating frozen soup, let it thaw first. You can also microwave it. Use a microwave-safe bowl and cover it loosely. Heat it in short bursts, stirring in between. Enjoy it hot, topped with some grated Parmesan cheese! Yes, you can make this soup in a slow cooker. Start by browning the Italian sausage in a skillet. After that, transfer the sausage to the slow cooker. Add all the vegetables, diced tomatoes, broth, seasonings, and orzo. Cook on low for 6-8 hours or on high for 3-4 hours. Stir in the fresh spinach right before serving. To make this soup spicier, choose spicy Italian sausage. You can also add red pepper flakes to the pot. Start with a pinch and taste as you go. If you want more heat, add more. Another option is to add diced jalapeños or hot sauce. If you don't have orzo, there are great substitutes. You can use small pasta shapes like ditalini or acini di pepe. Rice or quinoa can also work well in this soup. Adjust the cooking time as needed, since they may take longer to cook. In this blog post, I covered the key steps to make a tasty soup. We discussed the ingredients, from flavorful Italian sausage to fresh greens. I outlined cooking methods and shared tips to avoid overcooked orzo. You can also try fun variations, like adding extra veggies or making it vegetarian. For storage, I included how to keep leftovers fresh. This soup is simple to make and full of flavor. Try it today!

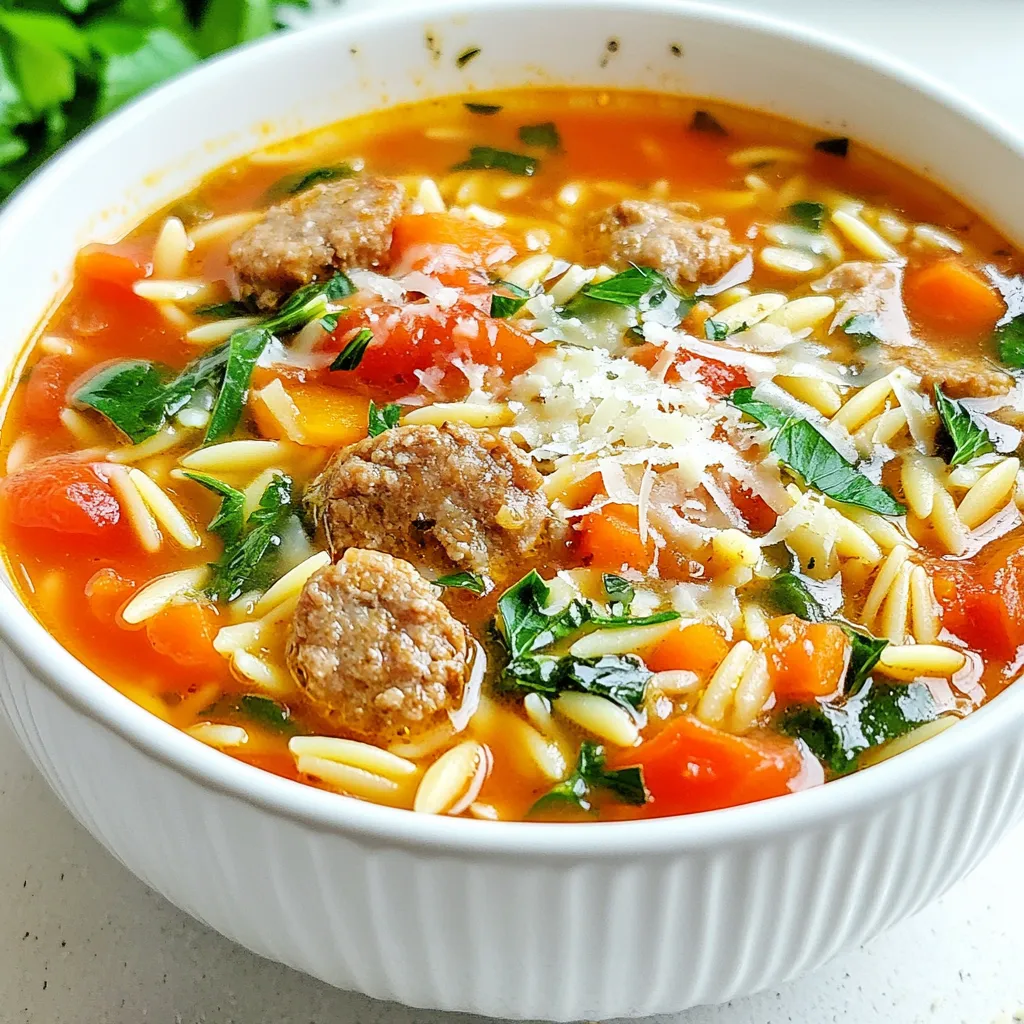
If you’re craving a warm, comforting meal, look no further than Italian Sausage Orzo Soup. This dish blends savory sausage, fresh vegetables, and tender orzo pasta into a hearty bowl …

Read more

Categories Dinner

Stuffed Pepper Soup Flavorful and Hearty Meal

December 1, 2025January 16, 2025 by Chef Nate
- 2 large bell peppers (red, yellow, or green), diced - 1 medium onion, chopped - 2 cloves garlic, minced - 1 lb ground turkey or beef - 1 can (14.5 oz) diced tomatoes - 4 cups chicken or vegetable broth - 1 cup uncooked quinoa or rice - 1 teaspoon dried oregano - 1 teaspoon smoked paprika - Salt and pepper to taste - 1 cup corn kernels (fresh or frozen) - 1 cup black beans, rinsed and drained - ½ cup shredded cheese (cheddar or mozzarella) for topping - Fresh cilantro or parsley for garnish - Extra shredded cheese - Chopped fresh herbs, like cilantro or parsley - A squeeze of lime juice for brightness - Sliced jalapeños for a spicy kick For the best flavor, choose fresh bell peppers. Bright colors mean ripe and tasty peppers. Use lean ground turkey for a healthier option, or go with beef for a richer taste. Fresh herbs elevate the dish. If possible, pick organic vegetables and herbs to avoid pesticides. Quality broth adds depth. Homemade broth is great, but store-bought works too. Always check labels for low sodium options. {{ingredient_image_1}} To make stuffed pepper soup, gather all your ingredients first. This helps you stay organized. You will need bell peppers, onion, garlic, ground turkey or beef, diced tomatoes, broth, quinoa or rice, corn, black beans, and cheese. Having everything ready makes cooking fun and easy. 1. Heat the Oil: In a large pot, add a splash of olive oil. Heat it over medium heat. 2. Sauté the Onion and Garlic: Add the chopped onion and minced garlic. Cook them until they are fragrant and soft, about 3-4 minutes. 3. Brown the Meat: Add the ground turkey or beef to the pot. Cook until it is browned, breaking it into smaller pieces with a wooden spoon. 4. Add the Peppers: Stir in the diced bell peppers. Cook for another 3-4 minutes until they start to soften. 5. Mix in Tomatoes and Broth: Pour in the diced tomatoes and their juice. Add the chicken or vegetable broth and mix well. 6. Incorporate Grains and Seasonings: Add the uncooked quinoa or rice, dried oregano, smoked paprika, salt, and pepper. Stir to combine everything. 7. Bring to a Boil: Let the soup come to a gentle boil. Then, reduce the heat to a simmer. Cover the pot and cook for 20-25 minutes. This time allows the grains to become tender. 8. Final Touches: Stir in the corn and black beans. Heat them through for an extra 5 minutes. Taste and adjust the seasoning if needed. 9. Serve: Ladle the soup into bowls. Top with shredded cheese and fresh cilantro or parsley. - Prep First: Chop your veggies and measure ingredients before cooking. It saves time. - Use a Timer: Set a timer for each step. This helps you stay on track. - Clean as You Go: Wash dishes and utensils while the soup cooks. It makes cleanup easier. With these steps, you will create a hearty and flavorful stuffed pepper soup that warms the soul! When making stuffed pepper soup, avoid these common mistakes: - Not browning the meat: Always brown the ground turkey or beef well. This step adds depth to the flavor. - Skipping sautéing the onions and garlic: Sautéing builds a strong flavor base. Don’t rush this step. - Using too much liquid: Follow the broth amount in the recipe. Too much can make the soup watery. To make your soup even tastier, consider these tips: - Add fresh herbs: Toss in fresh basil or thyme before serving. They add a bright flavor. - Use spices wisely: Consider adding cumin or chili powder for a warm kick. Just a pinch can change everything. - Incorporate acid: A splash of lime juice before serving brightens the flavors. It adds a nice contrast. You can easily adjust the soup to your taste: - Swap proteins: Use ground chicken or plant-based meat for a different flavor. Each choice adds its own twist. - Change the grains: If you don’t like quinoa, try brown rice or even barley. Each option offers unique texture. - Add vegetables: Feel free to include zucchini, carrots, or spinach. They boost nutrition and flavor. Making stuffed pepper soup is simple and fun. Each tweak gives you a new dish! Pro Tips Choose Colorful Peppers: Using a mix of bell pepper colors not only enhances the visual appeal of your soup but also adds a variety of flavors and nutrients. Cook Quinoa Separately: For a more controlled texture, consider cooking the quinoa separately and adding it to the soup just before serving. This prevents it from becoming mushy. Customize Protein: Feel free to substitute the ground turkey or beef with other proteins like chicken, sausage, or plant-based alternatives to cater to your dietary preferences. Spice Adjustment: Adjust the amount of smoked paprika and oregano according to your taste. Adding a pinch of cayenne pepper can give your soup an extra kick! {{image_2}} You can make a tasty vegetarian or vegan version of stuffed pepper soup. Replace the ground turkey or beef with lentils or mushrooms. Both options bring a nice texture and flavor. Use vegetable broth instead of chicken broth. This keeps the soup plant-based. Add more beans, like kidney or pinto beans, for protein. You can also toss in extra veggies like zucchini or spinach for added nutrition. If you like a spicy kick, add red pepper flakes or diced jalapeños. Start with a small amount and taste as you go. This way, you can control the heat. For a milder soup, skip the spicy additions and focus on herbs. You can enhance flavors with cumin or chili powder. These spices give warmth without too much heat. If you prefer different proteins, consider using chicken or pork. Ground chicken works well and cooks quickly. If you want a plant-based source, try using tofu. Crumble firm tofu and sauté it with the onion and garlic. This will give you a hearty and filling meal. Remember, adjust cooking times for any protein changes you make. Each option can change the flavor, so feel free to experiment! To keep your stuffed pepper soup fresh, let it cool first. Use an airtight container for storage. Fill the container with soup, leaving some space at the top for expansion. Store it in the fridge. It will last for about three to four days. Always label your container with the date. This helps keep track of freshness. If you want to save some for later, freezing works great. Allow the soup to cool completely before freezing. Use freezer-safe bags or containers. Portion out the soup for easy meals. Squeeze out the air from bags to prevent freezer burn. You can freeze it for up to three months. When you are ready to eat, just thaw it in the fridge overnight. Reheating is easy! You can use a pot on the stove or the microwave. If using a pot, heat it over medium-low heat. Stir the soup occasionally to avoid sticking. For the microwave, place the soup in a bowl and cover it. Heat for 2-3 minutes, stirring halfway through. Check the temperature before serving. Make sure it is hot all the way through. Enjoy your warm and hearty meal! You can swap quinoa or rice with pasta. Small pasta works best. You can also use farro or barley. These options will add a nice texture. Just adjust the cooking time as needed. Yes, you can make this soup in a slow cooker. Cook the meat and veggies first. Then add them to the slow cooker with all other ingredients. Set it on low for 6-8 hours or high for 3-4 hours. Stuffed pepper soup lasts about 3-5 days in the fridge. Store it in an airtight container. If you want to keep it longer, freeze it. It can last for up to 3 months in the freezer. Just make sure to cool it first before freezing. This blog post covered all you need to know about stuffed pepper soup. We discussed key ingredients, preparation steps, and tips for perfect flavor. I shared ways to avoid common mistakes and customize your dish. Storage tips help you enjoy leftovers with ease. When you try this recipe, remember to have fun. Cooking is about exploring tastes and textures. Enjoy your soup and the time in your kitchen!

Get ready for a warm, delicious dish that brings comfort to any table: Stuffed Pepper Soup! This hearty meal packs all the flavors of stuffed peppers into a cozy soup …

Read more

Categories Dinner
Older posts
Newer posts
← Previous Page1 … Page102 Page103 Page104 … Page108 Next →

GRILLED FLAVORS

where delicious ideas come to life, from stovetop to backyard. Warm, simple, and always satisfying. 🍽️✨

PAGES

Home About Contact Privacy Policy Terms & Conditions Cookie Policy GDPR Policy Copyright Policy Disclaimer

CATEGORIES

Appetizers Desserts Salads Breakfast Dinner

Contact

  • Pinterest
  • Mail
Copyright © 2026 Grilled Flavors. All rights reserved.