Skip to content
grilledflavors.com
  • Home
  • Appetizers
  • Desserts
  • Salads
  • Breakfast
  • Dinner
  • Privacy Policy
  • Contact
  • About

Chef Nate

Mango Coconut Chia Pudding Refreshing and Healthy Treat

November 27, 2025January 15, 2025 by Chef Nate
- 1/2 cup chia seeds - 2 cups coconut milk (full-fat for creaminess) - 1 tablespoon maple syrup (or to taste) - 1 ripe mango, diced - 1 teaspoon vanilla extract - Fresh mint leaves for garnish For this Mango Coconut Chia Pudding, you need a few simple ingredients. Chia seeds are the star here. They soak up liquid and turn into a gel-like texture. This gives your pudding a nice, thick feel. Coconut milk adds creaminess and a tropical flavor. I prefer full-fat coconut milk for the best taste. You can use maple syrup to sweeten the pudding. Adjust the amount to fit your taste. For optional ingredients, a ripe mango is a must. It adds a sweet and juicy layer to your pudding. Vanilla extract enhances the flavor too. If you like, you can add fresh mint leaves for a pop of color and flavor. These ingredients make your dessert not just tasty but also fun to look at. {{ingredient_image_1}} To start, gather your ingredients. You need chia seeds, coconut milk, maple syrup, vanilla, and a pinch of salt. In a mixing bowl, add all these items. 1. Combine 1/2 cup chia seeds with 2 cups of coconut milk. 2. Add 1 tablespoon of maple syrup and 1 teaspoon of vanilla extract. 3. Don’t forget to sprinkle in a pinch of salt. Now, stir well. This helps prevent clumps. After mixing, cover the bowl with plastic wrap. Place it in the fridge for at least 4 hours. Overnight is even better. This waiting allows the chia seeds to swell. They will create a creamy, pudding-like texture. Once the time is up, check your pudding. Stir it a bit to see how it feels. If it seems too thick, add a splash of coconut milk. This will loosen it up. Next, it’s time to serve! Grab some clear glasses or bowls. Layer the chia pudding into each glass. Then, add a layer of diced mango on top. This gives a nice contrast and adds fresh flavor. For a beautiful look, use clear glass cups. This way, you can see the lovely layers. To finish, add a sprinkle of mango on top. You can also garnish with fresh mint leaves. This adds color and a fresh taste. Enjoy your tasty and healthy treat! To get the right texture for your mango coconut chia pudding, focus on consistency. Start by mixing the chia seeds and coconut milk well. Stir until the seeds are fully combined. This helps avoid clumps. After mixing, cover the bowl and chill it. I recommend a chilling time of at least 4 hours. For the best pudding, let it sit overnight. This allows the seeds to soak up the milk and expand fully. After chilling, check the pudding. If it is too thick, add a little more coconut milk. Stir it in until you reach your desired creaminess. This small step makes a big difference in your pudding's texture. You can easily change the flavor of your pudding. Adding spices can elevate the taste. Try adding a pinch of cinnamon or nutmeg for warmth. You can also add cardamom for a unique twist. These spices blend well with mango and coconut. For sweetness, maple syrup works great, but there are other options. You can use honey or agave syrup if you prefer. If you want a sugar-free option, try mashed ripe bananas or dates. These alternatives add sweetness and nutrition. Feel free to mix and match these ideas to create your perfect pudding! Pro Tips Perfect Consistency: If you prefer a creamier texture, use full-fat coconut milk. It enhances the richness of the pudding. Sweetness Adjustment: Taste the pudding before serving; you can always add more maple syrup if you like it sweeter. Layering Presentation: For an eye-catching display, layer the pudding and mango in clear glasses, allowing guests to see the beautiful colors. Garnish Ideas: Fresh mint adds a burst of flavor and color. You can also sprinkle toasted coconut flakes on top for added texture. {{image_2}} You can add many fruits to your mango coconut chia pudding. Berries, bananas, or kiwi work well. Each fruit brings its own taste and color. For a fun twist, mix fruits. Try mango with pineapple or berries with banana. This mix creates a burst of flavors. You can even layer different fruits for a colorful look. If you want a dairy-free version, use nut milks. Almond milk, cashew milk, or oat milk are great choices. Each nut milk adds a unique flavor. Almond milk is light, while oat milk is creamy. You can choose based on what you like best. Using nut milk keeps the pudding healthy and tasty. Plus, it caters to different diets, making it a win-win! You can store leftover mango coconut chia pudding in a glass jar or a plastic container. Make sure the lid is tight. This helps keep it fresh. The pudding lasts in the fridge for up to five days. Check for any off smell before eating. If it smells okay, enjoy! To freeze chia pudding, first portion it into small containers. Make sure to leave space at the top because it expands. Wrap the containers well with plastic wrap or a lid. You can freeze it for about one month. When you want to eat it, take a container from the freezer. Let it thaw in the fridge overnight. You can also speed up thawing by placing it in warm water. Once it's soft, stir it well. If it seems too thick, add a splash of coconut milk to bring it back to life! What is chia pudding? Chia pudding is a creamy dessert made with chia seeds. When mixed with liquid, these tiny seeds soak it up and swell. This creates a pudding-like texture. You can use different liquids, like coconut milk, almond milk, or dairy milk. I love coconut milk for its rich taste. You can add sweeteners and flavors to make it even better. How long does chia pudding last? Chia pudding can last up to five days in the fridge. Store it in a sealed container to keep it fresh. If you see any changes in texture or smell, it is best to throw it out. Enjoy your pudding within this time for the best taste. Why is my chia pudding too thick? If your chia pudding is too thick, you can easily fix it. Just add a splash of coconut milk or water and stir well. This will loosen the pudding. The chia seeds absorb liquid, so always check the thickness before serving. How do I make it sweeter? To make your chia pudding sweeter, add more maple syrup or honey. Start with just a little, then taste it. You can mix in a bit more until it reaches your desired sweetness. Remember, you can always add, but you can't take away! Chia pudding is simple and fun to make. You mix chia seeds, coconut milk, and maple syrup, chilling them for a tasty treat. You can customize it with fresh fruits and spices for extra flavor. Remember to check the pudding's consistency and layer it nicely for a great look. In the end, chia pudding is versatile and healthy. Experiment with different fruits and storage options. Enjoy this delightful dish whenever you want!

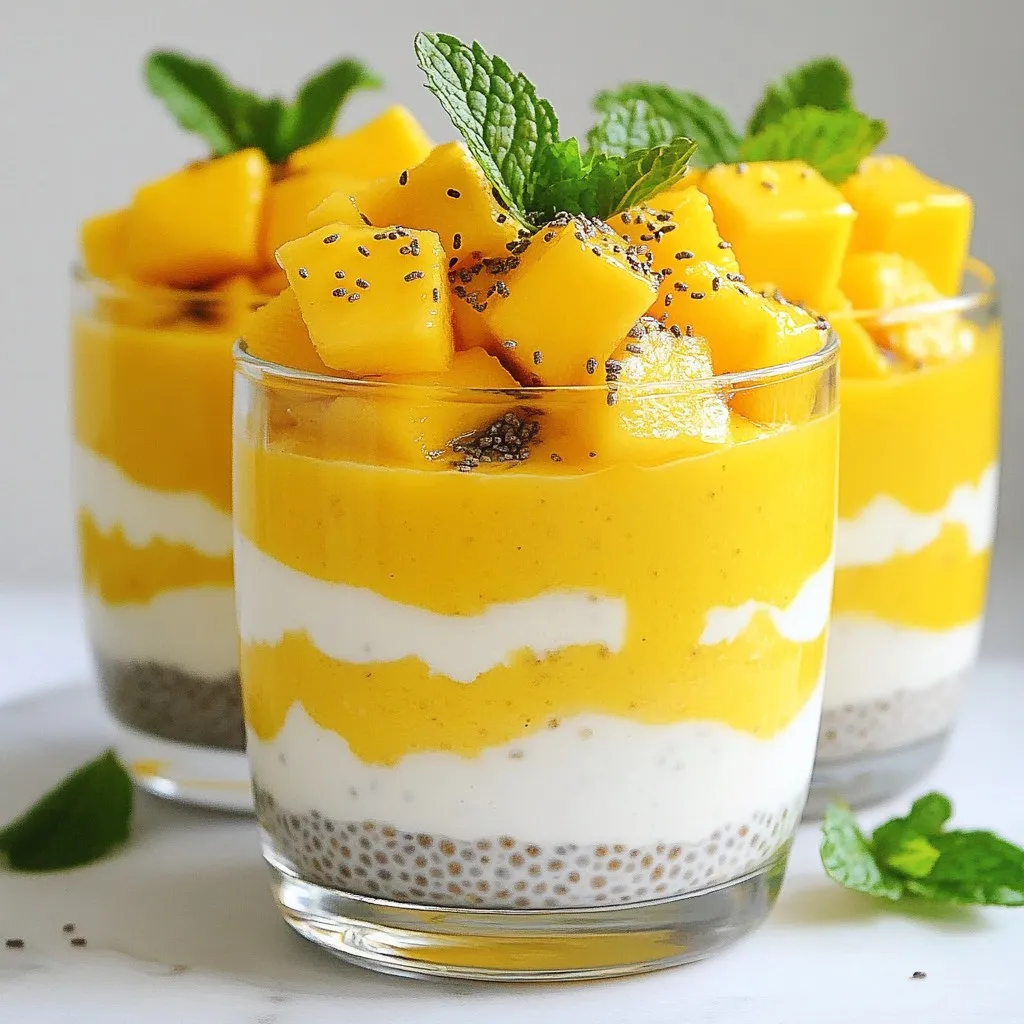
Are you ready for a cool, creamy treat that’s both refreshing and healthy? My Mango Coconut Chia Pudding is just what you need! Packed with nutritious chia seeds and the …

Read more

Categories Desserts

Baked Teriyaki Chicken Thighs Juicy and Flavorful Dish

November 27, 2025January 15, 2025 by Chef Nate
- 4 chicken thighs, skin-on and bone-in - 1/4 cup soy sauce (low-sodium preferred) - 1/4 cup honey - 2 tablespoons rice vinegar - 1 tablespoon sesame oil - 2 cloves garlic, minced - 1 teaspoon ginger, freshly grated - 1 tablespoon cornstarch mixed with 2 tablespoons water (for thickening) - 1/2 teaspoon black pepper To create a tasty baked teriyaki chicken, you need simple yet flavorful ingredients. The chicken thighs provide a juicy base. Using low-sodium soy sauce helps control salt levels. Honey adds sweetness, balancing the savory flavors. Rice vinegar gives a slight tang that brightens the dish. Sesame oil adds a rich, nutty taste that works well with the chicken. Fresh garlic and ginger enhance the overall flavor. Cornstarch helps thicken the sauce for a glossy finish. Black pepper adds a hint of spice. - Chopped green onions - Sesame seeds For a pop of color and texture, consider garnishing with chopped green onions and sesame seeds. These toppings not only look good but also add fresh, crunchy notes. You can sprinkle them on just before serving for maximum flavor. - Rice - Steamed vegetables Baked teriyaki chicken pairs well with rice. The rice absorbs the delicious sauce, making each bite satisfying. Steamed vegetables are a great addition, providing nutrients and a fresh taste. You can use broccoli, carrots, or snap peas for a balanced meal. These sides complement the rich flavors of the chicken and make your plate appealing. {{ingredient_image_1}} 1. First, preheat your oven to 400°F (200°C). This step is key for even cooking. 2. Line a baking dish with aluminum foil. This makes cleanup quick and easy. 3. In a medium bowl, mix the teriyaki sauce. Combine soy sauce, honey, rice vinegar, sesame oil, minced garlic, grated ginger, and black pepper. Whisk it well until smooth. 1. Place the chicken thighs in the baking dish, skin-side up. 2. Pour the teriyaki sauce over the chicken. Make sure to coat each piece well. 3. Bake the chicken in the oven for 30 minutes. This helps the flavors meld into the meat. 1. After 30 minutes, take the baking dish out. Move the chicken to a plate carefully. 2. Pour the remaining sauce into a saucepan. Bring it to a boil over medium heat. 3. Add the cornstarch mixture to the boiling sauce. Stir continuously until it thickens, which takes about 2-3 minutes. 4. Return the chicken thighs to the baking dish. Coat them with the thickened sauce. 5. Bake for an additional 10-15 minutes. Check the internal temperature; it should reach 165°F (75°C). 6. Let the chicken rest for 5 minutes before serving. This helps keep it juicy. To cook chicken thighs just right, use a meat thermometer. Insert it into the thickest part of the thigh. The chicken should reach 165°F (75°C) to be safe. This ensures it is juicy and cooked through. When choosing chicken, go for skin-on and bone-in thighs. They have more flavor and moisture than breasts. The bone also helps the chicken cook evenly. If you want a spicy kick, add red pepper flakes to the teriyaki sauce. Just a pinch can make a big difference. You can also add sriracha for more heat. Adding vegetables makes this dish even better. Try carrots or bell peppers. They roast well and soak up the teriyaki flavor. You can toss them in the baking dish with the chicken. To make cleanup easy, line your baking dish with foil. After cooking, you can simply toss the foil away. This saves time and effort. If you have leftover sauce, store it in an airtight container. It keeps in the fridge for about a week. You can use it for other meals or as a dip. Pro Tips Use Fresh Ingredients: Fresh garlic and ginger will significantly enhance the flavor of your teriyaki sauce compared to dried or jarred alternatives. Marinate for Better Flavor: For an even richer taste, marinate the chicken thighs in the teriyaki sauce for at least 30 minutes or up to overnight in the refrigerator before baking. Check Temperature: Always use a meat thermometer to ensure the chicken reaches an internal temperature of 165°F (75°C) for safe consumption. Serve with Sides: Pair your baked teriyaki chicken with steamed rice or sautéed vegetables to create a balanced and flavorful meal. {{image_2}} You can switch things up with different proteins. If you want a leaner dish, use chicken breast. Chicken thighs are great for juicy flavor. If you want a meat-free option, try tofu. Tofu soaks up teriyaki sauce well. Pork is another tasty choice. Use pork tenderloin for a sweet and savory twist. Get creative with flavors! Adding citrus can brighten your dish. Try orange or lime juice for a fresh taste. You can also mix in herbs or spices. Chili flakes can add a nice kick. This way, you can tailor the dish to your mood or season. For gluten-free diets, make simple swaps. Use gluten-free soy sauce instead of regular. It tastes just as good! If you need to thicken your sauce, cornstarch works well. You can also use arrowroot powder or potato starch as alternatives. Enjoy your teriyaki chicken without worry! To keep your baked teriyaki chicken thighs fresh, store them properly. First, let the chicken cool down to room temperature. Then, place the chicken in airtight containers. Glass or plastic containers work well. Make sure to seal them tight. You can keep the chicken in the fridge for up to four days. If you want to eat it later, freezing is a good option. When you are ready to eat the leftovers, reheating is key. The best way to reheat chicken is in the oven. Preheat your oven to 350°F (175°C). Place the chicken in an oven-safe dish, cover it with foil, and heat for about 20 minutes. This method keeps the chicken juicy. You can also use a microwave, but be careful. Heat in short bursts of one minute, checking often to avoid drying it out. Freezing your teriyaki chicken thighs is easy. Wrap each thigh in plastic wrap tightly. Then, put them in a freezer bag. Remove as much air as you can. This helps prevent freezer burn. You can freeze the chicken for up to three months. When you want to eat it, thaw the chicken in the fridge overnight. This keeps it safe and tasty. Bake chicken thighs for about 30 to 45 minutes at 400°F. The exact time depends on the thickness of the thighs. Thicker pieces may need more time. Always check the internal temperature. It should reach 165°F for safety. Use a meat thermometer for best results. This ensures juicy, safe chicken. Yes, making teriyaki sauce from scratch is easy and fun! Here’s a simple recipe: - 1/4 cup soy sauce (low-sodium is best) - 1/4 cup honey - 2 tablespoons rice vinegar - 1 tablespoon sesame oil - 2 cloves garlic, minced - 1 teaspoon fresh ginger, grated Mix these ingredients in a bowl. Whisk until smooth. This sauce is perfect for your chicken. You can adjust sweetness or add spice, too! Baked teriyaki chicken thighs can be healthy. Chicken thighs provide protein and essential nutrients. The sauce has soy sauce and honey, which adds flavor but also sugar. - One chicken thigh has about 250-300 calories. - It also brings protein and healthy fats. Pair it with brown rice and veggies for a balanced meal. Use low-sodium soy sauce for less salt. Enjoy your healthy, tasty dish! This blog post covered making delicious chicken teriyaki with ease. We explored key ingredients like chicken thighs and teriyaki sauce components. You learned the best prep steps, baking times, and cooking tips for perfect results. We also discussed tasty variations and storage methods. Cooking can be fun and rewarding. Enjoy your meal and get creative in the kitchen. Happy cooking!

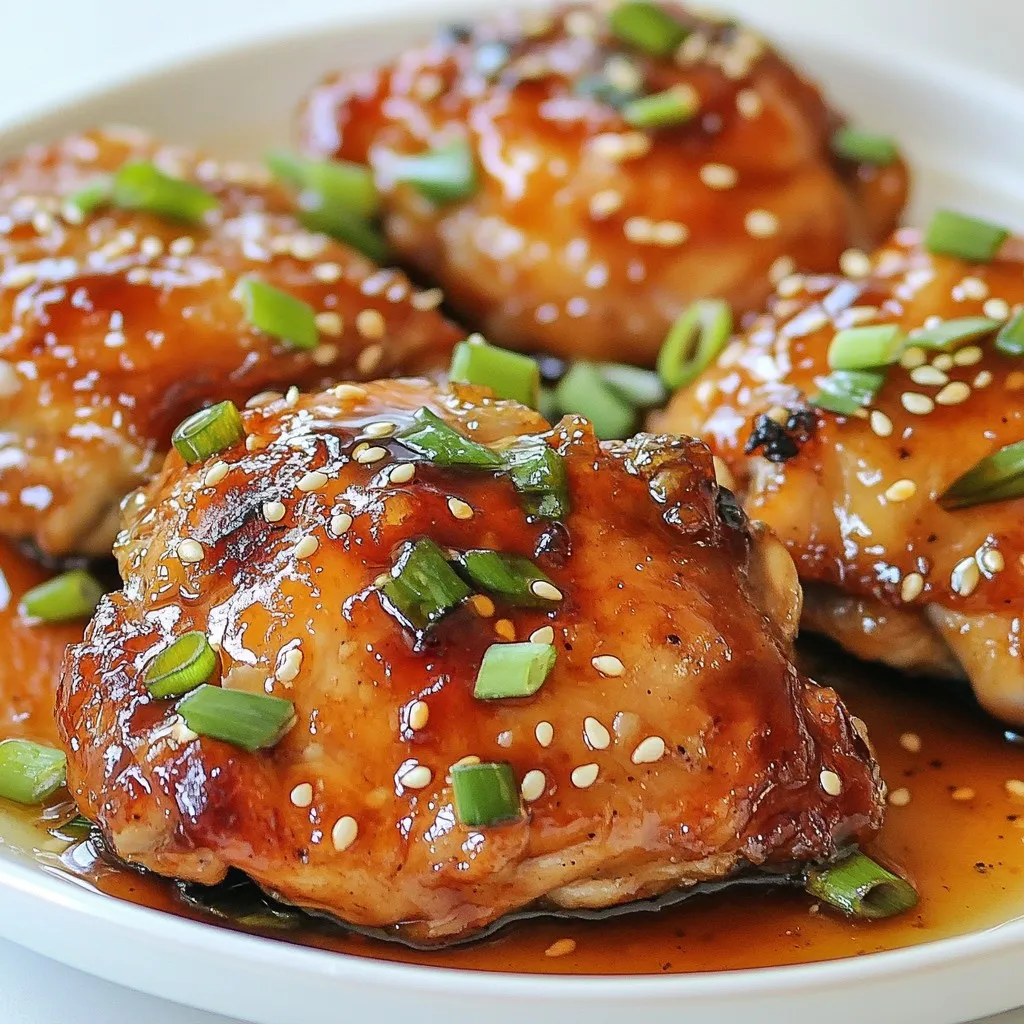
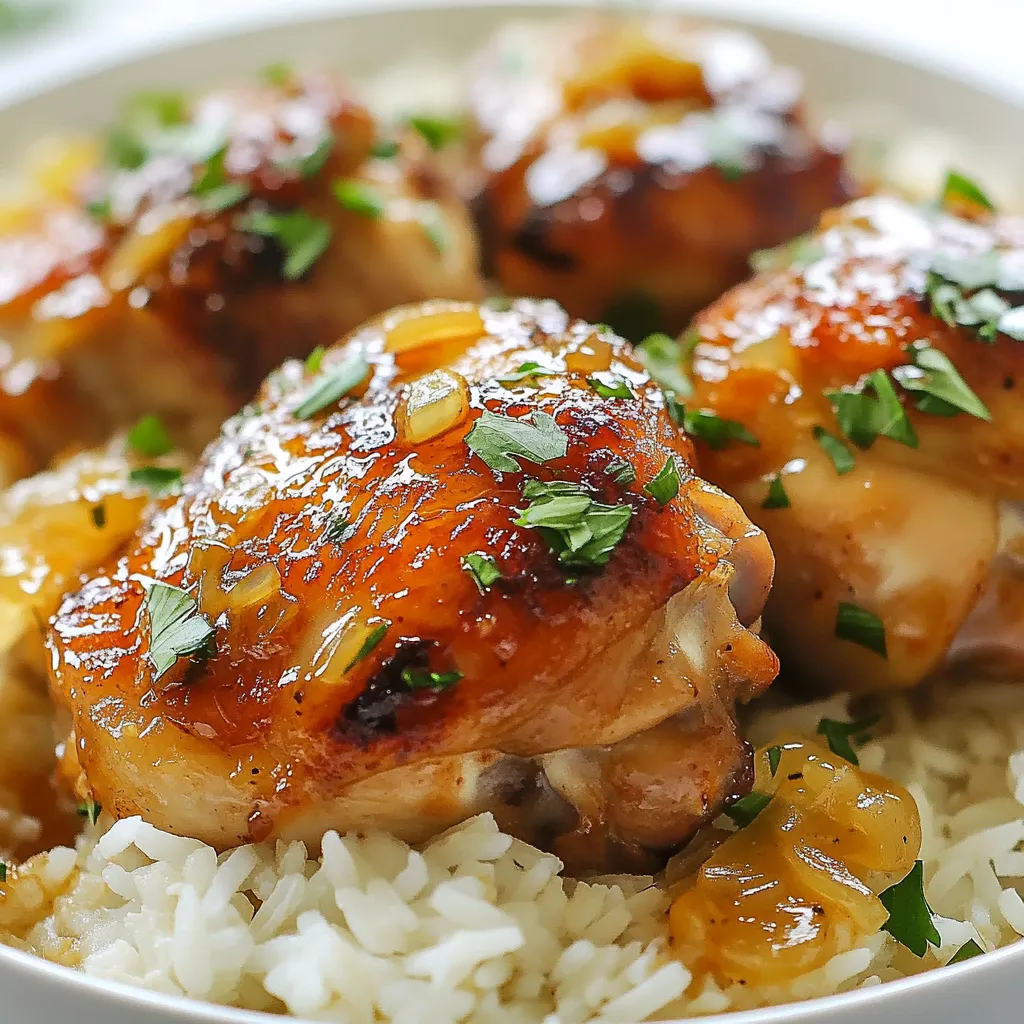
Are you ready to dive into a dish that’s both juicy and packed with flavor? Baked teriyaki chicken thighs are your answer! I’ll show you how to prepare this easy …

Read more

Categories Dinner

Apple Cider Doughnut Muffins Delightful and Easy Treat

December 4, 2025January 15, 2025 by Chef Nate
To make these delightful muffins, gather the following ingredients: - 1 cup apple cider - 1 ½ cups all-purpose flour - 1 teaspoon baking powder - ½ teaspoon baking soda - ½ teaspoon salt - 1 teaspoon ground cinnamon - ½ teaspoon ground nutmeg - ¾ cup granulated sugar - 2 large eggs - ½ cup unsweetened applesauce - ½ cup vegetable oil - 1 teaspoon vanilla extract - ½ cup granulated sugar (for coating) - 1 teaspoon ground cinnamon (for coating) Each ingredient plays a key role in flavor and texture. The apple cider gives a rich taste. The spices add warmth and depth. You can add a few optional ingredients to make these muffins even better: - Chopped nuts: Walnuts or pecans add crunch. - Raisins or dried apples: These bring a sweet, chewy element. - Zest of an orange: This adds a citrusy zing. These extras can elevate your muffins to a new level of deliciousness. Feel free to experiment! Sometimes, you may need to swap ingredients. Here are some great substitutions: - All-purpose flour: Use whole wheat flour for a nuttier taste. - Granulated sugar: Try brown sugar for a richer flavor. - Vegetable oil: Substitute with melted coconut oil for a tropical twist. These swaps can help you customize your muffins while keeping them tasty. Enjoy the process of making these treats! {{ingredient_image_1}} Start by preheating your oven to 350°F (175°C). Lightly grease your muffin tin so the muffins don’t stick. Next, pour 1 cup of apple cider into a small saucepan. Heat it on medium until it boils. Then, lower the heat and let it simmer for about 10 to 15 minutes. You want it to reduce to about half a cup. Once done, set it aside to cool. In a mixing bowl, whisk together 1 ½ cups of flour, 1 teaspoon of baking powder, ½ teaspoon of baking soda, ½ teaspoon of salt, 1 teaspoon of ground cinnamon, and ½ teaspoon of ground nutmeg. In another large bowl, beat ¾ cup of sugar and 2 large eggs until they are light and fluffy. Slowly mix in the cooled apple cider, ½ cup of unsweetened applesauce, ½ cup of vegetable oil, and 1 teaspoon of vanilla extract. Combine these well. Now, add the dry ingredients to the wet mix. Stir gently until just combined; be careful not to over-mix. It’s okay if there are some lumps. Next, fill each muffin cup about two-thirds full with this batter. Place your filled muffin tin in the preheated oven. Bake for 18 to 20 minutes. Check if they are ready by inserting a toothpick in the center. If it comes out clean, they are done! Once baked, remove the muffins from the oven and let them cool in the pan for 5 minutes. Then, transfer them to a wire rack to cool completely. While your muffins cool, mix ½ cup of granulated sugar with 1 teaspoon of ground cinnamon in a shallow dish. This will be your coating. When the muffins are still warm, roll each one in the cinnamon-sugar mix until fully coated. This adds a delightful sweetness and a lovely crunch. For a beautiful display, arrange the muffins on a platter and sprinkle some extra cinnamon-sugar over the top. You can also serve them with fresh apple slices for a tasty touch! Enjoy your warm, fragrant apple cider doughnut muffins. To get the best muffin texture, you must mix the batter correctly. Start by reducing the apple cider to concentrate its flavor. This step adds moisture and richness. In your mixing bowls, use one for dry ingredients and another for wet ingredients. When combining them, stir gently. Over-mixing leads to tough muffins. You want light and fluffy muffins, not dense bricks. Here are some common mistakes to steer clear of while baking: - Skipping the Apple Cider Reduction: This step boosts flavor. Don’t skip it. - Over-mixing the Batter: This makes your muffins dense. Mix just until combined. - Not Preheating the Oven: Muffins need a hot oven to rise properly. Always preheat first. - Using Freshly Ground Spices: Old spices lose flavor. Fresh is best for taste. The right tools make baking easy and fun. Here are my top recommendations: - Muffin Tin: A non-stick tin is best for easy release. - Mixing Bowls: Use at least two bowls, one for wet and one for dry. - Whisk and Spatula: A whisk combines ingredients well, and a spatula helps with folding. - Cooling Rack: This lets the muffins cool evenly, keeping them soft. With these tips, your apple cider doughnut muffins will be a hit! Pro Tips Use Fresh Apple Cider: Fresh apple cider will impart a richer flavor to your muffins compared to processed varieties. Don’t Overmix: To keep your muffins light and fluffy, mix the batter until just combined. Overmixing can lead to dense muffins. Adjust Cinnamon to Taste: Feel free to add more or less cinnamon based on your preference for spice; it truly enhances the autumn flavor. Cool Before Coating: Allow the muffins to cool slightly before rolling them in the cinnamon-sugar mixture to ensure the coating sticks well. {{image_2}} You can make these muffins vegan by swapping some ingredients. Use flax eggs instead of regular eggs. Mix one tablespoon of ground flaxseed with three tablespoons of water for each egg. Replace the applesauce with more apple cider if needed. Use a plant-based oil in place of vegetable oil. These small changes keep the muffins moist and tasty. For a gluten-free version, switch to a gluten-free all-purpose flour blend. Check that it contains xanthan gum, which helps with texture. Keep the rest of the ingredients the same. The muffins will still rise and taste great. You might need to bake them a bit longer, so keep an eye on them. You can add fun flavors to your muffins. Here are some great options: - Nuts: Chopped walnuts or pecans add a nice crunch. - Chocolate chips: Dark or milk chocolate chips make the muffins sweet and rich. - Dried fruit: Adding raisins or cranberries can bring a fruity twist. Feel free to mix and match these ideas. You can create a unique flavor each time you bake! Store leftover muffins in an airtight container. Keep them at room temperature. They stay fresh for up to three days. If you want them to last longer, consider freezing. To freeze, wrap each muffin tightly in plastic wrap. Place the wrapped muffins in a freezer bag. They can last up to three months in the freezer. Make sure to label the bag with the date. This helps you keep track of freshness. To reheat, take a muffin out of the freezer. Let it thaw in the fridge overnight. You can also heat it in the microwave for about 15-20 seconds. For a crispier top, warm it in the oven at 350°F (175°C) for 5-10 minutes. Enjoy your warm apple cider doughnut muffins! Yes, you can make these muffins ahead of time. Bake them, then cool completely. Store them in an airtight container at room temperature. They stay fresh for up to three days. If you want to keep them longer, freeze them. Just wrap each muffin well and place them in a freezer bag. They last for about three months. Thaw them overnight in the fridge when you're ready to eat. The best way to serve these muffins is warm. Roll them in cinnamon-sugar right after they cool. This adds a sweet crunch. You can also serve them with apple slices. They pair perfectly with hot cider or coffee. For a fun twist, drizzle some caramel sauce on top. This adds extra flavor and a nice touch for guests. You can find premade apple cider doughnut muffins at local bakeries or farmers' markets. Many grocery stores also sell them in the fall. Check the bakery section for fresh options. If you want a specific brand, look online at specialty food shops. They often ship directly to your home, making it easy to enjoy these treats anytime. In this post, we explored how to make apple cider doughnut muffins. We covered the main ingredients and optional ones for extra flavor. You learned step-by-step instructions to prep, bake, and finish your muffins. The tips shared will help you avoid common mistakes. We also looked at fun variations, storage tips, and answered some FAQs. Now you can create delicious muffins with ease. Enjoy baking these treats and sharing them with others!

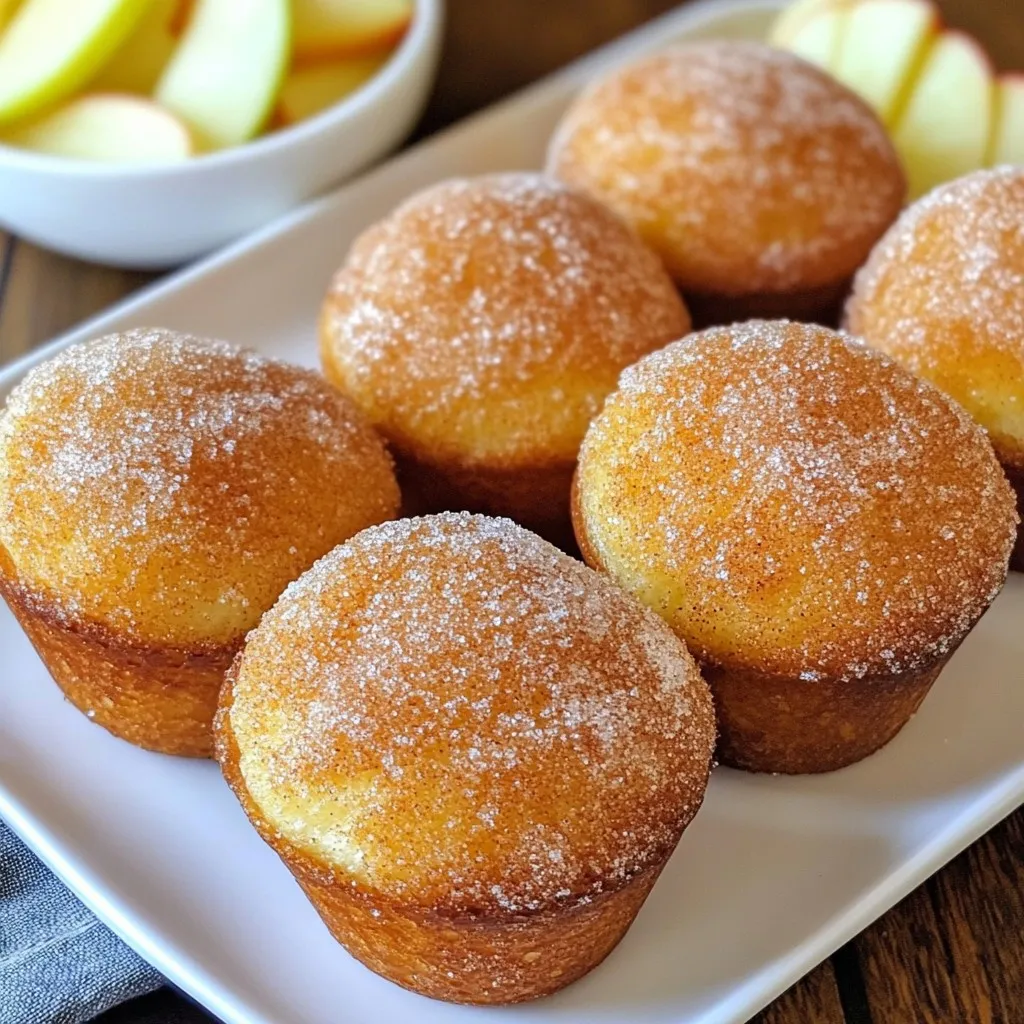
If you crave a warm, sweet treat, you’ve found your new favorite! These Apple Cider Doughnut Muffins are simple to make and bursting with autumn flavors. With tender bites and …

Read more

Categories Desserts

Colorful Vegetable Soup Packed with Flavorful Goodness

October 8, 2025January 14, 2025 by Chef Nate
- 1 tablespoon olive oil - 1 onion, chopped - 3 cloves garlic, minced - 2 carrots, diced - 1 red bell pepper, chopped - 1 yellow bell pepper, chopped - 1 zucchini, diced - 1 cup green beans, trimmed and cut into 1-inch pieces - 1 cup frozen peas - 6 cups vegetable broth - 1 teaspoon dried thyme - 1 teaspoon smoked paprika - Salt and pepper to taste - Fresh parsley for garnish For this colorful vegetable soup, I start with some olive oil. It adds a rich flavor and helps to cook the veggies. Next, I chop one onion and mince three cloves of garlic. These two are key for a great base. Then, I choose an array of colorful vegetables. I use two diced carrots, one red bell pepper, and one yellow bell pepper. Each one adds color and taste. I also add one diced zucchini for extra crunch. Don’t forget about the green beans. I cut one cup into one-inch pieces. Frozen peas also go in. They’re sweet and bright. For the broth, I use six cups of vegetable broth. It gives the soup depth and warmth. To season, I add one teaspoon of dried thyme and one teaspoon of smoked paprika. A pinch of salt and pepper finishes it off. Finally, I like to garnish with fresh parsley. It adds a pop of color and freshness. This mix of ingredients makes the soup not just colorful, but also full of flavor. {{ingredient_image_1}} Start by heating olive oil in a large pot. Use medium heat for this step. Add the chopped onion and cook it for about five minutes. You want the onion to turn soft and clear. Next, stir in the minced garlic. Cook it for one more minute. This will make your kitchen smell wonderful! Now, it's time to add the colorful vegetables. Toss in the diced carrots, red and yellow bell peppers, and zucchini. Sauté these veggies for five to seven minutes. Stir them often. You want them to soften but still keep some crunch. After the base is ready, it's time to stir in more ingredients. Add the green beans and frozen peas to the pot. Mix them well with the sautéed veggies. Then, pour in six cups of vegetable broth. This gives your soup a rich flavor. Season the soup with dried thyme, smoked paprika, salt, and pepper. Stir everything together nicely. Bring the soup to a boil, then reduce the heat. Let it simmer for 20 to 25 minutes. This helps all the flavors blend and the veggies to become tender. Once the time is up, taste the soup. Adjust the seasoning if needed. Serve it hot, and don’t forget to add fresh parsley on top for a nice look! To make your soup pop with color, choose a mix of veggies. I love using: - Carrots for orange - Red and yellow bell peppers for sweetness - Zucchini for a fresh taste - Green beans and peas for a bright green touch These choices create a rainbow of colors. Each veggie adds its own charm. Cooking times matter for texture. For soft veggies, simmer them for 20–25 minutes. If you want a bit of crunch, add green beans later in the cooking. This keeps them tender yet crisp. Seasoning brings your soup to life. Start with salt and pepper. Use about 1 teaspoon of each. Taste as you go. If it lacks flavor, add more. I recommend adding dried thyme and smoked paprika. They give depth and warmth. You can also experiment with other herbs. Try fresh basil or dill for a fun twist. Adding herbs at the end keeps their flavors bright. Just sprinkle them on top before serving. This simple step makes a big difference. Pro Tips Fresh Vegetables: Use seasonal vegetables for the best flavor and nutritional value. Fresh produce can elevate the taste of your soup. Adjusting Consistency: If you prefer a creamier soup, blend a portion of the soup and stir it back in for a smoother texture. Herb Variations: Experiment with different herbs like basil or cilantro for a unique flavor profile that complements the vegetables. Make Ahead: This soup can be made in advance and stored in the fridge for up to 3 days, allowing the flavors to develop even more. {{image_2}} You can change the veggies in this soup based on the season. In spring, try fresh peas or asparagus. In fall, add butternut squash or pumpkin. You can also use whatever you have on hand. This makes the soup fun and fresh each time. Leafy greens are a great addition, too. Spinach, kale, or Swiss chard work well. Add them at the end of cooking. This keeps them bright and tender. Want to boost the protein? You can add beans or legumes. Chickpeas or black beans fit well into this soup. They add creaminess and a hearty feel. For meat lovers, diced chicken or turkey is a great choice. Cook the meat first, then add it to the soup. This way, it soaks up all the yummy flavors. You can also use sausage for a spicier kick. To keep your colorful vegetable soup fresh, use airtight containers. Glass or plastic containers work well. Make sure the soup cools down before sealing it. This helps keep the flavors intact. Store it in the fridge for up to five days. When you want to eat it again, just reheat on the stove or in the microwave. Freezing soup is easy and great for later meals. First, let the soup cool completely. Then, pour it into freezer-safe bags or containers. Leave some space at the top for expansion. Label each bag with the date. You can freeze the soup for up to three months. When you're ready to eat, take it out and thaw in the fridge overnight. For quick thawing, use the microwave. After thawing, heat it on the stove until hot. Enjoy your soup packed with flavor! This colorful vegetable soup can last in your fridge for about 3 to 5 days. Store it in a sealed container to keep it fresh. Always check for any signs of spoilage before eating. If you want to enjoy it later, freezing is a great option. Yes, you can easily customize the vegetables in this soup. Use any fresh or frozen veggies you enjoy. If you have broccoli, spinach, or corn, feel free to toss them in. The key is to keep a balance of colors and textures for a tasty result. Absolutely! This vegetable soup is vegan-friendly since it uses only plant-based ingredients. The vegetable broth and all the vegetables make it healthy and satisfying. You can enjoy this soup without any animal products. This blog post covered how to make a delicious vegetable soup. You learned about key ingredients like olive oil, onions, garlic, and colorful veggies. I explained step-by-step instructions for sautéing and boiling. You also found tips for vibrant colors and flavor improvements. There were variations for seasonal options, proteins, and how to store leftovers. Experiment with the recipes and trust your taste. Your vegetable soup will be unique! Enjoy your cooking adventure!

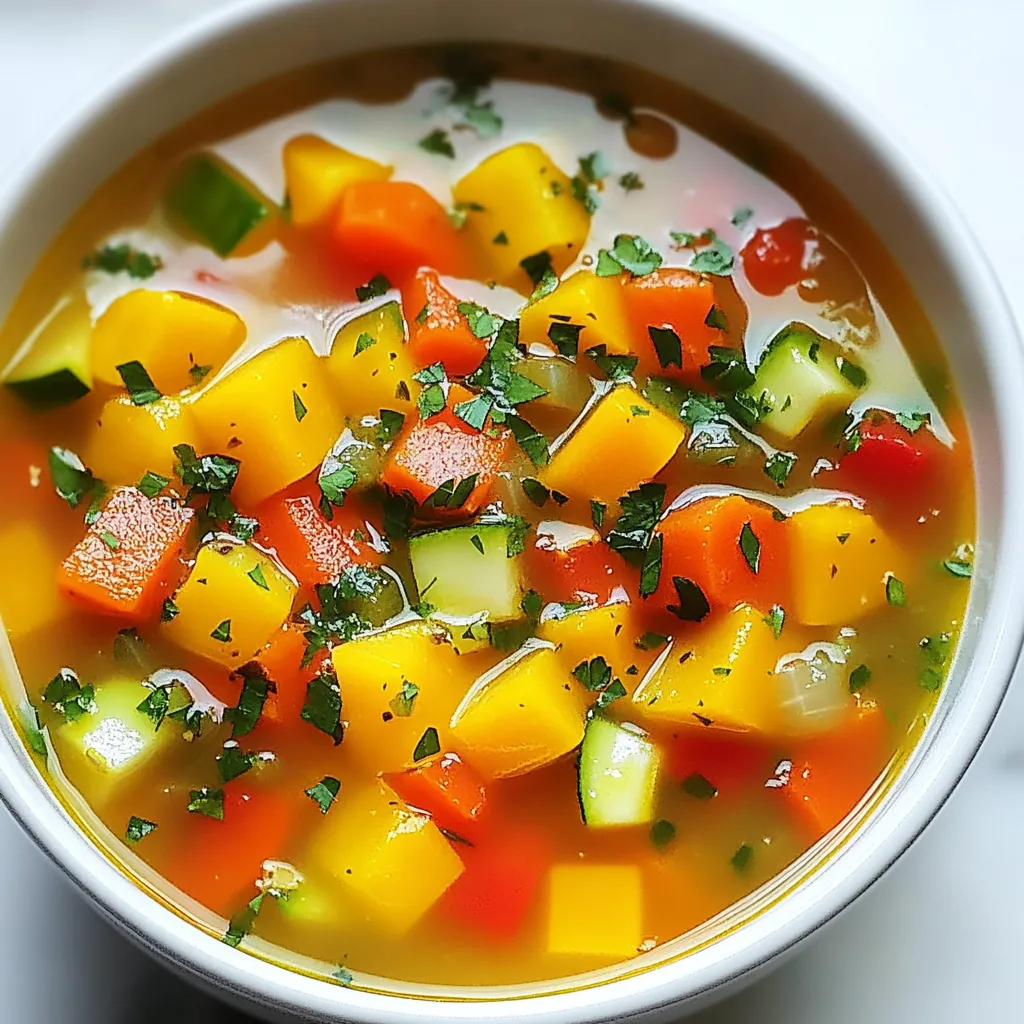
Are you ready to whip up a delicious bowl of Colorful Vegetable Soup? This dish is more than just a feast for the eyes; it’s packed with flavor and goodness! …

Read more

Categories Dinner

Street Style Chicken Tacos Flavorful and Simple Meal

October 17, 2025January 13, 2025 by Chef Nate
To make these tasty street-style chicken tacos, you need simple, fresh ingredients: - 2 chicken breasts, diced - 1 tablespoon olive oil - 1 teaspoon cumin - 1 teaspoon smoked paprika - 1 teaspoon garlic powder - 1/2 teaspoon salt - 1/2 teaspoon black pepper - 1/2 cup diced onion - 1/2 cup chopped fresh cilantro - 1 jalapeño, finely chopped (optional for heat) - 8 small corn tortillas Adding a few extra ingredients can boost the flavor: - Extra spices like chili powder or oregano - Fresh lime juice for a zesty kick - A pinch of cayenne for heat Toppings and sides make your tacos even better: - 1 cup shredded lettuce - 1 avocado, sliced - Salsa of choice for topping - Lime wedges for squeezing over tacos {{ingredient_image_1}} To prepare the chicken, start by dicing the two chicken breasts into small pieces. This helps them cook evenly. Next, take a medium bowl and add the diced chicken. Pour in one tablespoon of olive oil. Then, sprinkle in one teaspoon each of cumin, smoked paprika, and garlic powder. Add half a teaspoon of salt and black pepper as well. Mix everything well. Coating the chicken with spices makes it flavorful. Heat a skillet over medium-high heat. Once hot, add the seasoned chicken from the bowl. Cook for about 7-10 minutes. Stir occasionally to ensure even cooking. The chicken should be cooked through and have a slight char. After that, add half a cup of diced onion and the jalapeño if you like heat. Stir for another 2 minutes until the onions become soft and clear. Now it's time to assemble the tacos! First, warm the corn tortillas in a dry skillet for about 30 seconds on each side. You can also use a damp cloth and microwave them for 20-30 seconds. Once warm, place a portion of the chicken mixture on each tortilla. Top with shredded lettuce, avocado slices, and chopped cilantro. Finally, serve the tacos with lime wedges and your favorite salsa on the side. Enjoy your tasty creation! To get that true street food taste, use fresh ingredients. Fresh cilantro adds a bright note. Use fresh lime juice for zing. The spices are key too. Cumin and smoked paprika give warmth and depth. Mix these spices well with the chicken. Let the chicken marinate for at least 15 minutes for deeper flavor. One common mistake is overcooking the chicken. This makes it dry. Cook chicken until golden brown and juicy. Don't skip the onion and jalapeño. They add great flavor and texture. Lastly, avoid cold tortillas. Warm tortillas make a big difference in taste and texture. To warm your tortillas, use a dry skillet. Heat each tortilla for about 30 seconds. Flip and repeat. This makes them soft and easy to fold. You can also wrap them in a damp cloth and microwave. Just 20-30 seconds works wonders. Keep them warm in a towel while you finish cooking the chicken. Pro Tips Marinate for Flavor: For even more flavor, marinate the chicken in the spice mixture for at least 30 minutes before cooking. This allows the spices to penetrate the meat better. Use Fresh Ingredients: Fresh cilantro and lime juice will elevate the taste of your tacos significantly. Always opt for fresh produce when possible. Keep Tortillas Warm: To keep your tortillas warm while assembling, wrap them in a clean kitchen towel. This will prevent them from drying out and becoming brittle. Customize Your Toppings: Feel free to customize your toppings based on preference! Add cheese, sour cream, or other veggies for a unique twist on classic chicken tacos. {{image_2}} You can try different proteins for your tacos. Ground beef or pork works great. Shredded chicken also adds a nice touch. If you want something unique, try using shrimp or fish. These options bring different flavors to your meal. Each protein can use the same spices as the chicken. Just adjust your cooking time based on the meat you choose. You can easily make vegetarian or vegan tacos. Use black beans, lentils, or chickpeas for protein. Dice up some bell peppers or zucchini for extra crunch. You can also roast vegetables like sweet potatoes or corn. These add flavor and nutrition. For a vegan option, skip the cheese and sour cream. Instead, use avocado or a cashew cream for a creamy touch. Get creative with your toppings to make your tacos special. Instead of just lettuce, add shredded cabbage for crunch. You can use pickled onions or radishes for a tangy bite. Try different salsas like mango or pineapple for sweetness. A yogurt sauce can also add a nice twist. Experiment with different herbs like mint or dill for fresh flavors. Each topping can change the whole taco experience! After enjoying your street style chicken tacos, you may have some leftovers. To store them, place the chicken and toppings in separate airtight containers. This keeps everything fresh. Store the chicken in the fridge for up to three days. Keep the tortillas wrapped in foil or plastic wrap to avoid drying out. When you're ready to eat your leftovers, reheating is easy. For the chicken, heat a skillet over medium heat. Add the chicken and stir until warm. This keeps the chicken juicy. For the tortillas, warm them in the skillet for about 30 seconds on each side. This makes them soft and ready to fold. If you want to make street style chicken tacos ahead of time, freezing is a great option. Cook the chicken as directed and let it cool. Place the chicken in a freezer-safe bag. Remove air to prevent freezer burn. You can freeze the chicken for up to three months. When you're ready to eat, thaw it in the fridge overnight. Reheat as mentioned before. Enjoy your tasty meal any day! I recommend using boneless, skinless chicken breasts. They cook quickly and stay juicy. You can also use thighs for more flavor. Both options work well in tacos. Just make sure to cut the chicken into small, even pieces. This helps the spices coat the meat evenly. Yes, you can prepare the chicken in advance. Cook it and store it in a container. Keep it in the fridge for up to three days. When ready to serve, just warm the chicken in a skillet. You can also reheat it in the microwave if needed. For these tacos, a fresh pico de gallo is a great choice. It's bright and refreshing. You can also try a spicy salsa verde. This adds a nice kick. If you love heat, go for a mango salsa for sweetness. Each option enhances the flavors of the chicken perfectly. We explored how to make delicious street-style chicken tacos. First, we covered the key ingredients, cooking steps, and helpful tips. Then, we looked at tasty variations and storage methods. For your next taco night, use these ideas to impress family and friends. Remember, less is often more. Stick to fresh flavors and enjoy the process. With practice, you’ll master the art of street tacos. Happy cooking!

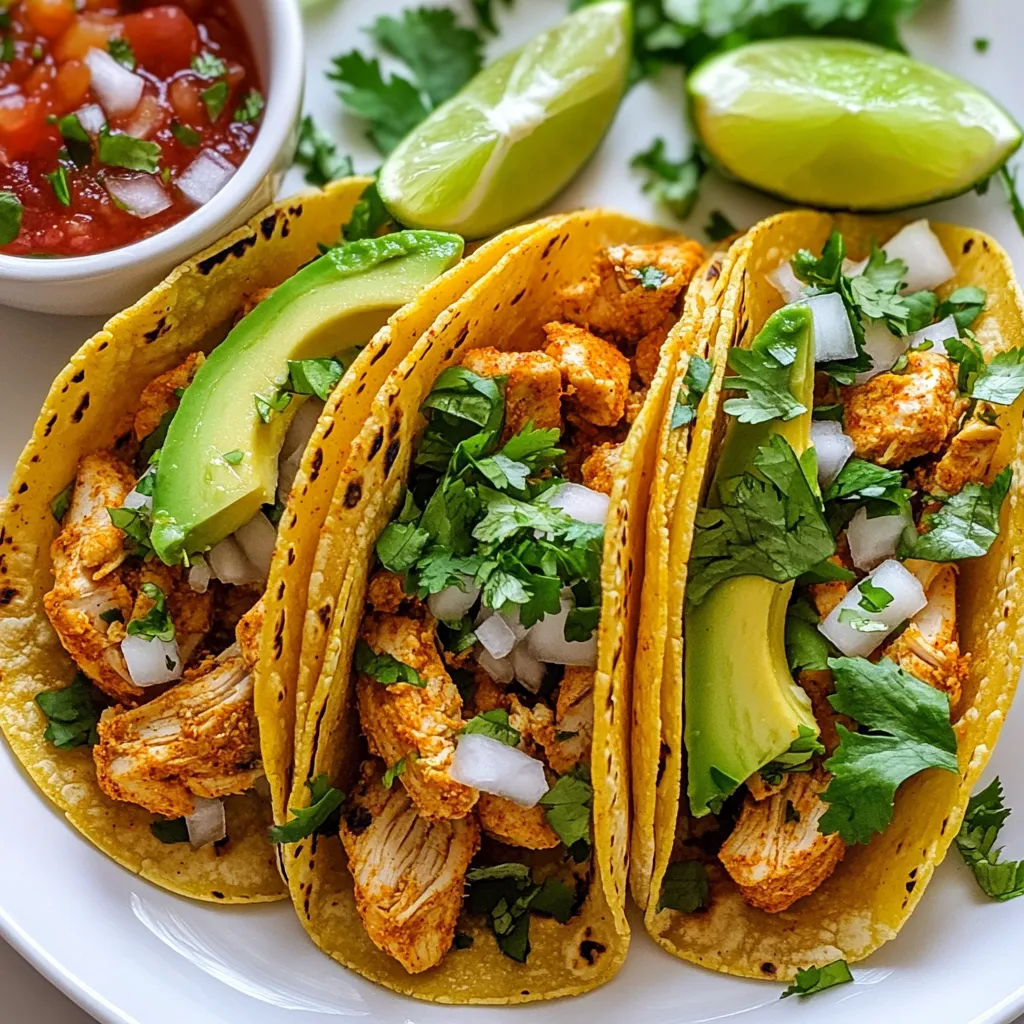
Craving a quick, tasty meal? Street style chicken tacos are your answer! In this post, I’ll share my simple recipe for these flavorful tacos. You’ll learn what ingredients to use, …

Read more

Categories Dinner

Yaki Udon Noodles Flavorful and Simple Recipe Guide

October 10, 2025January 13, 2025 by Chef Nate
To make a tasty bowl of Yaki Udon, you'll need: - 300g udon noodles - 2 tablespoons vegetable oil - 1 medium onion, thinly sliced - 2 cloves garlic, minced - 1 medium carrot, julienned - 1 red bell pepper, sliced - 100g snap peas, trimmed - 4 green onions, chopped - 3 tablespoons soy sauce - 1 tablespoon sesame oil - 1 tablespoon mirin (optional) - 1 teaspoon grated ginger - Salt and pepper to taste - Sesame seeds for garnish These ingredients come together to create a warm, savory dish that bursts with flavor. Feel free to get creative with your Yaki Udon. You can add: - Mushrooms for an earthy taste - Broccoli for extra crunch - Spinach for added nutrients - Bean sprouts for a fresh bite These options can change the texture and flavor, making each dish unique. To make your Yaki Udon more filling, consider adding protein. Here are some great choices: - Sliced grilled chicken - Tofu (great for a vegetarian option) - Shrimp for a seafood twist - Beef strips for a heartier meal Adding protein not only enhances the taste but also makes it a more balanced meal. Enjoy crafting your perfect Yaki Udon! {{ingredient_image_1}} First, boil a large pot of water. Add 300g of udon noodles. Cook them as the package says. This usually takes about 8-10 minutes. Once done, drain the noodles. Rinse them under cold water to stop the cooking. Set the noodles aside for later. Grab a large skillet or wok. Heat 2 tablespoons of vegetable oil over medium-high heat. Add the sliced onion and minced garlic. Stir them for about 2-3 minutes. The onion should turn soft and clear. Next, toss in the julienned carrot, sliced red bell pepper, and trimmed snap peas. Stir-fry these for around 4-5 minutes. You want them to be tender but still crunchy. Now it’s time for the noodles. Add the cooked udon noodles to your skillet. Use tongs to mix them with the veggies. Make sure everything is well combined. Pour in 3 tablespoons of soy sauce, 1 tablespoon of sesame oil, and 1 tablespoon of mirin if you want. Add in the grated ginger next. Season your dish with salt and pepper to taste. Stir-fry everything for another 3-4 minutes until it is all hot. Take the skillet off the heat. Stir in the chopped green onions for freshness. Sprinkle sesame seeds on top for a nice finish. Serve your Yaki Udon hot. If you like, you can add sliced grilled chicken or tofu for extra protein. Enjoy your meal! To cook udon noodles just right, start with a large pot of boiling water. Make sure to use enough water so the noodles do not stick. Cook the noodles according to the package's directions. Usually, this takes about 5 to 10 minutes. After cooking, drain them well and rinse them under cold water. This stops the cooking process and keeps them chewy. Set them aside until you need them. To make your yaki udon really pop, use fresh ingredients. Fresh garlic and ginger give a strong flavor. Sauté the onions until they are soft and fragrant. This takes about 2 to 3 minutes. Add a mix of colorful veggies like carrots, bell peppers, and snap peas. Stir-fry them until they are tender but still crunchy. Then, mix in the cooked udon noodles. Pour in soy sauce, sesame oil, and mirin for a rich taste. Adjust the seasoning with salt and pepper for balance. One common mistake is overcooking the udon noodles. This can make them mushy. Always rinse them in cold water after boiling. Another mistake is not using enough oil in the pan. This helps prevent sticking and gives a nice finish. Don’t skip the ginger or garlic; they add a lot of flavor. Finally, avoid cooking the noodles and veggies together for too long. You want them to keep their vibrant colors and crunch. Pro Tips Perfectly Cooked Noodles: Make sure to cook the udon noodles just until al dente, as they'll continue to cook slightly when stir-frying with the vegetables. Vegetable Variations: Feel free to add or substitute any seasonal vegetables you have on hand, such as broccoli, zucchini, or mushrooms for added flavor and nutrition. Protein Boost: For a heartier meal, add sliced grilled chicken, shrimp, or tofu. Just cook the protein separately and toss it in at the end to heat through. Garnish for Extra Flavor: Finish your dish with a sprinkle of sesame seeds, chopped cilantro, or a squeeze of lime juice for an extra burst of flavor. {{image_2}} You can easily make Yaki Udon vegetarian or vegan. Just skip the meat and use tofu instead. Tofu adds protein and absorbs all the delicious flavors. You can also replace the mirin with a splash of rice vinegar. This keeps it vegan but still tasty. Feel free to mix up your veggies. Try broccoli, mushrooms, or bok choy for new flavors. You can also add zucchini or bean sprouts for extra crunch. The key is to use fresh and colorful vegetables. This makes your dish not just tasty but also beautiful. Different regions have their own styles of Yaki Udon. In Osaka, they might add seafood like shrimp or squid. In Tokyo, you'll find a spicier version with chili oil. Each region puts its spin on the dish. Explore these variations to find your favorite! To keep your Yaki Udon fresh, first let it cool. Place the noodles in an airtight container. You can keep leftovers in the fridge for up to three days. If you want to store them for longer, freeze them in a freezer-safe bag. They will last for about a month in the freezer. When you’re ready to enjoy your Yaki Udon again, there are a few good ways to reheat it. You can use the microwave for quick warming. Put the noodles in a bowl, add a splash of water, and cover it. Heat for about one to two minutes. Stir halfway through to heat evenly. If you prefer the stove, heat a skillet over medium heat. Add a little oil, then toss in the noodles. Stir until they are hot. I suggest using glass containers for storage. They keep your food fresh and don’t stain. If you prefer plastic, make sure they are BPA-free. Look for containers with tight lids to prevent leaks. Small containers are great for snacks, while larger ones work well for meals. Yaki Udon is a Japanese stir-fried noodle dish. It features thick udon noodles tossed with fresh vegetables. You can use soy sauce for a savory flavor. It’s quick to make and very tasty. The dish is often topped with green onions and sesame seeds. You can add protein like chicken or tofu for a heartier meal. Yes, you can make Yaki Udon in advance. Cook the noodles and store them in the fridge. You can also prepare the vegetables ahead of time. Just keep them separate to stay fresh. When ready to eat, just stir-fry everything together. This saves time on busy days. You can find Yaki Udon noodles in most grocery stores. Look in the Asian food aisle. You can also find them in Asian markets. Fresh or frozen noodles work well. If you can’t find them, look for other udon noodles. They will still taste great in this dish. If you need a soy sauce substitute, try tamari or coconut aminos. Both provide a similar flavor. You can also mix water with miso paste for a unique taste. If you want a gluten-free option, tamari is a great choice. Always taste and adjust to your liking. Yaki Udon is a tasty dish you can easily make at home. We covered key ingredients, cooking steps, and helpful tips. You can customize this meal based on your taste and diet. Whether you're a meat lover or prefer veggies, there’s an option for everyone. Storing and reheating leftovers is simple, making Yaki Udon a great choice for meal prep. Enjoy creating your own version of this classic dish! You'll find it fun and rewarding to make your Yaki Udon just right.

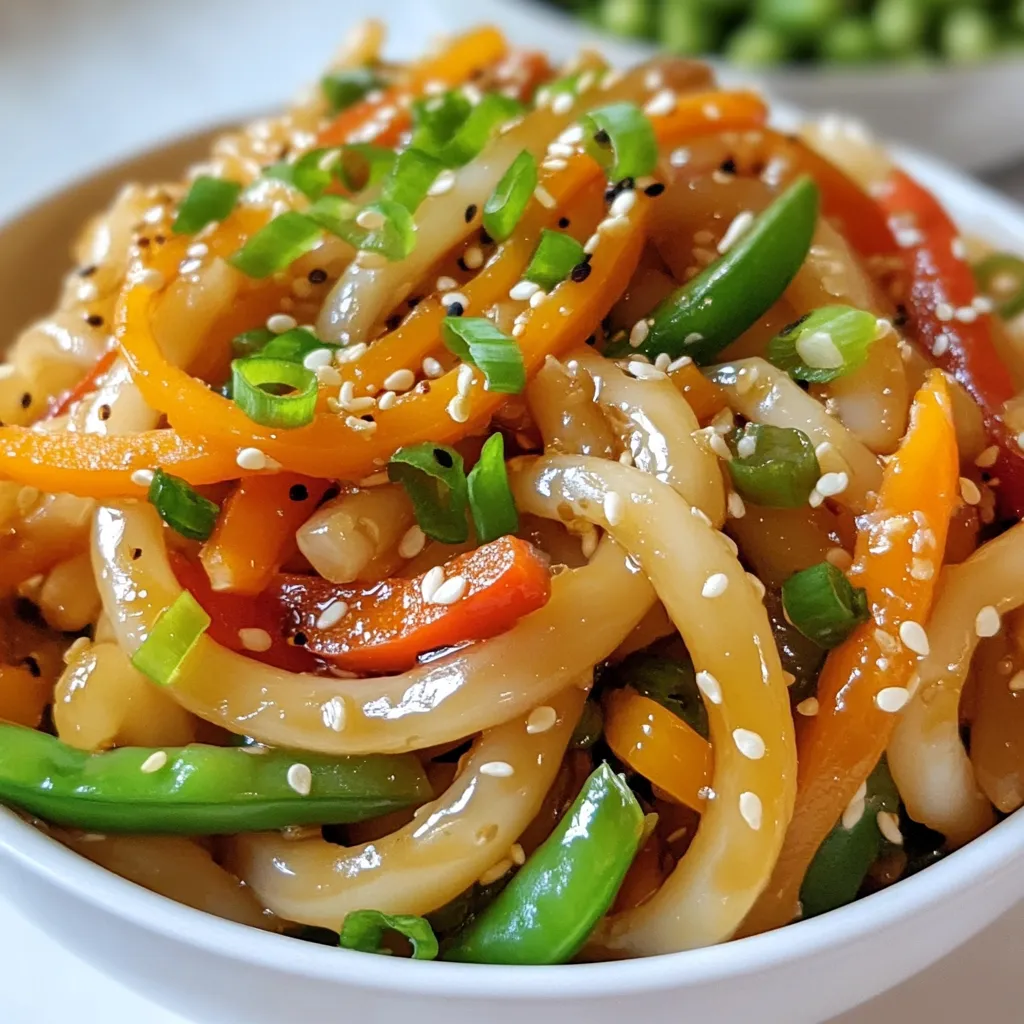
Yaki Udon noodles offer a tasty and easy meal perfect for any night. In this guide, I’ll share my simple recipe to help you make this delightful dish at home. …

Read more

Categories Dinner

Cranberry Orange Overnight Oats Delicious and Simple

November 15, 2025January 11, 2025 by Chef Nate
To make Cranberry Orange Overnight Oats, gather these ingredients: - 1 cup rolled oats - 2 cups almond milk (or any non-dairy milk) - 1/2 cup fresh or dried cranberries - Zest of 1 orange - Juice of 1 orange - 1 tablespoon maple syrup (adjust to taste) - 1/2 teaspoon vanilla extract - 1/4 teaspoon cinnamon - A pinch of salt You can add extra flavor and texture with these toppings: - Sliced almonds - Additional cranberries - Fresh orange segments - A dollop of yogurt Each ingredient brings unique benefits: - Rolled oats: They are high in fiber, which aids digestion and keeps you full. - Almond milk: It is low in calories and rich in vitamin E, promoting healthy skin. - Cranberries: They are packed with antioxidants that support your immune system. - Orange zest and juice: These add vitamin C, which helps your body fight infections. - Maple syrup: A natural sweetener that provides minerals like manganese and zinc. - Vanilla extract: It can help reduce stress and enhance mood. - Cinnamon: This spice may help lower blood sugar levels and reduce inflammation. - Salt: A small amount enhances flavor and balances the sweetness. These ingredients not only create a delicious meal but also offer health benefits. Enjoy crafting this nourishing dish! {{ingredient_image_1}} Start by gathering all your ingredients. You need rolled oats, almond milk, cranberries, orange zest, orange juice, maple syrup, vanilla extract, cinnamon, and salt. In a large bowl, mix the rolled oats and almond milk. Add the cranberries, orange zest, and orange juice. Then, pour in the maple syrup, vanilla extract, cinnamon, and a pinch of salt. Stir well until everything is mixed. Make sure the oats soak in the milk. This is key for great texture. Next, divide the mixture into Mason jars or airtight containers. Seal them tightly and place them in the fridge overnight. This allows the oats to soak and soften, absorbing all those lovely flavors. When morning comes, stir the oats in the jars. If you like it sweeter, add more maple syrup. You can serve the oats right in the jars. Top them off with sliced almonds, extra cranberries, orange segments, or a dollop of yogurt. This adds flavor and a nice look to your meal. Enjoy your tasty and simple breakfast! To make your oats just right, start with one tablespoon of maple syrup. After mixing, taste the oats. If you want it sweeter, add more syrup a little at a time. You can also try honey or agave syrup if you like. Each person has a different sweet tooth, so make it your own! Soaking oats overnight helps them get soft and creamy. Use a large bowl to mix everything well. Make sure all oats are covered in the liquid. This step helps the oats absorb the flavors. If you need a quicker soak, let them sit for at least 30 minutes before eating. One common mistake is not stirring enough. If you don’t mix well, some oats may stay dry. This can lead to uneven texture. Another mistake is using too little liquid. If the oats are too thick in the morning, just add more milk. Lastly, don’t skip on the toppings! They add flavor and texture that make your meal special. Pro Tips Use Fresh Ingredients: Fresh cranberries and oranges will enhance the flavor profile of your overnight oats, making them more vibrant and delicious. Experiment with Milk Alternatives: While almond milk is a great choice, feel free to try coconut milk or oat milk for a different flavor and texture. Customize Sweetness: Adjust the amount of maple syrup according to your taste preference; you can also use honey or agave syrup for a different sweetness level. Prep in Batches: Make a larger batch and store in the fridge for up to 4 days for a quick and healthy breakfast option throughout the week. {{image_2}} You can switch up the fruits in your overnight oats for fun. Berries like strawberries and blueberries add a sweet burst of flavor. Bananas give the dish a creamy texture and natural sweetness. You could also try apples or peaches for a different taste. Each fruit brings its own unique flavor and nutrients, making your dish exciting. You have choices when it comes to milk. Almond milk is great, but you can also use oat milk or soy milk. Each type of milk will change the flavor a bit. If you prefer dairy, whole or skim milk works too. Choose what fits your diet and taste best. You can boost the flavor of your overnight oats easily. A pinch of nutmeg adds warmth and depth. Honey brings extra sweetness and pairs well with orange. Cinnamon is another great option for a cozy touch. Feel free to mix and match these additions to find your favorite flavor profile. To store leftover cranberry orange overnight oats, first, seal them in an airtight jar or container. Make sure the lid is tight to keep the oats fresh. If you are using glass jars, they work great. Just remember to leave some space at the top. This allows for expansion as the oats soak up the liquid. The shelf life of these oats in the refrigerator is about three to five days. After this time, the oats may start to lose their flavor and texture. If you notice any strange smells or changes in color, it is best to throw them out. Always trust your nose and eyes. You can freeze your cranberry orange overnight oats if you want to keep them longer. To do this, divide the oats into smaller portions. Use freezer-safe containers or bags. Leave some space for expansion, as freezing can cause liquids to expand. When you are ready to eat, thaw the oats overnight in the fridge. You can also heat them up in the microwave for a quick breakfast. Yes, you can easily make this recipe vegan. Just use almond milk or any non-dairy milk. All other ingredients are already plant-based. Overnight oats can last up to five days in the fridge. Store them in airtight containers. Just give them a stir before eating. Absolutely! You can heat them in the microwave or on the stove. Just add a splash of milk to keep them creamy. If you prefer, you can use honey, agave nectar, or any sweetener you like. Adjust to your taste. Soaking oats overnight helps them soften and absorb flavors. However, you can soak for just 30 minutes if you're in a hurry. You’ve learned how to make cranberry orange overnight oats. We covered the key ingredients, step-by-step instructions, and helpful tips. You now know how to adjust sweetness, store leftovers, and explore variations. Remember, personalizing your oats makes them more enjoyable. With these insights, you can create tasty and healthy meals. Enjoy your time experimenting with flavors and textures to find your perfect recipe!

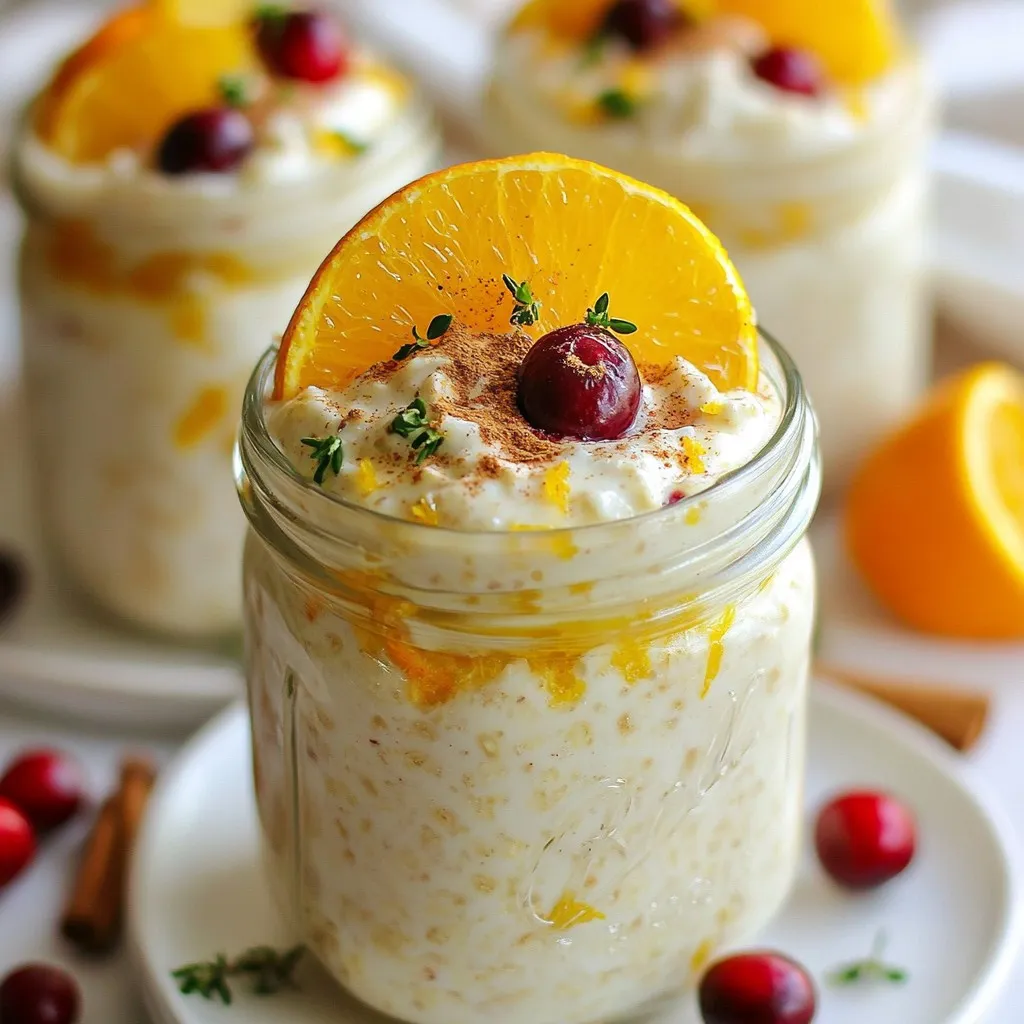
Cranberry Orange Overnight Oats are a tasty and easy way to start your day. Packed with fruity flavors, these oats are not just delicious; they’re also good for you. I’ll …

Read more

Categories Breakfast

Lemon Blueberry Yogurt Parfaits Simple and Tasty Treat

December 17, 2025January 9, 2025 by Chef Nate
To make zesty lemon blueberry yogurt parfaits, gather these simple ingredients: - 2 cups Greek yogurt (plain or vanilla) - 1 cup fresh blueberries - 1 medium lemon (zested and juiced) - 1 tablespoon honey (adjust to taste) - 1 cup granola (your choice) - 2 tablespoons chia seeds (optional) - Fresh mint leaves for garnish You can easily swap some ingredients if needed. Try these options: - Use coconut yogurt for a dairy-free version. - Swap honey for maple syrup or agave for vegan options. - If you don't have fresh blueberries, try raspberries or strawberries. - Use low-fat yogurt if you prefer a lighter option. Each ingredient in this recipe offers health benefits: - Greek yogurt is high in protein and good for digestion. - Blueberries are rich in antioxidants and may boost brain health. - Lemon adds vitamin C and aids in hydration. - Chia seeds provide fiber and omega-3 fatty acids. - Granola adds crunch and can offer whole grains, but watch the sugar. These ingredients not only make the parfait tasty, but they also support your health. {{ingredient_image_1}} 1. Grab a medium bowl. 2. Add 2 cups of Greek yogurt to the bowl. 3. Zest and juice 1 medium lemon. 4. Mix the lemon zest, juice, and 1 tablespoon of honey into the yogurt. 5. Stir until the mix is smooth and creamy. 6. Taste it. Add more honey if you want it sweeter. 7. In another bowl, gently fold in 1 cup of fresh blueberries. 1. Get your serving glasses or bowls ready. 2. Scoop a layer of the lemon yogurt mix into the bottom. 3. Add a layer of granola on top of the yogurt. 4. Next, spoon in a layer of the blueberry mix. 5. Repeat these layers until the glasses are full. 6. Finish with a dollop of yogurt and some granola on top. 7. If you want, sprinkle 2 tablespoons of chia seeds on the last yogurt layer. 8. Add fresh mint leaves for a nice touch. - Use clear glasses to show off the layers. - Make sure to spoon gently to keep layers separate. - Start with yogurt for a strong base. - Keep the granola crunchy by adding it last. - Experiment with the order of layers for fun! Start with one tablespoon of honey. This adds a nice touch of sweetness. Taste the yogurt mix. If you like it sweeter, add more honey. You can adjust the sweetness based on your taste. Remember, the blueberries also add natural sugar. So, balance the flavors as you go. Use plain or vanilla Greek yogurt for creaminess. This type of yogurt is thick and rich. Mix in the lemon juice and zest well. This helps create a smooth texture. If you want a lighter feel, try regular yogurt instead. Just know it will be less thick. Use clear glasses or bowls to show off the layers. Start with yogurt, then granola, and blueberries. Repeat these layers until you reach the top. For a fun twist, add fresh mint leaves on top. They add color and a fresh taste. Serve right away for the best texture, or chill briefly before serving. Pro Tips Choose Quality Yogurt: Opt for high-quality Greek yogurt for a creamier texture and better flavor. Fresh Ingredients Matter: Using fresh blueberries and mint will enhance the overall taste of your parfait. Layering is Key: Make sure to layer your ingredients carefully for a beautiful presentation and balanced flavor in every bite. Chill Before Serving: Allowing the parfaits to chill in the fridge for a bit can help the flavors meld beautifully. {{image_2}} You can switch up the flavors in your parfaits. Try adding other fruits like strawberries, raspberries, or peaches. These fruits pair well with lemon and add a fun twist. You can even mix in some tropical flavors, like mango or pineapple. You can create a berry medley by combining blueberries with blackberries or strawberries. The options are endless, so get creative! If you want to change the sweetness, try different sweeteners. Maple syrup or agave nectar works well. You can also use stevia or monk fruit for a lower-calorie option. Each sweetener has a unique taste, so experiment until you find your favorite. Just remember to adjust the amount based on how sweet you want your parfaits. Making dairy-free or vegan parfaits is easy. Use coconut yogurt or almond yogurt as a base. These options are rich and creamy. You can also use plant-based granola, ensuring it has no honey or dairy. For added flavor, try adding a splash of vanilla extract to your yogurt. Enjoying a tasty parfait is possible for everyone, no matter their diet. After enjoying your lemon blueberry yogurt parfaits, store any leftovers in the fridge. Use an airtight container to keep them fresh. This helps the yogurt and fruit stay tasty. If you see any liquid, just stir it back in before eating. Aim to eat leftovers within two days for the best flavor. To keep your ingredients fresh, store your yogurt in the coldest part of the fridge. Keep blueberries in their original container or a breathable bag. This lets air flow while keeping them from getting mushy. Store granola in a sealed bag or container to avoid moisture. This keeps it crunchy. Assembled parfaits are best eaten fresh. If you must store them, eat within one day. The yogurt can separate, and the granola will get soggy. If you want to prepare in advance, layer only yogurt and blueberries. Add granola just before serving to keep it crispy. Yes, you can make Lemon Blueberry Yogurt Parfaits ahead of time. Prepare the yogurt mixture and store it in the fridge. Keep the granola separate to stay crunchy. Layer the parfaits just before serving for the best texture. If you assemble them too early, the granola can get soggy. This dish is best enjoyed fresh for full flavor. For this recipe, Greek yogurt is my top choice. It is thick, creamy, and rich in protein. You can use plain or vanilla-flavored yogurt. Plain yogurt allows the lemon flavor to shine through. If you want a lighter option, try regular yogurt. For a dairy-free alternative, coconut or almond yogurt works well too. To lower the calories in this recipe, use low-fat or non-fat yogurt. You can also reduce the amount of honey or use a sugar substitute. Try adding more fruit to enhance sweetness without extra calories. Granola can be high in calories, so use a light sprinkle instead. Lastly, skip the chia seeds if you want to cut back on calories. This blog post covered key aspects of making Lemon Blueberry Yogurt Parfaits. We explored ingredients and their healthy benefits, step-by-step instructions for preparation and assembly, and tips for balancing sweetness and consistency. We also discussed variations for flavors and dietary needs, plus storage tips to keep your parfaits fresh. Remember, you can personalize this recipe to suit your taste. Mixing flavors and trying new ingredients makes it fun. Enjoy making and sharing your parfaits!

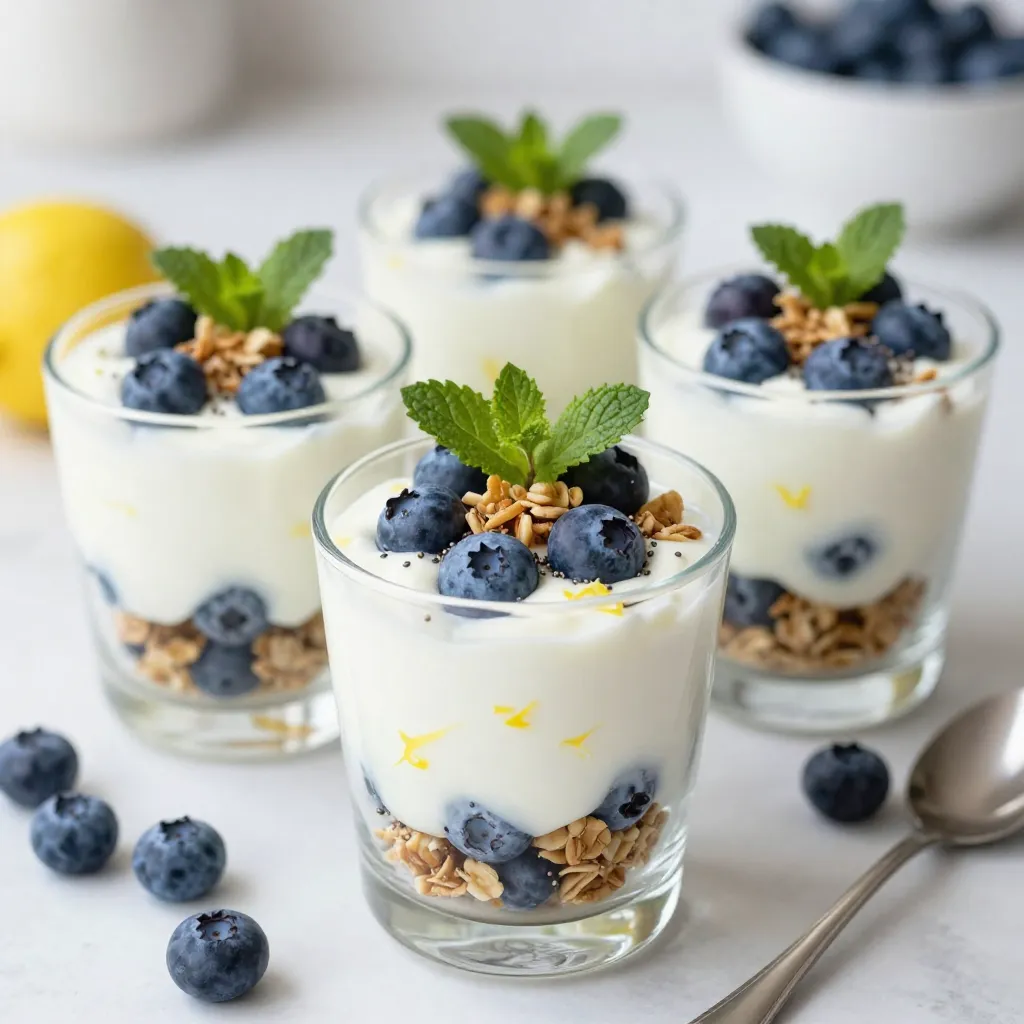
If you’re looking for a quick, tasty treat, you’ve come to the right place! Lemon Blueberry Yogurt Parfaits are a simple way to delight your taste buds and impress your …

Read more

Categories Desserts

Keto Garlic Parmesan Chicken Flavorful and Easy Recipe

October 29, 2025January 9, 2025 by Chef Nate
- 4 boneless, skinless chicken thighs - 1/2 cup grated Parmesan cheese - 1/4 cup almond flour - 4 cloves garlic, minced - 1/4 cup unsalted butter, melted - 1 teaspoon dried oregano - 1 teaspoon paprika - Salt and pepper to taste - Fresh parsley, chopped (for garnish) Each serving of Keto Garlic Parmesan Chicken has about 350 calories. It has 23 grams of fat and 30 grams of protein. You also get 4 grams of carbs per serving. This dish fits well into a keto diet, allowing you to enjoy flavor without the carbs. - Chicken Thighs: You can use chicken breasts for a leaner option. - Almond Flour: If you want, swap it with coconut flour. It will change the taste a bit. - Parmesan Cheese: Grated Pecorino Romano works well if you want a stronger flavor. - Unsalted Butter: Use olive oil or ghee if you prefer a dairy-free choice. - Garlic: If you don’t have fresh garlic, garlic powder can work, but use less. {{ingredient_image_1}} First, gather your chicken thighs. I prefer boneless and skinless thighs for this dish. They cook evenly and stay juicy. Rinse the chicken under cold water and pat it dry with paper towels. This step helps the coating stick better. Set the chicken aside, so it is ready for coating. In a mixing bowl, combine the grated Parmesan cheese, almond flour, minced garlic, dried oregano, paprika, salt, and pepper. Stir them together until they blend well. This mixture is key to getting that crunchy, tasty coating. It gives the chicken a lovely flavor. Next, melt the unsalted butter in a small bowl. Dip each chicken thigh into the melted butter. Make sure each piece is well-coated. After that, roll the butter-coated chicken in the Parmesan-almond mixture. Press lightly as you coat to ensure it sticks well. Now, it's time to bake! Preheat your oven to 375°F (190°C). Line a baking sheet with parchment paper. Place the coated chicken thighs on the sheet. Drizzle any leftover melted butter over the chicken. This adds extra flavor and helps crisp up the coating. Bake the chicken for 25 to 30 minutes. It’s done when the outside is golden and crispy. Use a meat thermometer to check. The chicken should reach at least 165°F (74°C) inside. Once baked, let it rest for a few minutes. Garnish with fresh parsley before serving. Enjoy your tasty Keto Garlic Parmesan Chicken! To achieve a crispy coating, use both Parmesan cheese and almond flour. The cheese gives a rich flavor, while the almond flour adds crunch. After mixing these, make sure to press the coating onto the chicken. This way, the coating sticks well. For juicy chicken, start with boneless, skinless thighs. They stay moist during cooking. Always coat the chicken in melted butter first. This step is key. It helps the coating stick and keeps the meat juicy. Bake the chicken at 375°F for 25-30 minutes. Check the internal temperature. It should reach at least 165°F for safety. Garnish your Keto Garlic Parmesan Chicken with fresh parsley. It adds color and a fresh taste. Serve the chicken right out of the oven for the best flavor. Pair it with a side salad or steamed veggies. This makes for a balanced meal. Enjoy the crispy bites and the rich, savory taste with every bite! Pro Tips Choose the Right Chicken: Opt for thighs instead of breasts for juicier and more flavorful results. Coating Technique: Press the coating onto the chicken firmly to ensure it adheres well during baking. Butter Benefits: Drizzling remaining melted butter on top before baking enhances the flavor and ensures a crispy texture. Resting Time: Let the chicken rest for a few minutes after baking to allow juices to redistribute for maximum tenderness. {{image_2}} You can add spinach to your Keto Garlic Parmesan Chicken. Spinach gives a fresh taste and boosts nutrition. Start by sautéing 2 cups of fresh spinach in a pan until it wilts. This takes about 2-3 minutes. After you coat the chicken, place the wilted spinach on top of each piece. Then, bake as usual. The spinach adds color and flavor. Plus, it makes the dish more filling. If you want to switch up the cheese, try using mozzarella or cheddar. Mozzarella melts great and gives a nice stretch. Cheddar adds a sharp flavor. You can mix two cheeses together for a rich taste. Just remember to keep the amount the same as Parmesan. This keeps the texture right. Experimenting with cheese can change the whole dish! For a spicy kick, add red pepper flakes to the coating mix. Start with 1 teaspoon and adjust to your taste. You can also marinate the chicken in a spicy sauce before coating it. Try hot sauce or sriracha for a zesty flavor. This version is perfect if you love heat. The mix of garlic, cheese, and spice will make each bite exciting! To keep your Keto Garlic Parmesan Chicken fresh, let it cool first. Once cooled, place the chicken in an airtight container. You can store it in the fridge for up to three days. Make sure to cover it well. This helps keep the chicken moist and tasty. When it's time to eat the leftovers, you can reheat the chicken easily. Preheat your oven to 350°F (175°C). Place the chicken on a baking sheet. Cover it with foil to keep it moist. Heat for about 15-20 minutes, or until it's warmed through. You can also use the microwave, but the oven keeps the coating crispy. If you want to save some for later, freezing works great. Wrap each piece of chicken tightly in plastic wrap. Then, place them in a freezer bag. Squeeze out as much air as possible. You can freeze the chicken for up to three months. When you're ready to eat it, thaw it in the fridge overnight before reheating. Yes, you can use chicken breasts. Chicken breasts are leaner than thighs. They will still taste great with this recipe. Just remember, they may cook faster than thighs. Check the internal temperature to ensure they reach 165°F (74°C). Yes, this recipe is gluten-free. Almond flour replaces regular flour. Almond flour keeps your meal tasty and keto-friendly. Just make sure to avoid any gluten in your other ingredients. To make this dish dairy-free, swap the butter and cheese. You can use coconut oil in place of butter. For cheese, try a dairy-free cheese alternative. These swaps will still give you a great flavor without the dairy. This article covered all you need for Keto Garlic Parmesan Chicken. We listed ingredients, their nutrition, and substitutes. You learned how to prep, coat, and bake the chicken perfectly. I shared tips for a crispy coating and juicy meat. Variations let you try new flavors, and storage info helps keep leftovers fresh. Cooking can be fun and rewarding. Enjoy making this dish your own!

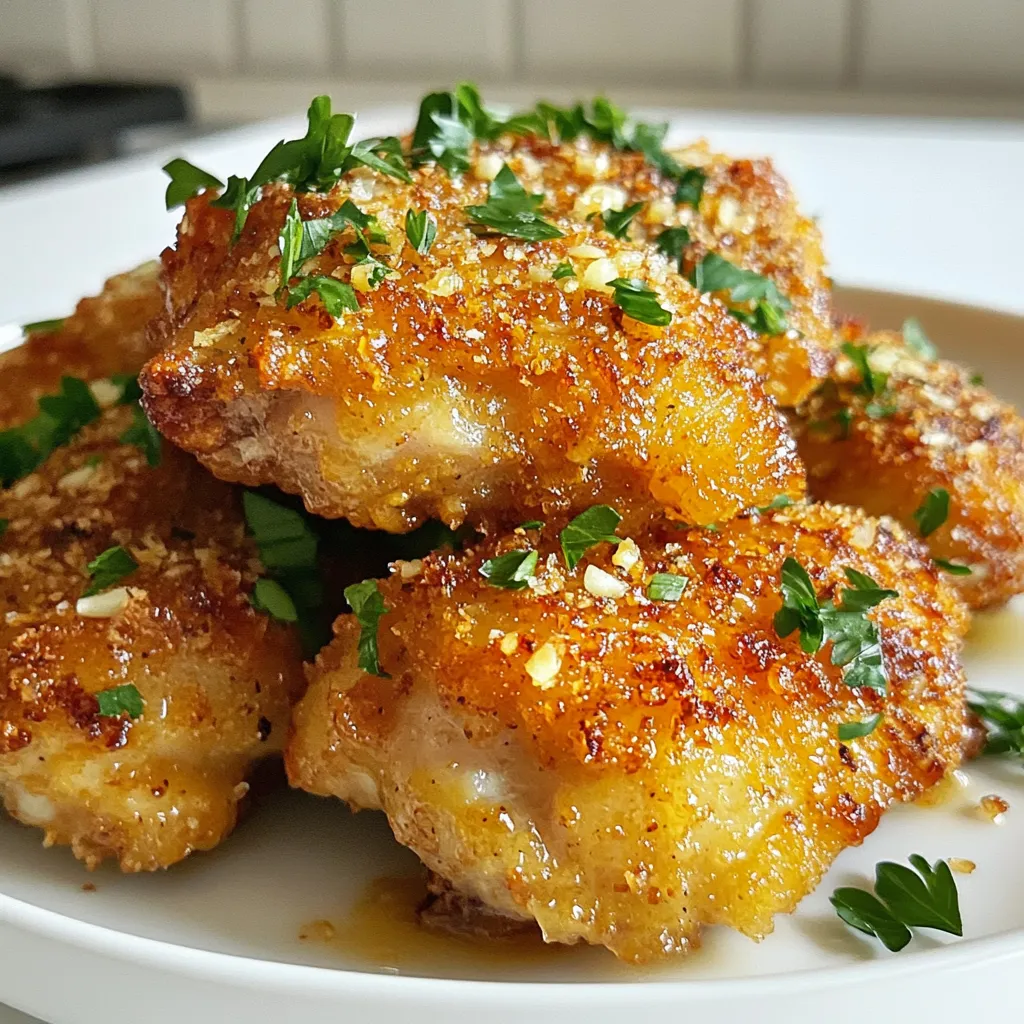
Are you ready to impress your family with a simple yet delicious dish? This Keto Garlic Parmesan Chicken is not only full of flavor, but it’s also easy to make. …

Read more

Categories Dinner

One-Pan Honey BBQ Chicken and Rice Delightful Meal

October 21, 2025January 8, 2025 by Chef Nate
- 4 bone-in chicken thighs, skin-on - 1 cup long-grain rice - 2 cups chicken broth The main ingredients in this dish create a hearty base. Bone-in chicken thighs give the meal rich flavor and moisture. I prefer long-grain rice for its fluffy texture. Chicken broth adds depth and helps the rice cook perfectly. - 1/2 cup honey - 1/2 cup BBQ sauce (your choice) - 1 medium onion, diced - 2 cloves garlic, minced Honey and BBQ sauce bring sweetness and tang. They coat the chicken and rice, enhancing every bite. Diced onion and minced garlic add great aroma and flavor. These ingredients work together to make the dish feel special. - 1 tablespoon olive oil - 1 teaspoon smoked paprika - 1 teaspoon garlic powder - 1/2 teaspoon black pepper - Salt to taste Olive oil helps to brown the chicken and keep it moist. Smoked paprika gives a lovely, warm flavor. Garlic powder and black pepper add layers of taste. Salt ties everything together, so don’t skip it! {{ingredient_image_1}} First, let's sear the chicken thighs. Heat 1 tablespoon of olive oil in a large skillet over medium heat. Season the chicken thighs with smoked paprika, garlic powder, salt, and black pepper for great flavor. Place the chicken skin-side down in the hot pan. Sear for 5-7 minutes until the skin is crispy and golden brown. Flip the chicken and cook for another 3-4 minutes. This step locks in the flavor and gives a nice texture. Remove the chicken from the pan and set it aside. Next, it’s time to cook the aromatics. In the same pan, add the diced onion. Cook for about 3-4 minutes until it turns translucent. This step adds sweetness to the dish. Then, add the minced garlic and cook for another minute. Garlic adds a wonderful aroma and depth to your meal. Timing here is key; if you cook it too long, it can burn and taste bitter. Now, let's combine the ingredients. Stir in 1 cup of long-grain rice. Make sure the rice is well coated with the onion and garlic mixture. This helps the rice soak up all the flavors later. Pour in 2 cups of chicken broth, adding a pinch of salt if you like. This broth is essential; it infuses the rice with flavor as it cooks. In a small bowl, mix 1/2 cup of honey and 1/2 cup of your favorite BBQ sauce. Pour this mix over the rice. Finally, place the seared chicken thighs on top, skin-side up. This layering ensures that the chicken steams while the rice cooks, keeping it juicy. Bring the dish to a gentle boil, then lower the heat. Cover the pan with a lid and let it simmer for 25-30 minutes. This step allows the rice to absorb the liquid and flavors. Check the rice for doneness around the 25-minute mark. You want it tender but not mushy. Once done, remove the lid and let it sit for 5 minutes. This resting time helps the flavors meld together. Fluff the rice with a fork before serving. Enjoy your delicious one-pan meal! To get that perfect crispy skin, start with bone-in, skin-on chicken thighs. Sear them skin-side down in a hot pan. This locks in moisture and creates a nice golden crust. Flip them after 5-7 minutes to get both sides crispy. If you want to mix it up, try using chicken drumsticks or wings. They also work well with this recipe and stay juicy. To avoid mushy rice, rinse it under cold water before cooking. This removes excess starch. Use long-grain rice for the best results. It cooks up light and fluffy. You can also try jasmine rice for a fragrant twist. Just make sure to follow the right water-to-rice ratio for great texture. You can add more to this dish by including vegetables like bell peppers or peas. Toss them in with the onions and garlic for a colorful touch. If you like a bit of spice, add some cayenne or crushed red pepper. Adjust the sweetness by using less honey or adding more BBQ sauce for tang. Don't be afraid to experiment! Pro Tips Let It Rest: After cooking, allow the dish to rest for a few minutes. This helps the flavors meld and the rice to finish absorbing any remaining moisture. Choose Quality BBQ Sauce: The flavor of your BBQ sauce can significantly impact the dish. Opt for a high-quality sauce that complements the sweetness of the honey. Customize the Rice: Feel free to add vegetables like bell peppers or corn to the rice for added nutrition and flavor. Just be sure to adjust the cooking time accordingly. Use Bone-In Chicken: Bone-in chicken thighs provide more flavor and moisture during cooking compared to boneless cuts, making for a juicier final dish. {{image_2}} You can switch up the chicken cuts for this dish. Boneless thighs work well since they stay juicy. Chicken breasts are another option, but they can dry out. If you choose breasts, cook them carefully. Keep an eye on the time. You want them tender and not overcooked. If you want to mix things up, try different rice options. Brown rice adds a nutty flavor, while quinoa boosts protein. Both take longer to cook, so adjust the broth amount. You can also experiment with sauces. Teriyaki sauce gives a sweet twist. Homemade BBQ sauce lets you control the flavor. For a vegetarian take, use plant-based proteins like tofu or tempeh. These add great texture and protein. Replace chicken broth with vegetable broth for flavor. You can add lots of veggies too, like bell peppers or peas. This way, you keep the dish hearty and satisfying. To keep your One-Pan Honey BBQ Chicken and Rice fresh, use airtight containers. Glass containers work best as they do not stain and are easy to clean. You can also use plastic containers, but ensure they are BPA-free. Before sealing, let the dish cool down. This step helps prevent moisture buildup inside the container. To enjoy leftovers, the best method is reheating on the stove. Place the chicken and rice in a skillet over low heat. Add a splash of chicken broth to keep it moist. Stir gently to avoid sticking. You can also use a microwave, covering the dish with a damp paper towel. This keeps the moisture in while heating. If you want to save some for later, freezing is a great choice. Allow the dish to cool completely. Then, transfer it to freezer-safe containers or bags. Remove as much air as possible to prevent freezer burn. For best results, eat within three months. When you're ready to eat, thaw overnight in the fridge. Reheat on the stove or in the microwave until hot. You can use other rice types. Brown rice is a great choice. It takes longer to cook, so add about 10-15 extra minutes. Jasmine or basmati rice work too. They cook faster, so check for doneness at 20 minutes. Adjust the liquid to 2 1/4 cups for brown rice or 1 3/4 cups for the others. Want more heat? Add red pepper flakes or cayenne pepper. Start with a pinch and taste as you go. You can also use spicy BBQ sauce. Mix in hot sauce for an extra kick. A dash of sriracha can spice it up too! Yes, you can bake it! Preheat your oven to 375°F (190°C). Sear the chicken in a pan then transfer it to a baking dish. Add the rice, broth, and sauce like in the stovetop method. Cover with foil and bake for about 30-35 minutes. Check that the rice is tender before serving. This blog post walked you through creating a tasty chicken and rice dish. We covered the key ingredients like chicken thighs, rice, and broth, alongside flavor enhancers and essential seasonings. I detailed step-by-step instructions, tips for crispiness, and variations to suit your taste. You can easily store and reheat leftovers. Experiment and make it your own! Enjoy sharing this dish with friends and family.

Are you ready to savor a delicious meal made easy? One-Pan Honey BBQ Chicken and Rice combines rich flavors with simple steps. You’ll enjoy crispy chicken thighs cooked in a …

Read more

Categories Dinner
Older posts
Newer posts
← Previous Page1 … Page103 Page104 Page105 … Page108 Next →

GRILLED FLAVORS

where delicious ideas come to life, from stovetop to backyard. Warm, simple, and always satisfying. 🍽️✨

PAGES

Home About Contact Privacy Policy Terms & Conditions Cookie Policy GDPR Policy Copyright Policy Disclaimer

CATEGORIES

Appetizers Desserts Salads Breakfast Dinner

Contact

  • Pinterest
  • Mail
Copyright © 2026 Grilled Flavors. All rights reserved.