Skip to content
grilledflavors.com
  • Home
  • Appetizers
  • Desserts
  • Salads
  • Breakfast
  • Dinner
  • Privacy Policy
  • Contact
  • About

Chef Nate

Chili Lime Salmon Bowls Flavorful and Healthy Meal

October 19, 2025December 6, 2024 by Chef Nate
To make a delicious Chili Lime Salmon Bowl, gather these ingredients: - 2 salmon fillets (6 oz each) - 1 tablespoon chili powder - 1 teaspoon garlic powder - 1 teaspoon smoked paprika - Juice of 2 limes - 2 tablespoons olive oil - Salt and pepper to taste - 1 cup quinoa (cooked) - 1 cup cherry tomatoes (halved) - 1 avocado (sliced) - ½ cup corn kernels (fresh or frozen) - 1 small red onion (finely chopped) - Fresh cilantro (for garnish) Each ingredient brings unique flavors and nutrients. Salmon is rich in omega-3 fatty acids, which are great for heart health. Quinoa serves as a protein-packed base. The lime juice adds a bright zing that balances the spices. Fresh vegetables boost the nutrition and add color to your bowl. This meal is not only tasty but also good for you! {{ingredient_image_1}} - Preheat the oven to 400°F (200°C). - In a small bowl, mix 1 tablespoon of chili powder, 1 teaspoon of garlic powder, and 1 teaspoon of smoked paprika. - Squeeze the juice of 2 limes into the bowl. Add 2 tablespoons of olive oil, salt, and pepper. - Stir the mixture well. - Coat the salmon fillets with this spice mix. - Place the seasoned salmon on a baking sheet lined with parchment paper. - Bake for 12 to 15 minutes. - Check if the salmon flakes easily with a fork to know it is done. - Rinse 1 cup of quinoa under cold water to remove any bitterness. - Cook the quinoa according to the package instructions. - Once it’s done, fluff the quinoa with a fork and set it aside. - Start with a base of quinoa in serving bowls. - Arrange half a cup of cherry tomatoes, corn kernels, and the finely chopped red onion around the quinoa. - Add slices of avocado to the mix for a creamy touch. - Place the baked salmon fillets on top of the ingredients in each bowl. - Sprinkle fresh cilantro over the bowls for a burst of flavor. - Drizzle with extra lime juice for added zest. - Serve with lime wedges on the side. Use colorful bowls to make it visually appealing. For the best taste, choose wild-caught salmon. It has a richer flavor. You can also use farmed salmon, but it may not taste as good. Fresh salmon is often best, but frozen can work well too. Just make sure to thaw it properly. Look for bright, shiny skin and a fresh smell. Adjust the spice levels to suit your taste. If you like it spicy, add more chili powder. You can also use lime zest for extra flavor. Want something sweet? Try a bit of honey in the marinade. Feel free to add garlic or ginger for a twist. Baking salmon is easy and keeps it moist. Preheat your oven to 400°F (200°C) for the best results. If you prefer grilling, make sure to oil the grill well. This helps prevent sticking. For perfect flake, cook the salmon until it is just opaque. Use a fork to test if it flakes easily. Enjoy the delicious flavors that come from your efforts! Pro Tips Marinating Time: Allow the salmon to marinate for at least 30 minutes before baking to enhance the flavors. Quinoa Rinsing: Always rinse quinoa before cooking to remove its natural coating, which can make it taste bitter. Fresh Ingredients: Use fresh lime juice for the best flavor; bottled lime juice can have a different taste profile. Cooked Salmon Storage: Leftover salmon can be stored in the fridge for up to 2 days; add it to salads for a quick meal! {{image_2}} You can switch up the base for your chili lime salmon bowls. Instead of quinoa, try brown rice. Brown rice adds a nutty flavor and more fiber. Cauliflower rice is another great option. It’s low in carbs and adds a fresh crunch. If you stick with quinoa, you can flavor it in different ways. Add lime zest for extra zing. You can also mix in some chopped herbs like cilantro or parsley. This adds a burst of freshness. Toppings can really change your bowl. Add some nuts or seeds for crunch. Toasted pumpkin seeds or chopped almonds work well. They add texture and healthy fats. You can also add seasonal vegetables. Grilled zucchini or bell peppers are great in summer. In winter, try roasted Brussels sprouts or carrots. These veggies bring color and flavor to your meal. Dressings can enhance the flavor of your bowl. A simple lime vinaigrette is easy to make. Just whisk lime juice, olive oil, salt, and pepper together. It brightens up all the ingredients. You can also use homemade dressings. A yogurt-based dressing adds creaminess. Store-bought options are fine too, but check the labels. Choose dressings with fewer additives for a healthier choice. To keep your chili lime salmon bowls fresh, use airtight containers. Separate the salmon, quinoa, and veggies to prevent sogginess. Store in the fridge for up to three days. If you need to keep them longer, freeze them for up to three months. Just remember, freezing may change the texture of the salmon. When you’re ready to enjoy leftovers, reheat the salmon and quinoa gently. Use the oven set to 350°F (175°C) for the best results. Place the salmon on a baking sheet and warm for about 10 minutes. For the quinoa, heat it in a pan with a splash of water, stirring until warm. This keeps it fluffy. Avoid the microwave if you can, as it can dry out the salmon. You can use brown rice, farro, or couscous. Each option has a unique taste and texture. If you want a low-carb choice, try cauliflower rice. It cooks fast and is light. Cooked salmon lasts about three to four days in the fridge. Make sure to store it in an airtight container. If it smells or looks off, it’s best to toss it. Yes, you can prepare the salmon and quinoa ahead of time. Cook them and store separately. Assemble the bowls just before serving for the best taste and freshness. Many sauces match this dish. Try a creamy avocado sauce for richness. A mango salsa adds sweetness and zest. You can also use a yogurt sauce to bring a cool touch. Yes, this recipe is gluten-free. All the ingredients, including the spices and quinoa, are safe for a gluten-free diet. Enjoy your meal without worry! In this post, I covered a tasty chili lime salmon bowl recipe. We explored the key ingredients, preparation, and cooking steps. I provided tips on selecting the right salmon and perfecting the seasoning. You also learned about storage and reheating options. Cooking can be fun and easy with simple recipes like this one. Enjoy your salmon bowl and get creative with variations. Your kitchen can be a place of joy and good food!

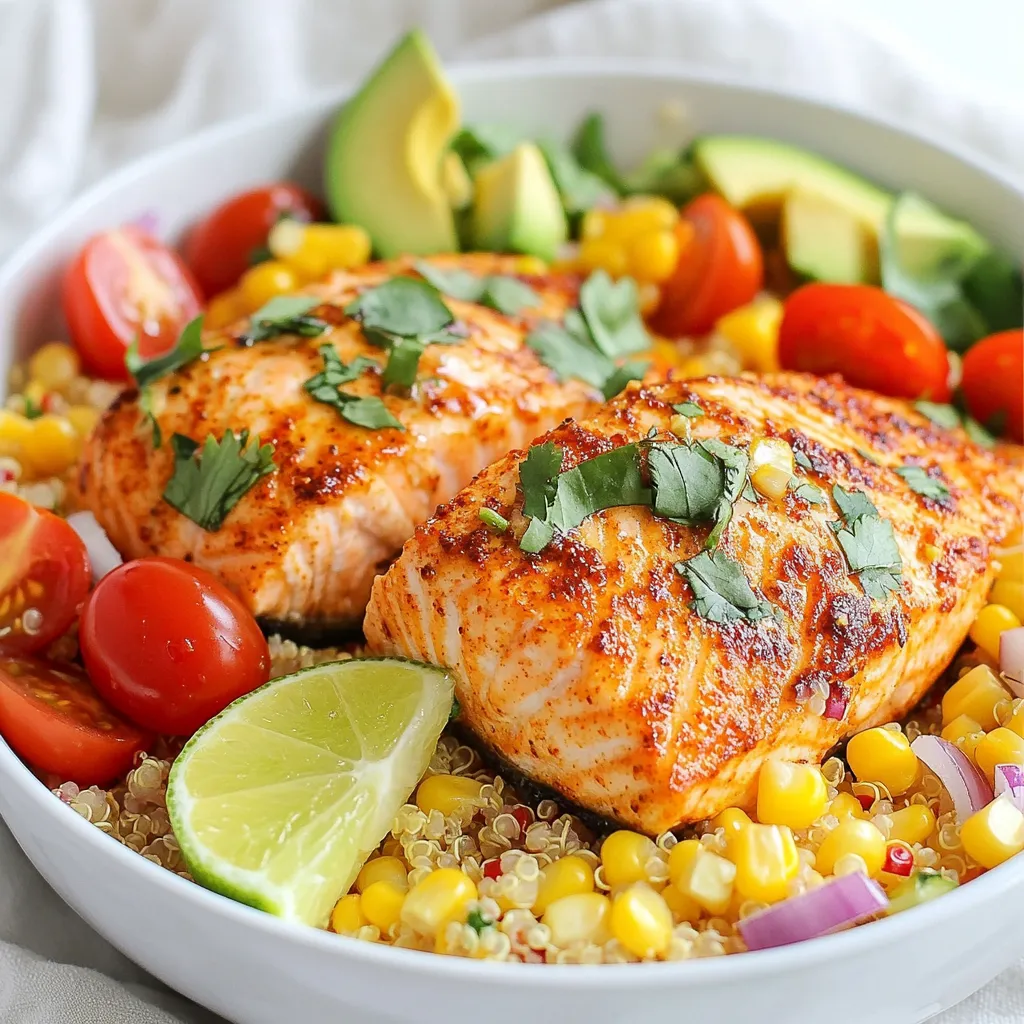
Craving a meal that’s both tasty and healthy? Let me introduce you to Chili Lime Salmon Bowls! This dish bursts with flavor and fresh ingredients, making it a perfect choice …

Read more

Categories Dinner

Cozy Crockpot Beef Stew Comfort Food Recipe

November 20, 2025December 5, 2024 by Chef Nate
- 2 pounds beef chuck, cut into 1-inch cubes - 4 medium carrots, sliced - 4 medium Yukon gold potatoes, diced - 1 large onion, diced - 3 cloves garlic, minced - 4 cups beef broth - 2 tablespoons tomato paste - 1 tablespoon Worcestershire sauce - 1 teaspoon dried thyme - 1 teaspoon dried rosemary - 2 tablespoons olive oil - Salt and pepper to taste - 2 bay leaves - 1 cup frozen peas (added at the end) When you make cozy crockpot beef stew, fresh ingredients really make a difference. I love using beef chuck. It’s tender and full of flavor. Look for nice marbling. The fat adds richness to the stew. Carrots and Yukon gold potatoes offer sweetness and texture. The potatoes become soft and soak up all the tasty broth. Don’t forget the onion and garlic. They add depth and aroma. For seasoning, beef broth is key. It gives the stew a hearty base. Tomato paste and Worcestershire sauce boost the umami. I use dried thyme and rosemary for warmth. They work well with beef. Olive oil helps with browning the meat. Salt and pepper are essential for taste. If you want more flavor, bay leaves can be great. They add a lovely herbal note. Frozen peas are a fun touch. They add color and sweetness. Toss them in during the last half hour. This stew is about layering flavor and enjoying every bite. {{ingredient_image_1}} Start by searing the beef. In a large skillet, heat two tablespoons of olive oil over medium-high heat. Season 2 pounds of beef chuck with salt and pepper. Brown the beef cubes in batches for about 4 to 5 minutes. Make sure each piece gets nice and brown on all sides. This step adds great flavor. Once browned, transfer the beef to the crockpot. Next, we will cook the vegetables. In the same skillet, add one large diced onion and three cloves of minced garlic. Sauté them for about 2 to 3 minutes until the onion looks soft and clear. This brings out their natural sweetness. After that, transfer this mixture to the crockpot. Now it’s time to combine all the ingredients. Add 4 medium sliced carrots, 4 diced Yukon gold potatoes, and 4 cups of beef broth. Include 2 tablespoons of tomato paste, 1 tablespoon of Worcestershire sauce, 1 teaspoon of dried thyme, 1 teaspoon of dried rosemary, and 2 bay leaves. Stir everything gently to mix well. Finally, cover the crockpot and set it to cook. You can choose to cook on low for 8 hours or high for 4 hours. In the last 30 minutes of cooking, add 1 cup of frozen peas. This gives the stew a pop of color and sweetness. Before serving, remove the bay leaves. Taste the stew and adjust the seasoning with salt and pepper as needed. Enjoy the warm and hearty flavors! To make your beef stew shine, think about your seasonings. You can adjust the salt and pepper to your taste. Adding a splash of soy sauce can bring a nice umami kick. If you want a hint of sweetness, a bit of brown sugar works wonders too. To enhance the beef flavor, use beef broth instead of water. The broth adds rich depth and makes the stew more hearty. Searing the meat is a key step. When you brown the beef, it locks in the juices and adds flavor. It also creates a nice color for your dish. For thickening your stew, there are a few options. You can use cornstarch mixed with cold water. Another way is to mash some of the potatoes in the stew for a natural thickening effect. Pair your stew with crusty bread. It soaks up all the rich juices and adds to the meal. You can also serve it with a fresh salad for crunch. For presentation, use deep bowls and sprinkle fresh parsley on top. This adds color and makes your dish look gourmet. Enjoy your cozy meal! Pro Tips Brown the Beef: Searing the beef before adding it to the crockpot enhances the flavor and adds depth to your stew. Use Fresh Herbs: If possible, use fresh thyme and rosemary instead of dried for a more vibrant flavor profile. Thicken the Stew: If you prefer a thicker stew, mix a tablespoon of cornstarch with cold water and stir it in during the last 30 minutes of cooking. Adjust Seasoning: Always taste the stew before serving and adjust the seasoning, as flavors can mellow during cooking. {{image_2}} You can change up the veggies in your stew. Try adding bell peppers, green beans, or even mushrooms. Seasonal swaps work great too. In fall, use butternut squash or sweet potatoes. In spring, add fresh asparagus or zucchini for a bright touch. You don’t have to stick with beef chuck. Cuts like brisket or round work well too. If you want chicken, use thighs for moisture. You can also try a vegetarian option. Lentils or chickpeas can add protein and texture. Just adjust the cooking time! Let’s spice things up! Swap out thyme and rosemary for fresh herbs like basil or cilantro. You can also add sauces for a kick. A splash of hot sauce or a spoonful of chili paste can add heat. Don’t be afraid to experiment with flavors until it feels right! To store your beef stew in the fridge, let it cool first. Use an airtight container. It will stay fresh for about three to four days. For freezing, divide the stew into portions. Use freezer-safe containers or bags. Squeeze out the air to prevent freezer burn. You can freeze it for up to three months. The best way to reheat beef stew is on the stove. Pour the stew into a pot and heat it over medium heat. Stir often until it's hot. You can also use a microwave. Place the stew in a microwave-safe bowl. Heat in short bursts, stirring in between. This helps keep the flavor and texture intact. You can keep beef stew in the fridge for about three to four days. After that, it may spoil. Signs that your stew has gone bad include a sour smell or mold on the surface. If you see either, toss it out. Always trust your nose and eyes; they don’t lie! Yes, you can cook this stew on high. Just adjust the time. Set your crockpot to high for about 4 hours. This will speed up the cooking process. The meat will still be tender and flavorful. You can use vegetable broth for a lighter taste. Chicken broth works too. If you prefer a richer flavor, try using mushroom broth. Each option gives a unique twist to your stew. To make this stew gluten-free, use gluten-free Worcestershire sauce. Check labels to ensure all ingredients are gluten-free. You can also use cornstarch instead of flour for a thickener. Yes, adding wine can enhance the flavors. Use a dry red wine for the best results. Add about 1 cup when you combine the other liquids. This adds depth to the overall taste. To recap, we explored key ingredients for a tasty beef stew. We covered everything, from main ingredients like beef chuck and veggies to seasonings that boost flavor. I shared step-by-step instructions, tips for perfecting flavor, and variations to try. In the end, making this stew can be fun and easy. Enjoy creating a dish that warms your heart and fills your belly. Happy cooking!

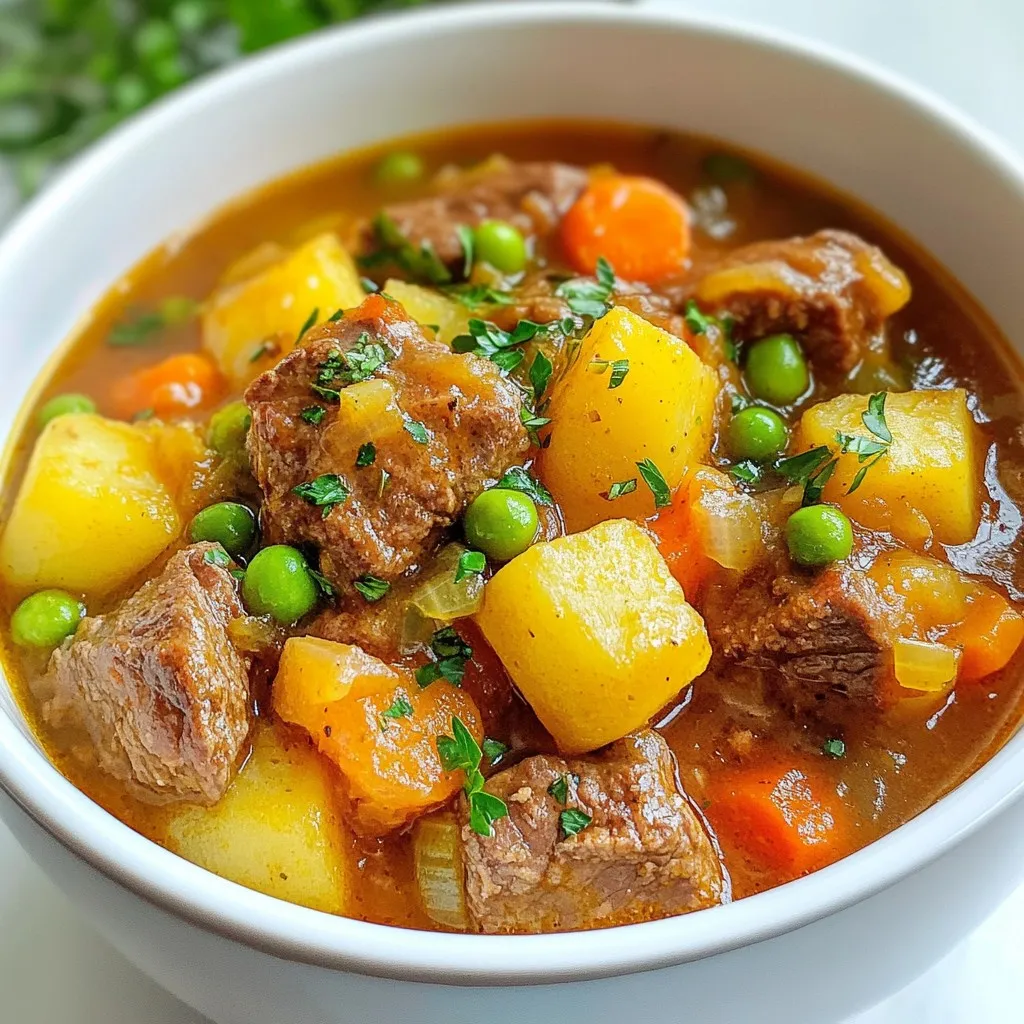
Nothing says comfort like a warm bowl of beef stew on a chilly day! In this Cozy Crockpot Beef Stew Comfort Food Recipe, you’ll discover how easy it is to …

Read more

Categories Dinner

Sweet and Tangy BBQ Sausage Rice Flavorful Delight

October 19, 2025December 4, 2024 by Chef Nate
- 2 cups jasmine rice - 1 lb smoked sausage, sliced - 1 cup barbecue sauce - 1 bell pepper, diced - 1 medium onion, diced - 2 cloves garlic, minced - 1 tablespoon apple cider vinegar - 1 tablespoon brown sugar - 1 teaspoon paprika - Salt and pepper to taste Gather these ingredients for a tasty dish. Jasmine rice gives a nice touch. It cooks fluffy and pairs well with the sausage. Smoked sausage adds rich flavor. You can use chicken or turkey sausage as a lighter choice. Your favorite barbecue sauce will bring sweet and tangy notes to the dish. For veggies, bell pepper and onion add crunch. Garlic boosts the overall taste. It gives a lovely aroma as it cooks. The apple cider vinegar adds a zing. Brown sugar balances the flavors with a hint of sweetness. Paprika, salt, and pepper are key for seasoning. They tie everything together. With these ingredients, you'll create a warm, flavorful meal. Enjoy the process of cooking and the delicious result! {{ingredient_image_1}} - Rinsing jasmine rice: Start by rinsing 2 cups of jasmine rice. Place the rice in a fine-mesh strainer. Rinse it under cold water until the water runs clear. This step removes excess starch. It helps keep the rice fluffy. - Cooking rice in chicken broth: In a medium saucepan, add the rinsed rice and 4 cups of chicken broth. Bring this to a boil. Once boiling, reduce the heat. Cover the pot and let it simmer for 15 minutes. The rice will absorb the broth and become fluffy. After cooking, let it sit covered for 5 minutes. - Browning the smoked sausage: While the rice cooks, heat a large skillet over medium heat. Add 1 pound of sliced smoked sausage to the skillet. Cook the sausage for 5 to 7 minutes. You want it to be browned and slightly crispy. - Sautéing onions and bell pepper: Next, add 1 medium diced onion and 1 diced bell pepper to the skillet. Sauté these for about 5 minutes until the onions become translucent. - Mixing barbecue sauce and additional ingredients: In a small bowl, combine 1 cup of your favorite barbecue sauce, 1 tablespoon of apple cider vinegar, and 1 tablespoon of brown sugar. Pour this mixture over the sausage and vegetable mix. Stir until everything is well coated. - Incorporating rice with sausage mixture: Let the mixture simmer for a few minutes. This allows the flavors to blend. Season with 1 teaspoon of paprika, salt, and pepper to taste. Then, fluff the rice with a fork. Add the rice to the sausage mixture. Gently toss to combine all the ingredients. Rinsing jasmine rice is key. It removes extra starch. This keeps the rice light and fluffy. Rinse it under cold water until the water runs clear. This step is simple but makes a big difference. After cooking, let the rice sit. Cover it for five minutes. This helps it absorb steam and become even fluffier. Fluff it gently with a fork before mixing it with the sausage. Choose a barbecue sauce you love. Sweet, smoky, or spicy sauces work well. Feel free to mix and match flavors. This lets you add your personal touch. Fresh herbs also add a nice touch. Chopped green onions brighten the dish. You can also add cilantro or parsley for more flavor. Sautéing the sausage right is important. Use medium heat and let it brown well. This brings out its rich flavor. When adding spices, adjust to your taste. Paprika adds warmth, while salt and pepper enhance overall flavor. Taste as you go. This will help you create a dish you love! Pro Tips Rinse the Rice: Rinsing jasmine rice removes excess starch, resulting in fluffier and less sticky rice. Choose Your Sausage Wisely: Opt for a high-quality smoked sausage to enhance the overall flavor of the dish. Customize the BBQ Sauce: Feel free to experiment with different barbecue sauces or add spices to create a unique flavor profile. Garnish for Freshness: Adding chopped green onions not only enhances the presentation but also adds a fresh, mild onion flavor. {{image_2}} You can switch up the protein in this dish. Using chicken or turkey sausage gives you a leaner choice. These options keep the flavor strong without too many calories. They also blend well with the sweet and tangy sauce. If you're looking for vegetarian substitutes, try plant-based sausage. They have great texture and taste. Tofu or tempeh also work well and soak up all the flavors. Want to change up the flavors? Add tropical notes with fresh pineapple. The sweetness pairs well with the BBQ sauce. You can also add a spicy kick. Just a splash of hot sauce or some diced jalapeños will do the trick. This adds heat and excitement to the dish. Feel free to mix and match until you find what you love. This dish is great on its own but can shine with some sides. Try it with a fresh salad or steamed veggies. You could also serve it in a bowl with toppings like avocado or cheese. Wrap the mixture in a tortilla for a tasty hand-held meal. The options are endless, so get creative! To keep your Sweet and Tangy BBQ Sausage Rice fresh, follow these tips: - Refrigeration: Place leftovers in an airtight container. This keeps moisture in and prevents a dry meal. - Freezing Portions: Divide the rice into smaller containers. This makes it easy to reheat only what you need. Make sure to label each container with the date. When it's time to enjoy your leftovers, use these methods: - Microwave: Place the rice in a microwave-safe bowl. Add a splash of water to keep it moist. Cover with a damp paper towel and heat for 1-2 minutes. Check and stir halfway through. - Stovetop: Heat a small skillet over low heat. Add the rice and a bit of broth or water. Stir often until heated through. This helps keep the rice fluffy. Knowing how long your food lasts is key: - Fridge: Your Sweet and Tangy BBQ Sausage Rice can last for about 3-4 days in the fridge. - Signs of Spoilage: Look for changes in color or smell. If it smells sour or looks off, it’s best to toss it. Always trust your senses when it comes to food safety. I love using smoked sausage for this dish. It adds great flavor. Chicken or turkey sausage works well, too. They are leaner but still tasty. You can also try spicy sausage for a kick. This adds depth without overpowering the other flavors. Yes, you can prepare this dish ahead of time. Cook the rice and sausage mix separately. Store them in the fridge for up to three days. When ready to serve, just heat them together. This makes meal prep easy and quick. To add heat, try these options: - Mix in diced jalapeños or hot sauce. - Use spicy barbecue sauce. - Add crushed red pepper flakes. These will boost the heat while keeping the sweet and tangy taste. This blog covered how to make a tasty dish using jasmine rice, smoked sausage, and barbecue sauce. You learned key steps like cooking the rice in broth and browning the sausage with veggies. Remember, customizing flavors keeps it exciting. Use different proteins or spices to suit your taste. With proper storage and reheating, your leftovers stay just as good. Enjoy creating this dish and making it your own!

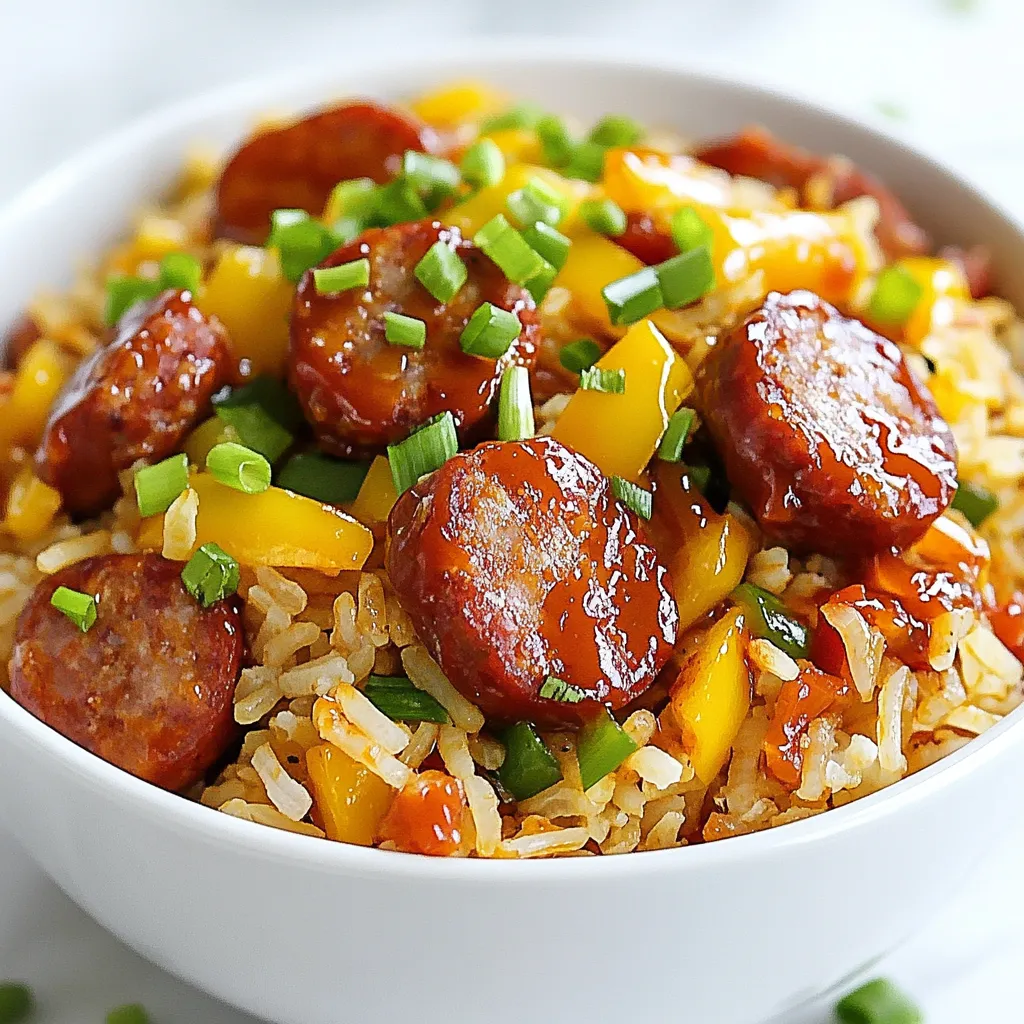
If you’re craving a meal that combines sweet and tangy flavors, this BBQ sausage rice is just for you! With tender jasmine rice, juicy smoked sausage, and a zesty barbecue …

Read more

Categories Dinner

Creamy Tomato Pasta Simple and Flavorful Recipe

October 23, 2025December 3, 2024 by Chef Nate
- 300g pasta (spaghetti or penne) - 1 tablespoon olive oil - 1 medium onion, finely chopped - 2 cloves garlic, minced - 1 can (400g) crushed tomatoes - 1 cup heavy cream or coconut cream for a dairy-free version - 1 teaspoon dried oregano - 1 teaspoon sugar - Salt and pepper to taste - Fresh basil leaves, for garnish - Grated Parmesan cheese (optional) You can swap heavy cream for coconut cream if you want a dairy-free dish. If you don’t have crushed tomatoes, use diced tomatoes instead. You can also replace the onion with shallots for a milder taste. If you want a gluten-free option, try a gluten-free pasta. For a vegan dish, leave out the Parmesan cheese or use a vegan alternative. Spaghetti and penne work best for creamy tomato pasta. Other great choices include fusilli and farfalle. These shapes hold the sauce well, making every bite tasty. You can also experiment with whole grain or chickpea pasta for added nutrition. {{ingredient_image_1}} Start by bringing a large pot of salted water to a boil. Add the pasta, either spaghetti or penne. Cook it according to the package instructions until it is al dente. This usually takes around 8 to 10 minutes. When done, reserve ½ cup of the pasta cooking water. Drain the pasta in a colander, but keep that water. You might need it later for the sauce. While your pasta cooks, grab a large skillet. Heat 1 tablespoon of olive oil over medium heat. Add 1 medium onion that you have finely chopped. Sauté this for 3 to 4 minutes until it turns translucent. Next, add 2 cloves of minced garlic. Cook this for an extra 1 to 2 minutes until you smell that fragrant garlic aroma. Pour in 1 can of crushed tomatoes, which is about 400 grams. Sprinkle in 1 teaspoon of dried oregano and 1 teaspoon of sugar. Season with salt and pepper to taste. Let this mixture simmer for about 10 minutes, stirring occasionally to blend the flavors. Now, lower the heat and gradually stir in 1 cup of heavy cream or coconut cream for a dairy-free option. Mix it well until the sauce becomes creamy. If the sauce is too thick, add that reserved pasta water a little at a time until it reaches your desired consistency. Once your sauce is creamy, it’s time to add the pasta. Toss the drained pasta into the skillet, ensuring it gets a nice coating of the sauce. Let it cook together for another 2 minutes. This helps the flavors meld perfectly. Taste your dish and adjust the seasoning if needed. Serve hot and garnish with fresh basil leaves and grated Parmesan cheese if you like. Enjoy the rich and creamy flavors of your homemade tomato pasta! To make your sauce creamy, use heavy cream or coconut cream. Both work well. If you find the sauce too thick, add some pasta water. This will help reach the right texture. Stir in the cream slowly for even mixing. Each bite should feel smooth and rich. Add fresh herbs like basil to boost flavors. You can also add grated Parmesan cheese for a cheesy kick. A pinch of red pepper flakes will give a nice heat. If you want a sweet touch, a little sugar balances the acidity of the tomatoes. Don’t skip salting the pasta water. This step adds flavor to the pasta. Avoid cooking the sauce too fast, as it needs time to blend flavors. Make sure to taste the sauce before serving. Adjust salt and pepper as needed for a perfect finish. Pro Tips Use Fresh Ingredients: Whenever possible, use fresh tomatoes instead of canned for a more vibrant flavor. If using canned, opt for high-quality brands. Adjust Creaminess: For a lighter sauce, you can substitute half of the heavy cream with vegetable or chicken broth, allowing the tomato flavor to shine. Enhance Flavor: Add a splash of balsamic vinegar or a pinch of red pepper flakes to the sauce for a depth of flavor and a little kick. Perfect Pasta Texture: Make sure not to overcook your pasta. Cooking it al dente ensures it holds up well in the sauce and absorbs flavors. {{image_2}} You can easily boost the flavor and nutrition of your creamy tomato pasta by adding proteins. Chicken is a great choice. Simply cook diced chicken in the skillet before adding the onion. For shrimp, add them after cooking the garlic. Cook them until they turn pink. You can also use cooked sausage for a hearty touch. Just slice it and mix it in with the sauce. If you want a vegetarian version, just skip the meat. You can add vegetables like spinach, mushrooms, or bell peppers. Sauté them along with the onions. For a vegan option, use coconut cream instead of heavy cream. This keeps the dish rich and creamy without dairy. You can also add nutritional yeast for a cheesy flavor. If you need a gluten-free option, choose gluten-free pasta. There are many types available, like rice or chickpea pasta. Just cook them as you would regular pasta. The creamy sauce works well with these options. Just be sure to check that your other ingredients, like the broth, are also gluten-free. To store your creamy tomato pasta, let it cool to room temperature first. Then, place it in an airtight container. This keeps it fresh and prevents unwanted smells in your fridge. Leftovers can stay good for up to three days. Always label the container with the date. This helps you track how long it has been stored. When you are ready to eat the leftovers, reheat them gently. You can use a skillet over medium heat. Add a splash of water or extra cream to keep it moist. Stir often to heat evenly. If you prefer the microwave, use a microwave-safe bowl. Heat in 30-second intervals, stirring in between, until it’s hot. If you want to freeze your creamy tomato pasta, use a freezer-safe container. Make sure to leave some space at the top. The sauce can expand when it freezes. Your pasta can last up to three months in the freezer. When you are ready to enjoy it, thaw it overnight in the fridge. Then, reheat it as mentioned above. This way, you can enjoy delicious pasta anytime! Yes, you can use fresh tomatoes. Start with about 1.5 pounds of fresh ripe tomatoes. Blanch and peel them for best results. Dice the tomatoes and add them to your skillet. Cook them down until soft, about 10 to 15 minutes. This process helps bring out their natural sweetness. The sauce will taste fresh and bright. To add heat, you can use red pepper flakes. Start with ¼ teaspoon and adjust to your taste. You can also add diced jalapeños or serrano peppers to the onion and garlic. Cook with them for a few minutes to release their heat. Another option is to sprinkle in some hot sauce while cooking the sauce. This allows you to control the spice level. This creamy tomato pasta pairs well with a fresh salad. Try a simple green salad with lemon vinaigrette. Garlic bread is another great option for dipping. You could also serve it with grilled vegetables for a colorful plate. For protein, grilled chicken or shrimp complements the pasta nicely. Enjoy exploring different sides! This blog post covered everything you need to know for creamy tomato pasta. We explored key ingredients, simple steps, and helpful tips. I shared ways to add protein and even vegan options. You learned about storing leftovers and reheating. Remember, cooking is about having fun and trying new things. So, get creative with flavors and enjoy your meal!

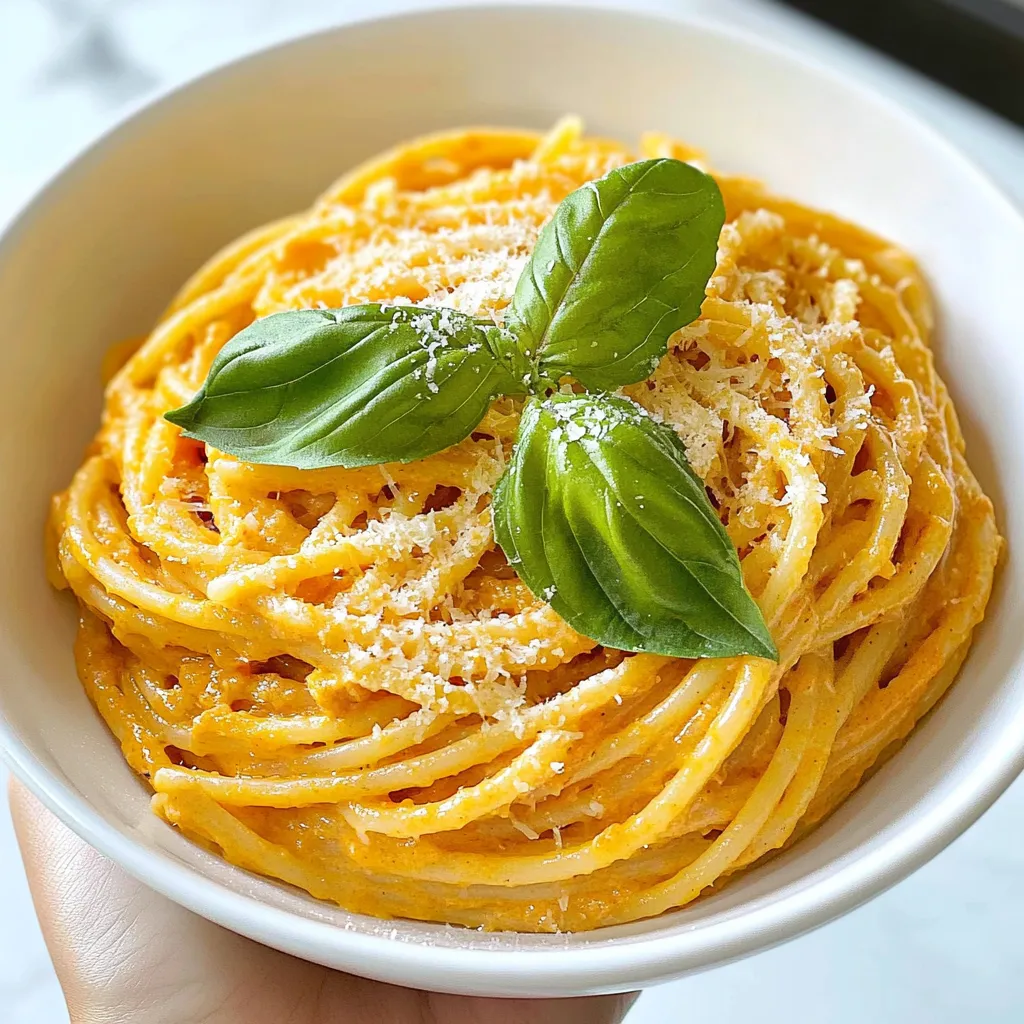
Are you ready to whip up a dish that delights your taste buds? My Creamy Tomato Pasta is simple to make and bursting with flavor. It’s perfect for busy weeknights …

Read more

Categories Dinner

Cheesy Chicken Pasta Delightful and Easy Recipe

October 8, 2025November 23, 2024 by Chef Nate
To make Cheesy Chicken Pasta, gather these items: - 2 cups rotini pasta - 1 lb chicken breast, diced - 1 tablespoon olive oil - 1 teaspoon garlic powder - 1 teaspoon onion powder - ½ teaspoon smoked paprika - 1 cup broccoli florets - 1 cup cherry tomatoes, halved - 1 ½ cups shredded cheddar cheese - ½ cup cream cheese - 1 cup chicken broth - Salt and pepper to taste - Fresh parsley, chopped, for garnish You can swap some ingredients if needed. Use gluten-free pasta for a gluten-free meal. For the chicken, try turkey or tofu for a different flavor. You can replace broccoli with spinach or peas. If you lack cream cheese, use sour cream instead. Having the right tools makes cooking easier. You will need: - A large pot for boiling pasta - A large skillet for sautéing - A cutting board and knife for chopping - Measuring cups and spoons for precision - A spatula for stirring and mixing These tools will help you create your dish smoothly and efficiently. {{ingredient_image_1}} To start, grab a big pot. Fill it with water and add salt. Bring the water to a boil. Once it boils, add the rotini pasta. Cook it according to the package directions. You want it to be al dente, which means it should still have a bit of bite. This usually takes about 8-10 minutes. After cooking, drain the pasta and set it aside for later. Next, take a large skillet and place it on medium heat. Pour in the olive oil and let it warm up. Once hot, add the diced chicken breast. Season it with garlic powder, onion powder, smoked paprika, salt, and pepper. Stir it well. Cook the chicken for about 7-8 minutes. You want it to be golden brown and fully cooked. This step adds flavor and texture to your dish. Now, it’s time to make the sauce. In the same skillet, add the broccoli florets and halved cherry tomatoes. Sauté these veggies for about 4-5 minutes. They should become tender but still bright and fresh. Next, lower the heat. Pour in the chicken broth and add the cream cheese. Stir this mix until the cream cheese melts fully. This creates a rich, creamy sauce that brings all the flavors together. Now you're ready to combine everything for a delicious cheesy chicken pasta! To make the chicken tender, cut it into small, even pieces. This helps it cook faster and more evenly. Use a hot skillet with olive oil. Cook until it is golden brown, about 7-8 minutes. You want the chicken to reach an internal temperature of 165°F. This ensures it is safe to eat. Let the chicken rest for a minute before adding it to the pasta. This step keeps it juicy. For the best cheese melt, use shredded cheddar cheese. Shredded cheese melts faster than blocks. Add it to the pan when the heat is low. Stir it in slowly to avoid clumps. Mixing it with cream cheese makes the sauce creamy and smooth. If you want extra cheesiness, add more cheese at the end. To boost flavors, use garlic powder, onion powder, and smoked paprika. These spices add depth to the dish. Fresh parsley gives a nice color and fresh taste. You can also add a squeeze of lemon juice for brightness. If you like a kick, consider adding red pepper flakes. This adds heat without overwhelming the other flavors. Pro Tips Cook Pasta Al Dente: For the perfect texture, cook the pasta just until al dente. This will prevent it from becoming mushy when mixed with the sauce. Season the Chicken Well: Don’t skimp on seasoning the chicken! A well-seasoned protein elevates the entire dish and enhances the flavors. Use Fresh Ingredients: Whenever possible, opt for fresh vegetables and herbs. They add vibrant flavors and color to your dish. Experiment with Cheeses: Feel free to mix different cheeses for a unique flavor profile. Try adding mozzarella or pepper jack for an extra kick! {{image_2}} You can easily make this dish vegetarian. Simply swap the chicken for a plant-based protein. Try using diced tofu or tempeh. These options absorb flavors well and add protein. You can also add other veggies, like bell peppers or spinach. This keeps the dish colorful and tasty. For those who like heat, add some spice! You can include red pepper flakes or chopped jalapeños. Mix them in while cooking the chicken. This gives the dish a fun kick. Alternatively, you can use spicy cheese blends. Pepper jack cheese melts well and adds great flavor. Feel free to get creative with the ingredients! Instead of rotini, use penne or fusilli. Both pasta types work well in this recipe. If you don’t have broccoli, try zucchini or green beans. You can also switch the cheddar for mozzarella or gouda. These swaps maintain that cheesy goodness while changing the taste! To store leftover Cheesy Chicken Pasta, let it cool first. Then, place it in an airtight container. You can keep it in the fridge for up to three days. Make sure to seal the container tightly to keep the pasta fresh. If you want to freeze it, use a freezer-safe container. This pasta can last in the freezer for about two months. When freezing, divide it into single servings. This way, you can thaw only what you need later. To reheat, place the pasta in a microwave-safe bowl. Add a splash of chicken broth or water to keep it moist. Heat it in the microwave for about two to three minutes. Stir halfway to ensure even heating. You can also reheat it on the stove. Just warm it gently over low heat. Add a bit more cheese if you want it extra creamy! Yes, you can make Cheesy Chicken Pasta ahead of time. Prepare the dish up to the point of combining the pasta and sauce. Store it in the fridge for up to two days. When ready to eat, reheat it gently on the stove or in the microwave. Add a splash of chicken broth to keep it creamy. This method saves time on busy days. Cheesy Chicken Pasta pairs well with many sides. Here are some options: - Garlic bread for a crunchy touch. - A fresh garden salad for a light crunch. - Steamed vegetables for extra nutrients. - Fruit salad for a sweet finish. These sides complement the dish and add variety to your meal. To make Cheesy Chicken Pasta low-carb, swap the rotini pasta for zucchini noodles or spaghetti squash. These options are lower in carbs and still taste great. Use full-fat cheese and cream cheese to keep it rich and creamy. You can also add more vegetables, like spinach or bell peppers, for extra flavor and fiber. This way, you enjoy a delicious meal without the extra carbs. In this post, we covered how to make a delicious Cheesy Chicken Pasta. You learned about key ingredients, easy substitutions, and the tools you need. We discussed step-by-step cooking methods, tips for perfecting texture, and flavor. Variations for diets and storage tips also made an appearance. With these insights, you’re ready to create a meal that’s both tasty and fun. Enjoy experimenting with your own twists and flavors!

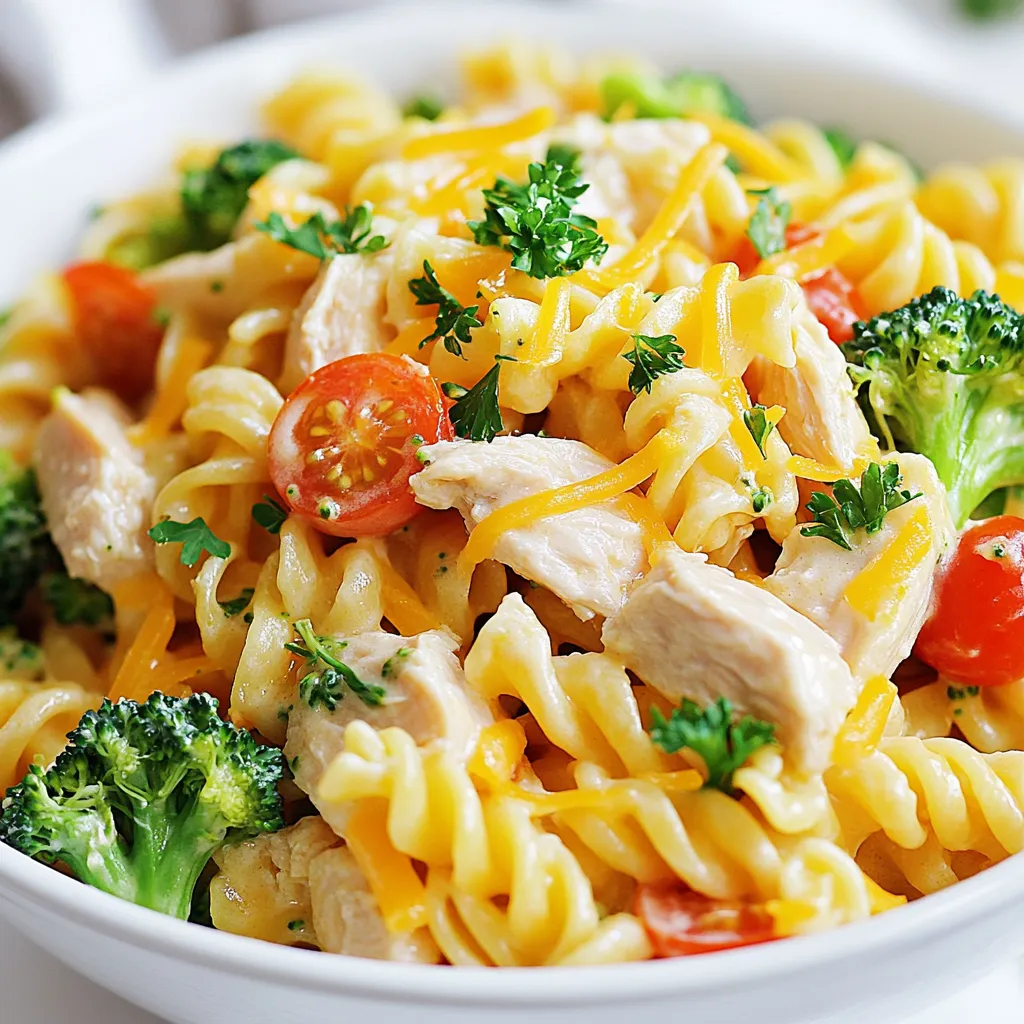
Are you ready to whip up a dish that’s creamy, cheesy, and oh-so-delicious? This Cheesy Chicken Pasta is not just easy to make; it’s also packed with flavor your whole …

Read more

Categories Dinner

Amazing Chicken Casserole Quick and Easy Recipe

October 26, 2025November 22, 2024 by Chef Nate
To make the Amazing Chicken Casserole, you need these main ingredients: - 2 cups cooked chicken, shredded - 1 cup broccoli florets - 1 cup cauliflower florets - 1 cup cooked quinoa - 1 can (10.5 oz) cream of mushroom soup - 1 cup sour cream - 1 cup shredded cheese (cheddar or mozzarella) - 1 teaspoon garlic powder - 1 teaspoon onion powder - 1 teaspoon paprika - Salt and pepper to taste - 2 tablespoons olive oil These ingredients work together to create a creamy and hearty dish. The chicken provides protein, while the broccoli and cauliflower add a lovely crunch. Quinoa gives it a nice texture and boosts nutrition. You can add breadcrumbs on top for an extra crunch. - 1 cup breadcrumbs (optional for topping) Breadcrumbs help create a golden crust. They add texture and make the dish even more satisfying. Drizzling with olive oil helps the breadcrumbs brown. If you have dietary needs, here are some easy swaps: - Use gluten-free breadcrumbs instead of regular ones. - Swap quinoa for brown rice or any grain you prefer. - Choose dairy-free sour cream and cheese for a vegan option. These substitutions keep the dish delicious while meeting your needs. You can enjoy this casserole no matter your dietary choices. {{ingredient_image_1}} 1. First, preheat your oven to 350°F (175°C). This helps cook the casserole evenly. 2. In a large bowl, mix 2 cups of shredded chicken, 1 cup of broccoli florets, 1 cup of cauliflower florets, and 1 cup of cooked quinoa. Stir well to combine. 3. In another bowl, whisk together 1 can of cream of mushroom soup, 1 cup of sour cream, 1 teaspoon of garlic powder, 1 teaspoon of onion powder, 1 teaspoon of paprika, and salt and pepper to taste. Make sure this mixture is smooth. 4. Pour the soup mixture over the chicken and veggies. Stir until everything is coated well. 5. Transfer the mixture into a greased 9x13-inch casserole dish. This will prevent sticking. 6. If you want a crunchy top, sprinkle 1 cup of breadcrumbs over the casserole. Drizzle 2 tablespoons of olive oil on top to help the breadcrumbs brown. 7. Add 1 cup of shredded cheese on top. You can use cheddar or mozzarella, depending on your taste. 8. Cover the dish with aluminum foil and bake for 25-30 minutes. This traps steam and keeps it moist. 9. After that, remove the foil and bake for an additional 10-15 minutes. Look for bubbly and golden cheese. 10. Let the casserole cool for a few minutes before serving. This makes it easier to cut and serve. - Serve with a fresh salad or crusty bread for a complete meal. - You can also top the casserole with fresh herbs like parsley for added flavor. - Leftovers can be stored in the fridge and reheated for another meal. To boost the flavor of your casserole, use fresh herbs. Chopped parsley or thyme adds zest. You can also mix in some sautéed onions or mushrooms for depth. If you like spice, add a pinch of cayenne pepper or a splash of hot sauce. Another trick is to use rotisserie chicken instead of plain cooked chicken. This adds a rich, savory taste to the dish. After serving, let the casserole cool. Cover it tightly with plastic wrap or aluminum foil. Store it in the fridge for up to three days. If you want to keep it longer, freeze it. Wrap it well in plastic, then put it in a freezer-safe container. It can last for up to three months in the freezer. To reheat, simply take it out of the fridge or freezer. If frozen, let it thaw in the fridge overnight. Preheat your oven to 350°F (175°C). Place the casserole in the oven for about 20-30 minutes. Cover it with foil to prevent it from drying out. If you want a crisp top, remove the foil for the last 10 minutes. Enjoy it warm and delicious! Pro Tips Tip Title 1: Using leftover rotisserie chicken can save you time and add flavor to your casserole. Tip Title 2: For a healthier option, substitute Greek yogurt for sour cream in the recipe. Tip Title 3: Add extra vegetables like bell peppers or carrots for added nutrition and color. Tip Title 4: Let the casserole sit for a few minutes after baking to help it set and make serving easier. {{image_2}} You can easily change the flavors in this casserole. Try using different veggies like spinach or bell peppers. Swap quinoa for rice or pasta for a new texture. Add herbs like thyme or rosemary for an earthy taste. If you want more spice, add diced jalapeños or chili powder. You can also replace the cream of mushroom soup with cream of chicken or even a homemade sauce. To make this dish gluten-free, use gluten-free breadcrumbs or skip them altogether. Ensure your cream of mushroom soup is gluten-free too. Many brands offer this option. Quinoa is naturally gluten-free, making it a great choice for the base. You can also use brown rice or cauliflower rice for a tasty twist. You can make this casserole vegetarian by omitting the chicken. Use beans or lentils instead for protein. Replace the chicken with extra vegetables, like zucchini or mushrooms. For a creamier texture, add extra sour cream or a plant-based alternative. Make sure the cream of mushroom soup is vegetarian too. This way, everyone can enjoy a delicious, hearty meal. To store your amazing chicken casserole, let it cool first. Once cooled, cover it tightly with plastic wrap or aluminum foil. You can also use an airtight container. This keeps the casserole fresh. Store it in the fridge for up to three days. Make sure to label it with the date for easy tracking. Freezing is a great way to save leftovers. First, let the casserole cool completely. Then, cut it into individual portions. Wrap each portion in plastic wrap, then in foil. You can also use freezer-safe containers. This helps prevent freezer burn. Store it in the freezer for up to three months. When you're ready to eat, thaw it in the fridge overnight. Stored in the fridge, the casserole lasts about three days. After that, it may lose taste or texture. If frozen, it remains good for about three months. To ensure safety, always check for changes in smell or appearance before eating. If in doubt, throw it out! Yes, you can use fresh vegetables. Fresh broccoli and cauliflower work well. Just chop them into small pieces. Cooking time may change if you use raw veggies. They might need a bit longer to cook. You can prepare the chicken casserole a day before. Mix all the ingredients and place them in the dish. Cover and store it in the fridge. When ready to bake, just add a few extra minutes to the cooking time. Chicken casserole pairs well with a simple green salad. You can also serve it with bread or rolls. For extra flavor, try garlic bread or cornbread on the side. These options complement the creamy casserole nicely. This post covered key ingredients for your casserole, including main and optional choices. It laid out simple steps for preparing, baking, and serving. You learned helpful tips for flavor, storage, and reheating. Variations like gluten-free and vegetarian options make this dish more flexible. Finally, storing leftovers properly keeps your meal fresh longer. Choose flavors and ingredients that suit you. Enjoy cooking and sharing your casserole with others!

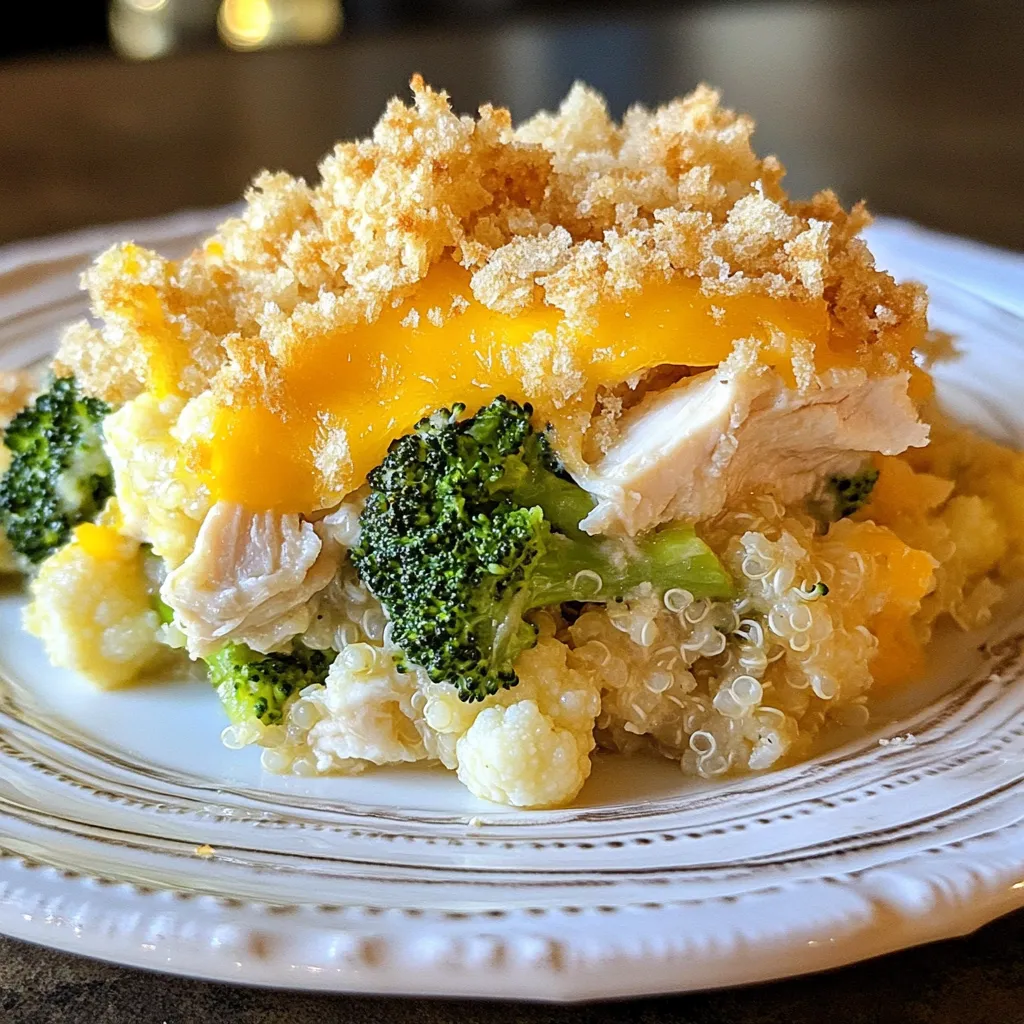
Looking for a simple, delicious dinner that everyone will love? You’re in the right spot! This Amazing Chicken Casserole is quick to make and packed with flavor. I’ll walk you …

Read more

Categories Dinner

Chicken and Sweet Potato Rice Bowl Hearty Meal Recipe

October 23, 2025November 22, 2024 by Chef Nate
- 2 boneless, skinless chicken breasts - 1 large sweet potato, peeled and diced - 1 cup brown rice - 2 cups vegetable broth - 1 bell pepper, sliced - 1 small red onion, diced - 2 cloves garlic, minced - 2 tablespoons olive oil - 1 teaspoon smoked paprika - 1 teaspoon cumin - Salt and pepper to taste - ¼ cup fresh cilantro, chopped (for garnish) - 1 avocado, sliced (optional, for serving) You need fresh ingredients to create the best flavors. The chicken gives protein and richness. Sweet potatoes add sweetness and texture. Brown rice forms a hearty base. Vegetable broth adds depth to the rice. For seasoning, smoked paprika and cumin bring warmth. Garlic and onion add nice flavors, too. Fresh cilantro adds brightness as a garnish. Avocado gives creaminess and is optional but nice. Choose quality ingredients to make your meal stand out. This bowl is not just tasty; it's also colorful and good for you. Each bite will be satisfying and full of flavor. {{ingredient_image_1}} To cook the brown rice, start by gathering your ingredients. You need 1 cup of brown rice and 2 cups of vegetable broth. Pour the broth into a medium pot with the rice. Bring it to a boil on high heat. Once it boils, lower the heat. Cover the pot and let it simmer for about 30 to 35 minutes. This will let the rice soak up the broth. - Tips for perfect rice texture: - Make sure to keep the pot covered while it cooks. - After the time is up, remove it from heat and let it sit for 5 minutes. This resting time helps the rice finish cooking. Fluff it with a fork for a light texture. Next, we move on to the sweet potatoes. Peel and dice 1 large sweet potato. Preheat your oven to 400°F (200°C). Take a baking sheet and spread the diced sweet potato evenly. Drizzle with 1 tablespoon of olive oil, and sprinkle some salt and pepper. Toss them well so they are coated. - Achieving caramelization: - Roast the sweet potatoes in the oven for about 20 to 25 minutes. - Check them halfway and give them a stir for even cooking. When they turn golden and tender, they are ready. Now for the chicken. Use 2 boneless, skinless chicken breasts. Season them with smoked paprika, cumin, salt, and pepper. In a skillet, heat 1 tablespoon of olive oil over medium heat. When hot, add the chicken. Cook on each side for about 5 to 7 minutes. - Sautéing onions and peppers: - Push the chicken to the side of the skillet. Add 1 small diced red onion and 2 cloves of minced garlic. Sauté for about 2 to 3 minutes until the onion is clear. - After the chicken is done, remove it from the skillet. Let it rest, then slice it. - In the same skillet, add 1 sliced bell pepper and sauté for another 2 to 3 minutes until it softens. Now you're ready to build your bowls! To make sure your chicken turns out tender, use these methods: - Brining: Soak the chicken in saltwater for 30 minutes. This keeps it juicy. - Pounding: Gently pound the chicken to an even thickness. This helps it cook evenly. When cooking, check the internal temperature with a meat thermometer. The chicken must reach 165°F (75°C) to be safe to eat. This ensures it is fully cooked and safe. Adding spices can make your dish pop. Here are some ideas: - Extra spices: Try adding garlic powder or chili powder for a kick. - Sauces: A drizzle of soy sauce or sriracha can add depth. You can also pair your rice bowl with fresh lime or lemon. This adds a bright, zesty touch. How you serve your rice bowl matters. Here are some tips: - Serving style: Use deep plates for a cozy look. Layer the ingredients for a colorful display. - Garnishes: Fresh cilantro adds a nice touch. Sliced avocado provides creaminess and flavor. These simple steps can make your meal look as good as it tastes. Enjoy! Pro Tips Rest the Chicken: Allow the cooked chicken to rest for a few minutes before slicing. This helps retain its juices and keeps the meat tender. Customize Your Veggies: Feel free to add or substitute other vegetables like zucchini or spinach for added nutrition and flavor. Perfectly Cooked Rice: Rinse the brown rice under cold water before cooking to remove excess starch, which helps achieve a fluffier texture. Garnish Wisely: Adding a squeeze of fresh lime juice over the assembled bowls can brighten up the flavors significantly. {{image_2}} You can easily swap the chicken in this recipe. Try using turkey or pork for a new taste. Each meat adds a different flavor and texture. If you want vegetarian options, consider chickpeas or tofu. Both are protein-rich and will fill you up. Just make sure you season them well to add flavor. Feel free to play with different vegetables. Instead of sweet potatoes, use butternut squash or even carrots. You can also add greens like spinach or kale for extra color and nutrition. For rice, try quinoa or cauliflower rice. Both options give you a unique twist and change the texture. If you like spice, add chili powder or sriracha for heat. These spices can turn your bowl into a fiery delight. You can also experiment with international flavors. For a Mexican touch, use black beans and corn. For an Asian flair, use soy sauce and sesame oil. These swaps create delicious new versions of your rice bowl. To keep your chicken and sweet potato rice bowl fresh, follow these tips: - Refrigeration tips: Store leftovers in an airtight container. Make sure the bowl cools to room temperature before sealing. This helps avoid moisture buildup. In the fridge, the meal stays good for up to 3 days. - Freezing for future meals: If you want to save it longer, freeze the rice bowl. Use freezer-safe containers and separate the chicken, rice, and veggies if possible. This keeps each part fresh. You can store it for up to 3 months. When you want to enjoy your leftovers, reheating is key: - Methods for maintaining texture and flavor: The best way to reheat is in the oven. Preheat it to 350°F (175°C). Place the bowl in a baking dish and cover it with foil. Heat for about 20 minutes. This method keeps the chicken juicy and the rice fluffy. You can also use the microwave. Place the bowl in a microwave-safe dish. Cover it with a damp paper towel to keep moisture in. Heat in 30-second intervals, stirring in between, until hot. Yes, you can prepare this meal ahead of time. Cook the rice and sweet potatoes first. Store them in separate airtight containers in the fridge. They will stay fresh for up to four days. When ready to eat, reheat them on the stove or in the microwave. You can also cook the chicken in advance. Store it sliced in the fridge. Just warm it up when you’re ready to assemble your bowl. You can easily adapt this rice bowl for different diets. For a gluten-free option, use a gluten-free soy sauce or tamari for flavor. To make it vegan, replace chicken with tofu or chickpeas. Use vegetable broth instead of chicken broth for cooking the rice. These swaps keep the dish tasty while meeting dietary needs. For a balanced meal, consider a side salad with mixed greens and a light vinaigrette. You can also serve roasted vegetables or steamed broccoli. If you want something warm, a cup of soup pairs well. These sides add more nutrients and flavor, making your meal even better. In this blog post, I shared a process for making a delicious chicken and sweet potato rice bowl. We covered key ingredients, cooking steps, and tips for perfect results. I also explored variations and how to store your meals. Remember, cooking is all about personalizing flavors and techniques to fit your taste. With simple adjustments, you can enjoy a dish that suits your needs. Try these tips for your next meal adventure. Happy cooking!

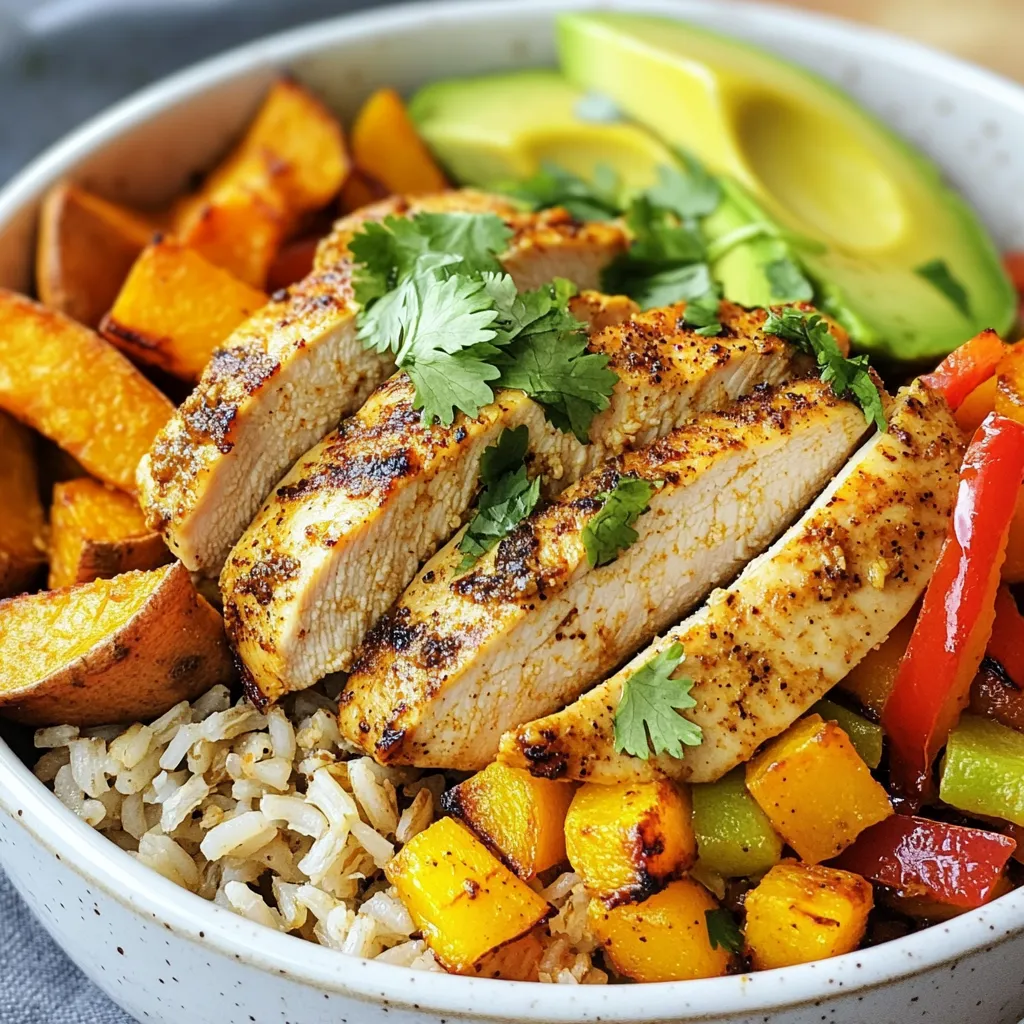
Are you ready to create a meal that’s both tasty and filling? In this post, I’ll share my Chicken and Sweet Potato Rice Bowl recipe, perfect for any day of …

Read more

Categories Dinner

Creamy Garlic Chicken Broccoli Skillet Delightful Meal

October 28, 2025November 20, 2024 by Chef Nate
To make this creamy garlic chicken broccoli skillet, you need the following: - 2 boneless, skinless chicken breasts, sliced into strips - 2 cups fresh broccoli florets - 4 cloves garlic, minced - 1 cup heavy cream - 1 cup chicken broth - 1 tablespoon olive oil - 1 teaspoon Italian seasoning - Salt and pepper to taste - 1/2 cup grated Parmesan cheese - Fresh parsley, chopped (for garnish) Each ingredient plays a key role in building flavor and texture in this dish. If you want to swap some ingredients, here are a few ideas: - Chicken: You can use turkey or tofu for a different protein. - Cream: For a lighter option, use half-and-half or coconut cream. - Broccoli: Cauliflower or green beans can work well too. - Parmesan: Use nutritional yeast for a dairy-free choice. - Olive oil: Any cooking oil, like avocado oil, can be used here. These substitutions can still give you a tasty meal but change the flavor slightly. Choosing fresh ingredients is key to a great dish. Here are some tips: - Chicken: Look for bright pink color and no smell. - Broccoli: Pick florets that are bright green and firm. Avoid yellowing. - Garlic: Choose bulbs that are heavy and firm, with no sprouting. - Cream: Check the date and choose a brand that you trust. Fresh ingredients make a big difference in taste and quality. {{ingredient_image_1}} Start by gathering all your ingredients. You will need chicken, broccoli, garlic, and more. Prepare the chicken by cutting it into strips. Wash the broccoli and cut it into small florets. Mince the garlic and set it aside. This prep makes cooking easier and faster. Heat olive oil in a large skillet over medium heat. Once hot, add the chicken strips. Season them with salt, pepper, and Italian seasoning. Cook for about 5 to 7 minutes until golden brown. Ensure the chicken is fully cooked, then remove it from the skillet. Set it aside on a plate. This keeps the chicken juicy while you make the sauce. In the same skillet, add minced garlic. Sauté it for about one minute. Be careful not to burn the garlic, as it can taste bitter. Next, pour in the chicken broth and bring it to a simmer. Let it reduce for about 3 to 4 minutes. Then, add heavy cream and mix well. Simmer for another 3 to 4 minutes. Watch as the sauce thickens and turns rich. Now, it’s time for the broccoli. Add the florets to the skillet and cover with a lid. Let them steam in the creamy sauce for 4 to 5 minutes. This keeps them bright and tender. Return the chicken to the skillet and sprinkle with Parmesan cheese. Stir everything to combine and cook for another 2 minutes. Adjust the seasonings to taste. Garnish with chopped fresh parsley. Serve hot and enjoy this delightful meal! To cook chicken just right, start with thin strips. Thin pieces cook quickly and evenly. Heat your skillet on medium heat and add olive oil. Once hot, season the chicken with salt, pepper, and Italian seasoning. Cook for about 5-7 minutes. Look for a golden color on the chicken. Always check if the chicken is cooked through. For perfect broccoli, use fresh florets. Fresh broccoli stays bright green and crunchy. Add the florets to the skillet after the sauce simmers. Cover the skillet with a lid to steam them. Let them cook for about 4-5 minutes. The broccoli should be tender but still firm. This keeps it vibrant and tasty. If you want to change flavors, try different seasonings. Lemon zest adds a fresh touch. Smoked paprika gives a warm flavor. You can also use fresh herbs like thyme or basil. These spices can elevate your dish. Experiment with what you like best. Each change can make this recipe feel new! Pro Tips Use Fresh Ingredients: Fresh broccoli and garlic will enhance the flavor and texture of your dish significantly. Opt for seasonal vegetables whenever possible. Don’t Overcook the Broccoli: Steam the broccoli just until tender to maintain its vibrant color and crisp texture. This adds not only flavor but also visual appeal to your dish. Adjust the Creaminess: If you prefer a lighter sauce, substitute half of the heavy cream with Greek yogurt or sour cream for a tangy twist without sacrificing creaminess. Experiment with Cheese: While Parmesan is delicious, feel free to experiment with other cheeses like mozzarella or cheddar for different flavor profiles. {{image_2}} You can make simple swaps to boost health. Instead of heavy cream, try coconut milk. It adds creaminess with fewer calories. You can also use low-sodium chicken broth. This helps cut down on salt. For cheese, swap Parmesan for nutritional yeast. It gives a cheesy flavor without dairy. Want to add more veggies? Toss in bell peppers or carrots for color and crunch. You can also use spinach or kale. These greens cook quickly and blend well in the sauce. Just add them when you add the broccoli. They will steam perfectly in the creamy sauce. To spice things up, add red pepper flakes. Start with a pinch and taste as you go. If you want more heat, add a diced jalapeño. This gives a nice kick without changing the dish too much. You can also use spicy Italian sausage instead of chicken for a bold twist. Store your creamy garlic chicken broccoli skillet in an airtight container. Allow it to cool first. This helps prevent sogginess. Keep it in the fridge for up to three days. Make sure to label your container with the date. This way, you know when to use it. When you're ready to eat your leftovers, reheating is easy. The best way is to use a skillet for even heating. Heat it over low to medium heat. Stir occasionally to prevent sticking. You can also use a microwave. Place it in a microwave-safe dish and cover it. Heat in short bursts until warm, stirring in between. If you want to save it for later, freezing is a great option. Let your dish cool completely before freezing. Use a freezer-safe container or bag. Squeeze out as much air as possible to avoid freezer burn. It can last for about three months in the freezer. When you’re ready to eat, thaw it in the fridge overnight before reheating. Yes, you can use frozen broccoli. Frozen broccoli cooks faster. It is already blanched, so it will be tender quickly. Just add it to the skillet and cook until heated through. The flavor will still be nice, but fresh broccoli gives better texture. This dish pairs well with rice or pasta. You can also serve it with crusty bread for dipping. A fresh salad or roasted potatoes can add a nice touch too. Each side complements the creamy sauce well. To make it dairy-free, swap heavy cream for coconut milk. Use dairy-free cheese instead of Parmesan. You can also use a thick nut milk to mimic the creaminess. This keeps the dish rich without dairy. If the sauce is too thick, add more chicken broth. Stir it in slowly until you reach your desired consistency. You can also add a splash of water or more cream. This keeps the sauce creamy without being too heavy. Yes, you can make this dish ahead of time. Cook it fully and let it cool. Store it in an airtight container in the fridge for up to three days. Reheat it gently on the stove for best results. This blog post covered all you need to make a tasty Creamy Garlic Chicken Broccoli Skillet. We explored key ingredients, helpful tips, and fun variations to try. Remember to choose fresh ingredients for the best taste and follow my steps for perfect chicken. Don't hesitate to experiment with your own twists. Store leftovers properly, and enjoy this dish whenever you crave it. Cooking can be fun and creative, so get started!

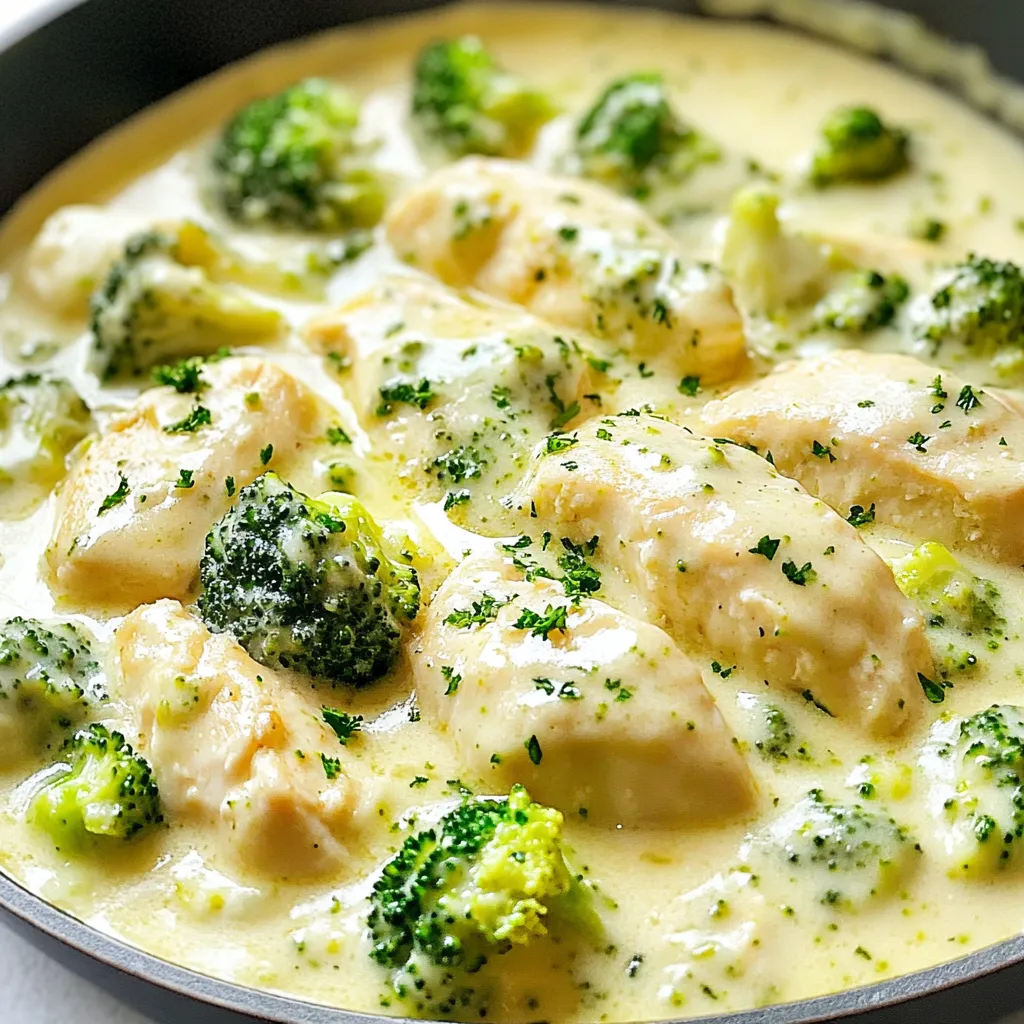
Are you ready to elevate your dinner game? This Creamy Garlic Chicken Broccoli Skillet is the perfect dish for you! Packed with flavor and easy to make, this meal combines …

Read more

Categories Dinner

Creamy Pasta Salad Delightful and Refreshing Recipe

October 15, 2025November 15, 2024 by Chef Nate
- 250g rotini pasta - 1 cup cherry tomatoes, halved - 1 cup cucumber, diced - 1/2 cup red bell pepper, diced - 1/4 cup red onion, finely chopped - 1 cup sweet corn (canned or cooked) - 1/2 cup black olives, sliced - 1 cup creamy Greek yogurt - 1/4 cup mayonnaise - 1 tablespoon Dijon mustard - 2 tablespoons lemon juice - Salt and black pepper to taste - 1 teaspoon dried oregano - Fresh parsley, chopped (for garnish) These ingredients create a wonderful mix of colors and flavors. The rotini pasta holds the creamy dressing well, making each bite a delight. Fresh vegetables like cherry tomatoes and cucumber add crunch and brightness. Using Greek yogurt and mayonnaise makes the dressing rich and creamy without being too heavy. Lemon juice adds a zesty kick. Oregano gives it warmth and depth. You can also add black olives and sweet corn for extra taste. Fresh parsley is not just a garnish; it adds a lovely touch of color and freshness. When you pick your ingredients, choose fresh ones. Fresh veggies make the salad taste better. If you want to switch things up, you can add other ingredients, but these are the core ones. {{ingredient_image_1}} 1. Start by boiling a large pot of salted water. Add enough salt to make the water taste like the sea. 2. Once the water boils, add 250 grams of rotini pasta. Cook it until al dente, which usually takes about 8 to 10 minutes. Stir it occasionally to prevent sticking. 3. After cooking, drain the pasta in a colander. Rinse it under cold water. This stops the pasta from cooking further and helps it cool down. 1. While the pasta cools, wash your vegetables. Dicing makes them easy to mix and eat. 2. Halve 1 cup of cherry tomatoes. Dice 1 cup of cucumber and 1/2 cup of red bell pepper. 3. Finely chop 1/4 cup of red onion. You can adjust the amount based on your taste. 4. Combine all these vegetables in a large mixing bowl. 1. In a separate bowl, whisk together the dressing ingredients. Use 1 cup of creamy Greek yogurt, 1/4 cup of mayonnaise, and 1 tablespoon of Dijon mustard. 2. Add 2 tablespoons of lemon juice, 1 teaspoon of dried oregano, and salt and black pepper to taste. 3. Taste the dressing and adjust the flavors. Add more salt, pepper, or lemon juice if needed. 1. Now, pour the creamy dressing over the pasta and vegetables in the mixing bowl. 2. Toss everything gently to coat the pasta and veggies evenly. Make sure every bite gets that creamy goodness. 1. After mixing, cover the salad with plastic wrap or a lid. Chill it in the fridge for at least 30 minutes. This helps all the flavors blend together. 2. When ready to serve, garnish the salad with freshly chopped parsley for a pop of color. Enjoy your refreshing creamy pasta salad! To get a creamy texture, always choose high-quality yogurt and mayonnaise. These add richness and flavor. You can also try using sour cream or cream cheese for a different twist. Both can make your pasta salad even creamier. To boost flavor, start with salt and pepper. You can also add garlic powder or onion powder. Using fresh herbs like parsley or basil can brighten your dish. They add color and taste. Just chop them finely for a nice touch. Creamy pasta salad goes great with grilled chicken or fish. It also pairs well with crusty bread. For serving size, about one cup is perfect for each person. This dish is great for picnics or potlucks. It stays fresh and tasty, making it a crowd-pleaser! Pro Tips Perfect Pasta: To achieve the best texture, make sure to cook the rotini pasta until it's al dente. This will help it maintain its shape and prevent it from becoming mushy when mixed with the dressing. Chill for Flavor: Allowing the pasta salad to chill in the refrigerator for at least 30 minutes helps the flavors meld together, resulting in a more delicious dish. Fresh Ingredients: Using fresh, high-quality vegetables such as ripe cherry tomatoes and crisp cucumbers can significantly enhance the overall taste and texture of your pasta salad. Customize Your Salad: Feel free to add other ingredients like diced avocado, feta cheese, or even cooked chicken to make this pasta salad your own! {{image_2}} You can use many types of pasta for this salad. Rotini works great, but penne and fusilli are also fun. They add a nice twist to your dish. If you need a gluten-free option, look for rice or chickpea pasta. These choices keep the dish tasty while meeting dietary needs. Adding protein can turn this salad into a meal. Grilled chicken or shrimp adds flavor and makes it filling. For a plant-based choice, try tofu or chickpeas. They boost protein without meat. Both options fit well with the creamy dressing. Fresh veggies can change with the seasons. In summer, add fresh corn or zucchini for a crisp bite. In winter, roasted squash or Brussels sprouts work nicely. Seasonal veggies keep your salad exciting and full of flavor. This way, you can enjoy a new taste each time you make it. Store your creamy pasta salad in an airtight container. This helps keep it fresh. If you don’t have one, use a bowl covered with plastic wrap. Make sure no air can get in. Place it in the fridge right after serving. This keeps it safe and tasty. Your creamy pasta salad lasts for about three to five days in the fridge. Look for signs that it has gone bad. If you see mold or an off smell, throw it away. If the pasta feels slimy, it’s time to say goodbye. Freezing creamy pasta salad is not recommended. The texture of the pasta and veggies may change when thawed. If you must freeze it, use a freezer-safe container. Thaw it in the fridge overnight before serving. Stir well to mix the ingredients again. Yes, you can use low-fat yogurt. It will make the salad lighter. Greek yogurt gives a rich taste, while low-fat yogurt is a healthier option. Both will still create a creamy texture. If you want to cut calories, low-fat yogurt works well. Try adding red pepper flakes or diced jalapeños. These will kick up the heat. You can also mix in hot sauce or a splash of sriracha. For a smoky flavor, consider smoked paprika. Adjust the amounts based on your spice level preference. Yes, you can make this salad vegan. Use dairy-free yogurt instead of Greek yogurt. Replace the mayonnaise with vegan mayo. For extra protein, add chickpeas or tofu. These swaps keep the salad tasty and creamy while being plant-based. This creamy pasta salad is easy to make and fun to personalize. You learned how to cook rotini, prepare fresh veggies, and whip up a tasty dressing. Mix everything for a quick meal or side dish. Remember, you can swap in different veggies, pasta types, or proteins to suit your taste. For storage, keep leftovers in the fridge or consider freezing for later. Enjoy your delicious creation with family and friends. It's a simple, tasty way to enjoy healthy ingredients anytime.

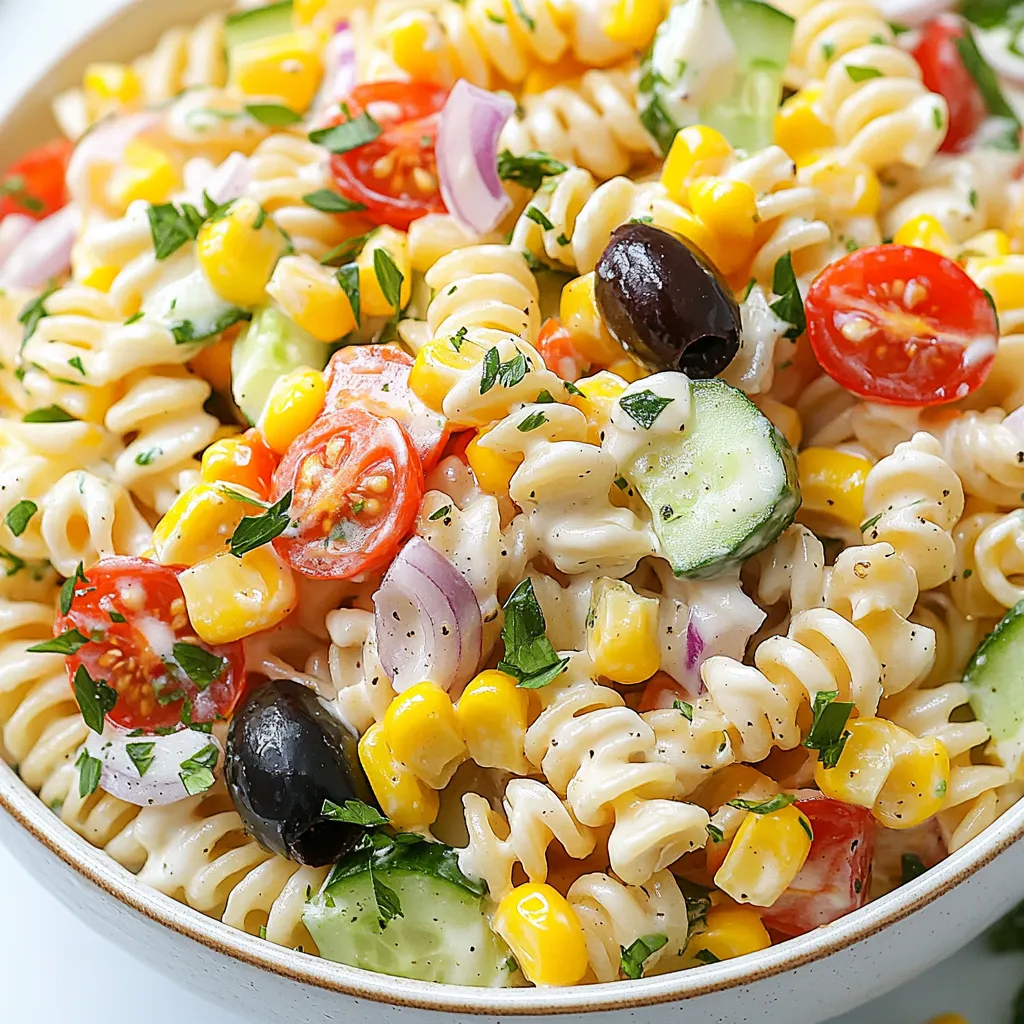
Welcome to my creamy pasta salad recipe! This dish combines fresh veggies, wholesome rotini, and a rich dressing for a delightful meal. Whether you’re hosting a picnic or enjoying a …

Read more

Categories Salads

Cheesy Pull-Apart Garlic Bread Tasty and Simple Delight

October 30, 2025November 9, 2024 by Chef Nate
- 1 large loaf of sourdough or Italian bread - 1 cup shredded mozzarella cheese - 1 cup shredded sharp cheddar cheese - 6 tablespoons unsalted butter, melted - 4 cloves garlic, minced - 2 tablespoons fresh parsley, chopped (or 1 tablespoon dried parsley) - 1 teaspoon Italian seasoning - ½ teaspoon salt - ¼ teaspoon black pepper The main ingredients for cheesy pull-apart garlic bread are quite simple. You need a big loaf of sourdough or Italian bread. The bread holds all the cheese and flavors well. Next, mozzarella and sharp cheddar cheese give that gooey, tasty bite. You will also need unsalted butter, which adds richness. The garlic makes it all pop with flavor. Fresh parsley or dried parsley adds a nice touch of color and taste. Italian seasoning, salt, and black pepper enhance the flavors even more. - ½ teaspoon red pepper flakes for a spicy kick - Variations on cheese types For a bit of heat, you can add red pepper flakes. This spice works well if you like a kick. You can also switch up the cheese types. Try using gouda, provolone, or even pepper jack. Mixing cheeses can create a fun twist on this dish. Feel free to get creative with your ingredients. Cheesy pull-apart garlic bread is all about personal taste! {{ingredient_image_1}} 1. Preheating the oven: Start by setting your oven to 375°F (190°C). This step is key for perfect baking. 2. Making diagonal cuts in the loaf: Take a large loaf of sourdough or Italian bread. Place it on a cutting board. Make diagonal cuts about 1 inch apart. Cut downwards but don’t cut all the way through. Then, make similar cuts in the opposite direction. This creates a nice diamond pattern, which helps with stuffing. 1. Combining ingredients in a bowl: In a small bowl, add 6 tablespoons of melted butter. Next, add 4 minced garlic cloves, 2 tablespoons of chopped parsley, 1 teaspoon of Italian seasoning, ½ teaspoon of salt, and ¼ teaspoon of black pepper. If you like spice, you can add ½ teaspoon of red pepper flakes. Mix these ingredients well. 2. Flavor enhancements: The garlic butter brings a rich taste. The herbs add freshness. This mixture makes the bread super tasty. 1. Brushing the butter mixture into cuts: Take a brush and dip it into your garlic butter mix. Brush it generously into each cut of the bread. Make sure every cut gets some butter. 2. Packing cheese into the bread: Now it’s time to add the cheese! Take 1 cup of shredded mozzarella and 1 cup of sharp cheddar. Gently stuff the cheese into the cuts. Press it in well to ensure every bite is cheesy and delicious. 1. Wrapping the bread in foil: Wrap the stuffed bread tightly in aluminum foil. This helps the cheese melt evenly and keeps the bread soft. 2. Baking and toasting tips: Place the foil-wrapped bread on a baking tray. Bake it in the oven for 15-20 minutes. After 20 minutes, remove the foil. Bake for an extra 10-15 minutes. This step makes the bread crispy and the cheese bubbly. Once done, let it cool slightly before serving. To get the best melt from your cheese, wrap your bread in foil. This helps keep the heat in while it bakes. Make sure the foil is tight around the loaf. This way, the cheese melts evenly without drying out. Adjust the baking time based on your oven. If your bread is larger or thicker, add a few more minutes. Keep an eye on it! You want the cheese to bubble and the bread to toast just right. For a great presentation, serve your cheesy pull-apart garlic bread on a wooden cutting board. Sprinkle chopped parsley on top for color. It looks nice and adds fresh flavor. Consider adding a small bowl of marinara sauce or a spicy dipping sauce on the side. This adds a fun twist to every bite. It's perfect for sharing at parties or enjoying with family. Pro Tips Use Fresh Ingredients: Always opt for fresh garlic and parsley to enhance the flavor profile of your garlic bread. Cheese Variations: Feel free to experiment with different cheese types like pepper jack or gouda for a unique twist on flavor. Prevent Sogginess: To prevent the bread from getting soggy, make sure to brush off excess garlic butter before stuffing with cheese. Serving Suggestions: Pair with marinara sauce or a spicy aioli for dipping to complement the cheesy goodness. {{image_2}} You can play with different cheese types for your pull-apart bread. Try using provolone or gouda for a unique twist. A mix of cream cheese and cheddar adds a rich flavor. You can also use pepper jack for a spicy touch. Mixing cheese types creates layers of flavor. Just ensure they melt well. Changing the herbs and spices can elevate your bread. Fresh basil or oregano brings a fresh taste. Try thyme for a warm, earthy flavor. You can also add a pinch of smoked paprika for depth. Red pepper flakes can add a nice kick. Feel free to combine different spices to make it your own. To keep your cheesy pull-apart garlic bread fresh, use an airtight container. This helps lock in moisture and flavor. If you don't have one, wrap the bread tightly in plastic wrap. Store it at room temperature for up to two days. If you need to keep it longer, freeze it! Just wrap it well in aluminum foil or plastic wrap, and it can last up to three months. When it's time to enjoy your leftovers, the best way to reheat them is in the oven. Preheat your oven to 350°F (175°C). Place the bread on a baking sheet. Cover it with foil to keep the cheese from drying out. Heat for about 10-15 minutes. If you want a crispier crust, remove the foil for the last few minutes. This helps maintain that perfect cheesy texture and brings back the bread's original glory. How do I prevent the bread from getting soggy? To keep the bread from getting soggy, avoid over-soaking it with the garlic butter. Use just enough to coat the cuts. Also, wrapping the bread in foil prevents steam from making it wet. This method keeps the crust nice and crispy while the cheese melts inside. Can I make this recipe ahead of time? Yes, you can make this recipe ahead. Prepare the bread and stuff it with cheese and garlic butter. Wrap it tightly in foil and store it in the fridge. When you're ready to bake, just pop it in the oven. Adjust the time if baking from cold. What can I substitute for garlic? If you want to skip garlic, try using garlic powder or garlic salt. You could also use onion powder for a different flavor. Fresh herbs like thyme or rosemary can also add great taste without garlic. Can I use a different bread type? Absolutely! You can use any bread you like. French bread, ciabatta, or even whole grain bread work well. Just make sure the bread is sturdy enough to hold the cheese and butter mixture. This blog post covered the ingredients and steps to make cheesy garlic bread. You learned about different bread, cheese, and optional spices. We discussed tips to ensure perfect cheese melting and how to store leftovers. You can experiment with variations for a unique touch. In the end, making this dish can bring comfort and joy to any meal. With a few simple steps, you can impress your family and friends. Enjoy your cheesy creation!

If you crave a warm, cheesy treat that’s easy to make and hard to resist, you’re in for a delicious surprise! This Cheesy Pull-Apart Garlic Bread is not just mouthwatering; …

Read more

Categories Appetizers
Older posts
Newer posts
← Previous Page1 … Page106 Page107 Page108 Next →

GRILLED FLAVORS

where delicious ideas come to life, from stovetop to backyard. Warm, simple, and always satisfying. 🍽️✨

PAGES

Home About Contact Privacy Policy Terms & Conditions Cookie Policy GDPR Policy Copyright Policy Disclaimer

CATEGORIES

Appetizers Desserts Salads Breakfast Dinner

Contact

  • Pinterest
  • Mail
Copyright © 2026 Grilled Flavors. All rights reserved.