Skip to content
grilledflavors.com
  • Home
  • Appetizers
  • Desserts
  • Salads
  • Breakfast
  • Dinner
  • Privacy Policy
  • Contact
  • About

Chef Nate

Tomato Ricotta Pasta Fresh and Flavorful Dish

October 24, 2025November 8, 2024 by Chef Nate
- 12 oz (340g) pasta of your choice (penne or rigatoni recommended) - 2 cups cherry tomatoes, halved - 1 cup ricotta cheese - 2 cloves garlic, minced - 3 tablespoons olive oil - 1 teaspoon dried oregano - 1/4 teaspoon red pepper flakes (optional) - Salt and pepper to taste - Fresh basil leaves for garnish - Grated Parmesan cheese for serving (optional) Gathering the right ingredients makes a big difference. For this dish, I like to use penne or rigatoni. They hold the sauce well. Fresh cherry tomatoes add a burst of flavor. Halving them helps them cook faster. Ricotta cheese gives the sauce a creamy touch. Minced garlic adds great depth to the dish. I use three tablespoons of olive oil to sauté. Dried oregano adds a nice herbal note. If you want a kick, add red pepper flakes. Salt and pepper are key to enhance all flavors. Fresh basil leaves make a lovely garnish. Grated Parmesan cheese can elevate your meal, too. Having all these ingredients ready will set you up for a tasty and fresh tomato ricotta pasta. {{ingredient_image_1}} To start, fill a large pot with water. Add a good amount of salt. This step is key; it flavors the pasta. Bring the water to a boil. Once boiling, add 12 oz of pasta. I suggest penne or rigatoni. Cook according to the package instructions until al dente. This usually takes about 8 to 10 minutes. Check the pasta a minute early to avoid overcooking. Reserve 1 cup of pasta water, then drain the rest. Next, grab a large skillet. Heat 3 tablespoons of olive oil over medium heat. Once hot, add 2 cloves of minced garlic. Sauté for about 1 minute until it smells great. Be careful not to burn the garlic; it can turn bitter quickly. Now, stir in 2 cups of halved cherry tomatoes. Add 1 teaspoon of dried oregano, and if you like heat, include 1/4 teaspoon of red pepper flakes. Season with salt and pepper too. Cook this mix for 5 to 7 minutes. Wait until the tomatoes soften and their juices flow. Lower the heat now. Add 1 cup of ricotta cheese to the skillet. Stir it in well until it combines with the sauce. Gradually mix in the reserved pasta water, a little at a time. This helps create a creamy texture. Once smooth, toss the drained pasta into the skillet. Mix well to coat the pasta with that tasty tomato ricotta sauce. Taste it and adjust the seasoning if needed. When you boil pasta, always add salt to the water. This step helps the pasta absorb flavor. Use about 1 tablespoon of salt per gallon of water. Test your pasta for the right texture. You want it al dente, which means firm to the bite. Start checking the pasta two minutes before the package time ends. To make your Tomato Ricotta Pasta even tastier, add fresh herbs like thyme or parsley. A pinch of garlic powder can also boost the flavor. If you want to switch up the cheese, try mascarpone or goat cheese. They can add a lovely creaminess, too. Serve your pasta in shallow bowls to show off its color. This makes for a pretty dish. Top with fresh basil leaves and a drizzle of olive oil. These simple touches will make your meal look special and inviting. Pro Tips Fresh Tomatoes: Using ripe, in-season cherry tomatoes will enhance the flavor of your sauce significantly. Cheese Variations: For added flavor, try mixing in some feta or goat cheese with the ricotta. Pasta Water Magic: Always reserve pasta water; it helps in achieving the perfect creamy consistency. Garnish Wisely: Add a sprinkle of toasted pine nuts for a delightful crunch and extra nutrition. {{image_2}} You can make this dish even more vibrant. Adding vegetables is a great way to boost flavor and nutrition. Spinach or mushrooms work well in this recipe. - Spinach: Toss in fresh spinach while cooking the tomatoes. It wilts quickly and adds a nice color. - Mushrooms: Sauté sliced mushrooms with garlic for a rich, earthy taste. They pair well with the creamy ricotta. Feel free to substitute other veggies too. Zucchini or bell peppers can also add flavor and texture. Get creative with what you have! Want to make the dish heartier? Adding protein can be a delicious option. Grilled chicken or shrimp are great choices to elevate your pasta. - Grilled Chicken: Slice or dice grilled chicken and mix it in. It adds a satisfying bite. - Shrimp: Cook shrimp until pink and toss in. Their sweetness complements the tomato sauce. For plant-based options, consider chickpeas or lentils. They pack protein and keep it plant-based. You can easily tweak the sauce to suit your taste. Adding cream or different cheeses can change the game. - Cream: A splash of heavy cream can make the sauce richer and smoother. - Different Cheeses: Try goat cheese or feta for a tangy twist. If you like some heat, adjust the spice levels. Add more red pepper flakes or try fresh chili peppers. They can bring a whole new flavor profile to your dish! To keep your tomato ricotta pasta fresh, store it in an airtight container. This helps keep the flavors intact. Make sure to cool the pasta to room temperature before sealing. If you place warm pasta in the fridge, it may steam and get soggy. You can store leftover pasta in the fridge for up to three days. If you want to ensure the best taste, eat it within two days. Reheating it the next day is usually perfect. You can freeze tomato ricotta pasta if you want to save some for later. First, let the pasta cool completely. Then, portion it into freezer-safe bags or containers. Remove as much air as possible to prevent freezer burn. To reheat, thaw the pasta in the fridge overnight. Then, heat it on the stove or in the microwave. Add a splash of water or extra olive oil to keep it creamy. This will help restore its original texture. Yes, you can use different pasta types. Penne and rigatoni are best, but you can also try spaghetti, fusilli, or farfalle. Each shape holds sauce differently. For a gluten-free option, choose brown rice or chickpea pasta. They work well with the creamy sauce. Absolutely! This dish is great for meal prep. Cook the pasta and sauce separately. Store them in airtight containers. You can mix them when you’re ready to eat. This keeps the pasta from getting soggy. You can also reheat it in the microwave or on the stove. You can make this dish dairy-free easily. Use cashew cream or silken tofu instead of ricotta. Nutritional yeast adds a cheesy flavor without dairy. For a richer taste, add some coconut milk. This keeps the dish creamy and tasty. This blog post shared a simple pasta dish, focusing on ingredients, cooking steps, tips, variations, and storage. You learned about fresh ingredients like tomatoes and basil, and how to make the sauce creamy with ricotta cheese. I hope you feel confident to try this recipe and make it your own. Don’t hesitate to experiment with flavors and share your dish. Enjoy your cooking adventure!

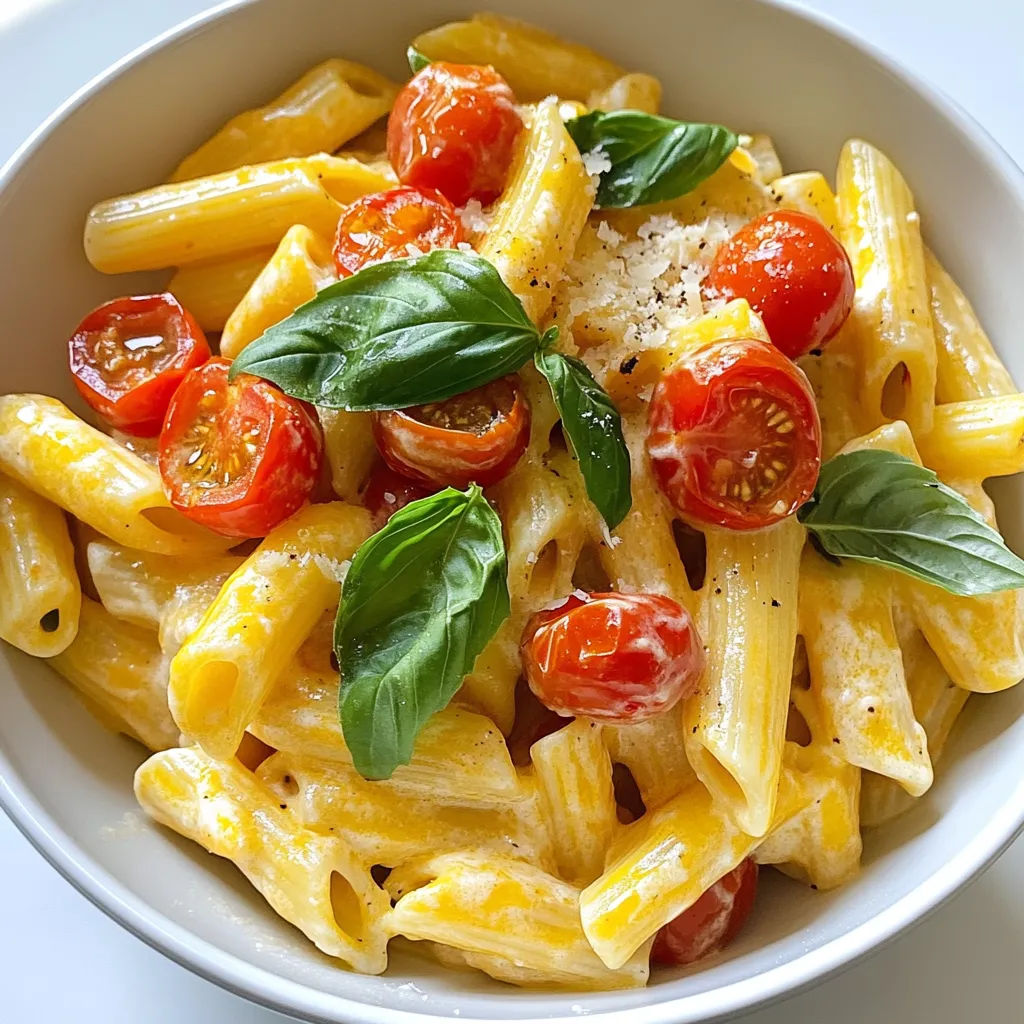
Are you ready to create a delicious Tomato Ricotta Pasta? This fresh and flavorful dish combines simple ingredients for a quick meal that impresses. With cherry tomatoes, creamy ricotta, and …

Read more

Categories Dinner

Spinach Stuffed Chicken Breasts Tasty and Simple Recipe

October 8, 2025October 31, 2024 by Chef Nate
To make delicious spinach stuffed chicken breasts, gather these items: - 4 boneless, skinless chicken breasts - 2 cups fresh spinach, chopped - 1 cup feta cheese, crumbled - 1/4 cup cream cheese, softened - 2 cloves garlic, minced - 1/2 teaspoon red pepper flakes (optional) - 1 tablespoon olive oil - Salt and pepper to taste - 1 teaspoon dried oregano - 1 lemon, zest and juice If you need to swap ingredients, here are some ideas: - Use goat cheese instead of feta for a creamier taste. - Swap cream cheese with ricotta for a lighter filling. - If you don't have fresh spinach, use frozen spinach, but drain it well. - You can replace red pepper flakes with black pepper for less heat. - Try using fresh herbs like parsley or basil instead of oregano for a different flavor. You will need a few simple tools for this recipe: - A sharp knife for slicing the chicken. - A cutting board for safe prep. - A mixing bowl for the filling. - A large oven-safe skillet for cooking and baking. - Toothpicks to secure the chicken if needed. These tools and ingredients will help you create a tasty meal that impresses everyone. Enjoy the process! {{ingredient_image_1}} To start, you will need to gather your ingredients. You need: - 4 boneless, skinless chicken breasts - 2 cups fresh spinach, chopped - 1 cup feta cheese, crumbled - 1/4 cup cream cheese, softened - 2 cloves garlic, minced - 1/2 teaspoon red pepper flakes (optional) - 1 tablespoon olive oil - Salt and pepper to taste - 1 teaspoon dried oregano - 1 lemon, zest and juice First, preheat your oven to 375°F (190°C). This step helps the chicken cook evenly. Next, grab a medium bowl. In this bowl, mix together the chopped spinach, feta cheese, cream cheese, minced garlic, optional red pepper flakes, oregano, lemon zest, and lemon juice. Make sure to season with salt and pepper to taste. This mixture is rich in flavor and will make your chicken shine. Now, take each chicken breast. Use a sharp knife to cut a pocket into the thickest part. Be careful not to cut all the way through. You want to hold the filling inside. Once your chicken is prepared, it's time to stuff it. Take your spinach and feta mixture. Fill each chicken breast pocket generously. If needed, use toothpicks to close the openings. This keeps the filling secure while cooking. Next, heat olive oil in a large oven-safe skillet over medium-high heat. Season the chicken breasts with salt and pepper. Sear each side of the chicken for about 4-5 minutes. Look for a nice golden-brown color; this adds flavor. After searing, transfer the skillet to your preheated oven. Bake the chicken for 20-25 minutes. You want the chicken to reach an internal temperature of 165°F (75°C). This ensures it’s fully cooked and safe to eat. When the chicken is done, remove it from the oven. Let it rest for a few minutes before serving. This resting time allows the juices to settle, making the chicken juicy and tender. For a beautiful presentation, serve the stuffed chicken breasts on a bed of sautéed vegetables or next to roasted potatoes. A drizzle of extra lemon juice adds brightness. Garnish with fresh herbs for a pop of color. Enjoy your meal! To keep your chicken moist, sear it well before baking. Use medium-high heat and a bit of olive oil. This gives the chicken a nice brown crust. Make sure to bake it just until it hits 165°F (75°C). Letting it rest after cooking helps lock in moisture. Add fresh herbs for more taste. Basil or parsley works great. A squeeze of fresh lemon juice before serving brightens up the dish. You could also try different cheeses. Goat cheese or mozzarella can give a new twist to the filling. For a beautiful plate, serve the chicken on a bed of sautéed veggies. Roasted potatoes also make a nice side. Drizzle with extra lemon juice to add shine. Fresh herbs on top add a pop of color and make your meal look gourmet. Pro Tips Don’t Overstuff: Ensure you don’t overfill the chicken breasts to avoid the filling spilling out during cooking. Use Fresh Ingredients: Fresh spinach and high-quality feta will enhance the flavor of the stuffing. Let it Rest: Allow the chicken to rest after cooking to let the juices redistribute for a more tender bite. Experiment with Herbs: Feel free to add other herbs like basil or thyme to the stuffing for a unique twist. {{image_2}} If you want to change the taste, try different cheeses. Cream cheese gives a rich feel. You can swap it with ricotta for a creamier texture. Goat cheese adds a tangy flavor that many love. Mozzarella melts well and makes the chicken gooey. Each cheese brings its own charm. You can mix in some veggies for extra crunch. Bell peppers add sweetness and color. Mushrooms give a nice umami flavor. Chopped artichokes bring a Mediterranean twist. Even sun-dried tomatoes can add a burst of flavor. Just make sure to chop them small so they fit well in the pocket. Baking is great, but you can grill the chicken too. Grilling gives a smoky flavor that is hard to beat. If you prefer a quicker method, try pan-frying. This way, you can cook the chicken faster. You can also use an air fryer for crispy skin without extra oil. Each method offers a tasty twist on the classic dish. Store leftover spinach stuffed chicken breasts in an airtight container. This keeps them fresh. Place the container in the fridge. They will stay good for 3 to 4 days. Make sure to cool the chicken down before sealing. This prevents moisture build-up. You can freeze spinach stuffed chicken breasts for later use. Wrap each chicken breast in plastic wrap. Then, place them in a freezer-safe bag. Be sure to remove as much air as possible. They can last up to 3 months in the freezer. When you are ready, thaw them in the fridge overnight. To reheat, preheat your oven to 350°F (175°C). Place the chicken in an oven-safe dish. Cover it with foil to keep it moist. Heat for about 20 minutes or until warm. You can also use a microwave. Heat on medium power for about 2-3 minutes. Make sure to check the middle is hot. Enjoy your tasty chicken! You can tell when chicken is done by checking the internal temperature. Use a meat thermometer. The chicken should reach 165°F (75°C). If you don’t have a thermometer, cut into the thickest part. The meat should be white and juices should run clear. Avoid pink meat inside. Let the chicken rest for a few minutes before serving. This helps the juices stay inside. Yes, you can use frozen spinach. Just make sure to thaw and drain it well. Squeeze out excess water. This keeps the filling from getting too watery. Frozen spinach is a great time saver. It’s also nutritious and easy to find. You can serve many things with this dish. Here are some ideas: - Sautéed vegetables like zucchini or bell peppers - Roasted potatoes for a hearty side - A fresh salad with lemon vinaigrette - Rice or quinoa for a filling option - Garlic bread for extra flavor Feel free to mix and match your sides! This blog post covered how to make delicious spinach stuffed chicken breasts. We looked at the needed ingredients, tools, and easy steps for cooking. I shared tips to keep the chicken moist and to boost the flavor. You learned about variations and how to store leftovers effectively. In closing, I hope these ideas make your cooking fun and tasty. Enjoy creating your meal with confidence!

Looking to impress at dinner without the fuss? My Spinach Stuffed Chicken Breasts recipe is both tasty and simple. With just a few easy steps, you can create a flavorful …

Read more

Categories Dinner

Rainbow Salad Bowls Fresh and Vibrant Meal Option

October 26, 2025October 29, 2024 by Chef Nate
- 1 cup quinoa - 1 cup cherry tomatoes, halved - 1 cup cucumber, diced - 1 cup bell peppers, diced - 1 cup shredded carrots - 1 cup purple cabbage, thinly sliced - 1 avocado, sliced - 3 tablespoons olive oil - 2 tablespoons lemon juice - Salt and pepper to taste You need quinoa for a great base. Quinoa cooks up fluffy and adds protein. Cherry tomatoes add sweetness, while cucumbers bring crunch. Bell peppers add color and flavor. Shredded carrots and purple cabbage provide more crunch and nutrients. Add avocado for creaminess. - 1/4 cup feta cheese, crumbled - 1/4 cup sunflower seeds - 1/4 cup fresh cilantro, chopped Optional ingredients can elevate your salad. Feta cheese adds a salty tang. Sunflower seeds offer a nutty crunch. Fresh cilantro adds a bright, herbaceous note. - Calories per serving: About 290 - Protein: 10 grams - Fiber: 8 grams - Vitamins A, C, and K from veggies This salad is packed with nutrients. It has good protein and fiber. You'll get vitamins from the fresh vegetables. Eating colorful foods like this is great for your health. {{ingredient_image_1}} To cook quinoa, start by bringing two cups of water to a boil in a medium saucepan. Add one cup of rinsed quinoa to the boiling water. Lower the heat to a gentle simmer, cover, and let it cook for about 15 minutes. The quinoa is ready when the water is absorbed. After cooking, fluff the quinoa with a fork to separate the grains. Set it aside to cool while you prepare the veggies. Next, it's time to prepare your colorful vegetables. Chop the cherry tomatoes in half and dice the cucumber into small pieces. For bell peppers, aim for a mix of colors. This makes the salad more vibrant. Shred the carrots and slice the purple cabbage thinly. To keep your veggies fresh, cut them just before assembling the salad. This helps maintain their bright colors and crunch. In a large bowl, combine the cooled quinoa with your prepared vegetables: cherry tomatoes, cucumber, bell peppers, carrots, and cabbage. Toss gently to mix the ingredients without mashing them. For the dressing, whisk together olive oil, lemon juice, salt, and pepper in a small bowl. Drizzle the dressing over the salad and toss again to combine everything evenly. To serve, scoop the rainbow salad into bowls. Top with avocado slices, fresh cilantro, and optional feta cheese. Finally, sprinkle sunflower seeds on top for extra crunch. To make a great dressing, you want balance. Add herbs like basil or parsley for fresh flavors. For a creamy dressing, try adding Greek yogurt or tahini. If you want tang, increase the lemon juice or add a splash of vinegar. Serve your rainbow salad in glass bowls. This lets you show off the bright colors. It also makes each layer visible. For garnish, add a sprig of cilantro on top. A few slices of lemon or lime also add a nice touch. Prep your ingredients ahead of time. You can chop veggies the night before. Store them in separate containers to keep them fresh. Cook the quinoa in advance and let it cool. This way, you can quickly assemble your salad when you're hungry. Pro Tips Perfectly Cooked Quinoa: To ensure your quinoa is fluffy and not mushy, rinse it thoroughly before cooking and pay attention to the water-to-quinoa ratio. Vibrant Veggies: For the freshest taste, choose seasonal vegetables. Mixing colors not only enhances presentation but also boosts nutritional value. Adjustable Dressing: Feel free to customize the dressing by adding herbs or spices according to your taste preference for a unique flavor profile. Make Ahead: This salad can be prepped in advance. Just keep the dressing separate until you're ready to serve to maintain freshness. {{image_2}} You can boost your salad with protein. Chickpeas add fiber and flavor. Grilled chicken offers a hearty bite. Tofu is great for a plant-based option. Each choice enhances taste and nutrition. Mix and match to keep it fun! Using seasonal veggies and fruits makes your salad fresh. In summer, try zucchini or peaches. In fall, add roasted squash or apples. Seasonal choices keep the dish vibrant and exciting. You can even swap ingredients based on what’s available. This salad is easy to adapt for different diets. For gluten-free, ensure your quinoa is labeled gluten-free. To make it vegan, skip the feta cheese. You can add nuts or seeds for extra crunch. These swaps keep the meal tasty for everyone! To keep your rainbow salad fresh, refrigerate it right away. Place it in an airtight container. This protects the salad from air and moisture. Make sure to store the dressing separately. This helps the veggies stay crisp. You can mix the dressing in just before serving. Always use clean utensils when scooping out portions. This keeps the salad safe to eat. You can freeze some salad components, but not all. Quinoa freezes well. Just let it cool, then place it in a freezer-safe bag. Seal it tightly and label it with the date. However, avoid freezing fresh veggies like tomatoes and cucumbers. They lose their texture and flavor when frozen. Instead, keep them in the fridge for the best taste. Your rainbow salad will last about 3 to 5 days in the fridge. Keep an eye on the veggies for freshness. If they start to look wilted or slimy, it’s time to toss them. Quinoa can last a bit longer, but check for any odd smells. Always trust your senses when it comes to food safety. Quinoa is a superfood packed with nutrients. It is high in protein, which helps build muscles. It also has fiber that aids in digestion. Quinoa is gluten-free, making it great for those with gluten issues. It contains essential vitamins and minerals like magnesium and iron. Eating quinoa can boost energy and keep you feeling full longer. Yes, you can make this salad ahead of time. Prepare the quinoa and chop the veggies in advance. Store them separately in the fridge. Mix them together just before serving. This keeps the salad fresh and crunchy. The dressing can also be made early. Just remember to stir it well before adding. The best dressing for rainbow salad bowls is a simple lemon-olive oil mix. This dressing enhances the fresh flavors of the salad. You can adjust the taste with salt and pepper. For a creamier option, try adding yogurt or tahini. Fresh herbs can also add more flavor to your dressing. - Additional common questions: - Can I add other vegetables? Yes, feel free to mix in your favorites. - Is this salad good for meal prep? Absolutely! It stores well and is easy to pack for lunch. - What can I use instead of feta? Try goat cheese or leave it out for a vegan option. This blog post covered how to make a vibrant rainbow salad, starting with key ingredients like quinoa and fresh veggies. I shared step-by-step instructions, tips for dressings, and ideas for presentation. You can also customize the salad with different proteins or seasonal vegetables. Remember to store leftovers properly for the best taste. Enjoying this colorful dish means eating healthy while having fun with flavors. This salad can fit any diet and be a great meal prep option. Your healthy eating journey just became exciting with this recipe!

Are you looking for a fun and healthy meal option? Rainbow salad bowls are colorful, tasty, and packed with nutrients! Using fresh veggies and quinoa, these bowls help you eat …

Read more

Categories Salads

Hot Chocolate Lasagna Irresistible Dessert Delight

October 11, 2025October 22, 2024 by Chef Nate
- Graham crackers - Milk - Heavy cream - Chocolate syrup - Instant chocolate pudding mix - Cream cheese - Powdered sugar - Vanilla extract - Mini marshmallows - Whipped cream - Grated chocolate or chocolate shavings for garnish To make hot chocolate lasagna, gather these simple ingredients. Start with graham crackers. They form the base of the dessert. You will also need two cups of milk. This helps make the pudding layer creamy. Next, get one cup of heavy cream. This adds richness and a light texture. For sweetness, grab one cup of chocolate syrup. It brings deep chocolate flavor. You will need one package of instant chocolate pudding mix, too. This thickens the pudding layer quickly. Don't forget the cream cheese! You need one package, softened to mix well. To sweeten the cream cheese layer, use one cup of powdered sugar. A teaspoon of vanilla extract adds warmth to the flavors. For a fun touch, grab two cups of mini marshmallows. They give that classic hot chocolate vibe. Finally, have whipped cream on hand for topping. Grated chocolate or chocolate shavings will add a nice finish to your dessert. With these ingredients, you can create a wonderful dessert. Each layer brings its own flavor and texture. Enjoy gathering your supplies! {{ingredient_image_1}} To start, take your softened cream cheese and place it in a large mixing bowl. Beat the cream cheese with a mixer until it becomes smooth. This step is key for a creamy texture. Next, gradually add in the powdered sugar. Mix well until it blends perfectly. Then, pour in the vanilla extract and mix again. Once done, set this creamy layer aside. In another bowl, open your package of instant chocolate pudding mix. Whisk it with 2 cups of cold milk. Follow the package directions to ensure it thickens well. After it thickens, gently fold in 1 cup of heavy cream. This will give your pudding a light and airy feel. Make sure to mix carefully so you don’t lose that fluffiness. Now, grab your 9x13 inch dish. Start by placing a layer of graham crackers at the bottom. Spread half of the cream cheese mixture over the crackers. Then, layer half of the chocolate pudding on top. Sprinkle a layer of mini marshmallows evenly over the pudding. Repeat this process. Add another layer of graham crackers, the rest of the cream cheese mixture, the remaining chocolate pudding, and more mini marshmallows. Finish with a top layer of graham crackers. Once assembled, cover the dish with plastic wrap. Refrigerate for at least 4 hours or overnight. This chilling time helps set the layers perfectly. When you’re ready to serve, spread whipped cream on top. Garnish with grated chocolate or chocolate shavings for a beautiful finish. Enjoy this sweet treat! For a stunning look, slice the hot chocolate lasagna into neat squares. Serve each square on a plate. Drizzle some chocolate syrup over each piece for that extra touch of sweetness. You can also add a handful of mini marshmallows on the side. This makes the dish fun and adds a pop of color. If you want to switch things up, use ricotta cheese instead of cream cheese. It gives a nice texture and taste. For those who are dairy-free, swap the heavy cream with coconut cream. It still adds a creamy feel without the dairy. You can also use almond milk in place of regular milk for a lighter version. One common mistake is overmixing the layers. Mix just enough to combine, and don't beat too long. Overmixing can make the texture less smooth. Another mistake is not chilling the lasagna long enough. Always chill it for at least 4 hours. This helps the layers set properly, making each bite a delight. If you skip this step, the layers might not hold together when you cut into them. Pro Tips Chill for Best Results: Make sure to chill the lasagna for at least 4 hours, or overnight if possible. This allows the layers to meld together, enhancing the flavor and texture. Use Fresh Ingredients: Opt for fresh, high-quality cream cheese and heavy cream. This will significantly improve the overall taste and creaminess of your layers. Layering Technique: When layering, ensure each layer is spread evenly. This helps in achieving a balanced flavor in each bite and prevents any layer from overpowering the others. Garnish Creatively: Don’t just stop at chocolate shavings! Consider adding crushed cookies or a sprinkle of cocoa powder on top for an extra touch of flavor and visual appeal. {{image_2}} You can make hot chocolate lasagna even more special. Try adding peppermint extract. This gives a refreshing twist, perfect for winter. Just a teaspoon adds a lot of flavor. You can also use different types of chocolate. Dark chocolate adds richness, while white chocolate gives sweetness. Mix and match your favorite chocolates for fun flavors. Pair your hot chocolate lasagna with drinks. Milk or hot cocoa works well. For adults, try coffee or a rich dessert wine. Add seasonal toppings for fun. Use crushed candy canes for a festive touch or sprinkle cinnamon for warmth. Fresh berries can bring a splash of color and taste. Mini hot chocolate lasagna is cute and fun. You can use small cups or dishes. This way, each person gets their own. Just layer the same way, but in smaller sizes. They’re great for parties or gatherings. Plus, they look adorable on any table! To keep your hot chocolate lasagna fresh, store it in the fridge. Cover the dish tightly with plastic wrap. This step prevents air from getting in and keeps the layers moist. You can also use a lid if your dish has one. Make sure it stays in the fridge until you're ready to serve. You can freeze hot chocolate lasagna for later enjoyment. First, cover the dish tightly with plastic wrap, then wrap it in aluminum foil. This double layer helps protect it from freezer burn. When you're ready to eat, move the lasagna to the fridge to thaw overnight. Once thawed, serve it cold or let it sit at room temperature for a bit. Then, add whipped cream and chocolate shavings before serving. Enjoy your delicious treat! You can keep hot chocolate lasagna in the fridge for up to five days. Store it in an airtight container to keep it fresh. This dessert tastes great cold, so it is perfect for leftovers. Yes, you can make hot chocolate lasagna a day before you serve it. Prepare all the layers, then assemble them in your dish. Cover it with plastic wrap and chill overnight. This gives the layers time to set and meld together for better flavor. If you want to switch it up, use cookies like Oreos or Digestive biscuits. You can also try vanilla wafers for a lighter taste. Just crush them into crumbs and use them as a crust. Each option adds its own unique flavor to your hot chocolate lasagna. In this post, I shared how to make a delicious hot chocolate lasagna. We talked about simple ingredients like graham crackers, cream cheese, and chocolate pudding. I provided step-by-step instructions for each layer and tips for great presentation. Remember to avoid common pitfalls, like overmixing. You can also customize flavors or make mini versions! Enjoy bringing this treat to your table, and don’t forget to store it right. Making this dessert can be a fun way to create sweet memories. Enjoy every bite and get ready for compliments!

Craving a decadent dessert that combines all your favorite treats? Say hello to Hot Chocolate Lasagna! This simple yet rich layered dessert brings together creamy chocolate pudding, graham crackers, and …

Read more

Categories Desserts
Newer posts
← Previous Page1 … Page107 Page108

GRILLED FLAVORS

where delicious ideas come to life, from stovetop to backyard. Warm, simple, and always satisfying. 🍽️✨

PAGES

Home About Contact Privacy Policy Terms & Conditions Cookie Policy GDPR Policy Copyright Policy Disclaimer

CATEGORIES

Appetizers Desserts Salads Breakfast Dinner

Contact

  • Pinterest
  • Mail
Copyright © 2026 Grilled Flavors. All rights reserved.