Crispy Air Fryer Apple Fries Delightful Snack Idea
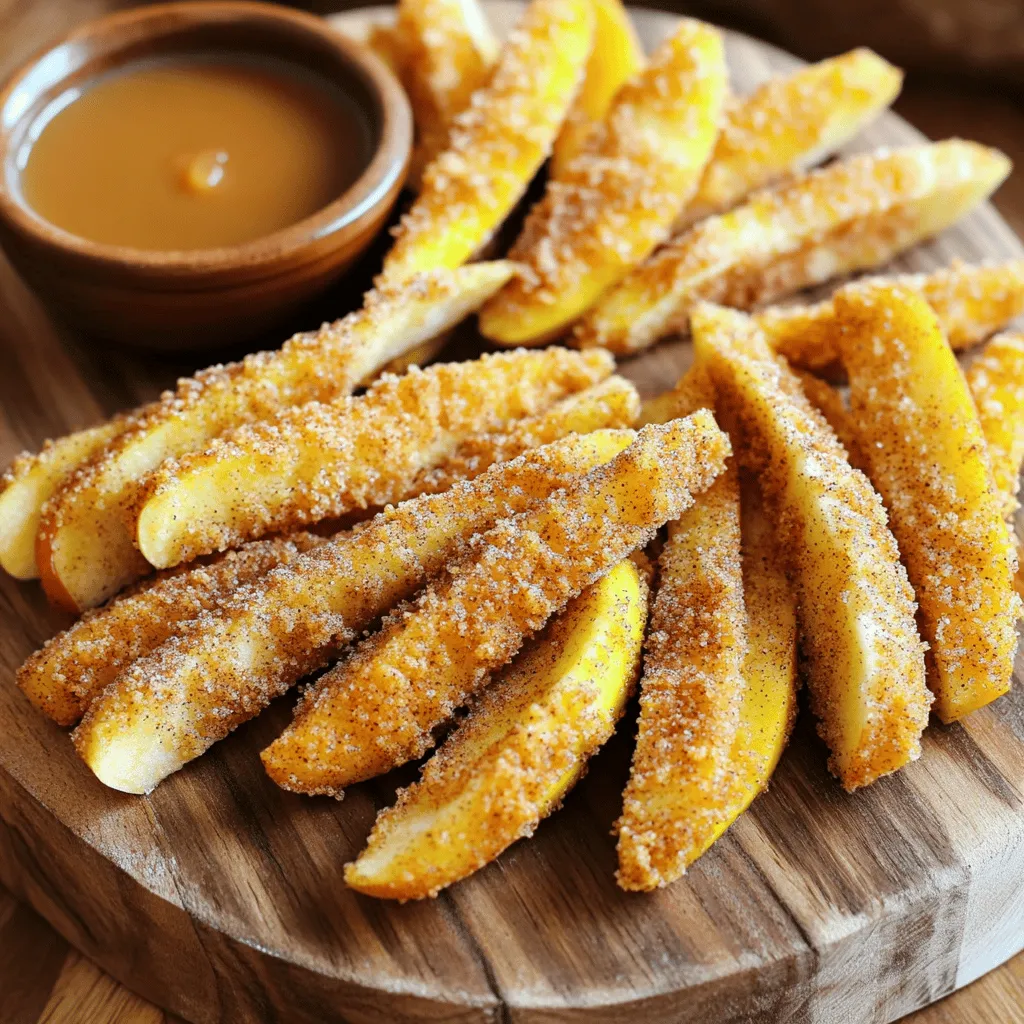
Are you ready to take your snacking game to the next level? With my crispy air fryer apple fries, you’ll enjoy a sweet and crunchy treat that’s easy to make. …
Are you ready to take your snacking game to the next level? With my crispy air fryer apple fries, you’ll enjoy a sweet and crunchy treat that’s easy to make. …
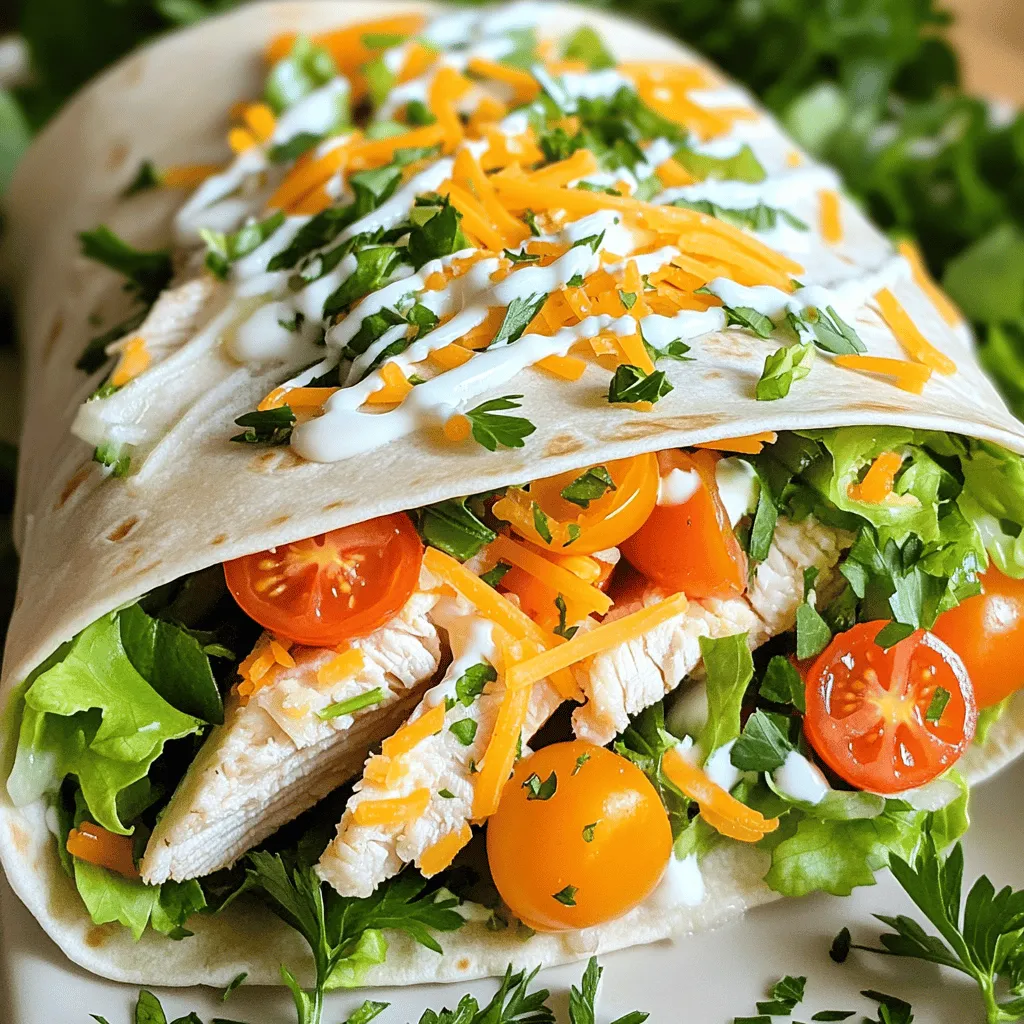
Looking for a delicious, easy meal? Try my Chick-fil-A Cool Wrap recipe! This tasty dish features grilled chicken, fresh veggies, and creamy ranch dressing all wrapped up in a tortilla. …
![- All-purpose flour: This flour gives the bread its structure. It helps the dough rise well. - Active dry yeast: Yeast is what makes the bread fluffy. It ferments and creates bubbles. - Warm milk (110°F/43°C): Warm milk wakes up the yeast. This step is key for a good rise. - Granulated sugar: This type of sugar helps the dough rise. It sweetens the bread too. - Brown sugar: It adds moisture and a rich flavor. It gives the bread a caramel taste. - Pecans and other nuts: Chopped nuts add a nice crunch. They give texture and flavor to the bread. - Recommended spices: You can change up the spice mix. Try adding cloves or cardamom for extra warmth. - Glaze essentials: A simple glaze made of powdered sugar and milk makes the bread shine. It adds sweetness and looks great. For the complete recipe, check out the Full Recipe. Activate the yeast Start by combining warm milk, sugar, and yeast in a small bowl. Let it sit for about 5 to 10 minutes. You will know it's ready when it becomes frothy. This step is key to making the dough rise well. Mixing dry and wet ingredients In a large bowl, mix the flour, salt, and spices. In another bowl, blend melted butter, pumpkin puree, and egg. Pour the yeast mixture into the dry mix, along with the pumpkin mixture. Stir until a soft dough forms. Key techniques for dough kneading Kneading helps develop gluten. Place your dough on a floured surface and knead for about 5 to 7 minutes. Use the heel of your hand to push down and fold the dough. It should be smooth when finished. Once done, place it in a greased bowl and cover it. Let it rise in a warm spot for about one hour, or until it doubles in size. Rolling out the dough After the dough has risen, punch it down gently. Roll it into a rectangle, about 10 by 12 inches. Make sure it's even for good baking. Layering with sugar and nuts Brush the surface with melted butter. Sprinkle brown sugar and chopped pecans evenly on top. This adds a lovely crunch and sweetness. Cutting and stacking techniques Cut the dough into strips about one inch wide. Stack the strips on top of each other and then cut them into 3 or 4 equal pieces. This will create layers for pulling apart later. Preheating the oven tips Preheat your oven to 350°F (175°C) while you shape the dough. This ensures even baking. Timing for perfect bake Place the stacked pieces in a greased loaf pan. Cover it with a towel and let it rise for another 30 minutes. Bake for 30 to 35 minutes until golden brown. Signs the bread is done Check for a deep golden color. Tap the bottom of the loaf; it should sound hollow. This means it is baked through. Enjoy the warm, cozy aroma filling your kitchen as it bakes! You can follow the [Full Recipe] for more details on making this delightful treat. To get a good rise, keep your dough in a warm spot. A cozy kitchen works well. You want a steady temperature around 75-80°F (24-27°C). If the room is cool, consider preheating the oven for a minute and then turning it off. Let the dough rest for about an hour. This time is vital for the yeast to grow. Using fresh spices makes a big difference. They add a vibrant flavor to your bread. Instead of pre-ground spices, choose whole spices and grind them yourself. For a light and fluffy texture, knead the dough well. Kneading adds air, helping the bread rise better. Aim for a smooth dough that springs back when you poke it. Serve your Pumpkin Spice Pull Apart Bread warm. It pairs well with whipped cream or vanilla ice cream. For drinks, consider a warm apple cider or spiced tea. When hosting, a beautiful presentation makes it special. Arrange slices on a platter and add a drizzle of glaze. This makes your bread look inviting and delicious. You can find the Full Recipe to guide you through this delightful process. {{image_2}} You can add chocolate chips to your pumpkin spice pull apart bread. They mix well with the spices and add a sweet twist. For a different taste, try using alternative spices. Cardamom can bring warmth, while cloves add depth. You can change the flavor profile to suit your mood. If you need gluten-free options, use a gluten-free flour blend. Make sure it’s designed for baking. For a vegan version, swap the egg for a flax egg. Mix 1 tablespoon of ground flaxseed with 2.5 tablespoons of water, then let it sit until thick. Replace the butter with coconut oil or a vegan butter substitute. You can make this bread even more special by adding cranberries or diced apples. Both fruits blend nicely with pumpkin spice flavors. For a holiday-themed version, sprinkle in some chopped pecans or walnuts. You can also add a touch of maple syrup for extra sweetness. These seasonal twists will make your bread a delightful treat at any gathering. For the full recipe, check out the details provided earlier in this article. To keep your Pumpkin Spice Pull Apart Bread fresh, store it in an airtight container. This helps keep the moisture in. Place a paper towel inside to absorb excess moisture. This way, the bread stays soft. You can also wrap it tightly in plastic wrap. For best results, eat leftover bread within two to three days. When you're ready to enjoy it again, simply reheat slices in the microwave for about 15 seconds. You can also warm it in the oven at 350°F for about 5-10 minutes. If you want to keep your bread longer, freezing is a great option. First, let the bread cool completely. Then, wrap it tightly in plastic wrap. After that, place it in a freezer bag or container. Be sure to label the bag with the date. This bread can stay good for up to three months in the freezer. When you're ready to eat it, remove the bread from the freezer. Let it thaw overnight in the fridge or on the counter for a few hours. You can reheat it after thawing for a warm treat. Freshly baked Pumpkin Spice Pull Apart Bread lasts about three days at room temperature. After that, it may start to dry out. If you store it properly, it can last longer in the fridge. Signs of spoilage include a hard texture or mold growth. Always check your bread before eating. If it smells off or looks strange, it's best to throw it away. Enjoy your cozy treat while it's still fresh and tasty! You can tell if your dough has risen enough by looking for a few signs. First, it should double in size. You can also do a touch test. Gently poke the dough with your finger. If the dent stays and does not spring back, it's ready. These simple checks ensure your dough is perfect for baking. Yes, you can use fresh pumpkin. However, fresh pumpkin has a higher water content. You may need to adjust the amount of flour in your recipe. To use fresh pumpkin, first, cook it until soft. Then, mash it well to remove any lumps. This will help achieve the right texture in your bread. This bread pairs well with many items. Try serving it warm with whipped cream or vanilla ice cream. A nice cup of coffee or spiced tea also complements the flavors. You can even enjoy it with butter or cream cheese for breakfast. These options make the bread even more delightful. Yes, this recipe is perfect for new bakers. The steps are clear and easy to follow. Make sure to measure your ingredients carefully. Don't rush the rising times; patience is key. If you have questions, feel free to ask for help. With practice, you'll master this cozy treat. For the full recipe, check out the details above. You can create delicious Pumpkin Spice Pull Apart Bread using simple ingredients and steps. Remember to activate the yeast, knead the dough well, and shape it carefully for the best results. Explore variations like chocolate chips or gluten-free options to make it your own. Practice proper storage to keep your bread fresh and tasty. With these tips and tricks, you’ll impress friends and family at any gathering. Enjoy your baking journey and the delightful flavors this bread brings!](https://grilledflavors.com/wp-content/uploads/2025/08/4772b9dc-c816-475a-83cb-995a57defd56.webp)
If you love fall flavors, you’ll adore this Pumpkin Spice Pull Apart Bread! This cozy treat is easy to make and perfect for sharing. Imagine layers of soft, sweet bread …

Are you craving a sweet treat that’s easy to make? Look no further than this Blueberry Danish Delight! This simple recipe combines flaky puff pastry and fresh blueberries for a …
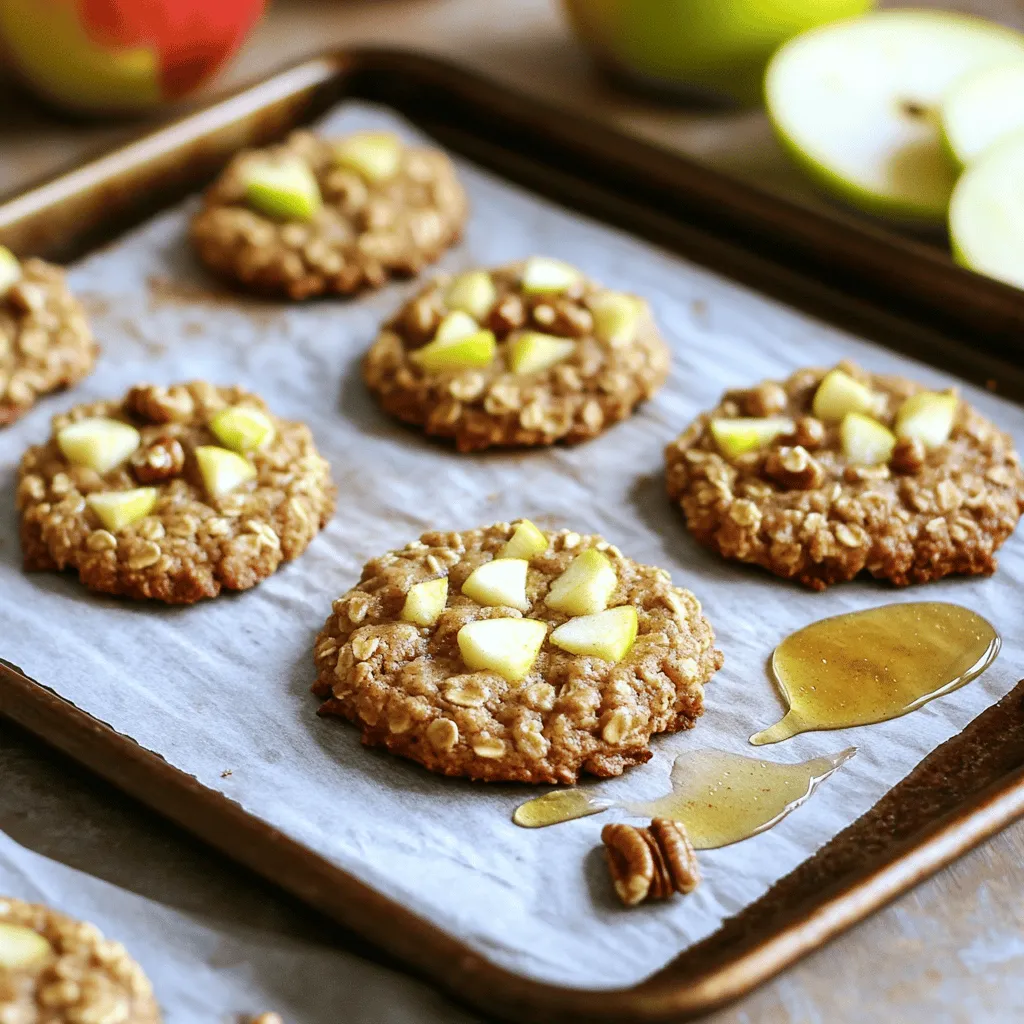
Craving a sweet snack that won’t derail your healthy eating plan? Try my Healthy Apple Pie Oatmeal Cookies! They bring the cozy flavor of apple pie into a nutritious cookie …
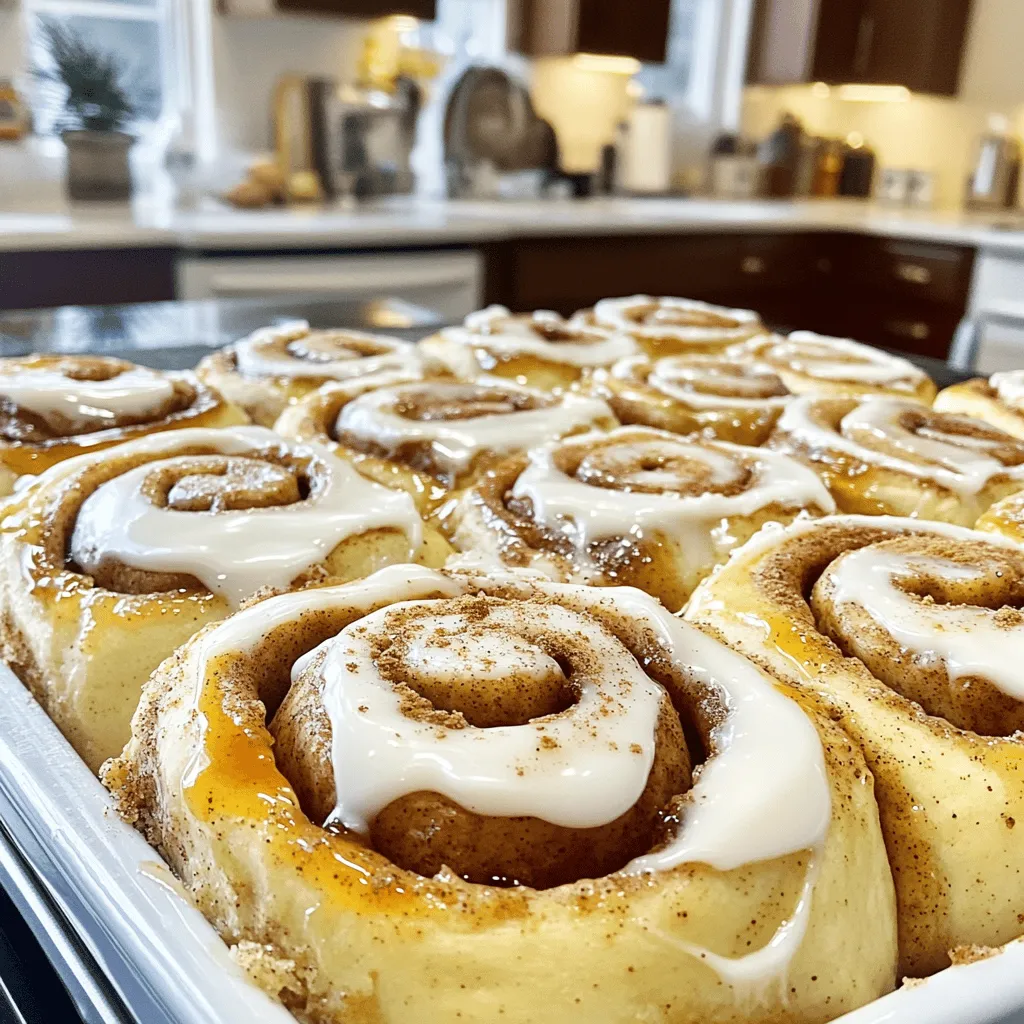
Get ready for a sweet fall treat! These Apple Cider Cinnamon Rolls combine warm, spiced flavors and gooey sweetness. They’re perfect for cozy mornings or festive gatherings. I’ll guide you …
![To make a Pumpkin Chai Iced Latte, gather the following items: - 1 cup brewed chai tea (preferably strong) - 1/2 cup pumpkin puree (canned or fresh) - 1/4 cup milk of choice (dairy or non-dairy) - 2 tablespoons maple syrup (adjust to taste) - 1/2 teaspoon vanilla extract - 1/2 teaspoon pumpkin pie spice (plus extra for garnish) - Ice cubes - Whipped cream (optional for topping) These ingredients blend to create a rich and creamy drink. You can easily adjust this recipe for your needs. If you’re dairy-free, try almond, oat, or coconut milk. These options still keep the drink creamy and delicious. For sweeteners, you can replace maple syrup with agave or honey. Each will add a unique flavor twist. When choosing pumpkin, look for bright orange puree. If using fresh pumpkin, select a sugar pumpkin. They are sweeter and smoother. For canned pumpkin, check the label to ensure it’s 100% pumpkin. This keeps flavors pure and avoids fillers. Always trust your taste buds; quality pumpkin makes a big difference in your iced latte. For the full recipe, check out the detailed instructions to enjoy this drink at home. To start, you need to brew strong chai tea. Use 1 1/2 teaspoons of loose chai tea leaves or one tea bag in 1 cup of boiling water. Let it steep for 5 to 7 minutes. This time gives the tea a bold flavor. Once done, let the tea cool to room temperature. This step is key for a great iced latte. Now, let’s make the pumpkin mixture. In a mixing bowl or a blender, add 1/2 cup of pumpkin puree, 2 tablespoons of maple syrup, 1/4 cup of your milk choice, 1/2 teaspoon of vanilla extract, and 1/2 teaspoon of pumpkin pie spice. Blend these ingredients until smooth. This mixture will give your latte a rich and creamy texture. Take a tall glass and fill it halfway with ice cubes. Pour the cooled chai tea over the ice. Next, carefully layer the pumpkin mixture on top. This creates a beautiful visual effect. You can gently stir the drink to mix the flavors or leave it layered for a stunning look. For a final touch, consider topping it with whipped cream and a sprinkle of extra pumpkin pie spice. This simple process leads to a delicious Pumpkin Chai Iced Latte. For the complete recipe, please refer to [Full Recipe]. To make your Pumpkin Chai Iced Latte even tastier, add a pinch of extra spices. You can try cinnamon, nutmeg, or even a bit of ginger. These spices will boost the warm flavors of chai and pumpkin. Just a dash can make a big difference. You can mix the spices into the pumpkin blend or sprinkle them on top for a nice look. Choosing the right milk is key for a creamy drink. You can use whole milk for richness or almond milk for a light feel. Oat milk is also a great option; it adds a nice creaminess. If you want a protein boost, consider using soy milk. Each milk gives a different texture, so pick the one that fits your taste best. If you want to prep your Pumpkin Chai Iced Latte in advance, here’s how. Brew extra chai tea and store it in the fridge. You can also mix the pumpkin blend ahead of time. Just keep it in an airtight container. When you’re ready to enjoy, layer the chilled tea and pumpkin mix over ice. This way, you save time and still enjoy a delicious drink. For more details on the recipe, check out the Full Recipe. {{image_2}} You can change the sweetener in your Pumpkin Chai Iced Latte. If you want less sugar, try using stevia or erythritol. For a richer taste, brown sugar or honey works well. Each sweetener brings a unique flavor. Adjust the amount to suit your taste. Add fun flavors to your latte! A splash of caramel syrup gives it a sweet twist. Vanilla extract can enhance the warm spices. If you love chocolate, mix in cocoa powder or chocolate syrup. These flavors can make your drink even more special. Switch up the chai for a new twist. Try rooibos tea for a caffeine-free option. Green tea adds a fresh taste with health benefits. For a spicy kick, use ginger tea. Each tea changes the latte's flavor and feel. Explore different blends to find your favorite! Store any leftover Pumpkin Chai Iced Latte in a sealed jar or container. Keep it in the fridge. Make sure to consume it within a few days for the best flavor. The chai and pumpkin mixture can separate, so give it a gentle shake before drinking. Brewed chai tea lasts about 3-5 days in the fridge. Pumpkin puree, if opened, is good for about a week. If unopened, it can last months. Milk varies; check the date on the carton. Always smell and taste before using any old ingredients. To reheat chai tea, pour it into a saucepan. Heat it on low until warm, not boiling. Stir gently to avoid burning. You can also microwave it in a safe mug. Heat for about 30 seconds, then check the temperature. If it's not warm enough, heat a bit more. You can use honey or agave nectar instead of maple syrup. Both sweeteners add great flavor. You can also try brown sugar or coconut sugar for a different twist. Adjust the amount to your taste. Each option will give your Pumpkin Chai Iced Latte a unique flair. Yes, you can prepare a hot version of this drink. Just brew the chai tea as usual. Mix the pumpkin puree and other ingredients in a pot over low heat. Stir until warm and combined. Pour it into your favorite mug. Enjoy the cozy warmth of your Pumpkin Chai Iced Latte. You can find ready-made Pumpkin Chai Iced Latte at many coffee shops in fall. Some grocery stores also sell bottled versions. If you want to make it at home, check the recipe for all the ingredients. You can easily whip up this tasty drink in your kitchen. This blog post shared a full guide to making a Pumpkin Chai Iced Latte. You learned about the key ingredients, helpful tips for brewing, and ways to customize your drink. Remember, you can swap ingredients for allergies and enjoy creative flavor twists. Proper storage helps keep your latte fresh for longer. Use this info to impress friends or enjoy a tasty treat at home. Get ready to sip something special and explore the delicious world of pumpkin chai!](https://grilledflavors.com/wp-content/uploads/2025/08/d76586e7-9300-4374-9590-684485a31eac.webp)
If you love cozy fall flavors, you’ll adore this Pumpkin Chai Iced Latte! This rich and creamy drink blends warm spices with smooth pumpkin for a delicious treat. Whether you …
![- 2 medium apples (Granny Smith or Honeycrisp work well) - 1 cup caramel sauce (store-bought or homemade) - 1 tablespoon butter - 1/2 teaspoon cinnamon - 1/2 cup mini chocolate chips - 1/4 cup finely chopped nuts (e.g., pecans or walnuts) - Sea salt for garnish When you make Easy Caramel Apple Slices, start with fresh apples. I love Granny Smith for their tartness or Honeycrisp for their sweetness. They both hold up well to the caramel. For the caramel, you can use store-bought or make your own. If you choose to make it, be careful to keep it smooth. Add butter to make it rich. Optional ingredients can really enhance your treat. A sprinkle of cinnamon adds warmth. Mini chocolate chips or nuts give extra crunch. Sea salt can bring out the sweet flavor. These easy caramel apple slices are fun to make. You’ll enjoy every bite, especially with the tasty toppings! Check the [Full Recipe] for more details. - Wash and dry the apples. - Core and slice apples into wedges. Start by washing your apples well. Clean them under cool water to remove any dirt or wax. Then, dry them with a towel. Next, use an apple corer to remove the core. If you do not have one, a small knife works too. After that, slice the apples into wedges about a quarter-inch thick. You can leave the skin on for extra flavor and color. - Combine caramel sauce and butter in a saucepan. - Stir until melted and smooth. In a small saucepan, add one cup of caramel sauce and one tablespoon of butter. Heat the mixture over low heat. Stir it gently with a spoon. Keep stirring until the caramel and butter blend together and become smooth. Be careful not to let it boil. If you want extra flavor, you can add half a teaspoon of cinnamon here. - Dip apple slices into caramel. - Set on a parchment-lined baking sheet. - Chill in the refrigerator. Once your caramel is ready, it’s time to dip! Take each apple slice and dip it into the warm caramel. Make sure to coat it well. Let any extra caramel drip off before placing the slice on a parchment-lined baking sheet. If you like, sprinkle mini chocolate chips or chopped nuts on top of the warm caramel. Repeat this with all the apple slices. Place the baking sheet in the fridge for about thirty minutes. This helps the caramel set up nicely. Enjoy your easy caramel apple slices! For the full recipe, check the earlier section. Choose apples that balance sweet and tart. I recommend Granny Smith or Honeycrisp. These apples have crisp textures that hold up well when dipped in caramel. Leaving the skin on adds color and a bit of texture. Plus, it gives you extra nutrients. To make your caramel smooth, heat it slowly. Combine the caramel sauce and butter in a saucepan. Stir gently until it melts and blends well. Avoid boiling the mixture. Boiling can cause the caramel to burn. Watch it closely. Make your caramel apple slices stand out. Arrange them on a platter in a fan shape. You can add toppings for extra flair. Mini chocolate chips or chopped nuts work great. Sprinkle a little sea salt on top for a fun twist! {{image_2}} You can make your caramel apple slices even better with fun toppings. Nuts are a great choice. Try chopped pecans, walnuts, or even almonds. Mix and match them for different tastes. You can also add mini chocolate chips for a sweet crunch. Right after dipping, sprinkle these on the warm caramel. The heat helps them stick well. Want to change the flavor? Add spices to the caramel! A sprinkle of nutmeg or a dash of vanilla extract makes a big difference. These spices bring warmth and depth to the taste. You might also think about using flavored caramel sauces. Salted caramel adds a nice twist. Each option lets you create a new favorite. Get creative with how you dip your apple slices. You can cover them in chocolate instead of caramel. Melt dark or milk chocolate and dip the apple slices in it. They will look and taste amazing. Another fun idea is to mix peanut butter with caramel. It adds a creamy texture and a nutty flavor that is hard to resist. For the full recipe, check out the section above. To keep your caramel apple slices fresh, follow these tips: - Store them in an airtight container. - Use parchment paper to separate layers. - Avoid stacking them to prevent sticking. For best results, use a shallow container. This helps maintain the texture. A glass or plastic container works well. Caramel apple slices last about 3 to 5 days in the fridge. Always check for signs of spoilage. - Look for any discoloration of the apples. - If the caramel appears hard or grainy, it may be time to toss them. If you want a fresh taste, reheat the caramel before serving. Place it in a microwave-safe bowl. Heat for 10 to 15 seconds. Stir until smooth. For serving, arrange slices on a nice platter. You can add a drizzle of extra caramel for flair. Consider serving with a scoop of ice cream for a fun treat! For the full recipe, check the earlier section. Making homemade caramel sauce is easy and fun. Here’s a simple recipe: - Ingredients: - 1 cup sugar - 6 tablespoons butter - 1/2 cup heavy cream - Instructions: 1. In a saucepan, heat sugar over medium heat. 2. Stir until it melts and turns amber. 3. Add butter and stir until melted. 4. Slowly pour in heavy cream and mix well. 5. Let it cool before using. For more tips, check out [Full Recipe]. Yes, you can use many other fruits! Here are some great options: - Pears: They are sweet and soft. - Bananas: They add a creamy texture. - Strawberries: Perfect for bite-sized treats. - Pineapple: Offers a tropical twist. These fruits will pair well with caramel, making tasty snacks. To keep caramel smooth, follow these tips: - Use low heat when melting. High heat can cause quick hardening. - Stir constantly to keep it smooth. - Work fast when dipping fruits. - If it hardens, reheat gently on low heat. These steps will help you enjoy your caramel treats longer. You now know how to make delicious caramel apple slices. We covered key ingredients and easy steps for preparation. You learned about tips for choosing apples, making smooth caramel, and creative toppings. We also explored storage methods to keep your treats fresh and questions many ask. Now you can enjoy this tasty treat any time. Get creative with flavors and toppings. Have fun experimenting and sharing with friends!](https://grilledflavors.com/wp-content/uploads/2025/08/b41ab472-e5bf-40d3-82a3-0797db663eec.webp)
Fall is here, and what better way to celebrate than with Easy Caramel Apple Slices? These sweet treats are simple to make and perfect for sharing. You’ll love the crisp …
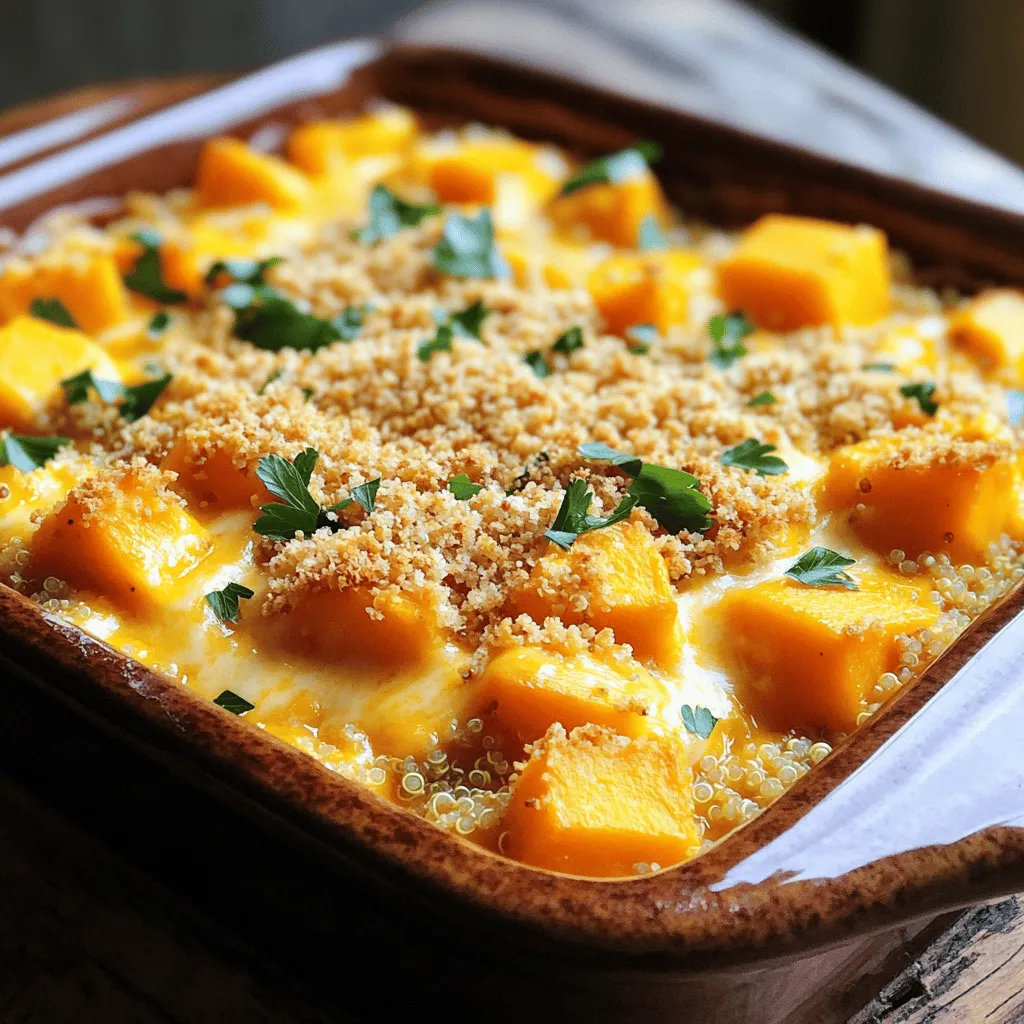
Looking for a delicious and healthy meal? You’ll love this easy butternut squash casserole! With simple ingredients and a few straightforward steps, you can create a warm dish packed with …
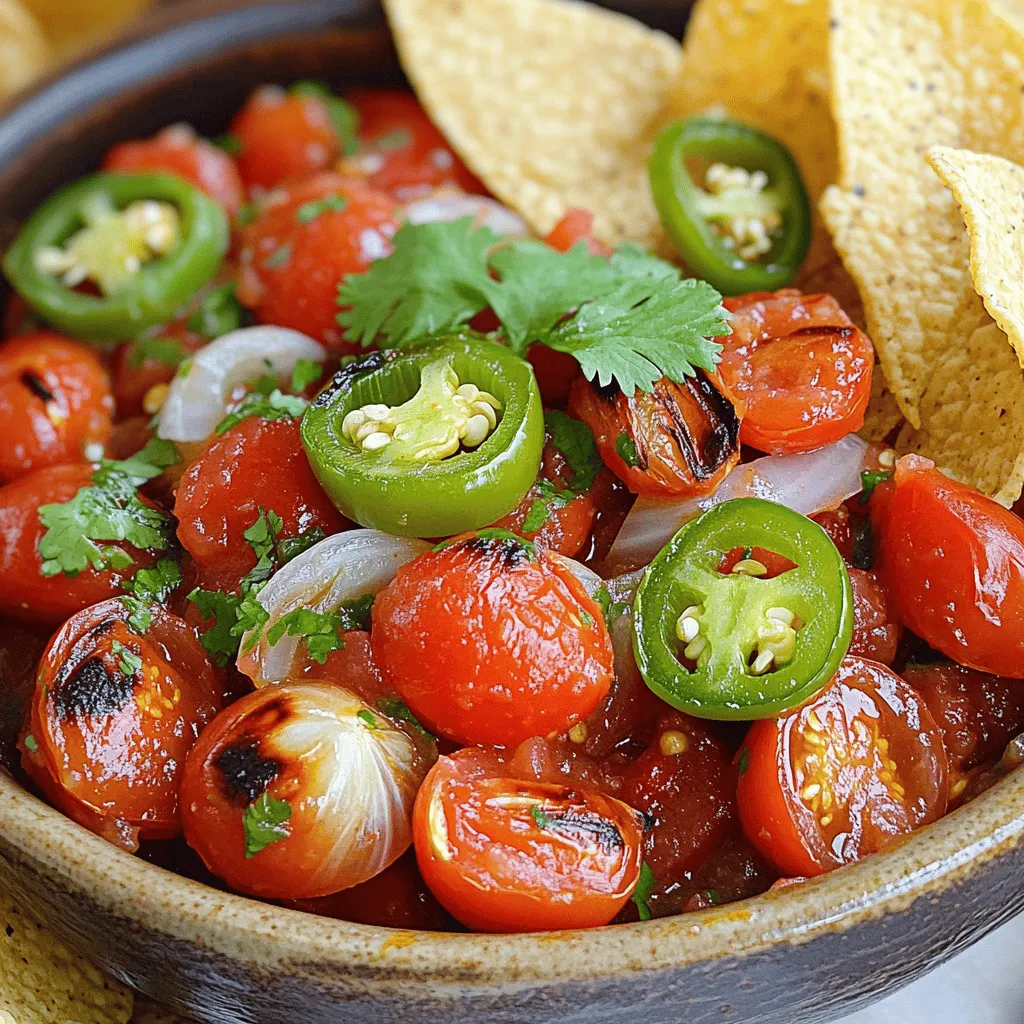
If you crave a burst of flavor in your meals, I’ve got the perfect solution: fire-roasted salsa. In this guide, I’ll walk you through a simple recipe that transforms fresh …