Creamy Balsamic Vinaigrette Simple and Flavorful Recipe
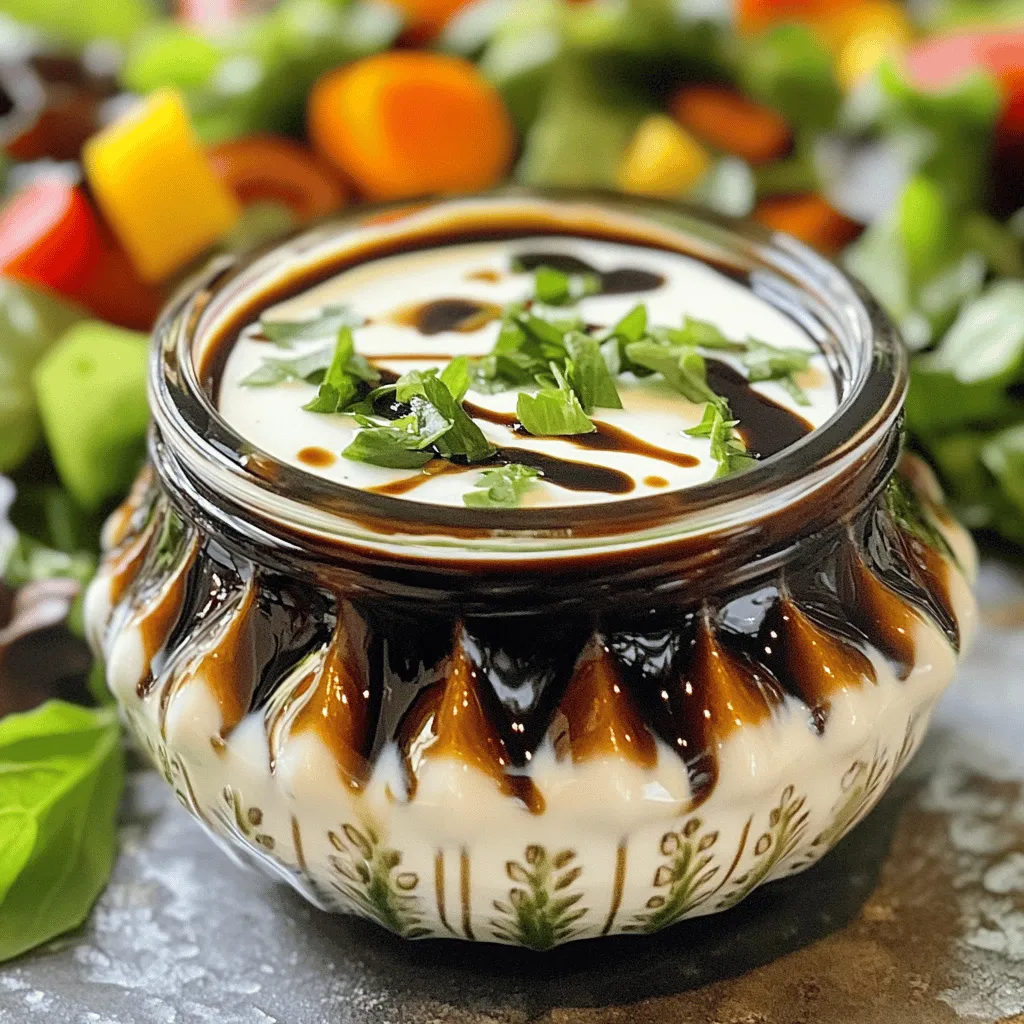
Are you ready to elevate your salads with a taste of creamy goodness? In this blog post, I’ll share my simple and flavorful recipe for Creamy Balsamic Vinaigrette. This dressings …
![The main ingredients in this easy healthy baby lasagna create a tasty and nutritious dish. Here’s what you need: - 9 whole wheat lasagna noodles - 1 cup ricotta cheese (low-fat) - 2 cups spinach (fresh, chopped) - 1 cup zucchini (finely diced) - 1 cup shredded carrots - 2 cups marinara sauce (preferably low-sodium) - 1 ½ cups mozzarella cheese (part-skim, shredded) - 1 teaspoon dried Italian herbs (oregano, basil) - Salt and pepper to taste - Olive oil spray (for greasing) These ingredients offer a blend of flavors and textures. Whole wheat noodles add fiber, while ricotta and mozzarella provide creamy goodness. Fresh veggies like spinach and zucchini boost the nutrition. You can personalize this lasagna with different ingredients. Here are some ideas: - Swap whole wheat noodles for gluten-free noodles if needed. - Use cottage cheese instead of ricotta for a different taste. - Add bell peppers or mushrooms for extra veggies. - Try using a low-sugar marinara sauce to cut down on added sugars. These variations keep the dish fun and exciting. You can change it every time you make it! If you don’t have an ingredient, try these easy swaps: - Replace ricotta with Greek yogurt for added protein. - Use frozen spinach if fresh isn’t available; just thaw and drain. - Substitute zucchini with yellow squash or eggplant. - If you need a dairy-free option, use cashew cheese instead of mozzarella. These substitutions help you adjust based on what you have at home. With the right swaps, you can still create a delicious meal. For the full recipe, check the section above! First, gather all the ingredients for Easy Healthy Baby Lasagna. You will need: - 9 whole wheat lasagna noodles - 1 cup ricotta cheese (low-fat) - 2 cups spinach (fresh, chopped) - 1 cup zucchini (finely diced) - 1 cup shredded carrots - 2 cups marinara sauce (preferably low-sodium) - 1 ½ cups mozzarella cheese (part-skim, shredded) - 1 teaspoon dried Italian herbs (oregano, basil) - Salt and pepper to taste - Olive oil spray (for greasing) Next, preheat your oven to 375°F (190°C). While the oven heats, cook the lasagna noodles as directed on the package. After cooking, drain the noodles and set them aside. In a mixing bowl, combine the ricotta cheese, chopped spinach, zucchini, shredded carrots, Italian herbs, salt, and pepper. Mix everything well until it forms a smooth filling. Grease a 9x13-inch baking dish with olive oil spray. This helps the lasagna not stick. Spread 1 cup of marinara sauce evenly on the bottom of the dish. Now, you will layer the ingredients in the dish. Start with 3 lasagna noodles placed side by side over the sauce. Then, spread half of the ricotta and vegetable mixture over the noodles. Sprinkle with ½ cup of mozzarella cheese. Repeat the layering process: add another 3 lasagna noodles, followed by another cup of marinara sauce, the remaining ricotta mixture, and another ½ cup of mozzarella cheese. For the top layer, place the final 3 lasagna noodles on the cheese. Cover them with the remaining marinara sauce and the last ½ cup of mozzarella cheese. Ensure the entire top is well covered to create a nice crust. To bake, cover the dish with aluminum foil. Be sure to spray the foil with olive oil to avoid sticking. Bake for 25 minutes. After that, remove the foil and bake for an additional 15-20 minutes. Look for bubbly, golden cheese as the sign it’s ready. Once done, let the lasagna cool for 10 minutes. This makes it easier to slice and serve. Enjoy this healthy, tasty meal with your little one! For the full recipe, check out the Easy Healthy Baby Lasagna. To boost flavor, use fresh herbs. Instead of dried Italian herbs, try fresh basil or oregano. Fresh herbs add a bright touch. You can also use garlic powder or onion powder for a more robust taste. Add a pinch of red pepper flakes for a slight kick. If your baby is ready, a hint of cheese can enhance the richness. Texture matters for little ones. Make sure veggies are finely diced. This helps them blend well into the lasagna. Cook the zucchini and carrots slightly before adding them. This softens them, making them easy to chew. You want each bite to be soft but not mushy. Layer the ricotta cheese well to keep everything creamy and smooth. Make meals fun to eat! Use colorful plates to catch their eye. Cut the lasagna into small squares or fun shapes. Serve with a sprinkle of fresh basil on top for color. You can also add a side of steamed veggies for a pop of green. This not only makes the plate look nice but also adds nutrition. Creating a fun presentation can make your baby more excited to eat! {{image_2}} You can mix in many veggies for extra flavor and nutrition. Try adding chopped bell peppers or mushrooms. They add a nice texture and taste. You can also use broccoli or cauliflower for more crunch. If your baby likes it, you can blend in some peas too. Each veggie brings its own unique flavor. So, feel free to get creative with what you have on hand. If you want a gluten-free lasagna, use gluten-free noodles. Many brands offer great options that taste good. For dairy-free, you can swap ricotta and mozzarella with cashew cheese or almond cheese. These alternatives still give a creamy texture. Just check the labels to ensure they fit your needs. These changes make the dish suitable for many diets. As your baby grows, you can adjust the recipe. Add more spices like garlic powder for a stronger flavor. You can also increase the amount of cheese for a richer taste. If your child enjoys meat, consider adding ground turkey or chicken. Just cook it before mixing with the cheese and veggies. These tweaks keep the dish appealing as their taste buds develop. For the complete method, check the [Full Recipe]. You can store leftover lasagna in the fridge. Place it in an airtight container. It stays fresh for about three to five days. Before you eat it, check for any signs of spoilage. If it looks or smells off, it’s best to toss it. If you want to save some for later, freezing is a great option. Cut the lasagna into individual portions. Wrap each piece tightly in plastic wrap, then place it in a freezer bag. It will keep well for up to three months. To reheat, let it thaw in the fridge overnight. Then bake it at 350°F (175°C) until warm, about 25-30 minutes. You can also microwave it. Just cover it with a damp paper towel and heat in short bursts. Choose containers that seal tightly. Glass containers work well because they keep odors out. If you use plastic, make sure it is BPA-free. Label your containers with the date. This helps you remember when you made the lasagna and how long it has been stored. Yes, you can make this lasagna ahead of time. Prepare the dish and layer it as instructed. Cover it tightly and store it in the fridge for up to 24 hours. This helps the flavors blend. When ready to bake, just pop it in the oven. You may need to add a few extra minutes of cooking time. This baby lasagna is great for babies over 10 months old. At this age, babies can handle soft textures and a variety of flavors. The veggies offer good nutrition, and the cheese adds protein. Always check with your pediatrician if you have concerns about introducing new foods. To check if the lasagna is done, look for bubbly cheese on top. The edges should be golden brown. Insert a knife into the center. If it goes in easily, the lasagna is ready. Let it cool for about 10 minutes before slicing. This helps the layers hold together better. For the full recipe, visit the [Full Recipe] link. This blog post covered how to make an easy and healthy baby lasagna. We discussed key ingredients, preparation, and cooking steps. I offered helpful tips to make the dish tasty and baby-friendly. We also explored variations for different dietary needs and how to store leftovers properly. Remember, this recipe suits babies and older kids. With these tips, you can create a meal everyone will love. Enjoy making this delicious lasagna for your family!](https://grilledflavors.com/wp-content/uploads/2025/07/795a898b-fce8-47a6-a28e-ce03d428a621.webp)
![To create a fun and tasty bento box, start with key ingredients. You want to include a mix of protein, grains, and plenty of colorful veggies and fruits. Here are some great options: - Protein: Cooked chicken, tofu, or hard-boiled eggs. - Grains: Sushi rice, brown rice, or quinoa. - Veggies: - Carrots - Bell peppers - Cucumbers - Broccoli - Fruits: - Apples - Grapes - Strawberries - Kiwi These ingredients not only look appealing but also keep your child healthy and energized. When making a bento box, you need the right containers and tools. Here are must-have items for your bento box setup: - Containers: - Divided bento boxes - Small containers for dips and sauces - Tools: - Bamboo mat for sushi rolling - Sharp knife for cutting - Measuring cups for rice and water Having the right supplies makes packing fun and easy. Plus, it helps keep everything neat and organized. For a delicious bento option, try the Full Recipe for colorful rainbow sushi rolls! To start, wash the sushi rice. Rinse it under cold water until it runs clear. This step removes extra starch. In a medium pot, mix the rice with water. Bring it to a boil. Then, cover it and lower the heat. Let it cook for 18 to 20 minutes. After that, turn off the heat and let it sit for 10 minutes without lifting the lid. Next, we need to season the rice. In a small pot, combine rice vinegar, sugar, and salt. Heat it gently until the sugar dissolves. Mix this into the cooked rice and let it cool. This gives the rice a nice flavor. Now, let's roll! Place a bamboo sushi mat on a flat surface. Lay a sheet of nori, shiny side down. With wet hands, spread a thin layer of rice over the nori. Leave about an inch at the top. Now comes the fun part! Place thin strips of cucumber, carrot, avocado, and red bell pepper across the rice. Roll it up tightly. Start from the bottom and use the mat to help. Seal the edge with a bit of water. Finally, use a sharp knife to slice the roll into bite-sized pieces. Repeat this with the rest of your nori and filling. When packing your bento box, make it fun! Arrange the sushi pieces neatly. You want it to look colorful and inviting. Use a mix of colors to catch the eye. Add some extra veggies or fruits in the gaps. Think about textures too. Include crunchy veggies with soft sushi. This will keep kids excited about their meal. You can also add a small container of soy sauce for dipping. Remember, it's all about variety! Mix different flavors and textures for a balanced meal. With these tips, you can create a fun and tasty bento box that kids will love. For the full recipe, check out Colorful Rainbow Sushi Rolls. To make bento lunches exciting, focus on how food looks. Use fun shapes and colors. You can use cookie cutters to cut sandwiches into stars or hearts. Add colorful fruits and veggies to brighten the box. Let your kids help with the meal prep. Give them small tasks like washing vegetables or arranging food. This makes them feel involved and proud of their lunch. Ask them to choose their favorite colors for their bento box. Prepare ingredients ahead of time. You can wash and cut fruits and veggies the night before. Store them in the fridge in separate containers. This way, you save time when packing lunches. Batch cooking can also help busy families. Make a big batch of sushi rice or cook extra chicken. Use these ingredients for different meals throughout the week. This method gives you variety without the extra work. For a fun recipe, try making Colorful Rainbow Sushi Rolls. These sushi rolls are simple to prepare and a hit with kids. Follow the [Full Recipe] to get started! {{image_2}} You can swap sushi for different kid-friendly proteins. Try using chicken, turkey, or tofu. These options are tasty and keep lunch fun. You can grill or bake chicken bites. Use a little seasoning for flavor. For turkey, try small meatballs or strips. Tofu can be marinated and baked for extra taste. Adding color and nutrition is easy with veggies. Carrots and cucumbers are great choices. Bell peppers add crunch and bright colors. You can also use cherry tomatoes, snap peas, or broccoli florets. These veggies make your bento box look fun and tasty. Other fillings for rainbow sushi can keep things exciting. Instead of just veggies, try cream cheese or cooked shrimp. You can also add colorful fruits like mango or strawberries. These options bring new flavors and textures. Themed bento box lunches are another fun idea. You can create a beach theme with fish-shaped sandwiches and fruit. Or, make a space theme with star-shaped veggies and galaxy-colored rice. Let your child help pick a theme. This makes lunch special and sparks creativity! For a full recipe of colorful rainbow sushi rolls, check out the details above. To keep your bento box lunches fresh, use the right containers. I recommend using bento boxes made from stainless steel or BPA-free plastic. These materials are safe and durable. They also help to keep food fresh longer. Look for containers with separate compartments to keep different foods apart. This prevents flavors from mixing and keeps everything appealing. To maintain freshness, pack your bento box just before your child leaves for school. If possible, place an ice pack in the lunch bag. This helps keep the food cold and safe to eat. When packing food, always wash your hands and surfaces. This keeps germs away from your child's lunch. Use clean utensils and avoid touching the food directly. It is very important to maintain the right temperature for your bento lunch. Keep cold foods, like sushi, at 40°F or lower. Hot foods should stay at 140°F or higher. If you use an insulated container, it can help. These containers keep hot foods hot and cold foods cold for longer. By following these tips, you can pack tasty and safe bento lunches that your kids will love. To keep sushi fresh, you should pack it right. First, store sushi in the fridge until you leave for lunch. Use a tight container that keeps air out. If you can, add a cold pack to your lunch bag. This helps keep the sushi cool and tasty. Avoid leaving sushi out for too long. It tastes best when served fresh. You can also wrap sushi in plastic wrap to keep it from drying out. Yes, you can make bento box lunches ahead of time. I suggest prepping the night before. This can save you time in the morning. You can store sushi in the fridge for up to 24 hours. Just keep the rice and filling separate until lunch. This keeps the rice from getting soggy. You can also prep fruits and veggies. Cut them and store them in airtight containers. This way, you can mix and match for fun lunches all week. If sushi isn’t your thing, don't worry! You can use other easy meal ideas. Try wraps made with tortillas. Fill them with turkey, cheese, and some veggies. You can also add mini sandwiches cut into fun shapes. Another option is pasta salad. Just mix cooked pasta with veggies and dressing. Kids love fruit kabobs too. Simply skewer pieces of fruit for a colorful treat. These ideas are quick and sure to please! Making bento box lunches is fun and healthy for kids. We covered key ingredients like colorful fruits and veggies. I shared how to prepare rainbow sushi rolls and pack them nicely. You can make meal prep exciting for kids and save time in the kitchen. With simple swaps and creative ideas, bento boxes never have to be boring. Enjoy making these lunches together and keep food fresh for later. Your kids will love the tasty meals you create!](https://grilledflavors.com/wp-content/uploads/2025/07/1f899bb5-b019-4c24-9b23-b180995ff089.webp)

![To make Chai-Spiced Snickerdoodles, gather these simple ingredients: - 2 ¾ cups all-purpose flour - 1 teaspoon baking soda - 1 teaspoon cream of tartar - ½ teaspoon salt - 1 teaspoon ground cinnamon - ½ teaspoon ground cardamom - ½ teaspoon ground ginger - ¼ teaspoon ground cloves - 1 cup unsalted butter, softened - 1 ½ cups granulated sugar - 2 large eggs - 1 teaspoon vanilla extract - ¼ cup granulated sugar (for rolling) - 1 tablespoon ground cinnamon (for rolling) Each ingredient plays a key role. The flour gives the cookies structure. Baking soda and cream of tartar create the perfect rise. The spices add warmth and flavor, making every bite special. Butter and sugar combine to form a creamy base. Eggs add moisture and richness. Vanilla enhances the cookie's sweet notes. Finally, the rolling mixture of sugar and cinnamon gives a delightful crunch. Using high-quality spices makes a big difference. Fresh spices will give your cookies a vibrant flavor. Check your pantry to ensure they are not old. With these ingredients ready, you are all set to create delicious Chai-Spiced Snickerdoodles. For the complete process, refer to the Full Recipe. 1. Preheat your oven to 350°F (175°C). Line a baking sheet with parchment paper. 2. In a large bowl, whisk together: - 2 ¾ cups all-purpose flour - 1 teaspoon baking soda - 1 teaspoon cream of tartar - ½ teaspoon salt - 1 teaspoon ground cinnamon - ½ teaspoon ground cardamom - ½ teaspoon ground ginger - ¼ teaspoon ground cloves 3. In another bowl, cream together: - 1 cup unsalted butter, softened - 1 ½ cups granulated sugar Mix until light and fluffy. 4. Beat in 2 large eggs, one at a time. Then add 1 teaspoon vanilla extract. Mix well. 5. Gradually add the dry mixture to the wet mixture. Mix until just combined. Do not overmix. 6. In a small bowl, mix: - ¼ cup granulated sugar - 1 tablespoon ground cinnamon This will be for rolling the cookies. 7. Using a cookie scoop, form dough balls. Roll each ball in the cinnamon-sugar mixture until fully coated. 8. Place the rolled dough balls on the prepared baking sheet. Space them about 2 inches apart. 9. Bake for 10-12 minutes. The edges should be lightly golden. The centers may look slightly underbaked. They will set as they cool. 10. Let the cookies cool on the baking sheet for 5 minutes. Then, transfer them to a wire rack to cool completely. You can find the Full Recipe for more details! To get the best texture, don't overmix the dough. Mix just until combined. This keeps the cookies soft. Aim for a baking time of 10-12 minutes. The edges should be golden while the centers remain soft. They will firm up as they cool. For a stronger chai flavor, add more spices like cardamom or ginger. You can also swap some granulated sugar for brown sugar. Brown sugar adds moisture and a rich taste that enhances the snickerdoodles. Serve snickerdoodles warm with a cup of chai. Dust them with extra cinnamon for a beautiful look. For gatherings, stack them on a plate and add a small bowl of chai on the side. This creates a cozy and inviting display. For the complete preparation, check out the Full Recipe. {{image_2}} You can easily change the flavors in your Chai-Spiced Snickerdoodles. One fun option is adding white chocolate chips. They bring a sweet and creamy taste that pairs well with the spices. Just fold in about one cup of chips when you mix the dough. Another great idea is to switch up the spices. You might add nutmeg for a warm twist. You could also try some allspice or even a hint of cayenne for heat. These changes let you create a cookie that fits your taste. If you need a gluten-free option, almond flour works well. Replace the all-purpose flour with 2 ½ cups of almond flour. This change keeps the cookies soft and delicious. For a vegan version, use egg substitutes like flaxseed meal or applesauce. Combine one tablespoon of flaxseed with three tablespoons of water to replace one egg. This makes the cookies just as tasty while meeting dietary needs. You can adapt this recipe for different seasons. In fall, add pumpkin spice to the dough. A teaspoon of pumpkin spice gives a cozy flavor that matches the season. During the holidays, try adding peppermint extract. Just a teaspoon will give your cookies a festive twist. You might also add crushed peppermint candies for extra crunch. These seasonal swaps keep your snickerdoodles exciting all year round. For the full recipe, check out the [Full Recipe]. Store your chai-spiced snickerdoodles at room temperature. Use an airtight container to keep them fresh. This helps retain their soft texture and flavor. Try to separate layers with parchment paper. This prevents sticking and keeps cookies nice. To freeze your baked cookies, let them cool completely first. Then, place them in an airtight container or freezer bag. You can also wrap them tightly in plastic wrap. When you want to enjoy them, thaw at room temperature. For the best taste, heat them in the oven for a few minutes. Chai-spiced snickerdoodles last about a week at room temperature. Look for signs of spoilage like an off smell or hard texture. If they become dry or crumbly, it's time to toss them. For maximum enjoyment, eat them fresh within the first few days. What are Chai-Spiced Snickerdoodles? Chai-Spiced Snickerdoodles are a twist on the classic snickerdoodle cookie. They combine warm chai spices with a soft, chewy texture. The blend of cinnamon, cardamom, ginger, and cloves gives them a unique flavor. These cookies are perfect for any occasion, especially with a cup of chai. Can I make these cookies ahead of time? Yes, you can make Chai-Spiced Snickerdoodles ahead of time. You can prepare the dough and chill it in the fridge for up to three days. When you’re ready, scoop and bake them fresh. They’ll taste great, and you’ll have warm cookies ready to enjoy. Why are my cookies flat? Flat cookies often happen due to too much butter or not enough flour. Make sure to measure your ingredients carefully. Also, ensure your butter is softened, but not melted. This helps create a nice structure. How do I fix overbaked cookies? If your cookies are overbaked, they might be dry. To fix this, store them in an airtight container with a slice of bread. The bread adds moisture back to the cookies. This will help soften them over time. What pairs well with Chai-Spiced Snickerdoodles? These cookies pair wonderfully with a steaming cup of chai. The spices in the cookie enhance the drink's flavor. You can also serve them with milk or hot chocolate for a cozy treat. How to spice up a cookie platter for guests? To spice up a cookie platter, add variety. Include different cookies like chocolate chip or oatmeal raisin. Decorate with colorful sprinkles or edible flowers for a festive touch. This will make your cookie platter visually appealing and exciting for guests. To make chai-spiced snickerdoodles, start by gathering your ingredients. You will need flour, spices, butter, sugar, eggs, and vanilla. 1. Preheat your oven to 350°F (175°C) and line a baking sheet with parchment paper. 2. Whisk the dry ingredients in a bowl. This includes flour, baking soda, cream of tartar, salt, and spices. 3. In another bowl, cream the softened butter and sugar until light and fluffy. 4. Add eggs one by one, then mix in the vanilla. 5. Gradually mix the dry ingredients into the wet mixture. Be careful not to overmix. 6. Roll the dough into balls and coat them in a cinnamon-sugar mix. 7. Place the balls on the baking sheet, spaced apart. 8. Bake for 10-12 minutes until golden. Remember, they will continue to bake as they cool. 9. Let the cookies cool on the sheet for 5 minutes, then move them to a wire rack. This recipe yields about 24 cookies. Enjoy them warm with a cup of chai. You can find the full recipe online for more details! This blog post covered everything you need for Chai-Spiced Snickerdoodles. We explored the ingredients, the step-by-step process, and tips for perfect cookies. Understanding storage, variations, and common questions helps make these treats even better. Baking should be fun and rewarding. With this guide, you can impress yourself and your guests. Enjoy creating flavorful cookies that warm hearts and homes.](https://grilledflavors.com/wp-content/uploads/2025/07/4a95cd93-2ea7-4df7-9ce4-84c67d1fe308.webp)