Homemade Lunchable Easy and Fun Recipe for Kids
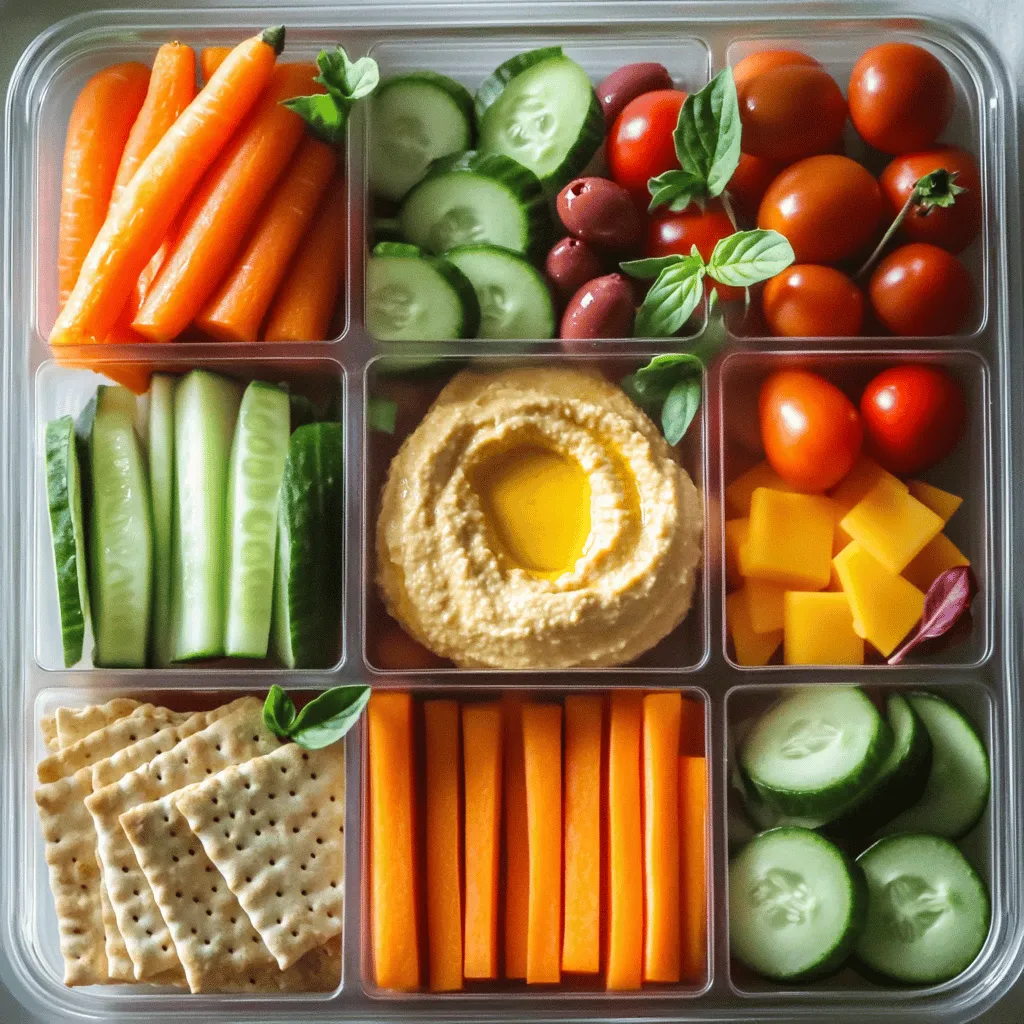
Looking for a fun lunch idea that kids will love? Try making your own Homemade Lunchable! This simple recipe is packed with tasty ingredients and allows for endless customization. You …
Looking for a fun lunch idea that kids will love? Try making your own Homemade Lunchable! This simple recipe is packed with tasty ingredients and allows for endless customization. You …
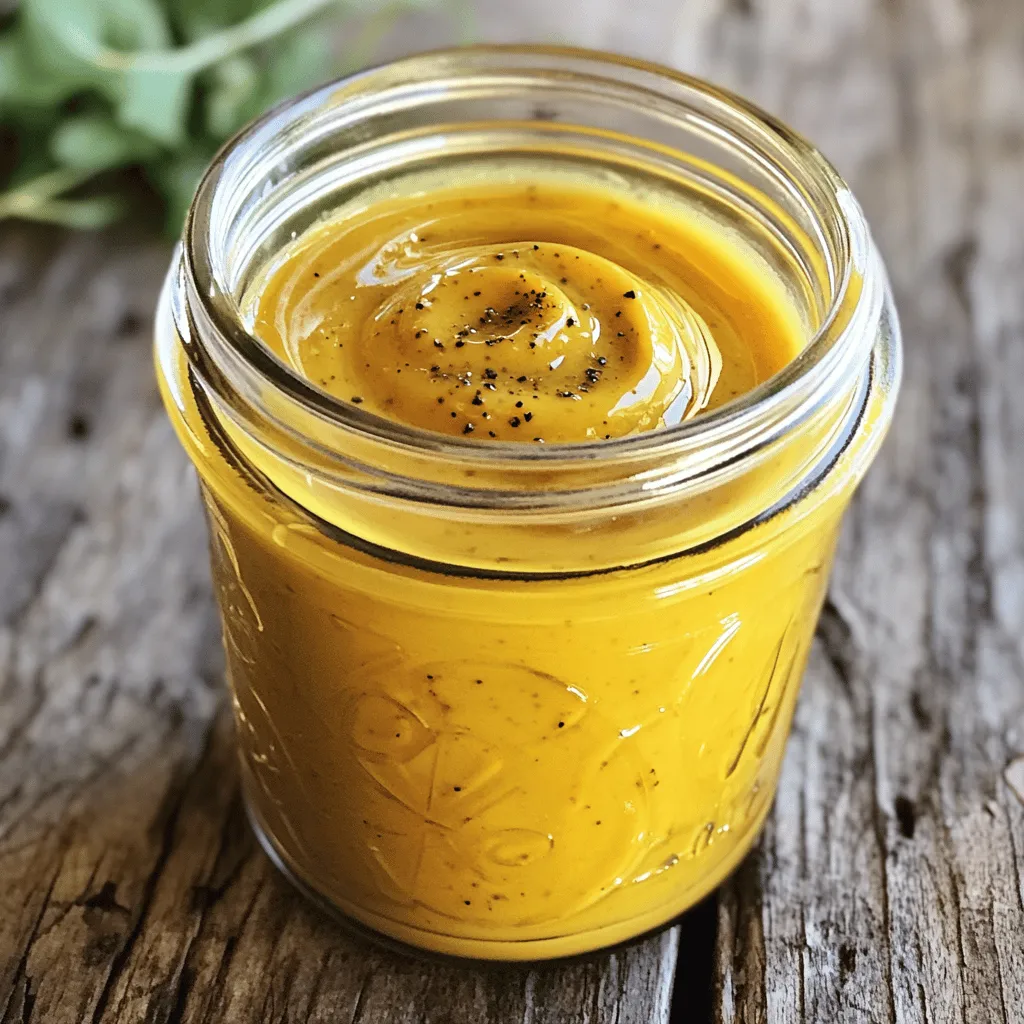
Are you ready to elevate your salads with a simple yet delicious dressing? This Easy Honey Dijon Vinaigrette recipe combines the sweetness of honey with the tang of Dijon mustard, …
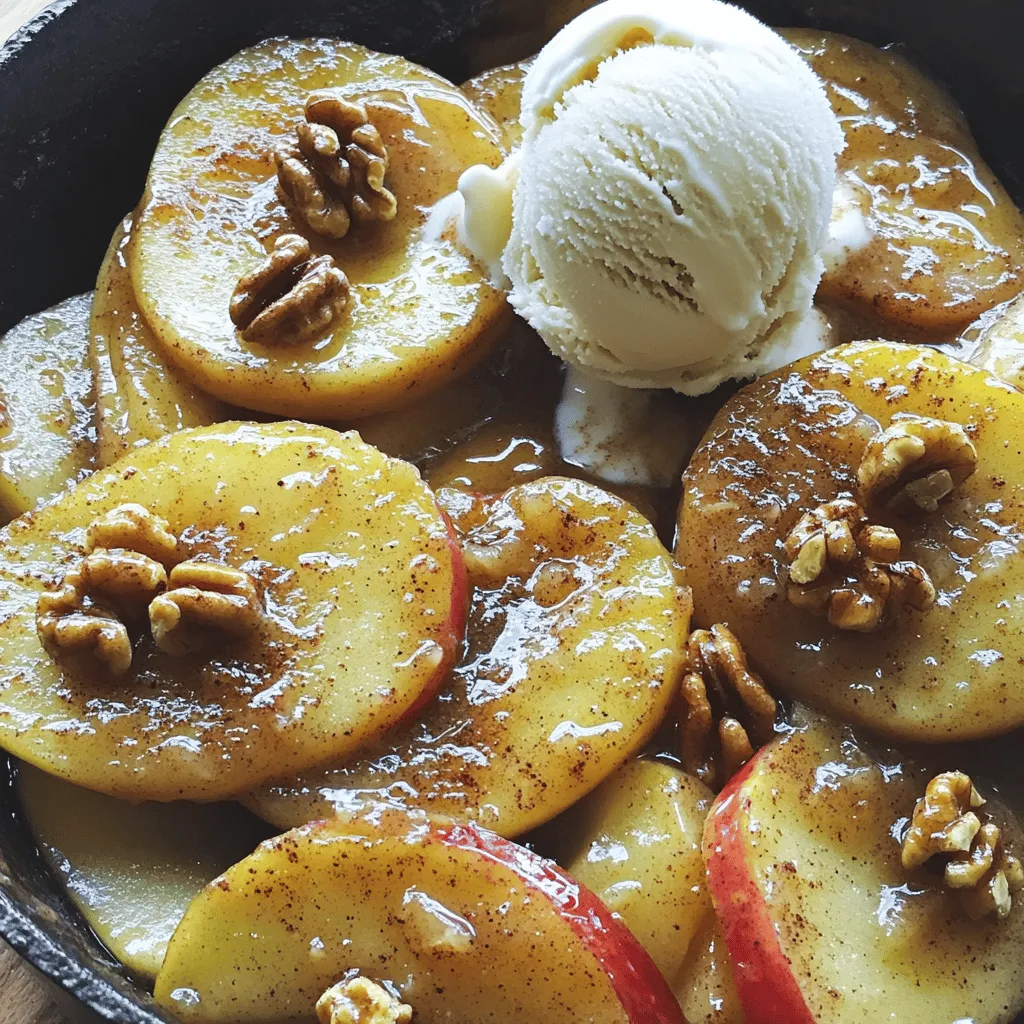
If you love sweet treats, you’re in for a real treat! In this post, I’ll show you how to make delicious cinnamon apples. This recipe is simple and perfect for …

Are you ready to spice up your meal routine? This Easy Buffalo Chicken Wrap is here to save the day! With just a few simple ingredients and quick steps, you …
![To make the best homemade salsa ever, you need the following fresh ingredients: - 4 ripe tomatoes, diced - 1 small red onion, finely chopped - 1 jalapeño, deseeded and minced - 1/4 cup fresh cilantro, chopped - 2 cloves garlic, minced - 2 tablespoons lime juice - 1 teaspoon ground cumin - Salt and pepper to taste Choosing fresh ingredients is key to great salsa. Look for vibrant tomatoes that feel firm. A good tomato should have a rich red color. The onion should be crisp and slightly sweet. For jalapeños, select ones that are shiny and firm. Fresh cilantro should be bright green, with no yellow or brown spots. These choices will enhance your salsa's taste and texture. Feel free to make this salsa your own! You can add a pinch of sugar for sweetness. A splash of vinegar can give it a tangy kick. You might also try adding fruits like mango or pineapple for a sweeter twist. If you love extra heat, consider adding more jalapeños or even a serrano pepper. Customize to fit your taste! For the full recipe, check here: [Full Recipe]. To make the best homemade salsa, you need fresh ingredients. Start with four ripe tomatoes. Dice them into small pieces. Next, take a small red onion. Finely chop it to bring out its strong flavor. A jalapeño adds heat, so remove the seeds and mince it carefully. You can adjust the amount based on your spice preference. Don't forget the garlic; two cloves minced will add a nice punch. In a medium bowl, combine the diced tomatoes, chopped onion, minced jalapeño, and garlic. Mix them gently to keep the tomatoes intact. Next, add 1/4 cup of fresh cilantro, chopped finely. The cilantro adds a fresh taste. Pour in two tablespoons of lime juice for zing. Then, sprinkle one teaspoon of ground cumin for warmth. Finally, season with salt and pepper to taste. Stir everything together until well mixed. For the best flavor, let your salsa rest. This time helps the flavors meld. I suggest letting it sit for at least 30 minutes. You can cover the bowl with plastic wrap. If you have time, letting it rest longer enhances the taste even more. For the full recipe, check the details above. Enjoy your fresh salsa with tortilla chips or on tacos! Cutting tomatoes and onions can be tricky. To start, pick ripe tomatoes. Use a sharp knife for clean cuts. Cut the tomato in half, then make slices from top to bottom. Turn the tomato and slice again to make small cubes. For onions, cut off both ends first. Peel off the skin, then cut it in half. Slice from top to bottom, then chop. This helps avoid tears and keeps your salsa fresh. Spice is key in salsa. If you like it hot, keep the seeds from the jalapeño. For a milder taste, remove all seeds and the white part. You can also swap jalapeños for bell peppers. They add flavor without much heat. Always taste your salsa as you mix. If it’s too spicy, add more diced tomatoes or avocado to cool it down. To keep your salsa fresh, store it in an airtight container. This stops air from getting in and keeps it tasty. Put it in the fridge and use it within three days for the best flavor. If you want to save it longer, consider freezing it. Just make sure to leave space in the container for expansion. This way, you can enjoy your homemade salsa anytime! For the complete recipe, check out the Full Recipe section. {{image_2}} Do you love heat? You can make spicy salsa easily. Add more jalapeños or use serrano peppers. For a smoky flavor, add chipotle peppers in adobo sauce. Try a pinch of cayenne for extra kick. Each choice gives a unique twist. Adjust the spice to match your taste. Want something sweet? Fruit-infused salsa is a fun choice. Dice mango, pineapple, or peaches for a fresh burst. These fruits add sweetness that balances the heat. You can mix them with tomatoes for a tasty blend. It’s a great way to use seasonal fruits, too! This salsa is already vegan! But you can make it allergy-friendly, too. If you have a nightshade allergy, substitute tomatoes with roasted zucchini. This adds a rich flavor without the risk. You can also skip the jalapeño if you prefer mild salsa. Enjoy delicious salsa without worry. For the full recipe, check out Best Homemade Salsa Ever. To keep your salsa fresh, store it in an airtight container. Glass jars work great. Make sure to press out any air before sealing. This helps prevent spoilage. Always keep your salsa in the fridge. Avoid leaving it out at room temperature. Homemade salsa lasts about 5 to 7 days in the fridge. The flavors can change over time. Use it within this time for the best taste. If you see any mold, throw it out right away. Always trust your senses; if it smells off, it's time to discard it. You can freeze salsa for longer storage. Pour it into freezer-safe bags or containers. Remove as much air as possible. Salsa can last up to 3 months in the freezer. When ready to use, thaw it in the fridge overnight. It may be a bit watery. Just stir it well before serving. For the best flavor, enjoy it as soon as possible after thawing. You can find the full recipe for the best homemade salsa ever in the earlier sections. Homemade salsa can last in the fridge for about 5 to 7 days. To keep it fresh, store it in an airtight container. Make sure to check for any signs of spoilage before using it. If it smells off or looks different, it's best to toss it. The flavors will get better as it sits, but don't wait too long! Yes, you can use canned tomatoes in your salsa. This option can save time and still taste great. Look for canned tomatoes that are low in sodium and without added sugars. Drain the tomatoes well before using them. This helps keep your salsa from being too watery. Fresh tomatoes give a brighter flavor, but canned can work well in a pinch. There are many great options to serve with homemade salsa. Here are a few ideas: - Tortilla chips - Tacos or burritos - Grilled chicken or fish - Quesadillas - Nachos You can also use salsa as a topping for eggs or mix it into salads. It adds a fresh kick to any meal! For the full recipe, check out the Best Homemade Salsa Ever. To make great salsa, start with fresh, quality ingredients. Follow the steps for perfect prep and combining. Remember the best tips for cutting and storing. Don’t forget to explore tasty variations to suit your taste. In conclusion, homemade salsa is easy and fun. With these simple steps, you’ll create salsa everyone loves. Enjoy your fresh salsa with friends or family. You’ll impress them with your skills!](https://grilledflavors.com/wp-content/uploads/2025/07/5cf70b75-f08e-4637-b5d8-3890a8a82959.webp)
Are you ready to elevate your snack game? I’m excited to share the Best Homemade Salsa Ever recipe, packed with flavor and freshness! This salsa is simple to make and …

Looking for a sweet snack that’s both crunchy and chewy? You’ll love these Caramel Apple Pretzel Bites! They’re a fun twist on flavors you know and love. With an easy …
. You now have all the details to make delicious pumpkin coffee cake cookies. We covered ingredients, baking steps, and helpful tips. You learned how to adapt for diet needs and storage options. Don't forget the fun variations, like gluten-free and vegan recipes. Take these basics and get creative in your kitchen. Enjoy baking and sharing these tasty treats with friends and family!](https://grilledflavors.com/wp-content/uploads/2025/07/bd73a130-d1e8-4025-92f2-51e0922cd6e6.webp)
Are you ready for a cozy treat that combines two favorites: coffee cake and cookies? These Pumpkin Coffee Cake Cookies are rich, soft, and packed with warm spices. Perfect for …
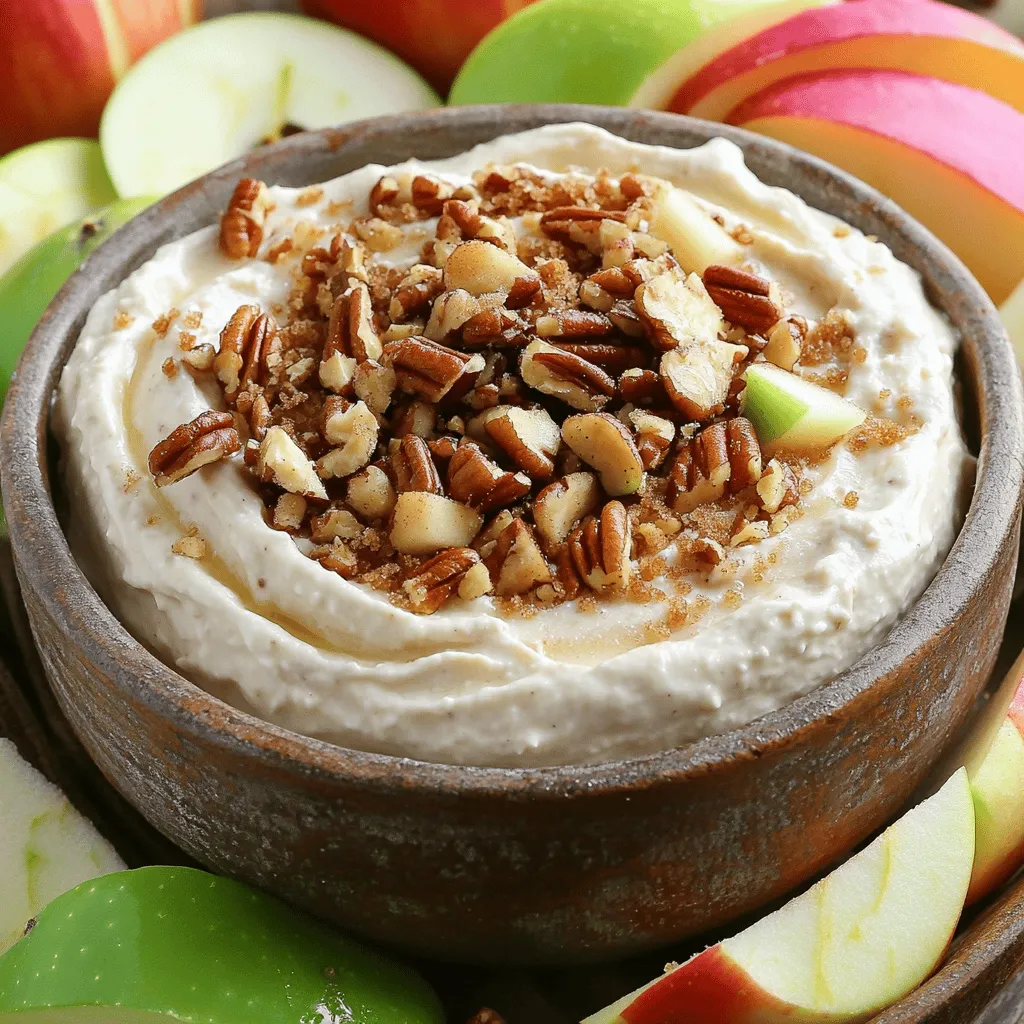
If you’re looking for a quick and tasty treat, you’ve found it! My Apple Toffee Dip recipe is both easy to make and incredibly delicious. You’ll wow your friends and …
![- Milk and cream components - 4 cups whole milk - 1 cup heavy cream - Pumpkin and chocolate ingredients - 1 cup pumpkin puree - 1/2 cup semi-sweet chocolate chips - 1/4 cup cocoa powder - Spices and sweeteners - 1 teaspoon vanilla extract - 3 tablespoons brown sugar (adjust to taste) - 1 teaspoon ground cinnamon - 1/2 teaspoon nutmeg - 1/4 teaspoon salt - Whipped cream, for serving - Pumpkin spice or cocoa powder, for garnish This warm drink needs simple yet tasty ingredients for a cozy feel. Whole milk and heavy cream create a rich base. The pumpkin puree gives it a nice fall flavor. Semi-sweet chocolate chips and cocoa powder add chocolatey goodness. For sweetness, I use brown sugar. You can adjust this to fit your taste. Ground cinnamon and nutmeg bring warmth and spice. A pinch of salt enhances all the flavors. Finally, whipped cream on top makes it special. You can sprinkle pumpkin spice or cocoa powder for a pretty finish. Check out the Full Recipe for more details on how to combine these ingredients into a delightful treat. 1. Mixing the base ingredients Start by pouring 4 cups of whole milk and 1 cup of heavy cream into your crockpot. Stir them together until they blend well. This creamy base is the heart of your hot chocolate. 2. Adding the pumpkin and chocolate mixture Next, add 1 cup of pumpkin puree, 1/2 cup of semi-sweet chocolate chips, and 1/4 cup of cocoa powder. Mix everything well. Watch as the chocolate melts and the mixture becomes smooth and rich. 3. Cooking and heating in the crockpot Now, add 1 teaspoon of vanilla extract, 3 tablespoons of brown sugar, 1 teaspoon of ground cinnamon, 1/2 teaspoon of nutmeg, and 1/4 teaspoon of salt. Stir until fully combined. Set your crockpot to low and cover it. Let it cook for about 2 to 3 hours. Stir occasionally so it heats evenly. 4. Final adjustments and serving instructions Once the hot chocolate is warm, taste it. Adjust the sweetness or spices to your liking. Serve it hot in mugs. Top each serving with whipped cream and a sprinkle of pumpkin spice or cocoa powder for a lovely touch. For the full recipe, check the previous section. Enjoy your cozy drink! To make your Crockpot Pumpkin Hot Chocolate just right, think about sweetness and spice. For sweetness, start with 3 tablespoons of brown sugar. Taste it after cooking. If you want it sweeter, add more sugar. You can also try maple syrup for a new flavor. Spices add warmth. Use cinnamon and nutmeg to enhance the pumpkin. If you like more spice, add an extra dash of cinnamon or even a pinch of ginger. This mix brings out the fall vibes in every sip! When serving, consider adding whipped cream on top. You can sprinkle pumpkin spice or cocoa powder for a nice touch. Serve it with cookies or warm pastries for a cozy treat. Slow cooking is key for this drink. Set your crockpot to low. This lets the flavors blend well. Stir every so often to avoid burning. It usually takes about 2 to 3 hours to heat through. For perfect consistency, make sure to mix thoroughly when adding ingredients. If it seems too thick, add a bit more milk. If it's too thin, let it cook longer to thicken. The right texture turns this drink into a comforting hug on a cold day. For the full recipe, check [Full Recipe]. {{image_2}} You can change the recipe to fit your needs. For a dairy-free version, use almond milk or oat milk instead of whole milk and heavy cream. These options still create a creamy drink. You might also try coconut milk for a tropical twist. You can also switch up the chocolate. Instead of semi-sweet chocolate chips, go for dark chocolate. This will give your drink a richer taste. If you prefer white chocolate, use that instead. It offers a sweet and creamy flavor that pairs well with pumpkin. To make your hot chocolate more exciting, add spices like ginger or cloves. These spices bring warmth and depth to the drink. A pinch of cayenne can add a nice kick, too, if you enjoy a little heat. Using flavored extracts is another fun way to mix things up. Try adding peppermint extract for a wintery touch. Almond extract can also add a unique flavor that pairs well with pumpkin. Just a few drops can change the whole drink. For the full recipe, check out the Cozy Crockpot Pumpkin Hot Chocolate section. To keep your leftover pumpkin hot chocolate fresh, I recommend using an airtight container. This helps prevent any unwanted odors from your fridge. Make sure to cool the hot chocolate to room temperature before you store it. You can place it in the fridge for up to three days. If you want to enjoy it later, freezing is a great option. Pour the cooled hot chocolate into freezer-safe bags or containers, leaving some space for expansion. It can last up to two months in the freezer. When you're ready to enjoy your hot chocolate again, reheating is simple. For the best results, use a saucepan on the stove over low heat. Stir often to ensure it warms evenly. If you prefer, you can also use the microwave. Heat it in short bursts of 30 seconds, stirring in between. This helps to avoid any hot spots. Adjust sweetness or spices if needed before serving. Enjoy your cozy drink with whipped cream and a sprinkle of pumpkin spice! How can I make the hot chocolate less sweet? You can cut back on brown sugar. Start with less, then taste it. You can also skip the sweet chocolate chips. Using unsweetened cocoa powder can help too. Can I use a different type of milk? Yes! You can use almond, oat, or coconut milk. Each will add a unique flavor. Just make sure to choose a creamy option for the best taste. How long does the crockpot hot chocolate keep? This hot chocolate stays good for up to three days in the fridge. Make sure to store it in an airtight container. What’s the best way to thicken the hot chocolate? To thicken it, add more chocolate chips or some cornstarch. Mix cornstarch with a little cold water first, then stir it in. Can I make this recipe in advance? You can! Make it a day ahead, then heat it up when ready to serve. Just stir well before serving. How do I make a smaller batch? To make a smaller batch, cut all ingredients in half. This way, you still enjoy that creamy pumpkin flavor without leftovers. What's the secret to creamy hot chocolate? The key is using a mix of whole milk and heavy cream. The cream adds richness and smoothness. Can I add alcohol for an adult version? Absolutely! Try adding a splash of rum or bourbon. It adds warmth and depth to the drink. This blog post gives you all you need to make great hot chocolate. We covered ingredients, step-by-step instructions, and tips for flavor and consistency. You'll feel ready to create warm drinks for any occasion. Remember to adjust sweetness and try different types of chocolate for fun twists. With proper storage and reheating, you can enjoy your hot chocolate for days. So, grab your crockpot and start mixing. Your perfect cup of cocoa awaits!](https://grilledflavors.com/wp-content/uploads/2025/07/f8778001-f699-4ef9-9666-7ef89e0ccab5.webp)
As winter sets in, nothing warms the soul like a cozy cup of Crockpot Pumpkin Hot Chocolate. This creamy, spiced drink combines pumpkin’s rich flavor and chocolate’s sweet touch, perfect …
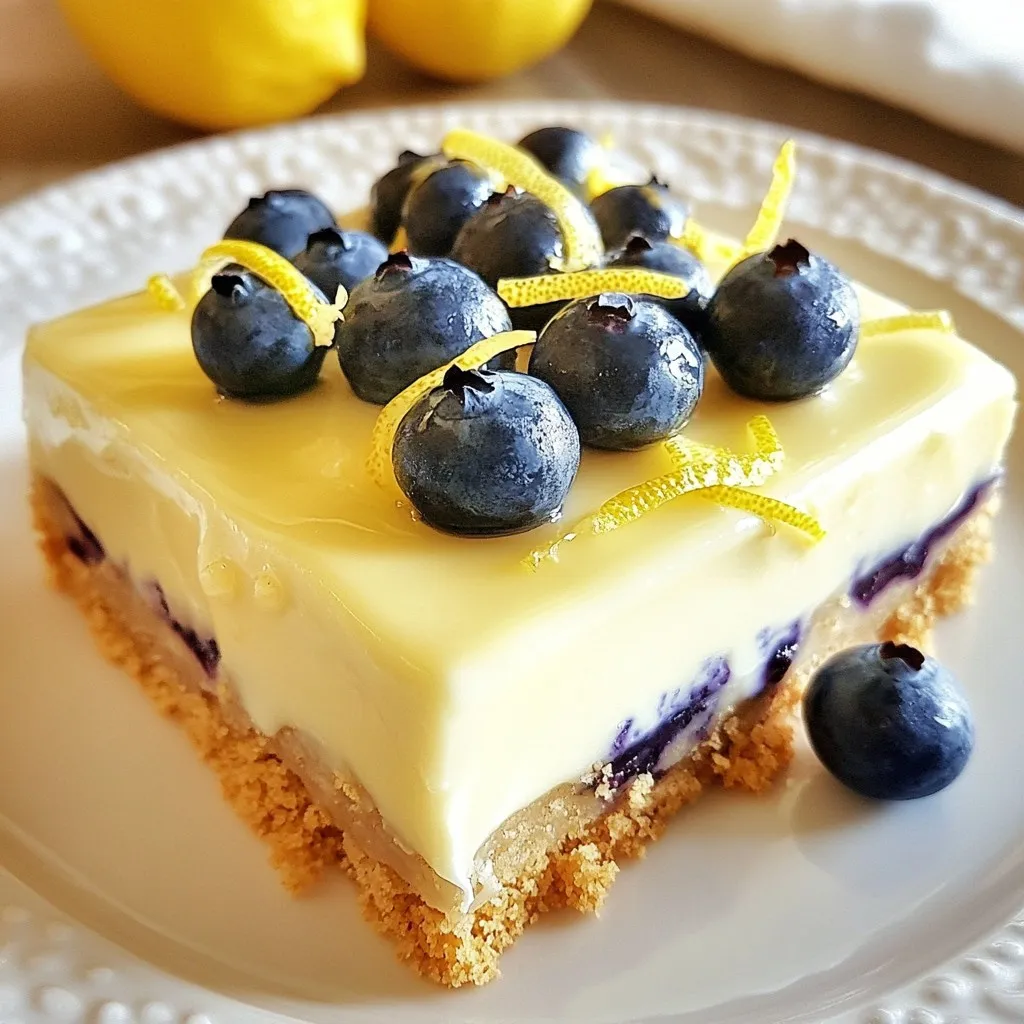
Are you ready to make a dessert that wows everyone? Lemon Blueberry Cheesecake Bars are simple, delicious, and perfect for any occasion. You’ll enjoy a zesty lemon flavor paired with …