Spinach Feta Stuffed Salmon Flavorful and Healthy Dish
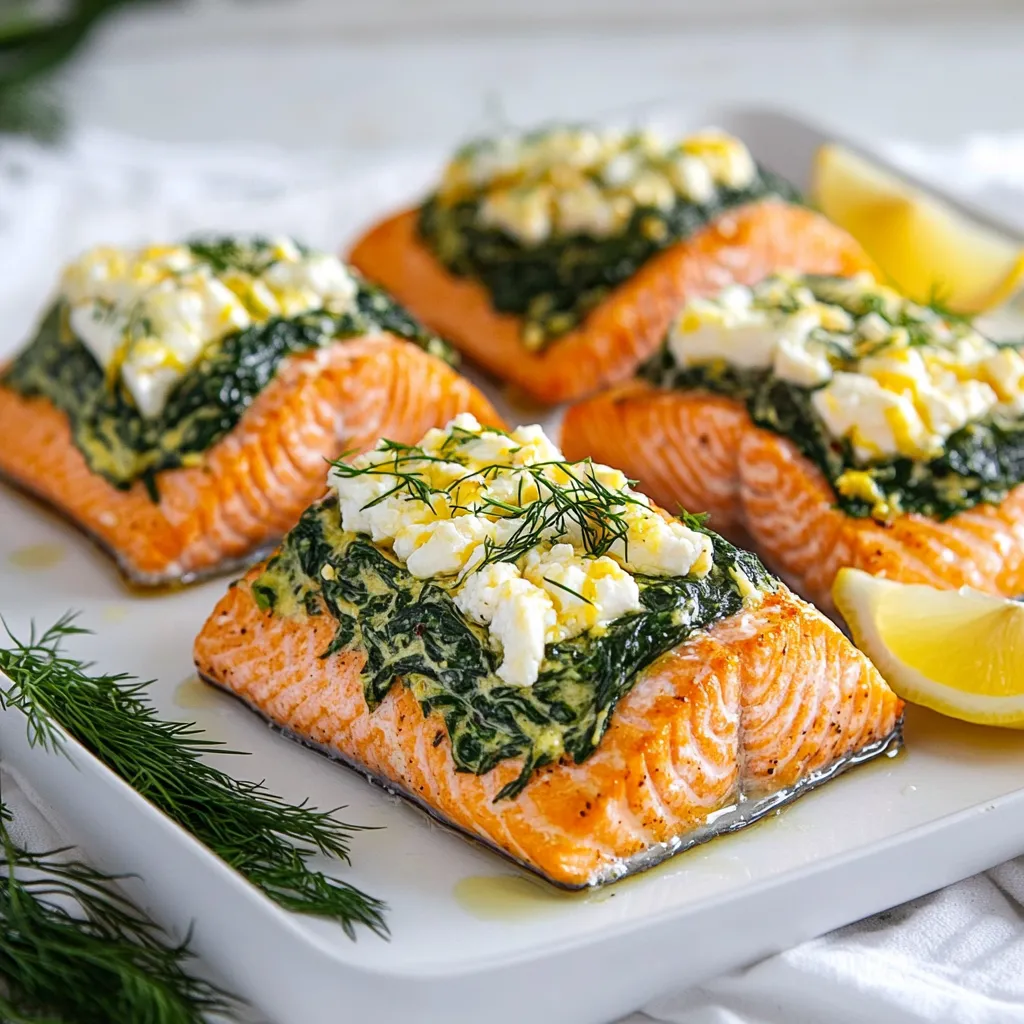
Looking for a dish that’s both tasty and healthy? Spinach Feta Stuffed Salmon is your answer! This recipe combines fresh spinach and creamy feta inside tender salmon fillets. It’s simple …
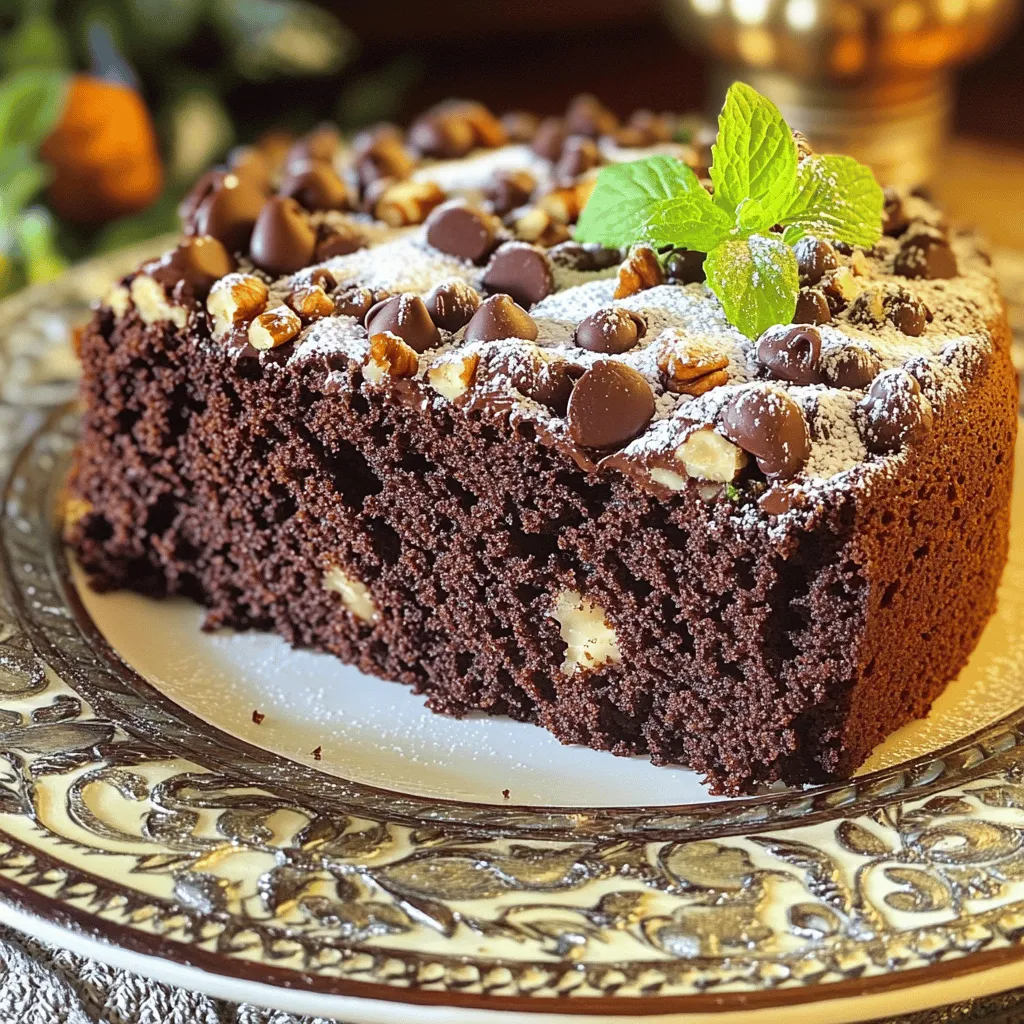
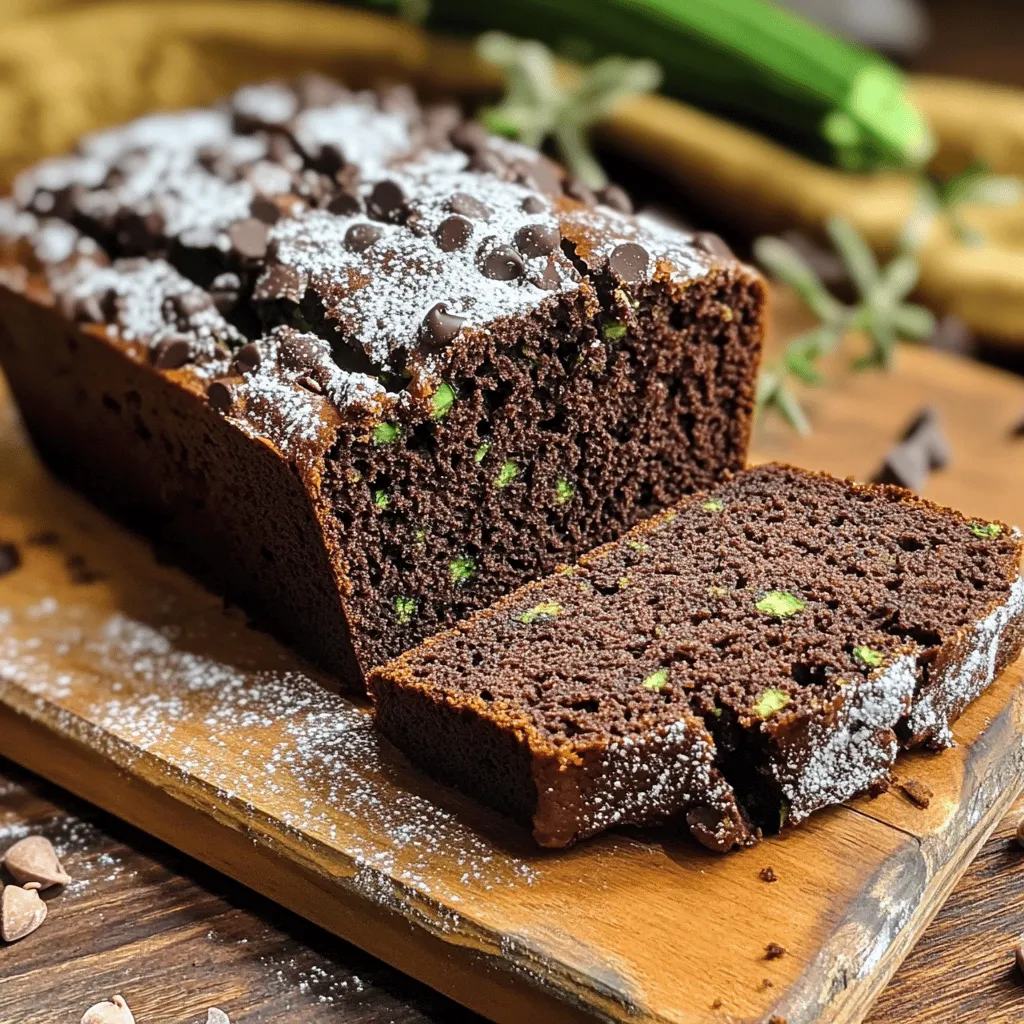
![For a delightful zucchini coffee cake, you'll need the following main ingredients: - 2 cups grated zucchini (about 2 medium zucchinis) - 1 ½ cups all-purpose flour - 1 cup granulated sugar - ½ cup brown sugar, packed These ingredients create a moist and sweet cake that is hard to resist. Grated zucchini adds flavor and keeps the cake tender. You can enhance the cake with these optional items: - ½ cup chopped walnuts or pecans - ½ cup chocolate chips These add-ins give the cake a nice crunch or a touch of sweetness. Choose what you like best! The right spices and leavening agents make your cake rise and taste amazing. You will need: - 1 teaspoon baking soda - ½ teaspoon baking powder - ½ teaspoon salt - 1 teaspoon cinnamon - ½ teaspoon nutmeg (optional) Cinnamon and nutmeg bring warmth and depth to the flavor. Baking soda and powder help the cake rise nicely. For the complete recipe, check out the [Full Recipe]. 1. Preheat the oven to 350°F (175°C). This helps the cake rise evenly. 2. Prepare the zucchini by washing it well. Trim the ends and grate it using a box grater. 3. After grating, place the zucchini in a clean kitchen towel. Squeeze out any extra moisture. This step keeps the cake from being soggy. 1. In a large mixing bowl, combine the dry ingredients. Use a whisk to mix the flour, granulated sugar, brown sugar, baking soda, baking powder, salt, cinnamon, and nutmeg. Make sure everything is well mixed. 2. In another bowl, beat the eggs. Add the vegetable oil and vanilla extract. Whisk until you see a smooth mixture. 3. Pour the wet mixture into the dry ingredients. Stir gently until just combined. Do not overmix! 4. Fold in the grated zucchini. If you want, add chopped nuts or chocolate chips at this stage. 1. Pour the batter into the prepared pan. Spread it evenly across the bottom. 2. Bake for 30-35 minutes. To check for doneness, insert a toothpick into the center. If it comes out clean, the cake is ready. Follow these steps, and you'll have a delicious zucchini coffee cake. For the full recipe, refer to the earlier section. To get the best texture in your zucchini coffee cake, you must remove excess moisture from the zucchini. Grate the zucchini and then wrap it in a clean towel. Squeeze it tight until no more water drips out. This step keeps your cake from being too wet. Using room temperature eggs also helps. When eggs mix well, they create a smoother batter. This gives your cake a nice rise and fluffy texture. If you want a healthier version, try using alternatives to sugar. You can use honey or maple syrup instead. These sweeteners add a unique flavor and keep it moist. Spices can really elevate the taste too. Consider adding a pinch of ginger or a hint of cloves. You can even try vanilla powder for a twist. These flavors will surprise your taste buds! Zucchini coffee cake pairs well with coffee or tea. A dollop of whipped cream adds a nice touch too. You can also serve it with fresh fruit like berries for added color and taste. For storage, keep the cake in an airtight container at room temperature for up to three days. If you want it to last longer, refrigerate it. This helps keep it fresh for up to a week. For longer storage, you can freeze slices. Wrap them well to prevent freezer burn. Enjoy your cake anytime! {{image_2}} You can make this cake fit many diets. For those who avoid gluten, swap all-purpose flour with a gluten-free blend. Look for a mix that includes xanthan gum. This helps the cake rise well. If you want a vegan option, replace eggs with flaxseed meal. Mix one tablespoon of flaxseed with three tablespoons of water. Let it sit for five minutes. For oil, you can use unsweetened applesauce. It keeps the cake moist without added fat. To change the cake's taste, think about adding spices. Ginger and cloves can give a warm twist. Just a pinch can make a big difference. You can also switch up the nuts. Try pecans instead of walnuts for a different crunch. Dried fruits, like raisins or cranberries, add sweetness and chewiness. Mix and match to find your favorite blend. Zucchini coffee cake is great for many occasions. It works as a breakfast treat or a dessert. For brunch, serve slices with fresh fruit. Add a dollop of whipped cream for extra flair. If it's a special day, dust the top with powdered sugar. This makes it look pretty and festive. You can even serve it warm with a scoop of ice cream. Each style gives a new way to enjoy this tasty cake. To keep your zucchini coffee cake fresh, store it at room temperature for up to three days. Make sure to wrap it tightly in plastic wrap or foil. This keeps moisture in and helps prevent it from drying out. If you live in a humid area, it’s best to put it in the fridge. Place it in an airtight container to avoid absorbing other smells. It can last up to a week in the fridge. If you want to keep your zucchini coffee cake longer, freezing is a great option. Wrap slices in plastic wrap, then place them in a freezer bag. This way, you can grab a slice anytime! It will stay good for up to three months in the freezer. When you’re ready to eat it, thaw it overnight in the fridge. For a warm treat, reheat it in the microwave for about 15-20 seconds. You can also use the oven; just wrap it in foil and heat it at 350°F until warm. Zucchini coffee cake stays fresh for about three days at room temperature and a week in the fridge. After that, check for signs it may have gone bad. Look for mold or an off smell. If the cake feels very dry or crumbly, it’s best to toss it. You want to enjoy this delicious treat while it’s still moist and flavorful! For the full recipe, check out the section above. Yes, you can use frozen zucchini. First, thaw the zucchini in the fridge overnight. Once thawed, place it in a clean kitchen towel. Squeeze out as much water as you can. This step helps keep your cake from getting too soggy. After squeezing, measure out two cups for the recipe. This way, you still get that fresh taste in your cake. You can easily swap out some ingredients for allergies. For a nut-free option, skip the walnuts or pecans. You can use sunflower seeds instead. If you need a dairy-free version, try using almond milk or oat milk for moisture. You can also use coconut oil in place of vegetable oil. These swaps keep your cake tasty and safe for everyone. Zucchini coffee cake pairs well with many drinks. A warm cup of coffee is a classic choice. You can also serve it with herbal tea for a lighter touch. If you want something a bit sweeter, try a light dessert wine. These drinks will enhance the flavors of the cake and make your snack time even better. This blog post covered everything you need to know about zucchini coffee cake. We discussed key ingredients, baking steps, and helpful tips. Remember to squeeze out zucchini moisture for the best texture. Explore different variations to suit your taste and dietary needs. Whether as a breakfast treat or dessert, this cake will please everyone. Enjoy your baking adventure and share your delicious results!](https://grilledflavors.com/wp-content/uploads/2025/07/ebfaa264-15f8-488d-8f2e-7ea00957b84c.webp)
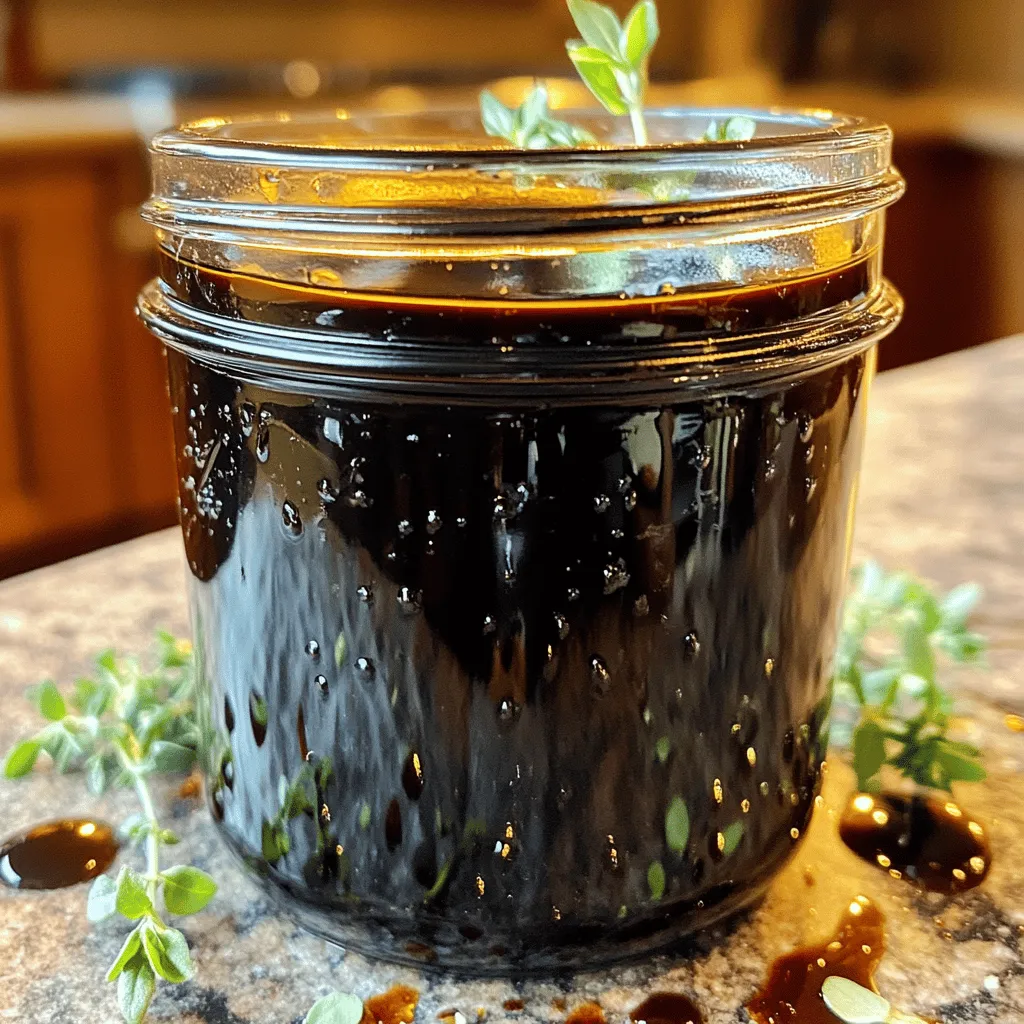
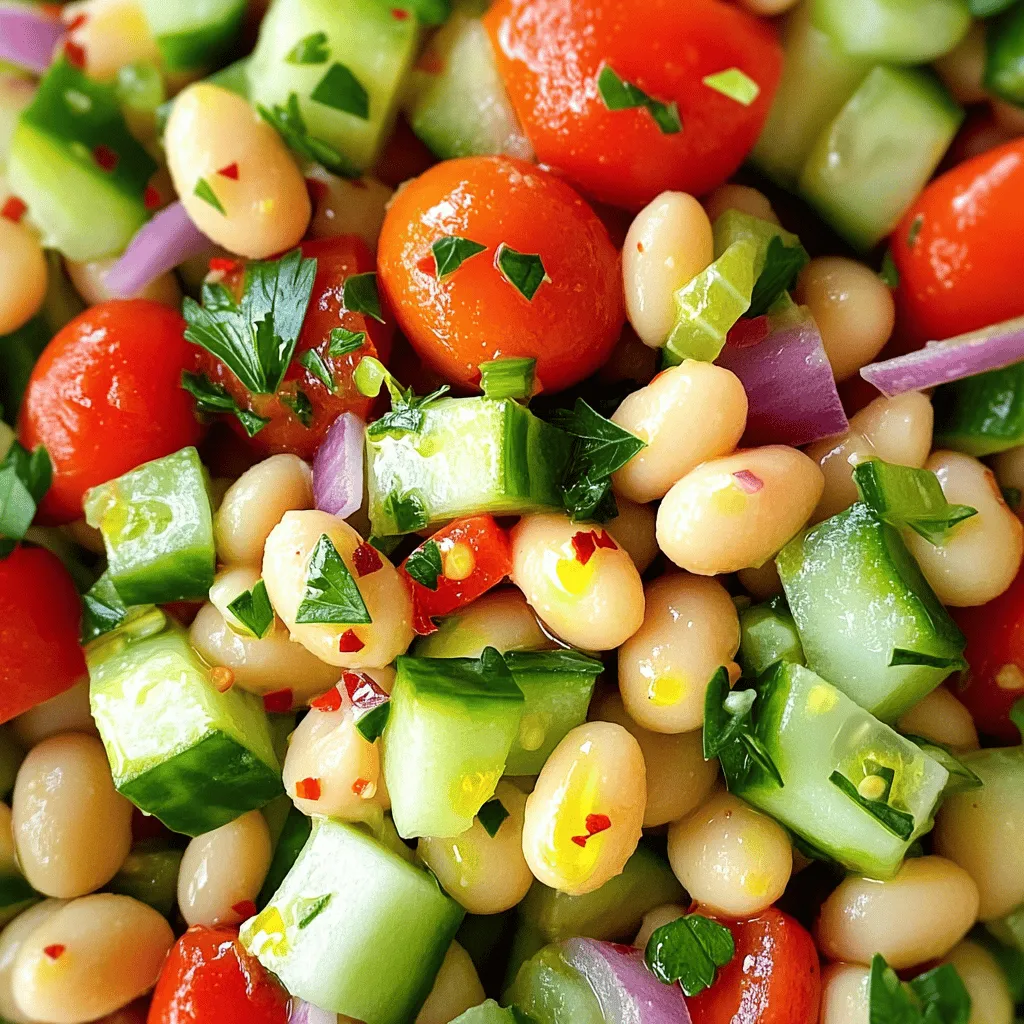
![- 1/2 cup balsamic vinegar - 1/4 cup extra virgin olive oil - 1 tablespoon Dijon mustard These three ingredients form the base of your vinaigrette. Balsamic vinegar brings a rich, tangy flavor. Extra virgin olive oil adds smoothness. Dijon mustard gives it a nice kick and helps blend the oils. - 1 tablespoon honey or maple syrup - 1 clove garlic, minced - 1 teaspoon dried oregano - Salt and black pepper to taste Feel free to adjust the flavor! Honey or maple syrup adds sweetness. Garlic gives a bold taste. Dried oregano adds a hint of earthiness. You can also add fresh herbs like basil or thyme if you wish. - About 80 calories per serving - Fats: 9g, Carbs: 2g, Protein: 0g This vinaigrette is low in calories but full of flavor. Olive oil is a source of healthy fats. Balsamic vinegar contains antioxidants, which are good for your body. Each ingredient offers health benefits while keeping your meals tasty. For the full recipe, check [Full Recipe]. First, I start by whisking the balsamic base. In a medium bowl, I combine 1/2 cup balsamic vinegar, 1 tablespoon Dijon mustard, and 1 tablespoon honey or maple syrup. I mix this well until it is smooth. This step is key. The vinegar and mustard give a nice tang, while the honey adds a touch of sweetness. Next, I emulsify with olive oil. I slowly pour in 1/4 cup extra virgin olive oil while whisking constantly. This helps to blend everything together. The oil makes the vinaigrette rich and smooth. Keep whisking until it looks glossy and thick. Now, I mix in garlic and herbs. I add 1 clove minced garlic and 1 teaspoon dried oregano. These ingredients bring a burst of flavor. I then season with salt and black pepper to taste. This is where you can adjust the taste for your liking. To balance sweetness and acidity, I suggest tasting the vinaigrette. If it is too tangy, add a bit more honey or maple syrup. If it's too sweet, a splash of vinegar can help. This is all about finding your perfect mix. You can personalize the taste with spices. Want a bit of heat? Try adding black pepper or a dash of chili flakes. For a fresh twist, you can add a bit of lemon juice or fresh herbs, like thyme or basil. For storage, I recommend using a jar with a tight-fitting lid. Transfer the vinaigrette to the jar and shake it well before each use. This keeps it fresh and well-mixed. When it comes to serving, drizzle this vinaigrette over fresh salads or roasted vegetables. It works great as a marinade for grilled chicken, too. If you want to impress, serve it in a small glass jar with a ribbon. This makes it a charming gift for friends or family. For the best taste, always store your healthy balsamic vinaigrette in the refrigerator. This keeps it fresh and tasty. I like to use a jar with a tight lid. It helps keep the flavors sealed in. How long does homemade vinaigrette last? Homemade vinaigrette can last about one week in the fridge. After that, it may lose flavor and freshness. Always check for any changes in smell or color before using. If you're looking to cut calories, consider using less olive oil. You can use water instead to reduce fat. Another option is to swap honey for a low-calorie sweetener, like stevia. Gluten-free options for a healthier dressing: Most ingredients in this vinaigrette are gluten-free. Just ensure your Dijon mustard is gluten-free as well. This makes the dressing suitable for anyone avoiding gluten. This vinaigrette pairs perfectly with fresh salads. Drizzle it over greens for a burst of flavor. You can also use it on roasted vegetables for a tasty side dish. Creative uses beyond salads: Try using this vinaigrette as a marinade for grilled chicken or fish. It adds great flavor. You can also use it as a dip for fresh veggies or bread. Let your creativity flow with this versatile dressing! {{image_2}} You can easily make a vegan balsamic vinaigrette. Simply swap honey with maple syrup. This keeps the sweetness while staying plant-based. You can also use agave syrup as a vegan option. For flavor, try adding a bit of mustard or a splash of soy sauce. These enhance the taste without using animal products. This way, you get a tasty dressing that fits your diet. Herbs can really boost the flavor of your vinaigrette. Fresh herbs like basil, parsley, or dill add a nice touch. Simply chop them finely and mix them in. You can also try regional herbs. For example, tarragon gives a French flair, while cilantro adds a twist of Latin flavor. Experimenting with different herbs can surprise your taste buds. If you want a creamy version, mix in yogurt or mashed avocado. This creates a rich texture that works well with salads. You can also add a kick with chili flakes or a dash of sriracha. This spicy twist is great for those who enjoy heat. Each of these variations offers a fun way to enjoy your healthy balsamic vinaigrette. For the full recipe, check the earlier section above. For storing your healthy balsamic vinaigrette, choose jars that seal tightly. Glass jars work best. They keep flavors fresh and do not hold smells. Dark glass jars offer added protection from light. This helps preserve the quality of the vinaigrette. Plastic containers can work too, but they can absorb odors over time. After storing, your vinaigrette may separate. This is normal. To refresh it, simply shake the jar. If it still looks separated, use a whisk to blend it again. Always check for freshness before using. If it smells off or has changed color, it’s best to toss it out. Making a double batch of vinaigrette saves time. You can keep it for up to two weeks in the fridge. Use leftover vinaigrette in many ways. Drizzle it over roasted veggies, or use it as a marinade for chicken. It can also be a tasty dip for bread. This recipe is simple, tasty, and perfect for various dishes. For the full recipe, check out the details above. Making healthy balsamic vinaigrette is easy and quick. Here’s how: 1. Gather your ingredients: You need balsamic vinegar, olive oil, Dijon mustard, honey or maple syrup, minced garlic, dried oregano, salt, and pepper. 2. Mix the base: In a medium bowl, whisk together 1/2 cup of balsamic vinegar, 1 tablespoon of Dijon mustard, and 1 tablespoon of honey or maple syrup. 3. Add the oil: Gradually pour in 1/4 cup of extra virgin olive oil while whisking. This helps blend the ingredients. 4. Incorporate flavors: Stir in 1 clove of minced garlic and 1 teaspoon of dried oregano. 5. Season: Add salt and black pepper to taste. Adjust sweetness or acidity as needed. 6. Store: Pour the vinaigrette into a jar with a tight lid. Shake well before each use. This simple method gives you a fresh and tasty dressing in just 10 minutes. For the full recipe, check out the section above. Homemade vinaigrette has many perks: - Healthier ingredient control: You pick what goes in, so you avoid unwanted additives and preservatives. This means you can enjoy a clean and tasty dressing. - Cost-effective compared to store-bought options: Making your own vinaigrette is often cheaper than buying it. Plus, you can make larger batches and save. Yes, you can freeze it! Here’s how: - Freezing: Pour the vinaigrette into ice cube trays or freezer-safe containers. Leave some space for expansion. - Thawing: When ready to use, move the vinaigrette to the fridge overnight. - Effects on flavor and texture: Freezing may change the texture a bit, but the flavor will still be good. Just shake or stir well before using. Making your own balsamic vinaigrette is simple and rewarding. You learned about key ingredients, customizations, and nutrition. I shared step-by-step instructions for easy preparation. We discussed tips for storage and creative uses. Lastly, I explored various flavors and options that suit your needs. Homemade vinaigrette is a healthy choice. It enhances your dishes while giving you control over ingredients. Enjoy experimenting and crafting your perfect mix!](https://grilledflavors.com/wp-content/uploads/2025/07/be93c1b3-89ef-44cc-8ef9-56bd36a2a054.webp)

. How long should I let the pickles ferment? You should let the pickles ferment for 1 to 2 days at room temperature. This time allows the flavors to develop. After that, move the jars to the fridge. The pickles will taste better if you let them sit for a week or more. Can I reuse the pickling brine? Yes, you can reuse the pickling brine once. Just make sure you strain it well. The second batch may not taste as strong, but it can still work well. What types of cucumbers are best for pickling? Pickling cucumbers are the best choice. They are small, crisp, and have fewer seeds. Varieties like Kirby or Persian cucumbers work great too. How to tell if pickles have spoiled? Look for any off smells or changes in color. If you see mold or bubbles, it’s best to throw them away. Fresh pickles should smell tangy and fresh. Can I can these pickles for longer shelf life? Yes, you can can pickles for longer storage. Just use a water bath canning method. This will help keep them safe to eat for months. For the full recipe, check out the Crunchy Dill Pickles recipe. You can find more ideas for pickling and adding flavor to your meals. You’ve learned the essentials of pickle-making, focusing on ingredients, preparation, and fermentation. Remember to choose fresh cucumbers and the right brine mix for tasty results. Avoid overcrowding jars to ensure a good seal and flavor. Don't be afraid to experiment with different spices for unique flavors. With proper storage, your homemade pickles can last and delight for months. Enjoy the fun of pickling and savoring your crunchy creations!](https://grilledflavors.com/wp-content/uploads/2025/07/9953803f-2adc-4302-af6d-9b7b7cb9f863.webp)