Southwest Chipotle Pasta Salad Fresh and Flavorful Dish
![To make your Southwest Chipotle Pasta Salad, gather these ingredients: - 8 oz elbow macaroni - 1 can (15 oz) black beans, rinsed and drained - 1 cup corn kernels (fresh, frozen, or canned) - 1 red bell pepper, diced - 1 green onion, chopped - 1/2 cup cherry tomatoes, halved - 1/4 cup cilantro, chopped - 1/2 cup mayonnaise - 2 tablespoons sour cream - 1 tablespoon chipotle in adobo sauce (or adjust for spice preference) - 1 tablespoon lime juice - 1 teaspoon garlic powder - 1 teaspoon cumin - Salt and pepper to taste You can switch some ingredients if needed. Here are a few ideas: - Use whole wheat macaroni for a healthier pasta choice. - Swap black beans with kidney beans or chickpeas for a twist. - Try fresh corn off the cob instead of canned for better taste. - Replace mayonnaise with Greek yogurt for a lighter dressing. - Add fresh herbs like parsley if you don’t have cilantro. Choosing the best ingredients makes a big difference. Here are my tips: - Pick pasta that is made from durum wheat for a firmer bite. - Use fresh vegetables when possible. They add vibrant colors and flavors. - Buy high-quality canned beans. Look for low-sodium options. - Fresh lime juice is better than bottled for brightness. - Choose ripe cherry tomatoes for sweetness. They enhance the salad’s flavor. This dish is not just tasty; it’s a feast for the eyes too. You can find the Full Recipe above to guide you through making this vibrant salad. Start by boiling water in a large pot. Add salt to the water for flavor. Once the water boils, add 8 oz of elbow macaroni. Cook for about 8-10 minutes until it is al dente. You want it to be firm but not hard. Drain the pasta and rinse it under cold water. This cools it down and stops the cooking. Set the macaroni aside to dry. In a large bowl, combine the cooled macaroni with the other ingredients. Add 1 can of black beans, rinsed and drained. Then, toss in 1 cup of corn kernels, 1 diced red bell pepper, and 1 chopped green onion. Next, mix in 1/2 cup of halved cherry tomatoes and 1/4 cup of chopped cilantro. Gently stir everything to mix well. In a separate bowl, make the dressing. Whisk together 1/2 cup of mayonnaise and 2 tablespoons of sour cream. Add 1 tablespoon of chipotle in adobo sauce for spice. Then, mix in 1 tablespoon of lime juice, 1 teaspoon of garlic powder, and 1 teaspoon of cumin. Finally, season with salt and pepper to taste. Pour this dressing over the pasta salad mixture. Toss gently until everything is well coated. For the full recipe, check out the detailed steps above. Enjoy your delicious Southwest Chipotle Pasta Salad! Store your Southwest Chipotle Pasta Salad in an airtight container. This keeps it fresh longer. I recommend eating leftovers within three days. If you notice extra liquid, drain it before serving. You can also add fresh ingredients to revive the taste. You can make this pasta salad a day in advance. It allows the flavors to blend well. Just keep the dressing separate until you are ready to serve. This way, the pasta stays firm and does not get mushy. Mixing in the dressing just before serving keeps everything fresh. Not everyone loves spice the same way. Start with one tablespoon of chipotle in adobo sauce. Taste the salad before adding more. If you want more heat, add extra sauce or diced jalapeños. For a milder version, skip the chipotle altogether or use a mild sauce. Adjusting spice levels makes this dish perfect for everyone. For the full recipe, check out the [Full Recipe]. {{image_2}} You can boost the protein in your Southwest Chipotle Pasta Salad easily. Consider adding grilled chicken or shrimp. These add a nice texture and flavor. You might also try diced tofu or tempeh for a plant-based option. They soak up the dressing well, adding depth to your dish. For a quick fix, canned tuna or salmon works great too. Just drain and toss it in! If you want a vegetarian or vegan salad, swap out the mayo and sour cream. Use a vegan mayo instead. It gives the same creamy texture without the dairy. You can also add avocado for richness and healthy fats. It adds a lovely green color, making your salad look fresh. For extra flavor, try adding nuts or seeds. They add crunch and protein, making the salad more filling. You can play with the flavors in this salad. Try adding diced jalapeños for extra heat. A sprinkle of smoked paprika can deepen the smoky taste. If you like tang, squeeze in more lime juice or add some vinegar. Fresh herbs like parsley or dill can brighten the dish. You can even add a small amount of honey or agave for a sweet twist. These changes can make this salad your own! For the full recipe, check the link above. To keep your Southwest Chipotle Pasta Salad fresh, store it in an airtight container. This helps to keep moisture in and air out. Make sure the salad is fully cooled before sealing it. This prevents condensation, which can make the salad soggy. It will stay fresh in the fridge for about three to five days. I recommend not freezing this pasta salad. Freezing can change the texture of the pasta and vegetables. If you freeze it, the salad may become mushy when thawed. However, if you have extra dressing, you can freeze that. Just store it in a small container. It will keep well for up to three months. When you're ready to eat leftovers, check the texture. If it seems dry, add a splash of lime juice or a bit of dressing. Stir gently to mix it in. You can also toss in fresh veggies for crunch. This will brighten up the flavors and make it taste fresh again. You can swap the mayonnaise for Greek yogurt. This change cuts fat and adds protein. Use whole wheat pasta instead of regular for more fiber. Adding more veggies also boosts nutrition. Try adding spinach, kale, or zucchini. You can also reduce the amount of chipotle for less heat. This makes the dish friendlier for kids. Yes! You can use any pasta shape you like. Rotini or penne works well. They hold the dressing nicely. You can even try gluten-free pasta if needed. Just cook it according to package directions. Remember, cooking time may vary based on the shape you choose. This salad pairs well with grilled chicken or shrimp. You can also serve it with tacos or quesadillas for a fun meal. For a lighter option, serve it with a green salad. You can add avocado or guacamole on the side. This adds creaminess and flavor to your plate. This blog post covered all you need for a great Southwest Chipotle Pasta Salad. We explored the best ingredients, like quality pasta and yummy dressings. You learned about cooking pasta, mixing ingredients, and making tasty dressings. I shared tips to store leftovers and options for protein or vegetarian styles. To sum up, this salad is fun to make and offers many twists. Enjoy creating your version!](https://grilledflavors.com/wp-content/uploads/2025/07/1c1efac1-d237-46d8-afc1-1301d2443596.webp)
Are you ready to spice up your meals? The Southwest Chipotle Pasta Salad is a fresh and flavorful dish that brings vibrant flavors right to your table. Packed with colorful …
Are you ready to spice up your meals? The Southwest Chipotle Pasta Salad is a fresh and flavorful dish that brings vibrant flavors right to your table. Packed with colorful …

Craving a sweet treat that’s also a bit healthy? Look no further! My Moist Zucchini Chocolate Muffins blend rich chocolate flavor with the goodness of fresh zucchini. These muffins are …
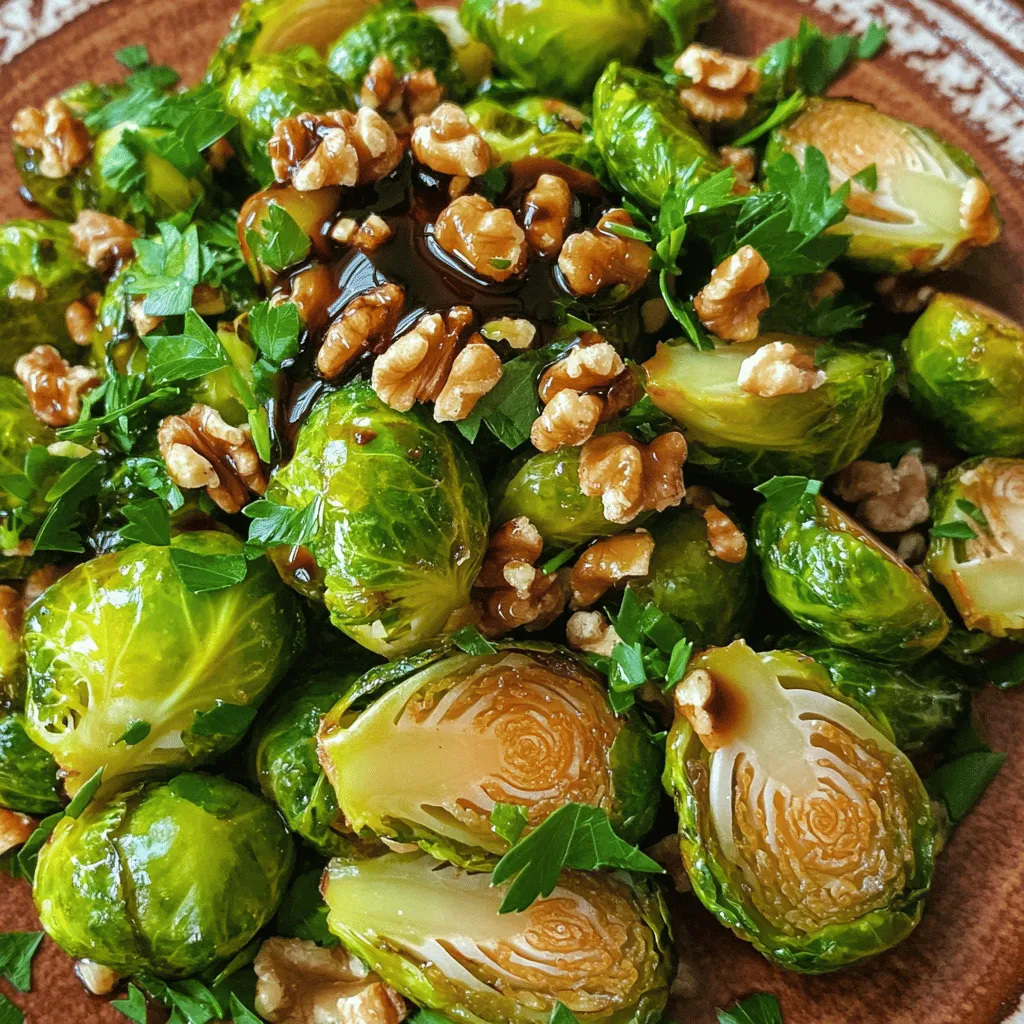
Looking for a simple yet delicious side dish? Try my Brussels Sprouts with Balsamic Honey recipe! This tasty roast combines sweet and tangy flavors that elevate any meal. With just …

If you love chocolate but want to eat healthier, these Healthy Chocolate Brownies with Zucchini are for you! I’ll show you how to mix rich chocolate flavor with sneaky veggies. …
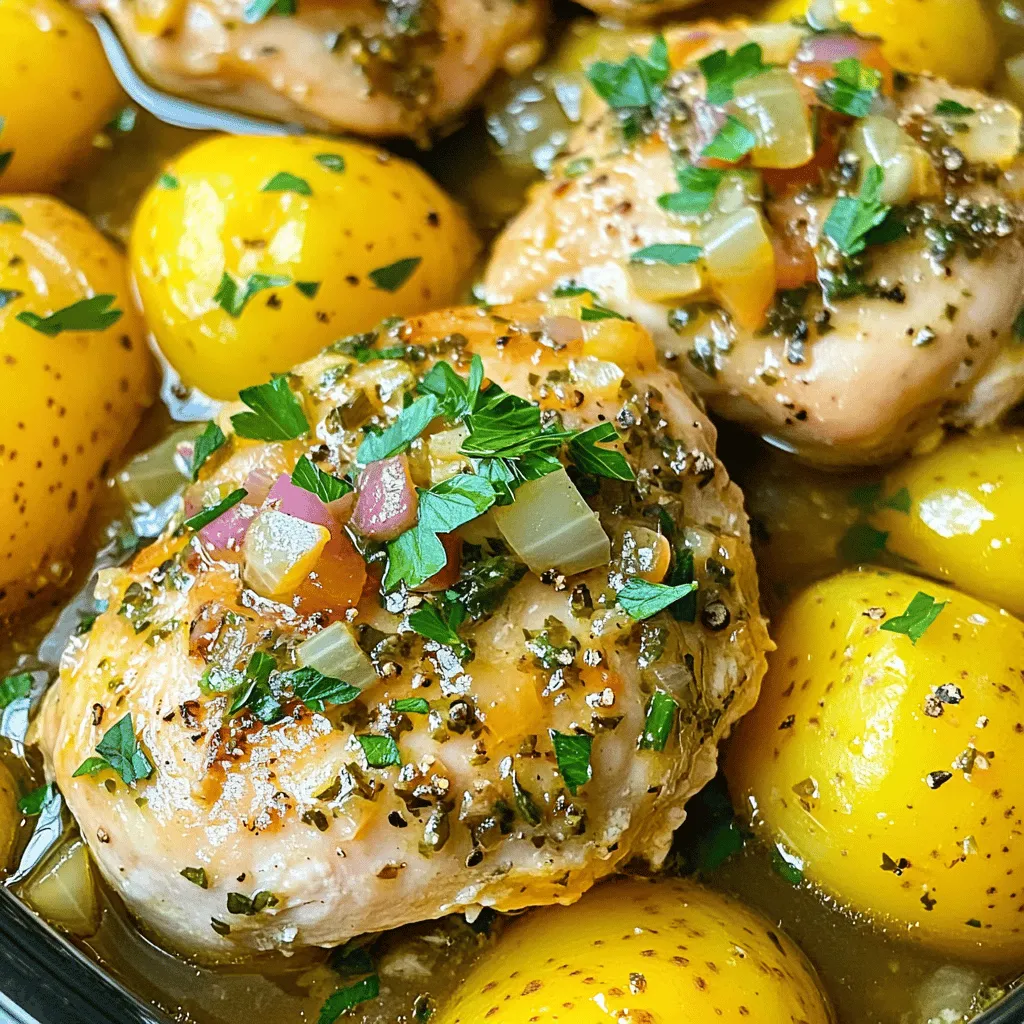
Get ready to fill your kitchen with the warm, savory scent of my Crockpot Garlic Herb Chicken & Potatoes Delight! This easy recipe combines tender chicken with perfectly cooked potatoes, …
![To make the best Tasty Lemon Coconut Zucchini Cake, you need fresh, quality ingredients. Each one plays a key role in the flavor and texture. Here’s what you will need: - 1 medium zucchini, grated (about 1 cup) - 1 cup all-purpose flour - 1/2 cup shredded unsweetened coconut - 1/2 cup granulated sugar - 1/4 cup brown sugar - 1/2 cup unsalted butter, softened - 2 large eggs - 1/4 cup freshly squeezed lemon juice - Zest of 1 lemon - 1 teaspoon baking powder - 1/2 teaspoon baking soda - 1/4 teaspoon salt - 1 teaspoon vanilla extract These ingredients create a moist cake, bursting with lemon and coconut flavors. The zucchini adds moisture and nutrients without altering the taste. You can make this cake even better with a few add-ins. Here are some tasty options: - 1/2 cup chopped walnuts or pecans for added crunch - 1/2 teaspoon almond extract for extra depth - 1/4 cup dried cranberries or raisins for a sweet twist Feel free to mix and match these extras. They can elevate the cake's flavor and texture. If you don't have an ingredient, don't worry. Here are some easy swaps: - Swap all-purpose flour for whole wheat flour for extra fiber. - Use coconut oil instead of unsalted butter for a vegan option. - Replace granulated sugar with honey or maple syrup for natural sweetness. These substitutions can change the taste slightly, but they still work great in this recipe! Gather all your ingredients before you start. This makes your work easier and faster. For this recipe, you need: - 1 medium zucchini, grated (about 1 cup) - 1 cup all-purpose flour - 1/2 cup shredded unsweetened coconut - 1/2 cup granulated sugar - 1/4 cup brown sugar - 1/2 cup unsalted butter, softened - 2 large eggs - 1/4 cup freshly squeezed lemon juice - Zest of 1 lemon - 1 teaspoon baking powder - 1/2 teaspoon baking soda - 1/4 teaspoon salt - 1 teaspoon vanilla extract - Optional: 1/2 cup chopped walnuts or pecans Make sure your zucchini is fresh and firm. Grate it finely for even mixing. Softened butter helps combine better with sugar. Also, squeeze fresh lemon juice for the best flavor. Start by creaming the softened butter with both sugars in a large bowl. Mix until light and fluffy. This step is key for a soft cake. Next, add eggs one at a time. Mix well after each addition. Then, stir in the lemon juice, zest, and vanilla extract. In a separate bowl, mix the dry ingredients: flour, coconut, baking powder, baking soda, and salt. Stir them well to combine. Gradually add the dry mix to the wet mixture. Mix just until combined to avoid a tough cake. Now, gently fold in the grated zucchini and nuts, if using. This adds moisture and flavor to your cake. Be careful not to over-mix. The batter should be thick but smooth. Pour the batter into a prepared loaf pan. Smooth the top with a spatula for even baking. Bake in a preheated oven at 350°F (175°C) for 45-55 minutes. Check for doneness by inserting a toothpick in the center. It should come out clean. Once baked, remove the cake from the oven. Let it cool in the pan for about 10 minutes. Then, transfer it to a wire rack to cool completely. This helps keep the cake moist and fluffy. For more details, refer to the Full Recipe. To boost the lemon and coconut in your cake, use fresh ingredients. Fresh lemon juice and zest give the cake a bright flavor. For coconut, shredded unsweetened coconut works best. If you want more coconut taste, try adding coconut extract. A pinch of salt can also bring out these flavors. It balances the sweetness and enhances the overall taste. Avoid these common mistakes to ensure success. First, don’t skip grating the zucchini. This keeps the cake moist. Second, don’t over-mix the batter. Mixing too much can make the cake dense. Third, always measure your flour correctly. Too much flour can lead to a dry cake. Lastly, make sure your oven is at the right temperature. Baking at the wrong temp can ruin the cake. To make your cake moist, follow these simple tips. Use room temperature ingredients, like butter and eggs. They mix better and help the cake rise. Adding the zucchini is also key. It adds moisture and keeps the cake soft. Don't leave the cake in the oven too long. Check it a few minutes early. A toothpick should come out clean, but not dry. For an extra touch, brush the cooled cake with lemon syrup. This adds flavor and keeps it moist. For the full recipe, check out the [Full Recipe]. {{image_2}} If you want a gluten-free cake, use almond flour instead of all-purpose flour. Almond flour gives the cake a nice, nutty taste. You can also use gluten-free all-purpose flour blends. Be sure they have xanthan gum to help with texture. Follow the same steps from the Full Recipe to bake your cake. It will be just as tasty! You can make this cake even better by adding nuts or fruits. Try walnuts or pecans for a crunchy bite. You can chop them and fold them into the batter. If you like fruits, add blueberries or raspberries. They will add a sweet and tangy flavor. Just make sure to adjust the sugar if you add more fruits. To make a vegan version, swap eggs for flax eggs. Mix 1 tablespoon of ground flaxseed with 2.5 tablespoons of water for each egg. Let it sit for a few minutes until it thickens. Replace butter with coconut oil or a vegan butter. Use plant-based milk to replace the dairy ingredients. This way, you can enjoy a delicious vegan Tasty Lemon Coconut Zucchini Cake! Store leftover Tasty Lemon Coconut Zucchini Cake in an airtight container. This keeps it fresh and moist. You can leave it at room temperature for about two days. If you want to keep it longer, place it in the fridge. Make sure to wrap it well in plastic wrap or foil to avoid drying out. To freeze the cake, first let it cool completely. Then, slice it into pieces for easy serving. Wrap each slice tightly in plastic wrap. Place the wrapped slices in a freezer-safe bag. This way, you can enjoy a slice whenever you crave it. The cake can last in the freezer for up to three months. When you're ready to eat, simply thaw it in the fridge overnight. To reheat your cake, preheat the oven to 350°F (175°C). Place the slices on a baking sheet. Heat them for about 10-15 minutes. This warms the cake without drying it out. You can also microwave a slice for about 15-20 seconds. Just be careful not to overheat it. Enjoy it warm for a delightful treat! For the complete process, check out the Full Recipe. Yes, you can use other squash. Yellow squash works well. It has a similar texture and flavor. You can also try butternut squash for a sweeter taste. Just make sure to grate it well. This keeps the cake moist and tasty. Check the cake with a toothpick. Insert it into the center of the cake. If it comes out clean, your cake is ready. You can also gently press the top. It should spring back if it’s done. The edges may pull away from the pan too. This cake pairs well with many things. A scoop of vanilla ice cream adds a creamy touch. Fresh berries can add a nice, tart contrast. You could also serve it with whipped cream for extra sweetness. For a light drink, try iced tea or lemonade. Check out the Full Recipe for more serving ideas. This blog post covered key ingredients, baking steps, and helpful tips for Tasty Lemon Coconut Zucchini Cake. You learned how to enhance flavors and avoid common mistakes. We explored gluten-free and vegan options for all to enjoy. Proper storage keeps your cake fresh, while our FAQs answered your pressing questions. Baking can be fun and rewarding. With these tips, you can enjoy a delicious cake time and again.](https://grilledflavors.com/wp-content/uploads/2025/07/1c31e323-469d-4dd4-b0f3-37aa4ea13188.webp)
Are you ready to bake something truly delicious? This Tasty Lemon Coconut Zucchini Cake is a unique twist on a classic treat. With fresh zucchini, tangy lemon, and sweet coconut, …
![Gather these items for your One Pan Balsamic Chicken and Asparagus: - 4 boneless, skinless chicken breasts - 1 bunch of fresh asparagus, trimmed - 1/4 cup balsamic vinegar - 2 tablespoons honey - 2 tablespoons olive oil - 4 cloves garlic, minced - 1 teaspoon dried oregano - Salt and pepper to taste - Fresh basil leaves for garnish (optional) Using fresh ingredients is key in this dish. Fresh chicken makes it juicy and tender. Fresh asparagus adds a nice crunch and bright color. The balsamic vinegar should smell strong and sweet. Fresh garlic gives a bold, rich flavor. Each fresh item enhances the meal's taste and appeal. You can swap some ingredients if needed. Try chicken thighs instead of breasts for more flavor. If you can't find fresh asparagus, use green beans or broccoli. Maple syrup can replace honey for a different sweetness. For a vegan option, use tofu and a plant-based honey substitute. Feel free to mix and match! Start by making the marinade. In a bowl, mix the balsamic vinegar, honey, olive oil, minced garlic, dried oregano, salt, and pepper. Whisk it all together until it blends well. This marinade gives the chicken a rich, tangy flavor. You can taste it to see if it needs more salt or sweetness. Now, you need to marinate the chicken. Place the chicken breasts in a large baking dish. Pour the marinade over the chicken, making sure each piece gets coated. This step is key for flavor! Let it sit for at least 15 minutes. If you have more time, you can marinate it longer in the fridge for even more taste. When you're ready, preheat your oven to 400°F (200°C). While the oven heats, arrange the trimmed asparagus around the chicken in the same dish. Drizzle any leftover marinade over the asparagus. Bake everything for 20-25 minutes. Check that the chicken reaches an internal temperature of 165°F (75°C). The asparagus should be tender yet still bright. Once done, let it rest for 5 minutes, then serve warm. Enjoy your One Pan Balsamic Chicken and Asparagus! For complete details, refer to the Full Recipe. To keep your chicken juicy, start with fresh, high-quality chicken breasts. Marinate them well in the balsamic mixture. This adds flavor and moisture. Bake the chicken at 400°F (200°C) for 20 to 25 minutes. Use a meat thermometer to check for 165°F (75°C) inside. Let the chicken rest for five minutes after baking. This helps the juices redistribute, making it tender. For perfect asparagus, choose firm, bright green stalks. Trim the ends to remove the tough parts. When you bake it, place it around the chicken, so it cooks evenly. It should be tender but still crisp. Avoid overcooking, or it will become mushy. You want that nice snap when you bite into it. Serve the chicken and asparagus right from the pan for a rustic look. A sprinkle of fresh basil adds color and flavor. Pair this dish with rice or crusty bread to soak up the sauce. You can also serve it with a light salad for a complete meal. This recipe is great for family dinners or easy weeknight meals. Enjoy the vibrant flavors and simple prep! For more details, check out the Full Recipe. {{image_2}} You can add more veggies to this dish. Carrots, bell peppers, or zucchini work well. Just chop them into bite-sized pieces. Add them to the baking dish with the chicken and asparagus. This makes your meal colorful and packed with nutrients. You can also try adding cherry tomatoes for a burst of flavor. If you want to switch proteins, try using salmon or shrimp. Both cook quickly and absorb the balsamic flavor. If using salmon, adjust the cooking time to about 15-20 minutes. For shrimp, just 10-12 minutes is enough. You can also use tofu for a vegetarian option. Make sure to press it to remove extra water before marinating. To boost the flavor, think about adding fresh herbs. Thyme or rosemary can bring a nice touch. You can also sprinkle some red pepper flakes for heat. For a sweet twist, add sliced strawberries or peaches during baking. These fruits caramelize and add a lovely flavor contrast. Check the [Full Recipe] for more tips on making this dish your own. Store any leftover balsamic chicken and asparagus in an airtight container. Allow the dish to cool to room temperature first. This helps keep the flavors fresh. You can store it in the fridge for up to three days. Be sure to keep the chicken and asparagus together for the best taste. When it's time to eat your leftovers, reheat them in the oven. Preheat your oven to 350°F (175°C). Place the chicken and asparagus in an oven-safe dish. Cover with foil to keep moisture in. Heat for about 15-20 minutes or until warmed through. You can also use a microwave if you're in a hurry. Just cover the dish to prevent drying out. If you want to save your dish for later, freezing is a good option. First, let the chicken and asparagus cool completely. Then, place them in a freezer-safe bag or container. Squeeze out as much air as possible to avoid freezer burn. You can freeze it for up to three months. When ready to eat, thaw in the fridge overnight and reheat as mentioned above. For the detailed cooking process, check out the Full Recipe. Yes, you can use other types of vinegar. Red wine vinegar or apple cider vinegar work well. Each option brings its own taste. Experiment with what you have at home for a unique flavor. The chicken is done when it reaches an internal temperature of 165°F (75°C). You can check this with a meat thermometer. The juices should run clear, not pink. Cut into the thickest part to be sure. Yes, you can prep this dish a day in advance. Marinate the chicken and store it in the fridge. Cook the chicken and asparagus right before serving. This keeps them fresh and tasty. For the full recipe, check the earlier sections. This post shared a simple chicken recipe with fresh ingredients. We covered how to prepare, marinate, and bake the dish. I offered tips for juicy chicken and perfect asparagus. We looked at variations, storage tips, and answered common questions. Cooking at home can be fun and rewarding. Use these steps to create a tasty meal. Fresh ingredients make a big difference! Enjoy trying new flavors and techniques. Your kitchen can be a place of joy and creativity.](https://grilledflavors.com/wp-content/uploads/2025/07/3c9422d3-8c69-47e8-b6ff-645f8e43a1c6.webp)
Are you ready to impress your family with an easy and tasty meal? This One Pan Balsamic Chicken and Asparagus recipe is packed with flavor and takes just one pan …
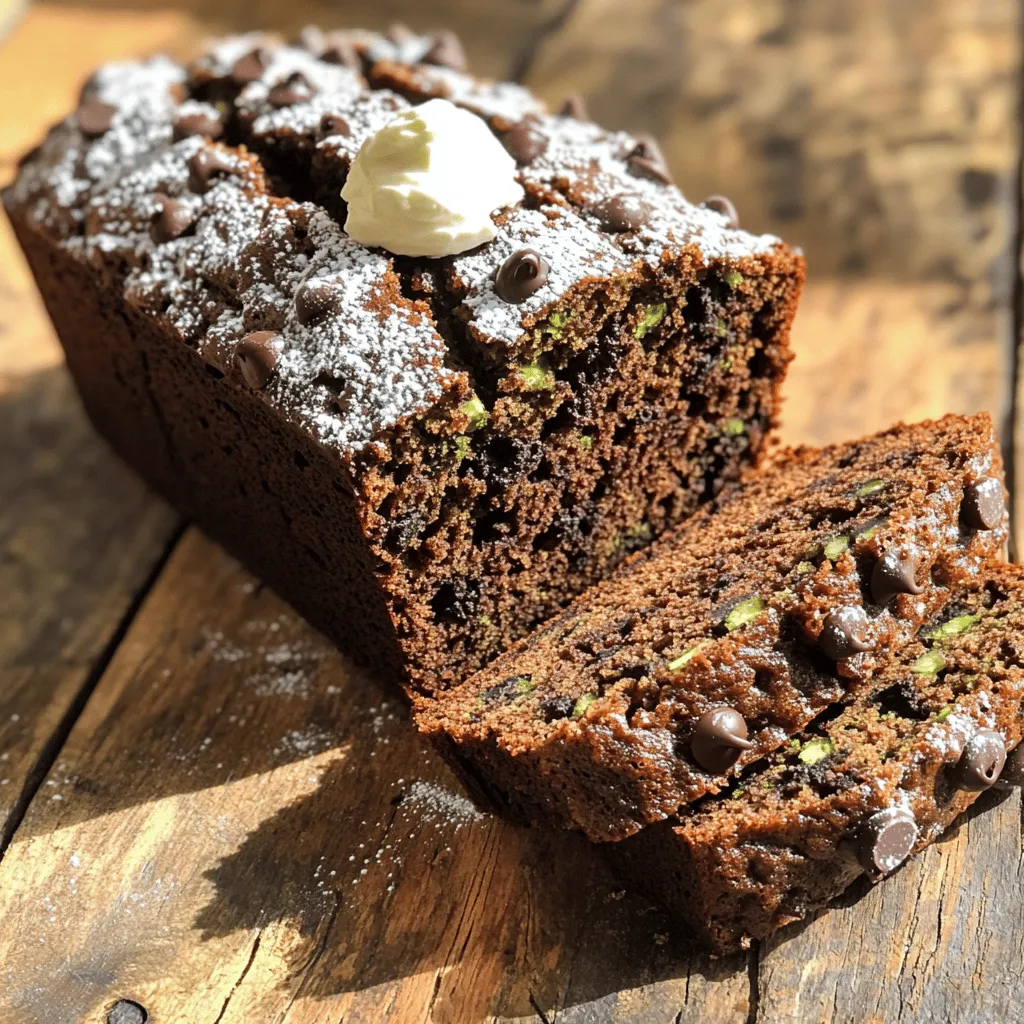
Ready to satisfy your sweet tooth? You’ll love my decadent chocolate chip zucchini bread! This easy recipe combines moist, grated zucchini with rich chocolate chips for a delightful treat. Whether …
. - Heat 2 tablespoons of olive oil in a large pot over medium heat. Add the finely chopped onion. Sauté for about 5 minutes until it turns soft and clear. - Next, add 2 cloves of minced garlic. Cook for another minute. This step adds a rich flavor to your chowder. - Pour in 4 cups of vegetable broth. Bring the mixture to a rolling boil. - Add 3 medium diced potatoes. Reduce the heat and let it simmer for about 10 minutes. The potatoes should be soft and tender by now. - Stir in 3 diced zucchinis and 1 cup of corn. Let the chowder simmer for another 5-7 minutes. This helps the zucchinis cook through without losing their crunch. - Now, add 1 cup of coconut milk, 1 teaspoon of dried thyme, and 1 teaspoon of smoked paprika. Season with salt and pepper to taste. Allow it to simmer for another 3-5 minutes. This melds the flavors together beautifully. - Use an immersion blender to blend the chowder. You can blend it until creamy or leave it chunky, depending on your preference. Check out the Full Recipe for detailed cooking times and tips! For the best zucchini chowder, focus on cooking temperatures. Sauté the onion on medium heat. This helps it become soft and sweet. When simmering, keep the heat low. This allows the flavors to blend well without burning. To achieve the perfect blend consistency, use an immersion blender. Blend until it’s creamy but still have some chunks. If you like it chunkier, blend less. Adjust the texture based on your taste. Presentation matters. Serve the chowder in deep bowls. Garnish with fresh parsley and a drizzle of olive oil. This adds flavor and brightens the dish. A sprinkle of smoked paprika also looks nice. Pair the chowder with crusty bread or a light salad. A fresh green salad balances the chowder's warmth. Bread soaks up the delicious broth, making each bite enjoyable. If the chowder tastes bland, adjust the seasoning. Add more salt or pepper a little at a time. Taste as you go to avoid overdoing it. Fresh herbs can also boost flavor. If your chowder is too thick, add more vegetable broth or coconut milk. Stir well and heat through. This keeps the flavors intact while adjusting the texture. Enjoy your creamy, comforting bowl of zucchini chowder! For the full recipe, check out the Zucchini Chowder Delight section above. {{image_2}} You can easily swap out some veggies in your zucchini chowder. Try carrots, celery, or bell peppers. These add more color and taste. If you want a different creamy texture, use heavy cream or yogurt instead of coconut milk. A non-creamy chowder works well too! You can skip the coconut milk for a lighter version. To spice things up, add cayenne pepper or red pepper flakes for heat. A little goes a long way! Fresh herbs can brighten your chowder. Try basil, dill, or cilantro for a refreshing twist. They add depth and make your bowl look beautiful. You can make this chowder vegan by using only vegetable broth and skipping any dairy. For a vegetarian option, stick to the coconut milk. If you need it gluten-free, just check your broth for any hidden gluten. Most vegetable broths are safe, but it's always good to verify. Enjoy your bowl of chowder, no matter your diet! Store your zucchini chowder in airtight containers. This keeps it fresh and tasty. You can keep it in the fridge for up to three days. Make sure it cools down before sealing. This helps prevent condensation. Always check for signs of spoilage before eating. To freeze zucchini chowder, let it cool completely. Pour it into freezer-safe containers. Leave some space at the top for expansion. You can freeze it for up to three months. When you're ready to eat, move it to the fridge overnight to thaw. Reheat it on the stove over low heat. Stir often to avoid burning. You can also use a microwave, but be careful not to overheat. Zucchini chowder lasts about three days in the fridge. When freezing, it stays good for three months. Look for changes in color or smell to know if it’s bad. If it smells sour or has mold, throw it away. Always trust your senses to keep your meals safe and delicious. Zucchini chowder is a thick, creamy soup. It features fresh zucchini, corn, and potatoes. This dish has a rich flavor from herbs and spices. Coconut milk adds creaminess without dairy. Each bowl bursts with comfort. You can enjoy it warm, perfect for any season. Yes, you can prepare zucchini chowder in advance. Cook the chowder and cool it down. Store it in an airtight container in the fridge. It stays fresh for about three days. You can also freeze it for up to three months. When ready to eat, just reheat it on the stove. To thicken your chowder, add more potatoes or blend it longer. You can also mix in a little cornstarch. For a thinner chowder, add more vegetable broth or coconut milk. Adjust the texture to your liking. A smooth blend gives a creamy feel, while chunky bits add texture. Zucchini chowder pairs well with crusty bread. You can also serve it with a fresh salad. A sprinkle of cheese on top adds flavor. For something extra, try a dollop of sour cream. These sides enhance the meal and make it more filling. Zucchini chowder is a healthy and tasty choice. This blog taught you how to make it with simple steps. You learned about key ingredients like zucchini, corn, and potatoes. We also covered tips for cooking, serving, and storage. Feel free to try variations to suit your taste. Enjoy making this chowder and share it with others. Your kitchen can be a place of fun and flavor!](https://grilledflavors.com/wp-content/uploads/2025/07/8d60e2e9-649e-4aad-a130-bead1458ee51.webp)
Zucchini chowder is a warm, tasty dish packed with fresh veggies and creamy goodness. It’s perfect for any season and makes a comfy meal. You can whip it up with …

Are you ready to whip up a delicious and easy meal? Let’s dive into the world of Crockpot Coconut Curry Chicken. This dish blends rich flavors with simple steps, making …