Best Almond Flour Brownies Rich and Decadent Delight
![To create the best almond flour brownies, you need a few key ingredients. These ingredients work together to give the brownies a rich and decadent taste. Here’s what you need: - 1 cup almond flour - 1/2 cup cocoa powder - 1/2 cup maple syrup - 1/4 cup coconut oil, melted - 3 large eggs - 1 teaspoon vanilla extract - 1/2 teaspoon baking powder - 1/4 teaspoon salt - 1/2 cup dark chocolate chips - 1/4 cup chopped walnuts (optional) Using almond flour makes these brownies gluten-free. Almond flour adds a nutty flavor and a moist texture. If you want to boost the flavor and texture, you can add a few optional ingredients. These help create a unique twist on the classic brownie. Here are some fun options: - 1/4 cup of shredded coconut - 1/4 cup of peanut butter or almond butter - 1 teaspoon of espresso powder - A pinch of sea salt on top These additions can enhance the taste and make your brownies even more special. Almond flour offers many health benefits. It is a great alternative to regular flour. Here are some key benefits to consider: - Low in carbs: Almond flour has fewer carbs than wheat flour. - Rich in protein: Almonds contain a good amount of protein, which is great for muscle health. - High in fiber: The fiber in almond flour helps with digestion. - Packed with vitamins and minerals: Almond flour is rich in vitamin E and magnesium. Choosing almond flour makes your brownies not only delicious but also a healthier option. For the full recipe, see the section above. First, I preheat the oven to 350°F (175°C). Next, I grab an 8x8 inch baking pan. I grease it lightly or line it with parchment paper. This step helps with easy removal later. In a large mixing bowl, I add the almond flour, cocoa powder, baking powder, and salt. I use a whisk to mix them until they blend well. This creates a nice base for my brownies. Now, I take a separate bowl for the wet mix. I combine the maple syrup, melted coconut oil, eggs, and vanilla extract. I whisk these ingredients together until they are smooth and creamy. This mixture adds moisture to the brownies. Next, I pour the wet ingredients into the dry mix. I stir them together gently. It’s important not to overmix; I just want to combine them. Then, I fold in the dark chocolate chips and walnuts if I choose to use them. I then pour the brownie batter into my prepared pan. I spread it out evenly with a spatula. I place the pan in the oven and bake for 20-25 minutes. I check for doneness by inserting a toothpick into the center. It should come out with a few moist crumbs. After baking, I let the brownies cool in the pan for about 10 minutes. Then, I transfer them to a wire rack to cool completely. This step is crucial for cutting neat squares. Once cool, I slice them into portions and enjoy! For the full recipe, you can refer back to my earlier notes. To get that rich and fudgy texture, don’t overmix. Mix your wet and dry ingredients until they just blend. This keeps the brownies soft. Bake them at the right temperature, 350°F (175°C), for 20-25 minutes. A toothpick should come out with a few moist crumbs. If it comes out clean, you may have overbaked. If you need a gluten-free treat, almond flour is perfect. You can swap maple syrup for honey or agave for sweetness. For a dairy-free option, use coconut oil and dairy-free chocolate chips. If you're allergic to nuts, try oat flour or all-purpose flour instead. Just remember, the texture may change a bit. One common mistake is not measuring the almond flour correctly. Too much can make brownies dry. Also, make sure your oven is calibrated. An incorrect oven temperature can lead to uneven baking. Don't skip cooling the brownies before cutting. This helps them hold their shape better. Following these tips will help you make the best chocolatey delights. For the full recipe, check out the complete guide! {{image_2}} You can easily make these brownies gluten-free and dairy-free. Almond flour is naturally gluten-free, so you’re already on the right track. For dairy-free options, use dairy-free chocolate chips. This simple swap keeps your brownies rich while meeting dietary needs. Want to switch up the flavor? Try adding a few drops of mint extract for a refreshing twist. If you love peanut butter, mix in a half cup of creamy peanut butter. This gives your brownies a nutty flavor that pairs well with chocolate. You can also experiment with extracts like almond or coconut for extra fun. Add-ins can take your brownies to the next level. Chopped walnuts or pecans add crunch and flavor. You can also try seeds like chia or flax for a healthy boost. For a sweet surprise, toss in some dark chocolate chunks or even dried fruit. Each add-in creates a unique taste experience, making your brownies even more enjoyable. To keep your leftover brownies fresh, place them in an airtight container. You can layer them with parchment paper to avoid sticking. Store at room temperature for about three days. If you want to keep them longer, refrigeration is a good option. Just make sure to wrap them well to avoid drying out. If you want to save brownies for later, freezing is a great choice. First, let the brownies cool completely. Then, cut them into squares. Wrap each square tightly in plastic wrap. Place the wrapped brownies in a freezer-safe bag or container. They can last for up to three months in the freezer. When you're ready to eat them, just take out what you need. To enjoy brownies warm, preheat your oven to 350°F (175°C). Place the brownies on a baking sheet. Heat them for about 10 minutes. You can also use a microwave for quick heating. Just place a brownie on a microwave-safe plate and heat for 20-30 seconds. This will make them soft and gooey again. Enjoy your delicious treats! You can use regular flour, but it changes the texture. Almond flour makes brownies soft and moist. Regular flour gives a denser, more cake-like result. If you want to try it, use a 1:1 ratio. Just remember, the taste and texture will differ. Almond flour brownies are rich and fudgy. They have a nutty flavor that adds depth. Traditional brownies use wheat flour, which can make them lighter. Almond flour gives a unique texture that many love. You might find almond flour brownies more satisfying. Yes, almond flour brownies can be healthier. Almond flour has more protein and healthy fats. It also has fewer carbs than regular flour. This makes almond flour brownies a good option for low-carb diets. Plus, they are often gluten-free, which is great for those with sensitivities. If your brownies are dry, a few fixes exist. First, check your baking time. Overbaking is a common mistake. If they are dry, try adding a bit more moisture. You can add a tablespoon of maple syrup or a splash of coconut oil. This will help soften them. Another tip is to store them in an airtight container with a slice of bread. The bread adds moisture and keeps the brownies soft. For the full recipe to make these delicious brownies, check out the [Full Recipe]. In this guide, we explored key ingredients for almond flour brownies and their benefits. We outlined simple steps to make rich, chewy brownies that suit many diets. You can also customize your recipe with fun variations and tips. Remember, storage is key to keeping your brownies fresh. Almond flour brownies can be healthy, too. So, get ready to enjoy a delicious treat that nourishes your body and satisfies your sweet tooth.](https://grilledflavors.com/wp-content/uploads/2025/07/72b8544a-1528-403c-b45d-0bbb2757022c.webp)
Are you ready to indulge in the best almond flour brownies? This rich and decadent treat is both satisfying and easy to make. With simple ingredients and a few key …
Are you ready to indulge in the best almond flour brownies? This rich and decadent treat is both satisfying and easy to make. With simple ingredients and a few key …
![To make the BEST Easy Carrot Bread, gather these ingredients: - 2 cups all-purpose flour - 1 teaspoon baking soda - 1/2 teaspoon baking powder - 1/2 teaspoon salt - 1 teaspoon ground cinnamon - 1/2 teaspoon ground nutmeg - 1/2 cup vegetable oil - 1 cup granulated sugar - 2 large eggs - 2 cups grated carrots (about 3 medium carrots) - 1/2 cup crushed pineapple, drained - 1/2 cup walnuts or pecans, chopped (optional) - 1/2 cup raisins (optional) - 1 teaspoon vanilla extract Using fresh ingredients makes a big difference. Look for vibrant orange carrots. They add flavor and moisture. Choose ripe pineapples for sweetness. Fresh eggs provide great texture. Use high-quality oil for a light crumb. If you opt for nuts, make sure they are fresh, too. This ensures a tasty bread! You can swap some ingredients if needed. For flour, whole wheat flour works well. If you want a lower sugar option, try honey or maple syrup. For oil, you can use applesauce to cut fat. If you're avoiding nuts, leave them out or use seeds instead. Raisins can be replaced with dried cranberries for a twist. Each change still keeps the bread delicious! Start by gathering all your ingredients. You will need two cups of flour, sugar, eggs, and carrots. Make sure to grate the carrots finely. This helps them blend well into the bread. Preheat your oven to 350°F (175°C). Grease a 9x5-inch loaf pan or line it with parchment paper. This makes it easy to remove the bread after baking. In a medium bowl, mix the dry ingredients. Whisk together the flour, baking soda, baking powder, salt, cinnamon, and nutmeg until they are all combined. In a large bowl, combine the vegetable oil and sugar. Mix them well. Add the eggs, one at a time, stirring thoroughly after each. Now, fold in the grated carrots, crushed pineapple, and vanilla extract. If you want, you can also add nuts or raisins. Then, gently mix in the dry ingredients. Be careful not to overmix; it's okay if there are a few lumps. Pour the batter into the prepared loaf pan. Smooth the top with a spatula. Bake in the oven for 55-65 minutes. You can check if it's done by inserting a toothpick into the center. If it comes out clean, the bread is ready. Once baked, remove it from the oven. Let it cool in the pan for about 10 minutes. After that, transfer the bread to a wire rack to cool completely. Enjoy your warm, flavorful carrot bread! You can find the full recipe here. To keep your carrot bread moist, use fresh carrots. Grate them just before you mix. This helps retain their natural juice. Adding crushed pineapple also adds moisture. Make sure to drain it well to avoid excess liquid. Lastly, do not overmix your batter. A few lumps are okay. Overmixing can make your bread dry and tough. Use a 9x5-inch loaf pan for the best shape. I suggest greasing it well or lining it with parchment paper. A whisk is great for mixing dry ingredients. A large mixing bowl helps combine wet ingredients smoothly. A spatula is perfect for folding the batter. And don't forget a toothpick to test for doneness! One common mistake is using old flour. Always check the date on your flour bag. Another mistake is skipping the measuring of ingredients. Accurate measurements matter for the perfect bread. Also, avoid baking at the wrong temperature. Always preheat your oven to 350°F (175°C) before baking. Finally, don’t open the oven door too early. This can cause your bread to sink. For the full recipe, refer to the details above. {{image_2}} You can make this carrot bread healthier by using whole wheat flour. Whole wheat adds fiber and nutrients. It gives a nutty taste that pairs well with carrots. You can also use less sugar. Try cutting the sugar by a third. This change keeps it tasty and lowers calories. Add fun flavors to your carrot bread! Ginger gives a warm spice that mixes well with carrots. You can add about one tablespoon of grated ginger. Orange zest adds a nice citrus touch. Try using the zest from one orange for a bright flavor. These small changes make a big difference! If you need a gluten-free option, use a gluten-free flour blend. Many blends work well in this recipe. Just make sure it includes a binding agent, like xanthan gum. This helps the bread rise and stay together. Your gluten-free carrot bread will still taste amazing! For the full recipe, check out [Full Recipe]. To keep your carrot bread fresh, wrap it tightly in plastic wrap or aluminum foil. You can also place it in an airtight container. Store it at room temperature for up to three days. If it’s warm, let it cool first. This way, moisture won’t build up inside. You can also slice the bread before storing. This makes it easy to grab a piece later. If you want to save your carrot bread for later, freezing is a great option. Wrap the whole loaf or slices in plastic wrap first. Then, wrap it in aluminum foil or place it in a freezer bag. This prevents freezer burn. Carrot bread can last in the freezer for up to three months. When you’re ready to eat it, just take it out and let it thaw in the fridge overnight. To enjoy warm carrot bread again, preheat your oven to 350°F (175°C). Place the bread on a baking sheet and cover it with foil. Heat for about 10-15 minutes, or until warm. You can also use a microwave, but it may get soggy. For the best taste, I recommend the oven method. You can serve it warm with cream cheese or butter for a yummy treat. For the full recipe, check out The BEST Easy Carrot Bread. Yes, you can make carrot bread without eggs. Use flaxseed meal or applesauce as a substitute. For one egg, mix 1 tablespoon of flaxseed meal with 2.5 tablespoons of water. Let it sit for five minutes to thicken. Applesauce works well too; use 1/4 cup for each egg. This will keep your bread moist and tasty. Homemade carrot bread lasts about one week at room temperature. Store it in an airtight container to keep it fresh. If you keep it in the fridge, it can last up to two weeks. For longer storage, freeze it. Wrap the bread tightly in plastic wrap and then in foil. It will stay good for up to three months in the freezer. Absolutely! You can choose any nuts or dried fruits you like. Walnuts and pecans add crunch, but you can also use almonds or hazelnuts. For dried fruits, raisins are classic, but dried cranberries or apricots add a unique twist. This flexibility lets you tailor the bread to your taste. For more details, check out the Full Recipe. In this blog post, we covered how to make delicious carrot bread. We explored key ingredients, how to mix them, and baked the bread to perfect flavor. I shared tips for moistness, useful tools, and common mistakes to avoid. You learned about healthy swaps and flavorful add-ins for variations. Plus, we discussed storage methods to keep your bread fresh. Enjoy your baking adventure with carrot bread! Each step will bring you closer to a tasty, homemade treat.](https://grilledflavors.com/wp-content/uploads/2025/07/e1ce124f-03ac-4486-a571-f4e1481438df.webp)
Looking for a delicious treat that’s easy to make? You’ve landed in the right spot! This blog post will guide you through my simple and flavorful carrot bread recipe. I’ll …

Looking for a quick and tasty dish? This Crustless Zucchini Quiche is your answer! With fresh zucchini, creamy cheese, and simple spices, it’s easy to make and packed with flavor. …

Looking for a tasty treat that won’t ruin your low-carb diet? I’ve got just the solution: Low Carb Zucchini Bread! This healthy and simple recipe is perfect for breakfast or …
Welcome to the world of baking with oat flour! Today, I’m excited to share my recipe for Oat Flour Zucchini Bread—a moist and flavorful delight. Whether you’re looking for a …
![To make a tasty pineapple zucchini bread, you need a few key ingredients. Here’s what you will need: - 1 cup grated zucchini (about 1 medium zucchini) - 1 cup crushed pineapple, drained - 1/2 cup unsweetened applesauce - 1/2 cup granulated sugar - 1/2 cup brown sugar, packed - 2 large eggs - 1/3 cup vegetable oil - 1 teaspoon vanilla extract - 1 1/2 cups all-purpose flour - 1 teaspoon baking soda - 1/2 teaspoon baking powder - 1/2 teaspoon salt - 1 teaspoon ground cinnamon - 1/4 teaspoon nutmeg (optional) - 1/2 cup chopped walnuts or pecans (optional) Using fresh zucchini and pineapple makes the bread moist and full of flavor. The applesauce adds sweetness, while the sugars balance the taste. Eggs help bind everything together, and the spices add warmth. You can play with this recipe by adding different ingredients. Here are some suggestions: - Nuts: Use walnuts or pecans for crunch. - Dried Fruit: Add raisins or dried cranberries for extra sweetness. - Spices: Try ginger or allspice for a different flavor. - Flour: Swap some all-purpose flour with whole wheat for added fiber. - Applesauce: Use mashed banana instead of applesauce for a fruity twist. These options can make your bread unique and fit your taste. Don’t be afraid to experiment! When baking, accurate measurements matter. Here are some useful tips: - Use Dry Measuring Cups: For flour and sugars, use dry measuring cups. - Spoon and Level: Spoon flour into the cup and level it with a knife. Don’t pack it down. - Liquid Ingredients: Use a liquid measuring cup for oils and liquids. - Egg Size: Use large eggs for best results. Measuring accurately helps your bread rise and bake evenly. Follow these tips to ensure your pineapple zucchini bread turns out great! If you want the full recipe, check it out. Gather all the ingredients first. This makes it easy to cook. You need: - 1 cup grated zucchini (about 1 medium zucchini) - 1 cup crushed pineapple, drained - 1/2 cup unsweetened applesauce - 1/2 cup granulated sugar - 1/2 cup brown sugar, packed - 2 large eggs - 1/3 cup vegetable oil - 1 teaspoon vanilla extract - 1 1/2 cups all-purpose flour - 1 teaspoon baking soda - 1/2 teaspoon baking powder - 1/2 teaspoon salt - 1 teaspoon ground cinnamon - 1/4 teaspoon nutmeg (optional) - 1/2 cup chopped walnuts or pecans (optional) Make sure to wash the zucchini well. Grate it finely. Drain the pineapple so it doesn't add too much liquid. This keeps your bread from getting soggy. In one big bowl, mix the wet ingredients. Combine the grated zucchini, crushed pineapple, applesauce, both sugars, eggs, vegetable oil, and vanilla. Stir until everything blends well. In another bowl, combine the dry ingredients. Whisk together the flour, baking soda, baking powder, salt, cinnamon, and nutmeg if you choose to add it. Now, slowly add the dry mix to the wet mix. Stir gently. Don’t overmix; a few lumps are okay. If you want some crunch, fold in the chopped nuts. Preheat your oven to 350°F (175°C). Grease a 9x5-inch loaf pan with oil or butter. Pour your batter into the pan and smooth the top. Bake for 50-60 minutes. To check if it’s done, insert a toothpick into the center. If it comes out clean, your bread is ready. Once baked, let it cool in the pan for about 10 minutes. After that, move it to a wire rack to cool completely. This helps keep the bread nice and moist. You can find the Full Recipe for exact details. To keep your pineapple zucchini bread moist, use fresh zucchini. Grate it right before mixing. The water in the zucchini adds great moisture. Adding crushed pineapple helps, too. Both ingredients make the bread soft and tasty. If you want extra moisture, you can add more applesauce. You can also try adding a bit of yogurt. This gives a nice creaminess to the bread. One common mistake is overmixing the batter. Mix just until combined. If you see some lumps, that's okay! Overmixing makes the bread tough. Another mistake is not checking the oven temp. Always use an oven thermometer. If the oven is too hot, the bread may burn outside but stay raw inside. Lastly, don't skip the cooling time. Let the bread cool in the pan for 10 minutes. This helps it stay together when you remove it. When grating zucchini, use a box grater or food processor. Aim for small, even pieces. After grating, squeeze out excess water using a clean cloth or paper towel. This helps prevent the bread from being too wet. If you want a sweeter taste, use smaller zucchini. They are often more tender and sweeter. Grated zucchini can also be stored in the fridge for a day, but use it fresh for the best flavor. For the complete guide with all the details, check out the [Full Recipe]. {{image_2}} You can change the flavor of your pineapple zucchini bread by using different nuts or seeds. Try using chopped almonds or hazelnuts instead of walnuts or pecans. Each nut adds a new twist. You may also try sunflower seeds or pumpkin seeds for a crunchy texture. These options make the bread fun and unique. If you need a gluten-free version, swap all-purpose flour for gluten-free flour. Be sure to check the flour blend for baking powder. This will help keep the bread light and fluffy. You can also add a bit of xanthan gum to mimic the texture of regular flour. This small change can make a big difference in your bread. Adding spices or extracts can boost the flavor of your bread. Try adding 1/2 teaspoon of ginger or allspice for warmth. You can also use almond extract instead of vanilla for a nutty taste. These small tweaks can make your pineapple zucchini bread even more delightful. Feel free to experiment and find your favorite flavors! To keep your pineapple zucchini bread fresh, store it in an airtight container. Place the bread at room temperature for up to three days. If you want it to last longer, refrigerate it. The cold air will slow down spoilage. However, refrigeration can dry it out. To combat this, wrap it in plastic wrap before placing it in the fridge. Freezing is a great option if you want to save some for later. First, let the bread cool completely. Then, wrap it tightly in plastic wrap. After that, place it in a freezer bag. Label the bag with the date. You can freeze it for up to three months. When you are ready to enjoy it, thaw it overnight in the fridge. This will help keep it moist. To reheat your bread, slice it first for even heating. You can use a microwave for quick warming. Heat it in 10-15 second intervals until warm. For a crispier texture, use an oven. Preheat the oven to 350°F (175°C), and place the slices on a baking sheet. Heat for about 10 minutes. This will bring back its delicious flavor and texture. Enjoy your pineapple zucchini bread warm! Yes, you can use frozen zucchini. Just make sure to thaw and drain it well. If you skip draining, the bread may end up soggy. The texture might differ slightly, but the taste stays great. You can use mashed bananas or yogurt as a substitute for applesauce. Both options keep the bread moist. If you want a more tropical flavor, consider using crushed pineapple instead. This adds sweetness, too. To check if your bread is done, insert a toothpick into the center. If it comes out clean, the bread is ready. You can also gently press the top; it should spring back. If it leaves an indentation, bake for a few more minutes. You learned about key ingredients and methods for making delicious pineapple zucchini bread. I shared useful tips for baking and storage too. Remember, a little care in measuring and mixing helps your bread turn out perfect. Try different nuts or spices for fun new flavors. Keep this guide handy for your next baking adventure. Enjoy your tasty bread and happy baking!](https://grilledflavors.com/wp-content/uploads/2025/07/f4814c43-bba9-4f36-a5b0-fc72732e895a.webp)
For a moist and flavorful treat, look no further than pineapple zucchini bread. I can’t wait to share this delightful recipe that combines sweet pineapple and fresh zucchini for a …
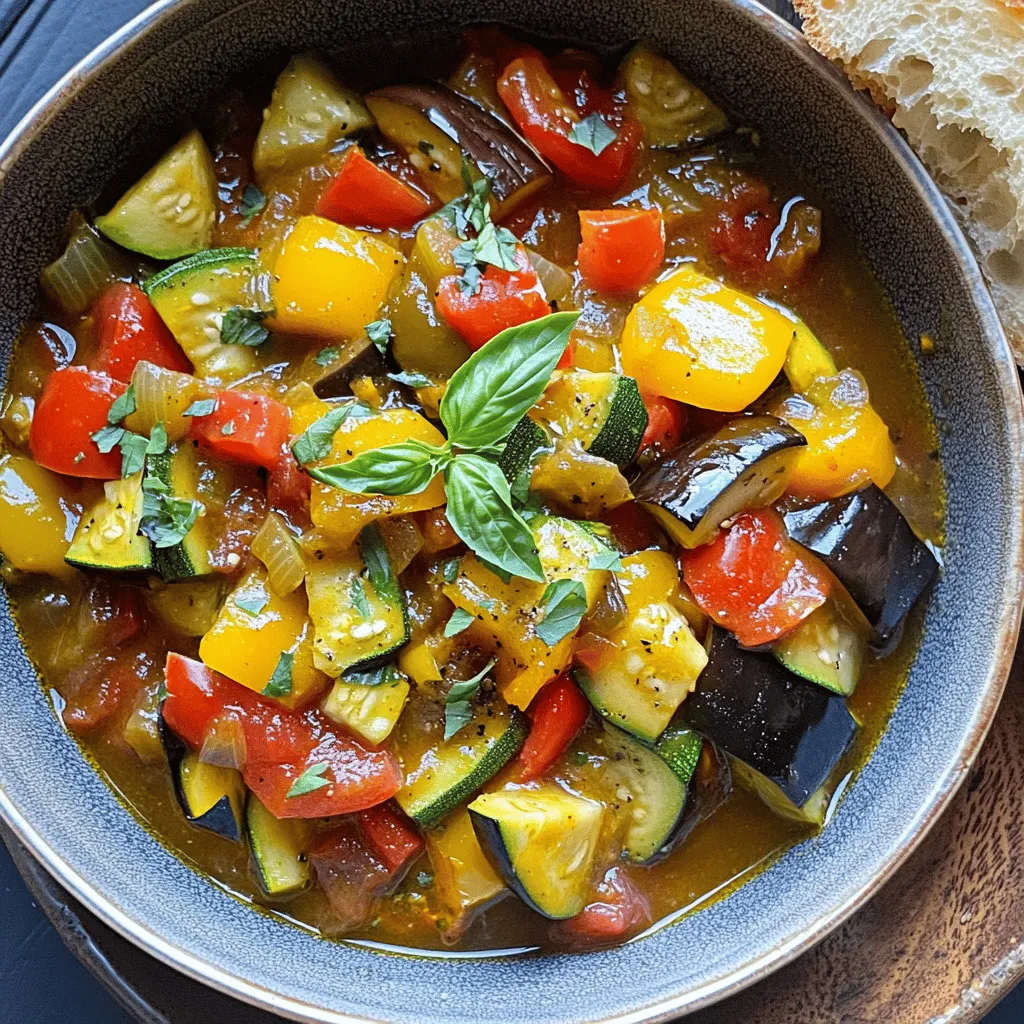
Are you ready to savor a taste of the French countryside? My homemade ratatouille is the perfect dish for you! It’s bursting with flavor and showcases fresh veggies that you …
![- 4 boneless, skinless chicken breasts - 1 tablespoon olive oil - 1 teaspoon garlic powder - 1 teaspoon smoked paprika - 1 teaspoon onion powder - 1 teaspoon dried thyme - 1 teaspoon salt - ½ teaspoon black pepper - 1 cup chicken broth - 2 tablespoons lemon juice - 1 tablespoon fresh parsley, chopped (for garnish) When cooking, it helps to know how to convert measurements. Here are some tips: - Tablespoons to Teaspoons: 1 tablespoon equals 3 teaspoons. - Cups to Ounces: 1 cup equals 8 ounces. - Pounds to Ounces: 1 pound equals 16 ounces. This can help you when you may need to adjust the recipe based on what you have. You can swap ingredients based on what you have at home. Here are some great options: - Olive Oil: Use avocado oil or vegetable oil instead. - Garlic Powder: Fresh minced garlic works too. Use 1 clove for each teaspoon. - Smoked Paprika: Regular paprika can replace it if you prefer less smoke. - Chicken Broth: Vegetable broth works well for a lighter flavor. - Lemon Juice: Lime juice is a nice alternative for a twist. Feel free to mix and match these ingredients to suit your taste! You can find the full recipe in the article. First, you need to prepare the chicken. Pat the chicken breasts dry with paper towels. This step is key. Dry chicken will sear better. Next, mix your spices in a small bowl. Use garlic powder, smoked paprika, onion powder, dried thyme, salt, and black pepper. Rub this spice mix all over the chicken breasts. Make sure they are evenly coated. This will add flavor as you cook. Now, let's sear the chicken. Heat a large skillet over medium-high heat and add olive oil. Wait until the oil shimmers. Carefully place the chicken breasts in the skillet. Sear each side for about 5-7 minutes. You want them golden brown. Check the internal temperature; it should hit 165°F or 75°C. If your skillet is small, cook in batches. This prevents overcrowding and ensures even cooking. After searing, remove the chicken and set it aside. In that same skillet, add chicken broth and lemon juice. Scrape the bottom of the skillet with a wooden spoon. This helps lift all the tasty bits stuck to the pan. Let the mixture simmer for about 3-4 minutes. It should reduce slightly. Finally, return the chicken to the skillet. Spoon some sauce over it and let it cook for 2 more minutes. This helps the chicken soak up the sauce's rich flavor. You can find the full recipe in the earlier sections. Enjoy your delicious skillet chicken! To keep your chicken juicy, start with good quality chicken breasts. Always pat them dry before cooking. This helps them brown better. Use a meat thermometer to check the internal temperature. Aim for 165°F (75°C). Let the chicken rest for a few minutes after cooking. This allows the juices to settle back in. You need a few key tools for this recipe: - A large, heavy skillet: This helps with even heat. - A meat thermometer: This ensures your chicken cooks perfectly. - Tongs: Use these to flip the chicken without piercing it. - A cutting board: Always good for resting your chicken after cooking. Don’t hesitate to mix up the flavors! Here are some ideas: - Add cayenne pepper for heat. - Use fresh herbs like rosemary or basil. - Swap lemon juice for lime juice for a different zest. - Try using honey for a sweet touch in the sauce. For the full recipe, check out the details provided above. {{image_2}} To make herb-infused chicken, choose fresh herbs. You can use rosemary, thyme, or basil. Chop them finely and mix them into the spice blend. This adds a bright flavor and a nice aroma. You will love the fresh taste! For a spicy kick, add cayenne pepper to your spice mix. Start with a small amount, like 1/4 teaspoon. You can always add more if you love heat. This will give your chicken a nice, bold flavor that packs a punch! For a zesty twist, use extra lemon juice and minced garlic. Add the garlic to the skillet just before deglazing with chicken broth. This will make your sauce rich and fragrant. It pairs well with any side dish. Plus, it’s a great way to brighten up your meal! Try these variations to change things up. They keep the recipe fresh and exciting. The best juicy skillet chicken breasts can be your canvas for flavor! For the complete method, check the Full Recipe. To keep your juicy skillet chicken breasts fresh, let them cool down first. Place the chicken in an airtight container. Make sure to store the chicken in the fridge if you plan to eat it within three days. For longer storage, wrap the chicken tightly in plastic wrap before placing it in the container. This helps prevent freezer burn and keeps it tasty. When you want to enjoy your leftovers, heat the chicken gently. Preheat your skillet over medium heat. Add a splash of chicken broth or water to keep it moist. Place the chicken in the skillet and cover it with a lid. Heat for about 5-7 minutes, flipping halfway through. Check until it reaches a warm center. You can also use a microwave, but be sure to cover it with a damp paper towel to prevent drying. If you want to save some chicken for later, freezing is a great option. First, let the chicken cool completely. Wrap each piece in plastic wrap, then place them in a freezer bag. Remove as much air as you can. Label the bag with the date, so you know when you froze it. The chicken can stay in the freezer for up to three months. To thaw, place it in the fridge overnight before reheating. This method keeps the chicken juicy and delicious. For the full recipe, check out The Best Juicy Skillet Chicken Breasts. You can check if chicken is cooked by using a meat thermometer. Insert it into the thickest part of the breast. The safe cooking temperature is 165°F (75°C). If you don't have a thermometer, cut into the chicken. The juice should run clear, and the meat should not be pink. Yes, you can use frozen chicken breasts. However, you need to thaw them first. Thaw overnight in the fridge or use the microwave. Cooking frozen chicken directly in the skillet can lead to uneven cooking. It is best to ensure they are fully thawed for the best results. Some great side dishes include: - Steamed vegetables like broccoli or green beans - Mashed potatoes or roasted potatoes - Quinoa or rice - A fresh garden salad These sides pair well and make your meal more balanced. You can also add a slice of crusty bread to soak up the flavorful sauce from the chicken. For the full recipe, check out [Full Recipe]. You now have all the tools to create delicious skillet chicken. We covered key ingredients, preparation steps, and helpful tips to keep your chicken juicy. Remember to explore variations like herb-infused options for extra flavor. Lastly, follow our storage tips to enjoy leftovers safely. With these guidelines, you can make a satisfying meal anytime. Happy cooking!](https://grilledflavors.com/wp-content/uploads/2025/07/87407bd6-61c3-4b72-b755-2ca4a4706945.webp)
Are you ready to cook the best juicy skillet chicken breasts that’ll impress everyone? This recipe is simple, quick, and packed with flavor. You will learn to sear chicken perfectly …
![- Zucchini and Yellow Squash Zucchini and yellow squash are the stars of this dish. They bring a mild taste and great texture. Slicing them thinly helps them cook evenly. This also ensures that they soak up all the cheesy goodness. - Cheese Varieties and Their Roles Cheese is key to making this casserole creamy and rich. I use sharp cheddar for its bold flavor, mozzarella for stretchiness, and Parmesan for a salty kick. Together, they create a delightful cheese blend. This mix melts perfectly and forms a golden crust. - Essential Seasonings and Condiments The right seasonings make all the difference. I add garlic for depth and thyme for an earthy touch. Salt and black pepper enhance the flavors. Heavy cream adds creaminess, while eggs bind everything together. These ingredients work in harmony to create a comforting dish. For the full recipe, check out the detailed preparation steps. Slicing the Vegetables Start by washing the zucchinis and yellow squashes. Next, slice them thinly. Thin slices cook evenly and blend well. Aim for about 1/4 inch thick. Sautéing Onion and Garlic In a large skillet, heat 2 tablespoons of olive oil over medium heat. Add the finely chopped onion and cook for about 5 minutes. Wait until it turns soft and clear. Then, toss in 3 minced garlic cloves. Sauté for another minute until you smell that nice aroma. Mixing the Casserole Components In a big bowl, combine the sliced zucchinis and yellow squashes. Add the sautéed onion and garlic. Pour in 1 cup of heavy cream and crack in 2 large eggs. Sprinkle in 1 teaspoon salt, 1/2 teaspoon black pepper, 1 teaspoon dried thyme, and 1 teaspoon garlic powder. Mix in half of the shredded cheddar and mozzarella cheeses. Stir everything until well combined. Greasing the Casserole Dish Grab a 9x13-inch casserole dish and grease it lightly with some olive oil. This step helps prevent sticking and makes serving easier. Layering the Mixtures Pour the vegetable mixture into the greased dish. Spread it out evenly with a spatula. Make sure the mix is level for even baking. Adding the Topping In a separate bowl, mix the remaining cheeses with 1 cup of breadcrumbs. Sprinkle this crunchy topping evenly over your casserole. It adds a great texture and flavor. Optimal Oven Temperature Preheat your oven to 375°F (190°C). This temperature ensures a nice golden crust. Cooking Time for Perfect Texture Bake the casserole for 30 to 35 minutes. Look for a golden brown top and bubbling edges. Cooling and Serving Tips Once it’s done, take it out and let it cool for about 10 minutes. This cooling time helps the casserole set. Garnish with fresh parsley before serving to add color and a fresh taste. For the complete recipe, check out the [Full Recipe]. To make your Cheesy Zucchini Squash Casserole shine, focus on texture and flavor. Here are some tips: - Texture and Flavor Enhancements: For a creamier texture, use heavy cream. Mix in a bit of sour cream for a tangy twist. Toast breadcrumbs in olive oil before topping for crunch. - Common Mistakes to Avoid: Don’t skip the cooling step after baking. Letting it cool helps the casserole set. Avoid overcooking the vegetables. They should be tender, not mushy. - Using Fresh vs. Frozen Ingredients: Fresh zucchini and squash give the best flavor. Frozen options work in a pinch, but may release more water. If using frozen, thaw and drain them well. Pair your casserole with simple sides for a full meal: - What to Serve with Cheesy Zucchini Squash Casserole: A fresh green salad or roasted chicken works great. Grilled fish or crusty bread also complements it well. - Plate Presentation Ideas: Serve in a bright dish to enhance colors. Garnish with fresh parsley for a pop of green. A sprinkle of extra cheese on top before serving looks appealing. - Pairing with Wines or Beverages: A light white wine, like Sauvignon Blanc, pairs well. For non-alcoholic options, try sparkling water with lemon. Both enhance the dish’s flavors beautifully. For the full recipe, refer to the section above. Enjoy your cooking! {{image_2}} You can make this casserole lighter. Try low-fat cheese options like part-skim mozzarella. It still melts well and tastes great. Another way is to swap heavy cream for Greek yogurt. This change cuts fat but keeps the creamy texture. Want to add protein? You can mix in cooked chicken or tofu. Both options make the dish heartier. You can also add other veggies. Try bell peppers, spinach, or mushrooms for extra flavor and nutrition. To enjoy this dish in summer, use fresh zucchinis and yellow squashes from local markets. In winter, consider using winter squash like butternut or acorn. These squashes add a sweet and nutty flavor, making it perfect for colder months. For the full recipe, visit the Full Recipe section. After making your cheesy zucchini squash casserole, let it cool down. Place it in a dish that seals tight. I recommend using a glass or plastic container with a lid. This keeps moisture in and helps it stay fresh. Store it in the fridge right away. You can keep it there for up to three days. To freeze your casserole, first cool it completely. Then, cut it into serving-sized pieces. Wrap each piece in plastic wrap, then place them in a freezer-safe bag. This helps keep the flavors locked in. When you're ready to eat, thaw it in the fridge overnight. To reheat, place it in the oven at 350°F (175°C) for about 20 minutes. You can also microwave it for a quick meal. In the fridge, your casserole lasts about three days. If you freeze it, it can stay good for up to three months. Always check for signs of spoilage. If it smells sour or looks off, toss it out. Trust your senses to keep your meals safe and tasty. You can use several options if you want a creamy texture. Whole milk mixed with butter works well. You can also try unsweetened almond milk with a bit of cornstarch. For a dairy-free option, coconut cream is great. It adds a nice flavor and richness. Each of these options keeps the dish creamy without heavy cream. Yes, you can prepare this casserole ahead of time. Just follow all the steps up to baking. Cover the dish tightly with plastic wrap. You can store it in the fridge for one day. When ready, just bake it without thawing. It may need a few extra minutes in the oven. Look for a golden brown top. The edges should be bubbling. You can also test it with a knife. Insert it into the center; if it comes out clean, it is ready. Let it rest for about ten minutes after baking. This helps it set up before serving. Yes, you can make this casserole gluten-free. Just swap regular breadcrumbs for gluten-free ones. Many brands offer good options that taste great. Always check labels to ensure there is no gluten in the cheese or other ingredients. With these changes, you can enjoy a delicious gluten-free meal. For the full recipe, check the link. This blog post shared the key ingredients, step-by-step instructions, and helpful tips for making a Cheesy Zucchini Squash Casserole. You learned about essential components, how to prep and bake, and ways to enhance flavor and texture. Remember to experiment with variations and storage tips to suit your needs. This dish is all about fun and creativity in the kitchen. Enjoy every bite and feel proud of your tasty creation.](https://grilledflavors.com/wp-content/uploads/2025/07/f9f8aad7-5171-40ca-928c-ca6803b2c2cf.webp)
Looking for a dish that’s both cheesy and healthy? Look no further! My Cheesy Zucchini Squash Casserole is simple and packed with flavor. Featuring fresh zucchini and yellow squash, this …

Looking for a delicious way to sneak veggies into your breakfast? You’re in the right place! My Healthy Blueberry Zucchini Muffins are easy to make and packed with flavor. In …