Skip to content
grilledflavors.com
  • Home
  • Appetizers
  • Desserts
  • Salads
  • Breakfast
  • Dinner
  • Privacy Policy
  • Contact
  • About

Chef Nate

Air Fryer Zucchini Fries Crunchy and Delicious Snack

July 2, 2025 by Chef Nate
To make air fryer zucchini fries, gather the following items: - 2 medium zucchinis, cut into fry shapes - 1/2 cup all-purpose flour - 2 large eggs, beaten - 1 cup breadcrumbs (preferably panko for extra crunch) - 1 teaspoon garlic powder - 1 teaspoon onion powder - 1 teaspoon paprika - Salt and pepper to taste - Olive oil spray These simple ingredients create a tasty snack. Zucchinis are low in calories and full of nutrients. You can use all-purpose flour for coating, but gluten-free flour works too. The eggs help the breadcrumbs stick well to the zucchini. Panko breadcrumbs give extra crunch. Seasoning is key. Garlic powder, onion powder, and paprika add great flavor. Adjust salt and pepper to your liking. Olive oil spray helps achieve that perfect crispiness. For the full recipe, check out the section above. Enjoy making these delicious zucchini fries! - Preheating the Air Fryer Start by preheating your air fryer to 400°F (200°C). This step is key for even cooking. - Setting up the Breading Station Use three shallow bowls. In the first, add 1/2 cup all-purpose flour. The second bowl should hold 2 beaten eggs. In the third, mix 1 cup of breadcrumbs with 1 teaspoon garlic powder, 1 teaspoon onion powder, 1 teaspoon paprika, salt, and pepper. This setup makes coating easy. - Coating the Zucchini Fries Take each zucchini fry and first coat it in the flour. Shake off any extra flour. Next, dip it in the egg, making sure it is fully covered. Finally, roll it in the breadcrumb mix, pressing gently so the crumbs stick well. - Placing Zucchini Fries in the Air Fryer Arrange the coated zucchini fries in the air fryer basket. Keep them in a single layer for the best results. Lightly spritz them with olive oil spray. This adds to their crunchiness. - Cooking Time and Temperature Cook the fries for about 10-12 minutes. Flip them halfway through to ensure they brown evenly. You want them golden brown and crispy. - Checking for Doneness Once the time is up, check the fries. They should be golden and crispy. If they need more time, pop them back in for a few minutes. - Serving Suggestions Let the zucchini fries cool slightly before serving. They pair well with dips like ranch or marinara. You can also serve them as a side dish with your favorite meal. For the complete recipe, check out the Full Recipe. To get the best crunch from your zucchini fries, olive oil spray is key. A light spritz helps the fries brown nicely. It’s important not to drown them in oil. Just a few sprays will do. This keeps them crispy without being soggy. Using panko breadcrumbs also makes a big difference. Panko is lighter and flakier than regular breadcrumbs. This gives your fries that perfect crunch. They will turn golden brown and crisp in the air fryer. Make sure to adjust the seasoning to your taste. Start with the basics like salt and pepper. From there, you can add more spices if you want. Garlic powder, onion powder, and paprika are great for flavor. You can also try flavor variations. Add parmesan cheese for a cheesy touch. Or mix in some Italian herbs for a fresh taste. Experimenting with spices can make each batch unique. One common mistake is overcrowding the basket. If you pile too many fries in, they won’t cook evenly. Give them space to crisp up. Cook in batches if needed. Another mistake is using the wrong cooking temperature. Preheat your air fryer to 400°F (200°C). This helps the fries cook quickly and evenly. If it's too low, they may end up soft instead of crispy. {{image_2}} You can make zucchini fries even more fun by using other veggies. Here are two great choices: - Sweet Potato Fries: Sweet potatoes add a sweet taste and a nice color. Cut them into fry shapes, coat them like zucchini, and air fry. They will turn crispy and delicious. - Eggplant Fries: Eggplant has a unique flavor and texture. Slice it into fry shapes, salt it a bit, and let it rest. This will remove some moisture. Then, bread and cook it just like the zucchini. You can switch up how you bread your fries for different flavors. Here are a couple of ideas: - Gluten-Free Options: Use almond flour or crushed gluten-free crackers instead of regular flour. For the breadcrumbs, you can use gluten-free panko. This way, everyone can enjoy the fries. - Spicing Things Up: Add your favorite spices to the breadcrumbs. Consider chili powder, cumin, or even some Italian herbs. This gives your fries a unique kick and makes them extra tasty. Now that your fries are done, think about how to serve them. Here are some ideas: - Dipping Sauces: Pair your fries with tasty dips. Try ranch, spicy mayo, or garlic aioli. These sauces add a burst of flavor and make the meal more fun. - Pairing with Meals: These fries are a great side for many dishes. Serve them with burgers, grilled chicken, or even a fresh salad. They add crunch and flavor to any meal. For the full recipe on making these tasty air fryer zucchini fries, check out the [Full Recipe]. After you enjoy your air fryer zucchini fries, store any leftovers properly. - Refrigeration Tips: Place the cooled fries in an airtight container. Keep them in the fridge for up to three days. This way, they stay fresh and tasty. - Freezing Zucchini Fries: If you want to save them longer, freeze the fries. Lay them flat on a baking sheet until frozen. Then, transfer them to a freezer-safe bag. They can last up to three months in the freezer. When you want to enjoy your leftover fries, reheating them is simple. - Best Methods for Reheat: The best way to reheat zucchini fries is in the air fryer. This keeps them crispy. You can also use a conventional oven. Set it to 375°F (190°C) and bake for about 5-7 minutes. - Re-crisping in Air Fryer: For the air fryer, heat it to 350°F (175°C). Place the fries in a single layer, and cook for about 3-5 minutes. Check them often to avoid burning. Knowing how long your zucchini fries last helps you plan meals. - How Long Do They Last? When stored in the fridge, zucchini fries last about three days. In the freezer, they can last three months. - Signs of Spoilage: Look for signs like a sour smell or slimy texture. If they smell off or feel mushy, it’s best to toss them. Enjoy your air fryer zucchini fries fresh whenever possible. For the full recipe, check out the main section. Cook zucchini fries in your air fryer for about 10-12 minutes. Set the temperature to 400°F (200°C). Flip them halfway for even cooking. You want them golden brown and crispy. This timing works well for most air fryers. Yes, you can prep them ahead. Cut the zucchinis and coat them as the recipe says. Store them in the fridge for a few hours. When ready, just pop them in the air fryer. They will still taste great! Zucchini fries pair nicely with many sauces. Here are some tasty options: - Ranch dressing - Marinara sauce - Garlic aioli - Spicy ketchup Feel free to mix and match! Zucchini fries are a healthier snack. Zucchini is low in calories and high in nutrients. The air fryer uses less oil than frying. You can enjoy them without guilt! You can bake zucchini fries in the oven. Preheat your oven to 425°F (220°C). Place the coated zucchini on a baking sheet. Bake for about 20-25 minutes, flipping halfway. They may not be as crispy, but they will still taste great! Check the [Full Recipe] for more details. In this guide, we explored how to make tasty air fryer zucchini fries. We covered ingredients, preparation steps, and cooking techniques to achieve crispiness. You learned how to avoid common mistakes and tried variations with other veggies and sauces. Keeping leftovers and reheating correctly ensures you enjoy these fries later. In summary, air fryer zucchini fries are easy, fun, and healthy. Enjoy perfecting this recipe and making it your own!

If you’re searching for a tasty snack that’s easy to make, you’ve found it! Air fryer zucchini fries offer a crunchy bite that satisfies your cravings without the guilt. With …

Read more

Categories Appetizers

Easy Italian Peach Crumb Cake Delightful and Simple

July 2, 2025 by Chef Nate
- Fresh peaches and their preparation - 3 ripe peaches, pitted and sliced - Choose peaches that are soft and fragrant for the best flavor. - Essential baking ingredients - 1 ½ cups all-purpose flour - 1 cup granulated sugar, divided - ½ cup unsalted butter, softened - 2 large eggs - 1 teaspoon vanilla extract - 1 teaspoon baking powder - ½ teaspoon baking soda - ¼ teaspoon salt - 1 teaspoon ground cinnamon - Optional toppings or substitutions - ½ cup brown sugar - ½ cup rolled oats - You can add nuts for a crunch or use other fruits if you prefer. Making this Easy Italian Peach Crumb Cake is simple when you have the right ingredients. Each item plays a key role in creating a moist and tasty cake. Fresh peaches add sweetness, while the crumb topping gives it a nice texture. You can mix and match toppings to fit your taste. This cake is great for any occasion! For the full recipe, check the details above. First, preheat your oven to 350°F (175°C). This step warms up the oven for even baking. Next, prepare your cake pan. You can grease a 9-inch round pan or use parchment paper. This makes it easy to take the cake out later. In a large bowl, beat ½ cup of softened butter with ¾ cup of granulated sugar. Mix until it looks light and fluffy. Then, add two large eggs one at a time. Make sure to mix well after each egg. Stir in 1 teaspoon of vanilla extract for flavor. Now, grab another bowl. In it, whisk together 1 ½ cups of all-purpose flour, 1 teaspoon of baking powder, ½ teaspoon of baking soda, ¼ teaspoon of salt, and 1 teaspoon of ground cinnamon. This dry mix helps the cake rise and adds taste. Gradually add this dry mix to the wet mix, alternating with the last ¼ cup of granulated sugar. Mix until just combined. Gently fold in 3 sliced peaches. Take care not to break them apart as you mix. These peaches add sweetness and moisture to the cake. Now, let’s make the crumb topping. In another bowl, mix together ½ cup of brown sugar, ½ cup of rolled oats, and another teaspoon of cinnamon. Cut in the rest of the butter until it looks like coarse crumbs. This mixture will create a nice crunchy topping. Pour the batter into your prepared cake pan. Spread it out evenly with a spatula. Then, sprinkle the crumb topping over the peach batter. Make sure it covers the top nicely. Bake in your preheated oven for 35-40 minutes. Keep an eye on it. You know it’s done when a toothpick comes out clean from the center. Let the cake cool in the pan for about 10 minutes. Then, transfer it to a wire rack to cool completely. For the complete recipe, check the Full Recipe section. - Ensuring the right peach ripeness: Use ripe peaches for the best flavor. They should feel slightly soft when you press them. If they are too hard, they won’t sweeten the cake enough. Overripe peaches can make the cake too mushy. - Alternative sweetener options: If you want to cut sugar, try using honey or maple syrup. Use less liquid for these. You can also use coconut sugar for a different taste. - Handling the crumb topping: Mix the crumb topping until it looks like coarse sand. This keeps the topping crunchy. Don’t overmix, or it will clump together. - Recommended mixing bowls and pans: I suggest using a large mixing bowl for the batter. A 9-inch round cake pan works perfectly for this recipe. Use a non-stick pan or line it with parchment paper for easy removal. - Useful kitchen gadgets for efficiency: A good whisk is key for mixing dry ingredients. A rubber spatula helps fold in the peaches without breaking them. A food processor can speed up making the crumb topping. {{image_2}} You can change the flavor of your Easy Italian Peach Crumb Cake in fun ways. Adding spices or extracts can really boost taste. A dash of nutmeg works well with peaches. You can also try almond or orange extracts for a unique twist. These flavors mix beautifully with the sweet peaches. Incorporating nuts or chocolate chips adds texture and richness. Chopped walnuts or pecans add a nice crunch. If you love chocolate, sprinkle in some chocolate chips. Both options create a heartier cake that delights everyone. You can swap out peaches for other fruits that work well in this crumb cake. Think about using ripe plums or juicy nectarines. Both fruits offer a similar sweetness and texture. Apples or pears are also great choices, especially in fall. Seasonal fruit substitutions keep your cake fresh all year. In the summer, try berries like blueberries or raspberries. In the winter, citrus fruits like oranges or tangerines add a bright flavor. These alternatives allow you to enjoy this cake in any season! For the full recipe, click here. To keep your Easy Italian Peach Crumb Cake fresh, follow these tips: - Let the cake cool completely before storing. - Wrap it tightly in plastic wrap or foil. - Place it in an airtight container to avoid moisture loss. I recommend storing your cake at room temperature for up to three days. If your home is warm, refrigerate it to extend freshness. Use a glass or plastic container with a tight lid for the best results. This keeps the cake moist and delicious. Freezing your cake is simple and preserves its flavor. Here’s how to do it: 1. First, let the cake cool completely. 2. Cut it into slices if you prefer individual servings. 3. Wrap each slice in plastic wrap, making sure it is tight. 4. Place the wrapped slices in a freezer-safe bag or container. Your cake can last up to three months in the freezer. When you're ready to enjoy it, simply thaw it in the fridge overnight. For a quick option, you can microwave a slice for about 20-30 seconds. Enjoy your cake warm and tasty! Can I use canned peaches instead of fresh? Yes, you can use canned peaches. Make sure they are in juice, not syrup. Drain them well and cut them into slices. This method works well when fresh peaches are out of season. How do I know when the cake is fully baked? Check the cake with a toothpick. Insert it into the center of the cake. If it comes out clean, the cake is ready. The top should also look golden and spring back when touched lightly. What is the difference between crumb cake and coffee cake? Crumb cake has a thicker crumb topping, while coffee cake is softer and often includes a swirl of cinnamon. Both pair well with coffee, but crumb cake is more about the topping. Can I make this recipe gluten-free? Yes, you can use a gluten-free flour blend. Make sure it has a good mix of starch and protein. Follow the rest of the recipe as is, and you will have a tasty treat. What to do if the cake is too dense? If the cake is dense, it may need more air. Make sure to beat the butter and sugar well until light. Also, avoid overmixing the batter after adding the flour. Why did the crumb topping not form? If the crumb topping is flat, it may need more fat. Ensure you cut in the butter properly until it looks like coarse crumbs. Also, check that you used enough brown sugar and oats. How can I fix an overbaked cake? To fix an overbaked cake, you can add a simple syrup. Mix equal parts water and sugar, heat until dissolved, and brush it over the cake. This adds moisture back into the cake. You now have all you need to create a delicious Easy Italian Peach Crumb Cake. From selecting ripe peaches to mixing the perfect batter, every step matters. Remember, you can customize this cake with different fruits and spices. Proper storage keeps your cake fresh. Use the tips and tricks shared to perfect your baking skills. Whether you're a pro or a beginner, enjoy each bite of your creation. Happy baking!

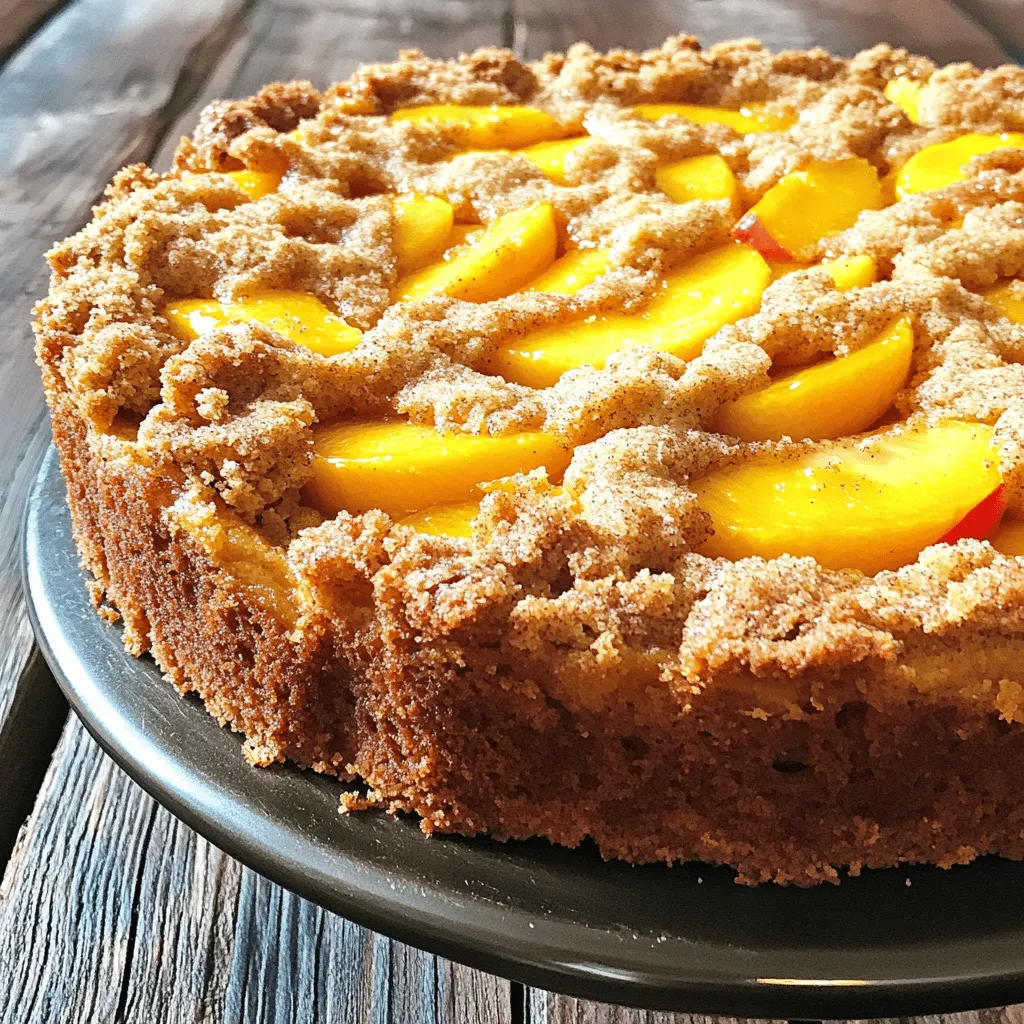
Craving a delicious dessert that’s both easy and mouthwatering? Look no further than this Easy Italian Peach Crumb Cake! With fresh peaches and a crispy crumb topping, this cake is …

Read more

Categories Desserts

Double Chocolate Zucchini Bread Rich and Moist Delight

July 2, 2025 by Chef Nate
- 1 cup all-purpose flour - 1/2 cup unsweetened cocoa powder - 1 teaspoon baking soda - 1/2 teaspoon baking powder - 1/4 teaspoon salt - 1 medium zucchini, grated - 1/2 cup granulated sugar - 1/2 cup brown sugar, packed - 2 large eggs - 1/2 cup vegetable oil - 1 teaspoon vanilla extract - 1/2 cup semi-sweet chocolate chips - 1/4 cup chopped walnuts (optional) To make this double chocolate zucchini bread, gather the ingredients listed above. The dry ingredients create the base, while the wet ingredients add moisture and flavor. The zucchini helps keep the bread rich and moist. When you mix in the chocolate chips, you can add a sweet surprise in every bite. If you want a little crunch, toss in the walnuts. They add texture and depth. This recipe is simple, yet it yields a delicious treat. If you're curious, you can find the full recipe at the end of this article. - First, grate the zucchini using a box grater. - Then, sprinkle a pinch of salt over the grated zucchini. - Let it sit for about 10 minutes. This draws out extra moisture. - After 10 minutes, gently squeeze the zucchini to remove excess liquid. - In a large bowl, combine 1 cup of flour, 1/2 cup cocoa powder, 1 teaspoon baking soda, 1/2 teaspoon baking powder, and 1/4 teaspoon salt. - Mix them well with a whisk until they are fully blended. - In a separate bowl, whisk together 1/2 cup granulated sugar, 1/2 cup brown sugar, 2 eggs, 1/2 cup vegetable oil, and 1 teaspoon vanilla. - Mix until everything is combined and smooth. - Gradually add the dry mix to the wet mix. Stir gently until just combined. - Avoid overmixing, as this will affect the bread's texture. - Fold in the grated zucchini, 1/2 cup chocolate chips, and 1/4 cup walnuts (if using). - Pour the batter into a greased 9x5 inch loaf pan. - Smooth the top with a spatula. - Bake in a preheated oven at 350°F for 50-60 minutes. - Check doneness by inserting a toothpick into the center. - Once done, let the bread cool in the pan for about 10 minutes. - Carefully transfer the bread to a wire rack to cool completely. For the full recipe, including detailed ingredient lists and tips, check the section above. To make your double chocolate zucchini bread rich and moist, do not overmix the batter. Overmixing can lead to a dense loaf, which we want to avoid. Mix just until combined for the best texture. Also, use room temperature eggs. Cold eggs can cause the batter to chill and not blend well. You can enhance the flavor by adding spices like cinnamon or nutmeg. These spices add warmth and depth to the chocolate. You can also experiment with different types of chocolate. Dark chocolate can bring a rich taste, while milk chocolate adds sweetness. Find the combination that you love best. When serving the bread, slice it on a wooden board. Dust it with powdered sugar for a sweet touch. You can pair it with a dollop of whipped cream or a scoop of vanilla ice cream. This makes for a delightful treat that everyone will enjoy. For the full recipe, click here. {{image_2}} To make this bread healthier, you can swap out some ingredients. - Use whole wheat flour for more fiber. - Try gluten-free flour for a gluten-free version. - Reduce the sugar. You can cut the sugar by one-third. You can change the flavor of the bread easily. - Add spices like cinnamon or nutmeg for warmth. - Toss in nuts, like pecans or almonds, for crunch. - Incorporate fruits such as orange zest or mashed banana for extra sweetness. If you want a vegan version, there are great swaps. - Use flaxseed meal mixed with water instead of eggs. - Substitute applesauce for vegetable oil to cut fat. These ideas help you create a version of Double Chocolate Zucchini Bread that fits your needs. You can find the Full Recipe above for all the details on making this delicious treat! To keep your double chocolate zucchini bread fresh, store it in a cool place. Wrap it in plastic wrap or place it in an airtight container. If you leave it out, it will stay good for about three days. If you want to extend the bread's life, refrigeration works well too. Just make sure to wrap it tightly to avoid drying out. This way, it can last up to a week. Freezing is a great option if you want to save some for later. To freeze, let the bread cool completely. Then, wrap it tightly in plastic wrap, followed by aluminum foil. This helps prevent freezer burn. You can freeze it for up to three months. When you're ready to eat it, take it out and thaw it in the fridge overnight. For a quick thaw, leave it out at room temperature for a few hours. The shelf life of double chocolate zucchini bread is impressive. At room temperature, it stays fresh for about three days. In the fridge, it lasts about a week. If you freeze it, you can enjoy it for three months without losing flavor or texture. Make sure to check for any signs of spoilage before eating. Enjoy your delicious treat! For the full recipe, check out the [Full Recipe]. You can check for doneness with a toothpick. Insert the toothpick into the center of the bread. If it comes out clean or with a few crumbs, the bread is done. This method is foolproof and helps avoid underbaking or overbaking. Yes, you can use frozen zucchini. Thaw it first and squeeze out excess water. This helps keep the bread from becoming too wet. I recommend using it in the same way as fresh zucchini for great results. If you need an egg substitute, you have options. Use 1/4 cup unsweetened applesauce or one ripe mashed banana for each egg. These alternatives add moisture and help bind the ingredients well. Absolutely! If you love chocolate, feel free to add more chocolate chips. You can increase the amount to 3/4 cup for an extra rich flavor. Just keep the overall balance in mind so the bread stays moist. To prevent your bread from sinking, avoid overmixing the batter. Mix until just combined. Also, make sure your baking soda and baking powder are fresh. This helps the bread rise properly during baking. This article guides you through making delicious zucchini chocolate bread. We explored ingredients, from dry and wet components to tasty add-ins. I shared step-by-step instructions for mixing and baking. You learned about tips for perfecting texture and flavor. Variations and storage methods help you adapt and enjoy your bread longer. I hope you feel ready to bake. Enjoy sharing your baked goodness with family and friends!

If you’re craving something sweet and healthy, you need to try my Double Chocolate Zucchini Bread! This rich and moist delight combines the goodness of zucchini with decadent chocolate. It’s …

Read more

Categories Desserts

Grilled Zucchini with Parmesan Flavorful Side Dish

July 2, 2025 by Chef Nate
To make grilled zucchini with Parmesan, you need a few key ingredients. Let's break them down. - Zucchini and Core Ingredients - 4 medium zucchinis, sliced lengthwise into 1/4-inch thick strips - Seasoning and Oil Components - 1/4 cup extra-virgin olive oil - 2 cloves garlic, minced - 1 teaspoon Italian seasoning - Salt and pepper to taste - Garnishes and Optional Add-Ins - 1/2 cup freshly grated Parmesan cheese - 1 tablespoon fresh lemon juice - Fresh basil leaves for garnish These ingredients work together to create a tasty side dish. The zucchini brings a fresh taste, while the Parmesan adds a rich, savory note. The olive oil and garlic enhance the flavors, making every bite delightful. Don't skip the lemon juice and basil; they brighten the dish! For more details, check the Full Recipe. Slicing Techniques First, take your zucchinis and slice them lengthwise. Aim for 1/4-inch thick strips. This thickness allows for even grilling. Use a sharp knife for clean cuts. Seasoning the Zucchini Next, mix together the olive oil, minced garlic, Italian seasoning, salt, and pepper in a bowl. Brush this mixture onto both sides of the zucchini strips. The oil helps the flavors stick during grilling. Preparing the Grill Now, preheat your grill to medium-high heat. This is key for getting those perfect grill marks. Make sure the grill grates are clean. A clean grill prevents sticking and ensures even cooking. First Side Grilling Tips Place the seasoned zucchini on the grill. Grill for about 3-4 minutes. Look for nice char marks as a sign they are ready to flip. Flipping and Cooking Time After 3-4 minutes, it’s time to flip the zucchini. Grill the other side for another 3-4 minutes. You want them tender but not mushy. Adding Parmesan for Flavor In the last minute, sprinkle the grated Parmesan over the zucchini. This adds a rich flavor. Let it melt slightly before removing from the grill. Drizzling Lemon Juice Once off the grill, drizzle fresh lemon juice over the zucchini. This adds brightness. The lemon cuts through the richness of the cheese. Garnishing with Basil Next, add fresh basil leaves on top. They bring freshness and a pop of color. Serving Suggestions Serve your grilled zucchini warm. It pairs well with grilled meats or pasta. Enjoy this tasty side dish from the Full Recipe! Achieving the Right Temperature Set your grill to medium-high heat. This gives zucchini a great sear and keeps it firm. You want it hot enough to char but not burn. A good grill gives your zucchini nice grill marks and flavor. Avoiding Overcooked Zucchini Grill zucchini for about 3-4 minutes on each side. Check for tenderness but stop before it gets mushy. If you overcook it, the zucchini loses its texture and flavor. Ensuring Even Grilling Lay zucchini slices flat on the grill. This helps them cook evenly. Avoid stacking them; that can trap steam and make them soggy. Alternative Seasonings You can switch up the Italian seasoning. Try smoked paprika, cumin, or chili powder for a twist. Each adds a unique flavor that complements zucchini well. Marinade Options Experiment with different marinades. A mix of balsamic vinegar, honey, and olive oil makes a tasty option. Let zucchini sit in the marinade for about 30 minutes for better flavor. Cheese Variations Parmesan is great, but you can try feta or goat cheese. These cheeses bring a tangy flavor to the dish. Sprinkle them on just like you would the Parmesan. Serving Platters For a beautiful presentation, use a large white platter. The contrast highlights the grilled zucchini's bright green color. Layer them in a fan shape to make it eye-catching. Pairing with Other Dishes Grilled zucchini pairs well with grilled meats or pasta dishes. Serve it alongside chicken or fish for a nice balance. It also works great in salads or as a topping on sandwiches. Creative Garnishing Add fresh basil leaves or a drizzle of balsamic glaze. These touches elevate the dish and add color. A sprinkle of red pepper flakes gives it a little kick and makes it pop. You can find the full recipe for Grilled Zucchini with Parmesan to get started on this delightful side dish. {{image_2}} You can enjoy zucchini in many ways. Here are three great methods. - Roasting Zucchini in the Oven: Preheat your oven to 425°F. Cut zucchini into bite-sized pieces. Toss them with olive oil, salt, and pepper. Spread on a baking sheet and roast for 20 minutes. This brings out a sweet, rich flavor. - Sautéing on the Stovetop: Heat a skillet over medium heat. Slice zucchini into rounds. Add olive oil and zucchini to the pan. Cook for about 5-7 minutes, stirring often. This method gives you a quick and tasty result. - Using a Grill Pan: If it's rainy or cold, a grill pan works well. Preheat the pan over medium heat. Brush zucchini with oil and place on the pan. Cook for 4-5 minutes on each side. You’ll still get those lovely grill marks. You can adapt grilled zucchini to fit various diets. Here are some ideas: - Vegan Options: Skip the Parmesan cheese. Instead, sprinkle nutritional yeast for a cheesy flavor. You can also add a dash of balsamic vinegar for extra zest. - Gluten-Free Substitutes: This recipe is already gluten-free! Just ensure your seasonings are gluten-free, too. - Low-Carb Adjustments: Grilled zucchini is low in carbs. For a fun twist, mix in some grilled bell peppers. They add color and flavor while keeping it low-carb. Spice up your grilled zucchini with different flavors. Here are some options: - Mediterranean Inspired: Add crumbled feta cheese and olives. A sprinkle of fresh oregano will transport you to the Mediterranean coast. - Spicy Zucchini Ideas: Mix in crushed red pepper flakes before grilling. This gives a nice kick. You can also serve it with a spicy aioli sauce. - Herb-Infused Options: Toss zucchini with fresh herbs like thyme or rosemary after grilling. This adds freshness and depth to your dish. With these variations, you can make grilled zucchini your own. Each method and flavor twist brings something new to the table! For a complete guide, refer to the Full Recipe. To keep grilled zucchini fresh, store it in the fridge. First, let the zucchini cool completely. Then, place it in an airtight container. This helps avoid moisture loss. You can also cover it tightly with plastic wrap. For longer storage, you can freeze grilled zucchini. Start by cooling it fully. Then, lay the slices flat on a baking sheet. Freeze them for about an hour. After that, place them in a freezer bag. Make sure to remove as much air as possible. This prevents freezer burn. You can use a microwave to reheat grilled zucchini. Place the slices on a microwave-safe plate. Cover them with a damp paper towel. Heat in short bursts of 30 seconds. Check after each burst to avoid overcooking. The best way to reheat grilled zucchini is on the stovetop. Heat a non-stick skillet over medium heat. Add a small amount of olive oil. Once hot, add the zucchini and heat for 2-3 minutes. This keeps the zucchini crispy. How long can you keep leftovers? Grilled zucchini lasts about 3 to 5 days in the fridge. Always check for signs of spoilage before eating. Signs of spoilage include a slimy texture or a strong odor. If you see any mold, throw it away immediately. Remember, fresh food is best! For the full recipe, check out the Grilled Zucchini Delight with Parmesan! To grill zucchini and keep it firm, follow these tips: - Choose fresh zucchinis. Pick ones that feel firm and are not too large. - Cut evenly. Slice them into 1/4-inch thick strips. This helps them cook evenly. - Preheat the grill. Make sure it is hot before adding the zucchini. - Brush with oil. This keeps them from sticking and helps with grilling. Common mistakes to avoid include: - Overcooking. Grill for only 3-4 minutes per side. Watch for grill marks. - Too much moisture. Avoid soaking the zucchini in oil. A light brush is enough. Yes, you can use other cheeses. Some great options are: - Pecorino Romano. It has a strong flavor and similar texture. - Asiago. This cheese melts well and adds a nice bite. - Feta. Crumbled feta gives a tangy twist. Flavor comparisons: - Pecorino is saltier and sharper than Parmesan. - Asiago is creamier when melted. - Feta provides a unique salty and tangy flavor. Grilled zucchini works well with many dishes. Here are some suggestions: - Grilled chicken. The mild taste of zucchini complements well-seasoned meat. - Fish tacos. The crunch of zucchini adds a fresh touch to soft tacos. - Pasta dishes. Toss it with spaghetti and olive oil for a light meal. For salads and side dish ideas: - Caprese salad. The fresh mozzarella and tomatoes pair nicely. - Quinoa salad. This adds protein and makes a great side. - Rice dishes. Zucchini adds color and texture to stir-fried rice. Enjoy this flavorful side dish with any of your favorite meals. For the complete recipe, check out the Full Recipe section. Grilling zucchini is simple and fun. We covered the best ingredients, from core elements to tasty garnishes. I shared easy steps, ensuring perfect results every time. The tips provided help avoid common cooking mistakes and enhance flavors. Explore different methods and adapt for dietary needs. Finally, store and reheat leftovers correctly to keep them tasty. Enjoy grilling zucchini this summer, knowing you can create delicious meals effortlessly. Your kitchen adventure begins now, so fire up that grill!

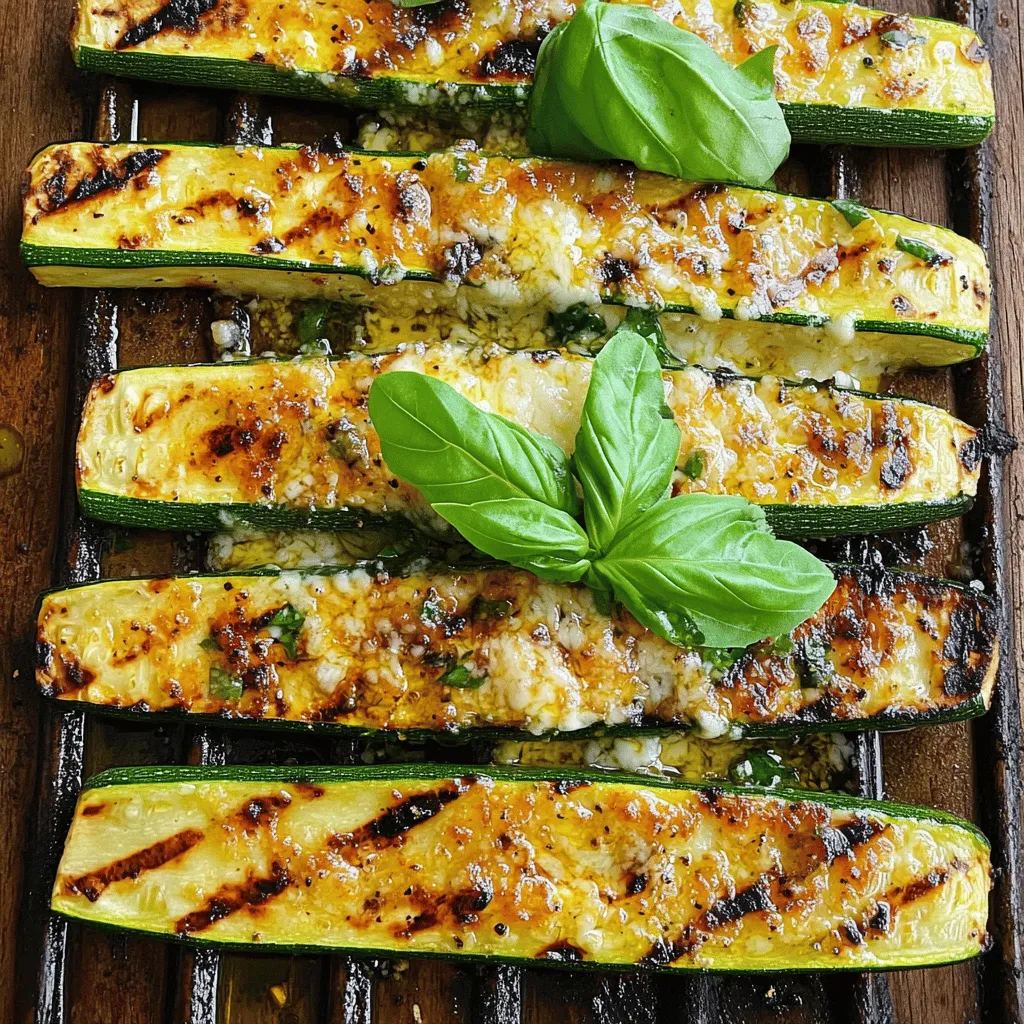
Looking for a simple yet flavorful side dish? Grilled zucchini with Parmesan is a top choice! This tasty recipe transforms fresh zucchini into a smoky, cheesy delight. I’ll guide you …

Read more

Categories Appetizers

Healthy Chocolate Zucchini Muffins Delightful and Nutritious

July 2, 2025 by Chef Nate
To make healthy chocolate zucchini muffins, you need simple and nutritious ingredients. Here’s what you’ll need: - 1 cup grated zucchini - 1 cup whole wheat flour - 1/2 cup unsweetened cocoa powder - 1/2 cup maple syrup or honey - 1/4 cup coconut oil, melted - 2 large eggs - 1 teaspoon vanilla extract - 1/2 teaspoon baking soda - 1/2 teaspoon baking powder - 1/4 teaspoon salt - 1/2 cup dark chocolate chips (optional) - 1/4 cup chopped walnuts (optional) Zucchini adds moisture and health benefits to these muffins. Whole wheat flour gives them fiber and a nutty flavor. Cocoa powder brings that rich chocolate taste we all love. I often use maple syrup for sweetness, but honey works too. The melted coconut oil keeps them moist without unhealthy fats. You can add dark chocolate chips for extra chocolate goodness. Walnuts add a nice crunch and healthy fats. If you're looking for a delicious and nutritious treat, this recipe is perfect. Check out the Full Recipe for easy steps to bake these delightful muffins! - Preheat your oven to 350°F (175°C). Line a muffin tin with paper liners or grease it. - In a large mixing bowl, whisk together the melted coconut oil, maple syrup or honey, eggs, and vanilla. Mix well. - Fold in the grated zucchini until it spreads evenly through the wet mixture. - In a separate bowl, combine whole wheat flour, cocoa powder, baking soda, baking powder, and salt. - Gradually add the dry mix to the wet mix. Stir just until combined, but do not over-mix. - Portion the batter into muffin cups, filling each about three-quarters full. - Bake for 18-20 minutes. Check for doneness with a toothpick. It should come out clean. Enjoy the delightful aroma filling your kitchen as these muffins bake! For the full recipe, check the previous section. To ensure your muffins stay moist, start with fresh zucchini. Grate it just before use. This adds natural moisture to your muffins. You can also try adding a bit more coconut oil if needed. It helps keep them soft. Do not over-mix your batter. When you combine wet and dry ingredients, mix until just combined. Over-mixing can lead to tough muffins. You want a light and fluffy texture. For fun add-ins, try using nuts or chocolate chips. Chopped walnuts add a nice crunch. Dark chocolate chips bring rich flavor and sweetness. Feel free to mix and match these options to your taste. You can also incorporate spices or extracts. A pinch of cinnamon or a dash of vanilla extract can elevate the flavor. Experimenting with flavors makes the muffins more exciting. Serve your muffins warm for the best taste. Dust them lightly with cocoa powder for an extra touch. This adds visual appeal and a hint of chocolate. Pair your muffins with yogurt or fresh fruit. Yogurt adds creaminess, while fruit brings freshness. This combination makes a tasty breakfast or snack. For the full recipe, check out the Healthy Chocolate Zucchini Muffins section. {{image_2}} You can easily swap out some ingredients to make these muffins even healthier. For sweeteners, consider using coconut sugar or agave nectar. These options lower the glycemic index while maintaining sweetness. If you want gluten-free muffins, use almond flour or a gluten-free blend. Both options keep the muffins light and delicious. Feel free to get creative with flavors! You might add white chocolate chips or dark chocolate chunks. You can even mix in fruits like blueberries or raspberries. Spices like cinnamon or nutmeg can add warmth and depth. Just a pinch can transform the taste. Incorporating seasonal produce can make your muffins special. In spring, add fresh strawberries or rhubarb. In fall, consider pumpkin puree for a festive touch. For the holidays, try adding cranberries or nuts. Each season brings a new chance to enjoy these muffins. You can easily create a unique version for any occasion. For the full recipe, check the earlier section! To keep your healthy chocolate zucchini muffins fresh, store them in an airtight container. This helps to keep them moist. You can also wrap them individually in plastic wrap for extra protection. A glass container works great for this as it seals well. If you want to save some for later, freezing is a good option. First, let the muffins cool completely. Then, place them in a single layer on a baking sheet. Freeze them for about an hour. Once frozen, transfer the muffins to a zip-top bag. Remove as much air as possible before sealing. To thaw, take a muffin out and leave it at room temperature for about 30 minutes. You can also warm it up in the microwave for 10-15 seconds. These muffins last about five days in the fridge when stored properly. In the freezer, they stay good for about three months. Just make sure to label your bags with the date! Enjoy your treats any time you like with these storage tips. Can I use regular flour instead of whole wheat? Yes, you can use all-purpose flour instead of whole wheat flour. However, whole wheat flour gives more fiber and nutrients. It also adds a nice flavor. If you use all-purpose flour, the muffins may be lighter, but they won’t be as healthy. How can I make these muffins vegan? To make these muffins vegan, swap the eggs with flax eggs. Mix one tablespoon of ground flaxseed with three tablespoons of water. Let it sit for five minutes to thicken. You can also replace honey with maple syrup for sweetness. What are the health benefits of zucchini in muffins? Zucchini is low in calories and high in nutrients. It adds moisture to muffins without extra fat. It also provides fiber, which helps digestion. Plus, zucchini has vitamins A and C, which are good for your skin and immune system. How do these muffins compare to traditional ones nutritionally? These healthy chocolate zucchini muffins have less sugar and fat than traditional chocolate muffins. Using whole wheat flour adds fiber. The zucchini boosts the nutrition without changing the taste. Overall, they are a better choice for your health. What should I do if my muffins are too dense? If your muffins are dense, you might have over-mixed the batter. Mix until just combined to keep them light. Also, check your baking powder and baking soda for freshness. Old leavening agents can cause dense muffins. Can I leave out the cocoa powder? Yes, you can leave out the cocoa powder. This will change the flavor and color. You can replace it with more flour or add spices like cinnamon for extra taste. These muffins combine healthy ingredients with simple steps for tasty results. You learned about the key ingredients, preparation, baking tips, and how to make variations. Remember to store your muffins well for the best flavor and texture. With the right adjustments, you can enjoy a healthier treat that fits your taste. So, get baking and enjoy these muffins whenever you crave something delicious and nutritious!

Are you ready to enjoy a tasty treat that’s also healthy? These Healthy Chocolate Zucchini Muffins are packed with nutrients and flavor. They use simple ingredients like whole wheat flour …

Read more

Categories Desserts

Lemon Herb Couscous Salad Fresh and Flavorful Recipe

December 21, 2025July 2, 2025 by Chef Nate
To make Lemon Herb Couscous Salad, you need the following ingredients: - 1 cup couscous - 1 ¼ cups vegetable broth - 1 medium cucumber, diced - 1 cup cherry tomatoes, halved - ½ red onion, finely chopped - 1 cup chickpeas, rinsed and drained - ½ cup parsley, finely chopped - ¼ cup mint leaves, finely chopped - Zest of 1 lemon - 3 tablespoons lemon juice - 3 tablespoons olive oil - Salt and pepper to taste You can swap ingredients if needed. Use quinoa instead of couscous for a gluten-free option. For the broth, water or chicken broth works too. If you don't have chickpeas, try black beans or kidney beans. You can also use different herbs like basil or cilantro instead of parsley and mint. If red onion is too strong for you, use green onions or shallots. Fresh herbs make the salad bright and tasty. They add a punch of flavor that dried herbs can't match. Parsley gives a fresh taste, while mint adds a cool note. Using fresh herbs makes your dish look nice, too. They add color and texture, making it more appealing. When you chop herbs, do it finely to release their oils. This helps to make the flavors pop. Fresh herbs are key to a delicious Lemon Herb Couscous Salad. {{ingredient_image_1}} To start, I heat 1 ¼ cups of vegetable broth in a medium saucepan until it boils. This step is key because broth adds flavor. Once it boils, I stir in 1 cup of couscous. Then, I cover the pan and remove it from heat. I let it sit for 5 minutes. After that, I fluff the couscous with a fork. This helps separate the grains. Finally, I let it cool before mixing it with the vegetables. Next, I grab a large mixing bowl. In it, I combine my diced cucumber, halved cherry tomatoes, finely chopped red onion, and rinsed chickpeas. I also add ½ cup of finely chopped parsley and ¼ cup of chopped mint leaves. These herbs give the salad a fresh taste. Mixing these veggies adds color and crunch. Now, I create the dressing. In a small bowl, I whisk together the zest of 1 lemon, 3 tablespoons of lemon juice, 3 tablespoons of olive oil, and some salt and pepper. This dressing brightens the salad. I pour it over the cooled couscous and vegetable mixture. Then, I gently toss everything together until well combined. To let the flavors blend, I cover the salad and refrigerate it for at least 30 minutes. This step is important for a tasty meal. To fluff couscous well, start by using a fork. After the couscous sits, gently stir it. This breaks apart any clumps. Be careful not to mash it. The goal is light and fluffy grains. For great flavor, add the dressing right before serving. This keeps the couscous fresh. Use fresh herbs like parsley and mint. They add bright, zesty notes. You can also let the salad chill. This lets the flavors blend nicely. Serve your salad in a large bowl. This makes it look inviting. Garnish with lemon wedges and extra mint. It adds a pop of color. You can also use a platter for a more elegant look. A sprinkle of extra herbs on top makes it even better. Pro Tips Cool Couscous: Allow the couscous to cool completely before mixing it with the vegetables to prevent wilting. Fresh Herbs: For the best flavor, use fresh herbs rather than dried ones, as they add brightness to the dish. Chill Time: Let the salad chill in the refrigerator for at least 30 minutes so the flavors can meld together beautifully. Customize Add-ins: Feel free to add other ingredients like feta cheese, bell peppers, or olives for additional texture and flavor. {{image_2}} You can easily add protein to your Lemon Herb Couscous Salad. Cooked chicken, tofu, or fish makes the dish heartier. For chicken, grill or roast it, then slice it thin. For tofu, press it to remove water, then cube and sauté until golden. If you prefer fish, grilled salmon or shrimp works well. Simply mix the cooked protein into the salad before serving. This makes it a perfect meal. The base of this salad is already vegetarian. To make it vegan, just skip any animal-based proteins. You can add more chickpeas for protein. Nuts like almonds or walnuts also provide a nice crunch. Try using avocado for creaminess. These options keep the salad fresh and filling while still being plant-based. Change the ingredients based on the season. In summer, add fresh corn or bell peppers. In fall, roasted sweet potatoes or butternut squash are great choices. During winter, use hearty greens like kale or spinach. These swaps add variety and keep the salad exciting year-round. Each season offers unique flavors, making this dish versatile and fun to prepare. Lemon herb couscous salad stays fresh in the fridge for about three days. After that, the veggies can lose their crunch. The flavors may fade too. Always check for any signs of spoilage before eating. I do not recommend freezing this salad. Freezing can change the texture of the couscous and fresh veggies. If you freeze it, the salad may turn mushy when thawed. Enjoy it fresh for the best taste and texture. Use an airtight container for the best storage. Glass or BPA-free plastic works well. Make sure to seal it tightly to keep out air and moisture. This helps maintain the salad's freshness longer. Yes, you can make this salad ahead of time. It tastes even better after resting. The flavors blend well when chilled. I suggest making it a few hours before serving. Just store it in the fridge. This way, you save time and enjoy a tasty dish. This salad pairs well with many dishes. You can serve it with grilled chicken or fish. It also works great with roasted veggies. For a vegetarian option, try it with falafel. You can enjoy it as a light lunch or a side for dinner. The fresh flavors complement many meals. To make this salad gluten-free, use quinoa instead of couscous. Quinoa is a great substitute. It has a similar texture and absorbs flavors well. Just cook the quinoa in vegetable broth like you do with couscous. Follow the same steps for mixing in the veggies and dressing. You'll still have a delicious dish! In this blog post, we explored how to create a tasty lemon herb couscous salad. We looked at key ingredients, ingredient swaps, and the role of fresh herbs. Then, I shared simple steps for cooking and mixing the salad. You learned tips for perfect fluffiness and flavor. We even discussed protein options and storage tips. Remember, this salad is versatile and can fit many diets. Try it with your favorite ingredients for a fresh meal anytime. Enjoy making it your own!

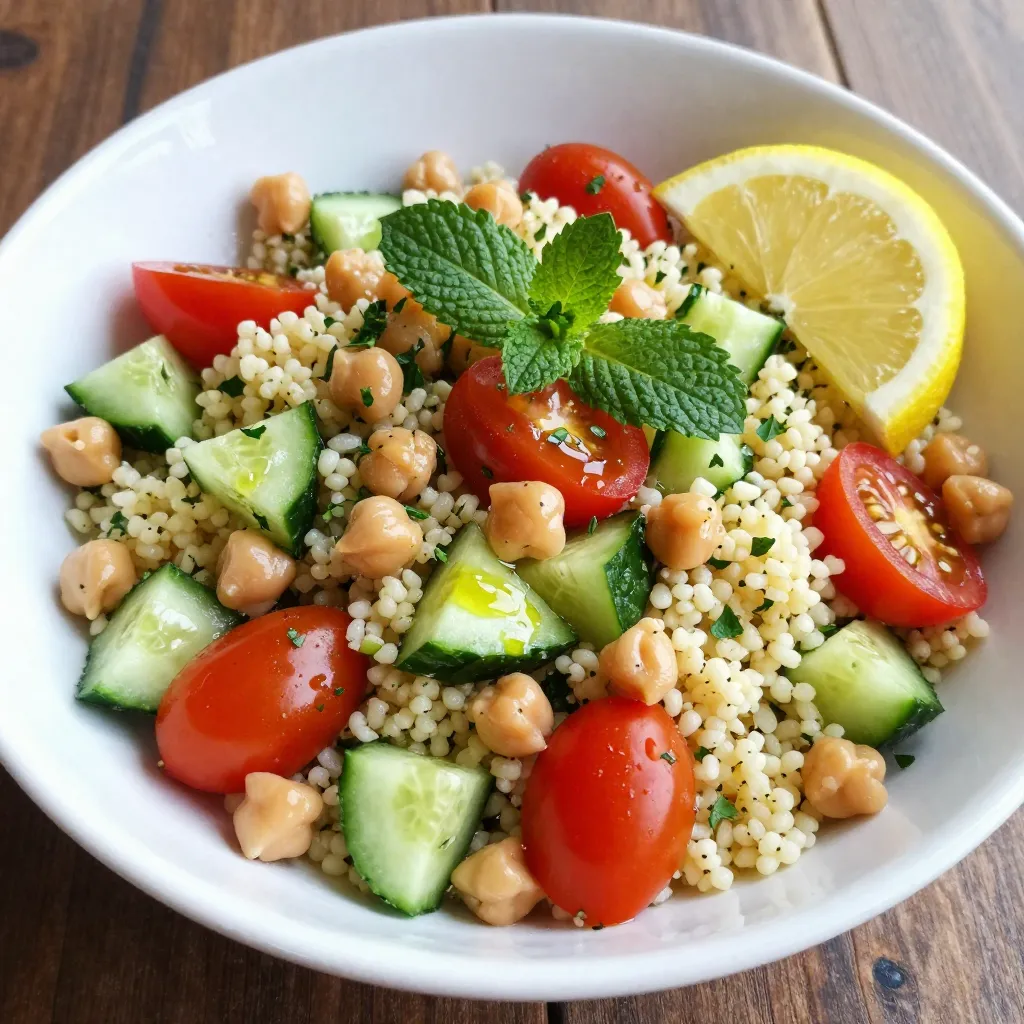
Looking for a fresh and tasty salad that’s quick to whip up? You’ve just found it! My Lemon Herb Couscous Salad is packed with flavor and vibrant colors. It’s perfect …

Read more

Categories Salads

Pumpkin Spice Overnight Oats Simple and Healthy Recipe

November 8, 2025July 2, 2025 by Chef Nate
To make pumpkin spice overnight oats, you will need these key ingredients: - 1 cup rolled oats - 1 cup almond milk (or any milk of your choice) - 1/2 cup canned pumpkin puree - 1 tablespoon chia seeds - 1 tablespoon maple syrup (or honey) - 1 teaspoon pumpkin pie spice - 1/2 teaspoon vanilla extract - Pinch of salt These ingredients create a tasty and healthy breakfast. The oats give you fiber, while the pumpkin adds vitamins. Chia seeds boost your omega-3 intake, and maple syrup sweetens the mix naturally. When measuring, use a standard cup and tablespoon. If you do not have almond milk, any milk works well. You can also swap pumpkin puree with sweet potato puree for a different flavor. Maple syrup can be replaced with honey or agave nectar, depending on your taste. For those who want to skip the pumpkin pie spice, you can mix cinnamon and nutmeg for a similar taste. Keeping the same measurements will yield the best results. Toppings can make your oats even better. Here are some ideas: - Chopped nuts (like walnuts or pecans) - Dried fruits (such as raisins or cranberries) - A dollop of yogurt for creaminess These toppings add texture and extra flavor. You can mix and match based on what you have at home. Enjoy experimenting to find your favorite combination! {{ingredient_image_1}} First, grab a mixing bowl. Add 1 cup of rolled oats, 1 tablespoon of chia seeds, and a pinch of salt. This mix serves as the heart of your oats. The oats provide fiber, while chia seeds add some protein and healthy fats. Stir these dry ingredients well to combine. In another bowl, whisk together your liquid ingredients. Use 1 cup of almond milk, 1/2 cup of canned pumpkin puree, and 1 tablespoon of maple syrup. Add 1 teaspoon of pumpkin pie spice and 1/2 teaspoon of vanilla extract. Mix until smooth. This mixture brings the pumpkin flavor and spice you love. The maple syrup adds sweetness, making the oats delicious. Now, pour the pumpkin mixture into your oat base. Stir until everything is well combined. This is where the magic happens! Divide the combined mixture into two jars or containers. Seal them tightly with lids. Place them in the fridge overnight. This allows the oats to soak up the flavors. The next morning, stir the oats. If they seem thick, add a splash of almond milk. Serve them chilled and add your favorite toppings. Enjoy the creamy, spiced goodness! To get the best texture in your overnight oats, use rolled oats. They soak up the liquid well. I recommend mixing them with chia seeds for added creaminess and nutrition. The chia seeds help the oats thicken overnight. If your oats are too thick in the morning, just add a splash of almond milk. Stir it well to reach a smooth, creamy texture. If you like your oats sweeter, you have options. You can add more maple syrup or honey to taste. Start with a little extra and mix well. Taste it before adding more. If you want less sweetness, cut back on the maple syrup. The pumpkin puree adds some natural sweetness too. You can also try adding a mashed banana for a different flavor. Meal prep makes mornings easier. You can double this recipe to have more servings. Use jars or containers that seal well. This keeps your oats fresh. Prepare them on Sunday night for quick breakfasts during the week. Just grab a jar and go! You can also change toppings each day to keep things fun. Try nuts one day and dried fruits the next. Pro Tips Use Steel-Cut Oats: For a chewier texture, substitute rolled oats with steel-cut oats. Just remember to extend the soaking time to overnight or even longer. Experiment with Milk Alternatives: While almond milk is great, try other milk alternatives like oat milk or coconut milk for different flavor profiles. Add Extra Spice: If you love pumpkin spice, feel free to increase the amount of pumpkin pie spice or add a pinch of nutmeg for a more robust flavor. Make it a Meal Prep: Double or triple the recipe and store in the fridge for quick breakfasts throughout the week. Just add toppings before serving! {{image_2}} You can make pumpkin spice overnight oats dairy-free and vegan with a few swaps. Use almond milk, coconut milk, or oat milk instead of regular milk. These alternatives keep the oats creamy and delicious. You can also skip honey and use maple syrup for sweetness. This way, everyone can enjoy your tasty oats! Pumpkin spice is great, but you can mix it up! Try adding apple pie spice in the fall. In winter, use gingerbread spice for a festive twist. For spring, switch to lemon zest and blueberries. Each season brings fresh flavors that make your oats exciting and fun! To boost the protein in your oats, add Greek yogurt or protein powder. A dollop of yogurt on top gives a creamy finish. You can also mix in nut butter like almond or peanut. These additions make your breakfast filling and keep you energized all morning. To store your pumpkin spice overnight oats, keep them in sealed jars. Glass jars work well, but any container with a tight lid will do. Make sure the oats are covered to keep them fresh. These oats last up to five days in the fridge. After that, they may lose flavor and texture. Check for any signs of spoilage before eating. If they look or smell off, it's best to toss them. You can freeze the oats for later use. Simply pour the mixture into freezer-safe containers. Leave some space at the top, as the oats will expand when frozen. They can last for up to three months in the freezer. When you're ready to eat, thaw them in the fridge overnight. Yes, you can use quick oats, but the texture will change. Quick oats cook faster and can become mushy. Steel-cut oats work too, but they need longer soaking. If you choose steel-cut oats, soak them longer than overnight. Adjust the liquid to make sure they soften well. You can keep leftover overnight oats in the fridge for up to four days. Make sure to store them in a sealed jar. If you notice any changes in taste or smell, it’s time to toss them out. Always check before eating! No, pumpkin puree and pumpkin pie filling are not the same. Pumpkin puree is just pure pumpkin. It has no added sugar or spices. Pumpkin pie filling has sugar and spices added for flavor. Stick with pumpkin puree for this recipe to get the best taste. In this article, we explored how to make delicious pumpkin spice overnight oats. You learned about key ingredients, measurements, and topping options. I shared step-by-step instructions for the perfect oat base and spice mix. Tips for texture, sweetness, and meal prep can help you customize your oats. We also covered variations, storage methods, and answered common FAQs. Enjoy experimenting with flavors and making this healthy breakfast your own. Eating well can be easy and fun!

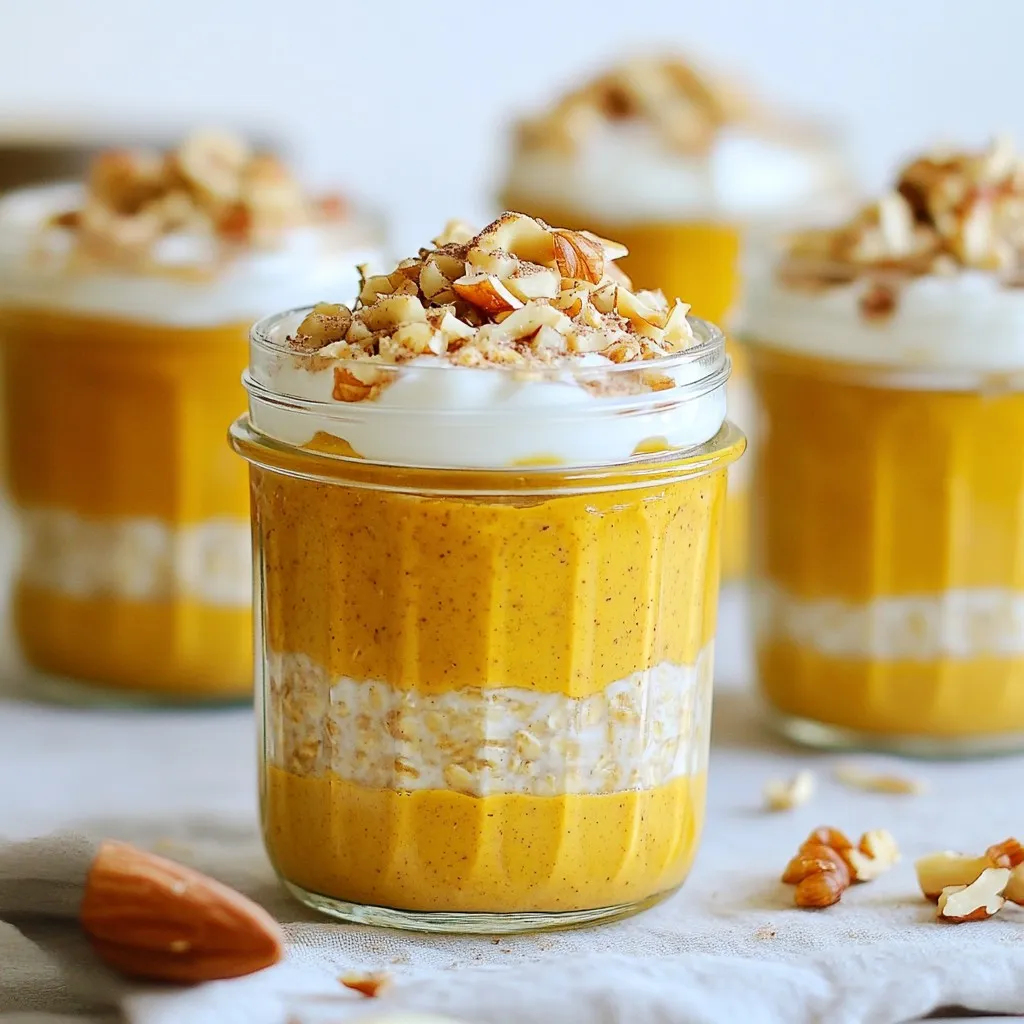
Are you ready to embrace fall with a tasty twist? Pumpkin Spice Overnight Oats are simple, healthy, and perfect for busy mornings. In this article, I’ll share how to make …

Read more

Categories Breakfast

Mixed Berry Chia Jam Fresh and Flavorful Spread

November 29, 2025July 2, 2025 by Chef Nate
Start by placing 2 cups of mixed berries in a medium saucepan. Use strawberries, blueberries, and raspberries for great flavor. Heat them over medium heat. Stir them occasionally. This helps the berries break down and release their juices. It will take about 5 to 7 minutes. Once the berries soften, you need to crush them. Use a masher or a fork. Crush them to your desired consistency. If you want a smoother jam, briefly blend the mixture with an immersion blender. Now, it’s time to add the sweet stuff. Stir in 2 tablespoons of honey or maple syrup. Adjust this based on how sweet you like your jam. Next, add 2 tablespoons of chia seeds. These will help thicken your jam. Don’t forget to include 1 tablespoon of lemon juice and a pinch of salt. Mix everything well to combine. Reduce the heat to low. Let the mixture simmer for 5 to 10 minutes. Stir it frequently. This helps the chia seeds absorb liquid and thickens the jam. Keep an eye on the texture. You want it to be just right for spreading. Once it's thickened to your liking, remove it from the heat. Let it cool to room temperature. - Adjusting sweetness levels: You can change the sweetness by adding more or less honey. Start with two tablespoons. Taste the jam as you mix. If you want it sweeter, add a little more honey or maple syrup. Always remember, you can add but cannot take away! - Tips for achieving the right texture: For a thicker jam, let it simmer longer. The chia seeds will soak up some liquid, so be patient. If you like a smoother jam, blend it briefly with an immersion blender. You can also mash the berries more if you prefer some chunks. - Ideas for pairing with toast and scones: This jam goes great on warm toast or fresh scones. Spread a thick layer for a tasty breakfast. You can also use it as a filling for pastries or even pancakes. - Creative uses for mixed berry chia jam: Use this jam as a topping for yogurt or oatmeal. It also makes a great filling for cakes or muffins. Try mixing it into smoothies for a fruity kick! Pro Tips Fresh Berries for Best Flavor: Use fresh, ripe berries for the best flavor and natural sweetness in your jam. Adjust Sweetness to Taste: Feel free to adjust the amount of honey or maple syrup based on your sweetness preference. Storage Tips: Store the jam in an airtight container in the fridge, and it should last for up to two weeks. Versatile Uses: This jam is great on toast, but also works well as a topping for yogurt, pancakes, or desserts. {{image_2}} You can change the flavor of your jam by using different berries. Strawberries, blueberries, and raspberries work well together. But you can also try blackberries, cranberries, or even cherries. Seasonal berries taste fresh and bright. In summer, use ripe strawberries. In winter, frozen berries are a good choice. Mixing different berries adds depth and excitement to your jam. While honey and maple syrup are great, don't be afraid to explore other sweeteners. Agave nectar or coconut sugar can add a nice twist. For a sugar-free version, consider using stevia or monk fruit. Just remember to adjust the amount based on your taste. Each sweetener will give a unique flavor to your jam. Spices can elevate your jam's taste. Try adding a dash of vanilla extract for a warm note. Cinnamon can add warmth and sweetness too. A pinch of ginger can bring a zing that pairs well with berries. Be creative! Small changes can make your jam different and special. To store your mixed berry chia jam, use a clean glass jar. Make sure the jar is dry. After cooling the jam to room temperature, place it in the jar. Seal the jar tightly. Store it in the fridge for the best taste. You can freeze mixed berry chia jam for later use. First, let the jam cool completely. Then, transfer it to a freezer-safe container. Leave space at the top, as the jam will expand when frozen. Seal the container tightly and label it with the date. It will keep well in the freezer. In the fridge, your jam should last about two weeks. If you freeze it, it can last up to six months. Always check for signs of spoilage before using. If it smells off or shows mold, throw it away. This way, you can enjoy your jam fresh and tasty. Making mixed berry chia jam is quick and easy. It takes about 10 minutes to prep. The cooking time is around 20 minutes. So, the total time is about 30 minutes. This quick jam is perfect for busy mornings or snacks. Yes, you can use frozen mixed berries. They work just as well as fresh ones. Just make sure to thaw them first. This helps them break down easily. Frozen berries may release more juice. Adjust your cooking time if needed to thicken the jam. Chia jam is very healthy. Chia seeds are packed with nutrients. They are high in fiber, omega-3 fatty acids, and protein. This makes them great for digestion and heart health. Plus, using natural sweeteners like honey or maple syrup adds good flavors without too much sugar. You can make delicious mixed berry chia jam with just a few simple steps. We covered the ingredients, cooking methods, and tips for perfecting your jam. Don’t hesitate to try different berries and sweeteners to find your favorite blend. Remember, storage is key for freshness, so use the tips we shared. Making this jam is fun and rewarding. Enjoy it on your breakfast or snack. You’ll love the flavors and health benefits!

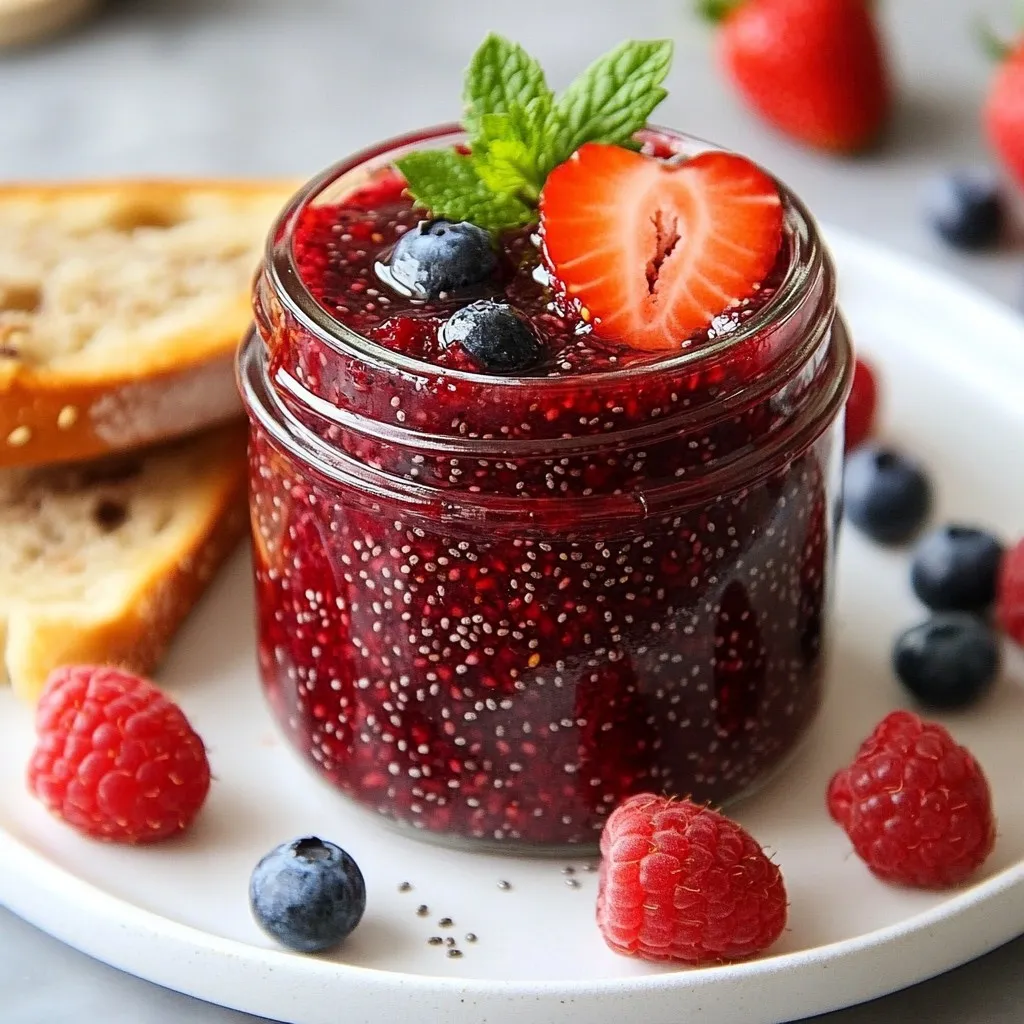
Are you ready to level up your breakfast game? This Mixed Berry Chia Jam is both fresh and flavorful, perfect for spreading on toast or scones. With just a handful …

Read more

Categories Desserts

Easy Zucchini Lasagna Quick and Simple Homemade Dish

July 1, 2025 by Chef Nate
- 3 medium zucchinis - 2 cups ricotta cheese - 1 cup shredded mozzarella cheese - 1/2 cup grated Parmesan cheese - 1 egg - 2 cups marinara sauce - 1 teaspoon dried Italian herbs - 1/2 teaspoon garlic powder - Salt and pepper to taste - Fresh basil leaves for garnish You can switch out cheeses if needed. Try cottage cheese for a lighter option. Use goat cheese for a tangy twist. If you want a low-carb dish, replace zucchini with eggplant. For gluten-free marinara, choose brands that are certified gluten-free. Homemade sauce is also a great choice. When you make zucchini lasagna, think about using high-quality ingredients. This makes a real difference in flavor. Check your local markets for fresh produce and organic cheeses. When you combine fresh flavors, you create a meal that everyone will love. For the full recipe, check out the Easy Zucchini Lasagna section. Enjoy crafting this delicious dish! 1. Preheat your oven to 375°F (190°C). This gets it nice and hot. 2. Slice the zucchinis lengthwise into thin strips, about 1/8 inch thick. This helps them cook evenly. 3. To remove excess moisture, sprinkle salt on the zucchini slices. Let them sit for about 20 minutes. 4. After 20 minutes, pat the slices dry with paper towels. This step is key for a good texture. 1. In a mixing bowl, stir together the ricotta cheese, 1/4 cup of Parmesan cheese, egg, dried herbs, garlic powder, salt, and pepper. Make sure it’s smooth and well-mixed. 2. In a baking dish, spread a thin layer of marinara sauce on the bottom. This prevents sticking and adds flavor. 3. Layer zucchini slices over the marinara sauce, covering the bottom completely. 4. Spread half of the ricotta mixture over the zucchini. This will add creaminess. 5. Add another layer of marinara sauce, then another layer of zucchini, followed by the rest of the ricotta mixture. 6. Finish with a final layer of marinara sauce on top. 7. Sprinkle the shredded mozzarella cheese and the remaining Parmesan cheese over the last layer. 1. Cover the baking dish with foil to keep in moisture. 2. Bake for 25 minutes. This lets all the layers cook through. 3. After 25 minutes, carefully remove the foil. Bake for another 15 minutes. This step helps the cheese brown nicely. 4. Once it's done, let the lasagna sit for about 10 minutes before slicing. This helps it hold its shape when you serve it. Now you're ready to enjoy a delicious Easy Zucchini Lasagna! For the full recipe, check out the Easy Zucchini Lasagna section. To perfect your zucchini lasagna, moisture control is key. Zucchinis hold a lot of water. To reduce moisture, slice the zucchinis thinly. Salt the slices and let them sit for 20 minutes. This draws out excess liquid. Then, pat them dry with paper towels. This step makes your lasagna less soggy. Even cheese distribution is also important. When you layer, spread the cheese mixtures evenly. This ensures every bite is rich and creamy. Use a spatula to help spread the ricotta mixture. It helps to avoid clumps and keeps flavors balanced. Garnishing your dish makes it look inviting. Fresh basil leaves add color and a sweet scent. Simply place a few leaves on top right before serving. You can also drizzle some marinara sauce around the plate. This adds flair and makes the dish pop. For sides, a simple salad pairs well. A mix of greens with a light vinaigrette works nicely. You could also serve garlic bread for a heartier meal. Both sides complement the flavors of the lasagna. One common mistake is overlayering zucchini. Too many layers can make the dish watery. Stick to one layer of zucchini per section. This keeps your lasagna firm and easy to serve. Another mistake is not letting it rest. After baking, let your lasagna sit for 10 minutes. This helps the layers set. Cutting it too soon can make it fall apart. Patience will reward you with perfect slices. For the full recipe, check out the Easy Zucchini Lasagna 🥒 section. {{image_2}} You can easily make this lasagna heartier by adding meat. Ground turkey or beef work great. Just brown the meat in a pan before layering it. This step adds flavor and makes the dish filling. If you want more spice, try using Italian sausage. It brings a nice kick to the dish. Simply cook it the same way as the ground meat. For a veggie-packed version, consider adding spinach and mushrooms. Layer them with the zucchini for extra nutrients and taste. Sauté the mushrooms first to reduce water. You can also swap in other vegetables like bell peppers or eggplant. This gives the dish a fresh twist, making it colorful and tasty. To boost the flavor, add spices and herbs. A pinch of red pepper flakes brings heat and excitement. You can also mix in fresh herbs like basil or parsley for brightness. If you enjoy a smoky flavor, try a touch of smoked paprika. These options transform your lasagna into a unique dish. Experiment with your favorites to find the perfect blend. Explore the full recipe for more ideas and tips! Store your zucchini lasagna in a proper container. Use an airtight container to keep it fresh. It will last about 3 to 5 days in the fridge. Make sure to cool it completely before sealing the container. This helps prevent moisture build-up. Freezing is a great option if you want to save some for later. First, let the lasagna cool completely. Wrap it tightly in plastic wrap, then in aluminum foil. This stops freezer burn. You can freeze it for up to 3 months. When you're ready to eat, thaw it overnight in the fridge. You can reheat your lasagna in the oven or the microwave. The oven gives the best results. Preheat it to 350°F (175°C). Cover the dish with foil to keep it moist. Bake for about 20 minutes or until it's hot. If you use the microwave, heat it in short bursts. This keeps it from getting too soggy. Always check the center to make sure it’s warm. Yes, you can make zucchini lasagna ahead of time. Just prepare the dish up to the baking step. Then, cover it tightly and store it in the fridge. - Make-ahead tips: - Assemble the layers but skip baking. - Use a glass dish for easy storage and reheating. - You can bake it the next day. Just add a few minutes to the baking time. This way, you save time on busy days. You still enjoy a fresh, warm meal. Absolutely! Zucchini lasagna is gluten-free by nature. Instead of pasta, you use zucchini slices. - Ingredient alternatives: - Check your marinara sauce for gluten. Most store-bought options are safe. - If using cheese, avoid brands that add gluten as a thickener. This dish is perfect for gluten-free diets. You get all the flavor without any gluten. Preventing watery zucchini is key to a great lasagna. Salt helps draw out moisture. - Techniques to reduce moisture: - Slice the zucchini thinly and sprinkle salt. Let it sit for 20 minutes. - Pat the slices dry with paper towels before layering them in the dish. - Bake uncovered for part of the time to let steam escape. These steps keep your lasagna from being soggy. You want rich, thick layers full of flavor. You learned how to make a delicious zucchini lasagna in this post. We covered the key ingredients and their substitutes. I shared step-by-step instructions for cooking and assembling your dish. Tips on handling zucchini and mistakes to avoid can help you succeed. Feel free to explore variations and storage options to customize your meal. With these insights, you can impress anyone with your cooking. Enjoy every bite and happy cooking!

Looking for a delicious, healthy twist on lasagna? You’re in the right place! This Easy Zucchini Lasagna is quick to make and will impress your family. We’ll layer fresh zucchini …

Read more

Categories Dinner

Zucchini Carrot Oatmeal Muffins Healthy and Tasty Treat

July 1, 2025 by Chef Nate
In these zucchini carrot oatmeal muffins, each ingredient plays a key role. Here are the main ones: - 1 cup grated zucchini (about 1 medium zucchini) - 1 cup grated carrot (about 2 medium carrots) - 1 cup rolled oats - 1 cup whole wheat flour - 1/2 cup brown sugar (or coconut sugar) - 1/2 cup unsweetened applesauce - 1/4 cup honey or maple syrup - 1/4 cup vegetable oil or melted coconut oil - 1 tsp baking powder - 1/2 tsp baking soda - 1/2 tsp cinnamon - 1/4 tsp nutmeg - 1/4 tsp salt These ingredients create a moist and tasty muffin. The zucchini adds moisture, while the carrots bring sweetness and color. The oats and whole wheat flour add fiber, making these muffins filling and nutritious. You can customize these muffins with some fun add-ins. Here are a few options: - 1/2 cup walnuts or pecans (optional) - 1/2 cup raisins or chocolate chips (optional) Adding nuts gives a nice crunch. Chocolate chips add sweetness, while raisins boost flavor. Feel free to mix and match based on your taste! If you need to swap ingredients, here are some ideas: - Replace brown sugar with coconut sugar for a lighter option. - Use almond flour instead of whole wheat flour for a gluten-free muffin. - Swap applesauce with mashed banana for a different flavor. These substitutions can help you make the muffins fit your diet or taste. Enjoy experimenting with your own twist on the full recipe! Start by gathering all your ingredients. This helps keep you organized. Preheat your oven to 350°F (175°C). Line a muffin tin with paper liners or lightly grease it. In a large bowl, combine 1 cup of grated zucchini and 1 cup of grated carrot. Set this bowl aside for now. In another bowl, mix 1 cup of rolled oats with 1 cup of whole wheat flour. Add in 1 teaspoon of baking powder, 1/2 teaspoon of baking soda, 1/2 teaspoon of cinnamon, 1/4 teaspoon of nutmeg, and 1/4 teaspoon of salt. Stir until well blended. Next, in a third bowl, whisk together 1/2 cup of brown sugar, 1/2 cup of unsweetened applesauce, and 1/4 cup of honey or maple syrup. Pour in 1/4 cup of vegetable oil or melted coconut oil. Whisk until smooth. Pour the wet mixture into the bowl with the zucchini and carrot. Mix until everything is combined. Now, gradually fold the dry mixture into the wet mixture. Mix until just combined. Avoid over-mixing to keep your muffins light. If you want extra flavor and texture, gently fold in 1/2 cup of walnuts or pecans and 1/2 cup of raisins or chocolate chips. Now your batter is ready! Divide the batter evenly among the muffin cups. Fill each cup about two-thirds full. Now, place the muffin tin in the preheated oven. Bake for 18-20 minutes. To check if they’re done, insert a toothpick into the center of a muffin. If it comes out clean, they are ready. Once baked, remove the muffin tin from the oven. Let the muffins cool in the pan for about 5 minutes. After that, transfer them to a wire rack to cool completely. Store any leftovers in an airtight container. Enjoy your homemade Zucchini Carrot Oatmeal Muffins! For more details, check the Full Recipe. To make the best zucchini carrot oatmeal muffins, focus on your ingredients. Use fresh, firm zucchini and bright carrots. Grate them finely for even mixing. Combine wet and dry ingredients gently. Over-mixing can make your muffins tough. Aim for a nice, thick batter that holds shape but is not dry. One big mistake is not squeezing out excess moisture from the zucchini. Wet zucchini can lead to soggy muffins. Another mistake is skipping the oil. It adds moisture and helps your muffins rise. Finally, don’t forget to check your oven temperature. An oven that’s too hot can burn the tops before the insides are done. You can prepare the batter the night before. Just cover it and store it in the fridge. When ready to bake, let it sit at room temperature for about 15 minutes. This helps create a better texture. You can also bake the muffins and freeze them. Wrap each one in plastic wrap and place them in a freezer bag. They’ll stay fresh for up to three months. Just reheat them in the oven or microwave when you want one. For the full recipe, check the earlier section. {{image_2}} You can make these muffins gluten-free easily. Use gluten-free oats and flour. There are great blends available in stores. These blends work well in most baked goods. Just substitute them for the whole wheat flour. Your muffins will taste just as good. To make these muffins vegan, replace the honey with maple syrup. Use a flax egg instead of the regular egg. A flax egg is simple. Mix one tablespoon of flaxseed meal with three tablespoons of water. Let it sit for a few minutes to thicken. This swap keeps the muffins moist and tasty. You can add different flavors to these muffins for fun. Consider adding vanilla extract or almond extract for a unique twist. You can also switch up the spices. Try adding ginger for warmth or cardamom for a different flavor profile. For a chocolate twist, mix in chocolate chips or cocoa powder. These small changes can make a big difference. You can explore many flavors while making the base recipe. Check out the Full Recipe for ideas! Store your zucchini carrot oatmeal muffins in an airtight container. This keeps them fresh. Place a piece of parchment paper between layers to avoid sticking. You can keep them at room temperature for up to three days. If you want them to last longer, refrigerate them. They will stay fresh for about a week in the fridge. Freezing is a great way to save muffins for later. First, let the muffins cool completely. Wrap each muffin in plastic wrap or foil. Then, place them in a freezer-safe bag. Label the bag with the date. Your muffins will stay tasty for up to three months in the freezer. When you are ready to eat them, you can thaw them overnight in the fridge. Reheat frozen muffins quickly in the microwave. Place one muffin on a microwave-safe plate. Heat for about 20-30 seconds. For a bit of crunch, use the oven. Preheat the oven to 350°F (175°C). Place the muffins on a baking sheet and heat for about 10-15 minutes. Enjoy your warm muffins just like fresh! For the Full Recipe, check out the previous section. Zucchini carrot oatmeal muffins can last about 3 to 5 days at room temperature. Store them in an airtight container to keep them fresh. If you want them to last longer, refrigerate them for up to a week. You can also freeze them for up to three months. Just make sure to wrap them well. Yes, you can replace the sugar. Use coconut sugar, honey, or maple syrup instead. Each option gives a slight twist to the flavor. If you want a sugar-free option, use a sugar substitute like stevia or monk fruit sweetener. Adjust the amount based on sweetness. You can use mashed bananas or yogurt instead of applesauce. Both options add moisture and flavor. You can also try pureed pumpkin for a fall twist. Just remember, the texture might change slightly. Yes, these muffins are healthy! They have whole grains from oats and whole wheat flour. The zucchini and carrots add vitamins and fiber. They are low in added sugars when you use substitutes. These muffins make a great snack or breakfast! Absolutely! You can add fruits like blueberries or chopped apples for sweetness. For veggies, try adding spinach or grated beet for color. Just make sure to adjust the moisture if needed. It’s fun to mix and match flavors! For the complete recipe, check out the Full Recipe. You learned about making tasty zucchini carrot oatmeal muffins. We discussed key ingredients and fun add-ins. The step-by-step guide makes baking easy. Tips helped you avoid common mistakes and store muffins well. Variations ensure there's a muffin for everyone. These muffins are versatile, healthy, and delicious. I encourage you to try different flavors and adapt the recipe. Happy baking!

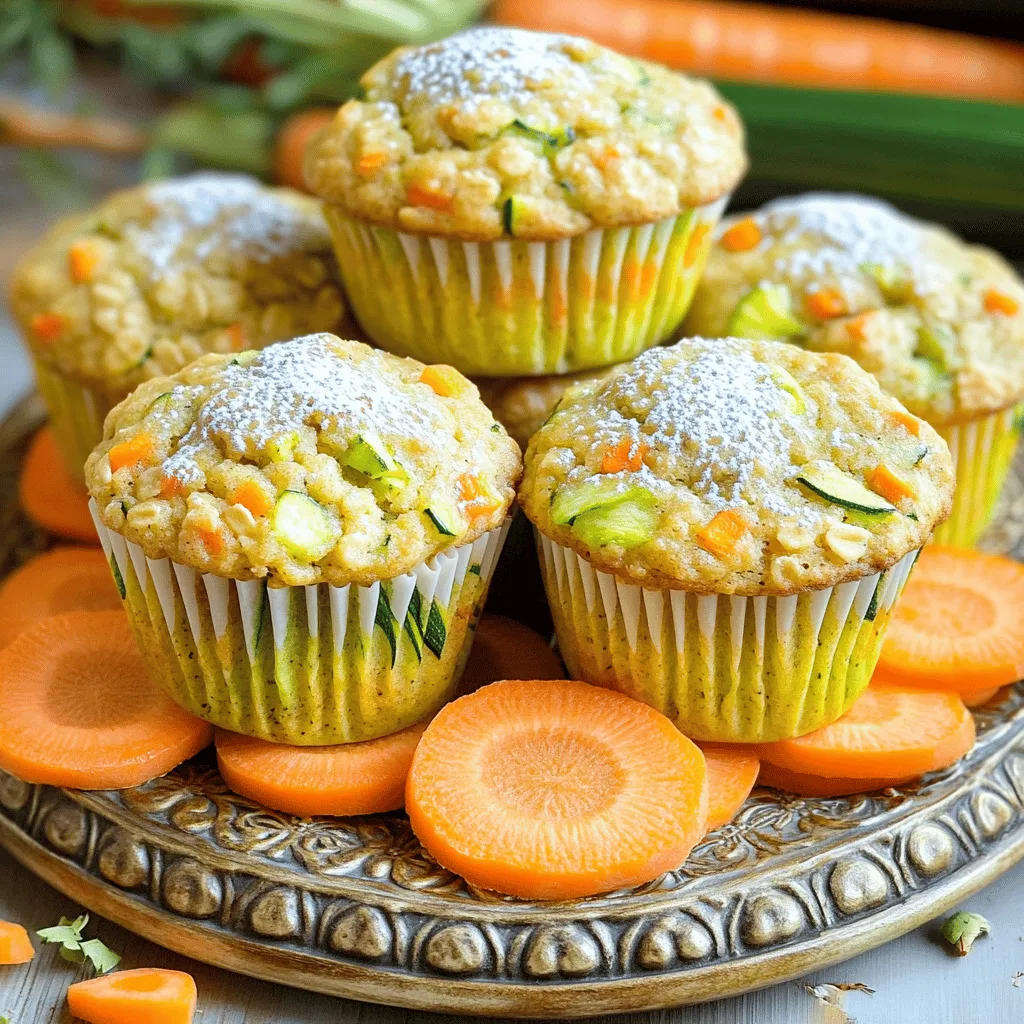
If you’re looking for a tasty and healthy treat, you’ve found it! Zucchini Carrot Oatmeal Muffins are packed with flavor and nutrition. These muffins are easy to make and perfect …

Read more

Categories Desserts
Older posts
Newer posts
← Previous Page1 … Page42 Page43 Page44 … Page108 Next →

GRILLED FLAVORS

where delicious ideas come to life, from stovetop to backyard. Warm, simple, and always satisfying. 🍽️✨

PAGES

Home About Contact Privacy Policy Terms & Conditions Cookie Policy GDPR Policy Copyright Policy Disclaimer

CATEGORIES

Appetizers Desserts Salads Breakfast Dinner

Contact

  • Pinterest
  • Mail
Copyright © 2026 Grilled Flavors. All rights reserved.