Cinnamon Roll Zucchini Bread Flavorful and Moist Treat
![Cinnamon Roll Zucchini Bread is a tasty treat that starts with simple, fresh ingredients. Here’s what you need to make this moist and flavorful bread: - 2 cups grated zucchini (about 2 medium zucchinis) - 1/2 cup unsweetened applesauce - 1/2 cup granulated sugar - 1/4 cup brown sugar, packed - 1/2 cup vegetable oil - 2 large eggs - 1 teaspoon vanilla extract - 2 cups all-purpose flour - 1 teaspoon baking soda - 1/2 teaspoon baking powder - 1 teaspoon ground cinnamon - 1/2 teaspoon salt - 1 cup chopped walnuts or pecans (optional) - 1/4 cup cinnamon sugar (1/4 cup sugar mixed with 1 tablespoon cinnamon) for topping Each ingredient plays a role in creating a rich flavor and soft texture. The grated zucchini adds moisture, while the applesauce keeps it light. The sugars blend well with cinnamon, giving the bread its sweet, warm taste. You can choose to add nuts for crunch, but it’s optional. The cinnamon sugar on top is what gives this bread its signature cinnamon roll flair. Check out the Full Recipe for more details on how to make this delicious treat! 1. Preheat the Oven: Set your oven to 350°F (175°C). Grease a 9x5-inch loaf pan or line it with parchment paper. This step helps with easy removal later. 2. Grate Zucchini: Take 2 medium zucchinis and grate them. Use a clean kitchen towel or cheesecloth to squeeze out the excess moisture. Removing this moisture keeps the bread from being soggy. 1. Mix Wet Ingredients: In a large bowl, whisk together 1/2 cup of unsweetened applesauce, 1/2 cup of granulated sugar, 1/4 cup of brown sugar, 1/2 cup of vegetable oil, 2 large eggs, and 1 teaspoon of vanilla extract. Make sure everything is well combined. 2. Sift and Combine Dry Ingredients: In another bowl, sift together 2 cups of all-purpose flour, 1 teaspoon of baking soda, 1/2 teaspoon of baking powder, 1 teaspoon of ground cinnamon, and 1/2 teaspoon of salt. Mixing these dry ingredients ensures the bread will rise well. 1. Fold Dry Ingredients into Wet Ingredients: Gradually add the dry mixture to the wet mixture. Gently fold until just combined. Be careful not to overmix, as this can make the bread tough. 2. Incorporate Zucchini and Nuts: Gently fold in the grated zucchini and 1 cup of chopped walnuts or pecans (if using). This adds flavor and texture to your bread. 1. Transfer Batter to the Pan: Pour the batter into the prepared loaf pan. Smooth the top with a spatula for even baking. 2. Add Cinnamon Sugar: Sprinkle 1/4 cup of cinnamon sugar over the top of the batter. This gives the bread that signature cinnamon roll flavor. 3. Bake: Place the pan in the oven and bake for 50-60 minutes. Check if it’s done by inserting a toothpick in the center; it should come out clean. 4. Cool Down: Once baked, let the bread cool in the pan for about 10 minutes. After that, transfer it to a wire rack to cool completely. For the complete method, refer to the Full Recipe. Enjoy your delicious Cinnamon Roll Zucchini Bread! To ensure even baking, always preheat your oven to 350°F (175°C). This helps the bread rise and cook evenly. Use a 9x5-inch loaf pan for the best shape. Grease the pan well or line it with parchment paper for easy removal. This way, your bread will come out smoothly without sticking. Adding a glaze or icing can take your zucchini bread to the next level. A simple mix of powdered sugar and milk creates a sweet topping. This adds a nice touch and makes it look great. You can also experiment with spices like nutmeg or cardamom for extra flavor. Adding nuts like walnuts or pecans gives a nice crunch and boosts the taste. If the bread is too dry, you can fix it by adding a bit more applesauce. This keeps it moist and soft. If the bread does not rise properly, check that your baking soda and baking powder are fresh. Old ingredients can lead to flat bread. Make sure you mix the batter without overmixing to keep it light and fluffy. For the full recipe, check out the complete instructions and details to make your Cinnamon Roll Zucchini Bread perfect every time! {{image_2}} You can easily change the flavor of your cinnamon roll zucchini bread. Here are two fun ideas: - Chocolate Chip Cinnamon Roll Zucchini Bread: Add 1 cup of chocolate chips to your batter for a rich, sweet twist. The chocolate pairs well with the cinnamon and zucchini. You get a moist loaf that everyone loves. - Pumpkin Cinnamon Roll Zucchini Bread: Swap half of the applesauce for pumpkin puree. This gives your bread a warm, fall flavor. The spices in pumpkin blend perfectly with cinnamon. You can make this bread fit your diet with some simple swaps: - Making it Gluten-Free: Use a 1:1 gluten-free flour blend instead of all-purpose flour. This keeps the texture light and fluffy while cutting out gluten. - Reducing Sugar for a Healthier Option: Cut the granulated sugar to 1/4 cup and the brown sugar to 2 tablespoons. You can also use a sugar substitute like stevia. This keeps the bread sweet without the added calories. Thinking about how to enjoy your bread? Here are some tasty ideas: - Best Pairings with Beverages: Serve your cinnamon roll zucchini bread with coffee or tea. The warm spices in the bread enhance the flavors of your drink. A glass of milk also makes a great match. - Creative Ways to Serve and Present the Bread: Slice the bread and place it on a pretty plate. Drizzle a simple icing made from powdered sugar and milk over the top. You can also add fresh fruit or nuts for a lovely garnish. For the complete recipe, check out the [Full Recipe]. To keep your cinnamon roll zucchini bread fresh, start by storing it at room temperature. Place it in an airtight container or wrap it tightly in plastic wrap. This will help maintain its moisture. If you plan to enjoy it later, consider refrigerating it. The cool air helps slow down spoilage. You can also freeze the bread for longer storage. Slice it first, then wrap each piece in plastic wrap and place them in a freezer bag. This way, you can grab a slice anytime. To keep your bread fresh, wrapping is key. Use plastic wrap to seal in moisture. You can also use foil, but plastic tends to work better for this. If your bread gets stale, don’t worry! You can rejuvenate it. Simply wrap it in a damp paper towel and microwave it for about 10 seconds. This will help bring back some softness. Enjoying your cinnamon roll zucchini bread fresh is easy with these simple tips. For the full recipe, check out the [Full Recipe]. Can I use frozen zucchini? Yes, you can use frozen zucchini. Thaw it first and drain any excess water. This helps keep the bread moist without making it soggy. How long does it take to bake? It takes about 50-60 minutes to bake. Use a toothpick to check for doneness. The toothpick should come out clean when the bread is done. Can I use applesauce instead of oil? Yes, you can substitute applesauce for oil. It keeps the bread moist while reducing fat. Just use the same amount. What can I substitute for eggs? You can use one banana or 1/4 cup of yogurt as an egg substitute. This keeps the bread fluffy and adds a nice flavor. What goes well with Cinnamon Roll Zucchini Bread? It pairs well with coffee or tea. A light cream cheese spread also enhances the flavor. Can I serve it for breakfast? Absolutely! This bread makes a great breakfast treat. It’s sweet and satisfying, perfect with a cup of milk or juice. For the full recipe, check out the [Full Recipe]. You’ve learned how to make delicious cinnamon roll zucchini bread using simple steps. We covered key ingredients, step-by-step instructions, tips, variations, and storage info. Remember, you can get creative with flavors and adjust for dietary needs. With these ideas and techniques, you can bake perfect bread every time. Enjoy sharing it with friends and family! Taste the warmth and comfort of this recipe, and make it your own.](https://grilledflavors.com/wp-content/uploads/2025/07/845b806a-959e-48f9-91ce-12fb77bad196.webp)
If you love cinnamon rolls and want a fun twist, you’re in the right place! This Cinnamon Roll Zucchini Bread is a moist, flavorful treat that combines the sweetness of …
If you love cinnamon rolls and want a fun twist, you’re in the right place! This Cinnamon Roll Zucchini Bread is a moist, flavorful treat that combines the sweetness of …
![To make this delightful soup, you will need the following ingredients: - 2 medium zucchinis, diced - 1 cup sweet corn (fresh or frozen) - 1 onion, finely chopped - 2 cloves garlic, minced - 4 cups vegetable broth - 1 cup coconut milk - 1 tablespoon olive oil - Salt and pepper to taste - 1 teaspoon smoked paprika - Fresh basil leaves for garnish You can easily adapt this soup to fit your taste. Here are some substitutions: - Zucchini: You can use yellow squash instead. - Sweet Corn: If fresh corn is not available, use canned corn or frozen corn. - Coconut Milk: Substitute with regular milk or almond milk for a different flavor. - Olive Oil: You can use butter or avocado oil instead. - Vegetable Broth: Chicken broth works well too for a richer taste. Feel free to mix and match to suit your needs! When selecting your ingredients, keep these tips in mind: - Zucchini: Look for firm zucchinis with smooth skin. Avoid any that feel soft or have blemishes. - Sweet Corn: Choose ears that are plump and have bright green husks. The silk should be sticky and brown. - Onions: Pick onions that are heavy for their size and have dry, papery skin. - Garlic: Choose bulbs that are firm and have no soft spots or mold. Fresh ingredients make a big difference in flavor! To start, gather your ingredients. You will need: - 2 medium zucchinis, diced - 1 cup sweet corn (fresh or frozen) - 1 onion, finely chopped - 2 cloves garlic, minced - 4 cups vegetable broth - 1 cup coconut milk - 1 tablespoon olive oil - Salt and pepper to taste - 1 teaspoon smoked paprika - Fresh basil leaves for garnish 1. First, heat the olive oil in a large pot over medium heat. 2. Next, add the chopped onion and sauté for about 5 minutes. You want it translucent. 3. Then, stir in the minced garlic and cook for one more minute. It should smell great! 4. Add the diced zucchinis and sweet corn. Stir well to mix with the onions and garlic. 5. Cook for another 4-5 minutes until the zucchinis soften a bit. 6. Pour in the vegetable broth and bring it to a boil. 7. Reduce the heat and let it simmer for 15-20 minutes. The veggies should be tender. 8. Now, take an immersion blender and blend the soup until it's smooth. If you don’t have one, transfer it in batches to a blender. 9. Return the soup to medium heat after blending. 10. Stir in the coconut milk and smoked paprika. Season with salt and pepper to taste. 11. Simmer for 5 more minutes to heat it through. 12. Serve warm, and don’t forget to garnish with fresh basil leaves. You can cook this soup on the stove or use a blender for a quick blend. The stove gives you a nice, even heat. It allows flavors to blend well. If you choose a blender, it’s faster but requires careful handling when hot. Always allow steam to escape when blending hot liquids. An immersion blender is a safe choice. Blending soup can be tricky. Here are some tips to blend safely: - Cool slightly: Let the soup cool for a few minutes before blending. - Work in batches: If using a standard blender, don’t fill it too full. - Cover loosely: If using a lid, leave it slightly ajar to let steam escape. - Blend gradually: Start on low speed and increase gradually to avoid splatters. These steps make blending simple and safe. Enjoy making your Zucchini & Sweet Corn Summer Soup! For the full recipe, check the complete details above. To make your zucchini and sweet corn summer soup shine, focus on fresh ingredients. Select young zucchinis with smooth skin. They should feel firm and heavy for their size. For corn, fresh ears are best. Look for bright green husks and plump kernels. When cooking, pay attention to heat. Medium heat keeps the onion from burning while it softens. Blend the soup until smooth for a creamy texture. If you prefer a chunkier soup, blend only half. Add a splash of lemon juice for a bright finish. One common mistake is overcooking the vegetables. They should be tender but not mushy. Avoid adding too much salt at first. You can always add more later. Another error is skipping the blending step. Blending creates a silky soup that enhances flavor. Don't forget to taste as you go. Adjust the seasoning for the best results. Lastly, don’t rush the simmering time. Allow the flavors to meld properly for a richer taste. Serve your soup warm with fresh basil on top. It adds a nice aroma and flavor. Pair it with crusty bread or a light salad for a complete meal. Try adding roasted chickpeas on top for a crunchy texture. A dollop of yogurt can add creaminess, too. This soup also goes well with a glass of chilled white wine. Consider Sauvignon Blanc or a light Pinot Grigio for a refreshing touch. For more ideas, check the Full Recipe for additional serving tips. {{image_2}} You can easily make this soup vegan or non-vegan. The base is already vegan since it uses vegetable broth and coconut milk. To keep it vegan, just skip any animal products. If you want a non-vegan version, simply add a splash of cream or milk for richness. Both ways are tasty, so choose what you like! Adding protein can make this soup more filling. I love using black beans or chickpeas. They add texture and flavor. If you prefer chicken, shredded rotisserie chicken works well. For a plant-based option, add cubed tofu. Just toss it in when you blend the soup and heat it through. Each option brings a different twist to this dish. Don’t be shy with herbs and spices! Fresh basil is a classic choice. It goes wonderfully with zucchini and corn. You can also try cilantro for a fresh taste. For a kick, add a dash of cayenne or chili powder. If you want a smoky flavor, smoked paprika is a great addition too. Experimenting with flavors keeps the soup exciting every time you make it. Check out the Full Recipe for more ideas! Storing this soup is simple. Let the soup cool to room temperature. Then, pour it into an airtight container. Make sure to leave some space at the top to allow for expansion. You can store it in the fridge for up to three days. This keeps the soup fresh and ready for your next meal. Reheating is easy. You can use a pot or the microwave. If you use a pot, pour the soup in and heat over medium heat. Stir often until it warms up. If you use the microwave, place the soup in a microwave-safe bowl. Heat in short bursts, stirring in between. This helps the soup warm evenly. Freezing the soup is a great option for longer storage. To freeze, pour the cooled soup into freezer-safe bags. Remove as much air as you can before sealing. You can freeze the soup for up to three months. When you're ready to eat, thaw it overnight in the fridge. Then, reheat it as mentioned above. Enjoy the fresh taste of summer any time! For the full recipe, refer to the section above. Zucchini & Sweet Corn Summer Soup lasts about 3 to 4 days in the fridge. Store it in an airtight container. This keeps it fresh and safe to eat. You can enjoy it warm or cold. Yes, you can make this soup ahead of time. In fact, the flavors improve after a day in the fridge. Just cook the soup, let it cool, and store it. When you’re ready to eat, reheat it gently. Absolutely! You can use frozen zucchini or corn for this recipe. They work well and save time. Just add them straight to the pot. No need to thaw before cooking. This makes the soup quick and easy to prepare. For the full recipe, check [Full Recipe]. This blog post covers everything you need for Zucchini & Sweet Corn Summer Soup. We listed the best ingredients and their substitutes. I shared tips for picking fresh produce and clear directions for cooking. You learned tricks to avoid common mistakes and how to store leftovers. Remember, you can customize the soup to fit your taste. Use different proteins or spices. Enjoy this dish anywhere and anytime. Make it your own, and savor the flavors!](https://grilledflavors.com/wp-content/uploads/2025/07/c1bd81e0-1845-4368-86ed-8870aa7212c1.webp)
Get ready to enjoy summer with my Zucchini & Sweet Corn Summer Soup! This dish is light, refreshing, and perfect for hot days. With just a few simple ingredients, you’ll …
![To make this delicious cheesy summer squash and zucchini casserole, gather these items: - 2 medium zucchini, sliced into thin rounds - 2 medium yellow squash, sliced into thin rounds - 1 cup shredded cheddar cheese - 1 cup shredded mozzarella cheese - 1/2 cup grated Parmesan cheese - 1 medium onion, finely chopped - 3 cloves garlic, minced - 1 cup heavy cream - 2 large eggs - 1 teaspoon dried thyme - 1 teaspoon dried oregano - Salt and pepper to taste - 1 cup breadcrumbs (preferably seasoned) - 2 tablespoons olive oil For the best flavor, use fresh squash. Choose firm, shiny zucchini and yellow squash. Look for cheese that melts well, like a good quality cheddar and mozzarella. Fresh herbs can elevate the dish, so consider using fresh thyme and oregano if possible. When buying breadcrumbs, pick ones that are seasoned for added depth. You can make this casserole fit many diets. For a lighter version, swap heavy cream for low-fat milk or a plant-based milk. Use egg substitutes like flaxseed meal or commercial egg replacers if needed. For a gluten-free option, use gluten-free breadcrumbs. If you want a dairy-free dish, try vegan cheese and cream alternatives. This recipe is flexible, so feel free to get creative! For the complete recipe, check out the [Full Recipe]. Start by gathering all your ingredients. You’ll need zucchini, yellow squash, and cheese. Slice the zucchini and squash into thin rounds. This helps them cook evenly. Chop the onion finely and mince the garlic. Sauté the onion in olive oil. Cook it until it looks clear, about five minutes. Add the garlic and cook for one more minute. This step brings out their flavors. In a large bowl, mix heavy cream, eggs, thyme, oregano, salt, and pepper. Whisk it until combined. Now, it’s time to layer the casserole. Take your greased baking dish and begin with half of the sliced zucchini and squash. Spread them evenly across the bottom. Next, add half of the sautéed onion and garlic. Pour half of the cream mixture over the veggies. Then sprinkle half of the cheddar and mozzarella cheese on top. Repeat this process with the rest of the squash and zucchini. Follow with the remaining onion and garlic, then the cream mixture, and finish with the rest of the cheese. Once your layers are complete, sprinkle breadcrumbs over the top. Add the grated Parmesan cheese for a nice finish. Bake your casserole in a preheated oven at 350°F for 40-45 minutes. You want the top to be golden brown and bubbly. After baking, let it cool for about ten minutes. This helps it set up. Serve it warm and enjoy! For extra flair, garnish with fresh parsley or serve with a salad. You can find the full recipe [here](Full Recipe). To avoid a watery casserole, salt your zucchini and squash. The salt pulls out moisture. After slicing, let them sit for 10-15 minutes. Then, pat them dry with paper towels. This step helps keep your dish thick and creamy. Using a mix of cheeses makes the casserole rich and tasty. I love using cheddar for sharpness, mozzarella for stretch, and Parmesan for a nutty flavor. The three together create a perfect balance. Feel free to try gouda or feta for a twist! For added flavor, you can mix in herbs and spices. Fresh basil or chives can brighten the dish. You can also add cooked bacon or sausage for a protein boost. For a spicy kick, sprinkle in some red pepper flakes. {{image_2}} You can keep the casserole vegetarian by sticking to the veggies. Add mushrooms, bell peppers, or spinach for extra flavor. These vegetables mix well with the summer squash and zucchini. You can also use different cheeses. Try goat cheese or feta for a unique taste. This gives a new twist without losing the cheesy goodness. To make the casserole heartier, add protein. Cooked chicken or sausage works great. I like to use grilled chicken for a light touch. If you choose sausage, go for a mild or spicy one, depending on your taste. Just slice it and layer it in with the veggies. This makes the dish filling and satisfying. For those who need gluten-free options, swap breadcrumbs for gluten-free breadcrumbs. You can also use crushed cornflakes or ground almonds. These alternatives keep the crunchy top you love. Always check labels to ensure they are truly gluten-free. This way, everyone can enjoy this tasty dish! Store any leftover cheesy summer squash and zucchini casserole in an airtight container. This helps keep it fresh. Place the container in the fridge. It will stay good for about three to four days. If you think you won't eat it soon, consider freezing it. To reheat, place the casserole in an oven-safe dish. Cover it with foil to keep moisture in. Heat at 350°F (175°C) for about 20-25 minutes. Check that it is warm all the way through. You can also microwave it. Use a microwave-safe plate. Heat in short bursts, checking often. To freeze the casserole, let it cool first. Cut it into serving sizes and wrap each piece in plastic wrap. Then, place the wrapped pieces in a freezer bag. Label the bag with the date. It will last for about three months in the freezer. When you're ready to eat it, thaw it in the fridge overnight before reheating. For the best taste, use the full recipe to enjoy it fresh! Yes, you can make this casserole ahead of time. Prepare it fully and store it in the fridge. Cover it well with plastic wrap or foil. When you are ready to bake, just uncover and pop it in the oven. You may need to adjust the baking time if it is cold from the fridge. This makes meal prep easy and fun! This casserole pairs well with many sides. Here are some tasty options: - A fresh green salad for crunch - Grilled chicken or fish for protein - Garlic bread for a comforting touch - Steamed broccoli or green beans for color These sides bring balance to the meal and make it even more delicious! The casserole lasts about 3 to 5 days in the fridge. Store it in an airtight container to keep it fresh. If you want to enjoy it later, consider freezing it. Just remember to label it with the date. This way, you can enjoy Cheesy Summer Squash and Zucchini Casserole whenever you like! For the full recipe, check out the detailed instructions. This blog post shows you how to make Cheesy Summer Squash and Zucchini Casserole. We covered all key ingredients, tips, and step-by-step instructions. You also learned how to avoid common mistakes and create tasty variations. Proper storage methods will help you enjoy leftovers. Cooking is fun, and this casserole recipe is easy for everyone. With a few simple tips, you can impress your friends and family. Try this recipe for a delicious meal that everyone will love. Enjoy your cooking journey!](https://grilledflavors.com/wp-content/uploads/2025/07/fb54a40d-a347-408c-8f4c-e953bf2f761f.webp)
Are you ready to enjoy a simple and tasty dish? My Cheesy Summer Squash and Zucchini Casserole Delight combines fresh veggies and gooey cheese for a true summer treat. It’s …
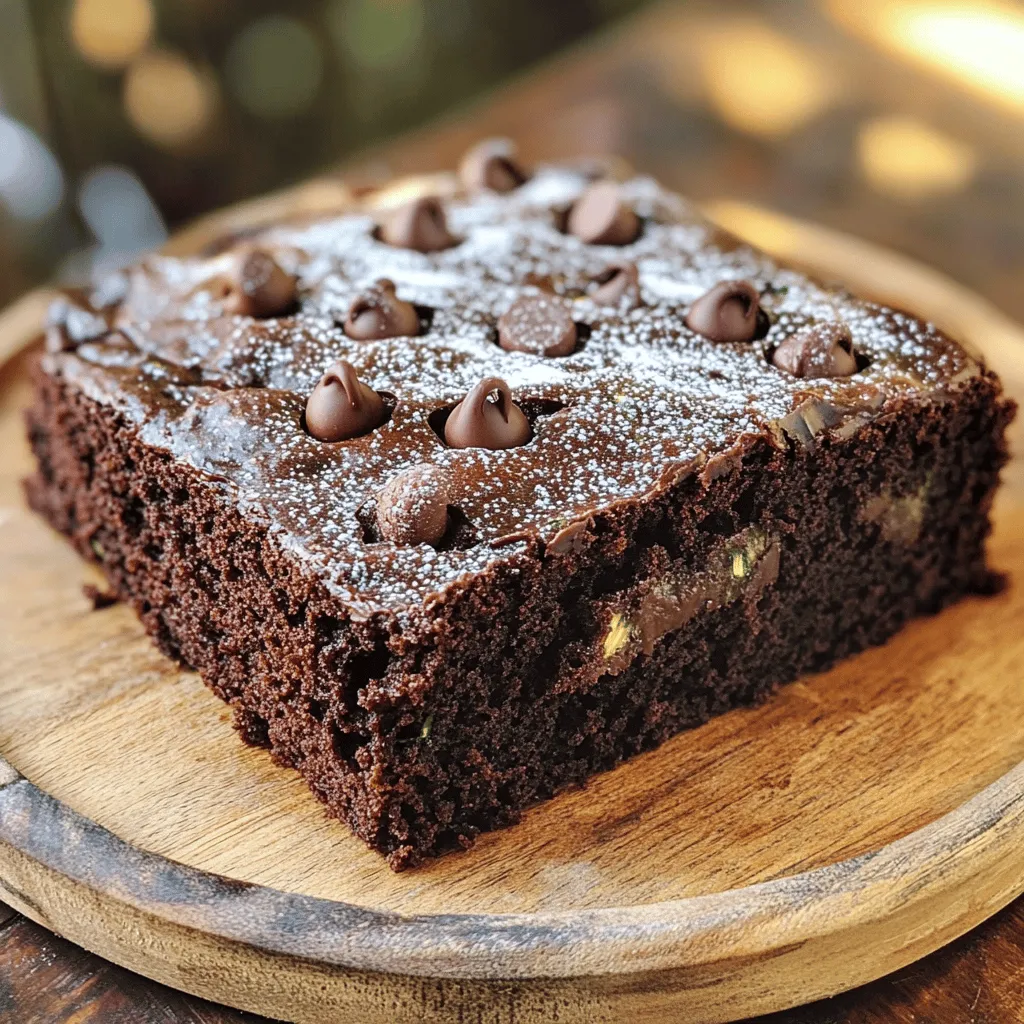
If you’re looking for a unique dessert that combines rich chocolate flavor with healthy veggies, this Chocolate Zucchini Cake is for you! It’s moist, delicious, and easy to make. You …
. 1. Preheat the oven to 350°F (175°C). This step is key for even baking. 2. Grate 2 medium zucchinis. You need about 2 cups of grated zucchini. Prepare a 9x5-inch loaf pan by greasing it or lining it with parchment paper. This makes for easy removal later. 1. In a large bowl, combine the wet ingredients. Add the grated zucchini, unsweetened applesauce, 1/4 cup honey (or maple syrup), 2 large eggs, and 1 teaspoon vanilla extract. Mix well until everything is blended. 2. In another bowl, whisk together the dry ingredients. This includes 1 cup whole wheat flour, 1 cup almond flour, 1 teaspoon baking soda, 1 teaspoon baking powder, 1 teaspoon ground cinnamon, 1/2 teaspoon nutmeg, and 1/4 teaspoon salt. 1. Gradually add the dry mixture to the wet mixture. Stir gently until just combined. Be careful not to overmix; this keeps the bread moist. 2. If desired, fold in 1/2 cup chopped walnuts or pecans and 1/2 cup dark chocolate chips for extra flavor and texture. 3. Pour the batter into your prepared loaf pan. Smooth the top with a spatula. 4. Bake in the preheated oven for 50-60 minutes. Check for doneness by inserting a toothpick into the center. It should come out clean or with a few moist crumbs. 5. Once baked, remove the zucchini bread from the oven. Let it cool in the pan for about 10-15 minutes. Then, transfer it to a wire rack to cool completely before slicing. For detailed ingredient amounts and tips, check the Full Recipe. To make the best low sugar zucchini bread, avoid overmixing. This keeps the bread moist and fluffy. Mix until just combined. Each oven is different. So, adjust the baking time based on your oven. Start checking at 50 minutes for doneness. Want to switch it up? Substitute honey with maple syrup for a different taste. This adds a nice depth to the flavor. You can also add spices like cardamom. Cardamom gives the bread unique flavor notes that pop. How you serve your zucchini bread matters. Use wooden boards for a rustic look. Slice the bread and place it on the board. Drizzle lightly with honey for a sweet touch. You can also serve it with yogurt. A dollop of Greek yogurt adds creaminess. Finish with fresh mint leaves for a pop of color. This makes the dish look inviting and delicious. {{image_2}} If you want a nut-free option, simply substitute almond flour with more whole wheat flour. This keeps the bread moist and adds fiber. You still get a great texture without any nuts. Want to change things up? You can add coconut flakes for a tropical twist. This gives the bread a sweet and chewy bite. You might also consider adding dried fruits like cranberries or raisins. These fruits add a burst of flavor and natural sweetness. For a vegan version, replace the eggs with flaxseed meal or chia seeds mixed with water. Mix one tablespoon of either seed with three tablespoons of water. Let it sit for about five minutes to thicken. This swap works great and makes your zucchini bread plant-based. Store your zucchini bread in an airtight container at room temperature. It stays fresh for up to 2-3 days. This method keeps it soft and tasty. For longer storage, freeze the bread. Wrap it in plastic and then in foil for best results. You can keep it in the freezer for up to 3 months. This makes it easy to enjoy later. To reheat, you can microwave individual slices. This takes just a minute or so. For a crisp outer layer, toast slices in an oven. This brings back that fresh-baked taste. Enjoy it warm! Use a toothpick to test for doneness. Insert it into the center of the bread. If it comes out clean or with a few moist crumbs, your zucchini bread is ready. This simple method helps you avoid over-baking. Over-baking can dry out your bread, making it less enjoyable. Keep an eye on the clock, but trust your toothpick! Yes, you can use frozen zucchini. Just make sure it is well-drained before use. Frozen zucchini often has extra water. Squeeze it gently in a clean cloth to remove moisture. This ensures your bread does not become soggy. Using frozen zucchini is a great way to enjoy this recipe year-round! The nutritional value includes details on calorie and sugar content included in the recipe section. Each slice is low in sugar, thanks to applesauce and a small amount of honey or maple syrup. This means you can indulge without guilt. If you're watching your calories, this recipe is a friendly choice. Yes, you can make this in a muffin tin instead of a loaf. Just adjust the baking time to about 20-25 minutes for muffins. Keep an eye on them to prevent overcooking. Muffins are a fun twist on the classic loaf. They also make great snacks or quick breakfasts! You now have a complete guide to making delicious, low-sugar zucchini bread. We covered the main ingredients, step-by-step instructions, and tips to perfect your loaf. From storage to variations, you can customize this recipe. Enjoy experimenting with flavors and textures to make it your own. This zucchini bread is a tasty way to sneak in veggies. Whether you share it or keep it for yourself, you’ll love the results. Happy baking!](https://grilledflavors.com/wp-content/uploads/2025/07/68fe8bd8-bc24-4e3c-b872-37aa3e7de75d.webp)
If you’re looking for a delicious treat that won’t spike your sugar levels, this low sugar zucchini bread is perfect for you! Packed with wholesome ingredients, it’s easy to make …

If you’re looking for a tasty side dish that everyone will love, try my Garlic Parmesan Roasted Brussels Sprouts Delight. This dish mixes crisp Brussels sprouts with garlic and Parmesan …
Craving a light and tasty treat? This Strawberry Cheesecake Smoothie packs a rich flavor and creamy texture that you’ll love. With simple ingredients like fresh strawberries, cream cheese, and honey, …

If you love desserts that combine layers of flavor and texture, you’re in for a treat! This Strawberry Shortcake Cheesecake is the perfect blend of rich creaminess and fresh strawberries. …

Looking for tasty and easy Chicken Bowl Dinner ideas? You’re in the right spot! I’ll share some flavorful recipes that are quick to make and packed with nutrition. From marinating …
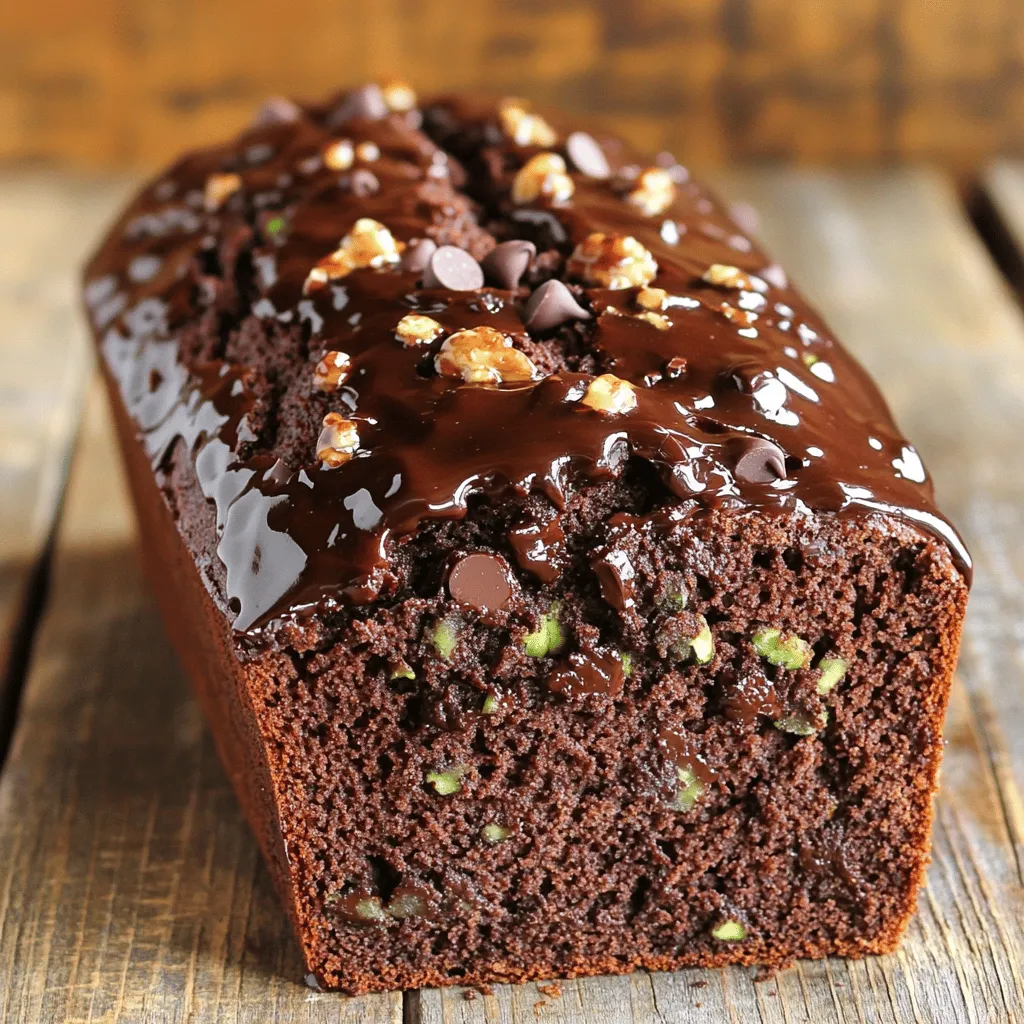
Looking for a delicious dessert that’s easy to make? You’ve found it! Chocolate zucchini bread is a yummy way to sneak in some veggies. Trust me, even your pickiest eaters …