Gluten Free Low Carb Zucchini Fries Easy and Delicious
 for step-by-step instructions and tips. Start by preheating your oven to 425°F (220°C). This high temperature helps make the fries crispy. While the oven heats, line a baking sheet with parchment paper. This keeps the fries from sticking and makes cleanup easy. In a shallow dish, mix together the almond flour, grated Parmesan cheese, garlic powder, onion powder, dried oregano, salt, and pepper. This blend gives the fries a tasty crust. Make sure to mix well so every bite is flavorful. Take each zucchini stick and dip it in the whisked eggs. Make sure each side is coated. Next, roll the zucchini sticks in the almond flour mixture. Press lightly to ensure they are well coated. This step is key for a crunchy texture. Place the coated zucchini fries on your prepared baking sheet. Arrange them in a single layer for even cooking. Lightly spray them with olive oil to enhance crispiness. Bake in your preheated oven for 20-25 minutes. Flip them halfway through to ensure both sides get golden brown. Once done, let them cool for a few minutes before serving. For the full recipe, check out the steps above. To make your zucchini fries extra crispy, follow these tips: - Proper oven temperature and placement: Always preheat your oven to 425°F (220°C). This high heat helps to crisp the fries. Place the baking sheet in the middle of the oven. This ensures even cooking. - Importance of coating the fries thoroughly: After dipping the zucchini in eggs, coat them well in the almond flour mixture. Make sure every side has a good layer. This creates a nice crunch when baked. Zucchini fries are more than just a snack; they shine when served right. Here are some ideas: - Ideal dipping sauces: Try marinara sauce for a classic touch. Ranch or garlic aioli also work well. They add flavor and moisture. - Presentation tips for an appealing look: Serve the fries in a basket lined with parchment paper. This adds a rustic feel. Arrange them neatly for a beautiful display. Want to make the recipe fit your needs? Here are some easy swaps: - Vegan substitutions for eggs: You can use flaxseed meal mixed with water instead of eggs. Mix 1 tablespoon of flaxseed meal with 2.5 tablespoons of water. Let it sit until it thickens. - Nut-free alternatives to almond flour: If you need a nut-free option, use sunflower seed flour. It gives a similar texture without the nuts. {{image_2}} You can easily change the taste of your zucchini fries by using different herbs or spices. Try adding smoked paprika for a smoky kick. You might also like using Italian herbs like basil or thyme for a fresh twist. Another great option is to sprinkle in some chili powder if you enjoy heat. For a cheesier flavor, add nutritional yeast to your almond flour mix. This will give your fries a nice umami taste without using dairy. You can also mix in some grated cheese to enhance the flavor even more. If you want a healthier option, try cooking your zucchini fries in an air fryer. Set your air fryer to 400°F (200°C) for about 10 to 15 minutes. Shake the basket halfway through for even crispiness. If you prefer a traditional method, you can pan-fry your zucchini fries. Heat some olive oil in a skillet over medium heat. Fry the coated zucchini sticks for about 3 to 4 minutes on each side until golden brown. Zucchini isn’t the only vegetable you can use for this recipe. Eggplant makes a great substitute, giving a rich and hearty texture. Just slice it into fry shapes and follow the same steps. Carrots are another fun option; they add a sweet crunch. You can adapt the recipe to fit your taste. Each vegetable will bring its own flavor and texture, so feel free to experiment! For the full recipe, check the earlier sections. To keep your leftover zucchini fries fresh, store them in an airtight container. Make sure the fries are completely cool before sealing. This helps keep moisture out and keeps them crispy. You can store them in the fridge for up to three days. If you want to enjoy them later, it's best to reheat them instead of eating them cold. To bring back the crispiness of your fries, use the oven or an air fryer. Preheat your oven to 400°F (200°C). Spread the fries evenly on a baking sheet. Heat them for about 10 minutes, flipping halfway through. This method helps to keep them crispy. Avoid using the microwave, as it makes them soggy. You can freeze zucchini fries before or after cooking. If you freeze them before cooking, lay them out on a baking sheet. Freeze until solid, then transfer to a freezer bag. They can last up to three months this way. If you prefer to freeze them cooked, let them cool completely first. Then, store them in an airtight container. Just remember, the texture may change a bit after freezing. To make zucchini fries crispy, follow these tips: - Use almond flour for a crunchy coating. - Coat the zucchini well in the egg and flour mixtures. - Bake at 425°F (220°C) for the best crunch. - Flip the fries halfway through baking for even crisping. These steps help achieve a perfect crunch. I find that using a light spray of olive oil also helps. Yes, you can prepare zucchini fries ahead of time. Here’s how: - Cut the zucchini and bread them as per the recipe. - Place them on a baking sheet in a single layer. - Cover and refrigerate for up to 24 hours. - When ready, bake them straight from the fridge. Making them ahead saves time and keeps them fresh. Zucchini fries pair well with various dips. Here are a few great options: - Marinara sauce for a classic touch. - Ranch dressing for a creamy flavor. - Garlic aioli for a bold taste. - Spicy sriracha mayo for a kick. These dips add fun and flavor to your zucchini fries. Gluten-free zucchini fries are low in carbs. Here’s a quick breakdown: - Each serving has about 10 grams of carbs. - The almond flour and zucchini are the main sources. This makes zucchini fries a great choice for low-carb diets. Yes, you can use other flours. Here are some alternatives: - Coconut flour gives a slightly sweet taste. - Chickpea flour adds protein and fiber. - Oat flour works well for a different texture. Each flour will change the flavor and crunch, so choose based on your taste! For the best results, stick to the original recipe using almond flour. For more details, check the Full Recipe. Zucchini fries are easy to make and delicious. You learned about key ingredients, steps, and tips that help you create crispy fries. Remember to coat the zucchini well and serve with your favorite dips. You can use different vegetables or cooking methods for fun twists. Storing and reheating them properly keeps your fries tasty. Feel free to explore flavors and share with others. Enjoy your zucchini fries as a healthy snack or side dish!](https://grilledflavors.com/wp-content/uploads/2025/06/55d56466-0e2b-4439-86f8-09046dfa51c2.webp)
Are you searching for a tasty snack that’s both gluten-free and low-carb? Look no further! I’m excited to share my easy and delicious recipe for zucchini fries. With just a …
Are you searching for a tasty snack that’s both gluten-free and low-carb? Look no further! I’m excited to share my easy and delicious recipe for zucchini fries. With just a …
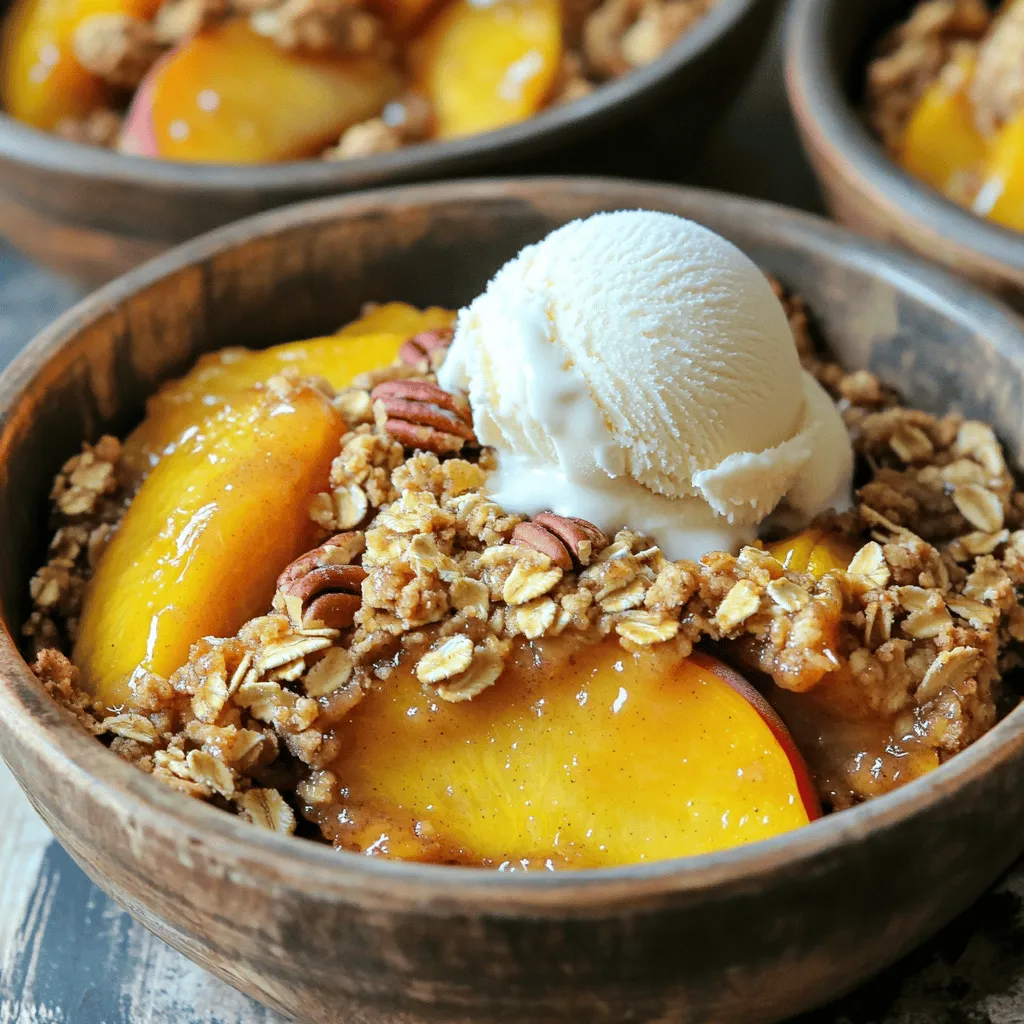
Ready to indulge in a warm, sweet Peach Crisp that’s as easy as pie? This delightful dessert bursts with fresh peach flavor and a crispy topping that’s simply irresistible. I’ll …

Are you ready to bake something truly delightful? Herb and Cheddar Squash Bread combines the warmth of roasted butternut squash with the rich flavor of sharp cheddar cheese and fresh …
![- 3 medium zucchinis, sliced into 1/4-inch rounds - 1 red bell pepper, sliced - 1 cup cherry tomatoes, halved - 1/2 red onion, thinly sliced - 2 tablespoons olive oil - 1 teaspoon garlic powder - Salt and pepper to taste - 1/4 cup crumbled feta cheese - Fresh basil leaves for garnish - Balsamic glaze for drizzling (optional) To make my grilled zucchini salad, I start with fresh, vibrant ingredients. The zucchinis are the star of the show. I slice them into 1/4-inch rounds. This size helps them grill nicely. The red bell pepper adds a sweet crunch. I slice it thin, too. Cherry tomatoes bring juicy bursts of flavor. Halving them lets their sweetness shine. Next, I thinly slice half a red onion. It adds a sharpness that balances the dish. I use olive oil to coat all the veggies. Just two tablespoons is enough. I sprinkle garlic powder for a nice kick. Salt and pepper round it all out. For a final touch, I add crumbled feta cheese. It gives a creamy, salty flavor. Fresh basil leaves make everything look pretty. If you like, drizzle some balsamic glaze on top. It adds a tangy sweetness. You can find the full recipe at the beginning of this article. This salad is colorful, fresh, and easy to make! 1. Preheat the grill to medium heat. This makes sure that the zucchini cooks evenly. 2. In a large bowl, toss together the vegetables with olive oil, garlic powder, salt, and pepper. Make sure every piece gets a good coat. 3. Place the zucchini and bell pepper slices on the grill. Grill them for about 3-4 minutes on each side. Look for nice grill marks and a tender texture. Once done, remove them from the grill and let them cool slightly. 1. Take a large platter or bowl. Arrange the grilled zucchinis, bell peppers, cherry tomatoes, and red onion in it. 2. Sprinkle crumbled feta cheese over the top. This adds a creamy, salty touch. 3. Finish by garnishing with fresh basil leaves. If you want, drizzle with balsamic glaze for extra flavor. - This salad is best served warm or at room temperature. It’s perfect for picnics or casual dinners. - Drizzle with optional balsamic glaze to enhance the taste. This adds a sweet and tangy flavor that complements the veggies well. For the full recipe, check out the [Full Recipe]. - Choosing the right zucchinis: Pick firm zucchinis that feel heavy for their size. Look for bright green skin without blemishes. Smaller zucchinis are sweeter and more tender. - Avoiding mushy texture when grilling: Slice zucchinis into 1/4-inch rounds. This thickness helps them cook evenly. Avoid overcooking; aim for grill marks and a bit of crunch. - Suggested seasonings and spices: Use garlic powder, salt, and pepper for a simple base. Add a pinch of red pepper flakes for heat. Fresh herbs like thyme or oregano also work well. - Recommended dressings or marinades: A light balsamic vinaigrette adds great flavor. You can also try a lemon herb dressing for a fresh twist. Marinade your veggies for 30 minutes to boost taste. - Creative plating ideas: Serve the salad in a large bowl or on a colorful platter. Layer the grilled zucchinis and peppers for height. - Using colorful garnishes: Fresh basil leaves add a pop of green. Crumbled feta cheese brightens the dish. A drizzle of balsamic glaze gives it a shiny finish. For the complete details on how to prepare this dish, check the Full Recipe. {{image_2}} If you want to swap out feta cheese, try using goat cheese or ricotta. These cheeses add creaminess and flavor. If you prefer a dairy-free option, use avocado or a nut-based cheese. For protein, grilled chicken or chickpeas work well. Chicken adds heartiness, while chickpeas provide plant-based protein. Both options pair nicely with the fresh veggies. You can add other veggies for variety. Try corn, asparagus, or eggplant. These vegetables add different textures and flavors. In summer, fresh herbs like dill or mint can brighten the dish. In fall, consider roasted butternut squash or sweet potatoes. Both add warmth and a bit of sweetness. This way, you can enjoy seasonal flavors year-round. Different dressings can change the whole dish. A lemon vinaigrette offers a zesty kick. Combine olive oil, lemon juice, salt, and pepper for a quick mix. For a healthier option, try yogurt-based dressings. They add creaminess without extra fat. You can also use balsamic glaze for a touch of sweetness. It adds a nice finishing touch to your salad. For the full recipe, check out the earlier section. Enjoy making this dish your own! To keep your grilled zucchini salad fresh, store it in an airtight container. This method prevents air from making the salad soggy. Make sure to cool the salad before sealing the container. You can keep the salad in the fridge for up to three days. After that, the veggies may lose their crunch. Grilled vegetables taste best fresh, but you can reheat them. Heat them gently in a pan over low heat. This method helps maintain their texture. Avoid using a microwave, as it can make them mushy. Just warm them until they are heated through. For quick meals, prepare the salad in advance. Chop the veggies and store them separately. Keep the zucchini and bell peppers in one container, and the cherry tomatoes and onions in another. This way, they stay fresh until you're ready to serve. When you're ready to eat, just grill the zucchini and bell peppers, then mix everything together. Grilling zucchini is quick and easy. I suggest grilling for about 3 to 4 minutes on each side. You want them to get nice grill marks. The zucchini should be tender but not mushy. This cooking time gives you the best results for flavor and texture. Yes, you can grill zucchini without oil. Just slice the zucchini and season it with salt and pepper. Place it on the grill. The natural moisture in the zucchini will help it cook. You can also use a non-stick grill mat. This method is great for those who want to cut down on oil. This salad pairs well with many dishes. You can serve it with grilled chicken, fish, or steak. It also goes great with quinoa or rice for a filling meal. For a light lunch, serve it with crusty bread or a side of hummus. Yes, you can easily make this salad vegan. Simply omit the feta cheese or use a plant-based cheese instead. You can also add chickpeas for protein. This makes the salad hearty and filling while keeping it fresh. This blog post showed you how to make a fresh grilled zucchini salad. You learned what ingredients to use and steps to grill the veggies perfectly. I shared tips for flavor and presentation, along with variations to suit your taste. Storing leftovers and meal prep showed how to keep things easy. Enjoy this salad warm or cold. Have fun with the ingredients and make it your own! You now have the tools to impress with a simple, healthy dish.](https://grilledflavors.com/wp-content/uploads/2025/06/5a1fcff2-7f56-4fbe-a24c-8726cb83807e.webp)
Are you ready to elevate your salad game? In this blog post, I’ll share a simple yet tasty recipe for a Grilled Zucchini Salad that bursts with fresh flavors. With …

Are you ready to elevate your vegetable game? Roasted zucchini is simple, tasty, and packed with flavor. In this guide, I’ll share my favorite recipe, including all the tips you …
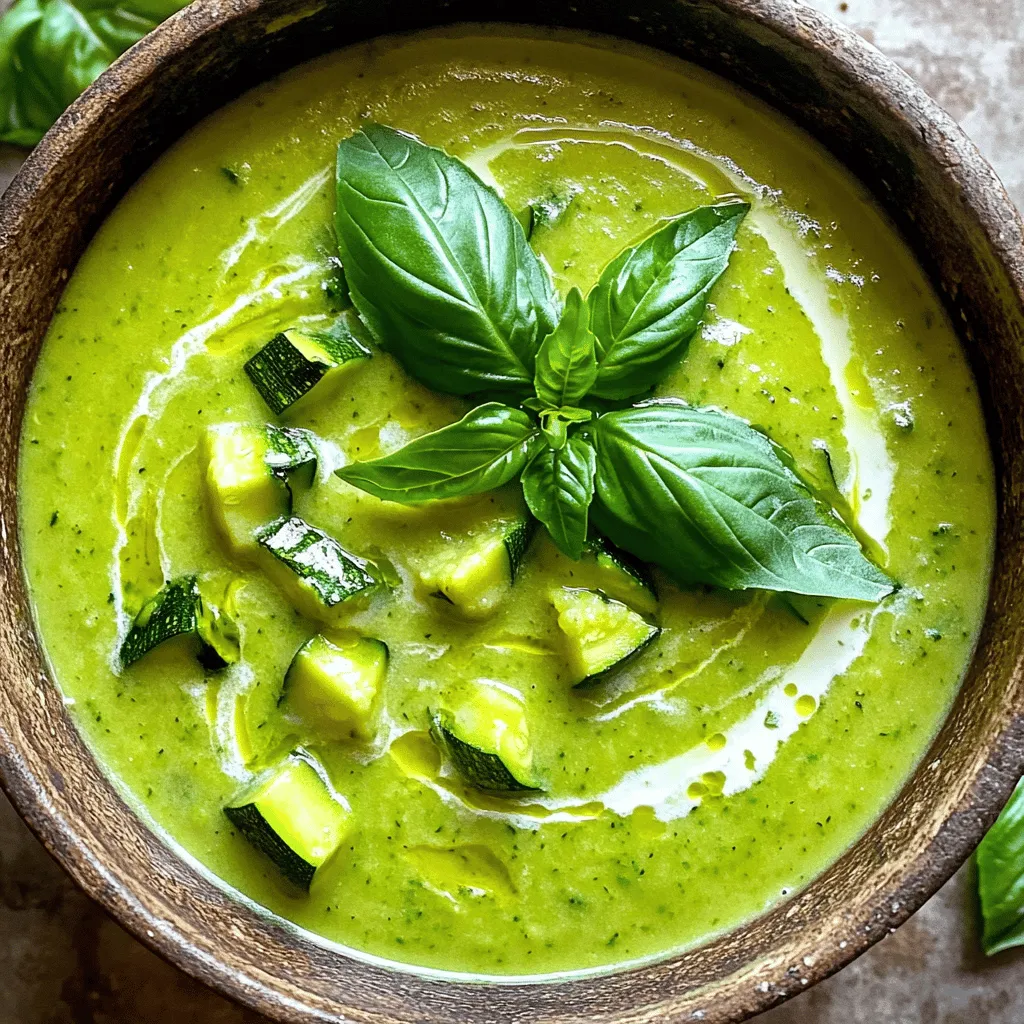
Ready for a warm and tasty dish that’s both easy to make and healthy? Zucchini soup is your answer! This simple recipe uses fresh veggies and coconut milk for creamy …
![To make the best zucchini salsa, you need these key ingredients: - 2 medium zucchinis, diced - 1 cup ripe tomatoes, diced - 1/2 red onion, finely chopped - 1 jalapeño, seeds removed and minced - 1 clove garlic, minced - 1/4 cup fresh cilantro, chopped - Juice of 1 lime - 1 teaspoon ground cumin - Salt and pepper to taste These ingredients create a bright and fresh flavor. The zucchinis add a nice crunch. The tomatoes give it a juicy base. The onion and garlic add depth to the taste. Jalapeño adds just the right amount of heat. You can customize your zucchini salsa with some optional add-ins. Here are a few ideas: - Diced bell peppers for extra crunch - Corn for sweetness and texture - Black beans for protein - Avocado for creaminess - Chopped green onions for a fresh touch These add-ins can change the flavor and texture. Feel free to mix and match based on your taste. Using fresh ingredients is key for a great salsa. Fresh zucchinis and tomatoes have better flavor. They also provide better texture. Fresh cilantro brightens up the dish. The taste of fresh lime juice adds a zing. Always choose ripe and firm vegetables for the best results. When everything is fresh, you get a salsa that pops with flavor. For the full recipe, check out the [Full Recipe]. To make the best zucchini salsa, start with fresh ingredients. First, wash the zucchinis and tomatoes. Then, dice the zucchinis and tomatoes into small, even pieces. This step helps the salsa taste great and look nice. Next, finely chop the red onion and remove the seeds from the jalapeño. Mince the jalapeño to add spice. Finally, mince the garlic and chop the cilantro. Each ingredient plays a key role in flavor and texture. In a large mixing bowl, combine the diced zucchinis, tomatoes, chopped red onion, minced jalapeño, and minced garlic. This mix of veggies creates a colorful base. Next, add the chopped cilantro for a fresh taste. Squeeze the juice of one lime over the veggies. Sprinkle in the ground cumin, salt, and pepper. Then, gently stir the mixture until all the ingredients are well combined. Let the salsa sit for at least 15-30 minutes. This resting time helps the flavors blend better. For the best flavor, always use ripe tomatoes and fresh herbs. Fresh ingredients make a big difference. If you want more heat, leave some seeds in the jalapeño. You can also mix in other spices, like paprika or coriander, for extra depth. When serving, use a colorful bowl to make your salsa pop. Garnish with extra zucchini strips or cilantro sprigs. Enjoy it with tortilla chips, or use it as a topping over grilled chicken. For the full recipe, check the main section. To make your zucchini salsa pop, use fresh, ripe ingredients. Fresh tomatoes and herbs bring out the best taste. Add a pinch more lime juice for a zesty kick. A touch of honey can balance the heat from the jalapeño. Letting the salsa sit for 15-30 minutes helps the flavors blend. This makes each bite burst with flavor. One mistake is chopping the zucchini too large. This can lead to uneven texture. Avoid using canned tomatoes; fresh ones taste much better. Don't rush the marinating time. If you serve it right away, the flavors won’t be as rich. Lastly, be careful with salt. Taste as you go to prevent over-seasoning. You will need a sharp knife and a cutting board for chopping. A large mixing bowl is essential for combining ingredients. A zester or juicer will help with the lime juice. Use measuring spoons for ground cumin and salt. Finally, a spoon or spatula is great for mixing everything together. {{image_2}} If you want to add some heat, try these spicy options. You can use more jalapeño or add a few sliced serrano peppers. For extra flavor, include a splash of hot sauce. You might also consider adding chipotle peppers in adobo sauce. This gives a smoky taste and packs a punch! Fruits can make zucchini salsa special. Try adding diced mango or peach for sweetness. They balance the heat and add juicy flavor. Pineapple also works well; it adds a tropical touch. Mix in fruits right before serving to keep them fresh and bright. Switching up herbs can change the taste of your salsa. Fresh basil or mint can offer a fresh twist. You can also try dill for a unique flavor. For spices, consider smoked paprika or chili powder. These add depth and warmth to your dish. For more ideas and a complete guide, check out the Full Recipe. To keep your zucchini salsa fresh, store it in an airtight container. Glass jars work great for this. Make sure the lid seals tightly. This keeps out air and moisture, which can spoil the salsa. Place it in the fridge right after making it. Fresh salsa tastes best, but proper storage helps it last longer. Zucchini salsa lasts about 3 to 5 days in the fridge. If you want to keep it longer, freezing is a great option. Use freezer-safe bags or containers. Leave some space in the bag for expansion. Zucchini salsa can stay good in the freezer for up to 3 months. When you're ready to use it, thaw it in the fridge overnight. You can enjoy zucchini salsa cold or warm. For a warm option, gently heat it in a pan over low heat. Stir it often to avoid burning. Serve it with tortilla chips, on tacos, or over grilled meats. For a fun twist, try it on eggs or with pasta. To make it look fancy, garnish it with extra cilantro or zucchini strips. This adds a nice touch and makes it more appealing! For the full recipe, check out The Best Zucchini Salsa. Zucchini salsa lasts about 3 to 5 days in the fridge. Keep it in an airtight container. After a few days, the flavors may change. If it looks or smells off, it's best to toss it. Yes, you can add many other vegetables to zucchini salsa. Bell peppers, corn, or even carrots work well. Just remember to chop them small, so they mix well. This lets you customize the salsa to your taste! Serve zucchini salsa chilled for the best flavor. Use a colorful bowl for a nice touch. It pairs great with tortilla chips or grilled chicken. You can also top tacos or nachos with it for extra zest. For the full recipe, check out the instructions above. Zucchini salsa shines with fresh, vibrant flavors. We explored key ingredients and optional add-ins, highlighting the importance of freshness. Step-by-step instructions helped you prepare, mix, and enhance your salsa. I shared pro tips, mistakes to avoid, and essential kitchen tools. Variations can add a spicy kick or fruity twist to your salsa. Lastly, knowing how to store it properly ensures you get the best taste over time. Celebrate your cooking with delicious zucchini salsa, ready to impress. Enjoy every bite!](https://grilledflavors.com/wp-content/uploads/2025/06/742047d1-5223-4899-93cd-ed16cad2c474.webp)
Looking for a fresh twist on salsa? Try my best zucchini salsa recipe! Zucchini shines here, mixing with bright veggies and spices to create a flavor-packed dip. Whether you’re enjoying …
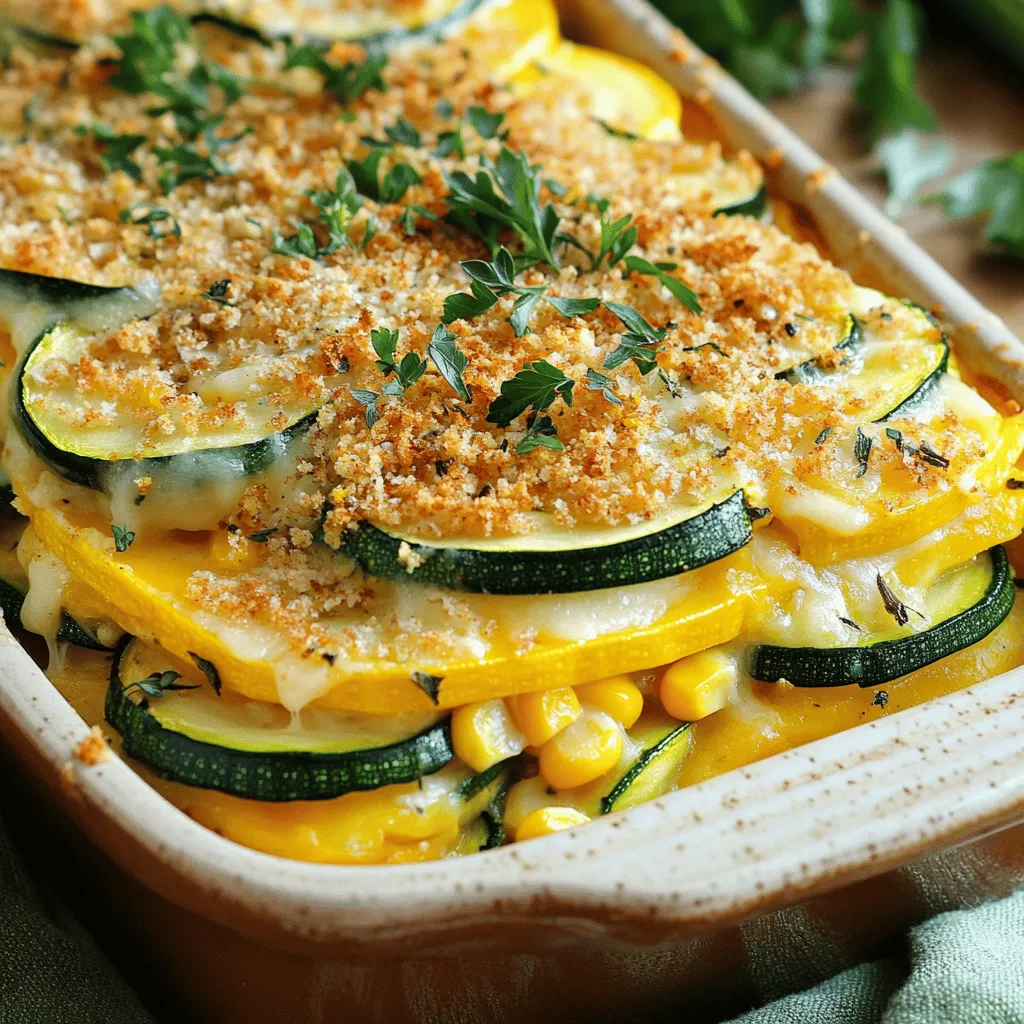
If you’re looking for a tasty, comforting dish, I have just the recipe for you! My Zucchini, Squash & Corn Casserole bursts with flavor and is perfect for any meal. …
![- Zucchini: Fresh vs. Frozen Fresh zucchini gives the best taste and texture. It adds moisture to the muffins. Frozen zucchini can work, too, but make sure to drain excess water. This helps avoid soggy muffins. - Flour Types: All-Purpose and Whole Wheat I like using a mix of all-purpose and whole wheat flour. All-purpose flour makes muffins light and fluffy. Whole wheat flour adds a nutty flavor and extra fiber. The blend creates a great texture. - Sweeteners: Granulated vs. Brown Sugar Granulated sugar gives sweetness and lightness. Brown sugar adds a rich, caramel flavor. Using both sweeteners in this recipe creates a balanced sweetness. It enhances the overall taste of the muffins. Here's the Full Recipe for your convenience: - 1 medium zucchini (about 1 cup grated) - 1 cup all-purpose flour - 1/2 cup whole wheat flour - 1 teaspoon baking soda - 1/2 teaspoon baking powder - 1/2 teaspoon salt - 1 teaspoon ground cinnamon - 1/2 cup granulated sugar - 1/4 cup brown sugar, packed - 1/2 cup vegetable oil - 2 large eggs - 1 teaspoon vanilla extract - 1 cup semi-sweet chocolate chips - 1/2 cup chopped walnuts (optional) Start by preheating your oven to 350°F (175°C). This temperature helps the muffins rise well and bake evenly. While the oven heats up, line a muffin tin with paper liners. This makes it easy to remove the muffins later. If you don’t have liners, grease the tin with cooking spray or butter. This keeps the muffins from sticking. Next, take out a bowl and mix the dry ingredients. Use 1 cup of all-purpose flour and ½ cup of whole wheat flour. Add 1 teaspoon of baking soda, ½ teaspoon of baking powder, ½ teaspoon of salt, and 1 teaspoon of ground cinnamon. Sifting the flour is important. It helps remove lumps and makes the muffins lighter. Measure the ingredients carefully for the best results. In another large bowl, mix together the sugars and oil. You need ½ cup of granulated sugar and ¼ cup of brown sugar. Add ½ cup of vegetable oil and blend well. Next, add 2 large eggs, one at a time, mixing well after each. Stir in 1 teaspoon of vanilla extract. Slowly add the dry mix to the wet mix. Stir until just combined. Do not overmix, as this can make the muffins tough. Finally, gently fold in 1 cup of grated zucchini and 1 cup of semi-sweet chocolate chips. If you like, add ½ cup of chopped walnuts for a nice crunch. Now, it’s time to bake! Fill each muffin cup about ¾ full with batter. Bake the muffins for 18-22 minutes. Check them by inserting a toothpick into the center. If it comes out clean, they are done. Let the muffins cool in the pan for 5 minutes. Then, transfer them to a wire rack. This helps them cool completely and keeps the texture perfect. For the best taste, enjoy your muffins warm. For the full recipe, refer to the detailed instructions above. Avoiding Soggy Muffins Soggy muffins can ruin the fun. To avoid this, use fresh zucchini. Grate it and remove excess water by squeezing it in a clean cloth. This keeps your muffins fluffy. Also, don't overmix the batter. Mixing just until combined helps maintain the right texture. Adding More Zucchini: Pros and Cons You can add more zucchini for extra moisture. But too much can make muffins dense. Start with a cup and see how you like it. If you want to add more, reduce some oil to balance it out. This keeps the muffins tasty but not too wet. Spice Variations and Add-ins Spices can take your muffins to the next level. Try adding nutmeg or ginger for warmth. You could also mix in dried fruits like raisins or cranberries for a sweet twist. Each spice gives a unique taste, so experiment and find your favorite. Choosing the Right Chocolate Chips Not all chocolate chips are the same. Semi-sweet chips work best in this recipe. They balance well with the sweetness from the sugars. If you want a richer flavor, dark chocolate chips are a great choice. They add depth to each bite. Displaying Your Muffins Creatively Presentation matters. Use a wooden board or a colorful plate for serving. Arrange the muffins in a circle or stack them high for a fun display. This adds appeal and makes your muffins the star of the table. Garnishing Ideas for Serving Garnish can elevate your muffins. A light dusting of powdered sugar adds charm. You can also top them with a dollop of whipped cream or a sprinkle of chopped nuts. Fresh mint leaves make a bright touch too. This adds color and freshness to your dish. For the full recipe, check the [Full Recipe]. {{image_2}} You can make these muffins gluten-free. Start by using gluten-free flour blends. Look for a blend that includes xanthan gum. This helps the muffins hold together. If your blend does not have it, add 1 teaspoon of xanthan gum to the mix. This will keep your muffins from crumbling. To make the muffins vegan, swap out the eggs and dairy. Use 1/4 cup of unsweetened applesauce for each egg. This keeps the muffins moist. For the oil, replace it with melted coconut oil or a vegan butter. Use coconut sugar instead of granulated sugar for a richer taste. If you want nut-free muffins, just leave out the walnuts. You can replace chocolate chips with carob chips for a different flavor. Always check labels for allergens in all your ingredients. This helps keep everyone safe. For a more classic muffin, use seeds like sunflower seeds instead of nuts. You can explore these variations, and get the full recipe for the best chocolate chip zucchini muffins to start baking! To keep your chocolate chip zucchini muffins fresh, store them in an airtight container. This helps keep moisture in. You can place them on the counter for up to three days. For longer storage, put them in the fridge. This extends their life to about a week. If you want to freeze muffins, wrap each one in plastic wrap. Then, place them in a freezer bag. This will help prevent freezer burn. You can freeze them for up to three months. When you’re ready to eat, just thaw them overnight in the fridge. To enjoy your muffins warm, you can reheat them in the oven or microwave. If using the oven, preheat it to 350°F (175°C). Place the muffins on a baking sheet and heat for about 10 minutes. This will keep them nice and soft. If you choose the microwave, heat each muffin for 15 to 20 seconds. Check to see if it’s warm enough. Be careful not to overheat them; they can become tough. Enjoy these simple reheating tips to savor every bite of your delicious muffins! Store your muffins in an airtight container. They last about 3 to 5 days at room temperature. For longer storage, keep them in the fridge for up to a week. You can also freeze them for up to 3 months. Just make sure to wrap them tightly in plastic wrap. Yes, you can make these muffins ahead of time. Prepare the batter and store it in the fridge for up to 24 hours. This helps the flavors blend better. Alternatively, bake the muffins and freeze them. Thaw them overnight in the fridge, then reheat them in the oven. You can swap all-purpose flour with gluten-free flour for a gluten-free option. For the sweeteners, use coconut sugar or maple syrup instead of granulated sugar. If you have egg allergies, applesauce or flaxseed meal can replace eggs in the recipe. Absolutely! You can add mashed bananas, shredded carrots, or even applesauce. Each option will give your muffins a unique twist. You can mix and match these add-ins based on what you have at home. These chocolate chip zucchini muffins are easy and fun to make. We talked about key ingredients, like using fresh zucchini and the right types of flour. Then, I shared steps to mix and bake them perfectly. Remember, you can try different flavors and options. Whether you go gluten-free or vegan, there’s a way for everyone. Store them well to keep them tasty. Now, it’s your turn to bake and enjoy these healthy treats!](https://grilledflavors.com/wp-content/uploads/2025/06/b637b67f-efae-47c6-81de-6225dee89905.webp)
Are you ready to enjoy a delicious twist on a classic treat? I’m excited to share my recipe for the Best Chocolate Chip Zucchini Muffins! These muffins are a perfect …
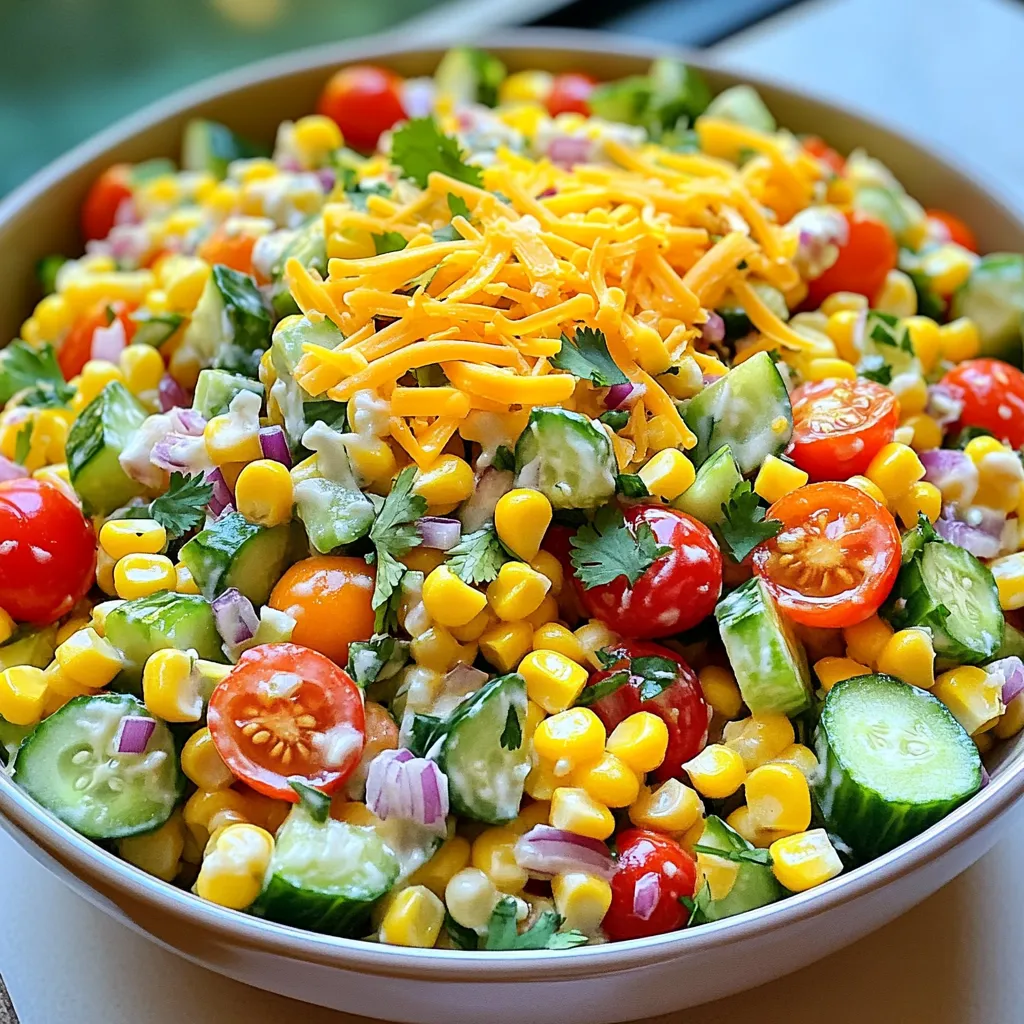
Looking for a fresh and tasty side dish? Try making Crack Corn Salad! This bright and colorful recipe is packed with sweet corn and crisp veggies. It’s perfect for picnics …