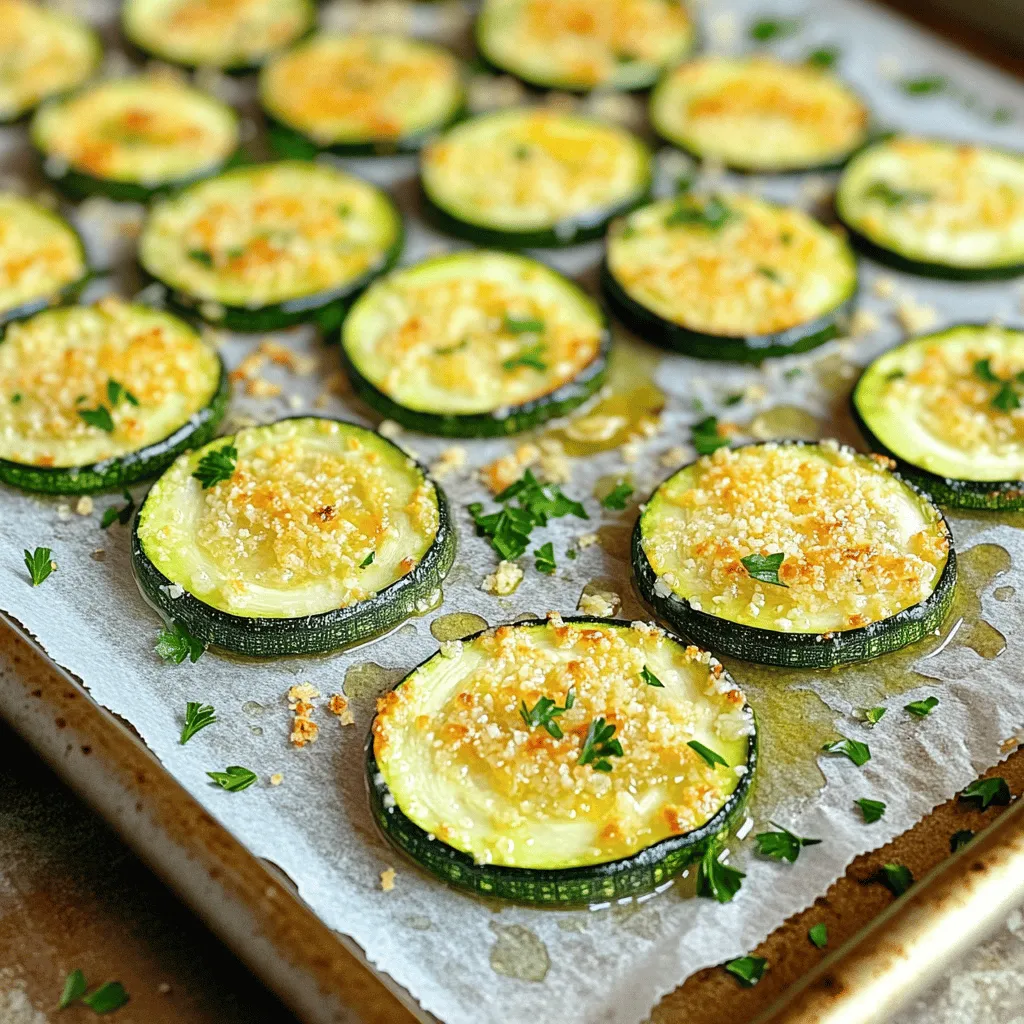
Zucchini Parmesan Crispy and Flavorful Bake Recipe

If you’re craving a tasty dish that’s both crispy and healthy, look no further! My Zucchini Parmesan recipe packs layers of flavor with simple ingredients. You only need a few …
If you’re craving a tasty dish that’s both crispy and healthy, look no further! My Zucchini Parmesan recipe packs layers of flavor with simple ingredients. You only need a few …
Are you ready to enjoy a crunchy, cheesy veggie dish? Quick Roasted Parmesan Zucchini is a simple treat that packs a great flavor punch. With just a few fresh ingredients …
![- 2 medium zucchinis, grated - 1 cup breadcrumbs (panko recommended for extra crunch) - 1/2 cup grated Parmesan cheese - 2 cloves garlic, minced - 2 large eggs, beaten - 1/4 cup fresh parsley, chopped - 1/2 teaspoon onion powder - 1/2 teaspoon baking powder - Salt and pepper to taste - Olive oil spray (for cooking) When making zucchini garlic bites, using fresh ingredients is key. Zucchini brings moisture and a mild flavor. Breadcrumbs, especially panko, give a great crunch. Parmesan cheese adds a salty, rich touch. Garlic gives it a kick that everyone loves. Eggs bind everything together, while parsley adds freshness. Onion powder enhances the taste without being too strong. Baking powder helps the bites rise and stay fluffy. Finally, salt and pepper round out the flavors. For the best results, choose firm zucchinis. Look for ones with smooth skin. Fresh herbs like parsley add vibrant color and taste. Keep your ingredients ready before starting. This makes the process smoother and more fun. You can find the full recipe later in this article. Enjoy crafting these bites! 1. Preheat your oven to 400°F (200°C). Line a baking sheet with parchment paper. This step helps keep the bites from sticking. 2. Grate the zucchinis using a box grater. Place the grated zucchini in a bowl. Add a pinch of salt and let it sit for 10 minutes. This draws out moisture, making your bites crispier. 3. After 10 minutes, grab a clean kitchen towel. Squeeze the zucchini to remove as much water as you can. This is key for crunch. 4. In the same bowl, add the breadcrumbs, Parmesan cheese, minced garlic, beaten eggs, parsley, onion powder, baking powder, salt, and pepper. Mix everything until it’s well combined. You want a nice, sticky mixture that holds together. 5. Now, use your hands to form small patties. Each should be about 2 inches wide. Place them on the prepared baking sheet, leaving space between each one. 1. Bake the bites in the oven for 20 to 25 minutes. Keep an eye on them. You want them to be golden brown and crispy. 2. To achieve that perfect golden brown, you can lightly spray the tops with olive oil spray before baking. This helps them crisp up nicely. Following these steps will lead you to delicious Zucchini Garlic Bites! For the complete recipe, check the [Full Recipe]. To make your zucchini garlic bites truly crisp, start by squeezing out extra moisture. After grating the zucchini, sprinkle it with salt and let it sit for about 10 minutes. This step helps pull out water. Then, use a clean kitchen towel or cheesecloth to wring out as much liquid as you can. This will make your bites crunchier. For the best baking results, set your oven to 400°F (200°C). Bake the bites for 20 to 25 minutes. Watch them closely. You want them golden brown and crispy on the outside, not burnt. Mixing the right ingredients ensures great flavor. Combine grated zucchini, breadcrumbs, Parmesan cheese, garlic, eggs, parsley, onion powder, baking powder, salt, and pepper. Stir until everything blends well. This mix creates a tasty bite that everyone will love. Your zucchini garlic bites pair well with dips and sauces. Try serving them with yogurt dip or marinara sauce. The tangy flavors will enhance the bites. For creative plating, arrange the bites on a colorful platter. Drizzle with extra virgin olive oil and sprinkle fresh parsley on top. This adds a nice touch. You can also serve them with a side salad for a complete meal. For the full recipe, check out the link above. {{image_2}} You can easily switch up the cheese in zucchini garlic bites. Try mozzarella for a melty texture or feta for a tangy kick. Each cheese brings a unique taste. You can also add spices to change the flavor. Consider paprika for smokiness or Italian herbs for a fresh twist. Experimenting with spices can lead to fun surprises. To make these bites gluten-free, swap breadcrumbs with almond flour or gluten-free panko. This keeps the texture while catering to dietary needs. If you want vegetarian or vegan options, use flaxseed meal mixed with water instead of eggs. This change binds the ingredients well. You can also use nutritional yeast for a cheesy flavor without dairy. These substitutions let everyone enjoy this delicious treat. To store your leftover Zucchini Garlic Bites, first let them cool completely. Then, place them in an airtight container. A good tip is to layer them with parchment paper to keep them from sticking. Store them in the fridge for up to three days. This way, you can enjoy a tasty snack later without losing flavor. When you're ready to eat your leftover bites, the best way to reheat them is in the oven. Preheat your oven to 350°F (175°C). Place the bites on a baking sheet and heat for about 10-15 minutes. This method keeps them crisp. If you're short on time, you can use a microwave, but this may make them a bit soggy. To keep the taste and texture, oven reheating is best. For a quick fix, you can also pan-fry them briefly in a little olive oil until warm. Enjoy your bites just like fresh from the oven! To make zucchini bites crispy, squeeze out as much moisture as you can. After grating the zucchini, let it sit with salt for ten minutes. This draws out water. Then, use a towel to press the zucchini. Also, use panko breadcrumbs instead of regular ones for extra crunch. A light spray of olive oil on top before baking helps too. Yes, you can freeze zucchini garlic bites. After baking, let them cool completely. Place them in a single layer on a baking sheet and freeze for one hour. Then, transfer them to a freezer bag. They will keep for up to three months. When ready to eat, bake them directly from the freezer. You can mix in different ingredients to change the flavor. Try adding shredded cheese like mozzarella or cheddar for a cheesy twist. You can also add chopped sun-dried tomatoes or olives for a Mediterranean touch. Fresh herbs like basil or dill can brighten the taste too. Zucchini bites are done when they are golden brown on the outside. You can test by inserting a toothpick into the center. If it comes out clean, they are ready. The cooking time is usually about 20 to 25 minutes at 400°F (200°C). Enjoy them warm for the best flavor. For the full recipe, check out the Zucchini Garlic Bites section above. In this post, I shared a simple recipe for zucchini garlic bites. We covered essential ingredients, prep steps, and cooking tips to make them perfect. I also included variations for dietary needs and how to store leftovers. When made right, these bites are not just tasty but healthy too. Enjoy experimenting with flavors and dipping sauces. With practice, you'll master this dish and impress everyone with your cooking skills. Happy baking!](https://grilledflavors.com/wp-content/uploads/2025/06/dc333eac-a466-4b53-9f4c-d47e8699ceba.webp)
Looking for a simple yet delicious appetizer? You’ll love these Zucchini Garlic Bites! They’re crispy on the outside, soft on the inside, and packed with flavor. This easy recipe uses …

Looking for a tasty and easy meal idea? You’ve come to the right place! Baked Orange Chicken is simple to make and packed with flavor. In this post, I’ll guide …

Are you ready to enjoy a delicious meal that’s both healthy and easy? My High Protein Vegan One Pot Chili is packed with flavor and nutrients. You’ll love how simple …

Looking for a quick and tasty meal? You’ll love my Crispy Parmesan Air Fryer Cod! It’s simple to make and packed with flavor. In just a few steps, you can …
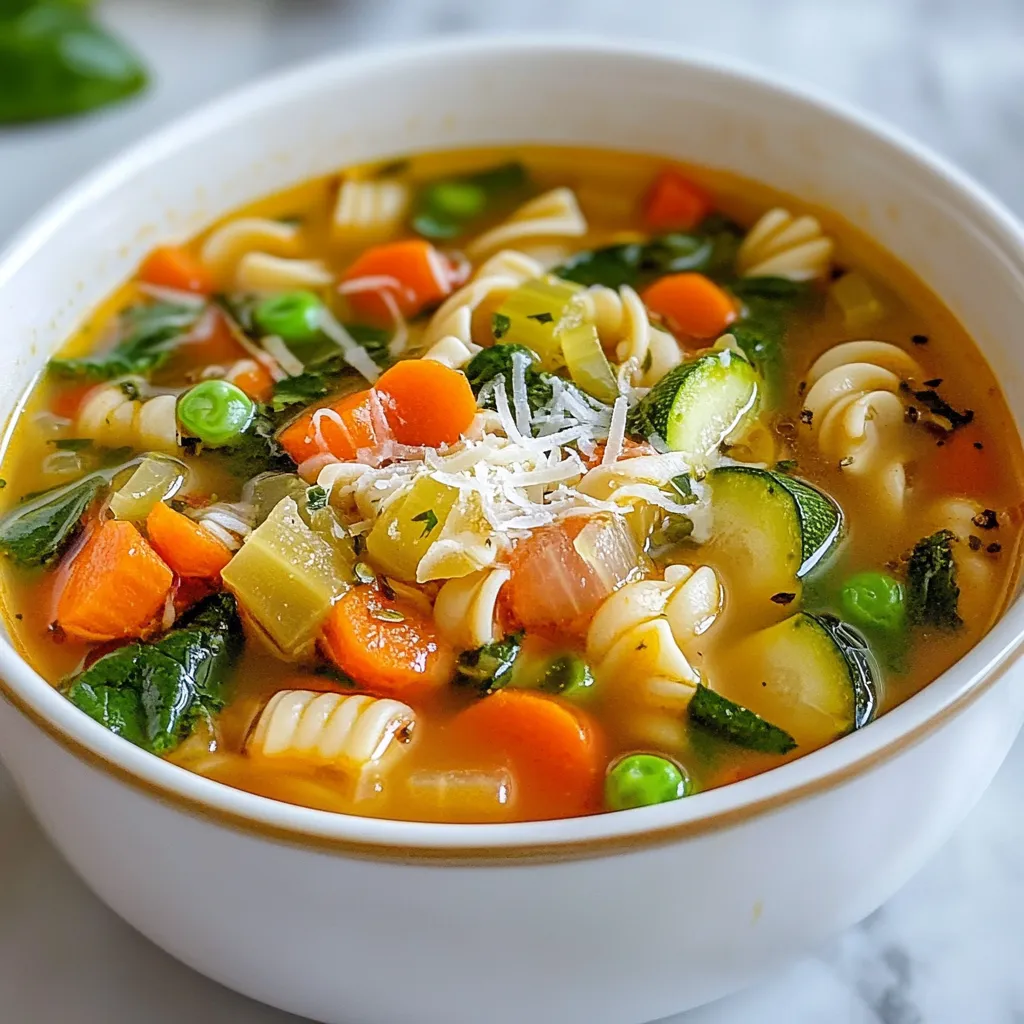
If you love Olive Garden’s minestrone soup, then you’re in for a treat! This copycat recipe is simple, flavorful, and perfect for any home cook. With fresh veggies, hearty beans, …
![To make Broccoli Cheese Stuffed Chicken, you will need fresh and simple ingredients. Here’s what to gather: - 4 boneless, skinless chicken breasts - 1 cup broccoli florets, blanched - 1 cup shredded cheddar cheese - 1/2 cup cream cheese, softened - 1/4 cup garlic, minced - 1/4 teaspoon black pepper - 1/4 teaspoon salt - 1 tablespoon olive oil - 1/2 cup breadcrumbs (optional for topping) - Fresh parsley for garnish Start by blanching the broccoli florets. This means you should boil them for just a few minutes and then cool them in ice water. This keeps the bright green color and a nice crunch. For cheese, I love using sharp cheddar for its bold flavor. You can also try mild cheddar or a mix of cheeses. Cream cheese adds creaminess and binds everything together. This mix makes every bite creamy and cheesy! By preparing these ingredients, you set yourself up for a tasty meal. You’ll love how easy it is to create this dish with these fresh items. For the full recipe, check the main page. Preparation of chicken breasts Start by preheating your oven to 375°F (190°C). Next, take the chicken breasts and place them on a cutting board. Slice a pocket into each breast. Be careful not to cut all the way through. This pocket will hold the tasty filling. Stuffing each chicken breast In a bowl, combine the blanched broccoli, cheddar cheese, cream cheese, minced garlic, black pepper, and salt. Mix this well. Now, take the filling and stuff it into each chicken breast. Make sure to pack it in tightly. You want each bite to be full of flavor. Cooking instructions in skillet and baking Heat olive oil in a large oven-safe skillet over medium heat. Once the oil is hot, add the stuffed chicken breasts to the skillet. Cook for about 3-4 minutes on each side. Look for a golden brown color. If you want a crunchy topping, sprinkle breadcrumbs on top now. Transfer the skillet to the preheated oven. Bake for 20-25 minutes. The chicken must reach an internal temperature of 165°F (75°C) to be safe. After baking, let the chicken rest for 5 minutes. This helps keep the juices in. Finally, garnish with fresh parsley before serving. For the full recipe, check the earlier section. To make your stuffed chicken perfect, start with the right technique. When you slice the chicken, be gentle. Make a pocket, but don’t cut all the way through. This keeps the filling inside. For a golden crust, heat your skillet well. Use medium heat and add olive oil. Cook each side for 3-4 minutes until it turns brown. You can also sprinkle breadcrumbs on top for a crunchy finish. Seasoning is key. Try adding herbs like thyme or paprika for extra flavor. You can also mix in some hot sauce for a little kick. This will make your dish even more tasty. For the full recipe, check the earlier section. Enjoy cooking! {{image_2}} Customization can make your Broccoli Cheese Stuffed Chicken even better! Here are some fun ideas. You can swap broccoli with other tasty veggies. Spinach works great and adds color. Mushrooms add a nice earthy taste. Feel free to mix and match! Cheddar cheese is classic, but you can try others. Mozzarella melts beautifully and gives a stringy texture. Cream cheese adds creaminess, while feta gives a tangy kick. Experiment to find your favorite! If you need gluten-free options, use crushed gluten-free crackers instead of breadcrumbs. For a low-carb dish, skip the breadcrumbs altogether. You can also try zucchini or eggplant instead of chicken for a veggie twist. These variations can help you create a dish that fits your taste. For more details, check out the Full Recipe for Broccoli Cheese Stuffed Chicken! To keep your broccoli cheese stuffed chicken fresh, use airtight containers. Glass containers work best as they do not retain odors. Plastic containers are also fine, just ensure they are tightly sealed. You can store leftovers in the fridge for three to four days. For longer storage, place them in the freezer. In the freezer, they will stay good for about three months. When you are ready to eat, reheating is key. For the best taste and texture, use an oven. Preheat the oven to 350°F (175°C). Place the chicken in a baking dish and cover it with foil. Heat for about 20 minutes or until it is warmed through. If you're in a hurry, you can use a microwave. Just be careful not to overcook it. Microwave in short bursts, checking often to avoid drying it out. Enjoy your delicious leftovers! For the full recipe, click [Full Recipe]. Can I make this dish ahead of time? Yes, you can prepare Broccoli Cheese Stuffed Chicken in advance. You can stuff the chicken and store it in the fridge for up to 24 hours. This way, you save time on busy days. Just bake it before serving to ensure it's fresh. What can I serve with Broccoli Cheese Stuffed Chicken? This dish pairs well with many sides. Some great options are: - Steamed rice - Mashed potatoes - Roasted vegetables - A fresh garden salad These sides balance the cheesy flavor and add nutrition. How can I tell if the chicken is cooked through? To check if the chicken is fully cooked, use a meat thermometer. The internal temperature should reach 165°F (75°C). If you don't have a thermometer, cut into the chicken. The juices should run clear, and the meat should no longer be pink. Enjoy your meal with confidence! For the full recipe, check out my Cheesy Broccoli Delight Chicken. This article covered how to make delicious Broccoli Cheese Stuffed Chicken. We explored the key ingredients, including specific kinds of cheese and veggie prep. I shared step-by-step instructions to guide your cooking. You learned tips to avoid tears when stuffing the chicken and how to get a perfect crust. I also offered fun variations and storage tips to enjoy leftovers. Final thoughts: This dish is easy to customize. You can try new flavors and ingredients. Enjoy creating your perfect stuffed chicken!](https://grilledflavors.com/wp-content/uploads/2025/06/4c18a98c-6fe6-4c7f-bab7-ba5dfb0666b2.webp)
If you’re looking for a delicious dinner option that’s simple to make, you’ve clicked on the right post! My Broccoli Cheese Stuffed Chicken is packed with flavor and nutrients. This …
![- 6 large eggs - 1 cup spinach, chopped - 1/2 cup bell peppers (red and yellow), diced - 1/2 cup zucchini, grated - 1/2 cup cherry tomatoes, halved - 1/4 cup red onion, finely chopped - 1/4 cup feta cheese, crumbled (optional) - 1 tablespoon olive oil - Salt and pepper to taste - Fresh basil for garnish (optional) When making a healthy vegetable frittata, choose fresh ingredients. Eggs are the base. They add protein and flavor. Spinach offers nutrients and a vibrant green color. Bell peppers add sweetness and crunch. Zucchini provides moisture and a mild taste. Cherry tomatoes give a burst of juiciness. Red onion brings a sharp flavor. Feta cheese adds a creamy touch, but it’s optional. Olive oil helps cook the veggies and adds richness. Finally, salt and pepper enhance all the flavors. - Calories per serving: Approximately 150 - Macronutrient breakdown: - Protein: 10g - Fat: 10g - Carbohydrates: 5g Each serving of this frittata is light yet filling. You get a good mix of protein, healthy fats, and carbs. This meal fits into many diets. You can enjoy it for breakfast, lunch, or dinner. - Seasonal recommendations: Choose veggies that are in season for the best taste. - Types of vegetables to use: Look for bright colors and firm textures. Fresh spinach, vibrant peppers, and crisp zucchini work well. Avoid any wilted or bruised produce. By picking fresh ingredients, you improve the flavor and nutrition of your frittata. Try this recipe for a quick, healthy meal. For the full recipe, check out the details above! First, set your oven to 375°F (190°C). This temperature helps the eggs cook evenly. Use an oven-safe skillet for great results. A cast-iron skillet works best, as it holds heat well. Next, let’s prepare the veggies. Start by heating olive oil in your skillet over medium heat. Add red onion and bell peppers first. Sauté them for about 3-4 minutes until they soften. This order is key. Cooking the onion first brings out its sweet flavor. Then, add grated zucchini and spinach. Cook them for 2-3 minutes until the spinach wilts. Finally, stir in halved cherry tomatoes and cook for just one more minute. This will keep their fresh taste. Now, pour your whisked eggs over the veggies. Fold gently to mix. If you want, sprinkle feta cheese on top. Transfer the skillet to your preheated oven. Bake for 20-25 minutes. Keep an eye on it. You know it’s done when the eggs are set and the top is slightly golden. Check doneness by gently shaking the skillet. If the eggs jiggle, it needs more time. Once baked, cool for a minute before slicing. Enjoy your colorful, tasty frittata! For the complete recipe, see the [Full Recipe]. To make a great frittata, avoid common mistakes. First, do not overcook your veggies. They should be tender but not mushy. Also, don't skip whisking the eggs well. This adds air and lightness. If you forget, your frittata can be dense and heavy. Adjust cooking times based on your oven. Every oven is different. Check your frittata a few minutes early. It should be firm in the center but still moist. Pair your frittata with a fresh salad. A simple green salad can add crunch and brightness. You can also serve it with roasted potatoes. Place your frittata slices on a colorful platter. Garnish with cherry tomatoes and fresh herbs. This makes it look more appealing. A vibrant presentation can make any dish pop! Making a dairy-free frittata is easy. Just skip the cheese or use a dairy-free alternative. You can also try silken tofu for creaminess. If you're vegan, replace the eggs with chickpea flour. Mix with water to create a batter. This gives a similar texture to eggs. The flavor will still be great with your chosen veggies. {{image_2}} You can easily change the vegetables in your frittata. Here are some ideas: - Broccoli florets - Mushrooms, sliced - Carrots, grated - Asparagus, chopped These swaps make the dish unique each time. You can also switch up the cheese. Instead of feta, try: - Cheddar - Goat cheese - Mozzarella To take your frittata to the next level, add some spices or herbs. Here are some options: - Oregano - Thyme - Paprika - Chili flakes Each will bring a new taste. You can also explore different cuisines. For a Mexican twist, add cumin and jalapeños. For Italian flair, use basil and sun-dried tomatoes. If you want smaller servings, consider mini frittatas. Use a muffin tin to bake them. This makes for easy portion sizes. Adjust your baking time to about 15-20 minutes. Check them with a toothpick. If it comes out clean, they are done! These mini versions are perfect for snacks or brunch. You can serve them warm or cold. For the full recipe, check out the Rainbow Veggie Frittata. To keep your frittata fresh, store it in the fridge. Place it in an airtight container. This helps keep it moist and prevents drying out. Make sure it cools to room temperature first. You can also cut it into slices for easy serving. For freezing, wrap individual slices tightly in plastic wrap. Then place them in a freezer-safe bag. This way, you can grab one whenever you want a quick meal. Just remember to label the bags with the date. When reheating, the oven works best for keeping the frittata's texture. Preheat your oven to 350°F (175°C). Place the frittata on a baking sheet and cover it with foil. Heat for about 10-15 minutes until warm. If you use a microwave, be careful. It can make the frittata rubbery. Heat on medium power for 1-2 minutes, checking every 30 seconds. This helps avoid overcooking. In the fridge, your frittata lasts about 3-4 days. Keep an eye on it, though. If you see any mold or off-smells, it’s time to toss it out. Signs of spoilage include a change in color or texture. If it looks dry or has a strange odor, don’t eat it. Always trust your senses when it comes to food safety. A frittata is an Italian egg dish. It is like an open-faced omelet. You mix eggs with vegetables, cheese, or meats. Then, you cook it slowly. It can be baked or cooked on the stove. The key features are its fluffy texture and colorful veggies. To make your frittata fluffy, you need to whisk your eggs well. Whisking adds air to the eggs. This air makes the frittata light. You can also bake it at a lower temperature. This helps it rise gently. Yes, you can make a frittata ahead of time. Cook it fully, then let it cool. Store it in the fridge for up to three days. You can also freeze it for longer storage. Just slice it before freezing. Some great vegetables for a frittata are: - Spinach - Bell peppers - Zucchini - Cherry tomatoes - Red onion These veggies add color and flavor. You can mix and match based on what you like. For more ideas, check the Full Recipe. In this post, I covered how to make a delicious frittata. We explored key ingredients, cooking steps, and tips for perfection. Fresh veggies enhance both taste and nutrition. I shared ways to customize your frittata and best storage practices. Remember, cooking is about experimenting and having fun. Try new flavors, learn from mistakes, and enjoy your tasty creations!](https://grilledflavors.com/wp-content/uploads/2025/06/f6b79faf-46f2-4fd6-9831-3fc1bbdb0719.webp)
Looking for a quick and healthy meal? This Healthy Vegetable Frittata is packed with flavor and nutrition. It’s an easy dish that you can whip up any time of day. …

If you crave a crispy and flavorful bite, Korean fried chicken is your answer! I’ll show you how to make this tasty dish at home, with step-by-step instructions and secret …