Skip to content
grilledflavors.com
  • Home
  • Appetizers
  • Desserts
  • Salads
  • Breakfast
  • Dinner
  • Privacy Policy
  • Contact
  • About

Chef Nate

Classic Chicken Noodle Soup Comforting Homemade Dish

November 28, 2025June 20, 2025 by Chef Nate
To make a great chicken noodle soup, you need these key ingredients: - 1 pound boneless, skinless chicken thighs (or breasts), cut into bite-sized pieces - 2 tablespoons olive oil - 1 medium onion, diced - 3 carrots, sliced - 3 stalks celery, sliced - 3 cloves garlic, minced - 8 cups low-sodium chicken broth - 1 teaspoon dried thyme - 1 teaspoon dried oregano - Salt and pepper to taste - 2 cups egg noodles - 1 cup frozen peas - Fresh parsley, chopped (for garnish) Each of these ingredients plays a role. The chicken adds protein and flavor. The vegetables bring freshness and texture. The herbs and broth create a rich base. Egg noodles make the soup hearty. Finally, parsley adds a pop of color and taste. When you gather these items, remember to choose fresh vegetables. They enhance the soup's flavor and nutrition. This classic recipe is simple yet satisfying, perfect for any day. {{ingredient_image_1}} Sautéing the Vegetables Start by heating 2 tablespoons of olive oil in a large pot over medium heat. Add 1 diced onion, 3 sliced carrots, and 3 sliced celery stalks. Stir these for about 5 minutes until they soften. Then, add 3 minced garlic cloves and cook for another minute. This step builds a great base for your soup. Browning the Chicken Next, add 1 pound of cut chicken thighs or breasts to the pot. Cook for 5 to 7 minutes. You want the chicken to brown lightly on all sides. This adds rich flavor to your soup. Adding Broth and Seasonings After the chicken is browned, pour in 8 cups of low-sodium chicken broth. Add 1 teaspoon each of dried thyme and oregano. Season with salt and pepper to taste. Bring this mixture to a boil. Simmering the Soup Once the soup boils, reduce the heat. Let it simmer for about 15 minutes. This allows the flavors to meld and the chicken to cook through. Incorporating Noodles and Peas Stir in 2 cups of egg noodles and 1 cup of frozen peas. Cook for an additional 8 to 10 minutes. Check that the noodles are tender. Final Adjustments and Serving Taste the soup and adjust the seasonings if needed. Remove it from heat. Let it sit for a few minutes before serving. This helps the flavors settle. Serve hot in bowls, and garnish with chopped parsley for a fresh touch. Enjoy with crusty bread for a complete meal. Recommended Seasoning Adjustments To boost flavor, you can add more herbs. Try using two teaspoons of thyme. If you like a little heat, add a pinch of red pepper flakes. This will give the soup a nice kick. Adding Fresh Herbs Fresh herbs can make your soup shine. Try adding chopped parsley or dill right before serving. This adds flavor and a pop of color. Best Cooking Techniques Sauté the vegetables first to build a base of flavor. Browning the chicken before adding the broth adds depth. Let the soup simmer gently to meld all the flavors together. Ideal Accompaniments Serve your soup with a slice of crusty bread. A simple green salad pairs well too. The bread is perfect for dipping. Presentation Ideas Serve the soup hot in deep bowls. Garnish with fresh parsley for a vibrant touch. You can also sprinkle some cracked black pepper on top for extra flair. Pro Tips Use Bone-In Chicken: For an even richer flavor, consider using bone-in chicken thighs. They add depth to the broth and are incredibly tender when cooked. Fresh Herbs: If you have fresh thyme and oregano on hand, use them instead of dried for a more vibrant flavor. Add them towards the end of cooking for maximum freshness. Customize Your Vegetables: Feel free to add your favorite vegetables like spinach or corn. This not only enhances nutrition but also adds color and texture. Store Leftovers Properly: To preserve the quality of your soup, store it in an airtight container in the fridge for up to 3 days. Reheat gently on the stove to avoid overcooking the noodles. {{image_2}} You can make chicken noodle soup even better with some fun swaps. If you want a healthier option, try using lean proteins like chicken breast instead of thighs. This change cuts down on fat. You can also use low-carb noodles, like zucchini or shirataki noodles. They offer a great texture without the carbs. Adding extra vegetables boosts nutrition and flavor. Spinach or kale makes a great choice. These greens add color and vitamins. You can toss them in during the last few minutes of cooking. This keeps them bright and fresh. Switching up the broth can change your soup's taste. Bone broth adds a rich flavor. It also has lots of nutrients that support health. Just use the same amount as chicken broth in the recipe. If you need a vegetarian or vegan option, use vegetable broth. It gives your soup a lighter taste. You can still add chicken if you want. Just keep the broth plant-based for a different twist. Refrigeration Tips Once your chicken noodle soup cools, store it in an airtight container. This keeps the soup fresh. Place it in the fridge if you plan to eat it in a few days. Chicken noodle soup lasts about three to four days in the fridge. Make sure to label the container with the date. Freezing Chicken Noodle Soup If you want to keep it longer, freezing is a great option. Let the soup cool completely before transferring it to freezer-safe containers. Leave some space at the top as the soup expands when frozen. Chicken noodle soup can stay fresh in the freezer for up to three months. When you are ready to enjoy it, thaw it overnight in the fridge. Methods for Reheating You can reheat chicken noodle soup on the stove or in the microwave. For the stove, pour the soup into a pot and heat over medium heat. Stir it often until it's hot. If using a microwave, pour the soup into a microwave-safe bowl. Heat on high for about 2-3 minutes, stirring halfway through. Safety Guidelines Always check the soup's temperature before eating. It should reach at least 165°F to be safe. If you see any ice crystals when thawing, it’s best to reheat the soup right away. Never refreeze thawed soup. Enjoy every warm, comforting bowl! How can I make chicken noodle soup thicker? To thicken your soup, you have a few options. You can add a cornstarch slurry. Mix cornstarch with cold water, then stir it in. You can also use a potato masher on some of the noodles. This releases starch and thickens the broth. Adding a bit of cream or milk can also help. Just stir it in at the end for a creamy finish. Can I use leftover chicken for the recipe? Yes, using leftover chicken is a great idea! It saves time and adds flavor. Just shred the chicken and add it when you pour in the broth. This way, you keep the soup simple and quick. What makes this recipe different from others? This recipe stands out due to its balanced flavors. The mix of thyme and oregano gives it depth. Using fresh veggies and low-sodium broth makes it healthier. Plus, the egg noodles absorb the broth well, adding heartiness. Caloric Content and Macronutrients This chicken noodle soup has about 300 calories per serving. It contains around 15 grams of protein, 10 grams of fat, and 35 grams of carbs. The egg noodles add some carbs, while the chicken provides protein. Allergen Information This soup contains common allergens like chicken and gluten from the noodles. If you need to avoid gluten, consider using gluten-free noodles. Always check labels for hidden allergens. You have all the tools to make a great chicken noodle soup. We covered the main ingredients, preparation steps, and cooking methods. Remember to adjust seasonings to fit your taste. With simple tips and variations, you can make this dish your own. Store any leftovers properly for later use. This soup is not only tasty but also nourishing. Enjoy your cooking experience and share this meal with others. You will love how rewarding it is!

Nothing warms the heart like a bowl of classic chicken noodle soup. With tender chicken, fresh veggies, and savory broth, this homemade dish is perfect for any day. I’ll guide …

Read more

Categories Dinner

Mango Coconut Chia Pudding Easy and Delicious Recipe

December 1, 2025June 19, 2025 by Chef Nate
To make this tasty treat, you'll need just a few simple items: - 1 cup coconut milk (canned or carton) - 1/4 cup chia seeds - 2 tablespoons maple syrup or honey - 1 ripe mango, pureed - 1/2 teaspoon vanilla extract These main ingredients create a rich, creamy base for your pudding. Coconut milk gives a nice tropical flavor, while chia seeds add texture and nutrition. The mango puree brings sweetness and a bright color. To make your pudding look fancy, consider these toppings: - Fresh mango slices - Toasted coconut flakes - Mint leaves (optional) These garnishes not only enhance the look but also add layers of flavor. Fresh mango slices add freshness, while toasted coconut gives a nice crunch. If you don’t have all the main ingredients, don’t worry. Here are some swaps you can try: - Use almond milk instead of coconut milk for a different taste. - You can replace maple syrup with agave syrup if you prefer. - Any ripe fruit can work instead of mango, like peach or banana. These alternatives still keep the pudding delicious and fun. Feel free to experiment and find your favorite version! {{ingredient_image_1}} First, gather your ingredients. You need: - 1 cup coconut milk - 1/4 cup chia seeds - 2 tablespoons maple syrup or honey - 1 ripe mango, pureed - 1/2 teaspoon vanilla extract In a medium bowl, whisk together the coconut milk, chia seeds, maple syrup, and vanilla. Make sure everything mixes well. After that, let the mix sit for about 5 minutes. This helps the chia seeds absorb some liquid. Stir the mix again to break up any clumps. Cover the bowl with plastic wrap or a lid. Place it in the fridge for at least 4 hours, or overnight if you can wait. This chilling time is key. It allows the chia seeds to swell and create that lovely pudding texture. Once the pudding sets, take it out of the fridge. Stir it well again. If you want it sweeter, add more maple syrup or honey to taste. Now it’s time to serve! Layer the chia pudding into clear glasses or bowls. Alternate with layers of mango puree for a beautiful look. Top it off with fresh mango slices and toasted coconut flakes. If you like, add mint leaves for a pop of color and flavor. Enjoy your tasty and healthy treat! To get the right pudding consistency, use a good ratio of coconut milk to chia seeds. I recommend one cup of coconut milk for every quarter cup of chia seeds. This mix will thicken well. After you whisk the ingredients together, let it sit for about five minutes. Then, stir again to break up any clumps. Cover and chill the mixture for at least four hours or overnight. The longer it sits, the thicker it gets. Taste is key when making this pudding. Start with two tablespoons of maple syrup or honey. After chilling, you can taste and add more sweetener if needed. Each mango has a different sweetness level. Adjust based on your taste preferences. If you prefer a less sweet pudding, reduce the sweetener. Serving this pudding is fun! Use clear glasses to show off the beautiful layers. Start with a layer of chia pudding, then add a layer of mango puree. Repeat this until the glass is full. To finish, top it with fresh mango slices and toasted coconut flakes. For a fresh touch, add a mint leaf on top. It makes the dish look fancy and inviting. Pro Tips Chia Seed Soaking: Ensure the chia seeds are fully submerged in the liquid to achieve the perfect pudding consistency. Sweetness Adjustment: Taste the pudding before serving; you can easily add more sweetener if needed. Mango Puree Texture: Blend the mango until completely smooth for a creamy layer that complements the chia pudding. Garnish Creativity: Experiment with different toppings like berries or nuts for added texture and flavor variations. {{image_2}} You can easily change the flavors in your mango coconut chia pudding. Try using other tropical fruits. Pineapple, kiwi, or passion fruit work great. Just use the same amount of pureed fruit. This gives your pudding a fun twist. You can mix and match flavors to find your favorite. To make this recipe vegan, use maple syrup instead of honey. Maple syrup adds a sweet touch and keeps it plant-based. For a sugar-free option, consider using a sugar substitute like stevia. Adjust the amount to suit your taste. This way, you can enjoy the pudding without added sugar. Add a pinch of salt to bring out the sweetness in your pudding. You can also try spices like cinnamon or nutmeg for a warm flavor. If you love coconut, add shredded coconut to the mix. This gives an extra crunch and coconut taste. To keep your mango coconut chia pudding fresh, use an airtight container. This will stop air and moisture from spoiling it. Place the pudding in the fridge right away. It stays tasty for later servings. If you have extra toppings, store them separately. Your chia pudding can last in the fridge for up to five days. After that, it may lose flavor and texture. Always check for any signs of spoilage before eating. If it smells sour or changes color, it’s best to toss it. When you’re ready to enjoy your pudding again, give it a good stir. This helps mix the chia seeds and coconut milk back together. If it seems thick, add a splash of coconut milk to loosen it. You can also freshen it up with more mango slices or coconut flakes. Yes, you can make this pudding ahead of time. In fact, chilling it overnight helps the chia seeds absorb the coconut milk. This gives the pudding a thick and creamy texture. I often prepare it the night before a busy day. Just remember to store it in the fridge in a covered bowl. Chia seeds are tiny but mighty! They are packed with fiber, which helps digestion. They also offer healthy fats, like omega-3s, that are good for your heart. Plus, they are a great source of protein and calcium. Eating chia seeds can help keep you full for longer, making them a smart choice for snacks or meals. To avoid clumping, whisk the chia seeds well with the liquid right away. Let the mixture sit for about 5 minutes, then stir again. This second stir helps break up any clumps that may form. Always ensure you mix the ingredients thoroughly before refrigerating. Following these steps will give you a smooth and creamy pudding every time. Mango Coconut Chia Pudding is a simple and tasty treat. I shared main ingredients, options for garnishes, and fun alternatives. You learned step-by-step how to make it and chill it perfectly. Tips for the best texture and sweet balance were also included. Think about fun variations, storage tips, and common questions to make it your own. Enjoy making this healthy dessert that fits your taste and needs.

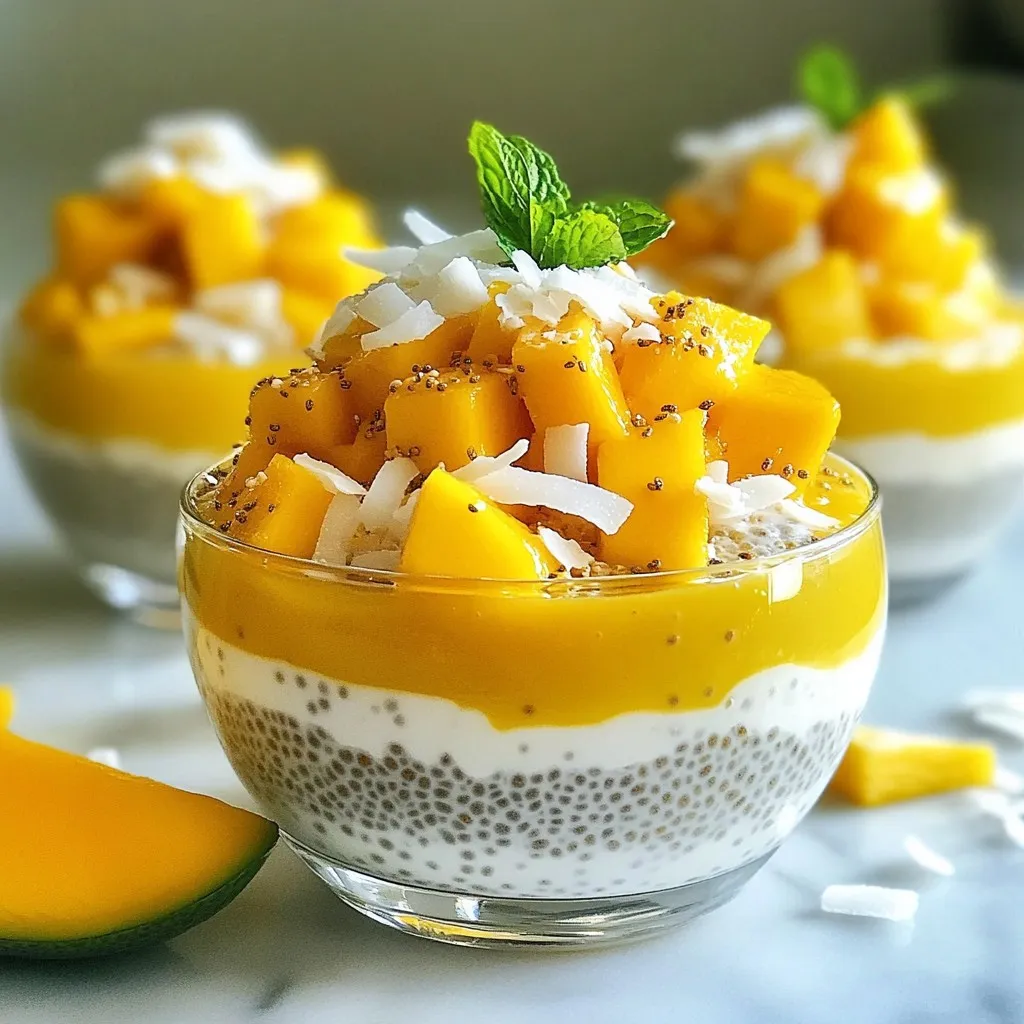
Are you ready to treat yourself to a tasty and healthy dessert? This Mango Coconut Chia Pudding recipe is easy to make and full of flavor. With just a few …

Read more

Categories Desserts

Healthy Chocolate Zucchini Bread Irresistibly Delicious

June 19, 2025 by Chef Nate
- Grated zucchini - Whole wheat flour - Unsweetened cocoa powder - Natural sweeteners (honey or maple syrup) - Unsweetened applesauce - Eggs To make Healthy Chocolate Zucchini Bread, you need simple ingredients. Grated zucchini adds moisture and nutrition. Whole wheat flour gives the bread a hearty texture. Unsweetened cocoa powder brings rich chocolate flavor without added sugar. For sweetness, you can use honey or maple syrup. Unsweetened applesauce helps keep the bread moist and adds natural sweetness. Lastly, eggs bind everything together and provide structure. - Dark chocolate chips - Ground cinnamon You can enhance the flavor with optional dark chocolate chips. They give extra chocolatey goodness. Ground cinnamon adds warmth and depth to the taste. If you love chocolate, don’t skip the chips! This recipe is flexible. You can mix in your favorite add-ins. Enjoy making this tasty treat! For the complete recipe, check out the Full Recipe. 1. Preheating the oven: Start by preheating your oven to 350°F (175°C). This step is key to getting the right bake for your bread. 2. Mixing wet ingredients: In a large bowl, mix together 1 cup of grated zucchini, 1/2 cup of honey (or maple syrup), 1/2 cup of unsweetened applesauce, 2 beaten eggs, and 1 teaspoon of vanilla extract. Stir until everything is well combined and smooth. 3. Combining dry ingredients: In a separate bowl, whisk together 1 cup of whole wheat flour, 1/2 cup of unsweetened cocoa powder, 1 teaspoon of baking soda, 1/2 teaspoon of baking powder, 1/4 teaspoon of salt, and 1/4 teaspoon of ground cinnamon if you like a hint of spice. Make sure these ingredients are mixed well. 1. Pouring batter into the pan: Gradually add the dry mix to the wet mix. Stir gently until just combined. Do not overmix; this keeps the bread soft. If you want, fold in 1/2 cup of dark chocolate chips for extra flavor. 2. Baking time and temperature: Pour the batter into a greased 9x5 inch loaf pan. Smooth the top with a spatula. Bake in your preheated oven for 50-60 minutes. Check for doneness by inserting a toothpick in the middle. It should come out clean or with a few moist crumbs. 1. Cooling time in the pan: After baking, take the loaf pan out of the oven. Let it cool for about 10 minutes in the pan. This helps it set up and makes it easier to remove. 2. Transferring to a wire rack: Carefully turn the bread out of the pan onto a wire rack. Let it cool completely before slicing. This allows the flavors to meld and makes for a better texture. For the full recipe, refer to the earlier section. Enjoy your delicious Healthy Chocolate Zucchini Bread! - Avoiding overmixing: Mix your wet and dry ingredients just until combined. Overmixing makes the bread dense and chewy. You want it light and moist. - Testing for doneness: Insert a toothpick into the center. If it comes out clean or with a few moist crumbs, your bread is ready. If it has wet batter, bake for a few more minutes. - Alternative sweeteners: You can use maple syrup or honey in this recipe. Try using agave nectar for a different flavor. Each sweetener gives a unique taste. - Gluten-free options: Substitute whole wheat flour with almond flour or a gluten-free blend. This makes the bread safe for gluten-free diets without losing taste. - Using spices like cinnamon: Adding cinnamon boosts the flavor profile. It pairs well with chocolate and zucchini. Just a pinch can make a big difference. - Adding nuts or seeds: Chopped walnuts or sunflower seeds add crunch and nutrition. They also enhance the texture and make each bite interesting. {{image_2}} You can make this healthy chocolate zucchini bread even more fun. Try adding fruits like mashed bananas. They add sweetness and moisture. You can also mix in nuts for a crunchy bite. Walnuts or pecans work well here. Just chop them up before adding. Want to cut some calories? Use Greek yogurt instead of applesauce. It keeps the bread moist and adds protein. You can also switch to lower-calorie sweeteners. Stevia or monk fruit are great options. They keep the sweetness without extra sugar. Change it up with the seasons. For fall, try pumpkin spice zucchini bread. Just add pumpkin puree and your favorite spices. You can also add festive holiday flavors. Think cinnamon, nutmeg, or even cranberries for a special touch. These variations keep the recipe exciting all year round. To keep healthy chocolate zucchini bread fresh at room temperature, wrap it in plastic wrap. Store it in an airtight container. This helps it stay soft and moist. It is best enjoyed within three days. If you plan to keep it longer, consider freezing it. For long-term storage, you can freeze the zucchini bread. First, let it cool completely. Then, wrap it tightly in plastic wrap and aluminum foil. This prevents freezer burn. You can also slice the bread before freezing, making it easier to grab a piece later. To thaw, place the bread in the fridge overnight or at room temperature for a few hours. To reheat healthy chocolate zucchini bread, use the oven or microwave. If using the oven, preheat it to 350°F (175°C). Place the bread on a baking sheet and heat for about 10 minutes. This keeps the bread moist and warm. In the microwave, heat a slice for 15 to 20 seconds, checking often. Avoid overheating, as it can dry out your delicious treat. Enjoy it warm for the best flavor! Can I use frozen zucchini? Yes, you can use frozen zucchini. Just thaw it first and drain excess water. This helps keep the bread moist without making it soggy. Fresh zucchini is great, but frozen works well too. How do I make this recipe vegan? To make this recipe vegan, replace the eggs with flax eggs. Mix 1 tablespoon of ground flaxseed with 2.5 tablespoons of water. Let it sit for a few minutes until it thickens. You can also use a plant-based sweetener instead of honey. Caloric content per slice Each slice of this healthy chocolate zucchini bread has about 150 calories. This makes it a great option for a snack or dessert. The lower sugar content helps keep the calories in check. Nutritional benefits of ingredients - Zucchini: Provides fiber and vitamins A and C. - Whole wheat flour: Adds whole grains and more fiber. - Cocoa powder: Rich in antioxidants and can boost mood. - Applesauce: Acts as a natural sweetener and adds moisture. - Honey or maple syrup: Natural sweeteners with some vitamins and minerals. Best pairings with drinks I love serving this bread with a warm cup of tea or coffee. The rich chocolate flavor pairs well with the warmth of these drinks. It also tastes great with a glass of milk or almond milk. Ideas for breakfast or snacks This bread is perfect for breakfast or a quick snack. Enjoy it plain or spread with almond butter. You can also add slices of banana on top for extra flavor. Perfect for any time of day! For the full recipe, check out the instructions above. This blog post covers the delicious and healthy zucchini bread recipe. You learned about key ingredients, preparation steps, and baking tips for success. Remember to experiment with flavors, like adding fruits or nuts, to make it your own. Proper storage ensures your bread stays fresh longer, while reheating tips keep it tasty. Use the FAQs to clarify any questions about ingredients or servings. Now, you have all the tools to bake the perfect zucchini bread. Enjoy creating your own delicious version!

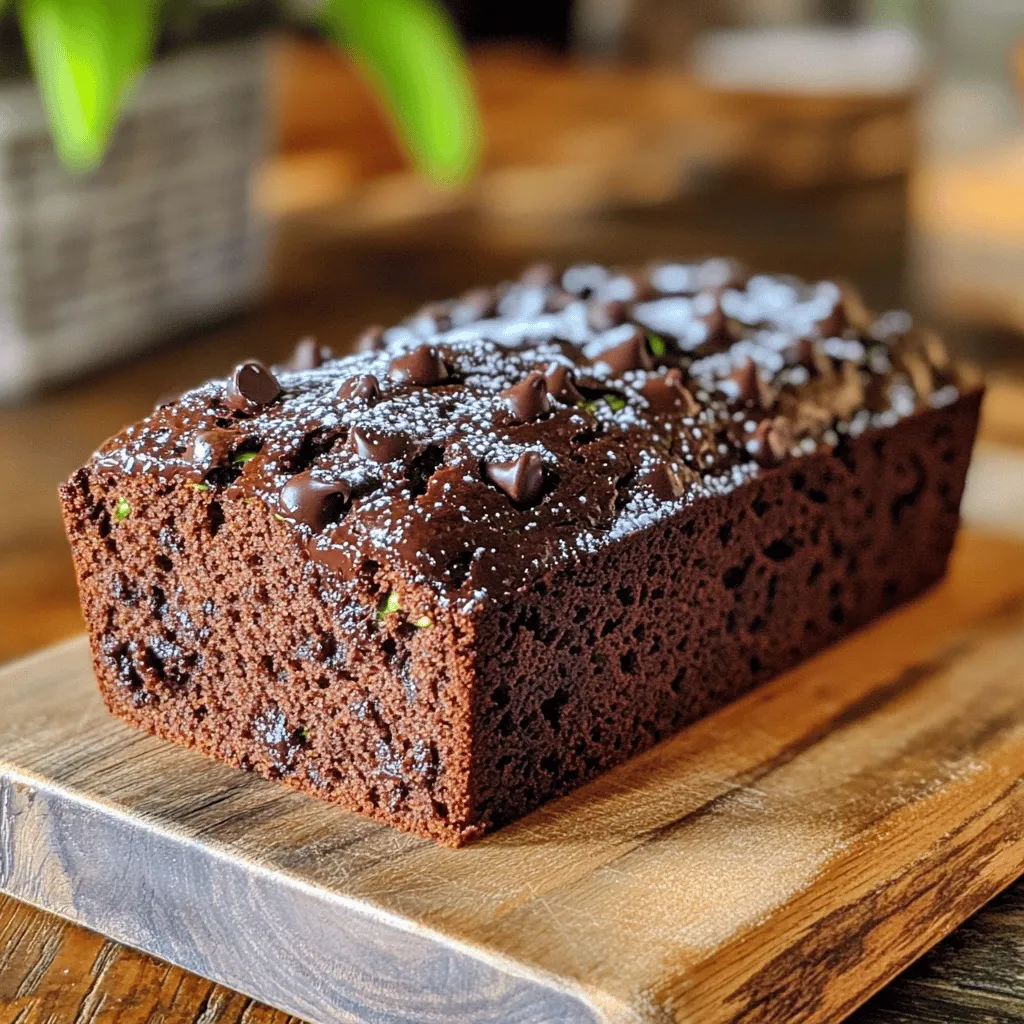
Are you ready to enjoy chocolate in a healthy way? My Healthy Chocolate Zucchini Bread is not only tasty but also packed with nutrients! This recipe uses fresh zucchini and …

Read more

Categories Desserts

Brown Butter Strawberry Peach Pie Deliciously Simple

June 19, 2025 by Chef Nate
To make a Brown Butter Strawberry Peach Pie, gather these simple ingredients: - 1 ½ cups all-purpose flour - ½ cup unsalted butter (1 stick), browned - ½ cup granulated sugar - 1 teaspoon salt - 1/4 cup ice water - 2 cups fresh strawberries, hulled and sliced - 2 cups fresh peaches, peeled and sliced - 1 tablespoon lemon juice - ½ cup brown sugar - 1 tablespoon cornstarch - 1 teaspoon vanilla extract - 1 egg (for egg wash) - 1 tablespoon coarse sugar (for topping) Choosing fresh fruit is key for a great pie. Look for strawberries that are bright red and firm. Avoid any that are mushy or have dark spots. For peaches, select ones that feel slightly soft. They should also have a sweet smell. Always wash your fruit before using it. This helps remove any dirt or chemicals. If you have dietary needs, you can modify this pie. For a gluten-free option, use a gluten-free flour blend instead of all-purpose flour. You can also swap the butter for a vegan butter substitute to make it dairy-free. This way, everyone can enjoy this delicious pie! Start by making your pie crust. In a bowl, mix 1 ½ cups of flour, ½ cup of sugar, and 1 teaspoon of salt. Next, add the browned butter. This butter gives the crust a nutty flavor. Stir until it looks like coarse crumbs. Gradually add 1/4 cup of ice water. Mix until the dough forms a ball. Shape it into a disc, wrap it in plastic, and put it in the fridge for at least 30 minutes. Chilling helps the dough stay flaky. While the dough chills, prepare the filling. In a separate bowl, combine 2 cups of sliced strawberries and 2 cups of sliced peaches. Add 1 tablespoon of lemon juice to brighten the flavors. Then, mix in ½ cup of brown sugar, 1 tablespoon of cornstarch, and 1 teaspoon of vanilla extract. This mixture will create a sweet and juicy filling. Let it sit for a bit. This allows the flavors to mix well. Once the dough is chilled, preheat your oven to 425°F (220°C). On a floured surface, roll out the dough to fit your 9-inch pie pan. Place the rolled dough in the pan and trim any extra. Pour the strawberry and peach filling into the crust, spreading it evenly. For a beautiful top, roll out more dough and cut it into strips. Weave these strips over the filling to make a lattice top. Crimp the edges with your fingers or a fork to seal. Brush the top with a beaten egg and sprinkle coarse sugar for a sweet crunch. Bake for 30-35 minutes until the crust is golden and the filling bubbles. Let it cool for an hour before slicing. This helps the filling set nicely. Enjoy your delicious pie! For the complete recipe, refer to the Full Recipe. To make brown butter, start by melting unsalted butter in a pan over medium heat. Keep stirring it. Soon, you'll see it change color. The butter will turn a golden brown and give off a nutty aroma. This step is key to adding depth and richness to your pie. Be careful not to burn it. Once it’s ready, let it cool slightly before using it in your dough. This enhances the taste of the crust and adds a lovely flavor to the filling. A flaky pie crust needs cold ingredients. Start with chilled butter and cold water. When you mix the butter into the flour, do it gently. You want small lumps of butter to remain. These lumps create steam when baking, which leads to flakiness. After mixing, wrap the dough and chill it for at least 30 minutes. This rest time allows the gluten to relax, making it easier to roll out. Preheat your oven to 425°F (220°C). This high heat helps the crust become golden and crisp. Bake the pie for 30-35 minutes. Watch for the crust to turn golden brown and the filling to bubble up. If the edges brown too quickly, cover them with foil. Let the pie cool for about an hour before slicing. This cooling period helps the filling set and makes serving easier. For the best taste, serve warm with vanilla ice cream or whipped cream. For the full recipe, check out the Brown Butter Strawberry Peach Pie. {{image_2}} You can mix up the filling in your Brown Butter Strawberry Peach Pie. While strawberries and peaches shine brightly, other fruits can add a twist. Try using blueberries or raspberries for a new flavor. These berries bring a tartness that balances the sweetness. You can even create a mix. Just keep the same amount of fruit to maintain the pie's structure. Sweetness is key in any pie. You can adjust the sugar based on your taste. If you like it less sweet, cut back on the brown sugar and granulated sugar. Adding a bit more lemon juice can also balance the flavors. Taste the filling before baking. This way, you can find the perfect sweetness for you and your guests. If you want a different texture, try a crumble topping. Instead of weaving a lattice crust, combine flour, brown sugar, oats, and butter to make a crumble. Sprinkle it over the filling before baking. This gives a crunchy contrast to the soft fruit. It also saves time if you’re in a hurry. Just remember, the baking time may vary, so keep an eye on it! For the full recipe, check out the link above! To keep your Brown Butter Strawberry Peach Pie fresh, store it in a cool place. Once the pie is fully cooled, cover it with plastic wrap or aluminum foil. This protects it from drying out and keeps the flavors intact. If you have a pie dish with a lid, that works great too. Always let the pie cool completely before covering it. This will prevent condensation that can make the crust soggy. In the fridge, your pie will last for about 3 to 4 days. Make sure it's well covered to maintain freshness. If you want to keep it longer, you can freeze it. When properly wrapped, the pie can last for up to 3 months in the freezer. Just remember to let it cool completely before freezing. If you plan to freeze it, I recommend slicing the pie first for easy serving later. To reheat your pie, preheat your oven to 350°F (175°C). Place the pie on a baking sheet to catch any drips. Heat it for about 15 to 20 minutes. This warms the filling and makes the crust crispy again. If you want to warm individual slices, you can use the microwave. Heat each slice for about 30 seconds or until warm. Enjoy it with ice cream for a delightful treat! To cut a pie cleanly, use a sharp knife. Dip the knife in hot water before each slice. This helps the knife glide through the crust and filling. Wipe the knife with a cloth after each cut. This keeps the slices neat and tidy. Always start from the center and work your way out. Yes, you can prepare the pie ahead of time! You can make the crust and filling a day before. Just store the crust wrapped in plastic in the fridge. Keep the filling in a sealed container. When you're ready, assemble the pie and bake it. This saves time and lets the flavors blend well. If your pie crust is soggy, try blind baking it. Blind baking means pre-baking the crust before adding the filling. This helps set the crust and keeps it crisp. If the crust is already baked, you can spoon off any excess liquid from the filling. This will help the crust stay crunchy when you serve it. This blog post covered everything you need for a perfect Brown Butter Strawberry Peach Pie. You learned how to choose fresh fruits, make a flavorful filling, and craft an ideal crust. My tips will help you achieve that rich brown butter flavor and flaky texture. You can even explore variations with different fruits or toppings. Remember to store leftovers properly to enjoy your pie later. With these steps, you’ll impress everyone with your pie-making skills. Happy baking, and enjoy every slice!

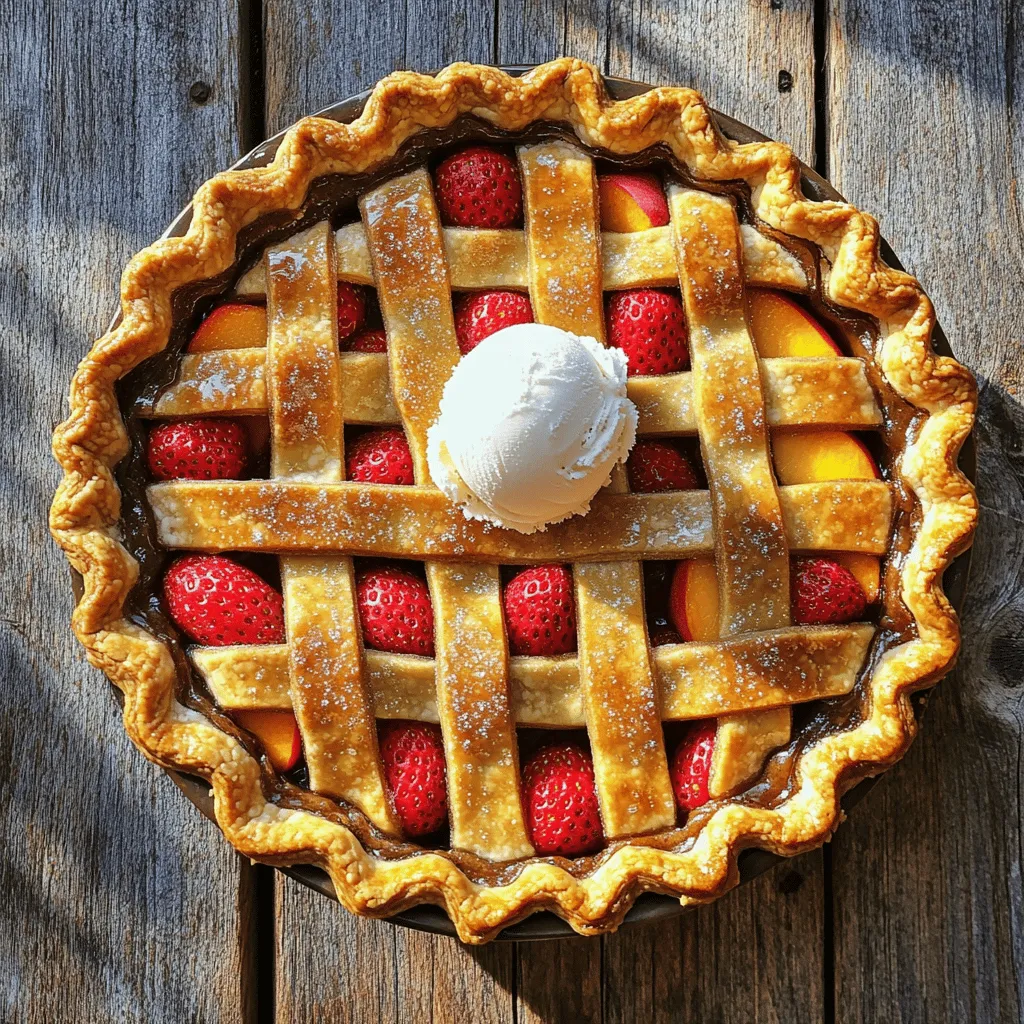
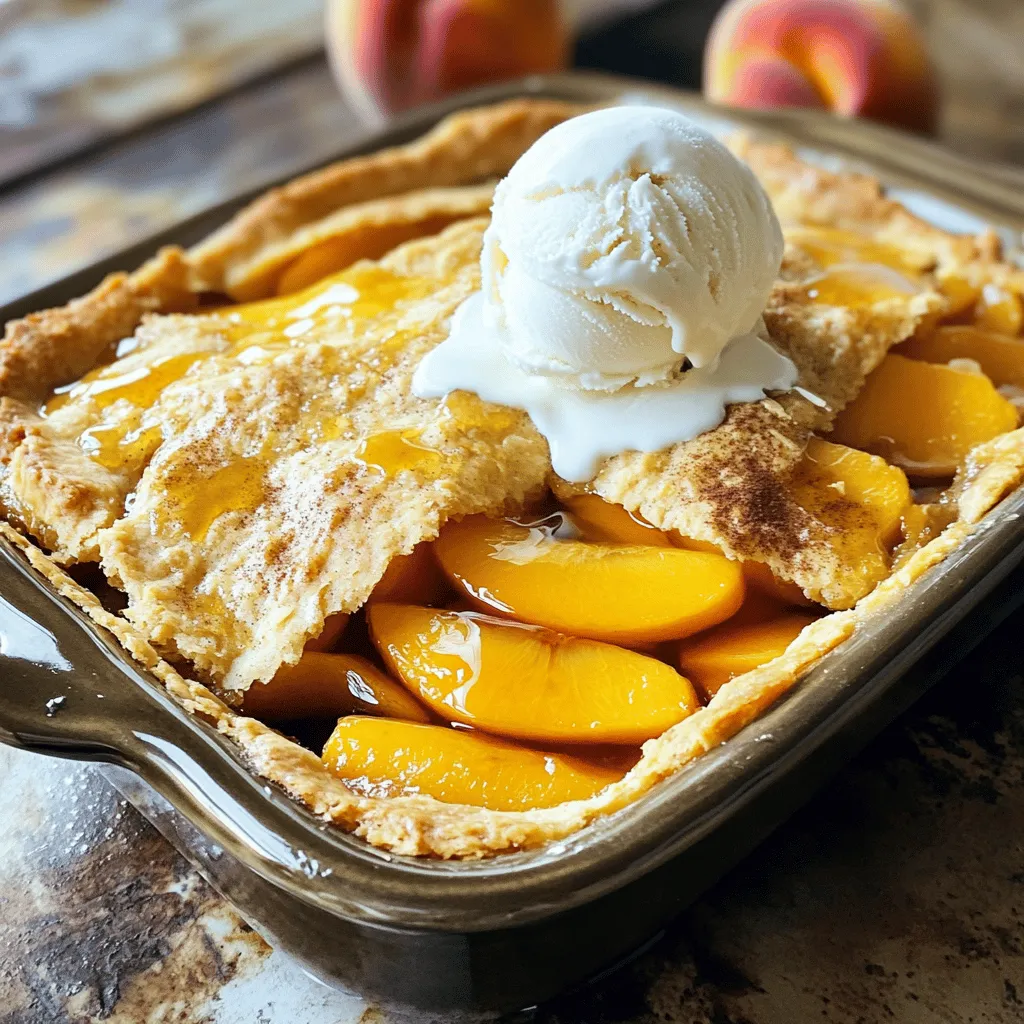
Get ready to indulge in the tasty goodness of Brown Butter Strawberry Peach Pie. This dessert is easy to make and packed with flavors that burst in every bite. I’ll …

Read more

Categories Desserts

Steak & Queso Rice Flavorful Comfort Food Recipe

June 19, 2025 by Chef Nate
- 1 lb flank steak - 1 cup long-grain white rice - 2 cups beef broth - 1 cup queso blanco cheese, shredded - 1 medium onion, diced - 2 cloves garlic, minced - 1 green bell pepper, diced - 1 teaspoon cumin - 1 teaspoon smoked paprika - 1 tablespoon olive oil - Salt and pepper to taste - Fresh cilantro, for garnish - Lime wedges, for serving Gather these ingredients before you start cooking. The flank steak adds rich flavor to the dish. Long-grain white rice gives a nice texture. Beef broth enhances the taste of the rice. Queso blanco cheese brings creaminess. Don't forget the veggies! Onion, garlic, and green bell pepper add color and taste. Cumin and smoked paprika give depth to your dish. Olive oil helps to sauté the vegetables. Use salt and pepper to adjust the flavor to your liking. Fresh cilantro makes a nice garnish. Lime wedges add a zesty touch when serving. For more details, check the Full Recipe. First, you need to marinate the flank steak. Mix cumin, smoked paprika, salt, and pepper in a bowl. Rub this mix all over the steak. Let it rest for at least 15 minutes. This step boosts the flavors. For cooking, you can use a skillet or grill. Heat olive oil in a large skillet over medium-high heat. Cook the steak for 4-5 minutes on each side for medium-rare. Adjust time for your desired doneness. After cooking, take the steak out and let it rest for 5 minutes. This helps keep it juicy. Slice it thinly against the grain for the best texture. In the same skillet, add diced onion and green bell pepper. Sauté these for 3-4 minutes until they soften. Then add minced garlic and cook for 1 more minute. This step builds a great base flavor. Next, stir in the long-grain white rice. Toast the rice for about 2 minutes to bring out its nutty flavor. Pour in the beef broth and bring it to a boil. Cover the skillet, lower the heat, and let it simmer for 18-20 minutes. The rice will soak up all the broth and become tender. Once the rice is cooked, it's time to add the queso. Stir in the shredded queso blanco cheese. This makes the dish creamy and rich. Mix well until the cheese melts completely. Taste the rice and add salt and pepper as needed. Now, spoon the cheesy rice onto plates. Top with the sliced steak. Garnish with fresh cilantro and serve with lime wedges. This dish is now ready to enjoy! For the full recipe, refer to the earlier section. - Best cooking temperatures: Cook flank steak at medium-high heat. Aim for 130°F for medium-rare. Use a meat thermometer for accuracy. - Resting tips for optimal juiciness: Let your steak rest for 5 minutes after cooking. This helps the juices stay inside the meat. - Optional spices or ingredients: Try adding chili powder or garlic powder for a kick. Fresh herbs like oregano can also add a nice touch. - Pairing suggestions with side dishes: Serve with a fresh salad or roasted vegetables. They balance the rich, cheesy flavors of the dish. - Ensuring the right texture: Add the queso blanco cheese to the warm rice. Stir until it melts smoothly, creating a creamy texture. - Alternatives for queso blanco: You can use cheddar or Monterey Jack cheese for a different flavor. These cheeses melt well and add a nice taste. {{image_2}} For a meatless take on this dish, you can substitute the flank steak with grilled portobello mushrooms or marinated tofu. Both options provide a hearty base and soak up flavors well. When it comes to cheese, you can use a creamy cashew cheese or a rich cheddar for a similar taste. These substitutes allow you to enjoy the cheesy goodness without the meat. If you like heat, consider adding jalapeños or a splash of hot sauce. This gives the dish a lively kick. For more depth, you can mix in chorizo or spicy sausage. Cook the sausage first to get that rich flavor, then add it when you mix in the rice. This makes the dish bold and exciting. You can switch out long-grain white rice for brown rice or quinoa. Each grain has its own cooking time. For brown rice, increase the liquid to 2 ½ cups and cook for about 40-45 minutes. For quinoa, use 1 ½ cups of broth and cook for around 15 minutes. Each option offers unique flavors and textures. To keep your Steak & Queso Rice fresh, use airtight containers. Glass or plastic containers work well. Store it in the fridge for up to three days. This way, you can enjoy it later without losing flavor. When you are ready to eat, the best way to reheat is on the stove. Place the rice in a skillet over low heat. Add a splash of beef broth to keep it moist. Stir gently until it warms through. This method keeps the dish tasty and creamy. If you want to save some for later, freezing is a great option. Place portions in freezer-safe bags. Remove as much air as possible before sealing. Your dish can stay good for up to three months in the freezer. When you are ready to eat, thaw it in the fridge overnight. Reheat it on the stove as mentioned above. This way, you retain all the yummy flavors from your Steak & Queso Rice. To cook flank steak tenderly, start by marinating it. A simple mix of oil, vinegar, and spices helps. Use cumin and smoked paprika for great flavor. Let it marinate for at least 15 minutes. This step adds moisture and taste. When cooking, use high heat. Heat oil in a skillet until hot. Cook the steak for about 4-5 minutes on each side. This keeps it juicy. After cooking, let it rest for 5 minutes. This helps the juices stay in the meat when you slice it. Yes, you can use other cheeses. Cheddar adds a sharp bite. Monterey Jack gives a smooth texture. Cream cheese can make the dish extra creamy. Just make sure to melt it well for a smooth mix in the rice. Several sides work well with Steak & Queso Rice. A fresh salad adds crunch. Guacamole brings a creamy element. You can also serve black beans for protein. Corn on the cob is a fun, sweet option. These sides make the meal feel complete. Yes, you can make this dish ahead. Cook the steak and rice, then store them separately. Keep them in airtight containers. They last for about 3-4 days in the fridge. When ready to eat, just reheat them in a skillet or microwave. Add fresh cheese before serving for that creamy touch. This recipe serves about four people. Each serving has around 500 calories. It includes protein from the steak and cheese. The rice provides carbs for energy. You also get vitamins from the vegetables. This meal is balanced and satisfying. For a more detailed breakdown, check the Full Recipe for exact nutrition facts. This blog post covered a tasty recipe for steak and queso rice. We discussed ingredients like flank steak, rice, and cheese. We walked through cooking the steak and rice, plus how to make it creamy. I shared tips for perfecting the steak and enhancing flavors. You learned about vegetarian and spicy twists, too. Finally, we covered storing and reheating leftovers. I hope you feel ready to cook this dish and enjoy it with your loved ones. Get started and share your delicious results!

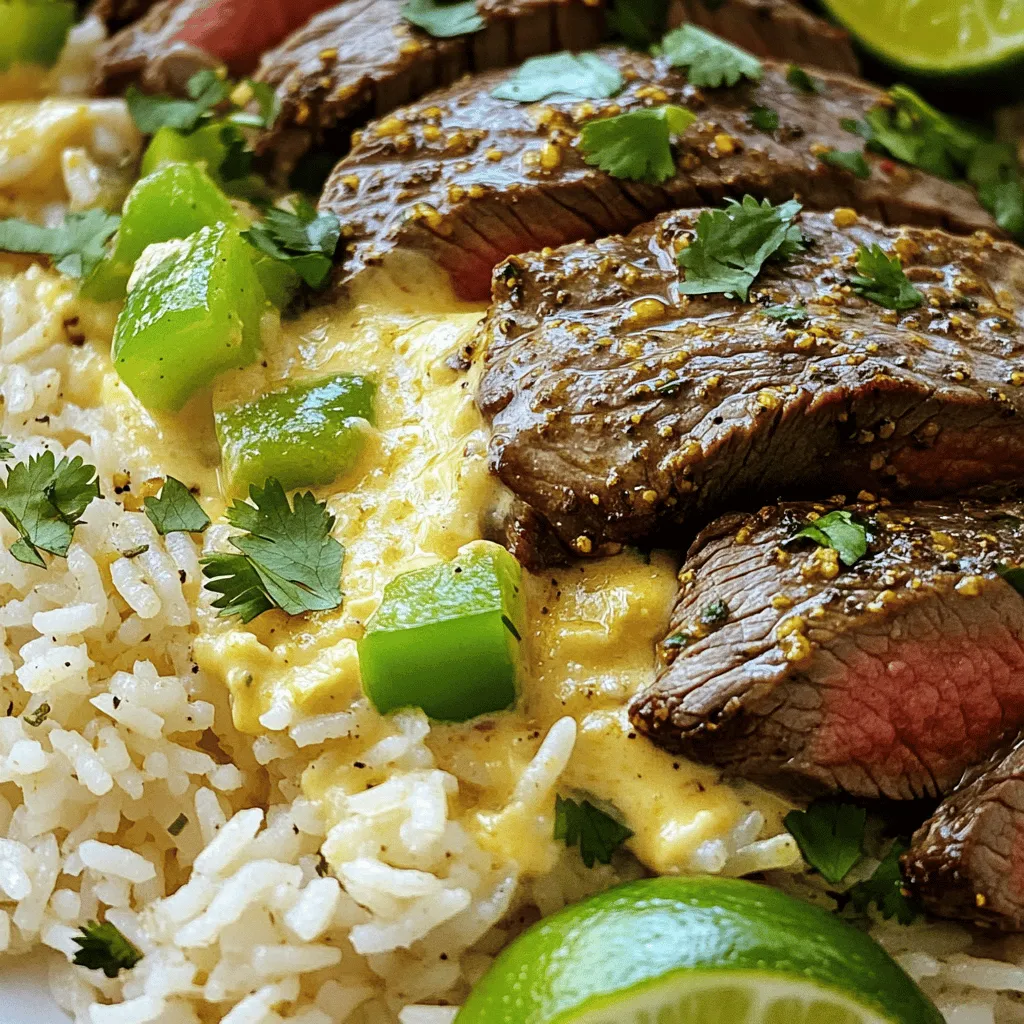
Craving a dish that’s both hearty and packed with flavor? Try my Steak & Queso Rice! This recipe combines tender steak, cheesy goodness, and fluffy rice into a comfort food …

Read more

Categories Dinner

Crispy Air Fryer Okra Quick and Easy Recipe

June 19, 2025 by Chef Nate
To make crispy air fryer okra, gather these ingredients: - 1 pound fresh okra, trimmed and halved - 1 cup cornmeal - 1/2 cup all-purpose flour - 1 teaspoon garlic powder - 1 teaspoon onion powder - 1 teaspoon paprika - 1/2 teaspoon cayenne pepper (adjust to taste) - 1 teaspoon salt - 1/2 teaspoon black pepper - 2 large eggs - 2 tablespoons milk (or a dairy-free substitute) - Cooking spray These ingredients will help you create a tasty snack or side dish. You can customize your okra with different spices. Try these options: - Cajun seasoning for a kick - Italian herbs for a fresh twist - Lemon zest for brightness - Parmesan cheese for a cheesy flavor Feel free to mix and match to find your favorite blend! If you have dietary needs, here are some swaps: - Use gluten-free flour instead of all-purpose flour. - Replace eggs with a flaxseed mixture (1 tablespoon flaxseed meal + 2.5 tablespoons water). - Choose almond milk or oat milk for a dairy-free option. These substitutions keep the dish delicious while meeting your needs! First, set your air fryer to 400°F (200°C). Let it heat for about 5 minutes. Preheating helps the okra cook evenly. It also makes them crispier. A hot air fryer is key for great results. In a large bowl, mix the following ingredients: - 1 cup cornmeal - 1/2 cup all-purpose flour - 1 teaspoon garlic powder - 1 teaspoon onion powder - 1 teaspoon paprika - 1/2 teaspoon cayenne pepper - 1 teaspoon salt - 1/2 teaspoon black pepper Stir all the dry ingredients together until they blend well. This mix will give the okra a flavorful crust. In another bowl, whisk together: - 2 large eggs - 2 tablespoons milk Dip each okra piece into the egg mix. Let the extra drip off. Then, coat it in the breading mixture. Make sure each piece is fully covered. Now, lightly spray the air fryer basket with cooking spray. This step helps the okra not stick. Place the coated okra in a single layer. If your air fryer is small, you may need to work in batches. Finally, spray the tops of the okra with a bit more cooking spray. This helps them get extra crunchy. Follow these steps for tasty, crispy air fryer okra. You can find the detailed cooking process in the Full Recipe. To get that crunchy outside, use a solid breading mix. Combine cornmeal and flour for the best crunch. The eggs help the breading stick well to the okra. Ensure each piece is fully coated in the mix. This gives the okra a nice, crispy layer. Set your air fryer to 400°F (200°C). Cook the okra for 10 to 12 minutes. Shake the basket halfway through to ensure even cooking. If you see golden brown okra, it’s ready! Keep an eye on it, as every air fryer cooks a bit differently. Sogginess happens if the okra is wet. Make sure to dry the okra before breading. Another tip is to use cooking spray lightly. A thin layer helps to crisp the breading. Avoid overcrowding the basket. Cook in batches if needed for the best results. For the full recipe, check the Crispy Air Fryer Okra Delight section. {{image_2}} You can change the flavor of your crispy air fryer okra with fun seasoning blends. Try adding Italian herbs like oregano and basil. You can also use taco seasoning for a zesty twist. If you love a smoky flavor, add smoked paprika. Mix and match spices to find your favorite blend. Why stop at okra? You can add other veggies to the mix. Slice zucchini, bell peppers, or even carrots. They will cook well in the air fryer. Just make sure to adjust the cooking time. Cut your veggies into similar sizes for even cooking. This makes a colorful and tasty snack or side dish. Want more heat? Add chopped jalapeños or red pepper flakes to your breading mixture. You can also serve your okra with spicy dipping sauces. Hot sauce or a spicy ranch dip works great. These additions will give your dish a fiery kick. Enjoy experimenting to find the perfect level of spice! After you enjoy your crispy air fryer okra, store leftovers in an airtight container. This keeps them fresh and tasty. You can keep them in the fridge for about 3 days. Make sure to let them cool before sealing the container. To reheat your okra, use the air fryer again. Set the air fryer to 350°F (175°C). Heat the okra for about 5 minutes. This helps restore their crunch. Avoid using the microwave, as it makes them soggy. You can freeze okra for later use. First, let the cooked okra cool completely. Then, spread them on a baking sheet in a single layer. Freeze for 1-2 hours until firm. Transfer the okra to a freezer bag and remove as much air as possible. It stays good for up to 3 months. When ready to eat, reheat directly from frozen in your air fryer. Enjoy your crispy treat anytime! You can make Air Fryer Okra without oil by using a dry breading method. Coat the okra pieces in your breading mix, which consists of cornmeal and flour. Instead of using oil, ensure you shake off any extra moisture from the okra. This helps the breading stick well. You can still achieve a crispy texture by cooking at the right temperature and time. Yes, you can use frozen okra. Just remember to thaw it first. Pat it dry with a paper towel to remove excess moisture. This step is key to getting that crunch you want. The cooking time may vary slightly, so keep an eye on the okra as it cooks. Okra is packed with nutrients and offers many health benefits. It is low in calories and high in fiber, which aids digestion. Okra also contains vitamins like C and K, which support your immune system and bone health. Additionally, it has antioxidants that help fight inflammation. Enjoying okra can be a tasty way to boost your health! Air fryer okra is easy and fun to make. We covered the best ingredients, cooking steps, and tips for a crispy texture. You can even change up the recipe with different spices or veggies. Proper storage and reheating help keep your okra tasting fresh. Remember, this dish is not just good; it also gives health benefits. I hope you enjoy making and eating this delicious snack. Keep experimenting to find your perfect flavor!

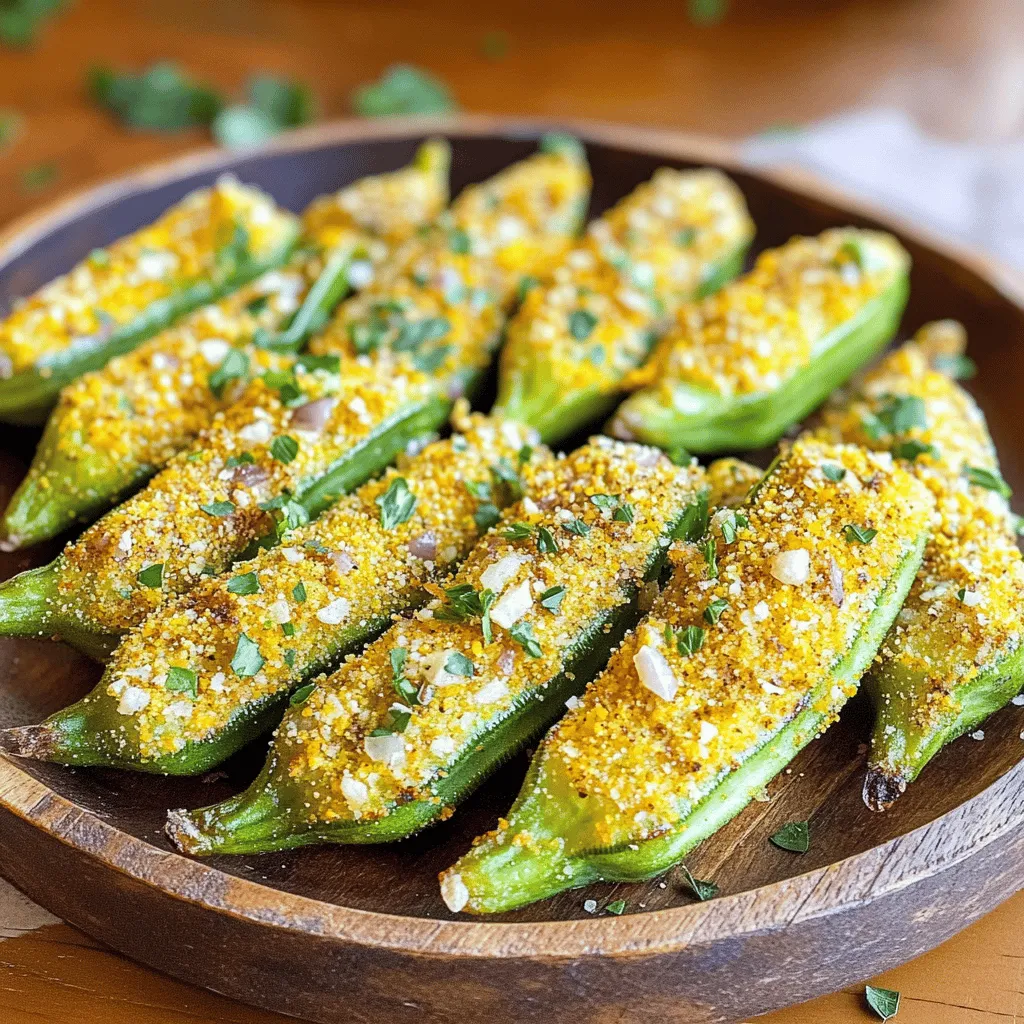
Looking for a tasty, healthy snack? You’ve got to try crispy air fryer okra! This easy recipe transforms fresh okra into a delightful dish that’s both crunchy and full of …

Read more

Categories Appetizers

Cake Mix Peach Cobbler Easy and Delicious Dessert

June 19, 2025 by Chef Nate
To make a delicious cake mix peach cobbler, you'll need some simple ingredients. Here’s what to gather: - 2 cans (15 oz each) sliced peaches in syrup or 4 cups fresh peaches, sliced - 1 cup granulated sugar - 1 tsp ground cinnamon - 1 box (15.25 oz) yellow cake mix - 1/2 cup unsalted butter, melted - 1/2 cup water - 1 tsp vanilla extract - Ice cream or whipped cream (for serving, optional) These ingredients create a sweet and fruity base with a soft cake topping. If you use fresh peaches, adjust the sugar based on how sweet they are. The yellow cake mix gives the cobbler a light and fluffy texture. Next, let’s talk about why this combo works so well. The peaches bring a juicy sweetness. The sugar enhances that flavor, while cinnamon adds warmth. The cake mix and butter create that comforting, cake-like topping. This recipe is easy and quick. It requires just a few steps and about 15 minutes of prep time. You can find the full recipe later, but with these ingredients, you are on your way to a delightful dessert that everyone will love! - Preheat the oven to 350°F (175°C). - Prepare a 9x13-inch baking dish by greasing it lightly. - In a large bowl, combine two cans of sliced peaches, one cup of sugar, and one teaspoon of cinnamon. Mix well. Spread this peach mixture evenly in the prepared baking dish. - In another bowl, take one box of yellow cake mix. Add half a cup of melted butter, half a cup of water, and one teaspoon of vanilla extract. Stir until just combined. Avoid overmixing. - Pour the cake batter over the peaches. Spread it gently to cover the peaches well. - Bake in the preheated oven for 35-40 minutes. Check for doneness by inserting a toothpick into the center. It should come out clean when done. This cake mix peach cobbler is easy to make and tastes amazing. Enjoy the warm, sweet flavors! For the full recipe, check the earlier section. - Choosing the right peaches: Select ripe peaches that are firm but slightly soft. Look for a sweet aroma. Fresh peaches are ideal, but canned peaches work well too. If using canned, pick those in light syrup for better flavor. - Adjusting sweetness based on peach ripeness: Taste your peaches first. If they are very sweet, cut down on the sugar. If they are less sweet, you may need to add a bit more sugar to balance the flavors. - Overmixing the batter: Mix just until combined. Overmixing can make the cake tough. Remember, lumps are okay! This ensures a light and fluffy texture. - Not greasing the baking dish properly: Always grease your dish well. This helps prevent sticking. Use butter or cooking spray for best results. - Adding spices like nutmeg or cloves: A pinch of nutmeg or cloves can add warmth. Start with a small amount and adjust to taste. These spices complement the peaches nicely. - Experimenting with flavored extracts: Try adding almond or lemon extract. This can bring a new twist to your cobbler. Just a teaspoon can elevate the flavor profile. For the complete recipe, check out the Full Recipe. {{image_2}} You can switch out peaches for other fruits. Berries like blueberries or strawberries work well. Apples add a nice crunch and flavor. You can also mix different fruits for a fun twist. A combination of peaches and raspberries makes a vibrant cobbler. Just keep the sugar amount right based on the fruit’s sweetness. The yellow cake mix is great, but you have options. Angel food cake mix gives a light texture. Spice cake mix adds warm flavors like cinnamon and nutmeg. If you need gluten-free options, many brands offer gluten-free cake mixes. These will keep your cobbler delicious without gluten. Serving your cobbler can be fun. Try drizzling caramel sauce on top for a sweet finish. Whipped cream adds a creamy touch that many enjoy. You can even turn this dessert into breakfast. Serve it warm with yogurt or fresh fruit on the side. It makes a tasty morning treat! For the full recipe, check the link. To store your peach cobbler, let it cool completely first. Place it in an airtight container. This keeps it fresh and prevents it from drying out. If you don’t have a container, cover it tightly with plastic wrap. In the fridge, peach cobbler lasts about 3 to 4 days. You can enjoy it warm or cold, so it's easy to grab a slice anytime! For reheating peach cobbler, the best method is to use the oven. Preheat your oven to 350°F (175°C). Place the cobbler in a baking dish and cover it with foil. Heat it for about 15 to 20 minutes. This helps keep it moist. If you're in a hurry, you can use the microwave. Place a slice on a microwave-safe plate and cover it with a damp paper towel. Heat it for 30 seconds to 1 minute. This way, it warms up without getting too dry. Yes, you can freeze peach cobbler! First, let it cool completely. Cut it into slices, then wrap each piece in plastic wrap. Place the wrapped slices in a freezer-safe bag. To thaw, move it to the fridge overnight. For best results, reheat it in the oven after thawing. This ensures you keep that lovely texture from the Full Recipe. Yes, you can use frozen peaches! Just make sure to thaw them first. Drain any excess liquid before adding them to the dish. This helps keep the cobbler from getting too watery. You may want to add a bit more sugar if the peaches are not very sweet. Your peach cobbler is ready when the top is golden brown. A toothpick inserted into the center should come out clean. The edges should bubble slightly, and the peaches will be soft. This usually takes about 35-40 minutes in the oven. You can prepare the peach cobbler in advance! Mix the peaches and sugar, and store them in the fridge for up to a day. Keep the cake mix batter separate until you are ready to bake. Just combine it right before baking for the best results. Serve your peach cobbler warm for the best taste. Top it with vanilla ice cream or whipped cream for a sweet finish. You can also add a sprinkle of cinnamon or a drizzle of caramel for extra flavor. A soggy cobbler often comes from too much liquid. Ensure you drain canned peaches well. If using frozen peaches, thaw and drain them before adding. Overmixing the batter can also make it dense and heavy, so mix just until combined. Peach cobbler is a simple and delicious dessert. We covered the key ingredients, like peaches and cake mix. I shared step-by-step instructions for making it perfectly. You learned tips to avoid mistakes and ideas for variations. Remember, the right peaches make a big difference. With these insights, you can bake a tasty cobbler your loved ones will enjoy. Now grab your ingredients and start baking!

Looking for a sweet and simple dessert? This Cake Mix Peach Cobbler is your answer! It combines juicy peaches and fluffy cake mix for a treat everyone will love. Don’t …

Read more

Categories Desserts

Easy Peach Cobbler Tasty and Quick Dessert Recipe

June 19, 2025 by Chef Nate
- 4 cups fresh peaches, sliced (or 2 cans of peaches, drained) - 1 cup granulated sugar (divided) - 1 teaspoon vanilla extract - 1 tablespoon lemon juice - 2 teaspoons ground cinnamon - 1 cup all-purpose flour - 1 teaspoon baking powder - ½ teaspoon salt - 1 cup milk - ½ cup butter, melted To make a great peach cobbler, you need fresh or canned peaches. Using fresh peaches gives a lovely taste. If you choose canned, drain them well. You also need granulated sugar. This sweetens the fruit and the batter. Ground cinnamon adds warmth and flavor. You will also use all-purpose flour. This forms the base of your batter. Baking powder helps it rise. Salt is key for flavor balance. Milk and melted butter create a rich, moist texture. - Vanilla extract - Lemon juice - Serving suggestions (e.g., vanilla ice cream) While you can make the cobbler without them, a teaspoon of vanilla extract boosts the flavor. A tablespoon of lemon juice adds brightness to the peach filling. For serving, a scoop of vanilla ice cream works wonders. The cold creaminess pairs perfectly with the warm cobbler. For the full recipe, check out the details above. 1. Preheat your oven to 350°F (175°C). This helps the cobbler cook evenly. 2. If you use fresh peaches, peel and slice them. Place the slices into a bowl. 3. Add ½ cup of sugar, vanilla extract, lemon juice, and 1 teaspoon of cinnamon to the peaches. Toss them together. Let them sit for about 10 minutes to release their juices. 4. In another bowl, mix the flour, remaining sugar (½ cup), baking powder, salt, and the last teaspoon of cinnamon. This is your dry mix. 5. Gradually add the milk and melted butter into the dry mix. Stir it gently until just combined. The batter should be a bit lumpy. Do not over mix. 6. Pour the batter evenly into a greased 9x13 inch baking dish. 7. Spoon the peach mixture evenly over the batter. Let the juices spread but do not stir. 8. Bake in the preheated oven for 45-50 minutes. The top should look golden brown and a toothpick should come out clean from the batter. Now, you have a warm and tasty peach cobbler ready to enjoy! For a full recipe, check the earlier sections. To get that golden brown top, bake your cobbler until it looks like sunshine. This usually takes about 45 to 50 minutes. Keep an eye on it. Every oven is different. You want it to be firm and not too jiggly. If it’s browning too fast, cover it lightly with foil. This helps cook the inside without burning the top. Mixing the batter is simple, but there are a few tricks. Start with your dry ingredients in one bowl. Then whisk them well. This includes flour, sugar, baking powder, salt, and cinnamon. In another bowl, combine the milk and melted butter. Pour the wet mix into the dry mix. Stir gently until just combined. You want it to be a bit lumpy. Over-mixing makes it tough, and nobody likes a tough cobbler! Serve your Easy Peach Cobbler warm for the best taste. It feels cozy on a chilly night. It’s great to let it cool for about 10 minutes before digging in. This helps the juices set a little. Top it off with a scoop of vanilla ice cream. The cold cream melts slightly on the warm cobbler, creating a delightful mix. You can also use whipped cream for a lighter touch. Drizzle some of the peach juice on top for added sweetness. This gives your dessert that extra wow factor. For the full recipe, check out the [Full Recipe]. {{image_2}} You can easily adjust this recipe for different diets. For a gluten-free option, swap all-purpose flour with a gluten-free blend. Many brands create blends that work well in most baked goods. You can also use almond flour, but it may alter the texture a bit. If you want a low-sugar version, use a sugar substitute like stevia or monk fruit. These sweeteners can replace granulated sugar with little change in taste. Just follow the package instructions for the right amounts. To make your peach cobbler even more exciting, try adding other fruits. Berries, like blueberries or raspberries, can mix well with peaches. Apples also add a nice crunch and sweetness. For spice lovers, consider adding nutmeg or allspice to the filling. These spices add warmth and depth to the flavor. Try one or mix a few for a unique twist. Feel free to get creative with your ingredients! Check the Full Recipe for all the details. To keep your peach cobbler fresh, start by letting it cool completely. Once cooled, cover it tightly with plastic wrap or aluminum foil. You can store it in the fridge for up to four days. If you want to save it for longer, freezing is a great option. Just make sure to wrap it well. You can use a freezer-safe container or a heavy-duty freezer bag. It will last for about three months in the freezer. When you are ready to enjoy your leftover peach cobbler, the best way to reheat it is in the oven. Preheat your oven to 350°F (175°C). Place the cobbler in an oven-safe dish and cover it with foil. Heat it for about 20 minutes or until it’s warm throughout. This method helps keep the topping nice and crisp. You can also use the microwave for quick heating. Just heat it for 30 seconds at a time until warm. However, the topping may get soft in the microwave. Easy Peach Cobbler lasts about 2 days at room temperature. You can keep it in the fridge for up to 5 days. Storing it in the fridge helps it stay fresh longer. Just cover it well to avoid drying out. Yes, you can use frozen peaches! They work well in this recipe. Just thaw them first and drain any extra liquid. This helps keep your cobbler from getting too soggy. Fresh peaches are great, but frozen ones save time and are still tasty. To make a vegan peach cobbler, swap the milk with almond or oat milk. Use coconut oil instead of butter. For the egg, you can use a flaxseed meal mixed with water. This keeps the texture nice and moist. Enjoy your vegan peach cobbler just as much as the classic version! Check the Full Recipe for more details. You learned how to make an easy peach cobbler with fresh or canned peaches. I shared simple steps for preparation and baking. You also gained tips for the perfect golden top and serving ideas. Remember, you can customize it with different fruits or dietary swaps. With these insights, you can enjoy a delicious dessert anytime. Now, get baking and share this delightful treat with loved ones!

If you’re craving a sweet, simple dessert, this Easy Peach Cobbler is just for you! With fresh or canned peaches, a few pantry staples, and minimal effort, you can whip …

Read more

Categories Desserts

Cajun Potato Soup Flavorful and Hearty Dish

June 19, 2025 by Chef Nate
For a delicious Cajun Potato Soup, you need these key ingredients: - 4 large russet potatoes, peeled and diced - 1 large onion, chopped - 3 cloves garlic, minced - 1 green bell pepper, chopped - 1 celery stalk, chopped - 4 cups vegetable broth - 1 cup heavy cream or coconut cream for a dairy-free option - 2 teaspoons Cajun seasoning - 1/2 teaspoon smoked paprika - Salt and pepper to taste - 2 tablespoons olive oil - Fresh parsley, chopped (for garnish) - Crumbled cornbread or croutons (for topping) Not all ingredients are a must. Here are some good swaps: - Potatoes: Sweet potatoes work well for a sweeter flavor. - Heavy cream: Use almond milk or oat milk for a lighter option. - Cajun seasoning: Blend your own mix of paprika, garlic powder, and cayenne pepper. - Vegetable broth: Chicken broth can add more depth if you prefer. Garnishes can elevate your soup. Here are some tasty ideas: - Chopped green onions for a bit of crunch. - Shredded cheese for creaminess. - A sprinkle of cayenne for heat. - Extra fresh herbs like thyme or chives for a fresh touch. These ingredient options and substitutes help you craft a flavorful and hearty dish that suits your taste. For the full recipe, check out the linked details. To make Cajun potato soup, start by gathering your ingredients. You will need russet potatoes, onion, garlic, green bell pepper, celery, vegetable broth, heavy cream or coconut cream, Cajun seasoning, smoked paprika, salt, pepper, olive oil, parsley, and croutons. 1. Heat olive oil in a large pot over medium heat. 2. Add the chopped onion, green bell pepper, and celery. Cook for about 5 minutes. The veggies should soften but not brown. 3. Next, stir in the minced garlic. Cook for 1-2 minutes until you smell its aroma. 4. Add the diced potatoes, vegetable broth, Cajun seasoning, and smoked paprika. Bring it all to a boil. 5. Once boiling, lower the heat to simmer and cover the pot. Cook for about 20 minutes. Check if the potatoes are tender with a fork. After cooking, it’s time to blend the soup. You can use an immersion blender for a smooth texture. Just place it in the pot and blend until creamy. If you don’t have one, carefully transfer small amounts to a regular blender. Blend until smooth and pour it back into the pot. Serve your soup hot in bowls. Garnish with chopped parsley for a fresh touch. Top with crumbled cornbread or croutons for crunch. This dish is hearty and perfect for chilly days. For the full recipe, check back to ensure every detail is perfect! To boost the flavor of your Cajun potato soup, use fresh herbs. Thyme and bay leaves add depth. You can also adjust your Cajun seasoning. If you like heat, add more. For a smoky taste, try adding more smoked paprika. A touch of lemon juice brightens the soup and balances the richness. One common mistake is overcooking the potatoes. Cook them just until tender. This keeps your soup creamy, not mushy. Another mistake is not blending enough. Blend until smooth for a nice texture. Lastly, taste your soup before serving. Adjust salt and pepper until it’s just right. You can make this soup ahead of time. It stores well in the fridge for up to three days. If you're making it early, stop before adding cream. This helps keep the soup fresh. When ready to serve, reheat gently and stir in the cream. You’ll enjoy a warm, hearty dish with rich flavors. For the complete recipe, check out the Full Recipe section. {{image_2}} You can add proteins to Cajun potato soup for more flavor. Smoked sausage works great. Slice it and sauté it with vegetables. Chicken is another option. Cook diced chicken breast until golden before adding it to the soup. Both choices make the dish heartier and more filling. For a vegetarian or vegan version, skip the meat. Use vegetable broth and coconut cream for a creamy touch. You can also add beans, like black beans or kidney beans, for protein. This keeps the soup hearty and satisfying without meat. If you want a low-carb version, swap potatoes for cauliflower. Cauliflower gives the soup a creamy texture. You can also add more vegetables like zucchini or spinach. These changes keep the soup delicious while cutting down on carbs. To keep your Cajun potato soup fresh, let it cool first. Then, pour it into an airtight container. Store it in the fridge for up to three days. Make sure to label the container with the date. This way, you’ll know when to enjoy it again! When you're ready to eat the soup, gently heat it on the stove. Use medium heat and stir often. This will prevent burning. You can also reheat it in the microwave. Just cover the bowl and heat in short intervals. Stir in between to ensure even heating. Want to save some for later? You can freeze the soup! Pour it into freezer-safe containers. Leave some space at the top for expansion. It will stay good for about three months. To reheat, let it thaw overnight in the fridge before warming it up. Enjoy the flavors anytime! You can find the full recipe [Full Recipe]. Cajun potato soup is a warm and hearty dish. It combines potatoes, spices, and rich cream. The soup has a thick and creamy texture. The Cajun seasoning gives it a unique kick. You’ll enjoy flavors of garlic, onion, and bell pepper. This dish warms you up on cold days. It’s perfect for family dinners or gatherings. You can thicken your Cajun potato soup in several ways. Try mashing some of the potatoes in the pot. This makes the soup creamier. Another option is to add a little cornstarch. Mix cornstarch with cold water before adding it to the soup. Allow it to cook for a few minutes to thicken. You could also add more heavy cream for extra richness. Yes, you can use instant potatoes in this recipe. Instant potatoes save time and are easy to use. Simply follow the package instructions to prepare them. Add them to your soup after cooking the broth and vegetables. This shortcut works well if you’re in a hurry. To make Cajun potato soup gluten-free, check your ingredients. Use gluten-free vegetable broth and Cajun seasoning. Most spices are gluten-free but always check labels. You can also use cornstarch as a thickener instead of flour. This way, you keep the soup thick and delicious. Cajun cuisine comes from the Acadian people in Louisiana. They blended French cooking with local ingredients. This style uses spices, herbs, and fresh seafood. Cajun food is known for its bold flavors and hearty dishes. It celebrates the culture and history of the region. Many classic Cajun dishes are stews, gumbos, and jambalayas. Cajun potato soup fits right into this flavorful tradition. For the full recipe, check the cooking details provided. This post shared key steps for making delicious Cajun potato soup. We explored ingredients, substitutes, and garnishes to personalize your dish. The cooking process and blending techniques help you achieve the best texture and taste. I also shared tips, variations, and storage advice to make your cooking experience easier. Remember, Cajun potato soup is flexible. You can mix in proteins or go vegan. Enjoy experimenting and making this dish your own!

Looking for a dish that warms you from the inside out? Cajun Potato Soup is packed with flavor and comfort. This hearty meal combines rich ingredients and spices that will …

Read more

Categories Dinner

Crispy Fried Mac and Cheese Balls Irresistible Treat

June 18, 2025 by Chef Nate
- 2 cups cooked macaroni - 2 cups shredded sharp cheddar cheese - 1/2 cup cream cheese, softened - 1/2 cup grated Parmesan cheese - 1 teaspoon garlic powder - 1/2 teaspoon onion powder - 1/2 teaspoon smoked paprika - Salt and pepper to taste - 2 large eggs - 1 cup all-purpose flour - 2 cups breadcrumbs (Panko for extra crunch) - Oil for frying Gathering the right ingredients is key for crispy fried mac and cheese balls. Start with cooked macaroni. This gives you a sturdy base. Next, sharp cheddar cheese adds a rich flavor. Cream cheese helps bind everything together for that creamy center. Grated Parmesan provides an extra layer of taste. For seasoning, garlic powder, onion powder, and smoked paprika bring warmth and depth. Don’t forget to add salt and pepper to enhance the flavors. Breading is where the magic happens. Eggs create a sticky layer. Flour helps the breadcrumbs cling better. Panko breadcrumbs give that extra crunch we all love. Finally, hot oil is essential for frying. It ensures a crispy outer layer while keeping the inside creamy. With all these ingredients ready, you will create a dish that is truly irresistible. Don’t forget to check the [Full Recipe] for detailed steps and tips! First, gather your cooked macaroni and cheeses. In a large bowl, combine: - 2 cups cooked macaroni - 2 cups shredded sharp cheddar cheese - 1/2 cup cream cheese, softened - 1/2 cup grated Parmesan cheese - 1 teaspoon garlic powder - 1/2 teaspoon onion powder - 1/2 teaspoon smoked paprika - Salt and pepper to taste Mix them well until everything is combined. It should look creamy and cheesy. Next, place the bowl in the fridge. Chill the mixture for at least 1 hour. This helps it firm up, making it easier to shape later. Once the mixture is chilled, it’s time to shape the balls. Scoop about 1 tablespoon of the chilled mix. Roll it in your hands to form a ball. Repeat this until you use all the mixture. Place these balls on a baking sheet. Make sure they are evenly spaced. Now, let's set up a breading station. You will need three bowls for this step: - One with 1 cup all-purpose flour - One with 2 large beaten eggs - One with 2 cups breadcrumbs (use Panko for extra crunch) Take each mac and cheese ball. First, dip it in the flour. Make sure to shake off any excess flour. Next, dip it in the eggs. Finally, roll it in the breadcrumbs. Ensure each ball is fully coated. For frying, heat oil in a deep pan over medium-high heat. Aim for about 350°F (175°C). Carefully add the balls in batches. Do not overcrowd the pan; this prevents them from getting crispy. Fry each batch for about 3-4 minutes. They should turn golden brown and crispy. Once done, place them on a paper towel-lined plate to drain excess oil. Enjoy them fresh and hot with your favorite dipping sauce. For the full recipe, check out the recipe section above. To get that creamy inside, use a mix of cheeses. The sharp cheddar adds great flavor, while cream cheese makes it smooth. Make sure to chill the mixture for at least one hour. This helps the balls hold their shape while frying. For a crispy coating, use Panko breadcrumbs. They create a crunchier texture than regular breadcrumbs. Coat each ball evenly and shake off any extra crumbs. This step is key to achieving that perfect crunch. The best oil for frying is vegetable oil. It has a high smoke point, which helps prevent burning. Make sure to heat the oil to about 350°F (175°C). Use a thermometer to check the temperature. This ensures even cooking and a nice golden color. To maintain oil temperature, fry in small batches. If you add too many balls at once, the oil cools down. This can lead to soggy balls. Fry for about 3 to 4 minutes, or until they’re golden brown. Dipping sauces can elevate your crispy fried mac and cheese balls. Marinara sauce is a classic choice. Ranch dressing also pairs well, adding a creamy touch. For serving, arrange them on a platter while they're hot. This makes them more inviting. You can also sprinkle some herbs on top for a pop of color. Enjoy these delicious bites at parties or as a fun snack! For the full recipe, check out the [Full Recipe]. {{image_2}} You can enhance your mac and cheese balls with different cheeses. Try gouda for a smoky taste or mozzarella for extra stretch. Mixing in cream cheese gives them a rich, creamy texture. Adding herbs can also boost flavor. Fresh parsley or chives can add a nice touch. Try Italian seasonings for a twist. If you want a lighter version, consider baking instead of frying. Baked balls can be just as tasty and crispy, especially if you spray them with oil. You can also use gluten-free breadcrumbs. This option makes them suitable for those with gluten allergies. It keeps the crunch while being healthier. Want to spice things up? Add jalapeños for a kick! They give a nice heat that pairs well with the cheese. For a sweet twist, try making dessert balls. Use sweetened cream cheese and crushed cookies. These sweet variations can surprise your guests and satisfy your sweet tooth. For the full recipe, check the section above! To keep your leftover crispy fried mac and cheese balls fresh, place them in an airtight container. This helps prevent them from drying out. You can store them in the fridge for up to three days. If you want them to last longer, freezing is the way to go. You have two main options for reheating: the oven or the microwave. The oven keeps the crispy texture better. Preheat your oven to 350°F (175°C). Bake the balls for about 10-15 minutes. If you use a microwave, they may get soft. Heat them for about 1-2 minutes, but they might lose crunch. To keep them crispy, you can also use an air fryer. Set it to 350°F and cook for about 5 minutes. If you want to freeze the balls before frying, first shape them and place them on a baking sheet. Make sure they don’t touch each other. Freeze until solid, then transfer them to a freezer bag. They can last up to three months in the freezer. For the best taste, try to fry them while still frozen. This keeps them crispy and delicious. Yes, you can make these ahead of time. You can prepare the mac and cheese mixture and shape it into balls. After that, place the balls on a baking sheet and cover them. Store them in the fridge for up to 24 hours. This way, you can fry them fresh when you are ready to eat. If you want to store them longer, you can freeze them. Just freeze the balls on the baking sheet, then transfer them to a bag. You can fry them straight from the freezer. Panko breadcrumbs are different from regular breadcrumbs in texture. Panko has a larger, flakier shape. This gives your mac and cheese balls a crunchier outside when fried. Regular breadcrumbs are finer and denser. They do not provide the same crispiness. Using Panko can really elevate the dish, making each bite more enjoyable. Look for a golden brown color on the outside. This means they are crispy and ready to eat. If you see bubbles around the balls, that’s a good sign too. You can also check the temperature inside. If it reaches 165°F, they are done. They should be hot and gooey on the inside. Yes, there are easy vegetarian alternatives. You can use plant-based cheese for a dairy-free option. Also, try using vegan cream cheese instead of regular cream cheese. For the breadcrumbs, make sure to choose a brand without animal products. This way, you can enjoy crispy fried mac and cheese balls and keep it vegetarian. For more details, check the Full Recipe. In this blog post, we explored how to make crispy fried mac and cheese balls. We covered the key ingredients, step-by-step instructions, and helpful tips to ensure success. Remember, the right seasoning and frying techniques bring out the best flavors. Don’t hesitate to get creative with different cheeses and add-ins. Whether for a snack or a party, these bites are sure to impress. Enjoy your cooking adventure and savor each crunchy, cheesy bite!

Craving a snack that’s both cheesy and crunchy? You’ve landed in the right place! These Crispy Fried Mac and Cheese Balls are an irresistible treat that will delight your taste …

Read more

Categories Appetizers
Older posts
Newer posts
← Previous Page1 … Page52 Page53 Page54 … Page108 Next →

GRILLED FLAVORS

where delicious ideas come to life, from stovetop to backyard. Warm, simple, and always satisfying. 🍽️✨

PAGES

Home About Contact Privacy Policy Terms & Conditions Cookie Policy GDPR Policy Copyright Policy Disclaimer

CATEGORIES

Appetizers Desserts Salads Breakfast Dinner

Contact

  • Pinterest
  • Mail
Copyright © 2026 Grilled Flavors. All rights reserved.