Skip to content
grilledflavors.com
  • Home
  • Appetizers
  • Desserts
  • Salads
  • Breakfast
  • Dinner
  • Privacy Policy
  • Contact
  • About

Chef Nate

Creamy Cajun Chicken Pasta Delightful and Flavorful Dish

June 11, 2025 by Chef Nate
- 2 boneless, skinless chicken breasts - 8 oz fettuccine pasta - 2 tablespoons Cajun seasoning - 1 tablespoon olive oil - 2 cloves garlic, minced - 1 cup heavy cream - 1 cup chicken broth - 1 cup cherry tomatoes, halved - 1 cup spinach, roughly chopped - 1/2 cup grated Parmesan cheese - Salt and pepper to taste - Fresh parsley for garnish Gathering these ingredients is the first step to making a great meal. The chicken adds protein and flavor. The fettuccine gives a nice, hearty base. Cajun seasoning brings the heat and complexity. Olive oil helps cook the chicken and adds richness. Garlic adds depth to the sauce. Heavy cream makes everything creamy and smooth. Chicken broth adds extra flavor to the sauce. Cherry tomatoes add a sweet burst. Spinach gives color and nutrients. Parmesan cheese brings a salty finish. Lastly, salt and pepper help balance all the flavors. You can find the full recipe to guide you through the cooking process. This dish serves four people. Each serving has about 550 calories. The protein comes mostly from the chicken and cheese. The pasta adds carbohydrates for energy. The cream and oil provide fat. Eating this dish gives a nice balance of nutrients. Enjoy it as a filling meal that satisfies your taste buds. - First, season the chicken breasts with Cajun spice on both sides. This adds bold flavor. - Next, heat olive oil in a skillet over medium-high heat. Add the seasoned chicken. Cook for about 6-7 minutes per side. Make sure the juices run clear. Remove the chicken and let it rest. Slice it into strips for later. - Boil salted water in a large pot. Add the fettuccine pasta and cook until al dente. This usually takes about 8-10 minutes. - Drain the pasta and set it aside. It will mix well with the sauce later. - In the same skillet used for the chicken, sauté minced garlic for about 1 minute. This brings a lovely aroma. - Pour in the chicken broth. Let it simmer for 2 minutes. Scrape any browned bits off the pan for extra flavor. - Stir in the heavy cream and add halved cherry tomatoes. Cook for another 3 minutes until the tomatoes soften. - Toss in the chopped spinach, followed by the sliced chicken. Mix everything well to combine. - Gradually add the cooked fettuccine to the skillet. Toss it with the sauce and chicken to coat everything evenly. - Finally, sprinkle the grated Parmesan cheese into the mixture. Stir until the sauce is creamy and well combined. Season with salt and pepper to taste. - Serve immediately, garnished with fresh parsley for a vibrant touch. This creamy Cajun chicken pasta is a delightful and flavorful dish that brings joy to any meal. For the full recipe, check out the details provided earlier. To achieve the perfect al dente texture, start by boiling water. Use a large pot and add a generous amount of salt. This salt boosts flavor and helps the pasta cook well. When you add the fettuccine, stir it gently right away. This helps prevent sticking. Cook it according to the package time. You want it firm but not hard. Drain the pasta when done, but save a cup of that pasta water for later. Want more spice? Adjust the Cajun seasoning to your taste. If you love heat, add more spice! If you prefer mild, use less. You can also mix in extra ingredients to boost flavor. Try adding bell peppers or mushrooms for added texture. Some people even like to toss in a squeeze of lemon juice for brightness. Explore what you like best! To make your dish look great, plate it with care. Use a large serving bowl for a family-style meal. Layer the pasta first, then add the creamy sauce and chicken on top. This creates a nice visual. For a finishing touch, sprinkle fresh parsley over the dish. It adds color and freshness. You can also add a sprinkle of extra Parmesan for more flavor. Enjoy your beautiful dish! For the complete recipe, check out the Full Recipe. {{image_2}} You can make a tasty vegetarian version of this dish. Swap the chicken for mushrooms or tofu. Mushrooms give a rich flavor. Use portobello or cremini for a meaty texture. Tofu is a great choice too. Just press it to remove water, then cube it. Sauté it until it gets golden brown. This change keeps the dish filling and satisfying. If you need gluten-free options, choose gluten-free pasta. Many brands offer great choices. Look for brown rice or chickpea pasta. These options taste good and have a nice texture. Always check the package for cooking times. You want the pasta to be tender but not mushy. This way, you can enjoy your creamy Cajun chicken pasta without worry. Not everyone likes spicy food. If you prefer a milder dish, reduce the Cajun seasoning. Start with one tablespoon instead of two. Taste as you go to find the right heat for you. You can also add other spices for flavor. Try smoked paprika or Italian herbs. These will enhance the taste without adding heat. Enjoy your customized version of this creamy dish! For the full recipe, check out the Cajun Comfort: Creamy Chicken Pasta. To keep your Creamy Cajun Chicken Pasta fresh, store it in an airtight container. This helps seal in the flavor. Place the container in the fridge within two hours of cooking. You can store it for up to three days. After that, the taste may change, and the pasta will lose its charm. When it’s time to reheat, the best method is using the stove. Heat a skillet over medium heat and add a splash of chicken broth or cream. This keeps the dish creamy. Stir gently to avoid burning. You can also use the microwave. Heat in short bursts, checking often, until warm. If you want to freeze some pasta, use a freezer-safe container. Make sure to leave some space for expansion. Label the container with the date. You can freeze it for up to two months. To thaw, place the pasta in the fridge overnight. You can also use the microwave for quick thawing. Just be sure to stir halfway through to ensure even thawing. For the full recipe, check out the detailed steps to make this delightful dish! To make this dish, follow these key steps: 1. Season chicken breasts with Cajun spice. 2. Cook fettuccine in boiling water until al dente. 3. Sear chicken in a hot skillet with olive oil. 4. Sauté minced garlic until fragrant. 5. Add chicken broth, then stir in heavy cream. 6. Mix in cherry tomatoes and spinach. 7. Combine cooked pasta with sauce and chicken. 8. Finish with Parmesan cheese and seasoning. By following these steps, you will create a flavorful meal that is easy to prepare at home. The mix of Cajun spice and creamy sauce makes this pasta dish delightful. Yes, you can use many types of pasta! While fettuccine works great, consider these options: - Penne - Bowtie - Spaghetti Each type brings a unique texture and flavor. Choose what you like best or what you have on hand. The sauce will still taste amazing, no matter the pasta choice! If you want a lighter option, a few substitutes work well for heavy cream: - Coconut milk for a dairy-free choice. - Greek yogurt for added tang. - Silken tofu blended until smooth. These alternatives keep the creaminess while adding unique flavors. You can enjoy this dish even if you avoid dairy! Creamy Cajun Chicken Pasta blends rich flavors with simple steps. You learned how to season chicken, cook pasta, and make a creamy sauce. I shared tips to enhance taste and create great presentation. You can make it vegetarian or gluten-free with easy swaps. Storing and reheating your dish is simple, keeping flavors fresh. Enjoy this dish anytime, and feel confident in your cooking skills. Dive in, experiment, and create your perfect plate!

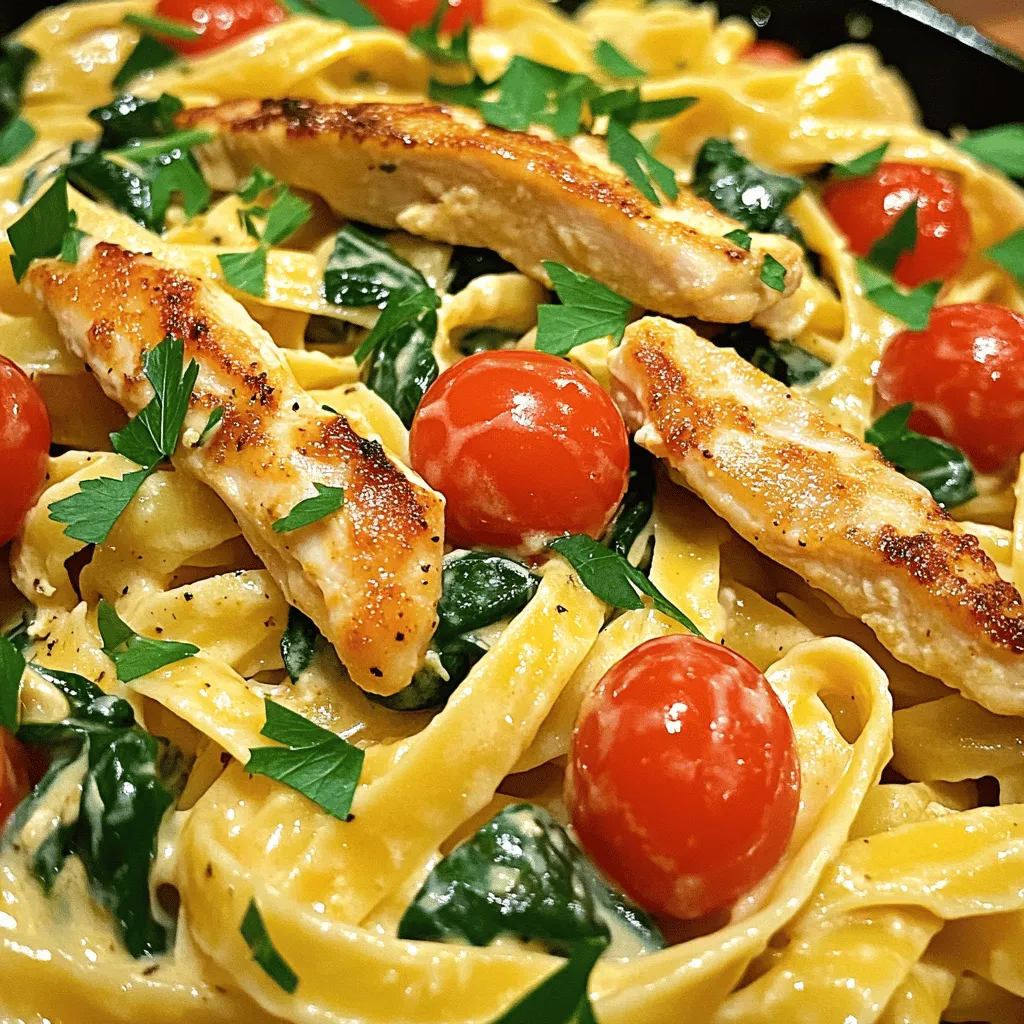
If you’re craving a dish that packs a punch, look no further than Creamy Cajun Chicken Pasta! This delightful meal combines tender chicken, zesty spices, and creamy goodness all in …

Read more

Categories Dinner

Low Carb Italian Grinder Salad Fresh and Flavorful Meal

June 11, 2025 by Chef Nate
- 2 cups romaine lettuce, chopped - 1 cup cherry tomatoes, halved - 1 cup cucumbers, diced - 1/2 cup red onion, thinly sliced - 1 cup cooked turkey breast, diced (or deli meat of choice) - 1/2 cup provolone cheese, diced - 1 cup pepperoncini, sliced - 1/2 cup Kalamata olives, pitted and halved - 1/4 cup Italian dressing (low carb option or homemade) Gather these fresh and vibrant ingredients for your Low Carb Italian Grinder Salad. The romaine lettuce gives a crisp base, while the cherry tomatoes add a sweet pop. Cucumber brings a refreshing crunch, and red onion offers a mild bite. For proteins, diced turkey breast adds substance. You can also use your favorite deli meat. Provolone cheese gives a creamy touch that complements the salad well. Next, we have flavor enhancers. Pepperoncini provides a tangy kick, while Kalamata olives bring briny depth. A good Italian dressing ties everything together. You can use a store-bought low-carb option or make your own with olive oil, vinegar, and herbs. All of these ingredients harmonize to create a delicious and satisfying salad. For the full recipe, visit the main section. - In a large bowl, combine 2 cups of chopped romaine lettuce, 1 cup of halved cherry tomatoes, 1 cup of diced cucumbers, and 1/2 cup of thinly sliced red onion. - Next, add 1 cup of sliced pepperoncini and 1/2 cup of pitted and halved Kalamata olives. - Finally, mix in 1 cup of diced turkey breast and 1/2 cup of diced provolone cheese. - Drizzle 1/4 cup of Italian dressing over the salad. - Toss gently to coat all ingredients evenly. - Season with salt and pepper to taste. - Garnish with freshly chopped basil for extra flavor and color. - Serve immediately or chill in the fridge for about 15 minutes for enhanced flavors. For the full recipe, check out the detailed steps above! To make your salad shine, I suggest using homemade Italian dressing. This dressing gives a fresher taste than store-bought options. A simple mix of olive oil, vinegar, herbs, and spices will work wonders. Let your salad sit for a few minutes before serving. This allows the flavors to meld together and become more vibrant. Presentation matters! Use a serving bowl with high sides. This creates an appealing display. For a beautiful finish, garnish with extra basil leaves or a sprinkle of parmesan cheese. This adds color and a touch of elegance to your dish. Feel free to swap turkey for a different protein. Chicken or salami can add new flavors. You can also adjust the veggies based on what you like or what is in season. Try adding bell peppers or radishes for extra crunch. Personalize the salad to fit your tastes! {{image_2}} You can make this salad even better by adding different proteins. Try ham or salami for a tasty twist. Both options add a nice flavor and extra protein. You can also add more veggies. Bell peppers, radishes, or artichoke hearts work great. They add crunch and color to your salad. Don't feel stuck with just one dressing. You can try different options like ranch or vinaigrette. Each dressing brings a new taste to the salad. You can also customize your dressings. Add herbs and spices to create unique flavors. A little garlic or oregano can change the whole dish. When adding new ingredients, check they are low-carb. You want to keep the salad healthy and fitting for your diet. Another fun idea is to use lettuce wraps. Instead of a salad, wrap your ingredients in large leaves of lettuce. This gives you a fresh look and a different way to enjoy your meal. Store leftover salad in an airtight container in the refrigerator. This keeps it fresh and tasty. It is best to eat it within 2 days for optimal freshness. Freezing the salad is not a good idea. The texture of the veggies will change. If you meal prep, store the dressing separately. This keeps the salad crisp when you are ready to eat. You do not need to reheat this salad. It is served cold and refreshing. After refrigeration, toss the salad again to refresh the ingredients. This helps mix the flavors and makes it more enjoyable to eat. A Low Carb Italian Grinder Salad is a fresh salad that mimics the flavors of an Italian grinder sandwich. It includes crisp romaine lettuce, juicy cherry tomatoes, crunchy cucumbers, and zesty red onion. I also add pepperoncini and Kalamata olives for a nice tang. For protein, I use diced turkey breast or your choice of deli meat. Provolone cheese adds creaminess, and a low-carb Italian dressing ties everything together. This salad differs from a traditional Italian grinder sandwich. The sandwich is packed with meats and cheeses between bread. In contrast, this salad offers all the great tastes without the carbs from bread. You can enjoy it as a light meal or a side dish. To make this salad vegetarian, you can swap the turkey for protein-rich options like chickpeas or tofu. Both add a nice texture and help keep you full. You can also try using roasted vegetables for added flavor. For cheese, you can keep the provolone or switch to mozzarella or feta. Both choices work well and add a lovely creaminess to the dish. Yes, you can prepare this salad in advance! To keep it fresh, store the ingredients separately. Chop the veggies and protein, and keep the dressing in a small container. This way, the salad will stay crisp. Assemble the salad just before serving. Toss all the ingredients together, drizzle the dressing, and enjoy right away. This method helps keep the flavors bright and the textures nice. This blog post offered a detailed look at making a Low Carb Italian Grinder Salad. We covered fresh vegetables, proteins, and flavorful add-ins. The step-by-step guide made preparation simple. You can tweak ingredients for taste and preference. Remember, freshness is key for this dish. Enjoy customizing your salad with ease! Create a colorful plate that delights everyone. This salad is versatile, and perfect for any meal!

Looking for a fresh and light meal that’s packed with flavor? The Low Carb Italian Grinder Salad is your answer! This salad combines crisp veggies, savory proteins, and zesty dressing, …

Read more

Categories Salads

Tuna Melt Wrap Savory and Satisfying Delight

June 11, 2025 by Chef Nate
- 1 can of tuna in water, drained - 2 tablespoons mayonnaise - 1 tablespoon Dijon mustard - 1/4 cup finely chopped red onion - 1/4 cup diced celery - 1/2 cup shredded cheddar cheese - 4 large flour tortillas - 1 cup fresh spinach leaves - Salt and pepper to taste - Sliced tomatoes for garnish - Olive oil for grilling Tuna is the star here. It gives the wrap protein and flavor. Mayonnaise and Dijon mustard add creaminess and a slight kick. The cheddar cheese melts beautifully, making each bite rich and satisfying. The onions and celery add crunch and freshness. Flour tortillas hold everything together, while spinach adds a healthy touch. Don’t forget the seasoning. A pinch of salt and pepper brings all the flavors to life. - Mixing bowl - Skillet for grilling - Measuring cups and spoons Use a mixing bowl to blend the tuna mix. A skillet works best for grilling the wraps. Measuring cups and spoons help get the right amounts. These tools make the process easy and fun. You'll be ready to enjoy a tasty Tuna Melt Wrap in no time. For a full recipe, check out the details provided above. To start, gather your ingredients. You need one can of drained tuna, two tablespoons of mayonnaise, and one tablespoon of Dijon mustard. Also, chop a quarter cup of red onion and a quarter cup of celery. 1. In a mixing bowl, combine the tuna, mayonnaise, and Dijon mustard. Mix until smooth. 2. Next, fold in the chopped red onion and celery. This adds crunch and flavor. 3. Finally, mix in half a cup of shredded cheddar cheese. Season with salt and pepper to your taste. Now it's time to put it all together. 1. Lay out your large flour tortillas on a clean surface. 2. At the center of each tortilla, add a handful of fresh spinach leaves. This gives a fresh taste. 3. Spoon a generous amount of the tuna mixture over the spinach. Make sure to cover it well. Now we will grill the wraps to get them nice and crispy. 1. Heat a drizzle of olive oil in a skillet over medium heat. 2. Place the wraps seam-side down in the skillet. Grill for about 3 to 4 minutes on each side. Look for a golden brown color and melted cheese. 3. Once done, remove them from the skillet. Let them cool slightly before slicing in half. For the complete recipe, check out the [Full Recipe]. Enjoy your delicious Tuna Melt Wrap! You can adjust the seasoning to fit your taste. If you like it spicy, add some hot sauce. If you prefer a milder flavor, skip it. You can also substitute canned chicken for tuna if you want a change. Try Greek yogurt instead of mayonnaise for a lighter version. Get creative with your mix-ins, like adding chopped pickles or capers for extra zing. To prevent spills, don’t overfill your wrap. Aim for a generous scoop but leave space at the edges. Start rolling from the bottom while tucking in the sides. This way, your filling stays inside. Make sure to roll tightly, but not so tight that it tears the tortilla. You want it snug and secure. Set your skillet to medium heat for the best results. Too hot, and the wrap burns; too low, and it won't crisp up. Grill each wrap for about 3-4 minutes on each side. Check for a golden color and melted cheese. If your wraps are thick, add a minute more to each side. This ensures a warm, gooey center without overcooking the outside. {{image_2}} If you need a gluten-free option, switch to gluten-free tortillas. These come in many flavors and styles. Just make sure they fit your taste and diet. You can also change up the filling. Use canned tuna, but swap out regular mayonnaise for a gluten-free brand. This small change makes a big difference. For a healthier twist, add sliced avocado or extra vegetables. Veggies like bell peppers or cucumbers work well. They add crunch and flavor. You can also use low-fat mayonnaise. It keeps the wrap creamy without too many calories. This way, you can enjoy your meal without feeling guilty. Want to spice things up? Try different cheeses. Instead of cheddar, use mozzarella or pepper jack. Each cheese brings its own taste. You can also experiment with spices. Adding a pinch of paprika or garlic powder gives your wrap a new kick. These little changes can make your tuna melt wrap exciting and fresh. To keep your Tuna Melt Wraps fresh, place them in the fridge. Use an airtight container to stop moisture. This helps keep the wraps tasty for up to three days. If you have extra filling, store it in a separate container. When you want to enjoy your wraps again, heat them up in a skillet. This keeps the outside crispy and the cheese melty. Warm each wrap over medium heat for about three minutes on each side. You can also use a microwave, but this may make them soft. To keep the texture, cover them lightly with a paper towel in the microwave. You can freeze Tuna Melt Wraps for later. Wrap each one in plastic wrap and then in foil. This keeps them fresh for up to three months. When you’re ready to eat, take them out and let them thaw in the fridge overnight. Reheat them in a skillet to bring back that crispy goodness. Yes, you can use canned tuna in oil. It will change the flavor and texture. Tuna in oil is richer and creamier. This can add a nice depth to your wrap. Just be aware that it can also make your filling a bit greasier. If you like a stronger taste, go for it! Tuna Melt Wraps taste great with many sides. You can serve them with a fresh salad. A crunchy side, like carrot sticks or chips, adds a nice touch. For drinks, try iced tea or lemonade. These drinks will balance the flavors well. If you want something warm, soup is a good choice. A light tomato soup pairs nicely. Tuna Melt Wraps last about three days in the fridge. Keep them in an airtight container. This keeps them fresh and safe to eat. If you notice any odd smells or changes in texture, toss them out. Always trust your senses when it comes to food safety. Enjoy your wraps while they are fresh! Tuna Melt Wraps are easy to make and tasty. We've explored the key ingredients, including tuna, cheese, and veggies. I shared simple steps to prepare and grill them. Remember to adjust the filling to your liking and try different flavors. Don’t forget how to store and reheat them for later. Enjoy experimenting with variations that suit your taste. With these tips, you can make the best Tuna Melt Wraps your way. Happy cooking!

If you love a quick and tasty meal, you’ll adore this Tuna Melt Wrap! Packed with rich flavors and satisfying ingredients, it’s a delight to enjoy for lunch or dinner. …

Read more

Categories Dinner

Mexican-Inspired Chicken Salad Meal Prep Delight

June 11, 2025 by Chef Nate
- 2 cups cooked chicken breast, shredded - 1 can black beans, rinsed and drained - 1 cup corn kernels (fresh or canned) - 1 cup cherry tomatoes, halved - 1 red bell pepper, diced - 1 avocado, diced - 1/4 cup red onion, finely chopped - 1/4 cup cilantro, chopped - Juice of 2 limes - 3 tablespoons olive oil - 1 teaspoon cumin - 1 teaspoon smoked paprika - Salt and pepper to taste When I make this Mexican-inspired chicken salad, I focus on using fresh ingredients. The cooked chicken breast is the star, giving protein and flavor. I like to shred it to mix well with other elements. Black beans add fiber and a nice texture, while corn kernels sweeten the mix. Cherry tomatoes bring color and juiciness. Next, I include a red bell pepper for crunch. It adds vibrant color and a sweet taste. Diced avocado comes next. It gives creaminess and tastes great. Red onion adds a sharp bite. Finally, chopped cilantro gives a fresh finish. For the dressing, I squeeze juice from two limes. This adds a tangy kick. I pour in olive oil for richness. Cumin and smoked paprika give warmth and depth. I add salt and pepper to balance the flavors. This combination creates a salad that is not only tasty but also colorful and healthy. If you want the full recipe, check it out above. 1. In a large mixing bowl, combine the shredded chicken, black beans, corn, cherry tomatoes, red bell pepper, and red onion. This mix gives your salad a colorful base. 2. In a small bowl, whisk together the lime juice, olive oil, cumin, smoked paprika, salt, and pepper. This dressing adds flavor and zest. 3. Pour the dressing over the chicken and vegetable mixture. Toss gently to ensure everything is well-coated. This step helps each bite taste great. 1. Add the diced avocado carefully. You want the pieces to stay whole for texture. 2. Mix gently for even distribution. This keeps the avocado creamy and adds fresh flavor. 1. Divide the salad into meal prep containers. Use four containers for easy serving. 2. Ensure even distribution among servings. This way, each container has a good mix of all ingredients. You can find the Full Recipe at the top of this article. To make shredded chicken, boil or bake it. Boiled chicken stays moist and is easy to shred. Bake it with spices for more flavor. Use two forks to pull the chicken apart. This method works well for meal prep. For seasoning, I recommend salt, pepper, and cumin. Cumin adds a warm flavor that matches the salad. You can also add garlic powder for extra taste. Marinating the chicken in lime juice works wonders too! To keep avocado fresh, sprinkle lime juice on it. Lime juice slows browning, keeping your salad bright and green. You can also store it separately and add it later. This method keeps the salad looking fresh longer. For meal prep storage, use airtight containers. Glass containers work best because they don’t stain. Group ingredients by type to keep flavors fresh. Store in the fridge for up to four days. Always label your containers with the date. Pair this chicken salad with a creamy dressing. A yogurt-based dressing adds a nice touch. You can also serve it with tortilla chips for crunch. The ideal serving temperature is cool or at room temperature. This salad is perfect for lunch or dinner. Enjoy it fresh for the best taste! {{image_2}} You can change the protein in this salad. Try tofu instead of chicken. Tofu absorbs flavors well. You can also use chickpeas for a different taste. For grains, swap out rice or quinoa. These work great and add texture. You can make this salad even tastier. Add spices like chili powder or cayenne for heat. Fresh herbs like mint or parsley also brighten the dish. You can adjust the spice level. Add more or less based on your taste. If you need a gluten-free meal, this salad is perfect. All the ingredients used are naturally gluten-free. For a vegan option, just remove the chicken. You can use beans or tofu as protein instead. This makes it both healthy and satisfying. How long will the salad last? Your Mexican-inspired chicken salad will stay fresh in the fridge for up to 4 days. This makes it perfect for meal prep. After that, it may lose taste and texture. Always check before eating. Best storage containers to use Use airtight containers for the best storage. Glass containers work well and do not stain. If you prefer plastic, choose BPA-free options. Make sure lids fit tightly to keep the salad fresh. Can this salad be frozen? I do not recommend freezing this salad. The avocado and tomatoes can turn mushy when frozen. It’s best enjoyed fresh, so make it only for the week you plan to eat it. Tips for thawing and reheating If you do freeze it, thaw slowly in the fridge overnight. Reheat gently in a pan or microwave. Keep in mind, the texture may not be the same. What to look for before consuming Check for any off smells or changes in color. If the salad looks slimy or has brown spots, throw it away. It’s always better to be safe than sorry when it comes to food. To make this salad vegan, substitute the chicken with a plant-based protein. Some great options include: - Chickpeas: These add a nice texture and protein. - Tofu: Pressed and cubed tofu can soak up flavors well. - Tempeh: This fermented soy product has a firm texture and a nutty taste. - Lentils: Cooked lentils offer protein and fiber. Using these options ensures you keep the salad tasty and filling. Yes, you can prep this salad ahead of time. Here are the best timeframes: - 1-3 days: This salad stays fresh in the fridge for up to 4 days. - Day of preparation: For the best flavor, prepare it the same day you plan to eat it. - Storage tips: Keep dressing separate until serving to maintain freshness. This way, your salad will taste great throughout the week. You can pair this salad with many tasty sides and toppings. Here are some recommended options: - Tortilla chips: Crunchy chips add a nice texture. - Rice: Serve it over brown or white rice for a filling meal. - Quinoa: This adds protein and a nutty flavor. - Sliced jalapeños: Add heat and flavor to your salad. - Extra lime wedges: A squeeze of lime brightens the dish. These sides enhance your meal and make it more satisfying. In this blog post, we explored a tasty chicken salad recipe. I covered key ingredients like chicken, beans, and veggies. The dressing adds great flavor with lime and spices. We also went through preparation steps for easy meal prep. Remember to store your salad right to keep it fresh. For variations, you can swap ingredients based on your taste or diet. This salad is versatile, nutritious, and perfect for any meal. Enjoy making your own version and share your favorites!

Looking to spice up your meal prep? This Mexican-Inspired Chicken Salad is your answer! Packed with vibrant flavors and fresh ingredients, this salad is both tasty and healthy. In just …

Read more

Categories Salads

Crispy Honey Garlic Salmon Bites Tasty Dinner Option

June 11, 2025 by Chef Nate
- 1 lb salmon fillet, skin removed and cut into bite-sized cubes - 1/2 cup cornstarch - 1/4 cup honey - 1/2 teaspoon salt - 1/2 teaspoon black pepper - 1/2 teaspoon garlic powder - 1 tablespoon fresh ginger, grated - 2 tablespoons soy sauce (low sodium) - 1 tablespoon sesame oil - 2 garlic cloves, minced - 2 green onions, chopped (for garnish) - Sesame seeds (for garnish) Crispy Honey Garlic Salmon Bites start with fresh salmon. I love using a firm fillet, as it holds its shape well when cooked. The cornstarch gives the bites a crunchy outer layer. Honey adds a sweet touch, balancing the savory flavors. For seasoning, salt and pepper are must-haves. They enhance the natural taste of the salmon. Garlic powder adds a nice depth. Fresh ginger brings a zing that brightens the dish. The sauce is where the real magic happens. Soy sauce gives it a rich umami kick. Sesame oil adds a nutty flavor, while minced garlic rounds everything out. Don't forget to garnish with green onions and sesame seeds for extra texture and color. For the full recipe, check out the instructions provided. You will enjoy making these tasty bites! Coating the salmon bites First, take your salmon fillet and cut it into bite-sized cubes. In a bowl, mix cornstarch, salt, black pepper, and garlic powder. Add the salmon cubes to the bowl. Toss them gently until each piece is fully coated. The cornstarch helps create that crispy texture you want. Making the honey garlic sauce Now, let's make the sauce. In another bowl, whisk together honey, soy sauce, grated ginger, minced garlic, and sesame oil. This sauce will give your salmon bites a delicious flavor. Make sure to blend it well so all the flavors mix together. Heating the skillet Heat a non-stick skillet over medium-high heat. Once it’s hot, add about two tablespoons of oil. You can use vegetable or olive oil. This oil helps the salmon get crispy. Cooking times for crispy texture Carefully place the coated salmon bites in the skillet. Don't overcrowd them; this helps them cook evenly. Cook for about 2-3 minutes on each side. You want them golden brown and crispy. Once done, remove them from the skillet and place them on a paper towel to absorb any extra oil. Tossing in the sauce In the same skillet, pour in your honey garlic sauce. Let it simmer for about 2-3 minutes while stirring. This thickens the sauce and enhances the flavor. Final presentation tips Return the crispy salmon bites to the skillet. Toss them in the sauce until they are well-coated. Cook for one more minute to heat through. Finally, place the honey garlic salmon bites on a serving platter. Garnish with chopped green onions and sesame seeds for that perfect touch. For the full recipe, check out the details above. To get that crispy outside, choose the right oil. I suggest using vegetable oil or canola oil. Both have high smoke points, which means they fry well. Avoid overcrowding the skillet. If you add too many salmon bites at once, they will steam instead of fry. Cook them in batches. This will keep them crispy and golden. You can adjust the sweetness and saltiness of the sauce. If you want it sweeter, add more honey. For a saltier taste, add a little more soy sauce. Taste it as you go! If you need a substitute for soy sauce, try coconut aminos or tamari. Both give a nice flavor without gluten. For side dishes, steamed broccoli or rice works great. These sides complement the salmon bites well. If you have leftovers, try making a salmon salad. Just flake the salmon and mix it with greens and a light dressing. It’s a quick and tasty meal! For the full recipe, check out the Crispy Honey Garlic Salmon Bites section. {{image_2}} You can enjoy crispy honey garlic bites with other proteins. If you want to swap salmon, use chicken or tofu. Both options work well. Chicken gives a hearty flavor, while tofu absorbs the sauce nicely. Shrimp is another great choice. Just peel and devein fresh shrimp. Cook them in the same way as salmon. They will become crispy and flavorful. Each protein brings a unique taste to this dish. Want to spice things up? Add chili sauce to your honey garlic mix. This will give a nice kick. You can adjust the heat level based on your taste. Incorporating vegetables can also enhance flavor. Try bell peppers, snap peas, or carrots. They add color and crunch. Stir them into the sauce or cook them alongside your protein. If you're looking for a gluten-free option, use tamari instead of soy sauce. This simple swap keeps the dish tasty without gluten. For vegetarian adaptations, replace the salmon with eggplant or cauliflower. Both can soak up the honey garlic sauce. They deliver a satisfying, flavorful bite. For the full recipe, check out the details above. To store leftovers, let the salmon bites cool to room temperature. Place them in an airtight container. This helps keep them fresh. Try to use them within 2-3 days for the best taste. Recommended containers include glass or BPA-free plastic. These materials prevent leaks and keep your food safe. Avoid using metal containers, as they can react with the sauce. To freeze salmon bites, first, let them cool completely. Arrange the bites in a single layer on a baking sheet. Freeze them for about 1-2 hours until solid. After that, transfer the bites to a freezer-safe bag. Remove as much air as possible to prevent freezer burn. For reheating, you can bake or pan-fry them. If baking, preheat your oven to 375°F (190°C). Place the bites on a baking sheet and heat for about 10-15 minutes. This method keeps them crispy. If pan-frying, use a little oil in a hot skillet for about 3-5 minutes. Enjoy your crispy honey garlic salmon bites again! For the full recipe, check out [Full Recipe]. To make your salmon bites crispy, follow these key steps: - Use cornstarch: This helps create a nice crust. Toss the salmon in a mix of cornstarch and spices. - Preheat your skillet: Make sure it’s hot before adding the salmon. This sears the outside quickly. - Avoid overcrowding: Cook in batches. If you add too much salmon, it will steam instead of fry. - Use enough oil: This helps achieve that golden brown color. Following these steps will give you perfectly crispy salmon bites every time! Yes, you can make the sauce ahead of time! Here’s how to store it: - Cool it down: Let the sauce reach room temperature first. - Use an airtight container: This keeps flavors fresh and prevents spills. - Refrigerate: The sauce can last for up to a week in the fridge. When you’re ready to use it, just heat it on the stove. It’s simple and saves time! Pair your salmon bites with these tasty sides: - Steamed rice: The simple flavor balances the sauce well. - Roasted vegetables: Broccoli or snap peas add some crunch. - Salad: A fresh green salad can lighten the meal. These options will complete your dinner and make it even more enjoyable! For the full recipe, check out the details above. In this blog post, we covered how to make crispy honey garlic salmon bites step by step. You learned about the essential ingredients, from salmon and cornstarch to soy sauce and sesame oil. We explored key tips for perfect texture and ways to customize your dish. Finally, remember that cooking should be fun and creative. Try different proteins, flavors, and sides. With these techniques, your meals will impress and satisfy. Enjoy your cooking adventure!

Looking for a quick and tasty dinner? Crispy Honey Garlic Salmon Bites are the answer! This dish combines crunchy salmon with sweet honey and garlic sauce, all in just minutes. …

Read more

Categories Appetizers

Creamy Basil Tomato Pasta Flavorful Dinner Delight

June 11, 2025 by Chef Nate
For a great Creamy Basil Tomato Pasta, you need some key items: - 12 oz pasta of your choice (fettuccine or penne works well) - 1 tablespoon olive oil - 3 cloves garlic, minced - 1 can (14 oz) crushed tomatoes - 1 cup heavy cream - 1/2 cup grated Parmesan cheese - 1/2 cup fresh basil leaves, chopped (plus extra for garnish) - Salt and pepper to taste These ingredients come together to create a rich, creamy sauce that clings to your pasta perfectly. I love using fettuccine for its wide shape, but penne also holds the sauce well. You can make this dish your own by adding some optional ingredients: - Red pepper flakes for heat - Extra basil for garnish - More Parmesan cheese for flavor If you like a little spice, red pepper flakes add a nice kick. Extra basil and Parmesan on top make the dish look and taste even better. For the full recipe, check out the [Full Recipe]. Start by boiling water in a large pot. Use enough water to cover the pasta. Add a pinch of salt to the water for flavor. Once the water reaches a rolling boil, add 12 oz of pasta. Cook according to the package instructions. This usually takes about 8 to 12 minutes, depending on the type of pasta. After cooking, reserve 1/2 cup of pasta water before draining. This water is starchy and helps the sauce stick to the pasta. Drain the pasta and set it aside. Next, grab a large skillet and heat 1 tablespoon of olive oil over medium heat. Add 3 cloves of minced garlic. Sauté for about 1 minute until it smells great, but don’t let it burn! Now, pour in 1 can of crushed tomatoes. Bring the mixture to a simmer and let it cook for about 5 minutes. This thickens the sauce a bit. Lower the heat, then add 1 cup of heavy cream. Stir until the sauce is smooth. Add 1/2 cup of grated Parmesan cheese next. Mix until it melts into the sauce. Finally, toss in 1/2 cup of chopped fresh basil. Season with salt and pepper to taste. If you like heat, sprinkle in some red pepper flakes. Now, it’s time to combine everything. Toss the cooked pasta into the skillet with the sauce. Mix well so the pasta is coated. If the sauce is too thick, add a splash of the reserved pasta water. This will help you reach the desired consistency. Stir until the pasta looks creamy and delicious. Serve immediately, and feel free to garnish with extra basil and a sprinkle of Parmesan on top. Enjoy your meal! For the full recipe, refer to the earlier section. To make your creamy basil tomato pasta shine, start with fresh basil. Look for vibrant green leaves without brown spots. Fresh basil has a sweet, peppery taste that makes this dish pop. You can also try using Thai basil for a unique twist. For extra flavor, consider adding: - A pinch of sugar to balance acidity. - Italian seasoning for a herby boost. - Lemon zest for brightness. - A dash of balsamic vinegar for depth. Avoid overcooking your pasta. Cook it just until it’s al dente. This means the pasta should be firm but not hard. Taste it a minute before the package time ends. To keep your sauce from burning, stir it often. Lower the heat if it starts bubbling too much. Add a splash of pasta water if it gets too thick. This keeps it creamy and helps the sauce stick to the pasta nicely. {{image_2}} You can add protein to your Creamy Basil Tomato Pasta easily. If you like chicken, try diced, cooked chicken. It adds flavor and makes the dish more filling. Just cook the chicken in the skillet before adding garlic. Shrimp is another great option. Sauté shrimp until pink, then mix with the sauce. For a vegetarian twist, use tofu or chickpeas. Tofu absorbs flavors well. Cube it and pan-fry until golden. Chickpeas add a nice texture. Just drain and rinse them, then stir into the sauce. Both choices make this pasta dish hearty. Adding veggies boosts the nutrition of your dish. Spinach is perfect for this pasta. It wilts quickly, so add it just before serving. Bell peppers add color and sweetness. Slice them thin and sauté with garlic. Feel free to get creative with seasonal vegetables. Zucchini, cherry tomatoes, or peas work well too. Just chop them up and toss them into the sauce. This adds flavor and makes your meal more vibrant. You can mix and match to suit your taste. For more ideas, check the Full Recipe for details! To store your creamy basil tomato pasta, first let it cool. Place it in an airtight container. This prevents the pasta from drying out. Make sure to store it in the fridge. It will stay fresh for about 3 to 5 days. If you need to keep it longer, consider freezing it. When reheating pasta, keep it moist. You can use a microwave or stovetop. For the microwave, place pasta in a bowl with a splash of water. Cover it loosely, then heat for 1 to 2 minutes. Stir halfway to ensure even heating. On the stovetop, add pasta to a pan with a bit of water or sauce. Heat on low, stirring gently. This way, you keep the creamy texture. Avoid high heat to prevent drying out the sauce. Enjoy your leftovers just like the first time! To make this dish vegan, you can swap out the heavy cream and cheese. Use coconut cream or cashew cream in place of heavy cream. For a cheese substitute, try nutritional yeast or a vegan Parmesan style cheese. These swaps keep the dish creamy and tasty without dairy. Yes, you can freeze this pasta. To do this, cool the dish completely. Place it in an airtight container or freezer bag. It can stay in the freezer for up to three months. When ready to eat, thaw it in the fridge overnight. Reheat it gently on the stove, adding a splash of water to restore creaminess. A light red wine like Pinot Noir works well with the creamy sauce. It won’t overpower the flavors. If you prefer white wine, choose a Sauvignon Blanc. Its crispness matches the freshness of the basil and tomatoes. Enjoy your meal with a glass that complements your dish. For the full recipe, check the recipe section. This post covered how to make Creamy Basil Tomato Pasta from scratch. You learned about key ingredients, cooking steps, and tips. I shared ways to enhance flavor and offered protein and vegetable options for variety. Storing and reheating tips help you enjoy leftovers. Incorporating these ideas will make your pasta dish shine. Get creative with flavors and enjoy every bite. Happy cooking!

If you’re craving a meal that bursts with flavor and comfort, look no further! My Creamy Basil Tomato Pasta is a delightful mix of fresh basil, rich cream, and zesty …

Read more

Categories Dinner

Philly Cheesesteak Bowls Flavorful and Satisfying Meal

June 11, 2025 by Chef Nate
To make these tasty Philly cheesesteak bowls, you will need: - 1 lb ribeye steak, thinly sliced - 2 tablespoons olive oil - 1 medium onion, sliced - 1 medium green bell pepper, sliced - 1 medium red bell pepper, sliced - 2 cloves garlic, minced - Salt and pepper to taste - 1 teaspoon oregano - 4 cups cooked rice or quinoa (for base) - 1 cup provolone cheese, shredded - Fresh parsley for garnish (optional) You can change some ingredients if you want. For a leaner option, use flank steak or chicken. If you prefer veggies, try mushrooms or zucchini instead of meat. You can also swap provolone cheese for mozzarella or cheddar. Use brown rice or cauliflower rice for a healthier base. Gather these tools before you start cooking: - A large skillet for sautéing - A sharp knife for slicing - A cutting board for prep - Measuring spoons for accuracy - A spatula for stirring - Bowls for serving These items will help you create these delicious Philly cheesesteak bowls with ease. For the full recipe, follow along! To make Philly Cheesesteak Bowls, start with the veggies. Heat 1 tablespoon of olive oil in a large skillet over medium-high heat. Add sliced onions, green bell peppers, and red bell peppers. Sauté these for about 5-7 minutes until they soften. Next, stir in minced garlic, oregano, salt, and pepper. Cook for another 2 minutes until the garlic smells great. Remove the veggies from the skillet and set them aside. In the same skillet, add another tablespoon of olive oil. Now, add the thinly sliced ribeye steak. Cook this for 3-4 minutes until the steak is brown but still tender. Return the sautéed veggies to the skillet with the steak. Mix everything well. Lower the heat and sprinkle shredded provolone cheese evenly over the steak and veggies. Cover the skillet with a lid to help the cheese melt for about 2-3 minutes. To serve, place a scoop of cooked rice or quinoa into a bowl. Top it with the cheesy steak and veggie mix. If you like, you can garnish with fresh parsley. For a tasty steak, choose ribeye. It has a great flavor and stays tender when cooked. Slice the steak thinly against the grain. This makes it easier to chew. Cook the steak quickly over high heat to keep it juicy. Don’t overcrowd the skillet; cook in batches if needed. These bowls are fun to customize. You can add hot sauce for a kick. Try adding sautéed mushrooms or jalapeños for extra flavor. You can also swap rice or quinoa for a salad base. The Full Recipe has all the details you need to create this dish. Enjoy your meal! One mistake is cutting the steak too thick. Thick slices can make the meat tough. Aim for thin slices to keep it tender. Another common issue is overcooking the vegetables. They should be soft but still crunchy. Watch the heat; cooking too fast can burn them. Lastly, don’t skip the cheese! It adds creaminess and flavor. To boost flavor, use fresh herbs. Fresh parsley or basil can brighten the dish. Adding a splash of Worcestershire sauce while cooking the steak gives it depth. For a smoky taste, consider using smoked provolone cheese. You can also add sautéed mushrooms for extra texture. Meal prepping makes busy days easier. Cook a larger batch of rice or quinoa. Store it in individual containers. You can prepare the steak and veggies in bulk too. Just separate them into containers and reheat when needed. This dish stays tasty for about three days in the fridge. When ready to eat, top the rice with the steak mix and cheese. Enjoy a quick and satisfying meal! For the full recipe, check out the details above. {{image_2}} You can create a tasty vegetarian version of Philly cheesesteak bowls. Use mushrooms instead of ribeye steak. Portobello mushrooms work well. They have a meaty texture. You can also add sautéed zucchini and eggplant for more flavor. Use the same spices and cheese. This keeps the dish rich and satisfying. If you want a different protein, try chicken or turkey. Thinly sliced chicken breast cooks quickly and tastes great with the same veggies. Ground beef or sausage also makes a hearty meal. Use these in the same way as the ribeye steak. Just adjust the cooking time for ground meat. You can change up the flavors easily. Add barbecue sauce for a smoky taste. A splash of hot sauce gives it a spicy kick. For a gourmet touch, use blue cheese instead of provolone. Fresh herbs like basil or cilantro can brighten the dish. Try adding roasted red peppers for extra sweetness. Each twist makes your Philly cheesesteak bowl unique and fun. For the full recipe, check the guide above. To keep your Philly cheesesteak bowls fresh, place leftovers in an airtight container. This helps lock in flavors and keep the dish safe. Store them in the fridge for up to three days. If you want to save them longer, consider freezing. When you're ready to enjoy leftovers, heat them in a skillet over medium heat. This method warms everything evenly. Stir often to avoid burning. You can also use a microwave, but it may make the rice a bit soggy. Heat in short bursts, checking often. For meal prep, freeze the cheesesteak mixture separately from the rice or quinoa. Use freezer-safe bags or containers. Label them with the date. They can last up to three months in the freezer. When you're ready to eat, thaw overnight in the fridge for best results. Reheat as mentioned above, and enjoy your tasty meal! The best cut of steak for Philly Cheesesteak Bowls is ribeye. Ribeye has great flavor and tenderness. It cooks well when sliced thin. Other good options include sirloin or flank steak. Choose cuts with some marbling for added taste. Look for fresh meat at your local market for the best results. Yes, you can make Philly Cheesesteak Bowls ahead of time. Prepare the steak and veggies in advance. Store them in the fridge for up to three days. Reheat them in a skillet before serving. You can also prep the rice or quinoa ahead. This makes for a quick and easy meal later on. Several sides pair well with Philly Cheesesteak Bowls. Here are some tasty options: - French fries: Crispy fries complement the meal nicely. - Coleslaw: A crunchy slaw adds freshness. - Side salad: A simple salad adds color and crunch. - Pickles: Pickles give a nice tang and crunch. Feel free to mix and match these sides for a complete meal. Philly Cheesesteak Bowls are a fun and tasty meal. You learned about key ingredients and tools. I shared tips for cooking steak just right. We explored alternative ingredients and variations to meet your needs. Don’t forget storage and reheating tips to keep meals fresh. Now you can make delicious Philly Cheesesteak Bowls anytime. Enjoy your cooking and share your results with friends!

If you’re craving a hearty meal that’s both flavorful and satisfying, look no further than Philly Cheesesteak Bowls. Packed with the taste of classic cheesesteaks, these bowls make for a …

Read more

Categories Dinner

Green Goddess Salad Sandwich Fresh and Flavorful Dish

June 11, 2025 by Chef Nate
- 1 cup cooked and cooled chickpeas - 1/2 cup Greek yogurt - 1/4 cup tahini - 1 tablespoon lemon juice - 1 tablespoon apple cider vinegar - 1/2 avocado, mashed - Fresh herbs: parsley and basil - Seasoning: Garlic, salt, and pepper - Whole grain bread - Baby spinach or mixed greens - Sliced cucumber This Green Goddess Salad Sandwich uses fresh, simple ingredients. Chickpeas give it protein and fiber. Greek yogurt adds creaminess and tang. Tahini brings a nutty flavor that blends well. Lemon juice and apple cider vinegar brighten the mix. The mashed avocado adds richness and creaminess. Fresh herbs like parsley and basil boost flavor and freshness. Garlic adds depth and a bit of zing. Whole grain bread provides a hearty base. You can use any type of whole grain bread you like. Baby spinach or mixed greens add crunch and nutrition. Sliced cucumber adds a refreshing crunch and a pop of color. Gathering these ingredients will set you up for a tasty sandwich. Each ingredient plays a role, making this dish both nutritious and flavorful. You can find the full recipe for more detailed steps. Enjoy the process of making this delightful meal! 1. Mixing the base ingredients In a large bowl, add the cooked chickpeas, Greek yogurt, tahini, lemon juice, apple cider vinegar, and mashed avocado. Use a fork to mix these until they blend well. This mixture forms the base for our sandwich. 2. Mashing the chickpea mixture Take a potato masher or a fork and gently mash the mixture. You want it to be well combined but still a bit chunky. This gives the spread a nice texture. 3. Stirring in herbs and seasoning Next, add the chopped parsley, basil, and minced garlic. Season with salt and pepper to taste. Mix everything together until it’s evenly distributed. Adjust the flavor as needed. 1. Toasting the bread Lightly toast the slices of whole grain bread until they turn golden brown. This adds a nice crunch to your sandwich. 2. Spreading the mixture on the bread Take two slices of your toasted bread and spread a generous amount of the green goddess mixture on each slice. Make sure to cover it well. 3. Adding greens and cucumber On top of the spread, add a handful of baby spinach or mixed greens. Layer on the sliced cucumber for a fresh crunch. 4. Cutting and serving the sandwich Place the other slices of bread on top to finish the sandwich. Carefully cut each sandwich in half. Serve them right away for the best taste and texture. Enjoy your delicious creation! For the complete recipe, check out the Full Recipe section. - Texture tips for the chickpea mixture: For a great mix, mash the chickpeas lightly. You want a mix that is creamy but still has some chunks. This adds a fun texture to your sandwich. If you like it smoother, mash a bit more, but keep some pieces for crunch. - Toasting bread for optimal crunch: Toast your bread until it’s golden brown. This adds a nice crunch. It also helps the bread hold up against the moist filling. Use a good quality whole grain bread for added flavor and health. - Seasoning adjustments for personal preference: Taste your chickpea mixture before spreading it. If you want more flavor, add a pinch of salt, pepper, or even a dash of hot sauce. Adjust to fit your taste. You can always add more, but you can’t take it out! - Presentation tips for serving: Serve your sandwiches on a nice wooden board. Add extra cucumber slices on the side for color. Garnish with a sprig of fresh parsley for a pop of green. This makes the dish look fresh and inviting. - Pairing options (sides and beverages): Pair your sandwich with a light salad or some fresh fruit. These sides enhance the meal without overpowering it. For drinks, try a crisp lemonade or herbal iced tea. These options complement the fresh flavors of the sandwich well. {{image_2}} You can easily change up the protein in this sandwich. If you want a different taste, try tuna or tempeh. Both options add great flavor and texture. For a dairy-free choice, swap Greek yogurt with coconut yogurt. It gives a creamy feel without dairy. You can also add more veggies and toppings. Bell peppers bring a nice crunch and sweetness. Sprouts add a fresh touch and extra nutrients. Feel free to mix and match your favorite ingredients. This sandwich is all about personal taste! To kick up the flavor, you can add spices or hot sauce. A pinch of cayenne or a splash of sriracha can add heat. Just a little can make a big difference! Don’t forget about the bread. Using different types can change the whole sandwich. Try sourdough for a tangy taste or a hearty rye for a unique twist. The right bread helps tie all the flavors together. For the full recipe, check out the Green Goddess Salad Sandwich 🥗🥪 section! To keep your Green Goddess Salad Sandwich fresh, store it in the fridge. Wrap the sandwich tightly in plastic wrap or place it in an airtight container. This helps prevent it from drying out. It stays good for about three days. If you want the best taste, eat it within the first day. Can you freeze the green goddess mixture? Yes! You can freeze the mixture before spreading it on the bread. Place it in a freezer-safe container or bag. It will stay fresh for up to one month. How to thaw and reassemble sandwiches? When you’re ready to eat, take the mixture out of the freezer. Let it thaw in the fridge overnight. Once it’s soft, spread it on toasted bread. Add your greens and cucumber. Enjoy your fresh sandwich again! For the full recipe, check out the Green Goddess Salad Sandwich section above. What can I use instead of chickpeas? You can use white beans or lentils instead of chickpeas. Both add nice texture and flavor. If you want a different taste, try diced tofu or cooked quinoa. These options will still keep your sandwich tasty and filling. Is this sandwich suitable for meal prep? Yes, this sandwich is great for meal prep. You can make the green goddess mixture ahead of time. Store it in the fridge for a few days. Just toast the bread fresh when you want to eat. Can I make the mixture ahead of time? Absolutely! You can make the mixture up to three days in advance. Store it in an airtight container in the fridge. This way, you’ll have a quick lunch ready to go. What are the nutritional benefits of the ingredients? The ingredients in this sandwich pack a punch! Chickpeas provide protein and fiber. Greek yogurt adds calcium and probiotics. Fresh herbs like parsley and basil offer vitamins and antioxidants. Whole grain bread gives you more fiber and nutrients. So, this sandwich is not just tasty; it’s also good for you! This blog post covered how to make a delicious Green Goddess Salad Sandwich. We looked at simple ingredients, clear steps, and helpful tips for the best result. I shared storage options, variations, and answers to common questions. In the end, this recipe is flexible and fun to make. You can tailor it to your taste. Enjoy creating your own unique version of this sandwich!

Are you ready to dive into a fresh and flavorful treat? The Green Goddess Salad Sandwich is not just a meal; it’s a colorful mix of taste and health. Packed …

Read more

Categories Salads

Gluten Free Peanut Butter Banana Muffins Simple Recipe

June 11, 2025 by Chef Nate
To make these gluten free peanut butter banana muffins, gather these items: - 2 ripe bananas, mashed - 1/2 cup creamy peanut butter - 1/3 cup honey or maple syrup - 2 large eggs - 1 teaspoon vanilla extract - 1 cup gluten-free all-purpose flour - 1 teaspoon baking powder - 1/2 teaspoon baking soda - 1/4 teaspoon salt - 1/2 teaspoon cinnamon (optional) - 1/4 cup chocolate chips or chopped nuts (optional) You can easily swap some ingredients for your needs: - Use almond butter or sunflower seed butter for peanut butter. - Maple syrup works well if you want a vegan option. - For eggs, try flax eggs (1 tablespoon flaxseed meal + 2.5 tablespoons water). - Replace gluten-free flour with almond flour or oat flour if preferred. - You can omit chocolate chips for a lower-sugar option. These muffins are not only tasty but also healthy! Here’s a quick look at their nutrition: - Each muffin has about 150 calories. - They provide healthy fats from peanut butter. - Bananas add potassium and natural sweetness. - Gluten-free flour keeps them light and fluffy. For the full recipe and more details, check out the [Full Recipe]. 1. Start by preheating your oven to 350°F (175°C). This gets the oven hot and ready. 2. Line a muffin tin with paper liners or grease it with non-stick spray. This makes for easy muffin removal. 3. In a large bowl, mash the ripe bananas with a fork. Aim for a smooth texture. 4. Add the creamy peanut butter to the mashed bananas. Mix well until smooth and combined. 5. Pour in the honey or maple syrup. Then, crack in the two large eggs. Don't forget the vanilla extract! Mix everything thoroughly. 6. In another bowl, whisk together the gluten-free all-purpose flour, baking powder, baking soda, salt, and optional cinnamon. This helps to evenly distribute the dry ingredients. 7. Slowly add the dry mix to the wet mix. Stir gently and stop as soon as it's combined. Overmixing can make the muffins tough. 8. If you want extra flavor, fold in chocolate chips or chopped nuts at this stage. This adds a delightful crunch. 9. Divide the batter evenly among the muffin cups, filling each about halfway. This allows room for rising. 10. Bake in the preheated oven for 18-20 minutes. Keep an eye on them! They should rise and turn golden brown. 11. To check if they're done, insert a toothpick into the center of a muffin. If it comes out clean, they’re ready! 12. Let the muffins cool in the tin for 5 minutes. This helps them firm up before you transfer them. 13. Move the muffins to a wire rack to cool completely. This keeps them from getting soggy. For the full recipe, check the ingredients and instructions above! Enjoy making these easy gluten-free peanut butter banana muffins! To make the best gluten free peanut butter banana muffins, start with very ripe bananas. The riper the bananas, the sweeter and moister your muffins will be. Use creamy peanut butter for a smooth batter. Mixing the wet and dry ingredients gently keeps the muffins light and fluffy. Overmixing makes them dense. Also, do not skip the baking powder and baking soda; they help the muffins rise well. One common mistake is using cold ingredients. Always let your eggs and peanut butter reach room temperature. This helps them mix better. Another mistake is not measuring the gluten-free flour correctly. Use a spoon to fill your measuring cup and level it off. Don’t pack the flour down. Lastly, resist the urge to open the oven too soon. This can cause your muffins to sink. These muffins taste great warm, right out of the oven. For a fun twist, serve them with a drizzle of honey or maple syrup. You can also add a sprinkle of cinnamon on top for extra flavor. Pair them with a glass of milk or a cup of tea to balance the sweetness. For a healthy snack, enjoy them with a side of fresh fruit. For the full recipe, check out the details above! {{image_2}} You can change the flavor of your muffins easily. Try adding spices like nutmeg or ginger for warmth. You can also mix in fruits like blueberries or diced apples. These fruits add sweetness and moisture. If you want a twist, add a splash of coconut extract for a tropical vibe. Each flavor change makes the muffins unique. If you need a vegan option, swap the eggs. Use 1/4 cup of unsweetened applesauce for each egg. This keeps the muffins moist and fluffy. Instead of honey, use maple syrup or agave nectar. Both options work well and keep the muffins sweet. You can enjoy these muffins without eggs or honey. Want to add some crunch? Toss in 1/4 cup of chopped nuts like walnuts or pecans. Seeds like sunflower or pumpkin seeds also add great texture. For a chocolatey touch, mix in 1/4 cup of chocolate chips. You can combine any of these extras to create your perfect muffin. Each addition gives you a new taste experience. For the full recipe, check out the Gluten Free Peanut Butter Banana Muffins recipe! You can keep your gluten-free peanut butter banana muffins at room temperature. Place them in an airtight container. They will stay fresh for about 2 to 3 days. Make sure to keep them in a cool, dry place. This way, you can enjoy a quick snack or breakfast any time! If you want to save your muffins for later, freezing is a great option. First, let the muffins cool completely. Then, wrap each muffin in plastic wrap. After that, put them in a freezer-safe bag or container. When stored this way, they last for up to 3 months. When you're ready to eat them, simply thaw at room temperature. To reheat your muffins, take them out of the container. You can warm them in the microwave for about 15-20 seconds. For a crispy outside, try putting them in the toaster oven for a few minutes. Enjoy the warm, fresh taste like it just came out of the oven! For the full recipe, check out the Gluten Free Peanut Butter Banana Muffins section. Yes, these muffins are perfect for a gluten-free diet. I use gluten-free all-purpose flour in the recipe. This flour mix helps create a light and fluffy texture without any gluten. You can enjoy these muffins without worrying about gluten. Yes, you can replace peanut butter with another nut butter. Almond butter or cashew butter works well. Just keep in mind that the flavor may change a bit. If you have nut allergies, sunflower seed butter is a great choice too. These muffins can last about 3 days at room temperature. Store them in an airtight container to keep them fresh. If you want to keep them longer, you can freeze them. They will stay good in the freezer for up to 3 months. When ready to eat, just thaw and enjoy! You can find the full recipe above. We covered key ingredients, substitutions, and nutritional facts for your muffins. I shared step-by-step instructions to help you bake perfectly. Use my tips to achieve the best texture and avoid common mistakes. Explore fun flavor variations and dietary modifications. Lastly, learn how to store them for freshness and reheat for taste. Muffins are easy to make and fun to share. Enjoy your baking journey!

Looking for a tasty treat that’s both gluten-free and easy to make? You’ve come to the right place! These Gluten Free Peanut Butter Banana Muffins are not only delicious but …

Read more

Categories Desserts

THE BEST Hot Fudge Brownie Bread Irresistible Treat

June 11, 2025 by Chef Nate
To make the best hot fudge brownie bread, gather these simple ingredients. Each one plays a key role in creating that rich, fudgy flavor we all love. - 1 cup all-purpose flour - 1/2 cup unsweetened cocoa powder - 1 teaspoon baking powder - 1/2 teaspoon salt - 1/2 cup unsalted butter, melted - 1 cup granulated sugar - 2 large eggs - 1 teaspoon vanilla extract - 1/4 cup hot fudge sauce (plus extra for drizzling) - 1/2 cup chocolate chips - 1/4 cup chopped walnuts (optional) Each ingredient brings something special to the bread. For example, the cocoa powder adds a deep chocolate taste. The butter helps keep the bread moist. The chocolate chips give bursts of chocolate in every bite. If you want a little crunch, add the walnuts. They add texture and flavor. This recipe is flexible. You can swap out some ingredients if needed. Just make sure to keep the core items like flour and sugar. For the full recipe, you can check the detailed instructions. Get ready to enjoy a treat that is sure to impress! 1. Preheat oven and prepare the loaf pan Start by setting your oven to 350°F (175°C). Grease a 9x5-inch loaf pan with butter or non-stick spray. This will help the bread come out easily. 2. Mix dry ingredients in a bowl In a medium bowl, whisk together the following: - 1 cup all-purpose flour - 1/2 cup unsweetened cocoa powder - 1 teaspoon baking powder - 1/2 teaspoon salt This mix gives your bread a rich chocolate flavor and structure. 3. Mix wet ingredients in another bowl In a large bowl, combine these ingredients: - 1/2 cup unsalted butter, melted - 1 cup granulated sugar Stir them together until smooth. Then add: - 2 large eggs - 1 teaspoon vanilla extract Beat this mixture until it is light and fluffy. 1. Fold wet ingredients into dry ingredients Gradually add the dry mix to the wet mix. Use a spatula to fold it together gently. Be careful not to overmix; you want to keep it fudgy. 2. Add in hot fudge sauce and chocolate chips Now, stir in: - 1/4 cup hot fudge sauce - 1/2 cup chocolate chips If you love nuts, you can add 1/4 cup chopped walnuts too! Mix gently until just combined. 1. Pour batter into the prepared pan Pour your rich batter into the greased loaf pan. Use a spatula to smooth the top. 2. Baking time and tips for checking doneness Place the pan in the oven and bake for 35-40 minutes. To check if it's done, insert a toothpick into the center. It should come out with a few moist crumbs. This shows your hot fudge brownie bread is ready! Now, you can find the Full Recipe to enjoy every step of making this sweet treat! To make the best hot fudge brownie bread, avoid overmixing. Overmixing can make the bread tough. Mix just until the flour disappears. This keeps your bread soft and fudgy. Also, use high-quality chocolate. Good chocolate adds depth to flavor. Choose chocolate with at least 60% cocoa for rich taste. You will notice the difference when you take a bite. Pair your hot fudge brownie bread with ice cream. Vanilla ice cream works best. The cold cream balances the warm bread. You can also top it with whipped cream. A drizzle of warm hot fudge sauce adds even more flavor. This extra touch makes your treat feel special. What if your bread is dry? You can fix this by adding more fudge. A few tablespoons can help. If it’s undercooked, bake it a little longer. Keep checking with a toothpick. If it's too sweet, try reducing the sugar next time. You can also add a pinch of salt. This will balance out the sweetness. For the best results, follow the Full Recipe for guidance. {{image_2}} You can easily change ingredients in this recipe to suit your needs. For a gluten-free option, use almond or coconut flour instead of all-purpose flour. Both work well and keep the bread tasty. You can also find gluten-free baking blends that combine various flours, which can be an easy swap. For dairy-free choices, use coconut oil or a dairy-free butter in place of regular butter. Instead of hot fudge sauce, look for dairy-free versions made from coconut or almond milk. These swaps keep the rich taste while making it suitable for more diets. To make the bread even more exciting, you can add flavors. A dash of cinnamon gives a warm kick to your treat. If you enjoy nutty flavors, a teaspoon of almond extract can enhance the sweetness. Adding berries, like raspberries or blueberries, can bring a fresh twist. Chopping up nuts, like pecans or hazelnuts, adds crunch and depth to the flavor. These extras let you create a unique version of hot fudge brownie bread. You don’t have to stick to one shape. Making mini loaves or cupcakes is fun and perfect for sharing. They bake faster and look cute on a plate. If you want to take it up a notch, transform the bread into a brownie sundae. Slice the loaf and warm it slightly. Top each slice with a scoop of vanilla ice cream and a drizzle of hot fudge sauce. This makes for a delightful dessert that impresses everyone. For the [Full Recipe], check the earlier section. Enjoy exploring these variations! To keep your hot fudge brownie bread fresh, use an airtight container. This prevents air from making it dry. You can also wrap it tightly in plastic wrap. Storing it at room temperature works well for short periods. For longer storage, the fridge is best. To keep the bread moist, always seal it well. Adding a slice of bread to the container can help maintain its softness. You can freeze the brownie bread to enjoy later. First, let it cool completely. Then, wrap it tightly in plastic wrap. After that, place it in a freezer bag. This helps prevent freezer burn. The bread can stay fresh in the freezer for up to three months. When you’re ready to eat it, thaw it overnight in the fridge. This keeps the texture nice. When it’s time to reheat, do it gently. The best method is to use an oven. Preheat it to 350°F (175°C) and warm the bread for about 10 minutes. This keeps it soft and gooey. You can also use a microwave, but be careful. Heat it in short bursts of 10 seconds to avoid drying it out. Serve it warm for the best taste. Drizzle with extra hot fudge for a treat! How can I make hot fudge brownie bread vegan? You can swap eggs with flaxseed meal. Mix one tablespoon of flaxseed meal with three tablespoons of water. Let it sit for five minutes to thicken. Use vegan butter in place of unsalted butter. Finally, choose a dairy-free hot fudge sauce. Can I use cocoa powder instead of melted chocolate? Yes, you can. However, melted chocolate gives a richer taste. If using cocoa powder, add a bit more fat to balance the recipe. You can mix cocoa powder with a little vegetable oil or melted vegan butter. What can I do if my bread is too crumbly? If your bread is crumbly, it might need more moisture. You can add a splash of milk or a little more hot fudge sauce to the batter. Make sure to mix just until combined to keep it tender. - Caloric content per slice: Each slice contains about 250 calories. - Overview of key nutrients: This bread offers healthy fats from butter and walnuts, a good amount of carbs from sugar and flour, and some protein from eggs. - Online retailers or local bakeries: You can find hot fudge brownie bread at local bakeries or online stores like Amazon. Many gourmet shops also sell it. - Reviews of popular brands and options available: Look for brands like "Bread & Butter" or "Sweet Treats Bakery." Both get great reviews for their rich flavor and moist texture. Try to buy from shops that prioritize quality ingredients for the best experience. You learned how to make hot fudge brownie bread with simple steps and tips. Start with quality ingredients for the best taste. Baking is fun, and you can add your twist by trying different flavors or serving styles. Store any leftovers properly to keep them fresh. Remember, cooking is all about creativity. Enjoy each bite and share your treats with friends! Your hot fudge brownie bread will impress everyone who tries it. Happy baking!

Are you ready to indulge in a treat that blends the best of brownies and bread? This Hot Fudge Brownie Bread is rich, fudgy, and oh-so-irresistible. You’ll want to savor …

Read more

Categories Desserts
Older posts
Newer posts
← Previous Page1 … Page60 Page61 Page62 … Page108 Next →

GRILLED FLAVORS

where delicious ideas come to life, from stovetop to backyard. Warm, simple, and always satisfying. 🍽️✨

PAGES

Home About Contact Privacy Policy Terms & Conditions Cookie Policy GDPR Policy Copyright Policy Disclaimer

CATEGORIES

Appetizers Desserts Salads Breakfast Dinner

Contact

  • Pinterest
  • Mail
Copyright © 2026 Grilled Flavors. All rights reserved.