Ground Beef Zucchini Casserole Flavorful and Easy Meal

Looking for a quick, tasty meal that packs a punch? Ground Beef Zucchini Casserole is the answer! This dish combines juicy ground beef with fresh zucchini for a comforting feast. …
Looking for a quick, tasty meal that packs a punch? Ground Beef Zucchini Casserole is the answer! This dish combines juicy ground beef with fresh zucchini for a comforting feast. …

Craving a delicious twist on a classic dish? My Cheesy Low Carb Philly Cheesesteak Casserole brings rich flavors right to your table without the guilt! Packed with ground beef, bell …
![- 1 lb large shrimp, peeled and deveined - 1 ripe avocado, diced - 1 cup fresh corn (or canned/frozen corn) - 2 tablespoons olive oil - 1 teaspoon smoked paprika - 1 teaspoon garlic powder - 1 teaspoon honey - Additional garnishes like cilantro or lime wedges This dish is all about balance. The shrimp brings a sweet and tender bite. The avocado adds creaminess, while the corn adds a pop of sweetness. Each ingredient plays its part. The spices enhance the shrimp, giving it a smoky flavor. Olive oil helps keep the shrimp moist on the grill. Smoked paprika adds depth, and garlic powder infuses a warm taste. You can add honey for a touch of sweetness. It complements the spicy notes of the shrimp. Extra garnishes like fresh cilantro or lime wedges can brighten the dish. For the full recipe, check out the recipe section. This bowl is a delight to make and eat. Enjoy the simple joy of fresh ingredients! To start, gather your ingredients for the shrimp marinade. You will need: - 1 lb large shrimp, peeled and deveined - 2 tablespoons olive oil - 1 teaspoon smoked paprika - 1 teaspoon garlic powder - Salt and pepper to taste In a bowl, mix the shrimp with olive oil, smoked paprika, garlic powder, salt, and pepper. This blend adds great flavor to your shrimp. Let the shrimp marinate for at least 15 minutes. This simple step makes a big difference in taste. Next, let’s make the corn salsa. For this, you will need: - 1 cup fresh corn (or canned/frozen corn) - 1 red bell pepper, diced - 1/4 red onion, finely chopped - 1/4 cup fresh cilantro, chopped - 1 lime, juiced - Salt and pepper to taste In a medium bowl, combine your corn, diced red bell pepper, chopped red onion, cilantro, and lime juice. Stir well to mix all the flavors. Taste the salsa and add salt and pepper as needed. This salsa adds a fresh crunch to your shrimp bowl. Now, let’s whip up the creamy sauce. For this sauce, gather: - 1/2 cup Greek yogurt - 1 tablespoon lime juice (for the creamy sauce) - 1 teaspoon honey (optional) - Salt and pepper to taste In a small bowl, whisk together the Greek yogurt, lime juice, and honey if you choose to use it. This sauce should be creamy and tangy. If it’s too thick, add a bit of water to thin it out. Taste it and adjust the salt and pepper as needed. This sauce ties all the flavors together nicely. It’s time to grill the shrimp. Here are the steps: - Preheat your grill or grill pan to medium-high heat. - Place the marinated shrimp on the grill. Grill the shrimp for about 2-3 minutes on each side. You will know they are done when they turn opaque and curl up. Remove them from the grill and set them aside. Perfectly grilled shrimp is key to a great bowl. Lastly, let’s put everything together. Start by layering the ingredients in each serving bowl. Here’s how: - Add a base of cooked rice or quinoa. - Layer with grilled shrimp. - Top with corn salsa and diced avocado. Drizzle the creamy sauce over the top for extra flavor. For a nice touch, garnish with extra cilantro or lime wedges. This colorful bowl is not only tasty but also looks beautiful on your table. For the full recipe, check out the complete guide. Enjoy your cooking! To make great grilled shrimp, watch out for a few common mistakes. First, don't over-marinate the shrimp. Fifteen minutes is enough time for flavor. If you marinate too long, the shrimp can become mushy. Second, use high heat to grill them. This helps to create that nice char and keeps them juicy. Cook the shrimp for just 2-3 minutes per side. You'll know they’re done when they turn opaque. For optimal flavor, season the shrimp well. Use smoked paprika and garlic powder in the marinade. These spices add depth and smokiness. A touch of salt and pepper brightens the taste. You can also add a squeeze of lime juice before grilling for an extra zing. To make your corn salsa even better, consider adding more ingredients. Try diced jalapeños for heat or chopped tomatoes for freshness. You can also add black beans for protein and texture. Fresh herbs like basil or mint can add a new twist. When serving, pair the salsa with tortilla chips for crunch. It also works great as a topping for tacos or as a fresh side dish. This salsa is versatile and can be enjoyed in many ways. If you want to switch up the creamy sauce, use different ingredients. Swap Greek yogurt for sour cream for a tangy taste. You can also try avocado instead of yogurt for a rich, creamy texture. Customization options are endless. Add hot sauce for heat or garlic for extra flavor. You can even mix in fresh herbs like dill or cilantro to complement the shrimp. Explore these variations to find your favorite twist on this sauce. For the full recipe, check out the detailed instructions above. {{image_2}} You can switch out the shrimp for chicken, tofu, or fish. Each choice brings its own flavor. For chicken, use boneless thighs or breasts, marinated the same way. Tofu works great too! Just press it to remove water and then cube it before marinating. Fish like salmon or tilapia also grill well. Adjust your cooking time to ensure everything is cooked perfectly. While this bowl shines with rice or quinoa, you can use leafy greens too. Spinach or mixed greens add a fresh crunch. If you prefer grains, try farro or barley for a nutty taste. Each base gives a different texture and flavor to the bowl. Feel free to experiment! Change the ingredients based on what's fresh. In summer, add tomatoes or cucumbers for extra crunch. In fall, roasted squash can add warmth. Pair your bowl with seasonal herbs like basil in summer or sage in fall. This keeps your dish exciting and new, no matter the time of year. To keep your grilled shrimp bowl fresh, store leftovers right away. Use airtight containers. This keeps moisture in and air out. The shrimp, salsa, and sauce can all be stored together. However, I suggest keeping the avocado separate to prevent browning. - Best Practices for Refrigeration - Cool the bowl to room temperature before placing it in the fridge. - Consume your leftovers within 2-3 days for best taste. - Freezing Tips - For longer storage, freeze the shrimp and salsa separately. - Use freezer-safe bags and remove as much air as possible. - The sauce can also freeze well in small portions. When you’re ready to enjoy your bowl again, you’ll want to reheat it correctly. This helps maintain the flavors and texture. - Methods to Maintain Quality - Use a microwave for quick warming, but avoid overheating. - Consider reheating on the stove for better texture. - Time and Temperature Recommendations - Heat in the microwave for about 1-2 minutes. - On the stove, warm over low heat for around 5-7 minutes. Knowing how long your ingredients last helps avoid waste. It’s important to check for signs of spoiling. - How Long Ingredients Last - Grilled shrimp lasts about 2-3 days in the fridge. - Corn salsa and creamy sauce can last up to 3-4 days. - Signs of Spoiling - Look for changes in color or smell. - If the shrimp feels slimy, it’s best to discard it. You can find the [Full Recipe] for this delightful grilled shrimp bowl earlier in the article. You can tell shrimp is done when it turns pink and opaque. The texture should be firm but not rubbery. If the shrimp curls tightly, it is overcooked. A good rule is to cook shrimp for about 2-3 minutes on each side. Always check to avoid a tough bite. Yes, frozen shrimp works great! Just make sure to thaw it before cooking. To defrost, place the shrimp in the fridge overnight or run it under cold water for a quick thaw. This keeps the shrimp juicy and tasty. Fresh shrimp has a slight edge in flavor, but frozen shrimp is still delicious. This shrimp bowl pairs well with rice or quinoa as a base. You can also add fresh greens for extra crunch. Consider serving with a side of black beans or a light salad. These options balance flavors and give you a full meal that’s satisfying. Yes, this recipe is gluten-free! All the ingredients used are safe for a gluten-free diet. Always double-check labels on sauces and seasonings. If you use packaged ingredients, ensure they are certified gluten-free to avoid any cross-contamination. You can prep some components ahead of time. Marinate the shrimp a few hours in advance for deeper flavor. You can also make the corn salsa and creamy sauce earlier in the day. However, I recommend grilling the shrimp fresh for the best taste. Enjoy the flavors when they are at their peak! This article covered how to make a delicious shrimp bowl. You learned about the main ingredients like shrimp, avocado, and corn, plus the spices that add flavor. We also discussed step-by-step instructions, from marinating to grilling. I shared tips for perfecting your shrimp and enhancing your corn salsa. In your kitchen, enjoy experimenting with different proteins and bases. Each variation can create a unique twist. Remember, fresh ingredients make a big difference. With practice, you can master this dish and impress your friends and family.](https://grilledflavors.com/wp-content/uploads/2025/06/59e57e28-2c86-4602-88e9-23cc105b79d1.webp)
If you’re craving a fresh and tasty dish, the Grilled Shrimp Bowl with Avocado and Corn Salsa is the perfect choice. This bowl unites juicy shrimp, creamy avocado, and zesty …
![- 2 ripe bananas, mashed - 2 cups all-purpose flour - 3/4 cup granulated sugar - 1/2 cup brown sugar, packed - 1/4 cup unsalted butter, softened - 1/2 cup milk - 2 large eggs - 1 teaspoon vanilla extract - 1 tablespoon baking powder - 1 teaspoon baking soda - 1/2 teaspoon salt - 1 tablespoon ground cinnamon - 1/2 cup pecans or walnuts, chopped (optional) To make these rolls, you need ripe bananas. They give the dough moisture and sweetness. The all-purpose flour forms the base. Sugar adds sweetness and a nice caramel crust when baked. Butter gives richness. Milk and eggs help bind everything together. Baking powder and baking soda make the rolls rise. Salt brings out the flavors, while cinnamon adds warmth. - 8 oz cream cheese, softened - 1/4 cup unsalted butter, softened - 2 cups powdered sugar - 1 teaspoon vanilla extract - 1-2 tablespoons milk (for consistency) The cream cheese frosting adds a sweet and tangy kick. Softened cream cheese and butter create a smooth base. Powdered sugar sweetens the mix and gives it a fluffy texture. Vanilla extract enhances the flavor. The milk helps you reach your desired creaminess. - 1/2 cup pecans or walnuts, chopped - Ground cinnamon for garnish Chopped nuts add crunch and flavor. You can use pecans or walnuts based on your taste. Ground cinnamon as a garnish makes the rolls look pretty and adds extra aroma. For the full recipe, you can refer to the [Full Recipe]. 1. Preheat your oven to 350°F (175°C). Grease a 9x13 inch baking dish. 2. In a large mixing bowl, combine the mashed bananas, softened butter, and granulated sugar. Stir until creamy. 3. Mix in the eggs, milk, and vanilla extract until fully combined. 1. In another bowl, whisk together the flour, baking powder, baking soda, salt, and half of the ground cinnamon. 2. Gradually add the dry mix to the wet ingredients. Stir gently until just combined. Avoid overmixing. 1. Turn the dough out onto a floured surface. Roll it into a rectangle about 1/4 inch thick. 2. Spread softened butter over the dough. Sprinkle the cinnamon sugar mixture evenly on top. 1. Starting from the longer edge, carefully roll the dough into a tight log. 2. Slice the log into 12 equal rolls. Place the rolls in the greased baking dish. 3. Let the rolls rise for about 20 minutes while the oven finishes preheating. 4. Bake the rolls for 25-30 minutes. Keep an eye on them until they turn golden brown. To make the best banana bread cinnamon rolls, start with the dough. You want to mix it just enough. Overmixing makes the rolls tough. Stir until the flour is just incorporated. This keeps the rolls light and fluffy. Also, bananas can vary in moisture. If your bananas are very ripe, you may need less flour. Watch the dough's texture; it should be soft and slightly sticky. Adjust the flour as needed to get it right. Next, let’s talk about the cream cheese frosting. A smooth frosting is key to tasty rolls. Start with softened cream cheese and butter. Beat them together first. Then, slowly add powdered sugar. Mix until it is creamy. If the frosting is too thick, add a tablespoon of milk. This helps you reach the right consistency. You want it to spread easily over warm rolls. Presentation can make your rolls look even more tempting. Once you frost your rolls, think about a little extra touch. Drizzle more frosting on top. A sprinkle of cinnamon adds a nice look and taste. For a fun twist, garnish with banana slices or nuts. If you serve these rolls at a party, consider stacking them on a cake stand. This way, they look fancy and inviting. You can find the full recipe linked here for all the details you need. {{image_2}} You can make these rolls even more fun by adding some extra flavors. Try mixing in chocolate chips or dried fruits like raisins or cranberries. These sweet bites will surprise you with a burst of flavor. You can also switch up the nuts. Use pecans, walnuts, or even sunflower seeds. Each nut brings its own crunch and taste to the rolls. If you want a healthier twist, consider using whole wheat flour instead of all-purpose flour. This change adds more fiber and nutrients. You can also cut back on sugar. Use honey or maple syrup for natural sweetness. This swap helps reduce refined sugar while still keeping the taste great. Make your rolls special for the season! In autumn, add pumpkin spice to the dough for a cozy flavor. You can mix in ground ginger, nutmeg, or cloves for a warm touch. For a fresh taste in spring or summer, add citrus zest. Lemon or orange zest will brighten up the rolls and make them light and airy. Feel free to check out the Full Recipe for more ideas on how to customize your Banana Bread Cinnamon Rolls with Cream Cheese Frosting! To keep your banana bread cinnamon rolls fresh, store them in an airtight container. Place parchment paper between layers to prevent sticking. You can refrigerate them for up to four days. If you plan to eat them later, try to avoid leaving them out. They taste best when kept cool. If you want to freeze the rolls, do it before baking. Wrap each roll tightly in plastic wrap. Then place them in a freezer-safe bag. They can stay frozen for up to three months. When you're ready to enjoy them, thaw in the fridge overnight. Reheat them in the oven at 350°F (175°C) for about 10-15 minutes. This makes them warm and soft again. These rolls are best served warm or at room temperature. Warm rolls enhance the cream cheese frosting's flavor. If you have leftover rolls, you can reheat them in the microwave for about 15 seconds. This will make them soft and delicious. Enjoy them fresh for the best taste! For the full recipe, check the main section. Yes, you can use frozen bananas. They are great for baking. Frozen bananas are often softer and sweeter. They also mix well into the dough. Just thaw and mash them before use. This saves you from wasting overripe bananas. Plus, they add moisture to your rolls. To check if the rolls are done, look for a golden brown color. You can also use a toothpick. Insert it into the center of a roll. If it comes out clean, the rolls are ready. The edges should pull away slightly from the pan. This shows they are baked correctly. Trust your eyes and the toothpick method for perfect rolls. Yes! You can make this recipe dairy-free easily. Use coconut oil or a dairy-free butter substitute for the butter. For the cream cheese, try a dairy-free cream cheese option. You can also use almond or oat milk instead of regular milk. Your rolls will still taste great without dairy. This recipe transforms simple ingredients into delicious banana rolls. You can mix ripe bananas, flour, and sugars to create the dough. Making the cream cheese frosting adds a sweet touch. Remember to avoid overmixing for the best texture and try adding variations like chocolate chips or nuts. Store extras in the fridge for later enjoyment. With these easy steps, you can bake delightful rolls sure to please everyone. Enjoy creating your own tasty treats!](https://grilledflavors.com/wp-content/uploads/2025/06/926d70a3-9268-4dd4-abcc-8179cdb05862.webp)
If you love the cozy taste of banana bread, wait until you try these Banana Bread Cinnamon Rolls with Cream Cheese Frosting! This easy recipe combines fluffy rolls with sweet, …
![To create a tasty air fryer egg and cheese toast, you need just a few key items: - 2 slices of whole grain bread - 2 large eggs - 2 slices of sharp cheddar cheese - 1 tablespoon unsalted butter, softened - Salt and pepper to taste These ingredients come together to make a delicious breakfast or snack. The eggs provide protein, while the cheese adds rich flavor. Whole grain bread gives a nice texture and helps keep you full. You can use various types of bread for this recipe. Here are some great options: - Sourdough - Rye - Multigrain - White bread Each type of bread brings its own flavor and texture. Sourdough adds a tangy taste, while rye has a hearty bite. Choose what you like best! Seasonings can elevate your egg and cheese toast. Here are some ideas: - Salt and pepper (basic must-haves) - Fresh herbs, like chives or parsley - Hot sauce for a kick - Avocado slices for creaminess Feel free to mix and match these add-ins. They can make your toast even more exciting. If you want more flavor, try adding fresh herbs on top after cooking. To start, preheat your air fryer to 350°F (175°C). This step is key to getting your toast crispy. While it heats, gather your ingredients. You will need whole grain bread, eggs, cheese, butter, salt, and pepper. Make sure everything is ready for quick assembly. Next, take your slices of bread. Spread softened butter on one side of each slice. This will help create a nice golden crust. Lay the bread, buttered side down, on a clean surface. Place a slice of cheese on each piece of bread. Now, crack an egg onto the cheese. Be careful not to break the yolk. Season the egg with a pinch of salt and pepper. Carefully transfer your prepared toast to the air fryer basket. Ensure they do not overlap. Cook your toast in the air fryer for 8-10 minutes. Keep an eye on the eggs. You want them cooked to your liking, with the cheese melted perfectly. Once done, take the toast out. If you want, sprinkle fresh herbs on top for added flavor. Serve hot and enjoy your delicious creation! For the full recipe, check out [Full Recipe]. To get the perfect egg yolk, crack the eggs gently. Place them directly on the cheese without breaking the yolk. This keeps the yolk runny and the white cooked just right. Cook the toast for 8-10 minutes. Check the eggs at 8 minutes for your desired doneness. If you like firmer yolks, leave them a bit longer. Buttering your bread is key for a golden crust. Use softened butter for easy spreading. Cover one side of each slice evenly. This helps the bread toast up nicely in the air fryer. Don’t skip this step! A golden crust adds flavor and makes it more appealing. Sharp cheddar cheese is my go-to for this recipe. It melts well and packs a punch of flavor. You can also try mozzarella for a milder taste or pepper jack for a bit of heat. Experiment with different cheeses to find your favorite mix. Each cheese adds a unique twist to the dish. {{image_2}} You can make your Air Fryer Egg and Cheese Toast even better by adding veggies. Spinach, tomatoes, or bell peppers work well. To add them, chop your chosen vegetables small. Layer them on the cheese before adding the egg. This extra step gives you more flavor and nutrients. While sharp cheddar is tasty, you can switch it up! Try mozzarella for a creamy melt or pepper jack for a kick. You might even like goat cheese for a tangy twist. Each cheese brings a unique taste, so feel free to experiment! Seasoning can change the whole dish! Besides salt and pepper, consider using smoked paprika or garlic powder. Fresh herbs like basil or chives can add freshness. A dash of hot sauce can bring heat. Mix and match to find your favorite flavors. Use these tips to create your own version of the Air Fryer Egg and Cheese Toast. For the full recipe, check out the details above. If you have leftover egg and cheese toast, store it in an airtight container. Let the toast cool first. This helps keep it fresh. You can keep it in the fridge for up to three days. Avoid stacking the toast, as this can make it soggy. If you have extra toppings, store them separately. To reheat your toast, use the air fryer. Set it to 350°F (175°C) and heat for about 3-5 minutes. This will help bring back its crispiness. You can also use a toaster oven for a similar effect. If using a microwave, place a paper towel over the toast. This keeps it from getting too chewy. You can freeze the toast if you want to save it for later. Wrap each piece in plastic wrap, then place them in a freezer bag. Make sure to remove as much air as possible. The toast can last for up to one month in the freezer. To enjoy, thaw it in the fridge overnight and reheat as mentioned above. Yes, you can use different types of bread. Use sourdough, rye, or even bagels. Each type adds its own flavor. Whole grain bread gives a nice nutty taste. Try what you like best! To keep the yolk intact, crack the egg gently. Hold it close to the bread. Use a bowl to catch the egg first, then slide it onto the toast. This way, you have more control. Cleaning the air fryer is easy. Let it cool first. Then, remove the basket and wash it in warm soapy water. Wipe the inside with a damp cloth. Make sure to dry it well before the next use. To make a vegan version, swap eggs for tofu or chickpea flour. Use vegan cheese as a substitute. You can also try mashed avocado on the toast for creaminess. Enjoy your plant-based twist on this dish! You learned about making tasty egg and cheese toast in an air fryer. We covered the key ingredients, from bread options to seasonings. The step-by-step instructions guide you through cooking it perfectly. Tips shared help you achieve that golden crust and creamy yolk. You can also explore fun variations and proper storage methods. Now, it's your turn to try this easy recipe and make it yours. Enjoy!](https://grilledflavors.com/wp-content/uploads/2025/06/f41c31d2-5ecc-4265-b0d5-8b57673a2257.webp)
Looking for a quick and tasty breakfast? Try my Savory Air Fryer Egg and Cheese Toast! This simple recipe is perfect for busy mornings when you crave something delicious yet …

Looking for a warm, cozy meal that the whole family will love? The Amish Hamburger Steak Bake is the perfect dish. With its hearty blend of ground beef, savory spices, …
. First, I take my steak and cut it into bite-sized pieces. I heat a large skillet over medium-high heat. Then, I sear the steak pieces until they are browned on all sides. This usually takes about 5-7 minutes. Once they are nice and brown, I carefully transfer the steak to my slow cooker. This step adds great flavor to the dish. In the same skillet, I add the chopped onion and minced garlic. I cook them until they are softened, which takes about 3-4 minutes. This step makes the onion sweet and the garlic fragrant. After that, I add the onion and garlic mix to the slow cooker over the steak. This builds a tasty base for the casserole. Next, I layer the sliced potatoes evenly on top of the steak and onion mix. This helps the potatoes soak up all the great flavors. In a mixing bowl, I combine the beef broth, heavy cream, Worcestershire sauce, dried thyme, salt, and black pepper. I whisk them all together until well mixed. I then pour this mixture over the potatoes in the slow cooker. Finally, I cover the slow cooker and cook everything on low for 6-8 hours. This slow cooking makes the potatoes tender and the steak melt in your mouth. This is where the magic happens! For the full recipe, check out the details provided earlier. To make the best casserole, start by searing the steak. Searing adds a rich flavor. Heat a skillet on medium-high heat. Cook the steak pieces until they are browned on all sides. This takes about 5-7 minutes. Then, move the steak to the slow cooker. Timing is key. Cook the potatoes until they are tender. This usually takes 6-8 hours on low. Make sure the steak is cooked through. A slow cooker makes this easy. When choosing a slow cooker, look for one with a locking lid. A larger size holds more food. A programmable timer helps you set cooking times. If you don’t have a slow cooker, use a Dutch oven. It works well in the oven. Serve the casserole in bowls. Top it with fresh parsley for a pop of color. You can also put extra cheese on the side. This way, everyone can add more cheese if they want. Pair it with a simple green salad or steamed veggies. This will balance the rich flavors of the casserole. {{image_2}} You can switch up the steak in this recipe. Try using flank steak or ribeye for different flavors. Each type brings its own taste and texture. For cheese, sharp cheddar is great, but you can use mozzarella or gouda. These cheeses will melt well and add a unique twist. Adding vegetables can boost the flavor and nutrition. Bell peppers add sweetness and color. Carrots bring a nice crunch and earthiness. Chop them and toss them in with the potatoes. You can also sprinkle in spices and herbs. Try smoked paprika for depth or Italian seasoning for a fresh taste. Fresh herbs like rosemary or basil can add a lovely aroma. To make this dish gluten-free, use gluten-free broth and check your Worcestershire sauce. Many brands are gluten-free, but not all. For vegetarian options, replace the steak with mushrooms or lentils. You can also add more veggies, like zucchini or spinach. This keeps it hearty and flavorful while being meat-free. Explore these variations to make your slow cooker steak and cheddar potato casserole even more delightful. For the full recipe, check back on the details provided earlier. After you enjoy your slow cooker steak and cheddar potato casserole, store the leftovers right. Let it cool first. Then, place it in an airtight container. It will stay fresh in the fridge for about 3 to 4 days. To reheat, simply scoop out a portion and place it in a microwave-safe bowl. Cover it with a lid or microwave-safe wrap. Heat it in short bursts, stirring in between. This way, it warms evenly. If you prefer the oven, bake it at 350°F (175°C) until hot. You can freeze this casserole for later. First, make sure it is completely cool. Then, transfer it to a freezer-safe container. Leave some space at the top for expansion. It can last in the freezer for up to 3 months. When you want to enjoy it again, take it out of the freezer. Move it to the fridge for a night to thaw. For faster thawing, place it in cold water, but keep it sealed. Reheat as mentioned above, ensuring it reaches an internal temperature of 165°F (74°C) before serving. For the full recipe, check out the details above. Yes, you can use other cuts of beef. If you want tender meat, try using flank steak or ribeye. These cuts add flavor and stay juicy. You can also use round steak, which is leaner. Just remember to cut the meat into bite-sized pieces. The casserole is ready when the potatoes are tender. You can check this by poking a potato slice with a fork. If it goes in easily, it’s done. The steak should also be fork-tender. This means it breaks apart easily when you push it with a fork. This casserole pairs well with many sides. You can serve it with a simple green salad. Steamed broccoli or green beans also make great choices. If you want more carbs, try some crusty bread or garlic bread. These sides balance the dish's richness. To save time, you can skip searing the steak. Just add it straight to the slow cooker. You can also slice the potatoes thinner. This helps them cook faster. If you're in a real hurry, consider using pre-cooked steak or leftover beef. For the full recipe, check out the Slow Cooker Steak and Cheddar Potato Casserole. This blog post guided you through making a hearty casserole. You learned about key ingredients, step-by-step instructions, and helpful tips. We covered tasty variations and how to store leftovers. Each section aimed to enhance your confidence in cooking. Remember, you can adjust the recipe to suit your taste and dietary needs. Enjoy creating this dish and sharing it with loved ones. Cooking should bring joy, and this casserole can do just that.](https://grilledflavors.com/wp-content/uploads/2025/06/e0505646-2569-4143-ace7-8af3ab25debd.webp)
If you’re hungry for a meal that warms you from the inside out, my Slow Cooker Steak and Cheddar Potato Casserole Delight is the answer. This hearty dish combines tender …

Looking for a quick and easy meal that packs a punch? These stuffed potato cakes are your answer. With a few simple ingredients, you can create delicious, crispy cakes stuffed …
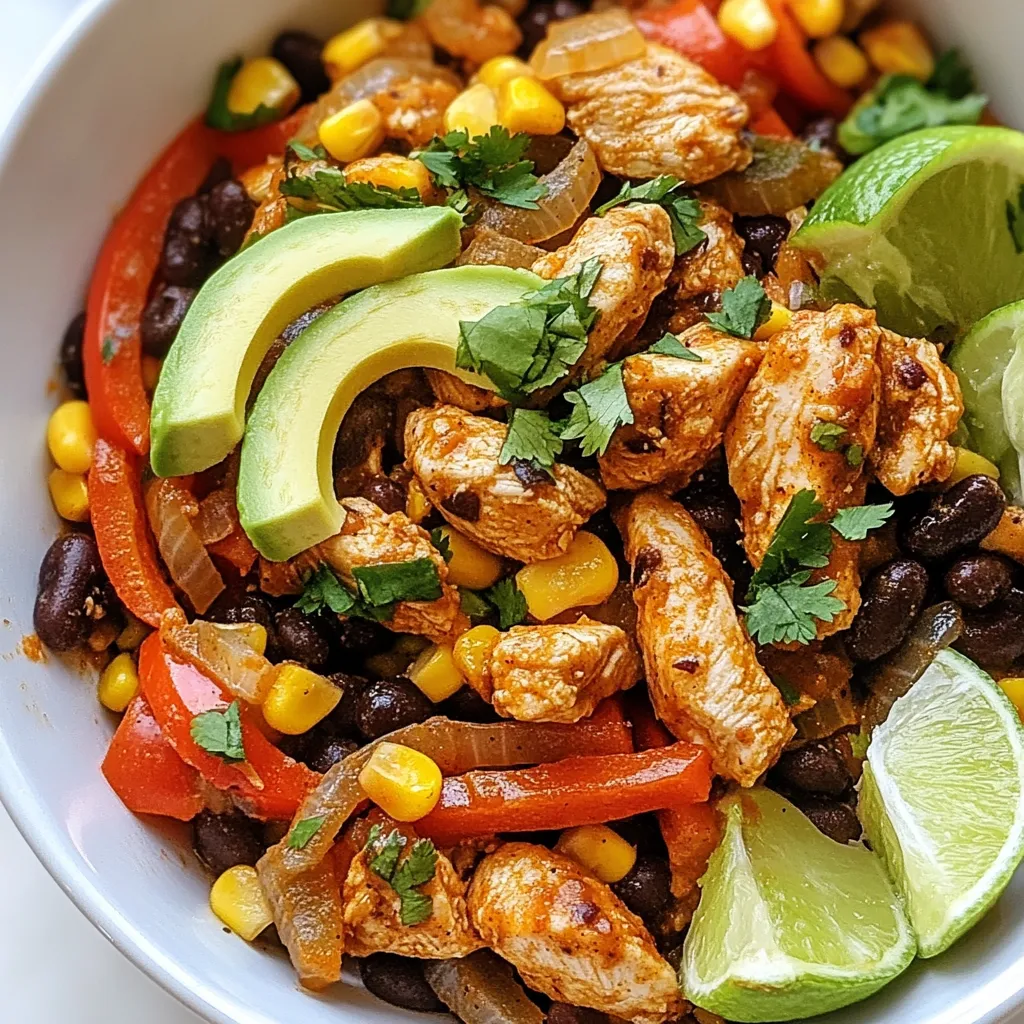
Looking for a quick and tasty dish? The Baja Chicken Bell Pepper Skillet has your back! This vibrant meal combines tender chicken, colorful bell peppers, and zesty spices—all cooked in …
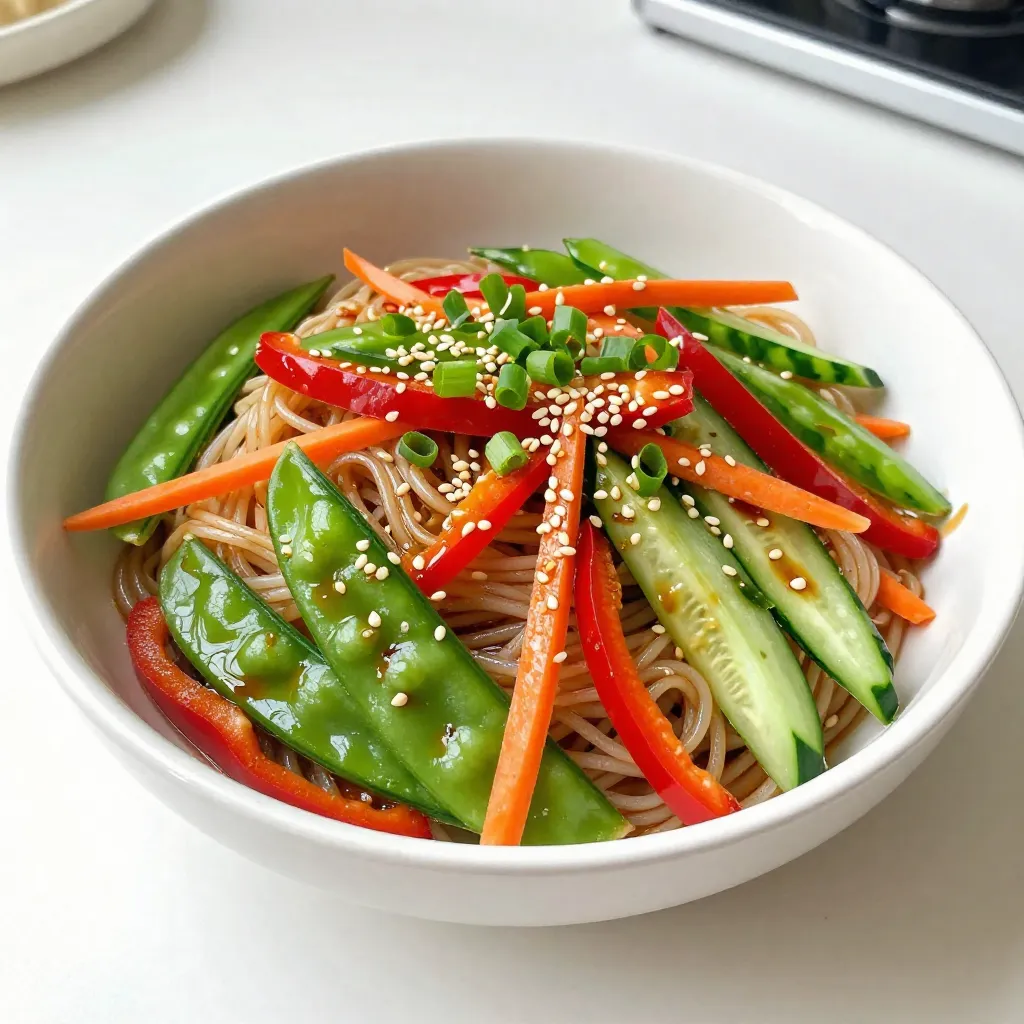
Are you ready for a dish that’s both fresh and packed with flavor? My Savory Sesame Soy Noodle Salad is a perfect choice for any meal! With crisp veggies and …