One-Pot Creamy Tuscan Chicken Pasta Simple Dinner

Are you ready for a quick, delicious meal that will impress your friends? This One-Pot Creamy Tuscan Chicken Pasta is your answer! You’ll love how easy it is to whip …
Are you ready for a quick, delicious meal that will impress your friends? This One-Pot Creamy Tuscan Chicken Pasta is your answer! You’ll love how easy it is to whip …

Get ready to savor the amazing flavors of my Air Fryer Honey BBQ Explosion Chicken! This dish combines tender chicken with a sweet and tangy BBQ sauce, topped with gooey …

Are you ready to elevate your dinner game? My Crispy Chicken Parmesan Recipe combines crunch, flavor, and ease. With simple steps and common ingredients, you’ll impress your family and friends …
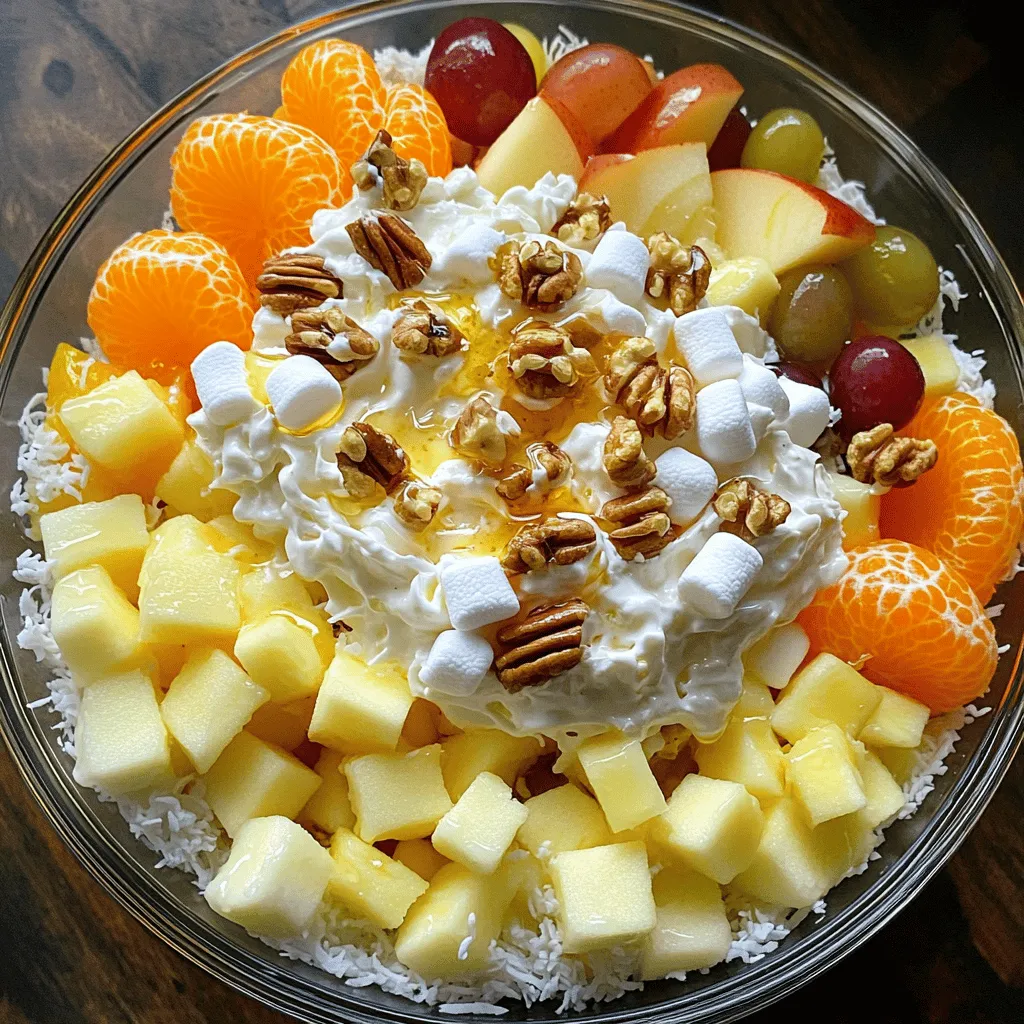
Are you ready to create a bright and tasty treat? Ambrosia Salad is the perfect mix of fruit and fluff. It’s sweet, creamy, and very simple to make! In this …

Get ready to treat yourself to a delicious morning delight! Strawberry Cheesecake Stuffed French Toast combines creamy goodness with sweet berries, making breakfast feel like dessert. You’ll learn how to …
![- 1 medium cauliflower, cut into florets - 1 cup all-purpose flour - 1 cup water - 1 teaspoon garlic powder - 1 teaspoon onion powder - 1 teaspoon paprika - Salt and pepper to taste - 1 cup panko breadcrumbs - 1/2 cup sweet chili sauce - 1 tablespoon soy sauce - 1 teaspoon sesame oil - 1 tablespoon sesame seeds (for garnish) - Fresh cilantro (for garnish) To make sweet chili cauliflower wings, you need fresh ingredients. Start with a medium cauliflower. Cutting it into florets makes it easy to handle. The batter needs flour and water, mixed with garlic powder, onion powder, and paprika. This gives a nice flavor. Don't forget salt and pepper to taste! Panko breadcrumbs create a crunchy outside. For the sauce, sweet chili sauce, soy sauce, and sesame oil blend well. Finally, sesame seeds and fresh cilantro add a lovely touch for garnish. A serving has about 250 calories, with 7 grams of protein, 36 grams of carbs, and 10 grams of fat. Cauliflower brings many health benefits. It is low in calories and high in fiber. It also contains vitamins C and K, which support your immune system. - Baking sheet - Mixing bowls - Whisk - Spatula Having the right tools makes cooking easier. A baking sheet helps the cauliflower wings crisp up. Mixing bowls are essential for making the batter. A whisk helps blend everything smoothly. Use a spatula to flip the wings and serve them. These tools will help you create the perfect sweet chili cauliflower wings. For the full recipe, check out the detailed steps above. First, cut the cauliflower into small florets. This helps them cook evenly. Rinse the florets under cold water to clean them well. Next, preheat your oven to 425°F (220°C). This high heat gives the wings a nice crisp. In a large bowl, mix 1 cup of all-purpose flour with 1 cup of water. Add 1 teaspoon of garlic powder, 1 teaspoon of onion powder, 1 teaspoon of paprika, salt, and pepper to taste. Whisk until the batter is smooth. It should not be too thick or too runny. The right consistency helps the batter stick to the cauliflower. Now, dip each cauliflower floret into the batter. Let the extra batter drip off. Then, roll the coated florets in 1 cup of panko breadcrumbs. This gives them a crunchy texture. Place the coated florets on a baking sheet. Bake in the preheated oven for 25-30 minutes. Flip them halfway through to get even cooking. After they turn golden brown, take them out. In a small saucepan, combine 1/2 cup of sweet chili sauce, 1 tablespoon of soy sauce, and 1 teaspoon of sesame oil. Heat gently until mixed. Once the cauliflower is baked, toss it in the sweet chili sauce. Make sure all the florets get coated. Return them to the baking sheet and bake again for 5-7 minutes. This step helps the sauce caramelize and adds more flavor. Enjoy your crispy and flavorful snack! For the complete recipe, follow the [Full Recipe]. To get those crispy wings, you must coat the cauliflower well. The batter needs to stick to each floret. Make sure to let any excess batter drip off before coating in panko. This helps create a crunch when baked. Bake at a high temperature of 425°F (220°C) for the best results. Flip the wings halfway through to cook evenly. This ensures every side gets that nice golden brown color. Adding spices to the batter can boost the flavor of your wings. Try adding a bit of cayenne for heat or smoked paprika for depth. You can also mix in some dried herbs like oregano or thyme. For dipping sauces, sweet chili sauce pairs perfectly, but you can also try ranch or a tangy yogurt sauce. These dips add a creamy contrast to the crispy texture of the wings. When serving your sweet chili cauliflower wings, think about pairing them with drinks. A cold beer or a refreshing iced tea works well. You can also serve them with a side of fresh veggies for a balanced meal. For presentation, arrange the wings on a colorful platter. Garnish with sesame seeds and chopped cilantro for a pop of color. This makes the dish look as good as it tastes! {{image_2}} To make this recipe vegan, you can swap the all-purpose flour and water for chickpea flour. Chickpea flour provides a nice texture and flavor. Mix it with enough water to form a thick batter. This keeps the wings crispy and adds more protein. You can also use flaxseed meal mixed with water as a binding agent. Just combine one tablespoon of flaxseed meal with three tablespoons of water. Let it sit for a few minutes until it thickens. If you love heat, add sriracha to the sweet chili sauce. Start with a tablespoon and mix it in well. Taste it, then add more if you want. You can also sprinkle cayenne pepper into the batter for a spicy kick. Adjust the heat level to your liking. Remember, you can always add more spice, but you can't take it out! You can use other veggies like broccoli or zucchini. They work well in this recipe. Just cut them into similar sizes as the cauliflower. Cooking times may change, so keep an eye on them. Broccoli may need about 20-25 minutes, while zucchini might be done in 15-20 minutes. Always check for crispiness before taking them out of the oven. To keep your sweet chili cauliflower wings fresh, store them in the fridge. Place the wings in an airtight container. This helps prevent moisture loss and keeps them crispy. Allow the wings to cool to room temperature before storing. They will stay good for about three to four days. When it comes to reheating, the oven is best. Preheat your oven to 350°F (175°C). Spread the wings on a baking sheet. Heat for about 10-15 minutes until they are crispy again. If you're in a hurry, you can use a microwave, but the wings won't be as crispy. Heat them in short bursts and check often to avoid sogginess. You can freeze your wings before or after baking. If you freeze them before baking, coat the florets and place them on a baking sheet. Freeze them until solid, then transfer to a freezer bag. If you freeze them after baking, let them cool first. Store in an airtight container or freezer bag. When you're ready to enjoy them, thaw overnight in the fridge. Reheat in the oven for the best texture. You can use gluten-free flour options. Try almond flour or chickpea flour. These flours work well and keep the batter light. Mix with water just like regular flour. This keeps the texture crispy and tasty. Yes, you can use frozen cauliflower. Just thaw and drain it well. This helps remove excess moisture. Pat the florets dry with a paper towel. This step is key for crispiness. These wings stay fresh for about 3 to 4 days in the fridge. Store them in an airtight container. Always check for any signs of spoilage before eating. Yes, you can prepare the wings ahead. Coat them and bake them. Let them cool, then store in the fridge. When you’re ready, just reheat them in the oven. This keeps them crispy. Great dips include ranch, blue cheese, or yogurt-based dips. These cool dips balance the heat from the sweet chili sauce. You can even try a tangy lime dip for a fresh twist. Check out the Full Recipe for more ideas! This article covered how to make delicious sweet chili cauliflower wings. You learned about the key ingredients, step-by-step instructions, and helpful tips for cooking. I shared variations, including vegan and spicy options, plus how to store and reheat leftovers. In my view, mastering this recipe gives you a great snack or appetizer. With some practice, you’ll create a dish that impresses. Enjoy your cooking journey and the tasty results!](https://grilledflavors.com/wp-content/uploads/2025/06/cc310fa6-5951-4b64-91c9-1bbe16e680c1.webp)
Looking for a tasty snack that’s both crispy and packed with flavor? Try my Sweet Chili Cauliflower Wings! This simple recipe turns cauliflower into a delicious treat that’s perfect for …

Looking for a fun, tasty way to start your morning? Cinnamon Roll French Toast Bites are your answer! This quick and easy recipe combines the fluffy goodness of cinnamon rolls …
![To make a tasty spaghetti salad, gather these key items: - 8 oz spaghetti - 1 cup cherry tomatoes, halved - 1 cucumber, diced - 1 bell pepper (red or yellow), diced - 1/2 red onion, finely chopped - 1/4 cup black olives, sliced - 1/4 cup feta cheese, crumbled - 1/4 cup fresh basil, chopped - 3 tablespoons olive oil - 2 tablespoons balsamic vinegar - 1 teaspoon garlic powder - Salt and pepper to taste These ingredients work well together. The pasta offers a filling base. Fresh veggies add crunch and color. You can change the recipe to match your taste. Here are some great options: - Avocado for creaminess - Spinach or arugula for extra greens - Grilled chicken for protein - Sun-dried tomatoes for a tangy kick - Different cheeses like mozzarella or parmesan Feel free to mix and match. These options let you create a salad just for you. Using fresh ingredients makes a big difference. Here are some tips: - Look for bright, firm tomatoes. They should smell sweet and ripe. - Choose cucumbers with smooth skin. Avoid any with soft spots. - Select peppers that feel heavy and crisp. Color should be bright and shiny. - Pick fresh basil that is vibrant green. Avoid any that looks wilted. Fresh ingredients lead to a better taste. Spend time selecting the best items for your salad. Start by boiling water in a large pot. Add a pinch of salt to the water. Once it boils, add 8 oz of spaghetti. Cook it according to the package instructions until it is al dente. This usually takes about 8-10 minutes. When done, drain the spaghetti in a colander. Rinse it under cold water to stop cooking. This helps keep the pasta firm. While the spaghetti cooks, wash and chop your vegetables. Slice 1 cup of cherry tomatoes in half. Dice 1 cucumber and 1 bell pepper. Use either red or yellow bell peppers. Finely chop 1/2 of a red onion. Slice 1/4 cup of black olives. You can mix and match veggies based on what you have. Fresh vegetables add crunch and flavor to your salad. In a large mixing bowl, combine all the chopped vegetables. Add the cooked spaghetti to this bowl. In a small bowl, whisk together 3 tablespoons of olive oil, 2 tablespoons of balsamic vinegar, and 1 teaspoon of garlic powder. Season it with salt and pepper. Pour this dressing over the spaghetti and veggies. Toss everything gently to mix well. Sprinkle 1/4 cup of crumbled feta cheese and 1/4 cup of chopped fresh basil on top. Toss lightly one more time to distribute the cheese and basil. Taste the salad and adjust the seasoning if needed. For a nice presentation, serve it chilled in a big bowl or individual plates. Garnish with extra basil leaves and a bit more feta for a pretty touch. Enjoy your quick and delicious spaghetti salad! For the complete recipe, see the [Full Recipe]. To make the best spaghetti salad, start with al dente pasta. This means the pasta should be firm but not hard. Rinse it with cold water to cool it down. This helps keep the salad fresh. Use fresh veggies for vibrant flavor and color. Always chop them into similar sizes for even bites. The dressing is key, so whisk it well. Taste it first and adjust if needed. A common mistake is overcooking the spaghetti. This makes it mushy and unappetizing. Another mistake is not cooling the pasta. Warm pasta wilts the veggies. Make sure to mix the salad gently. This keeps the ingredients from breaking apart. Lastly, avoid too much dressing. It can drown the salad and make it soggy. Serve your spaghetti salad chilled for the best taste. Use a large bowl for family style or individual plates for guests. Garnish with extra basil and feta cheese. This adds a pop of color and flavor. Pair it with grilled chicken or bread for a complete meal. Enjoy it at picnics, potlucks, or as a side dish. For the full recipe, you can check back for all the details. {{image_2}} You can easily make this spaghetti salad vegetarian. Just skip the meat. Focus on colorful veggies. Swap in roasted red peppers or artichoke hearts for extra flavor. You can also add more cheese. Try mozzarella or goat cheese for a creamy touch. If you want some protein, consider adding chicken, tuna, or shrimp. Grilled chicken works well. Use canned tuna for a quick fix. Shrimp adds a nice twist too. Just cook the shrimp until pink, then toss them in. This makes your salad hearty and satisfying. Need a gluten-free version? No problem! Use gluten-free pasta. Many brands offer great alternatives. You can also use spiralized veggies, like zucchini or carrots. They add crunch and flavor without gluten. This keeps the dish light and fresh. For more details, check out the Full Recipe for all the steps and tips. To keep your spaghetti salad fresh, use an airtight container. Glass or plastic containers work well. Store it in the fridge. This helps maintain flavor and texture. If you have leftovers, let the salad cool first. Place it in the container and seal it tightly. It can last up to three days in the fridge. If you notice any extra moisture, drain it before sealing. Spaghetti salad is best enjoyed cold. You don’t need to reheat it. If you prefer it warm, heat it gently in the microwave. Use a low setting to avoid cooking the veggies. For complete details, check out the Full Recipe. Yes, you can make this salad ahead of time. It tastes even better after chilling. Just prepare it a few hours before serving. Store it in the fridge in an airtight container. This makes it great for parties or quick lunches. If you want a change, you can use other pasta shapes. Bow ties, rotini, or penne work well. You can also try gluten-free pasta if needed. For a low-carb option, use zucchini noodles or spaghetti squash. Each choice gives a unique twist to the salad. To boost flavor, try adding herbs like oregano or parsley. You can also include some red pepper flakes for heat. A squeeze of lemon juice adds freshness too. Experiment with different dressings, like ranch or Italian, for variety. Each addition can make the salad taste different and exciting. Absolutely! This salad is perfect for meal prep. It stores well and lasts for several days in the fridge. Just keep the dressing separate until you’re ready to eat. This way, the noodles stay firm and the veggies stay fresh. For the full recipe, check the details below. This spaghetti salad serves four and is quick to prepare. It takes just 15 minutes from start to finish. Each serving is packed with flavor and nutrients, making it a healthy choice for any meal. You now know how to make a quick and tasty spaghetti salad. We covered the key ingredients, from essential to optional, and tips for choosing the best fresh items. The step-by-step guide gives you all you need to cook and mix the salad perfectly. Remember to avoid common mistakes to make it shine. You can customize it with proteins or make it gluten-free. Proper storage keeps leftovers fresh and tasty. Enjoy your salad today or prep it for later!](https://grilledflavors.com/wp-content/uploads/2025/06/06ef1fd9-f432-4cdd-ae8a-45e14220eb01.webp)
Are you ready to whip up a tasty dish in no time? This Quick & Delicious Spaghetti Salad is your new go-to meal. Packed with fresh veggies and a zesty …
![To make a vibrant rainbow orzo salad, gather these key ingredients: - 1 cup orzo pasta - 1 cup cherry tomatoes, halved - 1 cup cucumber, diced - 1 bell pepper (any color), diced - 1 cup cooked corn (fresh or canned) - 1/2 red onion, finely chopped - 1/2 cup feta cheese, crumbled These ingredients bring colors and textures to your plate. The orzo serves as a hearty base, while the veggies add crunch and freshness. Get creative with optional add-ins that enhance the salad: - Avocado, diced - Black olives, sliced - Fresh herbs like parsley or dill - Chickpeas for added protein These add-ins let you customize your salad. They can also boost flavor and nutrition. A simple dressing ties everything together. For the dressing, you need: - 2 tablespoons olive oil - 1 tablespoon lemon juice - 1 teaspoon dried oregano - Salt and pepper to taste This dressing is light and fresh. It highlights the salad's bright flavors without overpowering them. For the full recipe, check the [Full Recipe]. First, boil water in a large pot. Add salt for flavor. Once the water boils, add 1 cup of orzo pasta. Cook it for about 8 to 10 minutes. You want it to be al dente, which means firm to the bite. After cooking, drain the pasta and rinse it under cold water. This stops the cooking process and cools it down. While the orzo cooks, you can chop the fresh veggies. Start with the cucumber. Dice it into small pieces. Next, take a bell pepper and dice it as well. Any color works great! Then, halve the cherry tomatoes. If you are using fresh corn, now is the time to cook it briefly in boiling water. Cool it down after cooking so it mixes well. In a large mixing bowl, add the cooled orzo. Toss in the halved cherry tomatoes, diced cucumber, and bell pepper. Add the cooked corn and finely chopped red onion. Mix these ingredients gently. The colors and textures should look bright and inviting. Now, let’s make the dressing. In a small bowl, whisk together 2 tablespoons of olive oil, 1 tablespoon of lemon juice, and 1 teaspoon of dried oregano. Season with salt and pepper to taste. Pour this dressing over the salad mix. Stir well to coat everything evenly. For the full recipe, don't forget to check the detailed instructions. Enjoy your vibrant Rainbow Orzo Salad! To cook orzo, bring a large pot of salted water to a boil. Add the orzo pasta and cook it for about 8 to 10 minutes. You want it to be al dente, which means it should be firm but not hard. Once cooked, drain the pasta and rinse it under cold water. This stops the cooking process and cools it down quickly. Serve your rainbow orzo salad chilled for the best taste. You can add fresh herbs like basil or parsley to enhance the flavor. If you want a bit more zing, try squeezing some lemon juice over the top. Pair this salad with grilled chicken or fish for a full meal. It also makes a great side dish for barbecues. A clear glass bowl works best for serving this salad. It shows off the bright colors of the veggies. To make it even more appealing, drizzle a little extra olive oil before serving. Add a few whole basil leaves on top for a pop of green. This not only looks great but also adds fresh flavor. For the full recipe, check out the complete instructions. {{image_2}} You can make this salad purely vegetarian by skipping the feta cheese. Instead, try using avocado for creaminess. You can also add more veggies like spinach or kale for extra nutrients. Roasted chickpeas are another great way to add texture and flavor. They are crunchy and will give your salad a nice bite. If you want to make your salad more filling, add some protein. Grilled chicken or shrimp works well here. You can also use canned beans like black beans or chickpeas. They add protein and fiber, making the salad even healthier. Tofu is another option, and it soaks up flavors nicely. Feel free to swap ingredients based on what’s in season. In spring, add peas or asparagus for freshness. In summer, try adding zucchini or bell peppers for crunch. In fall, diced apples or roasted sweet potatoes can add sweetness. Winter months call for roasted Brussels sprouts or beets for a hearty touch. Each season brings new flavors to explore in your rainbow orzo salad. For the full recipe, check out the details above. To store leftover Rainbow Orzo Salad, place it in an airtight container. Make sure the lid seals tightly. This keeps the salad fresh and tasty. You can keep it in the fridge for up to three days. If you see any liquid in the container, drain it before serving again. The flavors will meld, making the salad even better. When you make this salad, keep the ingredients separate until serving. Store the orzo, veggies, and dressing in different containers. This way, the salad stays crisp. Fresh veggies taste best, so try to use them within a couple of days. If you have leftover feta, store it in its liquid to keep it moist. You can enjoy Rainbow Orzo Salad cold or at room temperature. If you prefer it warm, heat the orzo gently in a pot. Avoid overheating as it can make the salad mushy. Once warmed, add the fresh ingredients and dressing. Mix well before serving. This salad shines with its colors and flavors, making it a delightful dish. For the full recipe, check out the details above. Rainbow Orzo Salad can last about 3 to 5 days in the fridge. Store it in an airtight container. Keep it cool to maintain its fresh taste. If you spot any changes in color or smell, toss it out. Yes, you can use regular pasta instead of orzo. Choose a small shape like fusilli or shells. Cook it according to package instructions. The salad will still taste great. You can try many dressings with this salad. A balsamic vinaigrette adds a sweet touch. A yogurt-based dressing gives a creamy feel. Experiment to find what you love best! Yes, Rainbow Orzo Salad is great for meal prep. Make a batch at the start of the week. It stays tasty and fresh, making it a perfect lunch option. Just keep the dressing separate until you're ready to eat. Check out the Full Recipe for more tips! Rainbow Orzo Salad is a great dish full of flavor and color. We covered key ingredients, from the main orzo to tasty add-ins. The step-by-step instructions help you create it with ease. Tips on cooking orzo and presentation add extra joy. You can also personalize the salad with various options. Storing it right keeps leftovers fresh and tasty. With all these ideas, you now have the perfect recipe for any occasion. Enjoy your cooking journey and share your creations!](https://grilledflavors.com/wp-content/uploads/2025/06/efa6118a-68dc-4c73-8360-73e78a57c51b.webp)
Looking for a vibrant dish that’s as fun to make as it is to eat? You’ll love my Rainbow Orzo Salad! This colorful delight bursts with fresh flavors and is …

Craving a tasty snack that’s both healthy and satisfying? Dive into my Air-Fryer Asian BBQ Cauliflower Wings Flavor Feast! These crispy bites are perfect for game night or any gathering. …