30-Minute Strawberry Spinach Salad Fresh and Tasty Delight
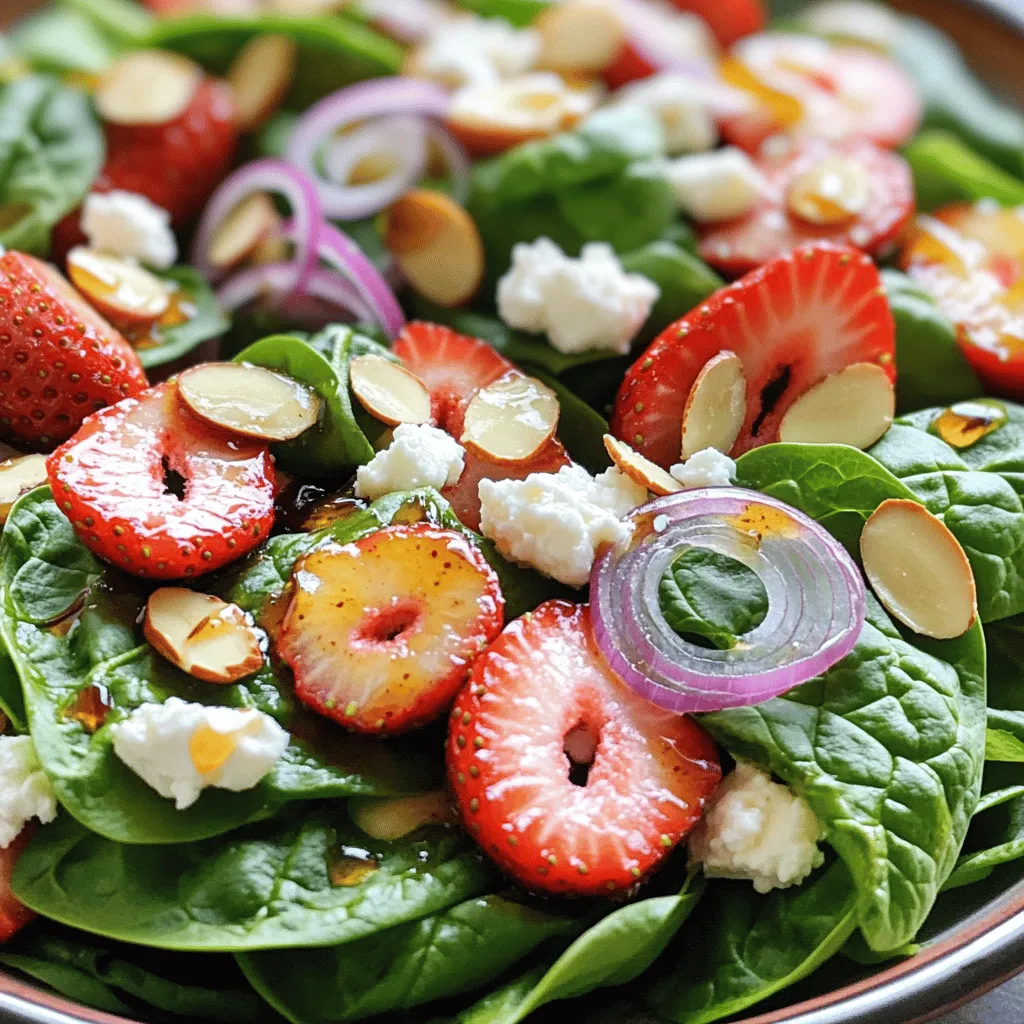
Looking for a quick and delicious salad? This 30-Minute Strawberry Spinach Salad is your answer! It’s fresh, easy, and perfect for any meal. We’ll mix baby spinach with sweet strawberries, …

![- 2 cups mixed greens (arugula, spinach, and romaine) - 1 cup cherry tomatoes, halved - 1 cup cucumber, diced - 1 ripe avocado, diced - 1 orange, segmented - 1/4 cup red onion, thinly sliced - 1/4 cup crumbled feta cheese - 1/4 cup sunflower seeds - 3 tablespoons olive oil - 2 tablespoons apple cider vinegar - 1 teaspoon honey - Salt and pepper to taste For a great Sunshine Salad, start with fresh produce. Mixed greens give a nice base. I love using arugula, spinach, and romaine for a mix of flavors. Cherry tomatoes add sweetness, while cucumber brings crunch. Next, add a ripe avocado. It makes the salad creamy. The orange segments add a burst of juicy flavor. Lastly, thinly sliced red onion gives a nice bite. Now, let’s talk about the other ingredients. Crumbled feta cheese adds a salty kick. Sunflower seeds add extra crunch and nutrition. For the dressing, whisk together olive oil, apple cider vinegar, honey, salt, and pepper. This simple mix adds a bright flavor. Make sure to check the Full Recipe for all the details. Enjoy your colorful and tasty Sunshine Salad! - First, wash all the fresh produce. - Dry the greens and place them in a bowl. - Dice the cucumber and avocado into small pieces. - Halve the cherry tomatoes and segment the orange. - Thinly slice the red onion. - Start with the mixed greens as the base in your bowl. - Layer the cherry tomatoes and cucumber on top. - Next, add the diced avocado and orange segments. - Sprinkle the sliced red onion and crumbled feta cheese over the layers. - Finally, add the sunflower seeds for a nice crunch. - In a small bowl, whisk together the olive oil and apple cider vinegar. - Add honey, salt, and pepper to taste. - Mix until the dressing is smooth and well combined. - Drizzle the dressing over the salad before tossing gently. - Be careful not to break the avocado pieces as you mix. This Sunshine Salad is a burst of flavor and color. For the full recipe, check out the [Full Recipe]. To make your Sunshine Salad shine, presentation matters. Serve it in a large, shallow bowl or on individual plates. This way, the colorful ingredients pop! Garnish with extra orange segments. Add a sprinkle of sunflower seeds on top for a fun crunch. This adds color and makes it look fresh and inviting. Feel free to swap ingredients based on your diet. For a vegan option, skip the feta cheese or use a plant-based version. You can replace honey with agave syrup for a vegan dressing. If you don’t like red onion, try green onions or chives for a milder taste. You can also use any leafy green you like, such as kale or mixed greens. Balancing flavors makes this salad a joy to eat. Start with the dressing. Olive oil and apple cider vinegar give a nice tang. Adjust the salt and pepper to taste. If you want more sweetness, add a bit more honey. To mix it up, try adding herbs like basil or mint. They will boost the flavor even more. The crunch from the sunflower seeds pairs well with the creamy avocado. Enjoy the mix of textures! For the [Full Recipe], click here. {{image_2}} You can change the fruits and veggies in the Sunshine Salad based on the seasons. In summer, I love adding sweet peaches or juicy strawberries. These fruits bring a delightful sweetness. In fall, try including crisp apples or juicy pears. They add a nice crunch and flavor. Using seasonal produce gives your salad a fresh taste and bright colors. To make your Sunshine Salad more filling, add some protein. Grilled chicken is a great choice. It pairs well with the salad's tangy flavors. Shrimp also works nicely, adding a touch of the sea. If you prefer a plant-based option, add chickpeas. They are rich in protein and fiber. These additions make your salad hearty and satisfying. While the basic dressing is tasty, you can try other options. A citrus vinaigrette can add a zesty kick. Just mix orange juice, olive oil, and a bit of honey. A creamy dressing like ranch or tahini also goes well. Each dressing will change the flavor, keeping it fresh and fun. Feel free to explore these variations to make the Sunshine Salad your own! For the complete recipe, check out the Full Recipe. To keep your Sunshine Salad fresh, store it in an airtight container. This container should be placed in the fridge. Use the salad within two days for the best taste. Keep the dressing separate until you are ready to eat. This helps prevent sogginess. If you notice any wilting, remove those greens before storing. Prep your ingredients in advance to save time. Wash and chop the mixed greens, tomatoes, and cucumbers. You can store these in separate containers. Dice the avocado and orange just before serving to keep them fresh. Crumble the feta cheese and store it in its own container. This makes it easy to assemble your salad quickly. When you're ready to serve the salad, check its freshness. If the greens look a bit wilted, give them a quick rinse in cold water. This can help revive them. Toss everything together and add the dressing just before serving. This keeps the salad crisp and bright. Enjoy the fresh taste of your Sunshine Salad! Sunshine Salad is a bright, tasty dish full of fresh flavors. It has mixed greens like arugula, spinach, and romaine as a base. You’ll find juicy cherry tomatoes, crisp cucumber, and creamy avocado in each bite. Orange segments add a sweet touch, while red onion adds a nice crunch. Crumbled feta cheese gives it a salty flavor, and sunflower seeds add a satisfying crunch. This salad bursts with colors and flavors, making it a feast for your eyes and taste buds. To make Sunshine Salad for a crowd, simply multiply each ingredient. If you need to serve 8 people, double the amounts. Use 4 cups of mixed greens and 2 cups each of tomatoes and cucumber. For other ingredients, just keep scaling up. A large bowl works best for mixing, so you have plenty of room to toss everything together. Remember, it’s all about keeping the ratios the same for that perfect balance. Yes, you can prepare Sunshine Salad ahead of time! To keep it fresh, store the dressing separately. Mix all the salad ingredients, but don’t add the dressing until you are ready to serve. This way, the greens stay crisp, and the flavors stay bright. You can prepare the salad a few hours in advance. Just cover it tightly in the fridge until serving time. Sunshine Salad is packed with nutrients. Mixed greens are rich in vitamins A and K. Cherry tomatoes are full of antioxidants. Cucumber keeps you hydrated and adds fiber. Avocado provides healthy fats that are good for your heart. Oranges bring vitamin C for a strong immune system. Feta cheese adds protein, and sunflower seeds offer vitamin E. This salad not only tastes good but also fuels your body with essential nutrients. This post covered how to make a vibrant Sunshine Salad. We explored fresh produce, tasty dressings, and smart tips for serving. Remember, you can change ingredients and adapt flavors to fit your taste. Storing leftovers properly helps keep your salad fresh. Finally, enjoy the health benefits that come with each colorful bite. Now, you can make this salad a regular part of your meals!](https://grilledflavors.com/wp-content/uploads/2025/06/e69705c5-c84d-4d11-993e-2bc231d5e708.webp)
![To make the best Italian grilled cheese, you need key ingredients. Here’s what you should gather: - 4 slices of sourdough bread - 1 cup fresh mozzarella cheese, sliced - 1 cup fontina cheese, shredded - 1/2 cup sun-dried tomatoes, chopped - 1/4 cup fresh basil leaves, chopped - 2 tablespoons pesto - 2 tablespoons olive oil - Salt and pepper to taste These ingredients bring together a mix of creamy, tangy, and savory flavors. The mozzarella offers a soft, melty texture while the fontina adds a rich, nutty taste. Sun-dried tomatoes provide a sweet and tangy burst in each bite, and fresh basil brings a fragrant aroma. Choosing the right brands makes a big difference. For cheese, I love using BelGioioso mozzarella and Emmi fontina. They melt well and taste great. For bread, Acme Bread Company sourdough is my top pick. It’s crusty and has a nice chew. These brands enhance the flavor and texture of your sandwich. If you want to kick up the flavor, try adding these optional ingredients: - A sprinkle of garlic powder - A dash of crushed red pepper flakes - A layer of roasted red peppers - A slice of prosciutto These additions can bring unique tastes and textures to your grilled cheese. Garlic powder gives an aromatic boost, while crushed red pepper adds heat. Roasted red peppers offer sweetness, and prosciutto adds a salty, savory touch. You can mix and match to find your favorite flavor combo. For the complete recipe, check out the Full Recipe. To make a tasty Italian grilled cheese, follow these simple steps. Start by gathering your ingredients. You will need: - 4 slices of sourdough bread - 1 cup fresh mozzarella cheese, sliced - 1 cup fontina cheese, shredded - 1/2 cup sun-dried tomatoes, chopped - 1/4 cup fresh basil leaves, chopped - 2 tablespoons pesto - 2 tablespoons olive oil - Salt and pepper to taste Now, heat a non-stick skillet over medium heat. Brush one side of each slice of sourdough with olive oil. On the unbuttered side of two slices, spread 1 tablespoon of pesto each. Next, layer the mozzarella and fontina cheese evenly over the pesto. Add the sun-dried tomatoes and fresh basil, seasoning with salt and pepper. Place the other two slices on top, pressing down gently. You can cook your sandwich in two ways: a panini press or a skillet. A panini press cooks the sandwich evenly and gives it nice grill marks. It also saves time, as you can cook both sides at once. If you choose a skillet, you will need to flip the sandwich. Cook the first side for about 3-4 minutes until golden brown. Use a spatula to press down gently. Then, flip the sandwich and cook for another 3-4 minutes. This method allows you to control the heat better. Both methods work well, so choose the one you prefer! Serve your Italian grilled cheese warm for the best taste. You can pair it with a simple salad or a bowl of tomato soup. For extra flavor, drizzle some balsamic glaze on top. This adds a sweet and tangy touch to your meal. If you want to impress guests, cut the sandwich into small triangles. Arrange them on a platter with fresh basil leaves for a nice touch. Enjoy your delicious creation! For the full recipe, check the details above. Choosing the right cheese is key to a great melt. I recommend using fresh mozzarella. It gives a soft, creamy texture. Fontina cheese is also a great choice. It melts well and adds a rich flavor. Mixing different cheeses enhances taste and texture. Try using a blend of mozzarella and fontina for a delightful experience. This combination creates a gooey center that pulls apart beautifully. To keep the bread crispy, use a good quality sourdough. Its sturdy crust holds up well. Before cooking, brush the outside with olive oil. This adds flavor and helps it brown nicely. Cook on medium heat; too high can burn the bread. Press down gently with a spatula while cooking. This ensures even crispiness and makes the cheese melt perfectly. You can personalize your Italian grilled cheese easily. Add ingredients like sun-dried tomatoes or fresh basil for extra flavor. If you like spice, try adding red pepper flakes. For a savory twist, include prosciutto or salami. Don’t be afraid to experiment! Each addition makes the sandwich your own. For the complete details and steps, check out the Full Recipe. {{image_2}} The classic Italian grilled cheese uses simple, fresh ingredients. It features sourdough bread, mozzarella, and maybe a hint of basil. The gourmet version takes it up a notch. It adds rich flavors with sun-dried tomatoes, pesto, and fontina cheese. Each bite bursts with deliciousness. The key is to balance flavors and textures. You want a crispy outside and a gooey inside. Try both styles to see what you love best. Adding protein can make your sandwich heartier. Thin slices of prosciutto or salami work great. They add a salty kick that pairs well with cheese. If you prefer plant-based options, try roasted vegetables or tempeh. Both add depth and flavor. Layer your choice on top of the cheese, just before grilling. This makes every bite more satisfying and filling. For a vegetarian option, stick to the classic ingredients. You can use rich cheeses and fresh herbs. If you're vegan, swap cheese for a plant-based alternative. Look for vegan mozzarella or cashew cheese. Both melt well and taste great. Add extra veggies like spinach or mushrooms for even more flavor. These choices keep your meal tasty and satisfying while meeting dietary needs. You can find the full recipe [here]. After enjoying your Italian grilled cheese, store leftovers in an airtight container. This keeps the bread from getting soggy. Let the sandwich cool before placing it in the fridge. It stays fresh for up to three days. If you want to keep it longer, consider freezing. To reheat, use a skillet for the best results. Heat the skillet on low. Place the sandwich in and cover it with a lid. This method warms the cheese without burning the bread. Cook for about five minutes on each side. If you prefer a microwave, wrap the sandwich in a damp paper towel. Heat it for 30 seconds, then check. Add more time if needed. You can freeze the Italian grilled cheese for later. Wrap each sandwich tightly in plastic wrap, then place it in a freezer bag. This prevents freezer burn. It can last up to three months in the freezer. When you're ready to eat, thaw it in the fridge overnight before reheating. Enjoy the taste of Italy anytime with this simple storage method! To make your grilled cheese crispy, use enough oil. I suggest olive oil or butter. Coat the bread well on each side. Heat your skillet to medium heat. This helps the bread toast evenly. Flip the sandwich carefully to avoid spills. Cooking it slow gives the cheese time to melt. For Italian grilled cheese, I love fresh mozzarella and fontina. They melt well and taste great. You can also try provolone or aged cheddar for a twist. Each cheese adds its own flavor. Mixing cheeses gives you a richer taste. Don't forget to use good quality cheese for the best results. Yes, you can make Italian grilled cheese ahead of time. Cook the sandwiches, but don’t slice them yet. Let them cool, then wrap in foil. Store in the fridge for up to two days. When you’re ready, reheat them in a skillet. This keeps the bread crispy while warming the cheese. For the full recipe, check out the detailed instructions above. Italian grilled cheese combines simple ingredients with tasty options. We explored essential cheeses and breads that make this dish shine. You learned cooking methods, like using a panini press or skillet. We also discussed tips for achieving the perfect melt and keeping your bread crisp. Don’t forget about flavor variations, including adding proteins or making it vegetarian. Store leftovers properly for the best taste when reheating. Now, it's time to enjoy your delicious creation!](https://grilledflavors.com/wp-content/uploads/2025/06/2389d145-f7d0-4071-9030-a80119cbc93e.webp)


. This blog post covered how to make a delicious fruit salad. We looked at fresh fruits, sweeteners, and garnishes. I shared steps for preparation and mixing, plus serving tips. We explored variations for seasons and dietary needs, and discussed storage best practices. In the end, it’s simple to create a vibrant salad. Using fresh ingredients creates a tasty and healthy dish for any meal. So, gather your fruits, and enjoy making your own unique creation!](https://grilledflavors.com/wp-content/uploads/2025/05/8a41ca65-9849-4edd-a09c-41f031129534.webp)