Skip to content
grilledflavors.com
  • Home
  • Appetizers
  • Desserts
  • Salads
  • Breakfast
  • Dinner
  • Privacy Policy
  • Contact
  • About

Chef Nate

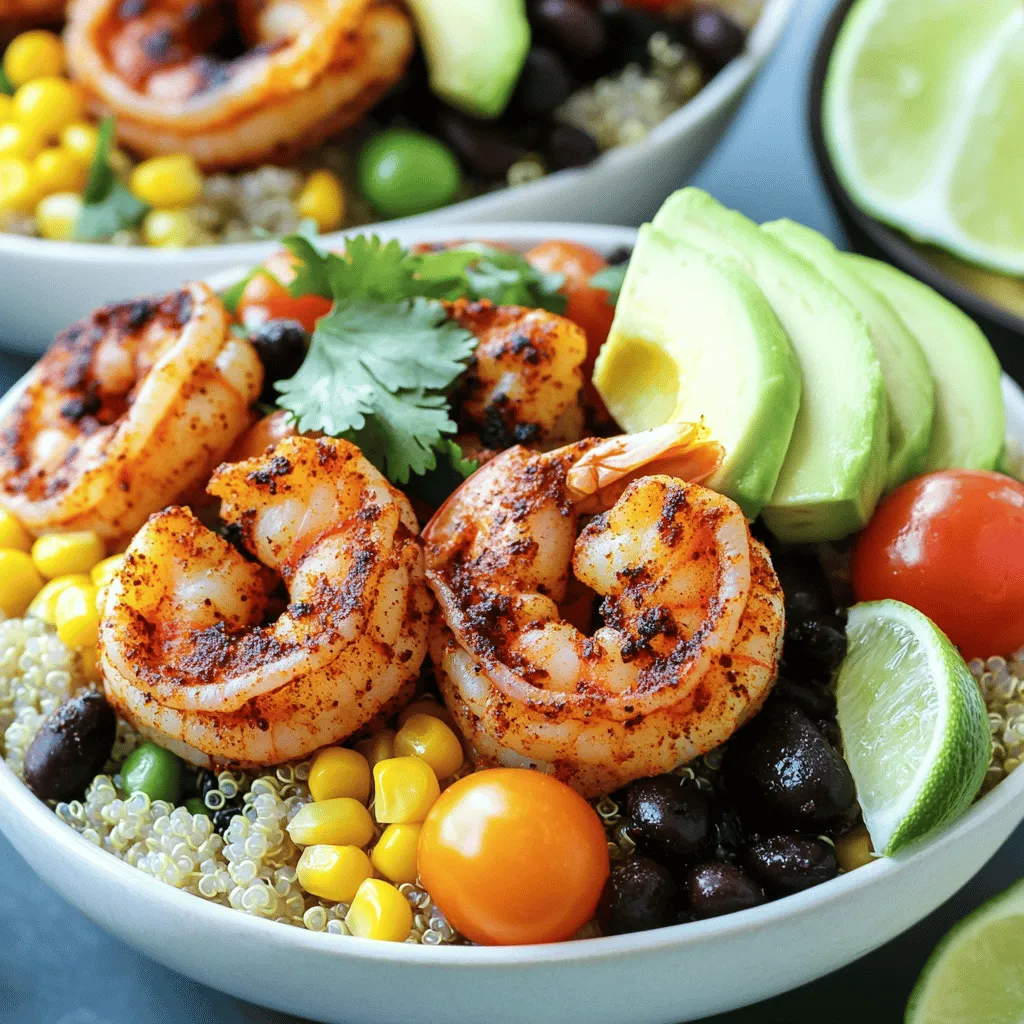
Savory Shrimp Avocado Mango Bowls Easy and Fresh Dish

May 27, 2025 by Chef Nate
- 1 lb large shrimp, peeled and deveined - 2 ripe avocados, diced - 1 ripe mango, diced - 1 cup cherry tomatoes, halved - 1 cucumber, diced - 1/4 cup red onion, finely chopped - 1/4 cup fresh cilantro, chopped - 2 tablespoons olive oil - Juice of 2 limes - 1 teaspoon honey - Salt and pepper to taste - 1 cup cooked quinoa or rice (optional, for a heartier bowl) This dish is packed with nutrients. Shrimp offers protein, while avocados provide healthy fats. Mango adds sweetness and vitamins, and vegetables boost fiber. Each serving has a good balance of calories, fats, and carbs. If you use quinoa, you gain more protein and fiber. A bowl with shrimp and veggies can satisfy your hunger and keep you energized. For the full recipe, check out the Shrimp Avocado Mango Bowls 🥑. Start with fresh shrimp. Take 1 pound of large shrimp, peeled and deveined. Place shrimp in a medium bowl. Add 1 tablespoon of olive oil, juice from 2 limes, salt, and pepper. Toss well to coat. Let the shrimp marinate for about 15 minutes. This step adds great flavor. Heat a skillet over medium-high heat. Once hot, add the marinated shrimp. Cook for 2-3 minutes on each side. The shrimp should turn pink and opaque. This means they are cooked through. When done, remove from heat and let them cool slightly. In a large bowl, combine the diced avocados, ripe mango, halved cherry tomatoes, diced cucumber, finely chopped red onion, and fresh cilantro. Drizzle with 1 tablespoon of olive oil, lime juice, and 1 teaspoon of honey. Toss gently. Be careful not to mash the avocados. If you want a heartier bowl, start with 1 cup of cooked quinoa or rice at the bottom. Then, add the avocado-mango mixture on top. Finally, place the cooked shrimp over everything. This creates a colorful and tasty dish. Check out the Full Recipe for more details! When you pick avocados, look for a darker skin color. Gently press the fruit. It should feel soft but not mushy. If it yields too much, it may be overripe. For mangoes, check the color based on the variety. Most ripe mangoes are yellow or orange, with a slight give when pressed. A sweet smell at the stem end is a good sign too. Always choose fresh shrimp for the best flavor. Rinse the shrimp and pat them dry. Marinate them for about 15 minutes with olive oil, lime juice, salt, and pepper. Heat the skillet well before adding shrimp. Cook them for 2-3 minutes on each side. They should turn pink and opaque. Avoid overcooking, as it can make shrimp tough. To make your bowl look great, use a deep dish. Start with quinoa or rice at the bottom. Add the colorful avocado and mango mix on top. Finally, place the shrimp neatly. Garnish with fresh cilantro and a lime wedge. This not only adds color but also enhances the flavor. Your Shrimp Avocado Mango Bowls will look amazing and taste even better. For the full recipe, check out the detailed instructions. {{image_2}} You can make this dish fit many diets. If you need it gluten-free, skip the quinoa or rice. Use a grain like quinoa or rice if you want it heartier. If you're vegan, replace shrimp with grilled tofu or chickpeas. For a low-carb option, try zucchini noodles instead of rice. Always check for allergens, especially with seafood. Want to add more flavor? Try mixing in some diced jalapeños for heat. You can also add mango salsa for a sweet twist. A splash of coconut milk can give it a creamy texture. Try using fresh herbs like basil or mint for a unique taste. A sprinkle of chili flakes can add a nice kick. Serve this bowl as a wrap! Use whole wheat tortillas to wrap the mixture for a fun twist. You can also turn it into a salad by adding more greens like spinach or arugula. Another idea is to serve it in hollowed-out bell peppers for a colorful look. The options are endless! For the full recipe, check out the detailed instructions above. To store leftovers, let the shrimp avocado mango bowls cool to room temperature. Place them in an airtight container. Keep the bowls in the fridge for up to two days. If you stored quinoa or rice separately, they can last three to four days. Freezing this dish works best without the avocados. They do not freeze well and can turn brown. You can freeze the shrimp and mango mixture. Use a freezer-safe container or bag, and keep it for up to three months. Thaw in the fridge overnight before using. Reheat the shrimp and mango mixture on the stove over low heat. Stir gently until warmed through. You can also use a microwave. Heat in 30-second intervals, stirring in between. Avoid reheating avocados. Instead, add fresh avocado slices right before serving. If you can't find shrimp, there are great alternatives. You can use chicken, tofu, or even tempeh. These options work well in the same dish. Each alternative brings its own flavor and texture. I love using grilled chicken for a heartier bowl. Yes, you can prepare parts of this recipe ahead of time. You can chop the veggies and mix the dressing early. Just store them in separate containers. Cook the shrimp fresh for the best taste. This way, your meal stays vibrant and fresh. To add some heat, try adding jalapeños or a dash of hot sauce. You can also sprinkle some chili powder or paprika for flavor. Fresh herbs like basil or mint can bring a new twist. Experiment with spices to find your favorite combination. This dish pairs well with a light salad or crunchy tortilla chips. You could also serve it with a refreshing cucumber salad. A simple fruit salad can complement the flavors, too. Choose sides that keep the meal light and fresh. For the full recipe, check out the [Full Recipe] section above! This blog post covered how to create delicious Shrimp Avocado Mango Bowls. We explored key fresh ingredients, pantry items, and their nutrition. You learned step-by-step instructions for preparing and cooking shrimp, mixing bowl ingredients, and assembling the dish. Helpful tips guided you in choosing ripe fruits and presenting your meal. Variations offered substitutes and flavor boosts for different diets. Finally, I shared storage and reheating tips to keep your meal fresh. Enjoy making this tasty dish, and feel free to customize it to your taste!

Looking for a light and tasty dish? Let me introduce you to savory Shrimp Avocado Mango Bowls. They’re fresh, easy to make, and packed with flavor. With just a few …

Read more

Categories Salads

Cheesy Penne with Garlic Butter Beef Savory Delight

May 27, 2025 by Chef Nate
- 12 oz penne pasta - 1 lb ground beef - 4 tablespoons unsalted butter - 4 cloves garlic, minced - 1 teaspoon red pepper flakes (optional) - 1 cup heavy cream - 1 ½ cups shredded mozzarella cheese - ½ cup grated Parmesan cheese - Salt and pepper to taste - ½ cup fresh parsley, chopped (for garnish) For this cheesy penne with garlic butter beef, you need fresh ingredients. Start with penne pasta, which cooks perfectly and holds sauce well. Ground beef gives the dish a hearty base. Use unsalted butter for a rich flavor, and don't forget the garlic—it adds a wonderful aroma and taste. The heavy cream makes the sauce creamy, while mozzarella and Parmesan add that cheesy goodness. Season with salt and pepper to enhance all the flavors. Finally, fresh parsley not only adds color but also a nice fresh taste. This dish is easy to make and comes together quickly. I recommend gathering all your ingredients before you start cooking. This makes the process smooth and fun. For the full recipe, check out the detailed instructions. Enjoy your cooking! - Bringing Water to a Boil: Start by filling a large pot with water. Place it over high heat. Wait until it bubbles fiercely. - Cooking Time and Water Salting: Once boiling, add a generous pinch of salt. This helps flavor the pasta. Add 12 oz of penne to the water and cook for about 10-12 minutes. You want it al dente, or firm to the bite. - Draining and Setting Aside: After cooking, carefully drain the pasta in a colander. Set the penne aside while you prepare the beef. - Cooking Method and Duration: In a large skillet, heat it over medium heat. Add 1 lb of ground beef to the pan. Stir it often for about 6-8 minutes. You want it browned and cooked through. - Draining Excess Fat: Once browned, carefully drain any excess fat. This keeps your dish from being greasy and heavy. - Reducing Heat and Adding Ingredients: Lower the heat to a gentle simmer. Add 4 tablespoons of unsalted butter to the skillet with the beef. - Cooking Garlic and Red Pepper Flakes: Once the butter melts, stir in 4 cloves of minced garlic and 1 teaspoon of red pepper flakes (if you like heat). Cook for 2-3 minutes until the garlic smells amazing. - Thickening the Sauce: Pour in 1 cup of heavy cream. Stir it well to blend with the beef and garlic. Let it simmer for 3-4 minutes to thicken a bit. - Mixing in Cheeses and Seasoning: Gradually add 1 ½ cups of shredded mozzarella and ½ cup of grated Parmesan cheese. Stir until melted and creamy. Season with salt and pepper to taste. - Adding Penne to Sauce: Now, it’s time to add the cooked penne to the skillet. - Tossing and Coating: Gently toss the pasta in the sauce. Make sure every piece is coated in that cheesy goodness. - Presentation Tips: Serve the cheesy penne in individual bowls. For a special touch, sprinkle extra cheese and fresh parsley on top. - Optional Side Suggestions: For a great side, consider garlic bread. It pairs perfectly with the creamy sauce and adds a nice crunch. For the full recipe, check below to get all the details! - Choosing the Best Ground Beef: Always select ground beef with some fat. A blend of 80/20 (meat to fat) gives flavor and juiciness. This ratio helps keep the beef moist while cooking. - Seasoning Recommendations: Season the beef with salt and pepper right after it browns. This adds flavor and enhances the beef's taste. For extra kick, add garlic powder or onion powder. - Tips for Cream Consistency: Use heavy cream for a rich sauce. If it's too thick, just add a splash of pasta water. This helps balance the sauce without losing flavor. - Cheese Selection for Optimal Flavor: Mix mozzarella and Parmesan for the best taste. Mozzarella melts well, while Parmesan adds depth. Try to use freshly grated cheese for a smoother texture. - Prepping Ingredients in Advance: Chop garlic and measure out cheese ahead of time. This cuts down cooking time and keeps you organized. - Cooking Efficiently: Cook the pasta and beef at the same time. While the pasta boils, brown the beef. This saves time and helps everything come together quickly. For the full recipe, check out the delicious Cheesy Penne with Garlic Butter Beef. {{image_2}} You can easily switch the protein in this dish. Ground turkey or chicken works well. Both options keep it light yet tasty. If you want a vegetarian dish, try using tofu or a mix of veggies. Tofu absorbs flavors well and adds a nice texture. You can sauté bell peppers, zucchini, or mushrooms. This change makes the dish colorful and packed with nutrients. Feel free to get creative with the sauce. Adding different cheeses can change the whole flavor. You can use cheddar for a sharper taste or gouda for a smoky twist. Incorporating herbs and spices can also elevate your dish. Basil, oregano, or even a pinch of thyme can add depth. A splash of lemon juice can brighten the flavors, too. If you need a gluten-free option, try gluten-free pasta. It cooks similarly and absorbs the sauce well. You can also explore other pasta shapes for different textures. Fusilli or rigatoni can add fun to your plate. Each shape holds sauce differently, giving you a new experience with every bite. For the full recipe, check out the details above and get cooking! After enjoying your Cheesy Penne with Garlic Butter Beef, store any leftovers in the fridge. Use an airtight container to keep the dish fresh. It’s best to store it within two hours of cooking. The dish will stay good in the fridge for about three to four days. If you want to save it longer, freezing is a great option. For freezing, allow the dish to cool completely. Then, transfer it to a freezer-safe container. You can freeze it for up to three months. Just remember to label the container with the date, so you know when you made it. When it’s time to enjoy your leftovers, I recommend reheating on the stove. Place the penne in a skillet over medium heat. Add a splash of milk or cream to help keep it moist. Stir periodically until heated through, which should take about five to seven minutes. You can also use the microwave if you're short on time. Place the penne in a microwave-safe dish. Cover it with a damp paper towel to trap moisture. Heat in 30-second intervals, stirring in between, until hot. This method will help avoid a dry texture. How long will the Cheesy Penne with Garlic Butter Beef last? In the fridge, it can last three to four days. If you freeze it, it can stay good for up to three months. To tell if the dish has gone bad, check for any off smells or changes in color. If the cheese looks separated or the sauce has separated, it’s best to discard it. Always trust your senses when it comes to food safety! You can prepare the dish in advance and store it. First, cook the penne and beef as directed. Let them cool before storing. Use airtight containers to keep them fresh. You can refrigerate for up to three days. When ready to eat, reheat on the stove over low heat. Add a splash of cream if it looks dry. This keeps the dish creamy and tasty. Yes, you can use alternatives to heavy cream. Options include half-and-half or whole milk. You can also use plant-based milk, like almond or cashew, for a lighter version. Just note that these swaps may change the creaminess of the sauce. If you use milk, add a bit of flour to thicken it. This will help maintain that rich texture you love. This dish pairs well with many sides. A simple green salad adds freshness. Garlic bread complements the meal nicely. Steamed vegetables also work well, adding color and nutrients. If you want more flavor, serve with a side of roasted broccoli or zucchini. These sides balance the richness of the penne and beef. Yes, this recipe is great for kids! It’s cheesy and flavorful without being too spicy. To make it even kid-friendlier, you can reduce the red pepper flakes. You can also add some diced veggies like bell peppers or peas for extra color. Kids love the creamy texture and cheesy taste. It’s a meal they will enjoy! In this post, you learned how to make Cheesy Penne with Garlic Butter Beef. We covered every step, from cooking the pasta to making your sauce creamy. I shared tips on ingredient choices and smart storage methods. Remember, you can make this dish your own with different proteins or pasta types. Don't forget, leftovers can last and be reheated well. Enjoy your cooking, and impress your family with this tasty meal!

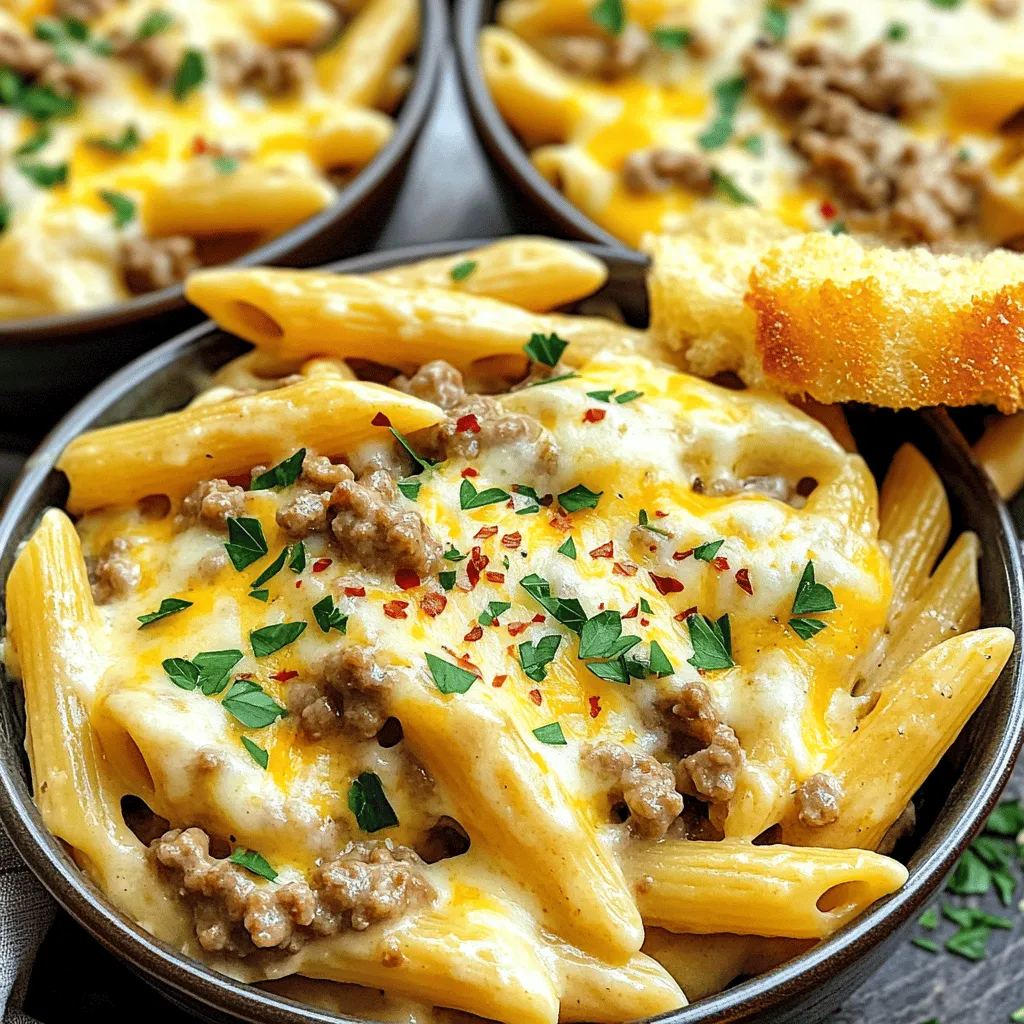
Craving a hearty meal that’s both rich and easy to make? Look no further! My Cheesy Penne with Garlic Butter Beef is the ultimate comfort food. With tender penne pasta, …

Read more

Categories Dinner

Grilled Cheese Burrito Simple and Flavorful Recipe

May 27, 2025 by Chef Nate
- 4 large flour tortillas - 1 cup shredded cheddar cheese - 1 cup shredded mozzarella cheese - 1 cup cooked grilled chicken, shredded (optional) - ½ cup black beans, rinsed and drained - 1 small avocado, sliced - 1 medium tomato, diced - ¼ cup fresh cilantro, chopped - 1 teaspoon garlic powder - 1 teaspoon onion powder - Salt and pepper to taste To make a great grilled cheese burrito, you need some key ingredients. Start with flour tortillas; they are soft and easy to roll. Then, you will want a mix of cheeses. I love using cheddar and mozzarella for their meltiness and flavor. Next, add some protein if you like. Grilled chicken works well, but you can skip it for a lighter burrito. For fillings, black beans add a nice texture and flavor. Sliced avocado adds creaminess, and fresh tomato and cilantro give a burst of freshness. Don’t forget the seasonings! Garlic powder and onion powder boost the taste. A little salt and pepper help tie all the flavors together. Now you have everything you need to create a tasty grilled cheese burrito! For the full recipe, check the details above. 1. First, grab a large bowl. Combine the shredded cheddar and mozzarella cheeses. Add garlic powder, onion powder, salt, and pepper. Mix until combined. 2. Now, take a flour tortilla and lay it flat. Spoon about ¼ of the cheese mixture into the center. Spread it out gently. 3. Next, add a few slices of avocado, a couple of spoonfuls of black beans, and shredded chicken if you want. Top this with diced tomatoes and cilantro. 4. Fold in the sides of the tortilla and roll it tightly. Repeat for the rest of the tortillas. 1. Heat a large skillet over medium heat. Add 1 tablespoon of butter and let it melt. 2. Place two burritos seam-side down in the skillet. Cook for about 3-4 minutes on each side. Look for golden brown and crispy tortillas. Check if the cheese is melted. 3. Remove the cooked burritos and repeat with the others, adding more butter as needed. 1. Slice the burritos in half for a nice presentation. Serve warm on a plate. 2. For extra flavor, add salsa and sour cream on the side. These make great accompaniments. To get crispy tortillas, heat your skillet well. Use medium heat and add butter. Let it melt before adding the burritos. Cook each side for about 3-4 minutes. Flip only when the bottom is golden brown. The best cooking temperature is medium. If it’s too high, the outside will burn. If it’s too low, the cheese won’t melt. You want that perfect golden color. You can make the burritos ahead of time. Just prepare the fillings and roll them up. Wrap them in foil or plastic wrap. Store them in the fridge for up to two days. For leftover fillings, store them in an airtight container. They will stay fresh for a few days. You can use them in salads or other dishes too. Serve the burritos warm. They taste best when the cheese is melty and the tortillas are crispy. For drinks, I suggest pairing with a cold soda or iced tea. A light beer is also a great choice. If you want something sweet, try a fruit smoothie. For the full recipe, check out the earlier section. {{image_2}} You can easily change the cheese in your grilled cheese burrito. Try using gouda for a smoky flavor or pepper jack for extra spice. These swaps keep your burrito fun and fresh. For a vegetarian option, swap out the chicken for more beans or some sautéed veggies. You can use mushrooms, bell peppers, or zucchini. If you want a vegan burrito, choose vegan cheese and skip the chicken. Your taste buds will still enjoy a creamy, delicious meal. Want to spice things up? Add jalapeños for heat. You can slice them and place them inside the burrito. If you love hot sauce, drizzle some inside before rolling it up. Looking for something sweet? Try adding mango or pineapple chunks. The fruit adds a nice burst of flavor that contrasts well with the cheese. This twist will surprise your friends and family. There are a few ways to cook your burrito. Grilling gives a nice crispy texture. You can use a skillet for a golden-brown finish. Just remember to use enough butter to get the right crunch. If you have an air fryer, it’s a great option too! Cook the burritos at 375°F for about 10 minutes. This method makes them crisp without using too much oil. For the Full Recipe, check out the details above! To store leftover grilled cheese burritos, let them cool first. Place them in an airtight container. You can keep them in the fridge for up to three days. If you want to store them for longer, wrap each burrito in foil or plastic wrap, then put them in a freezer bag. This way, they can last in the freezer for up to three months. To reheat, the best method is using a skillet. Heat it over medium heat, then add the burrito. Cook for about 3-4 minutes on each side. This keeps the tortilla crispy. If you're in a hurry, you can use the microwave. However, be careful to avoid soggy tortillas. You can place a paper towel under the burrito while heating to absorb extra moisture. In the fridge, grilled cheese burritos stay fresh for about three days. If frozen, they can last around three months. For the best taste and texture, eat them within this time frame. Enjoying them fresh will give you the best experience! A grilled cheese burrito is a tasty blend of two favorites: grilled cheese and burritos. You wrap melted cheese and fillings in a tortilla. It’s simple but very flavorful! This dish brings comfort food to a new level. You can find it in many places, but making it at home is fun and easy. You control the flavors and ingredients, making it perfect for everyone. Yes, you can easily make it vegetarian! Just skip the chicken and add more veggies. Try using mushrooms, bell peppers, or zucchini. You can also add extra beans for protein. This way, you keep it filling and delicious without meat. You can still enjoy the melty cheese that makes this dish special. Grilled cheese burritos pair well with many sides. Here are some great ideas: - Salsa: Fresh or jarred, it adds a nice kick. - Sour cream: Creamy and cool, it balances the heat. - Guacamole: Smooth and rich, perfect with cheesy flavors. - Salad: A fresh side salad can add crunch and color. - Rice: Flavored rice can make a hearty meal. Feel free to mix and match to find your favorite combo! For the best grilled cheese burrito, use melty cheeses. Here are my top picks: - Cheddar: Sharp and creamy, a classic choice. - Mozzarella: Stretchy and mild, it melts beautifully. - Monterey Jack: Smooth and buttery, adds richness. Mixing these cheeses gives the best flavor and texture. You can even try pepper jack for some heat! For the full recipe, check the [Full Recipe]. This blog post covered how to make the perfect Grilled Cheese Burrito. We discussed key ingredients, like tortillas, cheese, and tasty fillings. I shared steps to prepare and cook your burritos, plus helpful tips for serving. You can mix things up with ingredient swaps and cooking methods. Remember to store leftovers correctly for later enjoyment. Overall, this dish is fun and tasty to make. Grab your ingredients, and start creating your own delicious burrito feast!

Are you ready to take your taste buds on a wild ride? Grab your skillet because we’re making a Grilled Cheese Burrito! This fun twist combines gooey cheese, fresh veggies, …

Read more

Categories Dinner

Savory The Pizza Burger Pie Easy Recipe Guide

May 27, 2025 by Chef Nate
To make The Pizza Burger Pie, you need some key ingredients. These build the tasty layers and flavors. Here’s what you need: - 1 lb ground beef - 1 lb Italian sausage, casings removed - 1 cup pizza sauce - 2 cups shredded mozzarella cheese - 1/2 cup grated Parmesan cheese - 1 small onion, finely chopped - 1 bell pepper, diced - 1 teaspoon garlic powder - 1 teaspoon Italian seasoning - 1 pound pizza dough (store-bought or homemade) - Olive oil for drizzling - Salt and pepper to taste These ingredients create a hearty and flavorful pie. The ground beef and sausage give it a meaty base, while the cheeses add creaminess. Don’t forget the pizza sauce for that classic taste! You can customize The Pizza Burger Pie with some extra touches. Here are some great options: - Fresh basil leaves for garnish (optional) - Extra pizza sauce for dipping - Sliced olives or jalapeños for spice - Sliced mushrooms for an earthy flavor Feel free to mix and match these garnishes to suit your taste. They add color and extra flavor to your dish! To make this pie, you’ll need a few key tools. Here’s what you should gather: - A large skillet for cooking the meat - A 9-inch pie dish or deep oven-safe skillet - A rolling pin for the dough - A cutting board and knife for chopping Having these tools ready will make your cooking process smooth and quick. Plus, it helps you create a perfect Pizza Burger Pie every time! For the complete recipe, check the [Full Recipe]. Start by heating a large skillet over medium heat. Add 1 pound of ground beef and 1 pound of Italian sausage. Cook until both meats are browned. Use a spatula to break them apart as they cook. Once cooked, pour off any extra fat. Next, add 1 small onion, finely chopped, and 1 diced bell pepper to the skillet. Season with 1 teaspoon of garlic powder and 1 teaspoon of Italian seasoning. Sprinkle salt and pepper to taste. Cook this mixture for about 5 minutes until the veggies soften. This step adds great flavor to the meat. Now, stir in 1 cup of pizza sauce. Mix it well with the meat and veggies. Once combined, take the skillet off the heat. Your meat mixture is now ready! Roll out 1 pound of pizza dough on a floured surface. You want it to be big enough to fit a 9-inch pie dish. Place half of the dough into the pie dish, pressing it into the bottom and up the sides. Now, add half of the 2 cups of shredded mozzarella cheese on top of the dough. Spoon the meat mixture over this layer. Then, sprinkle 1/2 cup of grated Parmesan cheese on top. Finish with the remaining mozzarella cheese. Cover the filling with the rest of the pizza dough. Make sure to seal the edges well. Use a knife to cut a few slits in the top. This helps steam escape while baking. Preheat your oven to 400°F (200°C). Drizzle a bit of olive oil over the top crust. A pinch of salt adds flavor. Bake your pizza burger pie for 25-30 minutes. It should turn golden brown, and the cheese will be bubbly. Once done, let it cool for about 10 minutes. This makes it easier to slice. Serve warm, and don’t forget to check out the [Full Recipe] for more details! To make the best dough, start with the right ingredients. Use high-quality flour. A mix of all-purpose and bread flour gives great texture. Knead the dough for about 10 minutes. This builds gluten and makes the dough strong. Let it rise in a warm place until it doubles in size. This usually takes one hour. For a golden crust, brush the top with olive oil before baking. It adds flavor and color. Layer flavors for the best taste. Cook the meat mixture until it’s browned, not just cooked. This adds depth. Use fresh vegetables like onion and bell pepper. They add sweetness and crunch. Add garlic powder and Italian seasoning for that classic pizza flavor. Mix everything well with pizza sauce. Taste and adjust seasoning as needed. More salt or pepper can make a big difference. Serve your Pizza Burger Pie warm for the best experience. Cut it into wedges for easy sharing. Garnish with fresh basil leaves for color and aroma. A side of extra pizza sauce makes a great dip. You can also pair it with a fresh green salad. This adds a nice crunch and balances the meal. For a fun twist, serve it with garlic bread or cheesy breadsticks. Enjoy this tasty pie with friends and family! {{image_2}} You can easily make a vegetarian version of The Pizza Burger Pie. Simply swap out the meat for some hearty vegetables. I love using mushrooms, zucchini, and spinach. These ingredients add great taste and texture. You can also use plant-based sausage or ground meat alternatives. This keeps the same flavor profile while being meat-free. Add some extra cheese to enhance the richness. The Pizza Burger Pie is versatile when it comes to meat. You can mix and match different meats for unique flavors. Try using ground turkey or chicken for a lighter option. You can even add pepperoni or diced ham for a fun twist. Mixing beef with Italian sausage creates a rich, savory taste that everyone loves. Just remember to balance the flavors, so one meat does not overpower the others. Cheese is key to making The Pizza Burger Pie taste amazing. While mozzarella is a classic choice, you can experiment with other cheeses too. Try using provolone for a sharp kick, or gouda for a smoky flavor. Mixing in some feta or goat cheese can add a creamy, tangy touch. The right cheese can elevate your dish and make it even more special. Don’t be afraid to get creative with your cheese choices! To store leftover pizza burger pie, first let it cool. Once cool, slice it into pieces. Place the slices in an airtight container. You can keep it in the fridge for up to three days. If you want it to last longer, consider freezing it instead. When you're ready to eat leftovers, the oven works best for reheating. Preheat the oven to 350°F (175°C). Place the slices on a baking sheet. Cover them with foil to keep them moist. Heat for about 15-20 minutes until warm. If you want a crispier crust, remove the foil in the last few minutes. You can also use a microwave, but the crust might not be as crispy. If you want to freeze the pizza burger pie, wrap the whole pie or slices tightly in plastic wrap. Then, place it in a freezer-safe bag or container. It can last up to three months in the freezer. When you want to eat it, thaw it in the fridge overnight. Reheat as mentioned above. This method keeps the flavors fresh and delicious. The Pizza Burger Pie is a fun dish that combines pizza and burgers. It has layers of meat, cheese, and pizza sauce. This dish uses pizza dough to hold everything together. You bake it until golden and bubbly. The mix of flavors makes it a big hit at any meal. Yes, you can prepare the Pizza Burger Pie ahead of time. After assembling it, wrap it tightly and store it in the fridge. You can bake it later when you're ready to eat. This makes it a great option for busy days or gatherings. Just remember, it may need a few extra minutes in the oven if it's cold. The Pizza Burger Pie pairs well with several side dishes. Here are some great options: - A simple green salad with vinaigrette - Garlic bread for extra flavor - Oven-roasted vegetables for a healthy touch - Potato wedges or fries for a crispy side These sides balance the richness of the pie and add freshness to your meal. The Pizza Burger Pie combines two favorites: pizza and burgers. You learned about key ingredients, optional toppings, and the tools you need. The step-by-step guide made preparation easy, and the tips helped you perfect the crust and flavor. You can even explore vegetarian options and unique cheeses. In the end, this dish is fun and flexible. Enjoy experimenting with different flavors and share your tasty creations!

If you’re ready to spice up your dinner routine, The Pizza Burger Pie is your answer! This dish combines the juicy goodness of a burger with the cheesy delight of …

Read more

Categories Dinner

Blackened Shrimp Bowls Flavorful and Easy Delight

May 27, 2025 by Chef Nate
- 1 pound large shrimp, peeled and deveined - 2 tablespoons olive oil - 1 tablespoon smoked paprika - 1 teaspoon garlic powder - 1 teaspoon onion powder - 1/2 teaspoon cayenne pepper (adjust to taste) - 1/2 teaspoon ground black pepper - 1 teaspoon salt The heart of this dish is the shrimp. I love using large shrimp. They are juicy and tender. The olive oil helps the seasoning stick. The blackened seasoning gives each shrimp a bold flavor. You can adjust the cayenne for heat. I often keep it mild for kids. - 1 cup cooked quinoa - 1 cup black beans, drained and rinsed - 1 cup corn kernels (canned or frozen) The base of your bowl is key. Quinoa is a great choice because it is fluffy and filling. Black beans add protein and fiber. Corn brings sweetness and crunch. This trio makes a balanced meal. - 1 avocado, sliced - 1 cup cherry tomatoes, halved - Fresh cilantro, for garnish - Lime wedges, for serving Toppings add freshness. I love creamy avocado and sweet cherry tomatoes. They contrast the spicy shrimp. Fresh cilantro brightens the dish. Lime wedges bring a zesty kick. You can squeeze lime over everything for extra flavor. For the full recipe, check out the detailed steps. Enjoy making these Blackened Shrimp Bowls! Start by marinating the shrimp. In a medium bowl, mix the shrimp with olive oil, smoked paprika, garlic powder, onion powder, cayenne pepper, black pepper, and salt. Ensure every shrimp is coated well. Let them sit for 15-20 minutes. This wait helps the flavors mix. Next, prepare your pan. Heat a large skillet over high heat until it is very hot. A hot pan is key for great blackening. Now, it’s time for the shrimp to hit the pan. Add the marinated shrimp in a single layer. Cook without moving them for about 2-3 minutes. They should turn blackened and opaque. After that, flip the shrimp to cook the other side. Cook for another 2-3 minutes. Once both sides are blackened and cooked through, remove the shrimp from heat. Set them aside while you prepare the bowls. To assemble your bowls, start with a base of cooked quinoa. Spoon a scoop of black beans and corn on top. Make sure to spread them evenly for a lovely look. Then, layer the blackened shrimp on top. Add sliced avocado and halved cherry tomatoes for extra flavor and color. Finally, garnish each bowl with fresh cilantro. Serve with lime wedges on the side for a bright finish. Enjoy your Blackened Shrimp Bowls! For a detailed recipe, check the Full Recipe section. To get that deep, blackened crust on your shrimp, high heat is key. When your skillet is hot, it sears the shrimp quickly. This gives you that smoky flavor and crispy texture. Heat your pan until it’s almost smoking before adding the shrimp. Marination time also matters. For the best taste, let the shrimp sit in the spice mix for 15 to 20 minutes. This helps the flavors soak in and makes each bite more delicious. If you can’t find shrimp, try using chicken or fish. Both options work well with the same seasoning. You can also use tofu if you want a plant-based choice. Tofu absorbs flavors nicely and makes a great vegan alternative. Want to kick up the flavor? Add more spices! Try cumin or chili powder for a tasty twist. You can also mix in some fresh herbs like parsley or dill for added freshness. When it comes to sauces, consider a tangy yogurt sauce or a spicy aioli. Both can add creaminess and a burst of flavor to your bowls. For a zesty finish, squeeze some fresh lime juice on top before serving. For the full recipe, check out the Blackened Shrimp Bowls. {{image_2}} You can switch the shrimp for chicken or tofu. Chicken works well with the same spices. Just cut it into bite-sized pieces. Cook it until golden brown and fully cooked. Tofu is a great vegan option. Use firm tofu, and press it to remove extra water. Then, cut it into cubes. Coat it with the seasoning and cook it until crispy. If you prefer fish, try using salmon or tilapia. Both hold up nicely when cooked hot. Salmon has a richer taste, while tilapia is mild and flaky. Just adjust cooking times based on the thickness of the fish. For the bowl base, swap quinoa for rice or lettuce. White or brown rice gives a soft texture. Lettuce wraps add a fresh crunch and are low in carbs. You can also use cauliflower rice for a lighter option. Consider different beans, too. Black beans are great, but try pinto or chickpeas. They add protein and fiber. Mixing beans can also add new flavors and textures. Using seasonal vegetables makes your bowls even better. In spring, add asparagus or peas. Summer is perfect for bell peppers and zucchini. In fall, try roasted sweet potatoes or butternut squash. In winter, use hearty greens like kale or Swiss chard. Always adjust your ingredients based on what you find at the market. This keeps your bowls fresh and exciting. Plus, you support local farmers by choosing seasonal produce. To store leftovers, place them in an airtight container. Make sure to cool the shrimp and bowl components before sealing. This helps keep everything fresh. The shelf life of the shrimp is about three days. Other ingredients, like beans and quinoa, can last about four days in the fridge. The best way to reheat your blackened shrimp is on the stovetop. Heat a non-stick pan over medium heat. Add a splash of oil and cook the shrimp until warm. You can also use the microwave, but it may make the shrimp a bit rubbery. If you choose the microwave, heat in short bursts. Check often to avoid overcooking. You can freeze cooked shrimp for later use. Place them in a single layer on a baking sheet to freeze. Once frozen, transfer to a freezer bag. This keeps them from sticking together. You can freeze other bowl components too. Just make sure to pack each item separately. Cooked quinoa and beans freeze well and can last up to three months. Blackened seasoning is a blend of spices that makes food tasty and bold. It usually has smoked paprika, garlic powder, onion powder, cayenne pepper, black pepper, and salt. Each spice adds depth and warmth to the dish. This technique started in Louisiana, thanks to Chef Paul Prudhomme. He used high heat to create a charred crust. This crust locks in the flavors and gives a smoky taste. Yes, you can make Blackened Shrimp Bowls ahead of time. For meal prep, cook the shrimp and store it in the fridge. You can also prepare the quinoa, beans, and corn in advance. Keep each component in separate containers to maintain freshness. Pre-made bowls can last in the fridge for up to three days. Just add fresh toppings like avocado and tomatoes right before serving. You can serve various side dishes with Blackened Shrimp Bowls. A fresh green salad pairs well. You can also try coleslaw for a crunchy bite. For drinks, a cold beer or a refreshing lemonade works great. If you want something lighter, serve with iced tea or sparkling water. The spice level of blackened shrimp can vary. The cayenne pepper adds heat, but you control it. If you prefer less heat, reduce the cayenne. You can also use smoked paprika for flavor without extra spice. Adjusting the seasoning to your taste makes the dish enjoyable for everyone. We explored how to make delicious Blackened Shrimp Bowls. I covered key ingredients like shrimp, quinoa, and fresh toppings. You learned how to prepare and cook shrimp for maximum flavor. Remember to use high heat for that perfect blackened texture. Consider variations with different proteins and bowls. Don't forget about storage tips for leftovers and meal prep options. With these details, you can create a meal that's tasty and fun. Enjoy making this dish your own!

Want to impress your family with a tasty meal? These Blackened Shrimp Bowls are simple and full of flavor! I’ll guide you through marinating large shrimp, cooking them to perfection, …

Read more

Categories Dinner

Easy Cinnamon Roll Coffee Cake Perfect for Breakfast

May 27, 2025 by Chef Nate
To make this Easy Cinnamon Roll Coffee Cake, gather these ingredients: - 2 cups all-purpose flour - 1 cup granulated sugar - 1 tablespoon baking powder - ½ teaspoon salt - ½ cup unsalted butter, melted - 1 cup milk - 2 large eggs - 1 teaspoon vanilla extract - 1 tablespoon ground cinnamon - ½ cup brown sugar, packed - ½ cup chopped pecans (optional) - 1 cup powdered sugar (for glaze) - 2 tablespoons milk (for glaze) You can make simple swaps if needed. For a gluten-free version, use a gluten-free flour blend. If you need a dairy-free cake, try almond or oat milk instead of regular milk. You can also replace eggs with a flaxseed mixture (1 tablespoon flaxseed meal + 2.5 tablespoons water = 1 egg). For the butter, coconut oil works well too, giving a different flavor. Just melt it as you would the butter. If you prefer less sugar, reduce the granulated sugar or brown sugar, but keep in mind this may alter the texture slightly. To add some fun, consider these options: - Chopped pecans: They add a nice crunch and flavor. - Chopped apples: Mix in about 1 cup of diced apples for a fruity twist. - Chocolate chips: A half-cup of chocolate chips can make it extra sweet. - Raisins or cranberries: These dried fruits add a burst of sweetness. Feel free to mix and match! Each addition brings its own charm to the cake. For the full recipe, check out the detailed instructions above. To make this easy cinnamon roll coffee cake, you need a few tools. Grab a large mixing bowl, a whisk, a 9x13-inch baking pan, and measuring cups. First, preheat your oven to 350°F (175°C). While the oven heats up, grease your baking pan. This helps the cake come out easily after baking. Now, let's mix the ingredients. In a large bowl, whisk together these dry ingredients: - 2 cups all-purpose flour - 1 cup granulated sugar - 1 tablespoon baking powder - ½ teaspoon salt Make sure they blend well. In another bowl, mix the wet ingredients: - ½ cup unsalted butter, melted - 1 cup milk - 2 large eggs - 1 teaspoon vanilla extract Stir this mixture until it's smooth. Next, pour the wet mixture into the dry ingredients. Stir just until combined; avoid overmixing. It’s okay if some lumps remain. Now, let’s prepare the cinnamon filling. In a separate bowl, mix: - ½ cup brown sugar, packed - 1 tablespoon ground cinnamon This will create a sweet, spicy filling for your coffee cake. Spread half of the cake batter into your prepared pan. Then, sprinkle the cinnamon-brown sugar mixture evenly over the batter. If you like, add: - ½ cup chopped pecans (optional) Spoon the remaining batter on top. Gently spread it out to cover the filling. Use a knife or skewer to create a marbled effect. Be careful not to mix too much. Now, it’s time to bake! Place the pan in the oven and bake for 25 to 30 minutes. To check if it's done, insert a toothpick into the center. If it comes out clean, your cake is ready. While your cake bakes, mix the glaze. Combine: - 1 cup powdered sugar - 2 tablespoons milk Stir until smooth. Once the cake is done, let it cool in the pan for about 10 minutes. Drizzle the glaze over the warm cake. Allow it to cool completely before slicing. Enjoy your delicious cinnamon roll coffee cake! For the full recipe, see the main section above. To get that beautiful swirl in your Easy Cinnamon Roll Coffee Cake, use a knife or skewer. After you add the batter, gently swirl through the layers. Do this lightly to avoid mixing too much. You want a marbled look, not a blended color. Practice makes perfect, so don’t worry if it’s not perfect the first time! There are a few common mistakes you should watch for. First, don’t overmix the batter. Stir it just enough for the wet and dry parts to combine. Overmixing leads to a tough cake. Second, be careful not to skip the cooling time. If you cut it too soon, it may crumble. Lastly, remember to check for doneness with a toothpick. If it comes out clean, your cake is ready! This coffee cake pairs well with a hot drink. Try it with coffee or tea for a warm start to your day. You can also serve it with a scoop of vanilla ice cream for a sweet treat. For a twist, add fresh berries or whipped cream on top. These toppings add color and flavor, making your cake even more delightful. For a full recipe, check out the [Full Recipe]. {{image_2}} You can change this easy cinnamon roll coffee cake to fit the seasons. For fall, add pumpkin spice to the batter. Just mix in one teaspoon of pumpkin spice with the dry ingredients. You can also use pumpkin puree in place of some milk. For winter, try a chocolate twist! Add cocoa powder to the batter or sprinkle chocolate chips on top. You can mix 1/3 cup of cocoa powder into the dry mixture and adjust the sugar. If you need gluten-free options, use a gluten-free flour blend. Look for a brand that works well for baking. Replace the regular milk with almond or oat milk for a dairy-free version. You can make this cake vegan by using flax eggs. Mix one tablespoon of ground flaxseed with three tablespoons of water. Let it sit for five minutes to thicken before adding it to the wet ingredients. Serve this cake in fun ways! For a dessert style, add a scoop of ice cream on top. The warm cake with cold ice cream creates a great mix. For breakfast, pair it with fresh fruit or yogurt. You can also serve it with flavored coffee or tea for a cozy morning. Consider cutting the cake into small squares for a brunch buffet. This makes it easy for guests to grab and enjoy! Try these variations to make your easy cinnamon roll coffee cake unique. For the full recipe, check out the earlier sections of this article. To keep your cake fresh, store it in an airtight container. Make sure it cools down first. Place a piece of parchment paper between the cake and the lid to absorb moisture. This helps maintain its texture. You can keep it at room temperature for up to three days. If you want it to last longer, refrigerate it. Just remember, the fridge may dry it out a bit. If you want to save some cake for later, freezing works great. First, cut the cake into slices. Wrap each slice in plastic wrap tightly. Then, place the wrapped slices in a freezer bag. This keeps out air and prevents freezer burn. You can freeze the cake for up to three months. When you’re ready to enjoy it again, just thaw it in the fridge overnight. To reheat your cake, do it gently. Preheat your oven to 350°F (175°C). Place the cake on a baking sheet and cover it with aluminum foil. Bake for about 10-15 minutes. This warms it without making it dry. If you prefer the microwave, heat it in short bursts of 15 seconds. Check to ensure it is warm but not hot. Enjoy your Easy Cinnamon Roll Coffee Cake warm, just like fresh out of the oven! You can find the full recipe [Full Recipe]. Yes, you can prepare this cake a day ahead. Bake it, let it cool, and store it. Wrap it in plastic wrap to keep it fresh. You can also make the glaze ahead and store it in the fridge. Just drizzle it on before serving. If you want to skip eggs, use substitutes like applesauce or mashed banana. Each egg can be replaced with 1/4 cup of applesauce. You can also use a flax egg. Mix one tablespoon of flaxseed meal with three tablespoons of water. Let it sit for a few minutes until it thickens. Check if the cake is done by inserting a toothpick into the center. If it comes out clean or with a few crumbs, it’s ready. The edges should pull away from the pan slightly, and the top will look golden brown. Yes, you can double the recipe. Use a larger baking pan, like a 12x17-inch pan. Ensure to adjust the baking time. Check for doneness a few minutes earlier than the original recipe suggests. If you lack an ingredient, substitutions often work. Use yogurt or sour cream instead of milk. For flour, you can try whole wheat flour. If you don’t have butter, use coconut oil or a vegetable oil. The cake will still taste great! For the full recipe, check the recipe section above. This blog post shared all you need to know about making a fantastic coffee cake. We explored ingredients, preparation steps, and baking tips. You learned about fun variations and how to store your cake. Always remember to avoid common mistakes for the best results. With these simple guides, you can impress anyone with your baking. Now, go ahead and create something delicious! Enjoy every bite and share it with family and friends.

Start your day right with my Easy Cinnamon Roll Coffee Cake! This sweet, fluffy cake combines classic cinnamon roll flavors into a simple, delicious treat. Perfect for breakfast or brunch, …

Read more

Categories Desserts

Meat Lovers Pizza Tortellini Satisfying and Hearty Meal

May 27, 2025 by Chef Nate
- 12 oz. cheese tortellini - 1 cup cooked Italian sausage, crumbled - 1 cup pepperoni slices - 1 cup diced ham - 1 cup marinara sauce - 1 cup mozzarella cheese, shredded - 1/2 cup Parmesan cheese, grated - 1 teaspoon Italian seasoning - 1/2 teaspoon crushed red pepper flakes (optional) - Fresh basil leaves for garnish Each ingredient plays a special role in this dish. The cheese tortellini gives a soft base. It soaks up the meat and sauce flavors. The Italian sausage adds a savory kick. Pepperoni brings a smoky taste, while ham adds a touch of sweetness. Marinara sauce ties it all together with a rich tomato flavor. Mozzarella makes it creamy and gooey when melted. Parmesan adds a sharp note to balance the richness. Italian seasoning brings depth, and crushed red pepper flakes add a hint of heat. Fresh basil gives a fresh finish. You can switch up the meats based on what you like. Try bacon, ground beef, or turkey for new flavors. For add-ins, consider mushrooms or bell peppers for extra veggies. You can also top with olives or extra cheese before baking. For gluten-free options, look for gluten-free tortellini. There are many brands available now. If you need low-carb, use zucchini noodles instead of tortellini. For a vegetarian version, skip the meats and add spinach or artichokes. You can also use a meat substitute to keep the hearty flavor. To start, boil water in a large pot. Add salt to the water; it helps flavor the tortellini. Cook the cheese tortellini per the package directions, usually about 3-5 minutes. Once cooked, drain it and set it aside. For perfect texture, do not overcook the tortellini. It should be tender but still firm. Now, let’s move on to the meat. In a large skillet, heat the pan over medium heat. Add the crumbled Italian sausage. Cook it for about 5 minutes until it turns brown. This step adds great flavor. Next, toss in the pepperoni and diced ham. Stir for 2-3 minutes until they heat through. It’s time to mix it all together! Add the cooked tortellini to the skillet with the meat. Pour in the marinara sauce and sprinkle the Italian seasoning and crushed red pepper flakes. Gently toss everything together. Next, fold in half of the mozzarella and Parmesan cheese. This will create a rich, cheesy texture. Now, preheat your oven to 375°F (190°C). Transfer the tortellini mixture into a greased baking dish. Sprinkle the remaining mozzarella and Parmesan cheese evenly on top. Bake for 20-25 minutes until the cheese is bubbly and golden. Follow this detailed guide from the Full Recipe to ensure you create a delicious meal that everyone will love! To keep your Meat Lovers Pizza Tortellini from drying out, use enough sauce. Marinara keeps everything moist. If you want more flavor, add herbs like basil or oregano. They add a fresh taste. Crushed red pepper flakes give a nice kick. Don’t skip them if you love heat! For a beautiful dish, garnish with fresh basil leaves. They add color and flavor. You can also sprinkle some extra cheese on top before serving. A drizzle of olive oil brings a nice shine. Serve in a wide bowl to show off those layers of flavor. If you’re busy, use pre-cooked meats. They save time and still taste great. You can also chop veggies ahead of time. This cuts down on prep time. Cook your tortellini while the meat heats. It all comes together quickly for a satisfying meal. For the full recipe, check out the Meat Lovers Pizza Tortellini section. {{image_2}} For a fun twist, try different meats in your dish. You can use ground beef for a rich flavor. Chicken adds a lighter touch, while pancetta gives a salty kick. Mix and match to find your favorite blend. You can also explore flavors from other cuisines. How about adding some spicy chorizo for a kick? Or go Italian with prosciutto for a savory bite? Each meat brings its own taste, making your dish exciting and unique. If you want a meatless version, it’s easy to switch things up. Start by using mushrooms for a hearty base. They add umami and texture. Bell peppers and zucchini can give you that fresh crunch. You can also add plant-based sausage for that meaty flavor without the meat. Use your favorite marinara sauce and load up on cheese for richness. This way, everyone can enjoy a delicious meal! While tortellini is a great choice, there are many pasta options. You can try penne or rigatoni for a different shape and bite. If you prefer noodles, spaghetti or fettuccine works too. For gluten-free diets, look for rice or corn-based tortellini. These options will still give you a tasty and satisfying meal. No matter what pasta you choose, it will soak up all those lovely flavors. To keep your Meat Lovers Pizza Tortellini fresh, let it cool first. Place it in an airtight container. This keeps out air and moisture. Glass or plastic containers work well. Make sure the lid seals tight. You can store leftovers in the fridge for up to three days. When reheating, use a microwave or an oven. If using the microwave, heat in short bursts. Stir in between to warm evenly. For the oven, cover with foil to keep moisture. This helps avoid a dry texture. Soggy leftovers can ruin the meal. Keep an eye on it while it heats. You can also freeze this dish for later. To freeze, let it cool completely first. Scoop it into a freezer-safe container. Use a tight lid or wrap it well. It can last up to three months in the freezer. When you're ready to eat, thaw it overnight in the fridge. Reheat as mentioned before. Enjoy your tasty dish anytime! To make Meat Lovers Pizza Tortellini at home, follow these steps: 1. Cook the Tortellini: Boil salted water. Cook 12 oz. of cheese tortellini until tender. Drain and set aside. 2. Prepare the Meat Mixture: In a skillet, cook 1 cup of crumbled Italian sausage over medium heat for about 5 minutes. Add 1 cup of pepperoni slices and 1 cup of diced ham. Stir for another 2-3 minutes. 3. Combine Ingredients: Add the cooked tortellini to the skillet. Pour in 1 cup of marinara sauce. Sprinkle in 1 teaspoon of Italian seasoning and 1/2 teaspoon of crushed red pepper flakes. Toss everything gently. 4. Add Cheese: Mix in half of 1 cup of shredded mozzarella and half of 1/2 cup of grated Parmesan cheese until melted. 5. Transfer to Baking Dish: Preheat the oven to 375°F (190°C). Pour the tortellini mixture into a greased baking dish. 6. Top with Cheese: Sprinkle the remaining mozzarella and Parmesan on top. 7. Bake: Bake for 20-25 minutes until the cheese is bubbly and golden. 8. Garnish and Serve: Let cool slightly, then add fresh basil leaves on top. Enjoy your meal! For a full and detailed recipe, refer to the Full Recipe section. Yes, you can prepare Meat Lovers Pizza Tortellini ahead. Here's how: - Meal Prep: Cook the tortellini and meat mixture. Combine them, but don’t bake yet. - Storing: Place the mixture in an airtight container. Store it in the fridge for up to 2 days. - Freezing: You can freeze the unbaked dish for up to 3 months. Use a freezer-safe container. When ready to eat, thaw in the fridge overnight. Bake as directed until hot and bubbly. Here are some great sides to enjoy with your Meat Lovers Pizza Tortellini: - Garlic Bread: Easy to make and pairs well with the dish. - Caesar Salad: Adds a fresh crunch and balances the meal. - Roasted Vegetables: A healthy, colorful option that complements the flavors. - Steamed Broccoli: Simple, quick, and nutritious addition. Try these sides for a complete and satisfying meal! Meat Lovers Pizza Tortellini is rich, tasty, and easy to make. You learned about the key ingredients and how they work together. We explored optional ingredients for different preferences and dietary needs. I shared step-by-step instructions for cooking and assembling the dish. You also found tips on presentation, storage, and variations for everyone. Now, you're ready to create your own delicious version. Enjoy experimenting with flavors and making this comforting meal your own.

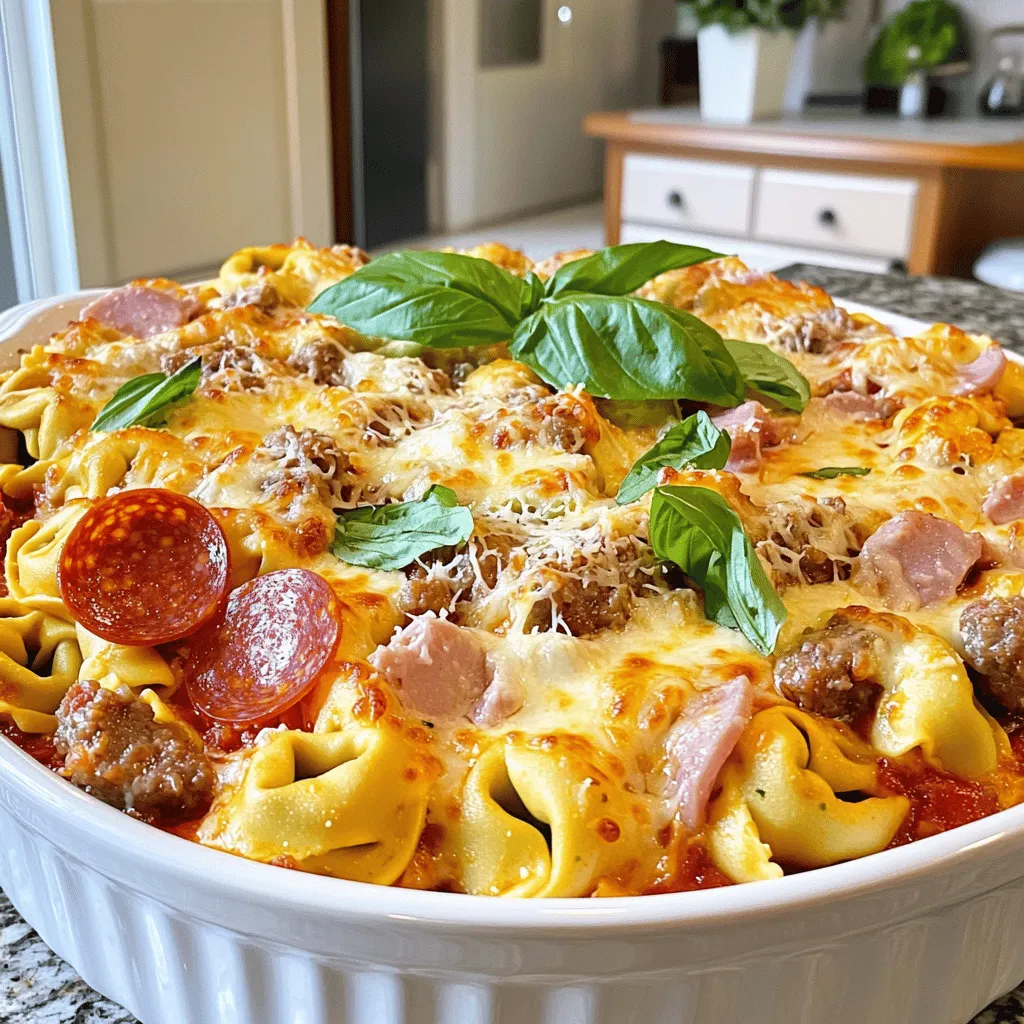
If you crave a meal that packs a hearty punch, Meat Lovers Pizza Tortellini is your answer. This dish combines rich flavors and textures, perfect for satisfying your hunger. You’ll …

Read more

Categories Dinner

Mediterranean Pasta Flavorful and Easy Recipe Guide

May 27, 2025 by Chef Nate
To make Mediterranean pasta, you need key ingredients for great taste. Here is the list: - 300g spaghetti or penne pasta - 2 tablespoons olive oil - 3 cloves garlic, minced - 1 medium red bell pepper, diced - 1 medium zucchini, diced - 1 cup cherry tomatoes, halved - 1 can (15oz) chickpeas, drained and rinsed - 1 teaspoon dried oregano - 1 teaspoon dried basil - Salt and pepper to taste - 1 cup feta cheese, crumbled - Fresh parsley, chopped (for garnish) - Juice of 1 lemon These ingredients make a bright and tasty dish. You can add other ingredients to give your Mediterranean pasta more flavor. Consider these options: - Fresh spinach for added nutrients - Kalamata olives for a briny kick - Sun-dried tomatoes for a richer taste - Capers for a zesty touch - Pine nuts for a crunchy texture Feel free to mix and match these extras to suit your taste. Picking fresh produce is important for the best flavor. Here are some tips to help you: - Choose firm tomatoes with vibrant color. - Look for zucchinis that are small and shiny. - Select bell peppers that are heavy for their size. - Always smell the produce; fresh items have a strong scent. - Buy seasonal vegetables for better taste and price. Using fresh ingredients will elevate your Mediterranean pasta to the next level. For the complete recipe, refer to the Full Recipe section. To make Mediterranean pasta, follow these steps closely. First, cook your pasta. Boil water in a large pot and add salt. Cook the pasta until it is al dente, which usually takes about 8-10 minutes. Drain the pasta, but remember to save ½ cup of the water. Next, heat 2 tablespoons of olive oil in a large skillet over medium heat. Add 3 cloves of minced garlic and cook for 1-2 minutes until it smells nice. Then, add 1 medium diced red bell pepper and 1 medium diced zucchini to the skillet. Stir them for 5-7 minutes until they are soft. Now, it is time to add 1 cup of halved cherry tomatoes and a can of drained chickpeas. Cook this mixture for another 3-4 minutes. You want the tomatoes to soften and give up their juice. After that, sprinkle in 1 teaspoon of dried oregano, 1 teaspoon of dried basil, and salt and pepper to taste. Mix everything together well. Then, add the cooked pasta to the skillet. Pour in the reserved pasta water and juice from 1 lemon. Toss everything gently so that the pasta gets coated with the veggie mix. Finally, fold in 1 cup of crumbled feta cheese. Let it melt a bit into the warm pasta, and then remove it from the heat. Garnish with fresh chopped parsley before serving. One common mistake is overcooking the pasta. Always check the package for timing and taste it before draining. Another mistake is not saving the pasta water. This water helps to create a nice sauce. Also, don’t forget to season your veggies well. It makes a big difference in flavor. Avoid heating the skillet too high. Medium heat is best for cooking garlic without burning it. Lastly, folding the feta gently is key. You do not want it to crumble too much before serving. To get the best texture in your Mediterranean pasta, use fresh ingredients. Fresh veggies taste better and give a nice crunch. Make sure your pasta is cooked just right, so it doesn't turn mushy. The reserved pasta water helps bind the sauce, so use it wisely. When mixing everything, toss gently. This keeps the pasta intact and allows the flavors to blend well. If you want extra creaminess, let the feta melt slightly into the pasta. It adds a smooth texture that everyone will love. To save time, use a large pot for boiling water. Start cooking the pasta while you chop the vegetables. This way, both will be ready at the same time. I often use a microwave to soften my garlic. Just crush it, place it in a bowl, and microwave for 20 seconds. It speeds up the cooking process. To boost flavor, use fresh herbs instead of dried ones. Fresh basil and parsley add bright notes. A squeeze of lemon juice brightens everything up. You can also add a pinch of red pepper flakes for a kick. If you have time, let the veggies marinate in olive oil and spices before cooking. This enhances their taste. A sturdy pot for boiling pasta is key. Use a large skillet for sautéing veggies. A good knife makes cutting easier and faster. I love using a wooden spoon for mixing; it’s gentle on your pans. A microplane zester is great for getting zest from lemons. These tools make cooking more fun and efficient. For the complete experience, check out the Full Recipe for Mediterranean Sun-Kissed Pasta. {{image_2}} You can easily make this dish vegetarian or vegan. For a vegetarian option, just skip the feta cheese or use a plant-based feta. If you want a vegan dish, replace the feta with a nut-based cheese. You can also try adding more veggies like spinach or kale for extra nutrition. Mediterranean pasta varies by region. In Italy, you might add olives or capers for a salty kick. Spanish influences can bring in saffron or chorizo for warmth. Greek styles often include fresh herbs and lemon, enhancing the bright flavors in your dish. Feel free to mix and match ingredients in your pasta. Try adding cooked shrimp or grilled chicken for protein. You can substitute chickpeas with lentils or beans for a different texture. If you can't find fresh herbs, dried versions work too, just use less. The key is to experiment and find your favorite blend. For the full recipe, check out the Mediterranean Sun-Kissed Pasta. To keep your Mediterranean pasta fresh, let it cool first. Once cooled, place it in an airtight container. This helps prevent any bacteria from growing. Store it in the fridge for up to three days. If you have extra sauce or veggies, store them separately. This keeps the pasta from getting soggy. When you're ready to eat, you can reheat the pasta easily. Use the microwave or a skillet. If using a microwave, cover the dish to keep moisture in. Heat it in short bursts, stirring often. If using a skillet, add a splash of water or olive oil. This helps to revive the flavors. Heat on medium until warm, stirring frequently. Freezing is a great way to save your pasta for later. First, let it cool completely. Then, divide it into portions and place in freezer bags. Remove as much air as possible to avoid freezer burn. You can freeze it for up to three months. When ready to eat, thaw it in the fridge overnight and reheat as mentioned before. This method makes meal prep simple and tasty! For the full recipe and more details, check out the Mediterranean Sun-Kissed Pasta section. Mediterranean pasta is a dish that blends fresh veggies, herbs, and pasta. It often has flavors from Italy, Greece, and Spain. The main ingredients include pasta, olive oil, and colorful vegetables. This mix makes the dish tasty and healthy. I love using chickpeas for protein and feta cheese for creaminess. You can enjoy it warm or cold, making it a great meal for any season. To make a gluten-free version, use gluten-free pasta. Many stores sell options made from rice, corn, or quinoa. They cook similarly to regular pasta. Follow the cooking time on the package. When you sauté your veggies, make sure they are fresh and flavorful. You can still add chickpeas and feta to keep the dish hearty. Mediterranean pasta is packed with nutrients. The veggies provide vitamins and minerals. Chickpeas add fiber and protein, which help you feel full. Olive oil has healthy fats that are good for your heart. Feta cheese offers calcium for strong bones. Overall, this dish supports a balanced diet and promotes good health. Yes, you can use different pasta types! Spaghetti and penne work well, but you can try others too. Farfalle or fusilli adds a fun twist. Just keep an eye on the cooking time. Each pasta type has its own texture, which can change the dish's feel. Preparing Mediterranean pasta takes about 30 minutes. You spend 10 minutes getting your ingredients ready and 20 minutes cooking. This quick time makes it perfect for busy nights. You can whip up a tasty meal without spending hours in the kitchen. For the full recipe, check out the details above! Mediterranean pasta is simple, tasty, and healthy. We covered the key ingredients and cooking steps. You learned how to pick fresh produce and avoid common mistakes. I shared tips to save time and enhance flavor. We also explored different variations and storage methods. Now, you have all you need to make your dish shine. Enjoy your cooking and savor each bite!

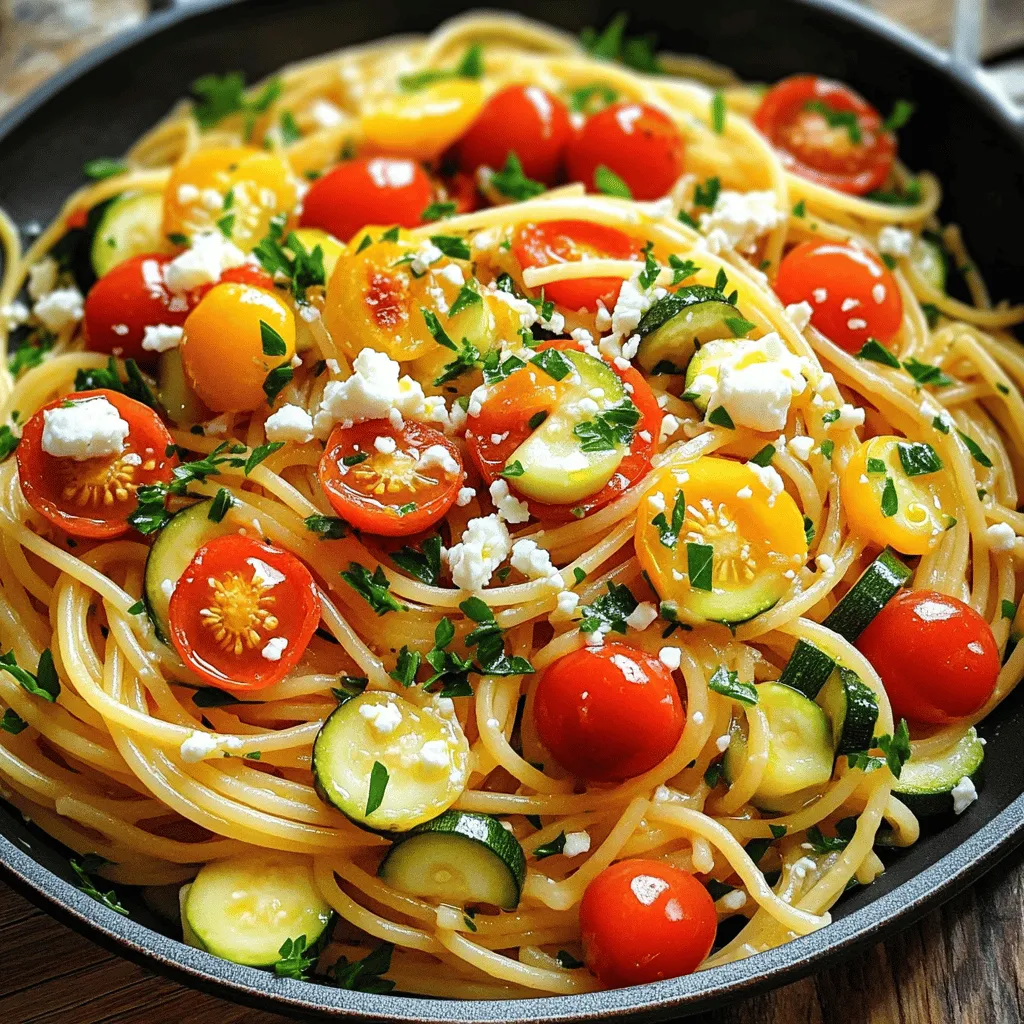
Looking to spice up your dinner routine? Mediterranean Pasta is not just tasty—it’s quick and easy! In this guide, I’ll share a flavorful recipe that includes fresh, vibrant ingredients. You’ll …

Read more

Categories Dinner

Mediterranean Salad Recipe Fresh and Flavorful Delight

May 27, 2025 by Chef Nate
- 1 cup cherry tomatoes, halved - 1 cucumber, diced - 1 red bell pepper, diced - 1/2 red onion, thinly sliced Fresh vegetables are key to a vibrant Mediterranean salad. Cherry tomatoes add sweetness. Dice the cucumber for a crisp bite. The red bell pepper gives a pop of color. Slice the red onion thinly for flavor without overpowering the dish. - 1 cup Kalamata olives, pitted and halved - 1 cup feta cheese, crumbled - 1/4 cup fresh parsley, chopped - 1/4 cup fresh mint, chopped Kalamata olives enhance the salad with their briny taste. Feta cheese adds creaminess and saltiness. Fresh parsley and mint bring brightness and freshness. These ingredients make the salad not just tasty but also a feast for the eyes. - 3 tablespoons olive oil - 2 tablespoons lemon juice - 1 teaspoon dried oregano - Salt and pepper to taste The dressing ties everything together. Olive oil gives richness, while lemon juice adds zing. Dried oregano provides a classic Mediterranean flavor. Don't forget to season with salt and pepper for balance. For the full recipe, check out the Mediterranean Delight Salad. This dish is perfect for any meal and full of flavor! - Halve the cherry tomatoes: Take each cherry tomato and cut it in half. This makes them easy to eat and helps release their juices. - Dice the cucumber and red bell pepper: Cut the cucumber into small pieces. Do the same with the red bell pepper. This adds crunch and sweetness to the salad. - Slice the red onion: Use a sharp knife to slice the red onion thinly. This adds a nice bite to the salad. - Combine vegetables in a mixing bowl: Place all the prepared vegetables in a large mixing bowl. Gently mix them to combine their flavors. - Add the olives and feta cheese: Next, add in the Kalamata olives and crumbled feta cheese. Be careful not to break the cheese as you mix. - Whisk together olive oil, lemon juice, oregano, salt, and pepper: In a small bowl, whisk the olive oil, lemon juice, dried oregano, salt, and pepper. This will be your fresh dressing. - Drizzle dressing over the salad: Pour the dressing over the salad. Toss gently to coat all the ingredients evenly. This step makes every bite delicious! For the full recipe, check out the Mediterranean Delight Salad. Enjoy making this fresh and easy salad! To make your Mediterranean salad burst with flavor, tweak the dressing to your taste. If you want more zing, add more lemon juice. For a richer taste, use a high-quality olive oil. Extra virgin olive oil works best. It brings out the best in your salad. Serve your salad in a shallow bowl. This way, all the colors shine. You can add extra feta cheese on top. A few sprigs of fresh mint will look great too. This not only makes it pretty but also adds freshness. Pair your salad with warm pita bread. It’s perfect for scooping up the mix. Grilled chicken also makes a great addition. Enjoy this salad as a light meal or a side dish. It’s perfect for any occasion and sure to impress! {{image_2}} You can easily boost your salad with protein. Grilled chicken or shrimp adds a tasty twist. Both options bring flavor and make the salad more filling. If you prefer a vegetarian option, try adding chickpeas. They add great texture and protein, making your salad hearty. Feel free to get creative with the ingredients. If you want a change, substitute feta with goat cheese. Goat cheese has a creamy texture and tangy flavor that many enjoy. You can also use different olives for variety. Adding artichoke hearts brings a unique taste and is a fun way to mix things up. The dressing is key to a great Mediterranean salad. If you want a different taste, try balsamic vinegar dressing. It adds a sweet and tangy flavor that pairs well with the veggies. For an extra kick, add a pinch of garlic to the dressing. This small change can elevate the overall taste and make your salad more exciting. For a full list of ingredients and steps, check out the Full Recipe. Store your Mediterranean salad in an airtight container in the fridge. This keeps it fresh and tasty. It’s best to eat it within 2-3 days. After that, the veggies can get soggy. I do not recommend freezing this salad. Fresh ingredients like tomatoes and cucumbers lose their crunch when frozen. If you want to make it ahead, prepare the dressing separately. This way, you keep the salad fresh and vibrant. If you chill the salad, toss it again before serving. This helps mix the flavors. You may want to adjust the seasoning after refrigeration. The flavors can change a bit when stored. Yes, but it's best to add delicate herbs just before serving. Make the salad without parsley and mint if you will serve it later. Combine the other ingredients and dressing ahead of time. This way, the flavors blend well. When you’re ready to serve, toss in the fresh herbs for that bright taste. Yes, all ingredients are naturally gluten-free. You don’t need to worry about gluten when enjoying this salad. It’s full of fresh veggies, olives, and feta cheese. These ingredients are safe for anyone with gluten sensitivities. This makes it a perfect dish for gatherings or potlucks. This salad is great as a side dish or paired with grilled meats or fish. It complements many meals well. You can enjoy it alongside grilled chicken, fish, or even pita bread. It adds a fresh touch to any plate. This salad can also stand alone as a light meal. Mediterranean salad is a simple, fresh dish with vibrant ingredients. You need cherry tomatoes, cucumber, bell pepper, and red onion, combined with kalamata olives and feta cheese. The dressing of olive oil and lemon juice brings it all together. You can adjust flavors and mix in proteins, like chicken or chickpeas. Remember, for the best taste, use fresh, high-quality ingredients. Store leftovers in the fridge and enjoy them quickly. This salad is perfect for a light meal or as a side dish that everyone will love.

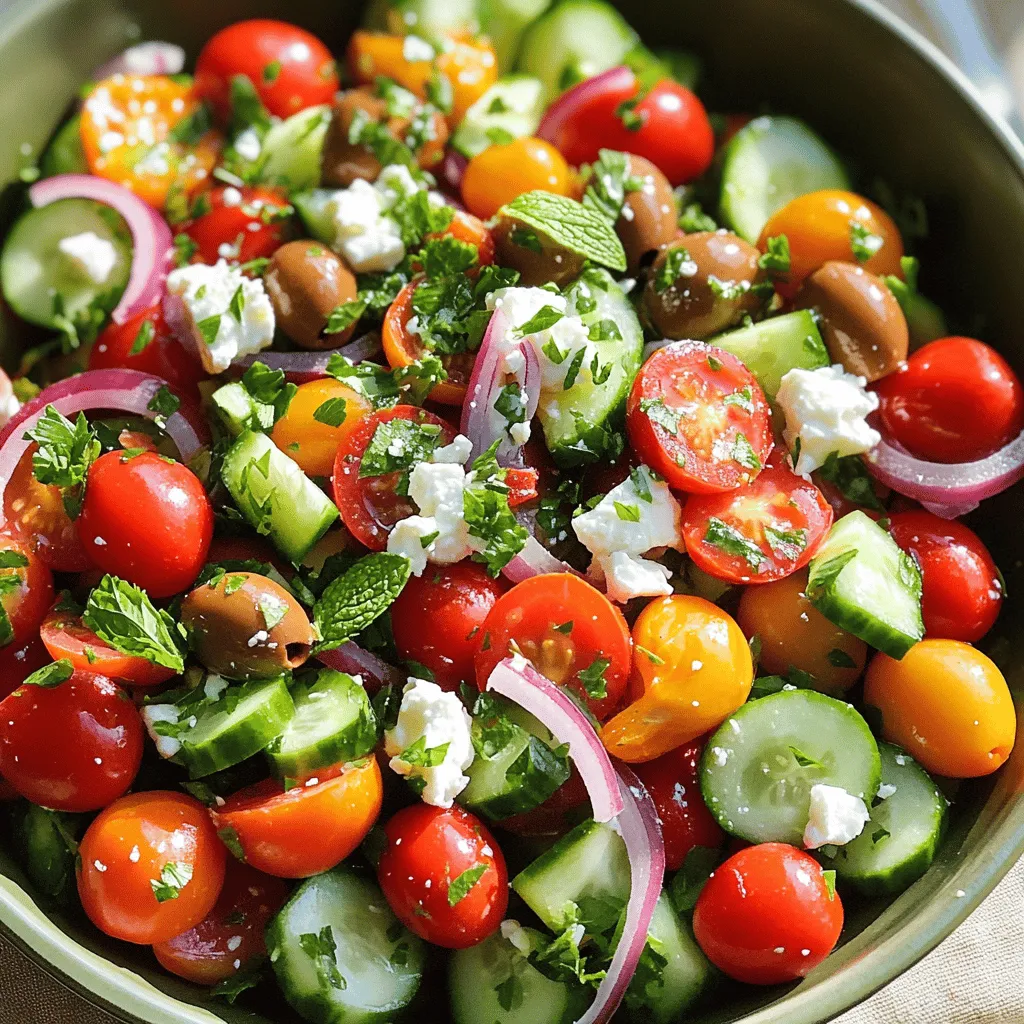
Are you ready to enjoy a burst of flavor? This Mediterranean Salad Recipe is fresh, vibrant, and easy to make. Packed with colorful vegetables, tangy feta, and a zesty dressing, …

Read more

Categories Salads

Blackberry Pistachio Dream Bars Irresistible Treat

May 27, 2025 by Chef Nate
To make these tasty bars, gather these items: - 1 ½ cups all-purpose flour - ½ cup unsalted butter, melted - ⅓ cup granulated sugar - ¼ teaspoon salt - 1 cup fresh blackberries, plus extra for garnish - ½ cup unsalted pistachios, chopped - 1 cup sweetened condensed milk - 1 teaspoon vanilla extract - 2 large eggs - 1 tablespoon lemon juice - ¼ teaspoon baking powder You can change some ingredients if needed. If you want a gluten-free option, use almond flour instead of all-purpose flour. Coconut oil can replace butter for a dairy-free treat. For a nut-free version, skip the pistachios or use sunflower seeds. You might also try honey instead of sugar for a different sweetness. Fresh blackberries should be plump and shiny. Look for deep purple or black colors. Avoid berries with white or green spots. Smell the berries; they should smell sweet and fruity. For pistachios, choose ones that are bright green and have a nice crunch. Check for any signs of mold or moisture. Always buy in small amounts to keep them fresh. First, gather all your ingredients. You need flour, butter, sugar, salt, blackberries, pistachios, sweetened condensed milk, vanilla, eggs, lemon juice, and baking powder. Make sure to measure carefully. Preheat your oven to 350°F (175°C). This is key for even baking. Then, grease and line an 8x8 inch baking dish with parchment paper. This helps with easy removal later. In a medium bowl, mix the flour, melted butter, sugar, and salt. Stir until it looks crumbly. Press this mix into the bottom of your baking dish. Bake this crust for 10 minutes. It should be just set. Let it cool a bit. While it cools, fold together the blackberries and chopped pistachios in another bowl. Then, in a third bowl, whisk the sweetened condensed milk, eggs, vanilla, lemon juice, and baking powder until smooth. Gently mix in the blackberry and pistachio blend. Pour this filling over the crust and spread it evenly. Bake again for 25-30 minutes. The edges should look set, but the center can still jiggle a bit. Once baked, let the bars cool completely in the pan. Use the parchment paper to lift them out. Cut into squares or bars. For a nice touch, garnish with extra blackberries and chopped pistachios. Enjoy these tasty treats! If you want the full recipe, check the link. To get the best texture in your Blackberry Pistachio Dream Bars, follow these tips: - Crust: Press the crust mixture firmly. This helps it hold together. - Baking Time: Bake the crust until just set. This keeps it soft but firm. - Filling: Mix the filling gently. Overmixing can break the blackberries. - Cooling: Let the bars cool completely. This helps them firm up. Here are some common mistakes to watch out for: - Using Frozen Blackberries: They can make your filling watery. Always use fresh berries for the best flavor. - Skipping the Parchment Paper: This can make it hard to lift the bars out. Always line your pan. - Not Cooling Enough: Cutting the bars too soon can cause them to crumble. Patience is key here. Serving these bars can be fun! Here are some ideas: - Garnish: Add extra blackberries and chopped pistachios on top for a nice look. - Pairing: Serve with whipped cream or vanilla ice cream. This adds creaminess. - Presentation: Cut into small squares for bite-sized treats. They are great for sharing! For the full recipe, follow the steps closely to get these perfect bars. Enjoy making and sharing them! {{image_2}} You can play with flavors in these bars. For a richer taste, add a splash of almond extract. You can swap blackberries for raspberries or blueberries. Each berry gives a new twist. Chopped chocolate can also be a fun mix-in. It adds a sweet touch that pairs well with nuts. Want to make these bars dairy-free? Use coconut milk instead of sweetened condensed milk. Replace butter with coconut oil for a rich flavor. To make them gluten-free, swap all-purpose flour with a gluten-free blend. Just check that the blend has a good structure for baking. Seasonal changes can make these bars even more fun. In fall, add spices like cinnamon or nutmeg. Try using pumpkin puree for a cozy twist. For winter holidays, you might include peppermint extract. Fresh cranberries can also brighten them up for festive occasions. Each season brings new flavors to explore. After baking, let your bars cool completely. Use the parchment paper to lift them out of the pan. Place the bars in an airtight container. This keeps them fresh and moist. Store them in the fridge if you want them to last longer. They taste great cold or at room temperature! You can freeze these bars for later. First, cut them into squares. Wrap each piece in plastic wrap. Place the wrapped bars in a freezer-safe bag. Be sure to label the bag with the date. They can stay frozen for up to three months. When you're ready to enjoy, thaw them in the fridge overnight. Blackberry Pistachio Dream Bars last about five days in the fridge. If stored well, they keep their taste and texture. Always check for signs of spoilage, like a change in smell or texture. Enjoy these tasty treats while they're fresh! You can find the full recipe for more details. Yes, you can use frozen blackberries. Just make sure to thaw them first. Drain any extra juice to keep your bars from getting soggy. Frozen blackberries work well but may be softer than fresh ones. They will still taste great in your bars. You can replace eggs with applesauce or mashed banana. Use 1/4 cup of either for each egg. This change keeps the bars moist and adds a hint of sweetness. You can also try a flaxseed meal mixture. Mix 1 tablespoon of flaxseed with 2.5 tablespoons of water. Let it sit for five minutes to thicken. To cut the bars neatly, let them cool completely. Use a sharp knife for clean cuts. Dip the knife in hot water, then wipe it dry. This method helps prevent crumbling. If you have trouble, try cutting them in the pan first, then lift them out with the parchment paper. You can find the full recipe for Blackberry Pistachio Dream Bars in the article above. It has all the steps and details you need to make these tasty treats! Blackberry Pistachio Dream Bars offer a tasty treat. We covered the ingredients, substitutions, and tips for picking fresh blackberries and pistachios. I shared step-by-step baking instructions for great results. We discussed texture, common mistakes, and serving ideas to enhance your bars. You can also explore fun variations and easy storage methods. In the end, enjoy experimenting with flavors and make this dessert your own. Happy baking!

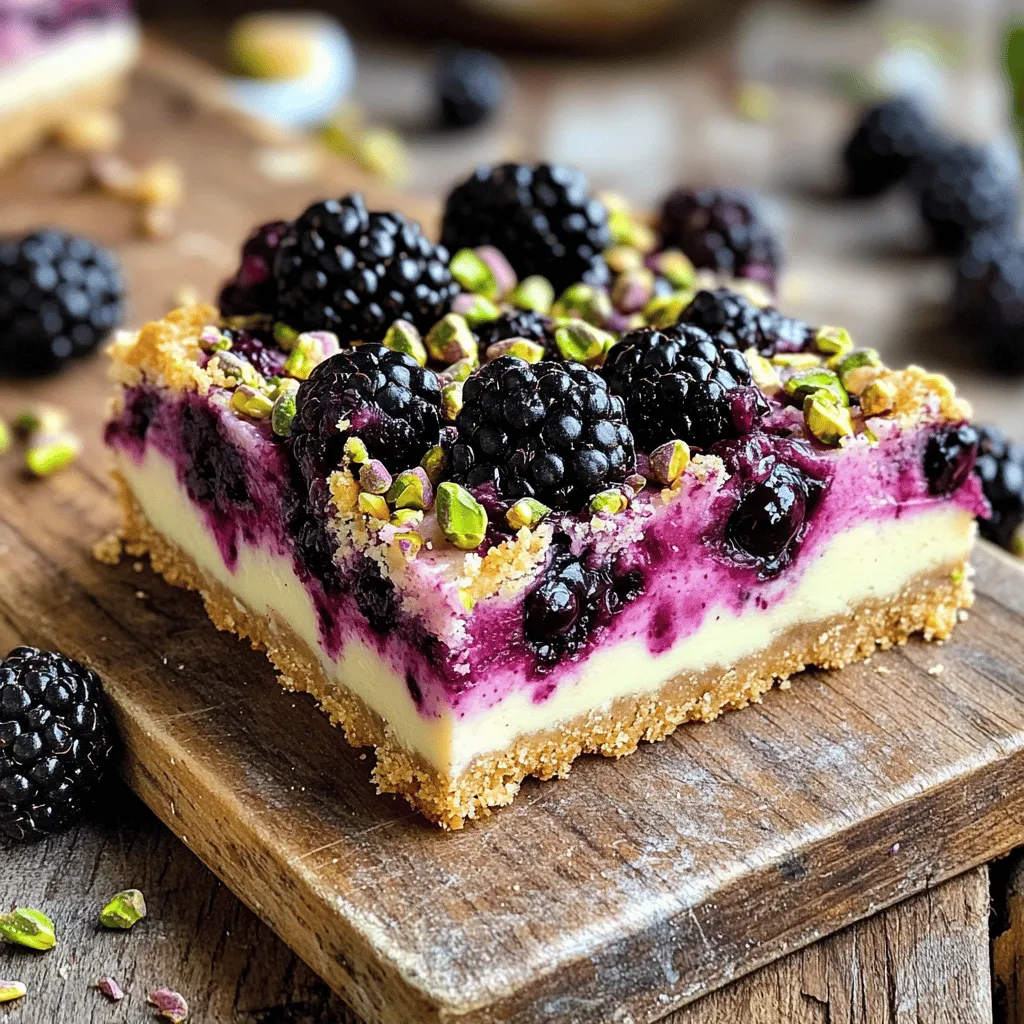
Are you ready to indulge in a treat that combines tart blackberries and crunchy pistachios? My Blackberry Pistachio Dream Bars are about to become your new favorite dessert. In this …

Read more

Categories Desserts
Older posts
Newer posts
← Previous Page1 … Page76 Page77 Page78 … Page108 Next →

GRILLED FLAVORS

where delicious ideas come to life, from stovetop to backyard. Warm, simple, and always satisfying. 🍽️✨

PAGES

Home About Contact Privacy Policy Terms & Conditions Cookie Policy GDPR Policy Copyright Policy Disclaimer

CATEGORIES

Appetizers Desserts Salads Breakfast Dinner

Contact

  • Pinterest
  • Mail
Copyright © 2026 Grilled Flavors. All rights reserved.