Skip to content
grilledflavors.com
  • Home
  • Appetizers
  • Desserts
  • Salads
  • Breakfast
  • Dinner
  • Privacy Policy
  • Contact
  • About

Chef Nate

Pizza Tater Tot Casserole Savory and Hearty Delight

May 27, 2025 by Chef Nate
- 1 lb ground beef or turkey - 1 small onion, chopped - 1 bell pepper, diced - 2 cups marinara sauce - 3 cups frozen tater tots - 2 cups shredded mozzarella cheese - 1 cup sliced pepperoni - Fresh basil leaves (for garnish) - 1 teaspoon garlic powder - 1 teaspoon Italian seasoning - Salt and pepper to taste You need these ingredients to build a great Pizza Tater Tot Casserole. Start with the meat. I like using ground beef or turkey, but you can choose what you enjoy. The chopped onion and diced bell pepper add flavor and color. Marinara sauce ties everything together, bringing a nice Italian taste. Tater tots give it a crispy texture on top. Next, let’s talk cheese. Mozzarella gives that gooey, melty goodness. And who can resist pepperoni? It adds a savory punch. Fresh basil leaves make a great garnish. They add a pop of color and a fresh taste. Don't forget seasonings! Garlic powder and Italian seasoning help bring out all the flavors in the dish. Adjust salt and pepper to fit your taste. For the full recipe, check out the detailed instructions. Enjoy gathering your ingredients and getting ready to cook! First, preheat your oven to 400°F (200°C). This helps cook everything evenly. Next, take a large skillet and cook 1 pound of ground beef or turkey over medium heat. Break the meat apart as it cooks. Once browned, drain any fat. Now, add 1 chopped onion and 1 diced bell pepper to the skillet. Sauté these for about 5 minutes. You want the veggies to be soft. This mix adds flavor and texture to your dish. After the meat and veggies are ready, stir in 1 teaspoon of garlic powder and 1 teaspoon of Italian seasoning. Then, pour in 2 cups of marinara sauce. Add salt and pepper to taste. Let it simmer for 2-3 minutes. This brings all the flavors together. Now, grab a greased 9x13 inch baking dish. Layer the meat sauce mixture evenly at the bottom. Next, sprinkle 3 cups of frozen tater tots over the sauce. Arrange them in a single layer. Cover the tater tots with 2 cups of shredded mozzarella cheese. Then, add 1 cup of sliced pepperoni on top. This will make the casserole cheesy and delicious. Place the dish in the oven and bake for about 30-35 minutes. You’ll know it’s ready when the tater tots are golden brown and crispy. The cheese should be bubbly and melted. Once done, remove the dish from the oven. Let it cool for about 5 minutes. This helps the flavors settle. Before serving, garnish with fresh basil leaves. Enjoy this hearty delight! For full details, check the Full Recipe. To make your Pizza Tater Tot Casserole shine, start with crispy tater tots. Bake them for a few minutes before adding them to the casserole. This step helps them crisp up more in the oven. You want that satisfying crunch with every bite. Choosing the right meat is key. I prefer using ground beef for its rich flavor. However, ground turkey works great too. Both options will give you a hearty base. Just make sure to drain the fat after cooking, so your casserole doesn’t get greasy. Pair this dish with a fresh side salad. The crunch of the greens balances the creamy cheese and potatoes. You can also serve it with garlic bread for a cozy meal. Drizzle extra marinara sauce on top before serving. It adds moisture and enhances the pizza flavor. You can also sprinkle some red pepper flakes for a spicy kick. Prep your ingredients in advance for a quicker dinner. Chop the veggies and cook the meat the day before. Store them in the fridge until you’re ready to bake. Using leftover ingredients is also smart. If you have extra veggies or meat, throw them in. This dish is flexible and forgiving, making it perfect for using up what you have on hand. {{image_2}} You can change the protein in this dish easily. If you want, use chicken instead of beef. Cook it the same way. Sausage adds a nice kick too. For a lighter choice, ground turkey works well. If you prefer a meat-free option, try using mushrooms or lentils. They soak up flavor and keep the dish hearty. Want to amp up the taste? Add more veggies! Sliced olives or spinach can boost flavor and nutrition. You can also mix in zucchini or mushrooms. For cheese lovers, try mixing mozzarella with cheddar or provolone. Each type adds its own unique taste. You can even add some parmesan for a salty touch. If you need gluten-free options, use gluten-free tater tots. They taste just as good! For low-carb diets, swap tater tots for cauliflower rice or zucchini slices. You can still get that satisfying base. Remember, it’s all about making it work for you while keeping that delicious flavor. For the full recipe, check out the [Full Recipe]. After enjoying your Pizza Tater Tot Casserole, let it cool to room temperature. Store leftovers in an airtight container. This keeps flavors fresh and safe. Place it in the fridge. Proper refrigeration can keep your casserole tasty for up to three days. If you want to save it longer, freeze it. Wrap the casserole tightly in plastic wrap and then in foil. This helps prevent freezer burn. To reheat, the best method is the oven. Preheat your oven to 350°F (175°C). Place the casserole in a baking dish. Cover it with foil to retain moisture. Heat for about 20-25 minutes. This keeps the tater tots crispy and the cheese melty. If you use the microwave, be careful. It can make the casserole soggy. Heat in short increments, stirring as needed. If stored correctly, your Pizza Tater Tot Casserole can last in the fridge for up to three days. In the freezer, it can stay good for two to three months. Always check for signs of spoilage, like off smells or changes in texture. Enjoy your delicious meal safely! How do I make Pizza Tater Tot Casserole? To make Pizza Tater Tot Casserole, follow these steps: 1. Preheat the oven to 400°F (200°C). 2. Brown 1 lb of ground beef or turkey in a skillet. Drain the fat. 3. Add 1 small chopped onion and 1 diced bell pepper. Cook until soft. 4. Mix in 1 teaspoon of garlic powder, 1 teaspoon of Italian seasoning, and 2 cups of marinara sauce. Season with salt and pepper to taste. 5. Layer the meat sauce in a greased 9x13 inch dish. 6. Spread 3 cups of frozen tater tots on top. 7. Add 2 cups of shredded mozzarella cheese and 1 cup of sliced pepperoni. 8. Bake for 30-35 minutes until golden brown and bubbly. 9. Let it cool for 5 minutes, then garnish with fresh basil. This recipe is a fun twist on pizza. You can find the Full Recipe for more details. Can I make this casserole in advance? Yes, you can make this casserole in advance. Prepare it up to the baking step and cover it. Store it in the fridge for up to 24 hours. When ready to bake, just pop it in the oven. You may need to add a few extra minutes to the baking time. Caloric count per serving Each serving of Pizza Tater Tot Casserole has about 450-500 calories. The count can vary based on the meat and cheese you use. Potential allergens This dish contains common allergens like dairy and gluten. If you have allergies, consider using gluten-free tater tots and dairy-free cheese. User feedback on the recipe Many users love this casserole. They find it fun to make and eat. Kids especially enjoy the cheesy, crispy top. Taste and texture comments People rave about the mix of flavors. The tater tots provide a great crunch, while the cheese melts perfectly. The meat sauce is rich and savory, making it a hearty meal. What makes Pizza Tater Tot Casserole so special? It blends comfort food with fun. This dish combines classic pizza flavors with crispy tater tots. You get a warm, cheesy meal that everyone loves. The main ingredients create a hearty base. You need: - 1 lb ground beef or turkey - 1 small onion, chopped - 1 bell pepper, diced - 2 cups marinara sauce - 3 cups frozen tater tots These items form the heart of the dish. The ground meat adds protein, while the vegetables give it texture and flavor. The marinara sauce ties it all together. To enhance the flavor, I add some seasonings: - 1 teaspoon garlic powder - 1 teaspoon Italian seasoning - Salt and pepper to taste These spices bring out the taste of the meat and sauce. Garlic powder offers depth, while Italian seasoning adds warmth. Adjust salt and pepper to your liking for the perfect balance. The toppings are just as important. You’ll want: - 2 cups shredded mozzarella cheese - 1 cup sliced pepperoni - Fresh basil leaves (for garnish) Mozzarella melts beautifully, creating that gooey goodness we crave. Pepperoni adds a savory kick. Fresh basil gives a pop of color and flavor. To serve, I recommend using a large spoon to scoop out portions. The casserole looks great in the baking dish. For an extra touch, drizzle some marinara on top. For the full recipe, you can check out the detailed instructions. This dish is sure to become a family favorite! In this blog post, we covered how to make a delicious Pizza Tater Tot Casserole. We discussed the main ingredients, like ground beef and marinara sauce, and outlined step-by-step instructions for easy preparation. We also shared tips for perfecting the dish and explored fun variations for different tastes. Remember, this casserole is great for family meals or quick dinners. Try it out and enjoy a tasty, comforting dish that everyone will love. Happy cooking!

Craving a meal that combines the fun of pizza with the comfort of a casserole? Pizza Tater Tot Casserole is your answer! This dish is hearty, savory, and will satisfy …

Read more

Categories Dinner

Honey Butter Skillet Corn Quick and Tasty Recipe

May 27, 2025 by Chef Nate
To make Honey Butter Skillet Corn, gather the following items: - 4 cups fresh corn kernels (about 6-8 ears of corn) - 4 tablespoons unsalted butter - 3 tablespoons honey - 1 teaspoon sea salt - 1/2 teaspoon black pepper - 1/4 teaspoon smoked paprika (optional for a smoky flavor) - 2 tablespoons fresh parsley, finely chopped (for garnish) If you need to convert measurements, here’s a quick guide: - 1 tablespoon = 3 teaspoons - 1 cup = 16 tablespoons - 1/4 teaspoon = 1.25 milliliters Choose corn that feels heavy for its size. The husk should be green and tight. Look for silk that is brown and moist. Avoid corn with dry or black silk. Fresh kernels should be plump and bright. Check for a nice yellow or golden color. If you can, buy your corn from a local farmer's market. This way, you get the best flavor. Start by gathering your ingredients. You need fresh corn, butter, honey, salt, pepper, and smoked paprika. Here’s a quick list: - 4 cups fresh corn kernels (about 6-8 ears of corn) - 4 tablespoons unsalted butter - 3 tablespoons honey - 1 teaspoon sea salt - 1/2 teaspoon black pepper - 1/4 teaspoon smoked paprika (optional) - 2 tablespoons fresh parsley, finely chopped Next, remove the corn kernels from the cobs. You can use a sharp knife for this. Place the kernels in a bowl and set them aside. Heat a large skillet over medium heat. Add the unsalted butter and let it melt. Once it bubbles, add the corn kernels. Stir well to coat them in butter. Cook for about 5 minutes. The corn should turn bright yellow and become tender. Next, lower the heat. Drizzle the honey over the corn. Stir to mix it well. Season with sea salt, black pepper, and smoked paprika if you want a smoky kick. Cook for an extra 2-3 minutes. This step helps the flavors blend together. Finally, take the skillet off the heat. Garnish with freshly chopped parsley for a pop of color. Serve the Honey Butter Skillet Corn in rustic bowls or on a platter. To make it even more inviting, drizzle a bit of extra honey on top. A sprinkle of parsley will also add a lovely touch. This dish goes well with grilled meats or can be enjoyed on its own. Try it as a side at your next meal. You can find the full recipe for more details. To get the best flavor from your Honey Butter Skillet Corn, use fresh corn. Fresh corn has a sweet taste that frozen corn lacks. Sweet corn is best when it is in season. Look for bright yellow kernels that are firm and plump. The butter adds richness. You can also use high-quality honey for a better taste. This makes the dish even sweeter. For a smoky twist, add smoked paprika. Just a little enhances the flavor without overpowering it. Keep tasting as you cook. Adjust the salt and pepper to match your taste. One common mistake is overcooking the corn. This can make it tough and chewy. Cook it just until it turns bright yellow. Another mistake is not stirring enough. You want to coat the corn well in butter and honey. If you forget to stir, some may burn while others stay raw. Avoid using too much honey; it can make it too sweet. Balance is key. Lastly, don’t skip the seasoning. Salt and pepper bring out the flavors. You can cook this dish in different ways if you don’t have a skillet. Try grilling the corn on the cob for a smoky flavor. Just brush it with butter and honey, then grill until charred. You can also roast it in the oven. Spread the corn on a baking sheet, drizzle with butter and honey, then roast until done. If you prefer, use a slow cooker. Combine all the ingredients and let it cook on low. This method takes longer but gives great flavor. Check the [Full Recipe] for detailed steps. {{image_2}} You can enhance the dish by adding other vegetables. Peppers and zucchini work well here. Just chop them into small pieces. Add them with the corn and cook until soft. This will give a nice crunch and color to your skillet corn. You can also add green onions for a fresh touch. If you want a different flavor, try using maple syrup instead of honey. This will give a rich taste. You can also try agave nectar for a lighter sweetness. Each sweetener brings its own twist to this dish. Just remember to taste as you go! Seasoning can change the whole dish. You can add a pinch of cayenne for heat. Or try Italian herbs like oregano or basil for a fresh taste. A squeeze of lime juice can add a bright zing, too. Mix and match to find what you like best. Each combo makes your Honey Butter Skillet Corn unique. Check out the Full Recipe for more ideas! To store leftover Honey Butter Skillet Corn, let it cool first. Place it in an airtight container. You can keep it in the fridge for up to three days. This helps keep the corn fresh and tasty. When you want to reheat the corn, do it gently. You can use a skillet over low heat. Add a little butter or water to keep it moist. Stir often to avoid burning. This way, you’ll keep the flavors alive and the corn tender. If you have lots of corn left, freezing is a great option. First, cool the corn completely. Then, place it in freezer bags. Squeeze out as much air as possible before sealing. Label the bags with the date. You can freeze for up to three months. When you are ready to eat it, thaw in the fridge overnight. Heat it up just like before, and enjoy! Yes, you can use frozen corn. Frozen corn saves time and is convenient. It often cooks faster than fresh corn. Just remember to thaw it before cooking. This way, the texture stays nice and tender. Using frozen corn may change the taste slightly, but it still tastes great. Honey Butter Skillet Corn pairs well with many dishes. Here are some tasty options: - Grilled chicken or steak - Barbecue ribs - Tacos or burritos - A fresh green salad - Mashed potatoes These sides create a colorful plate and boost flavors. Honey Butter Skillet Corn can be healthy. Corn has fiber, vitamins, and minerals. Using fresh corn adds nutrients. The butter and honey add flavor, but they also add calories. If you want a lighter dish, use less butter or honey. Overall, enjoy it as a side dish in moderation. For the full recipe, check out the Honey Butter Skillet Corn section. This blog post covered everything you need for Honey Butter Skillet Corn. I explained the ingredients, measurement tips, and how to pick fresh corn. You learned step-by-step instructions from prep to serving. I shared flavor tips, common mistakes, and variations for your dish. Lastly, I provided storage info and answered key questions. Now you can create this tasty dish with ease. Enjoy making it your own!

Get ready to elevate your side dishes with my Honey Butter Skillet Corn recipe! This quick and tasty dish bursts with flavor and is perfect for any meal. In just …

Read more

Categories Dinner

Shrimp and Avocado Bowls Flavorful Fresh Delight

May 27, 2025 by Chef Nate
The key to a great shrimp and avocado bowl lies in fresh, quality ingredients. Here’s what you need: - 1 lb large shrimp, peeled and deveined - 2 ripe avocados, diced - 1 cup cherry tomatoes, halved - 1 cup corn (fresh or frozen, thawed) - 1 small red onion, finely diced - 1 lime, juiced - 2 tablespoons olive oil - 1 teaspoon cumin - 1 teaspoon smoked paprika - Salt and pepper to taste - Fresh cilantro, chopped, for garnish - Cooked quinoa or brown rice, for serving Each ingredient plays a vital role. The shrimp provide a sweet, juicy protein. The avocados add creaminess and richness. Cherry tomatoes bring a burst of freshness, while corn adds a nice crunch. The red onion gives a slight bite, balanced by the lime juice’s acidity. Spices like cumin and smoked paprika infuse the dish with warm, earthy notes. Olive oil helps bring everything together and adds a silky texture. Garnishing with fresh cilantro adds a pop of color and a hint of herbal flavor. For a complete experience, serve the bowl over cooked quinoa or brown rice. This adds extra fiber and makes the meal more filling. Check out the Full Recipe for all the steps to create this colorful, delicious dish. 1. Preheat skillet and prepare shrimp seasoning First, heat a large skillet over medium-high heat. This step is key for cooking the shrimp evenly. In a bowl, mix the shrimp with olive oil, cumin, smoked paprika, salt, and pepper. Make sure each shrimp gets some of the spices. 2. Sauté shrimp to perfection Once your skillet is hot, add the shrimp. Cook for about 3 to 4 minutes. Watch for the shrimp to turn pink and opaque. This means they are fully cooked. Remove them from heat and set aside. 3. Prepare the avocado and vegetable mixture In another bowl, combine diced avocados, halved cherry tomatoes, corn, and finely diced red onion. Gently toss these ingredients together. Squeeze lime juice over the mix and fold it in carefully. You don’t want to mash the avocados. 1. Layering the quinoa or rice Start with a scoop of cooked quinoa or brown rice in each bowl. This base adds texture and nutrients to your dish. 2. Adding the avocado mixture Next, spoon the avocado mix over the quinoa or rice. Ensure it's evenly distributed for a balanced flavor. 3. Topping with sautéed shrimp and garnish Finally, place the sautéed shrimp on top of the avocado layer. For a fresh touch, sprinkle with chopped cilantro. Enjoy your flavorful shrimp and avocado bowls! For a detailed recipe, check the Full Recipe. To season shrimp effectively, start with fresh or thawed shrimp. Use olive oil, cumin, and smoked paprika. Add salt and pepper to taste. Mix well so each shrimp gets a good coat of the spices. This helps to enhance the shrimp's natural flavor. Cook shrimp for about 3-4 minutes. You want them to turn pink and opaque. Overcooking can make them tough. Watch closely for that perfect tenderness. Once done, remove them from the heat right away. To prevent avocado browning, use lime juice. It slows down the oxidation process. Toss the diced avocados gently with lime juice when you prepare them. This keeps their vibrant green color. Choosing the ripest avocados is key. Look for avocados that yield slightly to gentle pressure. Avoid ones with dark spots or hard skin. Ripe avocados are creamy and perfect for your bowl. Enjoy the fresh taste! {{image_2}} You can change up the shrimp in many ways. Try using chicken or tofu for a twist. Both options will soak up the spices well. If you want a seafood option, scallops are great too. They cook quickly and taste wonderful. You can also add more veggies to the bowl. Bell peppers add crunch and color. Zucchini is another good choice, providing a mild taste. You might also enjoy adding black beans for protein and fiber. They make the dish hearty and filling. To boost flavor, consider adding more spices. A pinch of chili powder can add heat. If you like herbs, fresh dill or parsley can brighten the dish. Try a dash of garlic powder for an extra kick. Dressings can also enhance the taste. A simple vinaigrette with lime and olive oil works well. You might enjoy a yogurt-based dressing for creaminess. For a tangy touch, try adding a splash of balsamic vinegar. Each option brings new flavors to your shrimp and avocado bowls. For the full recipe, check out the Zesty Shrimp and Avocado Bowls. To store shrimp and avocado bowls, use airtight containers. This keeps shrimp and veggies fresh. First, let the bowls cool completely. Next, put shrimp in one container and the avocado mixture in another. Avocado turns brown quickly, so keeping it separate helps. Store them in the fridge for up to two days. If you have leftover quinoa or rice, keep it in a separate container as well. This way, everything stays fresh and tasty. When reheating shrimp, use a skillet over low heat. This warms them without overcooking. Stir gently to keep shrimp juicy. For the avocado, it’s best to eat it cold. Reheat only the shrimp and grains. If you warm up the avocado, it may lose its creamy texture. Instead, add fresh avocado on top after reheating for flavor and freshness. Enjoy your meal again without losing its charm! For the full recipe, check out the Zesty Shrimp and Avocado Bowls. Yes, you can prepare some parts in advance. Cook the shrimp and mix the veggies early. Store them separately in the fridge. Just combine them before serving. This keeps the flavors fresh. These bowls are great on their own. For a complete meal, serve with crispy tortilla chips or a green salad. You can also add a side of black beans for extra protein. Yes, you can substitute shrimp with grilled tofu or chickpeas. Use the same spices to keep flavor. This makes a tasty, plant-based option. Enjoy the same fresh ingredients like avocado and tomatoes. You learned to make tasty shrimp and avocado bowls. We covered the key ingredients and steps. I shared tips for perfect shrimp and ripe avocados. We explored fun ingredient swaps and flavor boosts. Lastly, I explained how to store and reheat your bowls. Enjoy your culinary adventure! You can create a healthy meal that delights your taste buds and brings your family together. Remember, cooking is all about having fun and trying new things!

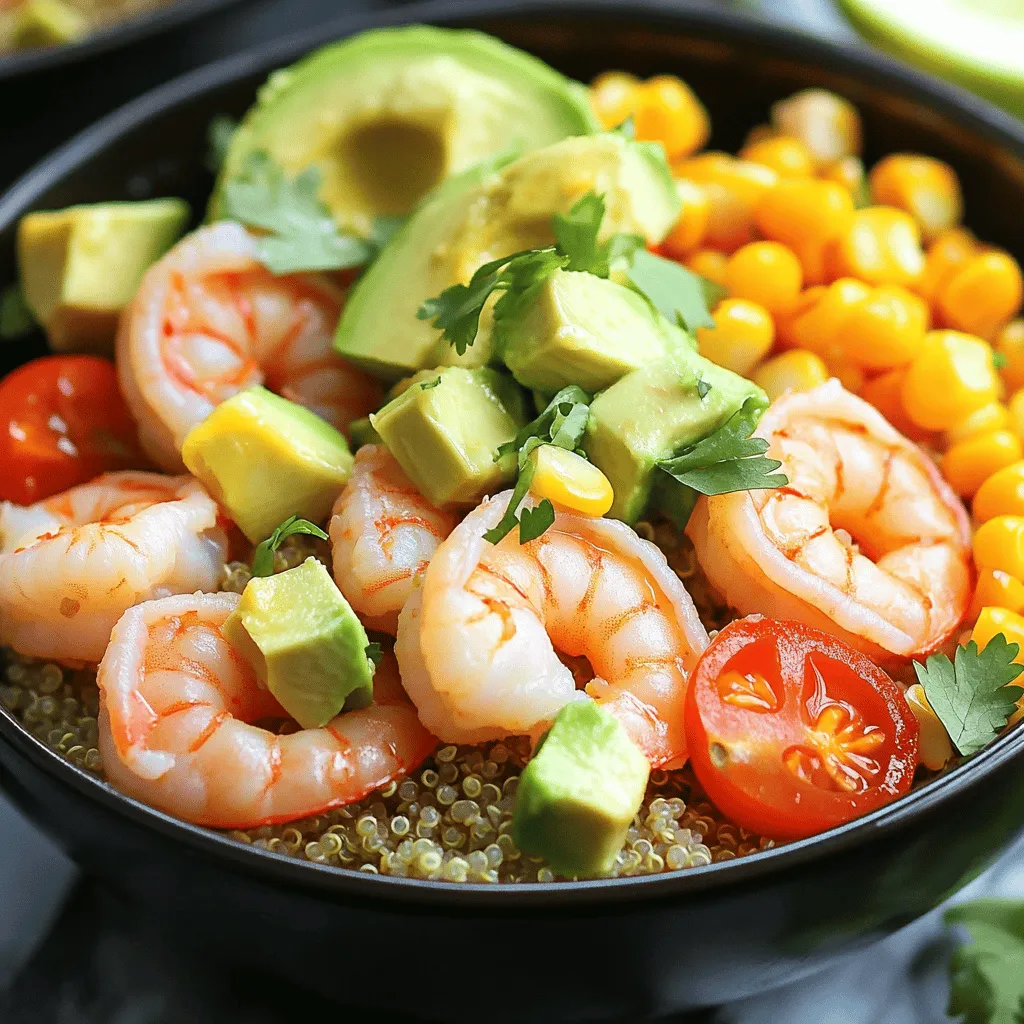
If you’re looking for a bright and tasty meal, shrimp and avocado bowls are the answer! This dish brings together juicy shrimp and creamy avocado in a fresh, healthy way. …

Read more

Categories Dinner

Balsamic Chicken Avocado Caprese Salad Delight

May 27, 2025 by Chef Nate
- 2 boneless, skinless chicken breasts - 1 large ripe avocado, sliced - 1 cup cherry tomatoes, halved - 1 cup fresh mozzarella balls (bocconcini) - 2 tablespoons balsamic glaze - 1 teaspoon garlic powder - 1 teaspoon dried basil - Salt and pepper to taste - 2 cups fresh arugula or mixed greens - Fresh basil leaves for garnish - Additional balsamic glaze for drizzling Gather these ingredients for a bright and tasty Balsamic Chicken Avocado Caprese Salad. Each item plays a role in making this dish delightful. The chicken adds protein, while the avocado gives creaminess. Cherry tomatoes bring sweetness, and mozzarella adds a lovely texture. For the marinade, balsamic glaze is key. It packs flavor. Garlic powder and basil enhance the chicken's taste. Salt and pepper round it all out. The salad base of arugula or mixed greens provides a fresh crunch. Garnish with fresh basil leaves for an extra pop of flavor. Drizzle more balsamic glaze for that finishing touch. Check the [Full Recipe] for exact amounts and step-by-step instructions. Enjoy the process! First, create the balsamic marinade. In a small bowl, mix: - 2 tablespoons balsamic glaze - 1 teaspoon garlic powder - 1 teaspoon dried basil - Salt and pepper to taste Make sure to combine everything well. This mix adds flavor to the chicken. Next, coat the chicken breasts thoroughly with the marinade. Ensure they are covered on all sides. Let them sit for about 15 minutes. This helps the flavors soak in. Now, preheat your grill or stovetop grill pan to medium-high heat. This step is key for juicy chicken. Place the marinated chicken on the grill. Grill each side for about 6-7 minutes. The chicken is done when its inside reaches 165°F (75°C). Once cooked, remove it from heat. Let the chicken rest for a few minutes before cutting. While the chicken rests, it's time to prepare the salad. In a large bowl, layer the salad ingredients: - 2 cups fresh arugula or mixed greens - 1 large ripe avocado, sliced - 1 cup cherry tomatoes, halved - 1 cup fresh mozzarella balls (bocconcini) Once the chicken has rested, slice it into strips. Place the chicken on top of the salad. Drizzle with additional balsamic glaze for extra flavor. Garnish with fresh basil leaves. Your salad is now ready to enjoy! For more details, check the Full Recipe. To ensure juicy chicken, start by marinating it well. The balsamic glaze adds flavor and moisture. You can let it sit for 15 minutes or longer for a stronger taste. Grill the chicken on medium-high heat for 6-7 minutes on each side. Use a meat thermometer to check if the internal temperature reaches 165°F (75°C). For the best marinades, try mixing balsamic glaze with garlic powder and dried basil. This combo gives the chicken a rich flavor. You can also add a bit of honey for sweetness. Experiment with your favorite herbs to make it your own. When serving, arrange the salad for visual appeal. Start with a bed of arugula or mixed greens. Next, add the sliced avocado and halved cherry tomatoes. Place the fresh mozzarella balls around the salad. Finally, lay the grilled chicken strips on top. Garnishing ideas include adding fresh basil leaves for a pop of color. A drizzle of balsamic glaze on top enhances the look and flavor. Use a light hand to keep it elegant. You can easily substitute ingredients based on your taste. If you want a vegetarian option, try using grilled tofu or chickpeas instead of chicken. You can also swap the mozzarella for feta or goat cheese for a different flavor. For dietary modifications, consider using gluten-free balsamic glaze. You can add nuts or seeds for extra crunch. Feel free to mix in other fresh veggies like bell peppers or cucumbers. Enjoy exploring these options! For the full recipe, click here. {{image_2}} You can switch the chicken with other proteins. Shrimp works great for a seafood twist. It cooks quickly and adds a nice flavor. Tofu is a perfect choice for a vegetarian option. It soaks up the marinade well, giving a tasty bite. You can bake or sauté these proteins too. Baking keeps them moist and healthy, while sautéing gives a nice sear. Feel free to change the greens in your salad. Spinach or kale can add a new texture. Spinach is soft and mild, while kale is hearty and crunchy. You can also swap out the cheese. Feta gives a salty touch, while goat cheese adds creaminess. Both can enhance the salad's flavor profile. Adding nuts or seeds can give your salad great crunch. Walnuts or pumpkin seeds are good options. They add protein and healthy fats too. You might also think about adding fruit. Strawberries or mangoes can bring a sweet flavor that complements the savory elements. These additions make the salad more vibrant and exciting. For the full recipe, check out the detailed instructions. To keep your Balsamic Chicken Avocado Caprese Salad fresh, store it in the fridge. I recommend using an airtight container. This way, you can enjoy your salad for up to three days. To keep the avocado from browning, store it separately. Slice the avocado just before serving for the best flavor and texture. Freezing this salad is not ideal, but you can freeze some components. For the chicken, let it cool, then slice it. Place the chicken in a freezer-safe bag. Remove as much air as possible. For the salad, do not freeze the greens or avocado. If you need to freeze, consider the chicken only. To thaw, place the chicken in the fridge overnight. Reheat it on the stove or in the microwave until warm. Check your salad for freshness before eating. Signs of spoilage include a sour smell or slimy texture. If the cherry tomatoes look wrinkled or the mozzarella is sticky, it’s time to toss it. Always follow food safety practices. When in doubt, throw it out to avoid any foodborne illness. Yes, you can make this salad ahead of time. To prepare in advance, follow these tips: - Cook the chicken: Grill the chicken and let it cool completely. - Store separately: Keep the chicken, avocados, and salad components in different containers. This helps keep everything fresh and prevents sogginess. - Dress before serving: Wait to add the balsamic glaze until just before serving. This keeps the greens crisp. If you don’t have balsamic glaze, try these alternatives: - Balsamic vinegar: Use it straight, but it’s more acidic. You can add a little honey for sweetness. - Red wine vinegar: This has a tangy flavor. Mix it with olive oil for a dressing. - Honey mustard: This adds a sweet and tangy taste. It pairs well with chicken. Each option changes the flavor a bit, but they all work well. Yes, this recipe is great for meal prep. Here are some suggestions: - Portion control: Divide the salad into meal-sized containers for easy grab-and-go lunches. - Mix and match: Swap out ingredients based on what you love. You can change the protein or greens. - Keep it fresh: Store the dressing separately to avoid soggy salad. You can enjoy this tasty dish all week long! For the full recipe, check out the detailed instructions earlier. This blog post guided you through making a fresh and tasty salad. We covered key ingredients, from juicy chicken to ripe avocados and vibrant greens. You learned how to prepare a simple marinade and grill the chicken perfectly. Tips for presentation and customization allowed you to make the dish your own. Incorporate your own flair by swapping ingredients based on your taste. Remember, this salad is easy to store and perfect for meal prep. Enjoy creating a dish that satisfies both your taste buds and your health goals.

Looking for a fresh, simple dish that dazzles? Try my Balsamic Chicken Avocado Caprese Salad Delight! This vibrant salad combines juicy grilled chicken, creamy avocado, and tangy mozzarella, all drizzled …

Read more

Categories Salads

Delicious Ravioli with Fresh Tomatoes Easy Dinner Dish

May 27, 2025 by Chef Nate
- 1 package of fresh cheese ravioli (about 9 oz) - 3 cups ripe cherry tomatoes, halved - 3 cloves garlic, minced - 1/4 cup fresh basil, chopped - 1 tablespoon olive oil - 1/2 teaspoon red pepper flakes (optional) - Salt and pepper to taste - Grated Parmesan cheese for serving (optional) Using fresh ingredients makes a big difference in this dish. Fresh ravioli taste better and have a nice texture. I recommend using brands like Giovanni Rana or Buitoni for great results. If you can’t find fresh ravioli, dried ravioli works, but cook it longer. For herbs, fresh basil is ideal. If you don’t have it, try dried basil. Just use less, as dried herbs are stronger. Fresh tomatoes add a sweet taste. If you can’t find cherry tomatoes, use small Roma tomatoes, but chop them smaller. Using good-quality olive oil also enhances the flavor. A high-grade olive oil can elevate your dish to new heights. This recipe shines when you pick the best ingredients. To cook the ravioli, start by bringing a large pot of salted water to a boil. Carefully add the ravioli to the boiling water. Cook them according to the package instructions, usually around 3 to 5 minutes. Stir gently to prevent them from sticking. To check if the ravioli are done, take one out and cut it in half. The filling should be hot and the pasta tender. Drain the ravioli in a colander, saving a little pasta water for later. This water helps to adjust the sauce later on. In a large skillet, heat the olive oil over medium heat. Add the minced garlic and cook for about 1 minute. You want the garlic to be fragrant but not browned. Next, add the halved cherry tomatoes to the skillet. Cook for about 5 to 7 minutes, stirring often. You want the tomatoes to soften and start to burst. This creates a fresh sauce. If you like a bit of heat, sprinkle in some red pepper flakes. Don’t forget to season with salt and pepper to taste. Once the tomatoes burst, it’s time to combine everything. Gently add the cooked ravioli to the skillet. Toss them with the tomato mixture to coat evenly. If the sauce seems dry, add a splash of the reserved pasta water. This helps to make a light, silky sauce. Finally, stir in the fresh basil just before serving. The heat from the pasta will wilt the basil, adding a lovely flavor. Serve hot and, if you like, sprinkle some grated Parmesan cheese on top for extra flavor. For the complete recipe, check out the Full Recipe. To boost the taste of your dish, add fresh herbs like thyme or oregano. You can also use a pinch of crushed garlic for extra zing. For a richer sauce, consider adding a splash of white wine while cooking the tomatoes. This adds depth and a slight tang. A teaspoon of balsamic vinegar can also enhance the sweetness of the tomatoes. When serving, place the ravioli in a shallow bowl. Top with the tomato mix, letting some sauce spill over. This gives a rustic look. For added color, sprinkle chopped basil on top. You can also use a few whole cherry tomatoes for visual appeal. A dusting of Parmesan cheese adds a nice touch, making it look gourmet. Avoid overcooking the ravioli. This can turn them mushy and less appealing. Always taste them about a minute before the package time ends. Also, season your sauce well. If it lacks flavor, the whole dish will too. Add salt and pepper gradually, tasting as you go to get it just right. {{image_2}} You can add protein to your ravioli dish. Chicken or shrimp works well. For chicken, use cooked, shredded pieces. For shrimp, choose medium-sized shrimp, peeled and deveined. Cook shrimp in the skillet for about three to four minutes until they turn pink. You can also grill or pan-sear the chicken before adding it to the dish. This gives your meal a tasty boost and keeps it filling. If you want a meat-free version, try adding more vegetables. Spinach, zucchini, or bell peppers add color and flavor. Sauté these veggies in the skillet with garlic and tomatoes. You can also use white beans for protein. They blend nicely with the sauce and keep the dish light. This way, you enjoy a tasty meal that’s still filling and healthy. You can change up the sauce base for a new twist. A classic tomato sauce is great, but you can also try a creamy sauce. Mix cream cheese or heavy cream into the tomato mix for a rich taste. A pesto sauce is another fun option. Blend fresh basil, garlic, nuts, and olive oil for a fresh flavor. Each option offers a unique taste while keeping the dish fresh and exciting. For the full recipe, check out the main article! To keep your ravioli fresh, refrigerate it right away. Place the ravioli in an airtight container. This will help prevent them from drying out. It is best to store the sauce separately if you have leftovers. This way, the ravioli stays soft and the sauce remains fresh. You can keep the dish in the fridge for about 3 to 4 days. After that, the flavor may fade. Always check for any signs of spoilage before eating. If you want to save ravioli for later, freezing is a great option. First, let the dish cool completely. Then, place the ravioli in a freezer-safe container. Make sure to leave some space for the ravioli to expand as they freeze. You can also use a freezer bag. Just remove as much air as possible. To reheat frozen ravioli, take it out of the freezer and let it thaw in the fridge overnight. You can also reheat it directly from the freezer. Boil water and gently add the frozen ravioli. Cook for 2 to 3 minutes until hot. You can also use a microwave, but be careful not to overcook it. This dish is best enjoyed fresh, so use it within 2 to 3 months for the best taste. For the [Full Recipe](#), you will find all the steps to make this tasty dish! To make homemade ravioli, follow these basic steps: - Make the dough: Mix flour and eggs until smooth. - Roll the dough: Use a pasta machine to thin it out. - Prepare the filling: Combine cheese, herbs, and spices. - Shape the ravioli: Place filling on dough, cover, and cut. - Cook the ravioli: Boil in salted water until they float. This process takes time but is rewarding. Fresh ravioli tastes amazing. Yes, you can use dried ravioli. Here are the differences: - Cooking time: Dried ravioli takes longer to cook. - Taste: Fresh ravioli has a softer, more delicate flavor. - Texture: Dried ravioli is firmer and chewier. If you’re in a hurry, dried ravioli works well. Just adjust the cooking time. Here are some great side dish ideas: - Garlic bread: A classic choice to soak up sauce. - Salad: A fresh green salad adds color and crunch. - Steamed veggies: Broccoli or asparagus are tasty options. These sides complement ravioli well and create a balanced meal. There are many creative ways to enhance flavor: - Add spices: Try Italian herbs like oregano and thyme. - Use sauces: A creamy sauce gives a rich taste. - Garnish: Top with nuts or extra cheese for texture. These tweaks make your dish more exciting and flavorful. This guide walks you through making a delicious cheese ravioli dish. You learned about fresh ingredients, easy cooking steps, and flavor-enhancing tips. Remember to avoid common mistakes, like overcooking the ravioli. Explore variations for proteins or veggies to fit your taste. With proper storage, you can enjoy leftovers too. Bringing these elements together makes every bite memorable. Try it, and enjoy a meal that delights.

Looking for a quick and tasty dinner? This Delicious Ravioli with Fresh Tomatoes recipe is your answer! With just a few fresh ingredients, you can whip up a flavorful dish …

Read more

Categories Dinner

Creamy Greek Salad Fresh and Tasty Delight

May 27, 2025 by Chef Nate
- 2 cups cherry tomatoes - 1 cucumber - 1 red bell pepper - 1 yellow bell pepper - 1/2 red onion - Fresh parsley - 1 cup kalamata olives - 2 tablespoons olive oil - 1 tablespoon red wine vinegar - 1 teaspoon dried oregano - Salt and pepper - 1/2 cup Greek yogurt - 1 cup feta cheese To make a tasty Creamy Greek Salad, start with fresh produce. You need ripe cherry tomatoes, a crisp cucumber, and colorful bell peppers. The red and yellow bell peppers add sweetness and crunch. A half red onion brings a nice bite. Fresh parsley at the end gives a pop of green and flavor. Next, gather your pantry staples. Kalamata olives add a salty, briny touch. Olive oil and red wine vinegar create a rich dressing. Dried oregano gives that classic Greek flavor. Don’t forget to season with salt and pepper to taste. For the creamy part, Greek yogurt makes it smooth and rich. Crumbled feta cheese adds a tangy taste and texture. This combination creates a delicious salad that everyone will love. For the full recipe, check out the instructions and enjoy making this delightful dish! Start by chopping the cherry tomatoes. Cut each one in half. Next, take your cucumber and dice it into small pieces. This gives your salad a nice crunch. For the bell peppers, first remove the seeds. Then, dice the red and yellow bell peppers into bite-sized cubes. Finally, finely chop the red onion. These fresh veggies will make your salad bright and tasty. In a small bowl, whisk together the Greek yogurt, olive oil, and red wine vinegar. Mix until smooth and creamy. This dressing adds a rich flavor. Next, add dried oregano, salt, and pepper to the bowl. Stir well to combine everything. This creamy dressing is key to your salad. In a large mixing bowl, toss the chopped vegetables with your creamy dressing. Make sure all the veggies are well coated. This helps every bite burst with flavor. Now, gently fold in the crumbled feta cheese. Be careful not to break it too much. This cheese adds a salty kick. For the full recipe, refer to the earlier section. Let the salad sit for about 10 minutes to allow the flavors to blend. Enjoy your fresh and creamy Greek salad! To get the right creaminess, adjust the yogurt thickness. If you want it thicker, use less yogurt. For a thinner mix, add a splash of water or more yogurt. This keeps the salad light and fresh. Crumbling feta cheese can be tricky. Use your hands for a better texture. This helps the feta mix well without becoming mushy. Marinating the salad can boost the taste. Let it sit for at least 10 minutes. This allows the veggies to soak up the flavors. You can also add herbs or spices. Fresh dill or mint can give it a nice twist. A pinch of crushed red pepper adds heat. Experiment to find what you love! For gatherings, serve the salad in a large bowl. This makes it easy for guests to help themselves. Drizzle a tiny bit of olive oil on top for shine. Sprinkle fresh parsley for color. You can also use lemon slices as a garnish. They add a bright touch and a hint of flavor. {{image_2}} You can make your creamy Greek salad even heartier by adding protein. Grilled chicken works great. Just slice it thin and mix it in. Chickpeas are another tasty option. They add a nice crunch and protein boost. If you're a seafood lover, try shrimp or tuna. Cooked shrimp adds a fun twist. Tuna gives a nice flavor and pairs well with the salad. If you want to switch things up, try a different dressing. You can swap Greek yogurt for a creamy ranch or Caesar dressing. This gives the salad a new taste. For a vegan option, blend silken tofu with lemon juice and herbs. This creates a smooth, creamy dressing without dairy. It’s just as yummy! Seasonal veggies can add new colors and flavors. In summer, toss in fresh corn or zucchini. In fall, roasted butternut squash is excellent. Fruits can also add a twist. Slices of avocado make it creamy and rich. Pomegranates add a burst of sweetness and crunch. These add-ins give your creamy Greek salad a whole new vibe. For the full recipe, check out the ingredients and steps above! To keep your creamy Greek salad fresh, store it in an airtight container. Glass or plastic containers work well. If you have leftovers, separate the salad from the dressing. This helps keep the veggies crisp. Store the dressing in a small jar or bowl. When stored properly, your salad can last in the fridge for about three days. After this, it may lose its taste and texture. Look for signs of spoilage, like a sour smell or slimy veggies. If you see any of these signs, it's best to throw it away. You can freeze Greek salad, but the texture may change. If you want to freeze it, leave out the creamy ingredients. Do not freeze the feta cheese or yogurt. Instead, freeze the veggies in a freezer bag. When ready to eat, thaw the veggies and mix in fresh dressing. This keeps your salad tasty and fresh! A creamy Greek salad brings a smooth texture to a classic dish. The main difference is the creamy dressing made with Greek yogurt. Traditional Greek salad uses olive oil and vinegar. The creamy version adds richness and a tangy flavor. This makes it a great choice for those who love a little extra creaminess in their salads. The creamy dressing pairs well with the fresh veggies and salty feta. You will enjoy the blend of flavors and textures. Yes, you can make the salad in advance. Prep the veggies and make the dressing ahead of time. Store the veggies in one bowl and the dressing in another. Combine them just before serving. This keeps the salad fresh and crunchy. Letting the salad sit for a few minutes also helps the flavors mix. However, do not let it sit too long, or the veggies may become soggy. If you need a substitute for Greek yogurt, try sour cream. It has a similar tangy taste. You can also use regular yogurt, but it will be thinner. Another option is mayonnaise for a richer flavor. If you want a dairy-free choice, try using avocado or silken tofu. Both can create a creamy texture while adding unique flavors. This blog post explored how to make a refreshing creamy Greek salad. We covered the needed fresh produce and pantry staples, along with step-by-step instructions. Tips for perfecting creaminess, enhancing flavor, and presentation ideas were shared to boost your salad game. Variations added proteins and seasonal options for unique flavors. Lastly, we looked at best storage practices to keep leftovers fresh. Enjoy crafting this delicious salad and experimenting with your own twists! It's simple, tasty, and sure to impress.

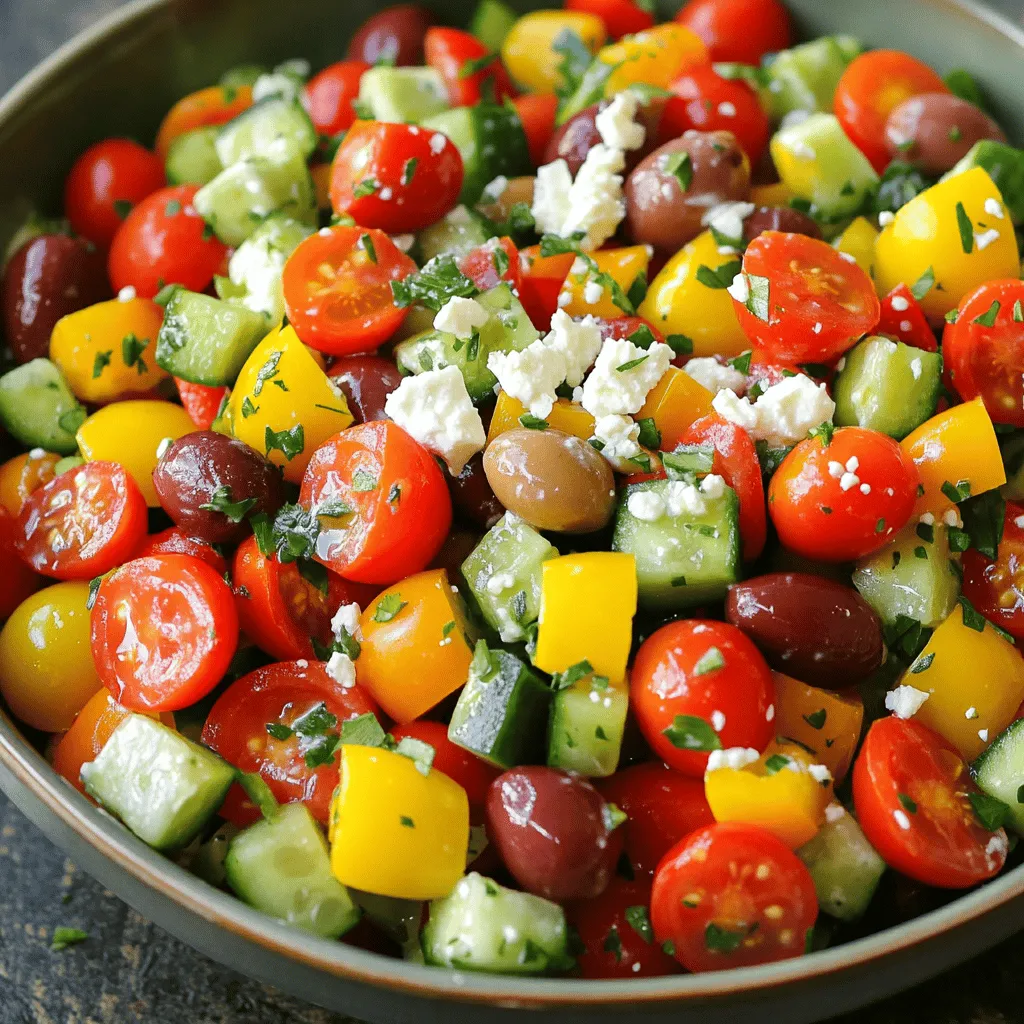
Welcome to the world of a Creamy Greek Salad, a fresh and tasty delight! If you’re looking for a dish that’s packed with flavor and easy to make, this recipe …

Read more

Categories Salads

Banana Pudding Rice Krispie Treats Simple Snack Delight

May 27, 2025 by Chef Nate
To make Banana Pudding Rice Krispie Treats, gather these simple ingredients. Each one plays a key role in creating this delightful snack. - 6 cups Rice Krispies cereal - 1 cup mini marshmallows - 1/2 cup unsalted butter - 1 cup banana pudding mix - 1/2 cup milk - 1 teaspoon vanilla extract - 1 cup sliced ripe bananas - 1/2 cup whipped cream (optional) - Crushed graham crackers (for garnish) These ingredients blend to form a sweet, chewy treat. The Rice Krispies add crunch. Mini marshmallows bring sweetness and stickiness. Unsalted butter helps everything stick together. The banana pudding mix gives flavor and creaminess. Milk adds moisture for a soft texture. Vanilla extract enhances the taste. Ripe bananas add freshness and fruity notes. Whipped cream can top the treats for extra fun. Finally, crushed graham crackers provide a nice crunch on top. You can find the full recipe in the recipe section. This list is easy to follow and fun to prepare! 1. Melting the butter and marshmallows Start by grabbing a large saucepan. Place it over low heat. Add the unsalted butter. Let it melt slowly. Once the butter melts, add the mini marshmallows. Keep stirring until they melt completely. The mixture should be smooth and creamy. 2. Mixing in the banana pudding and cereal Remove the saucepan from the heat. Now, add the banana pudding mix and milk. Stir well to combine. You want a thick, creamy mixture. Next, add the Rice Krispies cereal. Mix it in gently. Make sure every piece of cereal is coated with the gooey goodness. 3. Folding in the bananas Take your ripe bananas and slice them into small pieces. Gently fold them into the mixture. Be careful not to mash the bananas. You want them to stay chunky for texture and flavor. 1. Preparing the baking pan Grab a 9x13-inch baking pan. Lightly grease it with butter or cooking spray. This helps the treats come out easily later. 2. Pouring and pressing the mixture Pour the Rice Krispies mixture into the prepared pan. Use a spatula to press it down firmly. Make sure it forms an even layer. This step is key for nice, even treats. 3. Cooling and cutting the treats Let the mixture cool at room temperature for about 30 minutes. Once it is set, cut it into squares. If you want, add a dollop of whipped cream and sprinkle crushed graham crackers on top. This adds a nice crunch and extra flavor. For the full recipe, check out the details above. Enjoy your Banana Pudding Rice Krispie Treats! To make the best Banana Pudding Rice Krispie Treats, follow these simple tips: - Ensure marshmallows are fully melted: Start with low heat when melting butter. Add mini marshmallows right after the butter melts. Stir until they turn smooth and creamy. This step is key for the best texture. - Properly fold in ingredients to maintain texture: When mixing in the Rice Krispies, use a gentle hand. Stir carefully to coat every piece. When adding bananas, fold them in slowly to keep them intact. This helps keep your treats light and fluffy. Make your treats even more fun with these serving ideas: - Ideas for topping and presentation: After cutting the treats into squares, consider adding a dollop of whipped cream on top. Sprinkle crushed graham crackers for a nice crunch. You can even place a slice of banana on top for a cute touch. - Pairing with a beverage or complementary dessert: These treats go well with milk or a banana smoothie. You could also serve them with a scoop of vanilla ice cream. The creamy flavors will balance nicely with the banana pudding taste. Enjoy making and sharing these delicious Banana Pudding Rice Krispie Treats! For the full recipe, don't forget to check out the details above. {{image_2}} You can change the flavor of your Banana Pudding Rice Krispie Treats easily. Here are some fun ideas: - Adding chocolate chips: Mix in 1 cup of chocolate chips for a sweet twist. The chocolate pairs well with banana. It adds a rich layer of flavor to each bite. - Incorporating nuts or coconut: You can add 1/2 cup of chopped nuts or shredded coconut. Nuts give a nice crunch. Coconut adds a tropical flair, making your treats even more exciting. You can adapt this recipe to fit different diets. Here are a couple of adjustments you can try: - Gluten-free alternatives: Use gluten-free Rice Krispies. This keeps your treats safe for those with gluten issues. Always check the label to ensure they are certified gluten-free. - Vegan adjustments: Replace the butter with coconut oil or vegan butter. Use plant-based milk instead of cow's milk. This way, you can enjoy the treats without animal products. These variations and adjustments make the recipe fun and accessible for everyone. For the complete recipe, check out the [Full Recipe]. To keep your Banana Pudding Rice Krispie Treats fresh, store them properly. You can keep them at room temperature for a short time. Place them in an airtight container. This helps prevent them from getting hard or stale. Make sure to separate layers with parchment paper. This keeps them from sticking together. If you want to store them longer, refrigeration is a great option. Place the treats in the fridge in an airtight container. This helps them last a bit longer. Just remember to let them sit at room temperature for a few minutes before serving. This will make them softer and easier to enjoy. These treats are best enjoyed fresh, but they can last a while. At room temperature, they stay good for about 2 to 3 days. In the fridge, they can last up to a week. Check for signs of spoilage, like a change in smell or texture. If they become hard or dry, it’s time to toss them. Enjoy them while they are still soft and tasty! Can I use instant banana pudding instead? Yes, you can use instant banana pudding. It adds a strong banana flavor. Mix it into the melted marshmallow and butter as you would with the regular pudding mix. How can I make these treats without marshmallows? You can replace marshmallows with peanut butter or melted chocolate. These options will still bind the Rice Krispies together. Just warm them until they are smooth and mix them in. Can I freeze Banana Pudding Rice Krispie Treats? Yes, you can freeze these treats. Wrap them tightly in plastic wrap and place them in a freezer bag. They can last up to two months in the freezer. Troubleshooting common issues If your treats are too sticky, try adding a bit more Rice Krispies. If they fall apart, mix in more melted butter or marshmallow. This will help them stick better. Suggestions for enhancing flavor and texture Add a pinch of cinnamon or nutmeg for warmth. You can also mix in mini chocolate chips for a sweet twist. Top with crushed graham crackers for extra crunch. This blog covered how to make delicious Banana Pudding Rice Krispie Treats. You learned the key ingredients, preparation steps, and tips for great results. We explored fun variations and storage methods too. These treats are easy to make and always a hit. Feel free to be creative with flavors and toppings. Whether you share them or enjoy them yourself, these treats will bring joy. Happy cooking!

Are you ready for a tasty treat that’s easy to make? Look no further than Banana Pudding Rice Krispie Treats! This fun snack combines the crunch of cereal with the …

Read more

Categories Desserts

Overnight Crème Brûlée French Toast Delight Recipe

May 27, 2025 by Chef Nate
To create this indulgent dish, you need a few key ingredients: - 1 loaf of brioche or challah bread, cut into thick slices - 4 large eggs - 2 cups whole milk - 1/2 cup heavy cream - 1/2 cup sugar - 2 teaspoons vanilla extract - 1 teaspoon ground cinnamon - Pinch of salt - 1/2 cup brown sugar (for the caramelized topping) These ingredients bring rich flavors and a creamy texture to your French toast. The brioche or challah bread absorbs the egg mixture well, giving you that custardy bite. The eggs, milk, and cream work together to make a smooth base. Sugar adds sweetness, while cinnamon gives a warm, cozy flavor. You can take your French toast to the next level with some tasty toppings: - Fresh berries - Whipped cream Fresh berries add a burst of color and a tangy contrast. Whipped cream makes it even more special and creamy. You can mix and match these garnishes based on your mood or what you have on hand. Enjoy customizing your dish! For the full recipe, check out the detailed steps to create this delightful breakfast treat. Slicing the Bread Start by cutting your brioche or challah bread into thick slices. Aim for about 1 to 1.5 inches thick. This thickness helps the bread soak up the egg mixture well. Use a serrated knife for clean cuts. Arranging in the Baking Dish Next, take a greased 9x13-inch baking dish. Arrange the slices in the dish. Overlap them slightly to fit all the bread. This step ensures every piece gets that creamy texture later on. Whisking Ingredients Together In a large bowl, crack four eggs. Add two cups of whole milk and half a cup of heavy cream. Pour in half a cup of sugar, two teaspoons of vanilla extract, one teaspoon of ground cinnamon, and a pinch of salt. Whisk these together until smooth. Ensuring a Smooth Consistency Make sure there are no lumps in your mixture. A smooth consistency helps the bread soak evenly. If you see any lumps, keep whisking until everything is well combined. Pouring the Egg Mixture Once your egg mixture is ready, slowly pour it over the arranged bread slices. Use a spatula to gently press down on the bread. This helps each slice soak up the mixture fully. Refrigeration Process Cover the baking dish with plastic wrap. Place it in the fridge overnight. If you’re short on time, let it soak for at least four hours. This soaking time is key for great flavor and texture. Baking Instructions Preheat your oven to 350°F (175°C). Remove the dish from the fridge. Let it sit at room temperature for about 15 minutes before baking. Bake for 30 to 35 minutes. Look for a golden top and set custard. The smell will be heavenly! Remember, for the full recipe, you can check the earlier sections. Enjoy making this delightful dish! Bread Selection Tips Choose a rich bread like brioche or challah. These breads soak up the egg mixture well. Their soft and airy texture makes for a light meal. Avoid using stale bread, as it may become too soggy. Fresh bread gives the best results. Soaking Tips Soak the bread for at least four hours or overnight. This allows the flavors to blend and the bread to absorb the mixture. When soaking, gently press the bread down with a spatula. This step ensures every slice gets coated. Using a Kitchen Torch vs. Broiler You can use a kitchen torch to caramelize the sugar. This tool gives you more control. If you don’t have one, the broiler works too. Place the dish under the broiler for three to five minutes. Stay close and watch to prevent burning. Safety Tips for Caramelizing Be careful when using a kitchen torch. Keep the flame moving to avoid burning the sugar. For the broiler, use oven mitts to handle hot dishes. Always keep a safe distance from the flame. Best Pairings Serve your French toast with fresh berries. Strawberries, blueberries, or raspberries add bright flavors. A dollop of whipped cream can add creaminess. Maple syrup also makes a sweet addition. Presentation Tips Slice the French toast into squares or triangles. Arrange them neatly on a plate. Sprinkle extra brown sugar on top for a fancy look. Add a few berries on the side for color. This makes your dish pop and look appealing. {{image_2}} To make your Overnight Crème Brûlée French Toast even better, try adding zest. Zest from oranges or lemons brightens the flavor. It gives a fresh twist to the sweet custard. Just add a teaspoon of zest when you mix the eggs and cream. You can also experiment with different extracts. Instead of just vanilla, try almond or maple extract. Each extract brings its unique taste. Just use about half the amount of a stronger extract like almond. If you need gluten-free options, use gluten-free bread. Many stores offer gluten-free brioche or challah. This way, you can enjoy the same great taste without the gluten. For dairy-free substitutes, try almond milk or coconut milk. You can replace the heavy cream with coconut cream. This keeps the creaminess, but makes it dairy-free. Adding fresh fruits can make your French toast even more delightful. Sliced bananas or berries add color and taste. You can mix them into the egg mixture or layer them between the bread slices. If you love crunch, add nuts. Chopped pecans or walnuts give a nice texture. Sprinkle them on top before baking for a delicious crunch. Feel free to explore these ideas to make this dish your own. For the full recipe, check the link above. To keep your Overnight Crème Brûlée French Toast fresh, use an airtight container. This will help lock in moisture and flavor. You can store leftovers in the fridge for up to three days. If you want to keep it longer, consider freezing it. In that case, wrap individual slices in plastic wrap and place them in a freezer bag. They can last for up to three months in the freezer. When it's time to enjoy your leftovers, reheating is key. The best way to reheat is in the oven. Preheat your oven to 350°F (175°C). Place the French toast on a baking sheet and cover it with aluminum foil. Heat for about 15 to 20 minutes. This will warm it through without drying it out. If you prefer a quicker method, you can use the microwave. Heat a slice for about 30 seconds, but be careful. Microwaving can make it a bit soggy. To keep some crispness, consider giving it a quick toast in a pan after microwaving. This will help retain that fresh-baked feel. Enjoy your delicious French toast again! Yes, you can make Overnight Crème Brûlée French Toast the night before. It actually works best this way. You prepare it in advance, letting the bread soak overnight. This helps the bread absorb the egg mixture fully. This soaking time makes it extra soft and creamy. You just pop it in the oven the next morning. This saves you time and makes breakfast easier. I recommend using brioche or challah bread for this recipe. Both types of bread are soft and rich. They soak up the egg mixture well. This gives you a custardy texture. You can also use other bread types like French bread. However, brioche and challah will give the best flavor and texture. Just ensure the bread is fresh and cut into thick slices. To check if your French toast is done, look for a few signs. First, check if the top is golden brown. This usually takes about 30 to 35 minutes in the oven. Second, you can insert a knife in the center. If it comes out clean, it is done. The custard should also be set, not jiggly. If you see bubbles on top, that’s a good sign too. Enjoy this delicious dish warm for the best experience. Overnight Crème Brûlée French Toast blends rich flavors and simple steps. We covered the best bread, the egg mix, and baking methods. Remember, perfect texture matters, and garnishes enhance the dish's appeal. With variations, you can make this recipe fit your tastes. Store leftovers wisely, and follow reheating tips for best results. Enjoy this lovely dish and share your creations with others. It’s a delightful treat for any breakfast table.

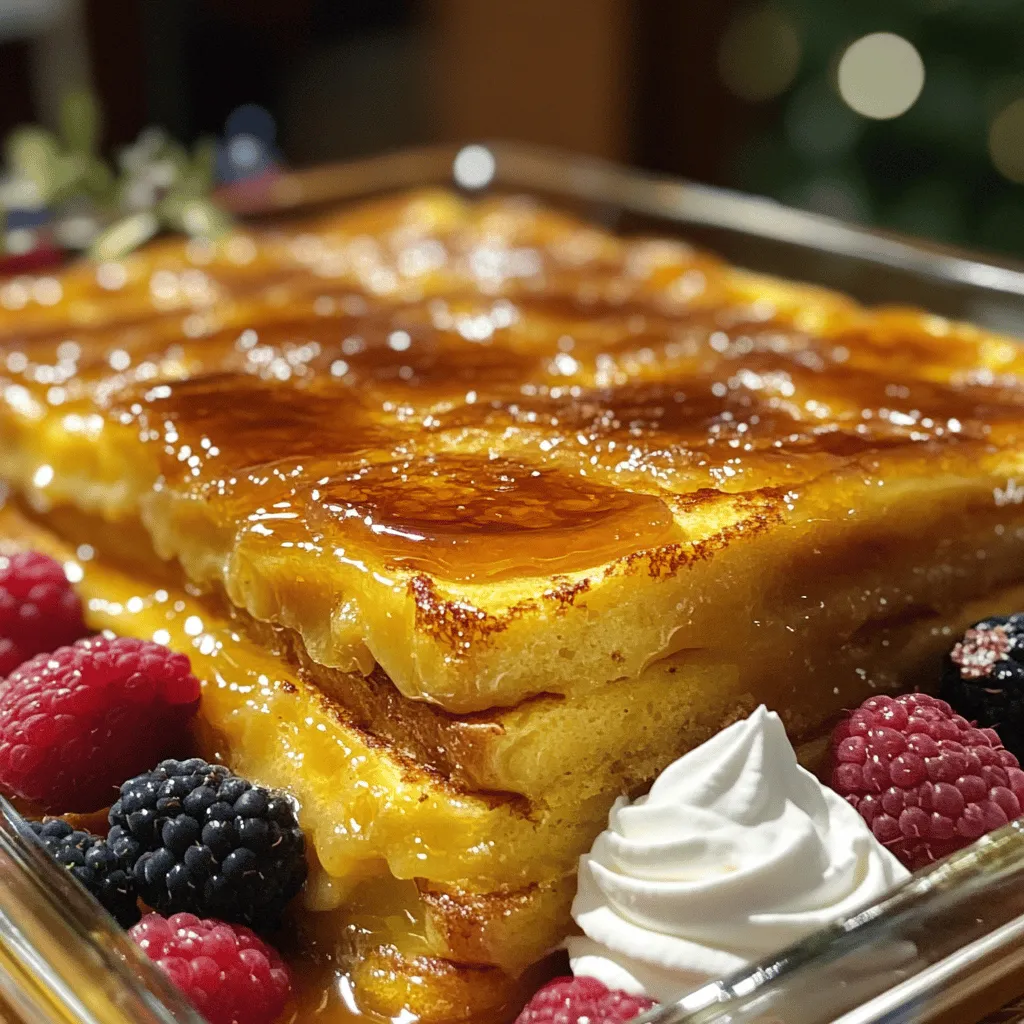
Get ready to impress your family and friends with Overnight Crème Brûlée French Toast! This easy recipe combines the rich flavors of crème brûlée with the beloved breakfast classic. You’ll …

Read more

Categories Breakfast

Brownie Cookies Scrumptious Treat You Will Love

October 10, 2025May 25, 2025 by Chef Nate
To make your brownie cookies, gather these key ingredients: - 1 cup all-purpose flour - 1/2 cup unsweetened cocoa powder - 1/2 teaspoon baking powder - 1/4 teaspoon salt - 1/2 cup unsalted butter, melted - 1 cup granulated sugar - 1/2 cup brown sugar, packed - 2 large eggs - 1 teaspoon vanilla extract - 1/2 cup semi-sweet chocolate chips These ingredients work together to create that rich, fudgy flavor you love. You can add fun twists to your brownie cookies. Consider using: - 1/2 cup walnuts or pecans, chopped - Sea salt for a savory touch Nuts add crunch, while sea salt balances the sweetness. Feel free to experiment! If you need alternatives, here are some options: - Use coconut oil instead of butter for a dairy-free option. - Swap all-purpose flour with almond flour for a gluten-free choice. - Replace granulated sugar with coconut sugar for a lower glycemic option. These swaps can change the taste and texture, so choose based on what you want! {{ingredient_image_1}} First, gather all your ingredients. You need: - 1 cup all-purpose flour - 1/2 cup unsweetened cocoa powder - 1/2 teaspoon baking powder - 1/4 teaspoon salt - 1/2 cup unsalted butter, melted - 1 cup granulated sugar - 1/2 cup brown sugar, packed - 2 large eggs - 1 teaspoon vanilla extract - 1/2 cup semi-sweet chocolate chips - 1/2 cup walnuts or pecans, chopped (optional) Make sure everything is measured out. This step saves time and helps you stay organized. Start by preheating your oven to 350°F (175°C). Line a baking sheet with parchment paper. Next, in a medium bowl, whisk the flour, cocoa powder, baking powder, and salt. Set this bowl aside. In a large bowl, mix the melted butter, granulated sugar, and brown sugar until smooth. Add the eggs one at a time. Mix well after each egg. Then, stir in the vanilla extract. Gradually add the dry mixture to the wet mixture. Stir gently until just combined. You want to avoid overmixing. Finally, fold in the chocolate chips and nuts if you like. Scoop tablespoons of cookie dough onto the prepared baking sheet. Space them about 2 inches apart. Bake the cookies for 10-12 minutes. The edges should be set, but the centers will be soft. After baking, let the cookies cool on the sheet for about 5 minutes. Then, transfer them to a wire rack to cool completely. Enjoy the smell of fresh cookies as they cool! To get the best texture, mix your dough just right. Overmixing can make cookies tough. Aim for a smooth, thick dough with a few lumps. The melted butter helps keep them soft and chewy. Bake them until the edges are set, but the center feels soft. This makes them fudgy and nice. Want to boost flavor? Add a pinch of sea salt on top before baking. It makes the chocolate taste richer. You can also try adding a teaspoon of instant coffee to the mix. This adds depth without a coffee flavor. If you love nuts, chop some walnuts or pecans. They add a nice crunch. Baking time is key to great cookies. Start with 10 minutes, but check for doneness. If you like softer cookies, take them out sooner. For firmer cookies, let them bake a minute or two longer. Each oven is a bit different, so keep an eye on them! Pro Tips Use Room Temperature Eggs: For a smoother batter, use eggs that are at room temperature. This helps them blend more easily with the other ingredients. Don’t Overbake: To achieve the perfect chewy texture, keep an eye on your cookies and remove them from the oven when the edges are set but the centers remain soft. Chill the Dough: If you have time, chill the cookie dough for about 30 minutes before baking. This enhances the flavor and helps maintain the cookie’s shape. Experiment with Mix-ins: Feel free to customize your cookies with different mix-ins like white chocolate chips, dried fruit, or even a hint of espresso powder for added depth of flavor. {{image_2}} If you want nut-free brownie cookies, just skip the nuts. Use all chocolate chips instead. You can still enjoy rich flavors without worries. If you like, add a bit more chocolate for extra taste. This keeps the cookies soft and chewy. To make gluten-free brownie cookies, swap the all-purpose flour for a gluten-free blend. Many brands work well. Be sure to check the blend has xanthan gum. This helps the cookies hold together. Follow the same steps, and you’ll have tasty treats for everyone. Adding flavors makes brownie cookies even better. For mint, add 1 teaspoon of mint extract. It gives a fresh twist. For a coffee kick, mix in 1 tablespoon of instant espresso powder. This adds a rich depth. You can experiment with other flavors, like orange zest or almond extract. The choice is yours! To keep your brownie cookies fresh, place them in an airtight container. This keeps them soft and chewy. You can store them at room temperature for up to a week. If you want them to last longer, consider refrigerating them. Just make sure they are in a sealed bag or container. Freezing brownie cookies is easy. First, let them cool completely. Next, place them on a baking sheet and freeze for one hour. After that, transfer the cookies to a freezer bag. They can stay in the freezer for up to three months. When you're ready to enjoy them, just thaw at room temperature. To reheat brownie cookies, use an oven or microwave. For the oven, preheat it to 350°F (175°C). Place the cookies on a baking sheet for about 5 minutes. If using a microwave, warm them for about 10-15 seconds. This helps restore their soft texture and delicious taste. Enjoy your warm brownie cookies! Yes, you can! Feel free to swap semi-sweet chocolate chips for dark or milk chocolate. Each type gives a unique taste. Dark chocolate makes the cookies richer, while milk chocolate adds a sweeter touch. You can even mix chocolates for fun flavors. Brownie cookies stay fresh for about one week at room temperature. Store them in an airtight container to keep them soft. If you want them to last longer, you can freeze them. They stay good in the freezer for up to three months. Absolutely! You can make the dough ahead and chill it in the fridge for up to 48 hours. This helps the flavors blend and makes the cookies even better. Just scoop and bake when you’re ready for a sweet treat! Check the edges of the cookies. They should be set and slightly firm. The centers will look soft and a bit shiny. If the edges are firm, but the center jiggles, that’s a good sign! Bake them for 10-12 minutes for the best results. Brownie cookies are simple yet delightful. You learned key ingredients, mixing steps, and baking tips. You can even make nut-free or gluten-free versions. Storing them is easy, so they'll stay fresh. Enjoy experimenting with flavors and variations. These cookies are a fun treat for everyone. Remember to keep it interactive, and let your taste guide you. Happy baking!

If you love brownies, you’re in for a treat! Brownie cookies combine rich chocolate flavor and chewy goodness in each bite. In this article, I’ll guide you through simple ingredients, …

Read more

Categories Desserts

Steak & Cheese Dirty Fry Burritos Rich Flavor Delight

May 23, 2025 by Chef Nate
- 1 lb flank steak, thinly sliced - 2 large potatoes, peeled and cut into fries - 1 cup shredded cheddar cheese - 4 large flour tortillas The main ingredients create a hearty and tasty dish. Flank steak provides rich flavor and great texture. Potatoes offer crunch, while cheddar cheese adds creaminess. Flour tortillas hold everything together, making it easy to enjoy. - 1 teaspoon garlic powder - 1 teaspoon paprika - 1 teaspoon onion powder - 1/2 cup sour cream - 1/4 cup salsa Seasoning enhances every bite. Garlic powder gives a warm taste, while paprika adds a slight smokiness. Onion powder boosts the flavor profile. Sour cream brings coolness, and salsa adds zest. Together, they create a perfect balance. - Oil for frying - Salt and pepper to taste - Fresh cilantro, chopped (for garnish) Oil is key for frying the potatoes to a golden crisp. Salt and pepper bring out the natural flavors. Fresh cilantro provides a pop of color and a bright finish. These essentials elevate the dish to a new level. For the complete recipe, check out the Full Recipe. Heat oil in a deep pan to medium-high. You need enough oil to cover the fries. When the oil is hot, add the cut potatoes carefully. Fry them for about 5-7 minutes. Look for a golden brown color. When done, take them out with a slotted spoon. Drain them on paper towels. Sprinkle salt over the fries while they cool. This step makes them tasty. In a skillet, heat a tablespoon of oil over medium-high heat. Season the flank steak slices with garlic powder, paprika, onion powder, salt, and pepper. This mix gives great flavor. Add the seasoned steak to the skillet. Cook for about 4-5 minutes. You want it browned and cooked to your liking. Once done, take it off the heat. Lay a flour tortilla flat on your work surface. Start with a good amount of cooked steak in the center. Next, add a handful of crispy fries. Then, sprinkle shredded cheddar cheese on top. Add a dollop of sour cream and a spoonful of salsa. To add a crunch, you can fry the rolled burritos. Place them seam-side down in the skillet. Cook each side for about 2-3 minutes until golden brown. This step is optional but adds great texture. Cut the burritos in half diagonally for serving. Garnish with chopped cilantro and serve with extra sour cream and salsa. For the full recipe, check the section above. To get the best fries, heat oil to 350°F. This temperature makes them crispy outside and soft inside. You can fry them in batches to avoid crowding. If you prefer a healthier option, bake them. Toss the fries with oil and seasoning. Bake at 425°F for about 30 minutes, flipping halfway for even cooking. Marinate your flank steak for at least 30 minutes. Use a mix of olive oil, lime juice, and spices to boost flavor. For cooking, let the steak rest after cooking. This helps keep it juicy and tender. Cook it until it's just medium-rare for the best taste. To keep your burritos intact, use large tortillas. Place the filling in the center, leaving space at the edges. Fold the sides in first, then roll from the bottom. Make sure to tuck the filling snugly. If you want to avoid spills, don’t overfill. A little practice will make you a burrito-wrapping pro! {{image_2}} You can swap flank steak for other meats. Try chicken, pork, or beef tips. If you want a vegetarian twist, use grilled mushrooms or seasoned tofu. Each choice brings its own flavor and texture. Feel free to get creative with toppings. Add guacamole, pico de gallo, or jalapeños for a kick. You can also layer in sautéed peppers, onions, or corn. Mixing in black beans or spinach boosts nutrition and taste. Personalize your burrito to suit your cravings! Do you like it hot? Add jalapeños or a spicy salsa. You can also drizzle hot sauce inside for a fiery burst. For those who prefer milder flavors, stick to regular salsa. Adjust the heat to match your taste, making every bite enjoyable. Store your burritos in an airtight container. This keeps them fresh. They can last about 3 days in the fridge. If you want to keep them longer, consider freezing. Always let the burritos cool before sealing. This helps prevent moisture build-up. To freeze burritos, wrap each one in plastic wrap. Then, place them in a freezer-safe bag. Mark the date on the bag. They can stay in the freezer for up to 3 months. When you want to eat them, thaw overnight in the fridge. Reheat in the microwave or oven until hot. This way, you keep the flavors intact. To avoid sogginess, do not stack burritos. Store them separately instead. If you have leftover fries, keep them in a separate container. You can make new meals with leftovers. Try chopping the burrito and tossing it in a salad. Or, turn the fries into a loaded fry dish. These tips help you enjoy every bite! Steak & Cheese Dirty Fry Burritos are a tasty blend of flavors. They combine juicy steak, crispy fries, and melted cheese. Each bite is a mix of textures that excite the taste buds. You start with a soft flour tortilla, then fill it with seasoned flank steak and hot fries. Top that with cheddar cheese, sour cream, and salsa for a kick. It’s a fun twist on a classic burrito, perfect for any meal. Yes, you can prep these burritos ahead of time. Cook the steak and fries first. Let them cool before storing them. Wrap each burrito tightly in foil or plastic wrap. Keep them in the fridge for up to two days. When you’re ready to eat, just reheat in the oven or microwave. This way, you save time and still enjoy a delicious meal. You can find these burritos at many food trucks and casual restaurants. Some popular chains might offer a version of this dish. To find the best spots, check local food blogs or apps. Ask friends for their favorite places too. They can lead you to some hidden gems. Serve these burritos with simple sides. A fresh salad or coleslaw pairs well. You can also add chips and guacamole for a crunchy side. For drinks, try iced tea or a cold soda. A light beer can also complement the flavors nicely. These sides enhance the meal and make it even more enjoyable. This blog post covered how to make delicious Steak & Cheese Dirty Fry Burritos. We looked at key ingredients, cooking steps, and tips for the best results. You can customize with different meats or add extra toppings to fit your taste. Remember to store leftovers properly to keep them fresh. With these tricks, you’ll make tasty burritos everyone will love. Try them out, and enjoy a fun meal at home!

Are you ready for a flavor-packed feast? Steak & Cheese Dirty Fry Burritos combine juicy steak, crispy fries, and gooey cheese in a tortilla wrap. This dish is not just …

Read more

Categories Dinner
Older posts
Newer posts
← Previous Page1 … Page77 Page78 Page79 … Page108 Next →

GRILLED FLAVORS

where delicious ideas come to life, from stovetop to backyard. Warm, simple, and always satisfying. 🍽️✨

PAGES

Home About Contact Privacy Policy Terms & Conditions Cookie Policy GDPR Policy Copyright Policy Disclaimer

CATEGORIES

Appetizers Desserts Salads Breakfast Dinner

Contact

  • Pinterest
  • Mail
Copyright © 2026 Grilled Flavors. All rights reserved.