Skip to content
grilledflavors.com
  • Home
  • Appetizers
  • Desserts
  • Salads
  • Breakfast
  • Dinner
  • Privacy Policy
  • Contact
  • About

Chef Nate

Easy Chicken & Rice Bowls with Garlic Sauce Delight

May 23, 2025 by Chef Nate
- 1 lb chicken breast, diced - 4 cloves garlic, minced - 1 tablespoon ginger, grated - 2 tablespoons soy sauce - 1 tablespoon honey - 1 tablespoon olive oil - 1 teaspoon sesame oil - Salt and pepper to taste Marinating the chicken is key. It helps the flavors soak in. This step makes the chicken juicy and tasty. You want every bite to burst with flavor. Let it marinate for at least 15 minutes. If you have more time, let it sit longer for even better taste. - 4 cloves garlic, minced - 2 tablespoons soy sauce - 1 tablespoon honey - 1 tablespoon olive oil - 1 teaspoon sesame oil The garlic sauce is simple yet bold. Garlic gives it a strong flavor. Soy sauce adds umami, while honey brings a hint of sweetness. You can switch up flavors by adding chili flakes or lime juice. These changes can give the dish a new twist. - 2 cups cooked jasmine rice - 1 bell pepper, thinly sliced - 1 cup broccoli florets - 2 green onions, chopped (for garnish) - Sesame seeds (for garnish) Adding vegetables makes the bowls colorful and healthy. Bell pepper adds crunch and sweetness. Broccoli gives a nice bite and bright green color. For garnishing, sprinkle green onions and sesame seeds on top. This adds a lovely touch and extra flavor. By using these ingredients, your Easy Chicken & Rice Bowls with Garlic Sauce will shine! You can find the full recipe to create this delightful dish. How to marinate the chicken To start, mix garlic, ginger, soy sauce, honey, olive oil, sesame oil, salt, and pepper in a bowl. This mix creates a tasty marinade. Add the diced chicken breast to the bowl. Coat the chicken well and let it marinate for at least 15 minutes. This step builds flavor and keeps the chicken juicy. Cooking the chicken to perfection After marinating, heat a large skillet over medium-high heat. Place the marinated chicken in the skillet. Cook it for about 6-8 minutes until golden brown and fully cooked. Stir occasionally to ensure even cooking. Once done, remove the chicken from the skillet and set it aside. Best practices for stir-frying Use the same skillet for the veggies. This way, you capture all the delicious flavors. Add sliced bell pepper and broccoli florets to the hot skillet. Stir-fry these for about 4-5 minutes. Keep the heat high to get a nice sear while cooking. Tips to retain crunch and color To keep veggies crisp and vibrant, avoid overcooking. Stir them quickly and watch closely. You want them tender but still bright and crunchy. This adds a fresh touch to your dish. Correct layering techniques In serving bowls, start with a generous scoop of cooked jasmine rice. This serves as the base. Next, add the garlic chicken and sautéed veggies on top. Layering this way keeps the dish balanced and colorful. Serving suggestions Finish the bowls by sprinkling chopped green onions and sesame seeds for texture. This adds extra flavor and visual appeal. You can enjoy these bowls warm or at room temperature. For more details, check the Full Recipe. How long should you marinate for maximum flavor? Aim for at least 15 minutes. This time allows the chicken to soak up the garlic and soy sauce. For deeper flavor, you can marinate it for up to 2 hours in the fridge. What are the best storage practices during marination? Use a sealed plastic bag or a covered bowl. This keeps the chicken from drying out. Place it in the fridge to keep it safe until cooking. How can you determine the doneness of chicken? Use a meat thermometer. The chicken should reach an internal temperature of 165°F. If you cut into it, the juices should run clear, not pink. How do you achieve the right texture in vegetables? Stir-fry over high heat for a short time. This method keeps the veggies crisp and colorful. Don't crowd the pan; cook in batches if needed. What are some ideas for plating? Start with a scoop of jasmine rice in the bowl. Layer the chicken and veggies on top. Create a colorful contrast with the bright bell peppers and green broccoli. How can you garnish for visual appeal? Sprinkle chopped green onions and sesame seeds on top. This adds a pop of color and a nice crunch. You can also add a wedge of lime for a fresh touch. For the full recipe, check out the Garlic Bliss Chicken & Rice Bowls. {{image_2}} You can change up the proteins in your Easy Chicken & Rice Bowls. Try using shrimp or beef for a different taste. Tofu works great too if you want a plant-based option. For vegetables, feel free to switch it up. You can add carrots, snap peas, or zucchini. This lets you customize the dish to what you love most. Mix and match to find your favorite combo! While garlic sauce is a star, don’t be shy to explore other sauces. Teriyaki or sweet chili sauce can bring a new twist. You can also use sriracha for some heat. For spices, try adding paprika or cumin. These can enhance the overall flavor without much effort. Even a sprinkle of Italian herbs can create a fun fusion dish. To make this dish gluten-free, use tamari instead of soy sauce. It gives similar flavor without gluten. Want a low-carb version? Swap out rice for cauliflower rice. This keeps it light but still filling. You can enjoy all the yummy flavors without the carbs! To keep your easy chicken and rice bowls fresh, cool them first. Place the bowls in airtight containers. Store them in the fridge for up to four days. If you want to save them longer, freeze the chicken mixture separately from the rice. Use freezer-safe containers to avoid freezer burn. You can keep them in the freezer for up to three months. When ready to eat, here are my favorite reheating methods: - Microwave: Place the bowl in the microwave. Heat for 2-3 minutes. Stir halfway through for even heating. - Stovetop: In a pan, add a splash of water. Heat over medium heat for 5-7 minutes. Stir often to keep it from sticking. For both methods, ensure the chicken is heated to 165°F to keep it safe. In the fridge, your chicken and rice bowls last about four days. If you freeze them, they last for three months. Check for signs that they are no longer good. If you see any discoloration or smell a strange odor, it’s best to toss them. Always trust your senses when storing food. Enjoy your meals knowing you’re safe! You can enhance your meal with side dishes and drinks. Here are some ideas: - Recommended side dishes: - Steamed green beans or asparagus - A fresh garden salad - Crispy roasted sweet potatoes - Drink pairings that enhance the meal: - A light, fruity white wine - Sparkling water with lemon - A refreshing iced tea These pairings will bring balance and extra flavor to your chicken and rice bowls. Yes, you can definitely make this recipe ahead of time. Here are some tips: - Tips for meal prepping: - Marinate the chicken the night before. - Cook the chicken and vegetables, then store them in separate containers. - Storing pre-cooked components: - Keep the rice in an airtight container. - Refrigerate everything for up to three days. When you’re ready to eat, just heat it up and enjoy! Reducing sodium is easy with a few simple swaps. Here are my suggestions: - Suggestions for low-sodium substitutions: - Use low-sodium soy sauce or coconut aminos. - Swap out regular broth for low-sodium options. - Tips for balancing flavors without added salt: - Add fresh herbs like cilantro or parsley. - Use citrus juice for a zesty kick. These changes will keep your dish tasty while being mindful of sodium. This blog post covered everything you need to make easy chicken and rice bowls. We discussed essential ingredients, including how to marinate chicken and create a tasty garlic sauce. You learned step-by-step cooking and assembling tips for the perfect meal. Remember, you can customize this dish with different proteins and vegetables. With the right storage and reheating methods, leftovers can taste great, too. Enjoy your cooking journey and make it your own!

If you’re craving a quick and tasty meal, you’re in for a treat! My Easy Chicken & Rice Bowls with Garlic Sauce will satisfy your taste buds in no time. …

Read more

Categories Dinner

Best Chocolate Cake Recipe Simple and Delicious Treat

May 23, 2025 by Chef Nate
- 1 ¾ cups all-purpose flour - 1 ¾ cups granulated sugar - ¾ cup unsweetened cocoa powder - 1 ½ teaspoons baking powder - 1 ½ teaspoons baking soda - 1 teaspoon salt - 2 large eggs - 1 cup whole milk - ½ cup vegetable oil - 2 teaspoons vanilla extract - 1 cup boiling water - Optional dark chocolate chips When you bake this cake, each ingredient plays a key role. The flour gives structure. The sugar adds sweetness. Cocoa powder gives that rich chocolate flavor. Baking powder and baking soda help the cake rise. Salt enhances all the flavors. Eggs bind the mixture and add moisture. Whole milk creates a tender cake. Vegetable oil keeps it moist. Vanilla extract adds warmth. Boiling water helps mix everything well and makes the cake light. Adding dark chocolate chips gives extra chocolatey goodness. You might want to change a few ingredients, and that’s okay! You can swap all-purpose flour with gluten-free flour if needed. For sweeteners, consider using coconut sugar or honey for a different taste. If you need dairy-free options, try almond milk or oat milk instead of whole milk. You can also use coconut oil in place of vegetable oil. To make this cake, you will need a few important tools: - 9-inch round cake pans - Mixing bowls and whisk - Oven thermometer Having the right equipment makes baking easier and more fun. Use 9-inch round cake pans for even baking. Mixing bowls help you combine your ingredients well. A whisk is great for blending dry and wet items. An oven thermometer ensures your oven is at the right temperature. This helps your cake bake perfectly. You can find the Full Recipe for more detailed steps to make this cake. Enjoy baking! 1. Preheat the oven: Start by setting your oven to 350°F (175°C). This step is key for even baking. 2. Prepare the pans: Grease and flour two 9-inch round cake pans. This prevents the cake from sticking. 3. Mix dry ingredients: In a large bowl, combine: - 1 ¾ cups all-purpose flour - 1 ¾ cups granulated sugar - ¾ cup unsweetened cocoa powder - 1 ½ teaspoons baking powder - 1 ½ teaspoons baking soda - 1 teaspoon salt Whisk them together until well mixed. 4. Mix wet ingredients: In another bowl, add: - 2 large eggs - 1 cup whole milk - ½ cup vegetable oil - 2 teaspoons vanilla extract Beat these together for about two minutes. 5. Combine mixes: Pour the wet mixture into the dry ingredients. Stir until the batter is combined. 6. Add boiling water: Slowly mix in 1 cup of boiling water. The batter will be thin, and that’s okay! This step helps create a moist cake. 7. Optional step: If you want extra rich flavor, stir in 1 cup of dark chocolate chips. 8. Bake the cakes: Divide the batter evenly between the prepared pans. Bake for 30-35 minutes. Check with a toothpick; it should come out clean. 9. Cool properly: Once baked, let the cakes cool in the pans for 10 minutes. Then, transfer them to wire racks to cool completely. This helps avoid soggy cakes. Follow these steps carefully, and you'll create a delicious cake! For a complete guide, check the Full Recipe. To make a light and fluffy cake, start by mixing the dry ingredients well. This helps create a good rise. When adding wet ingredients, mix just enough to combine. Overmixing can make the cake dense. Use a hand mixer on low speed. For your baking pans, grease them well and dust with flour. This step helps the cake come out easily. You can also line the bottom with parchment paper for extra protection. The best frosting for chocolate cake is chocolate buttercream. It pairs perfectly with rich chocolate. Cream cheese frosting also adds a nice twist. You can get creative with decorations! Add fresh berries on top for a pop of color. Chocolate shavings or sprinkles make it look fancy. Drizzling melted chocolate adds an extra touch of decadence. If your cake turns out dry, check your oven’s temperature. An oven that is too hot can dry it out fast. Adding a bit more liquid next time can help too. For a dense cake, ensure you measure your ingredients accurately. Also, avoid packing the flour down in the measuring cup. If your cake sinks in the middle, try baking it longer. A toothpick should come out clean from the center. Using these tips will help you create the best chocolate cake ever, making it a simple and delicious treat for anyone! For the full recipe, check out the Decadent Chocolate Dream Cake. {{image_2}} You can change the flavor of your chocolate cake easily. A simple way is to add espresso or coffee. This will give your cake a rich taste. Just use a small amount. Start with one tablespoon mixed into the boiling water. You can also try different types of cocoa powder. Dark cocoa will give you a bolder flavor. You can even mix regular cocoa with dark cocoa for more depth. The frosting can change your cake’s taste a lot. Try cream cheese frosting instead of buttercream. This frosting is tangy and pairs well with chocolate. You can also use whipped cream for a light touch. If you want something rich, go for ganache. You can make ganache by melting chocolate with cream. It’s simple and oh-so-delicious! Not everyone can eat regular cake. For a gluten-free option, use almond flour or a gluten-free mix. Make sure to check the package for the right measurements. If you want a vegan cake, swap eggs for applesauce or flax eggs. Use almond milk instead of whole milk. These changes keep the cake tasty and moist. To keep your chocolate cake fresh for 2-3 days, cover it well. Use plastic wrap or aluminum foil. You can also place it in an air-tight container. Store it at room temperature. Avoid putting it in direct sunlight. If you have leftover frosting, keep it in a separate container. This keeps the cake moist and tasty. For long-term storage, freezing is a great option. Wrap each cake layer in plastic wrap tightly. Then, wrap them in aluminum foil. This helps prevent freezer burn. You can freeze it for up to three months. To thaw, take the cake out of the freezer. Leave it in the fridge overnight. This keeps it moist and fresh. Choose air-tight containers for the best results. They keep moisture in and air out. Non-air-tight containers allow air in, which can dry out the cake. If you don’t have an air-tight container, cover the cake with plastic wrap. This helps as a backup. Always check that the container is clean and dry before storing. To keep your chocolate cake moist, follow these tips: - Use fresh ingredients. Old flour or baking powder can affect moisture. - Measure flour correctly. Too much flour makes the cake dry. - Add boiling water to the batter. This helps create a soft texture. - Don’t overbake. Check the cake a few minutes early. A toothpick should come out clean. - Consider using vegetable oil instead of butter. Oil adds moisture that butter may lack. Yes, you can make this cake in advance. Here’s how: - Bake the cake layers and let them cool completely. - Wrap each layer in plastic wrap. This keeps them fresh. - Store them in the fridge for up to three days. - For longer storage, freeze the layers. They last up to three months. - Thaw the layers in the fridge before frosting. To make cupcakes from this chocolate cake recipe: - Preheat your oven to 350°F (175°C). - Line a cupcake pan with paper liners. - Fill each liner about two-thirds full with batter. - Bake for 18-20 minutes. Check with a toothpick for doneness. - Allow cupcakes to cool before frosting. They will be delicious and cute! Avoid these common mistakes: - Using cold ingredients. Bring eggs and milk to room temperature first. - Not measuring ingredients accurately. This can ruin texture and taste. - Skipping the cooling step. Frosting a warm cake can make it soggy. - Opening the oven door too often. This can cause the cake to sink. - Using low-quality cocoa powder. Good cocoa makes a big difference in flavor. For the complete recipe, check out the [Full Recipe]. Enjoy your baking! This blog covered everything you need for a perfect chocolate cake. You learned about crucial ingredients and their substitutes. We discussed essential tools and provided clear, step-by-step baking instructions. Plus, I shared tips for texture, frosting ideas, and how to store your cake. Remember, baking is both fun and rewarding. Feel free to experiment with flavors and decorations. Enjoy your chocolate cake journey!

If you’re looking for a chocolate cake recipe that’s both simple and scrumptious, you’re in the right spot! I’ll share my favorite recipe that guarantees a moist, rich cake every …

Read more

Categories Desserts

Portobello Mushrooms Filled with Caprese Delight Dish

May 23, 2025 by Chef Nate
To make this dish, you will need: - 4 large Portobello mushrooms, stems removed - 1 cup cherry tomatoes, halved - 1 cup fresh mozzarella balls (bocconcini), halved - 1/4 cup fresh basil leaves, chopped - 2 tablespoons balsamic glaze - 2 tablespoons olive oil - 1 teaspoon garlic powder - Salt and pepper to taste These ingredients create a fresh and tasty filling. The mushrooms serve as a perfect base, holding all the flavors together. If you want to change things up, consider these options: - Swap cherry tomatoes for diced bell peppers for a crunch. - Use goat cheese instead of mozzarella for a tangy twist. - Try arugula instead of basil for a peppery flavor. - Use a splash of lemon juice instead of balsamic glaze for brightness. These alternatives can make your dish unique while keeping it delicious. For this recipe, gather these tools: - Baking sheet - Mixing bowl - Spoon or spatula for mixing - Measuring cups and spoons - Oven for baking Having the right tools makes the cooking process smoother and more enjoyable. You’ll be ready to create a delightful meal! First, preheat your oven to 375°F (190°C). This step helps the mushrooms cook evenly. Make sure your oven is hot before baking. Next, take your Portobello mushrooms. Use a damp paper towel to clean them. Avoid rinsing under water, as mushrooms absorb moisture. Remove the stems and place the mushrooms gill side up on a baking sheet. Now, let’s make the Caprese filling. In a mixing bowl, combine the halved cherry tomatoes and mozzarella balls. Add the chopped basil to the bowl. Drizzle in the balsamic glaze and olive oil. Sprinkle garlic powder, salt, and pepper. Mix gently to coat all the ingredients. It's time to stuff the mushrooms! Take a spoon and fill each mushroom cap with the Caprese mixture. Press down lightly to pack it in. Make sure each cap is full for the best flavor. Place the baking sheet in the preheated oven. Bake for 20 to 25 minutes. You want the mushrooms to be tender and the cheese to melt slightly. Once done, take them out and let them cool for a few minutes. Enjoy your Portobello mushrooms filled with Caprese delight! When selecting Portobello mushrooms, look for firm caps. They should be dark brown and smooth. Avoid mushrooms that feel slimy or have dark spots. Fresh mushrooms smell earthy and pleasant. You can ask your local store for the freshest batch. This ensures the best flavor in your dish. Serve the stuffed mushrooms hot from the oven. They are great as a starter or side dish. Pair them with a simple salad for a fresh touch. A light pasta dish complements the rich flavors well. You can also serve them with crusty bread to soak up any juices. Drizzle extra balsamic glaze on top to impress your guests. A common mistake is overcooking the mushrooms. Keep an eye on them during baking. If they become too soft, they lose their texture. Another mistake is skipping the seasoning. Salt and pepper enhance the flavors of the filling. Lastly, don’t forget to pack the filling tightly. This keeps the delicious mix from falling out during cooking. {{image_2}} You can easily make this dish vegetarian or vegan. For a vegetarian option, use the fresh mozzarella balls as is. If you want a vegan version, swap the mozzarella for a plant-based cheese. Many brands offer vegan mozzarella that melts well. You can also use cashew cheese for a creamy texture. While mozzarella is classic, you can try other cheeses. Goat cheese adds a tangy flavor that pairs well with mushrooms. Feta cheese offers a salty kick. For a rich taste, use burrata. Each cheese gives a unique twist to your stuffed mushrooms. Herbs and spices can elevate your Caprese filling. Add oregano or thyme for an earthy flavor. A pinch of red pepper flakes gives a nice heat. Fresh parsley or chives can brighten the dish. Experiment with different combinations for your perfect blend. To store leftover Portobello mushrooms filled with Caprese delight, let them cool first. Place them in an airtight container. You can keep them in the fridge for up to three days. Make sure to separate layers with parchment paper. This helps prevent sticking and keeps them fresh. When you want to enjoy the leftovers, reheat them in the oven. Preheat the oven to 350°F (175°C). Place the mushrooms on a baking sheet. Cover them with foil to keep them moist. Heat for about 10-15 minutes, or until hot. You can also use a microwave if you're in a hurry. Just heat for 1-2 minutes. Check to ensure they are warm throughout. You can freeze these stuffed mushrooms for later meals. First, let them cool completely. Then, wrap each mushroom tightly with plastic wrap. Place the wrapped mushrooms in a freezer bag. They can stay in the freezer for up to three months. When ready to eat, thaw them overnight in the fridge. Reheat using the oven for the best texture. Enjoy the taste of Caprese delight any time! You should bake Portobello mushrooms for about 20-25 minutes. This time allows them to become tender and the cheese to melt. Yes, you can make this recipe ahead of time. Prepare the mushrooms and filling the day before. Keep them in the fridge. Bake them right before serving. These stuffed mushrooms pair well with a fresh side salad. You can also serve them with crusty bread or pasta. A light white wine enhances the meal nicely. Yes, Portobello mushrooms are healthy! They are low in calories and high in nutrients. They provide fiber, vitamins, and minerals. They can help support a balanced diet. For the complete recipe, visit Caprese Delight Portobello Mushrooms. The steps are simple, and the flavors shine through! In this article, we covered how to create delicious Portobello mushrooms filled with Caprese delight. You learned about the key ingredients and tools needed to make this dish. We also discussed step-by-step instructions for preparation and cooking. Lastly, we shared tips to enhance your dish and storage info for leftovers. Experiment with variations to make this dish fit your taste. Cooking should be fun and rewarding. Enjoy making these tasty mushrooms!

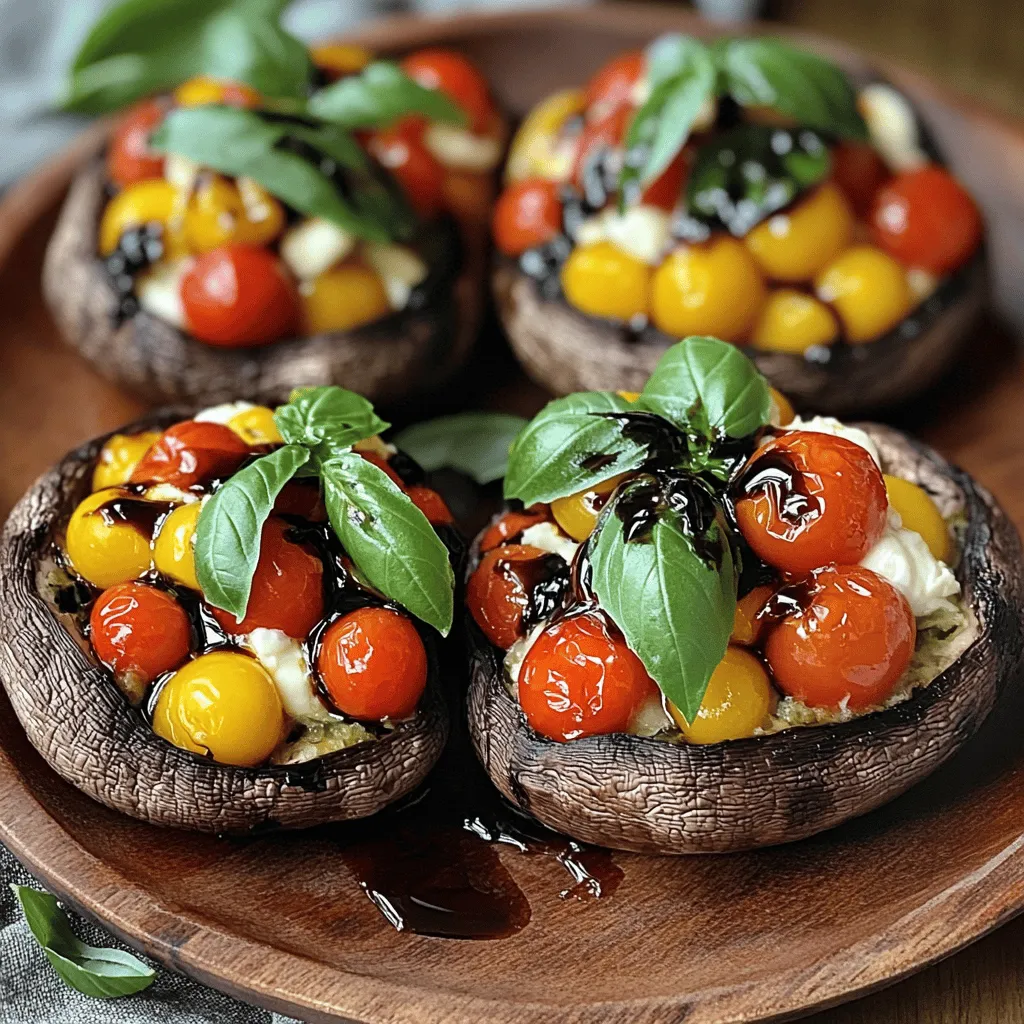
Are you ready to impress your family or guests? Portobello Mushrooms Filled with Caprese Delight is a fun and tasty dish. It combines juicy tomatoes, fresh basil, and creamy cheese …

Read more

Categories Appetizers

One-Pan Cheesy Ranch Potatoes Savory and Simple Dish

May 23, 2025 by Chef Nate
- 2 lbs baby potatoes, halved - 1 packet ranch seasoning mix - 3 tablespoons olive oil - 1 teaspoon garlic powder - 1/2 teaspoon paprika - 1 cup shredded cheddar cheese - 1/2 cup sour cream - 1/4 cup green onions, chopped - Salt and pepper to taste To make One-Pan Cheesy Ranch Potatoes, you need simple and fresh ingredients. First, grab some baby potatoes. These little gems cook quickly and taste amazing. You’ll also need a packet of ranch seasoning mix. This brings all the flavors together. Next, you need olive oil. It helps the potatoes crisp up nicely. Garlic powder adds a punch of flavor. Paprika gives a subtle smokiness. Cheddar cheese is a must for that gooey topping. Sour cream adds creaminess and tang. Finally, chopped green onions give a fresh kick. Don’t forget salt and pepper to taste; they enhance all the flavors. - Large mixing bowl - Baking sheet - Oven thermometer - Spatula or wooden spoon You will need a few tools for this dish. A large mixing bowl is perfect for combining the ingredients. A baking sheet helps spread out the potatoes for even cooking. An oven thermometer ensures your oven is at the right temperature for baking. Finally, a spatula or wooden spoon will help you mix everything well. With these simple ingredients and tools, you're ready to create a delicious, cheesy dish that the whole family will love. For the full recipe, check out the details in the section above. First, you must preheat the oven to 425°F (220°C). This step is key for getting crispy potatoes. Next, take a large mixing bowl. In this bowl, combine 2 lbs of halved baby potatoes, 3 tablespoons of olive oil, 1 packet of ranch seasoning mix, 1 teaspoon of garlic powder, and 1/2 teaspoon of paprika. Don’t forget to add salt and pepper to taste! Toss everything well. This ensures each potato gets a good coat of flavor. Now, spread the seasoned potatoes evenly on a large baking sheet. This helps them cook evenly. Bake the potatoes for 25-30 minutes. Halfway through, stir the potatoes for even cooking. You want them to be golden and tender, so check for that perfect texture. Once the potatoes are golden, take them out of the oven. Sprinkle 1 cup of shredded cheddar cheese over the hot potatoes. This is when the magic happens! Return the baking sheet to the oven for an extra 5 minutes. This time lets the cheese melt and get bubbly. When done, drizzle 1/2 cup of sour cream over the cheesy potatoes. Lastly, add 1/4 cup of chopped green onions for a fresh touch. You can find the complete guide in the Full Recipe section. To get the best texture, focus on cooking time. I recommend baking the potatoes for 25-30 minutes. This gives them a nice golden color and makes them tender. Keep in mind that you should stir them halfway through. This helps them cook evenly, so each bite has that delicious crunch. Enhancing flavor is simple. You can add spices like onion powder or cayenne for a kick. If you want fresh herbs, consider parsley or cilantro. They add a nice touch and brighten up the dish. Don’t shy away from experimenting. Each spice brings out new layers in the flavor. When serving, think about the look. You can serve the potatoes directly from the baking sheet for a rustic feel. This keeps things casual and fun. If you want a more polished look, transfer them to a serving dish. Sprinkle extra green onions on top for color and freshness. This little touch makes a big difference in how the dish feels. For the full recipe, check out the detailed instructions to make these tasty potatoes. {{image_2}} You can change things up with different seasonings. Instead of ranch mix, try Italian herbs or taco seasoning. These blends add unique flavors. You can also mix in spices like chili powder for a kick. For cheese, cheddar is great, but don’t stop there. Use mozzarella for a stretchy melt or pepper jack for a spicy twist. You might even like cream cheese for a rich touch. If you need gluten-free options, check your ranch mix. Many brands are gluten-free. You can also make your own mix with herbs and spices. This way, you control every ingredient. For a vegan version, swap the cheese for a plant-based option. Nutritional yeast gives a cheesy flavor. Use coconut yogurt or cashew cream instead of sour cream. These swaps keep the dish creamy and tasty. To make this dish even better, serve it with fresh veggies. A simple side salad pairs well. You could also add grilled chicken or steak for protein. This makes the meal more filling. Think about different occasions too. One-pan cheesy ranch potatoes fit well at barbecues, potlucks, or family dinners. They’re easy to share and always a hit. You can even serve them for brunch with eggs. The options are endless! To store your One-Pan Cheesy Ranch Potatoes, let them cool down first. Place any leftovers in an airtight container. They will stay fresh for about 3 to 5 days in the fridge. If you want to keep them longer, consider freezing them. The best way to reheat these potatoes is in the oven. Set your oven to 350°F (175°C). Spread the potatoes on a baking sheet. Heat for about 10 to 15 minutes. This method helps keep the potatoes crispy. You can also use an air fryer for a quick heat-up. Yes, you can freeze this dish! After cooling, place the potatoes in a freezer-safe container. They will last for about 2 to 3 months in the freezer. To thaw, move them to the fridge overnight. When ready, follow the reheating instructions above to enjoy them again. Yes, you can make One-Pan Cheesy Ranch Potatoes ahead of time. To prepare in advance, follow these tips: - Cook the potatoes as instructed and let them cool completely. - Store the cooled potatoes in an airtight container in the fridge for up to 2 days. - When ready to serve, reheat them in the oven at 350°F (175°C) until warm. - Add cheese and sour cream during the last few minutes of reheating. This way, you save time and still enjoy a tasty dish! If you want to swap ranch seasoning, you can make your own. Here’s a simple homemade ranch seasoning recipe: - 1 tablespoon dried parsley - 1 teaspoon garlic powder - 1 teaspoon onion powder - 1 teaspoon dill weed - 1/2 teaspoon salt - 1/2 teaspoon black pepper Mix them well and use this blend instead of store-bought ranch seasoning. It’s fresh and full of flavor! To add some heat to One-Pan Cheesy Ranch Potatoes, try these ideas: - Mix in some cayenne pepper or crushed red pepper flakes with the seasonings. - Add sliced jalapeños before baking for a spicy kick. - Top the finished dish with hot sauce or sriracha for extra flavor. These options will make your dish delightful and fiery! In this blog post, we explored how to make One-Pan Cheesy Ranch Potatoes. We covered the essential ingredients, equipment, and the step-by-step process to prepare and bake them. You now have tips for perfect texture and flavor enhancements, plus variations for diets and serving suggestions. Remember, cooking can be easy and fun. Use this recipe to impress friends and family. Enjoy your delicious dish, and feel free to experiment with flavors!

Are you ready for a dish that’s both savory and simple? One-Pan Cheesy Ranch Potatoes are here to delight your taste buds! In just a few steps, you can whip …

Read more

Categories Dinner

Shrimp Tacos with the Zesty Sauce You’ll Love

May 23, 2025 by Chef Nate
To make shrimp tacos, gather these main ingredients: - 1 lb shrimp, peeled and deveined - 1 teaspoon chili powder - 1 teaspoon cumin - 1 teaspoon garlic powder - 1 tablespoon olive oil - Salt and pepper to taste - 8 small corn tortillas - 1 cup shredded cabbage - 1 avocado, sliced - Fresh cilantro, for garnish These ingredients form a tasty base for your tacos. The shrimp brings a sweet flavor, while spices add warmth. Corn tortillas hold everything together and give a nice crunch. The sauce is key to these tacos. For it, you’ll need: - 1/2 cup Greek yogurt - 2 tablespoons mayonnaise - 1 tablespoon lime juice - 1 teaspoon honey - 1 clove garlic, minced - 1/2 teaspoon sriracha (adjust to taste) - Salt to taste This sauce is creamy and zesty. Greek yogurt adds a healthy twist, while lime juice brightens the flavor. Adjust the sriracha for your spice level. You can make this sauce ahead of time for easy taco prep. To make your shrimp tacos even better, try these toppings: - Extra lime wedges - Crumbled queso fresco - Diced red onion - Sliced jalapeños These toppings add freshness and zest to your tacos. The lime gives a burst of flavor, and queso fresco adds a nice creaminess. Use what you like best to customize your meal. For the full recipe, check out the complete guide. Start by making the sauce. In a small bowl, combine 1/2 cup of Greek yogurt and 2 tablespoons of mayonnaise. Add 1 tablespoon of lime juice and 1 teaspoon of honey. Then, add 1 minced garlic clove and 1/2 teaspoon of sriracha. Mix everything well. Taste the sauce and add more sriracha if you like it spicier. Set the sauce aside for now. This sauce gives the tacos a tasty kick! Next, we focus on the shrimp. Take 1 pound of peeled and deveined shrimp. In a bowl, mix the shrimp with 1 teaspoon of chili powder, 1 teaspoon of cumin, and 1 teaspoon of garlic powder. Drizzle in 1 tablespoon of olive oil. Add salt and pepper to taste. Toss everything together until all the shrimp are coated with the spices. This step is key to making the shrimp flavorful. Now, we will cook the shrimp. Heat a skillet over medium-high heat. Once hot, add the seasoned shrimp to the pan. Cook them for about 2-3 minutes on each side. The shrimp should turn pink and opaque when they are done. Once cooked, remove them from the heat. Perfectly cooked shrimp are juicy and full of flavor! Finally, let's warm the tortillas. Use another dry skillet and heat it over medium heat. Place 8 small corn tortillas in the pan. Warm each tortilla for about 30 seconds on each side. They should become soft and pliable. Warming the tortillas makes them easier to fold and adds a nice touch to the tacos. Now that you have the shrimp and sauce ready, you can check out the Full Recipe to assemble your tacos! To make the sauce pop, use fresh lime juice. It brightens the taste. I often add zest from the lime for extra zing. You can also play with the sriracha level. If you want it spicier, add more. For a milder sauce, just use less. Mixing in fresh herbs like cilantro adds a nice touch too. For the best shrimp, heat your skillet well. A hot pan helps the shrimp cook fast. This keeps them juicy. Cook the shrimp for just 2-3 minutes on each side. Look for a pink color and opaque look. Overcooked shrimp can become tough and rubbery, so keep an eye on them. When you assemble your tacos, layer with care. Start with shredded cabbage for crunch. Next, add your perfectly cooked shrimp. Then, place avocado slices for creaminess. Drizzle the sauce generously on top. Finally, sprinkle fresh cilantro to brighten the dish. Use warm tortillas to hold everything together. This way, your shrimp tacos will not fall apart. For more details, check the full recipe. {{image_2}} If you want to change things up, try other proteins. Chicken works well in tacos. Just season it like the shrimp. Fish also makes a great choice. Use flaky white fish, like tilapia or cod. For a meatier option, try beef or pork. Just remember to cook them until they are fully done. You can still enjoy tacos without meat. Use grilled veggies as your main filling. Bell peppers, zucchini, and mushrooms are tasty. Another great option is black beans or lentils. They give a good protein boost and flavor. Tofu is also a great choice; just season and cook it well. The dreamy sauce is a hit, but there are more to explore. Try a mango salsa for a fresh twist. Blend mango, lime, and cilantro for a fruity topping. You can also make a chipotle sauce. Mix chipotle peppers with Greek yogurt for a smoky flavor. For a classic taste, a simple guacamole pairs well too. Experiment and find your favorite! Check out the Full Recipe for the zesty shrimp tacos with dreamy sauce! To store leftover shrimp tacos, first, remove the shrimp from the tortillas. Place the shrimp in an airtight container. Keep the tortillas and sauce separate. This helps keep everything fresh and tasty. Store the shrimp in the fridge for up to two days. The tortillas can last about the same time. The sauce will stay good for about a week. If you want to freeze shrimp tacos, follow these steps. First, cook and cool the shrimp. Then, place the shrimp in a freezer-safe bag. Squeeze out as much air as you can. You can freeze the shrimp for up to three months. Tortillas can also be frozen. Just stack them with parchment paper between each one. This keeps them from sticking together. When you are ready to eat, reheat the shrimp carefully. You can use a skillet over medium heat. Cook until the shrimp are warm, but don’t overcook them. This can make them tough. Warm the tortillas in a pan or microwave. Just heat them a few seconds until soft. Then, add the shrimp, sauce, and toppings. Enjoy your meal just like it was fresh! For the full recipe, check the earlier section. The best type of shrimp for tacos is medium or large shrimp. These sizes offer a nice bite. Look for shrimp that are fresh, pink, and firm. Frozen shrimp work too; just thaw them before cooking. Fresh or frozen, ensure they are peeled and deveined. This makes for a smooth cooking process and easier eating. Yes, you can make the sauce ahead of time. This saves time when cooking. Just mix the Greek yogurt, mayonnaise, lime juice, honey, garlic, and sriracha. Store it in the fridge in a sealed container. It stays fresh for up to three days. The flavors may also blend better if you let it sit. To make shrimp tacos less spicy, adjust the sriracha in the sauce. Use less or skip it altogether. You can also add more yogurt or mayonnaise to balance the heat. Another option is to serve the sauce on the side. This way, everyone can add their preferred amount. Shrimp tacos pair well with many sides. Consider fresh guacamole or salsa for a cool taste. A side of corn salad adds crunch and sweetness. You can also serve rice or beans for a hearty option. For something light, a simple green salad works great too. To make delicious shrimp tacos, follow these steps from the blog post. We covered key ingredients, including shrimp, sauce, and toppings. Next, I guided you through cooking shrimp to perfection and warming tortillas. Plus, I shared tips for flavor and taco assembly. In the end, shrimp tacos are easy to customize, so try different proteins and sauces. Use the storage tips to keep leftovers fresh. Enjoy making these tasty tacos time and again!

Ready to spice up your dinner? These Shrimp Tacos with a zesty sauce will be your new favorite! I promise you’ll love each crunchy bite, bursting with fresh flavors. In …

Read more

Categories Dinner

Creamy Steak and Pasta Dinner Simple and Delicious

May 23, 2025 by Chef Nate
To make this creamy steak and pasta dinner, gather the following main ingredients: - 12 oz fettuccine or pasta of choice - 1 lb sirloin steak, thinly sliced - 2 tablespoons olive oil - 4 cloves garlic, minced - 1 cup heavy cream - 1 cup beef broth - 1 cup cherry tomatoes, halved - 1 cup fresh spinach - 1 teaspoon Italian seasoning - Salt and pepper to taste - Grated Parmesan cheese for serving - Fresh basil leaves for garnish These ingredients create a rich and tasty meal. The steak adds protein, while the pasta carries the creamy sauce. You can enhance the dish with these optional ingredients: - Mushrooms for extra flavor - Red pepper flakes for spice - Fresh herbs like parsley or thyme These options let you customize the dish to your taste. To prepare this meal, you will need: - Large pot for boiling pasta - Large skillet for cooking steak and sauce - Cooking spoon for stirring - Knife for slicing steak and vegetables Having the right tools makes cooking easier and more fun. For the full recipe, check the instructions provided above. Start by boiling water in a large pot. Add a pinch of salt to the water for flavor. Once the water reaches a rolling boil, add 12 oz of fettuccine or your favorite pasta. Cook the pasta according to the package instructions until it’s al dente. This usually takes about 8-10 minutes. After cooking, save ½ cup of the pasta water before draining. Set the drained pasta aside while you move on to the steak. Next, grab a large skillet and heat 2 tablespoons of olive oil over medium-high heat. While the oil heats, season 1 lb of thinly sliced sirloin steak with salt and pepper. Once the oil is hot, add the steak to the skillet. Cook for about 2-3 minutes until the steak is browned and cooked to your liking. Remember, overcooking can make the steak tough. After cooking, remove the steak from the skillet and set it aside. In the same skillet, add 4 cloves of minced garlic and sauté for about 30 seconds until fragrant. This will add a wonderful flavor to your sauce. Pour in 1 cup of beef broth and 1 cup of heavy cream. Stir well to combine the ingredients. Bring the mixture to a gentle simmer. As it simmers, it will thicken up and become creamy. Now it’s time to bring everything together! Stir in 1 teaspoon of Italian seasoning, 1 cup of halved cherry tomatoes, and 1 cup of fresh spinach. Keep stirring until the spinach wilts and the tomatoes soften. If your sauce looks too thick, add some of the reserved pasta water to loosen it. Finally, add the cooked pasta and seared steak back into the skillet. Toss everything together so the pasta and steak are coated in the creamy sauce. Taste and adjust with more salt and pepper if needed. Now you're ready to serve your creamy steak and pasta dinner! For the complete recipe, check the [Full Recipe](#). To make a great cream sauce, start with quality ingredients. Use fresh garlic and good beef broth. Sauté the garlic just until it smells nice. If you cook it too long, it can taste bitter. When you add the heavy cream, stir gently. Let it simmer for a few minutes. If the sauce is too thick, add reserved pasta water. This will help make it creamy and smooth. Choose sirloin steak for its flavor and tenderness. Slice the steak thinly for quick cooking. Heat the skillet until it is hot. This browns the steak well. Don’t crowd the pan. Cook in batches if needed. Let the steak rest after cooking. This keeps it juicy. You can season it simply with salt and pepper for great taste. Always use a large pot for boiling pasta. This helps it cook evenly. Add enough salt to the water; it should taste like the sea. Cook the pasta until it is al dente, which means firm to the bite. Reserve some pasta water before draining. This starchy water can help thicken your sauce. After draining, toss the pasta with a bit of olive oil to prevent sticking. {{image_2}} You can switch up your pasta to fit your taste. While fettuccine is great, you can use penne, spaghetti, or even whole wheat pasta. Each type offers a unique bite. If you want a fun twist, try using spiralized zucchini as a low-carb option. It pairs well with the creamy sauce. While sirloin is the star in this dish, other cuts work too. Ribeye adds a rich flavor, while flank steak offers a leaner option. You can also try tenderloin for a more tender bite. Each cut will change the taste slightly, so feel free to experiment based on what you love. Adding veggies or fresh herbs can elevate your meal. Spinach is a great choice, but you can also add bell peppers, mushrooms, or asparagus. They add color and nutrition. Fresh herbs like parsley or basil enhance the dish's flavor. Just sprinkle them on top right before serving for a fresh touch. After enjoying your creamy steak and pasta, let any leftovers cool down. Place them in an airtight container. Store the container in the fridge. Your leftovers will stay fresh for up to three days. Make sure to label the container with the date so you remember when you made it. To reheat, you can use the stove or microwave. If using the stove, add a splash of water or broth to a pan. Heat it over low heat and stir until warm. If using the microwave, place the pasta in a bowl. Cover it with a damp paper towel and heat in 30-second bursts until hot. Stir between each burst to heat evenly. If you want to save some for later, you can freeze it! Let the dish cool completely. Then, transfer it to a freezer-safe container. Make sure to leave some space at the top, as it will expand when frozen. It will last about two months in the freezer. To defrost, move it to the fridge overnight before reheating. For the best taste, try to eat it within a month. For the full recipe, check the section above! You can use milk and butter. Mix 1 cup of milk with 2 tablespoons of melted butter. This mix gives a creamy texture without heavy cream. You can also try coconut cream or cashew cream for a dairy-free option. Each choice adds a unique flavor to the dish. Yes, you can! Use gluten-free pasta instead of regular pasta. Many brands offer tasty gluten-free options. Just check the label to ensure it's truly gluten-free. This way, you enjoy a creamy steak and pasta dinner without the gluten. Use a meat thermometer for the best results. For medium-rare, aim for 135°F. For medium, go for 145°F. If you do not have a thermometer, check the color. A pink center usually means it is cooked well. Practice makes perfect, so don’t be afraid to try! For the full recipe and more details, check out the [Full Recipe] link. This will guide you through each step in detail for a creamy and delicious meal. This blog post explored how to create a creamy steak and pasta dinner. We discussed key ingredients, tips for cooking, and tools needed. I shared step-by-step instructions to help you succeed. You learned about variations to suit your taste and how to store leftovers properly. In the end, cooking this meal can be easy and fun. With practice, you can impress anyone at your table. Enjoy making this dish your own!

Are you craving a meal that combines savory steak with creamy pasta? You’ve found it! In this guide, I’ll share my easy recipe for a delicious Creamy Steak and Pasta …

Read more

Categories Dinner

Extra Moist Chocolate Peanut Butter Cake Delight

May 23, 2025 by Chef Nate
When I bake the Extra Moist Chocolate Peanut Butter Cake, I gather my ingredients first. This helps to keep things smooth and fun. Let's break it down into dry and wet ingredients, plus the peanut butter frosting. - 1 ¾ cups all-purpose flour - 1 ¾ cups granulated sugar - ¾ cup unsweetened cocoa powder - 1 ½ teaspoons baking powder - 1 ½ teaspoons baking soda - 1 teaspoon salt These dry ingredients create the base of the cake. The flour gives it structure. The sugar adds sweetness, while cocoa makes it rich. Baking powder and baking soda help it rise. Lastly, salt enhances all the flavors. - 2 large eggs - 1 cup whole milk - ½ cup vegetable oil - 2 teaspoons vanilla extract - 1 cup boiling water The wet ingredients bring moisture and depth. Eggs bind the mix together. Milk adds creaminess, and oil keeps the cake soft. Vanilla extract gives a lovely aroma. The boiling water is key; it activates the cocoa and makes the cake extra moist. - 1 cup creamy peanut butter - ½ cup powdered sugar - ½ cup heavy cream This frosting is a dream. Creamy peanut butter gives it that nice nutty taste. Powdered sugar sweetens it just right. Heavy cream adds fluffiness, making it easy to spread. For the complete recipe, check the Full Recipe. Enjoy gathering these ingredients and get ready for a delicious baking adventure! - Preheat your oven to 350°F (175°C). Grease and flour two 9-inch round cake pans. - In a large bowl, sift together: - 1 ¾ cups all-purpose flour - 1 ¾ cups granulated sugar - ¾ cup unsweetened cocoa powder - 1 ½ teaspoons baking powder - 1 ½ teaspoons baking soda - 1 teaspoon salt - Add the wet ingredients: - 2 large eggs - 1 cup whole milk - ½ cup vegetable oil - 2 teaspoons vanilla extract Mix on medium speed for 2 minutes until smooth. - Carefully stir in 1 cup of boiling water. The batter will be thin and that’s okay! - Pour the batter evenly into the prepared pans. - Bake for 30-35 minutes. Check with a toothpick; it should come out clean. Let the cakes cool for 10 minutes in the pans, then turn them out onto wire racks to cool completely. - In a medium bowl, beat together: - 1 cup creamy peanut butter - ½ cup powdered sugar Mix until smooth. - Gradually add ½ cup heavy cream. Beat until fluffy and spreadable. Once the cakes are cool, place one layer on a serving plate. Spread a nice amount of frosting on top. Place the second layer over it and cover the whole cake with the rest of the frosting. Enjoy your Extra Moist Chocolate Peanut Butter Cake! You can find the Full Recipe for more details. To make your cake extra moist, use boiling water in the batter. This step helps dissolve the cocoa powder and activates the other dry ingredients. The heat also keeps the cake light and soft. Baking time and temperature are equally important. Set your oven to 350°F (175°C). Bake for 30 to 35 minutes. Check for doneness by inserting a toothpick. If it comes out clean, the cake is ready. Spreading frosting can be tricky. First, use a spatula or a butter knife. Start in the center and push outwards. This way, you cover the whole cake evenly. For decoration, consider drizzling melted chocolate on top. Chopped peanuts also add a fun crunch. Get creative and have fun with it! Overmixing the batter is a common error. Mix just until combined. Too much stirring can make your cake dense. Don’t forget to cool the layers properly. If you stack warm layers, the frosting will slide off. Let them cool completely on wire racks before frosting. Using these tips, you will ensure a moist and tasty cake! For the full recipe, check out the detailed instructions above. {{image_2}} You can make your cake even better with some fun mix-ins. Adding chocolate chips gives a rich texture and taste. Just fold in about one cup of chocolate chips into the batter. This simple step makes each bite extra delightful. You can also try adding nuts or other flavors. Chopped walnuts or pecans work well. They add a nice crunch. For a twist, consider vanilla extract or a splash of coffee. Both enhance the chocolate flavor. If you want a change from peanut butter frosting, try chocolate ganache. It’s smooth and rich. To make it, heat one cup of heavy cream until it’s hot but not boiling. Pour it over one cup of chocolate chips. Stir until melted and creamy. This gives a nice shine and depth to your cake. For a vegan option, use coconut cream. Chill a can of coconut milk overnight. Scoop out the solid cream and whip it until fluffy. Add a little maple syrup for sweetness. This makes a light and tasty frosting. Serve your cake with a scoop of ice cream or a dollop of whipped cream. Vanilla ice cream pairs well with the rich flavors. It adds a creamy contrast that many love. For a pretty touch, garnish with mini chocolate chips or a drizzle of melted chocolate. Fresh berries also look nice on the plate. They add color and a bit of tartness. Presentation makes the cake even more special. For the full recipe, be sure to check it out and enjoy your baking! To keep your Extra Moist Chocolate Peanut Butter Cake fresh, store leftovers in the fridge. Use an airtight container to prevent the cake from drying out. If you have extra frosting, store it separately in another container. This way, the cake stays moist and the frosting remains fluffy. Enjoy the cake within five days for the best taste. If you want to save the cake for later, freezing is a great option. Wrap the cooled cake layers tightly in plastic wrap. Then, place them in a freezer-safe bag or container. For the frosting, store it in a separate airtight container. You can freeze the cake for up to three months. When you’re ready to enjoy it, let the cake thaw in the fridge overnight. To enjoy your cake after storing, let it reach room temperature first. If you like it warm, you can reheat individual slices in the microwave for about 10-15 seconds. Be careful not to overheat it, or the cake may dry out. Pair it with a scoop of ice cream or drizzle some warm chocolate over the top for a delicious treat! To make your cake more moist, follow these tips: - Use boiling water in your batter. - Add a bit of oil or yogurt. - Avoid overmixing the batter. - Bake at the right temperature for the right time. - Let the cake cool in the pan for a few minutes before moving it. These steps help to lock in moisture and give you a soft, rich cake. The boiling water is key! It activates the cocoa powder and helps create a batter that stays moist. Yes, you can prepare this cake ahead of time. Here’s how: - Bake the cake layers and let them cool completely. - Wrap each layer in plastic wrap and store in the fridge for up to 3 days. - You can also freeze the layers for up to a month. Just make sure to wrap them tightly. Frosting can be made in advance too. Store it in the fridge. Just give it a good stir before using. If you have nut allergies or prefer not to use peanut butter, try these options: - Almond butter - Sunflower seed butter - Soy nut butter - Cream cheese frosting These substitutes can change the flavor, but they still taste great. Pick the one you like best! To check if your cake is done, use these tips: - Insert a toothpick into the center. If it comes out clean, the cake is ready. - The edges will start to pull away from the pan. - The top should spring back when lightly pressed. These simple tests will help you avoid underbaking or overbaking your cake. Perfect timing gives you that extra moist texture! The extra moist chocolate peanut butter cake is a true delight. From mixing dry and wet ingredients to the rich peanut butter frosting, each step matters. Remember to pour in boiling water for moisture and watch your baking time closely. With tips on storage and variations, you're set for success. Enjoy serving this cake and impressing your friends or family. It’s a treat that makes any occasion special. Your baking journey can be fun and rewarding, so dive in and savor every bite!

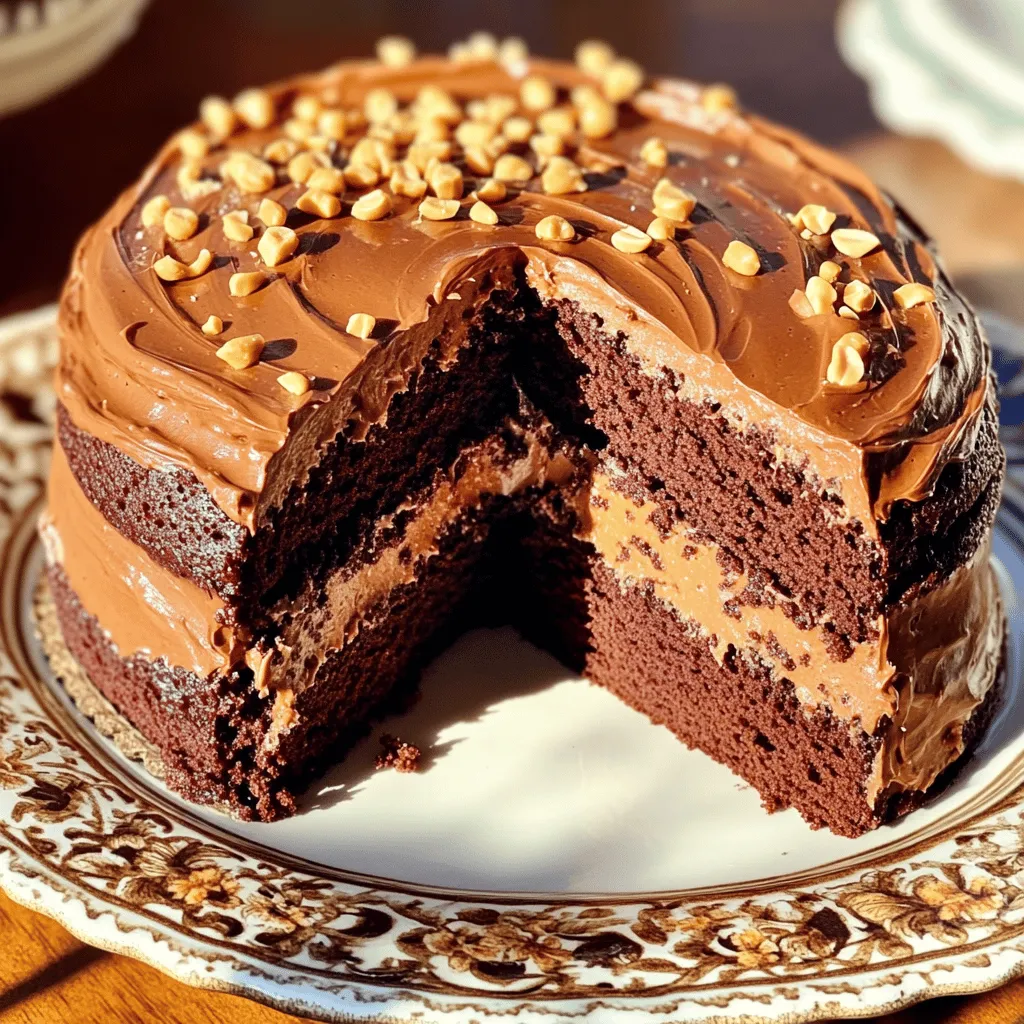
Indulge in the rich, creamy goodness of my Extra Moist Chocolate Peanut Butter Cake Delight. This recipe blends the classic flavors of chocolate and peanut butter for a dessert that’s …

Read more

Categories Desserts

Easy Boston Cream Pie Cookie Bites Delicious Treat

May 23, 2025 by Chef Nate
To make the Easy Boston Cream Pie Cookie Bites, you need simple ingredients that pack a lot of flavor. Here’s the list you’ll need: - 1 ½ cups all-purpose flour - ½ teaspoon baking powder - ¼ teaspoon baking soda - ½ teaspoon salt - ½ cup unsalted butter, softened - ¾ cup granulated sugar - 1 large egg - 1 teaspoon vanilla extract - ¼ cup milk - ½ cup chocolate chips (for melting) - ½ cup pastry cream (store-bought or homemade) - Powdered sugar (for dusting) Each ingredient plays a key role. The flour gives structure, while the butter adds richness. Sugar is key for sweetness, and the egg helps bind everything together. The baking powder and baking soda help the cookies rise. Pastry cream adds that creamy filling, and chocolate chips bring a delicious touch when melted. I recommend using high-quality chocolate for melting. It makes a big difference in taste. If you want to make your pastry cream, you can find a simple recipe in the Full Recipe section. It’s worth the extra step for that homemade touch! - Preheat the oven to 350°F (175°C). - Line a baking sheet with parchment paper. Start by preheating your oven. This gets it ready for baking. Next, line your baking sheet with parchment paper. This helps cookies not stick. - Whisk together dry ingredients. - Cream butter and sugar until light and fluffy. - Incorporate wet ingredients gradually. In a bowl, whisk together the flour, baking powder, baking soda, and salt. This mixes the dry ingredients well. In another bowl, cream the softened butter and sugar. Use a mixer for 3-5 minutes until it’s light and fluffy. This step adds air to the dough. Next, add the egg and vanilla extract to the butter mixture. Mix well until combined. Gradually pour in the milk and stir until smooth. Finally, slowly mix in your dry ingredients. Stop when it’s just combined to keep the cookies soft. - Scoop dough onto the baking sheet. - Bake until edges are golden. - Fill cookies with pastry cream. Using a small scoop, place rounded tablespoons of dough on the baking sheet. Leave space between each scoop. Bake for 10-12 minutes or until the edges turn golden. Let the cookies cool for 5 minutes on the sheet. Then, move them to a wire rack. Once they are cool, it’s time to fill them! Use a piping bag to fill each cookie with pastry cream. You can also slice the cookies in half to fill them. - Melt chocolate chips. - Drizzle or dip cookies in melted chocolate. - Dust with powdered sugar after setting. In a microwave-safe bowl, melt chocolate chips. Heat them in 20-second intervals, stirring until smooth. Drizzle or dip the tops of each filled cookie in the melted chocolate. Let the excess chocolate drip off. Place the cookies back on the wire rack. Once the chocolate sets, you can dust the cookies with powdered sugar. This adds sweetness and makes them look nice. For the full recipe, check out the link. Enjoy your Easy Boston Cream Pie Cookie Bites! Room temperature ingredients make a big difference. When butter and eggs are at room temp, they blend better. This helps create a light and fluffy dough. Cold ingredients can lead to dense cookies. Always plan ahead and let your butter sit out for about 30 minutes before using it. Do not overmix your dough. Overmixing makes the cookies tough. Mix just until you see no dry flour. This way, your cookie bites will be soft and tender. To achieve a neat chocolate drizzle, use a fork. Dip it in melted chocolate and move your wrist back and forth. This creates a lovely pattern. You can also use a piping bag for more control. If you want a change from chocolate, try white chocolate or caramel. Both add a nice twist. You can even use colorful candy melts for a fun look. Underbaking is a common mistake. If your cookies are too soft, they won't hold the filling. Bake until the edges are golden, and check for a firm center. Overbaking can also ruin your treats. If you leave them in too long, they will be dry. Keep an eye on the timer! Lastly, be careful when filling the cookies. Use a piping bag to insert pastry cream. If you slice the cookies, make sure the filling stays inside. This keeps each bite rich and creamy. For the full recipe, check out the [Full Recipe]. {{image_2}} You can make your Boston Cream Pie Cookie Bites even more fun by changing a few things. Adding citrus zest, like lemon or orange, to the dough gives a fresh taste. The zesty flavor pops and brightens every bite. You can also try using flavored extracts, such as almond or coconut. These extracts add a unique twist that surprises the taste buds. Just swap out the vanilla extract for your favorite flavor. If you need to make these cookie bites gluten-free, use gluten-free flour instead of all-purpose flour. Many blends work well and keep the cookie's texture light and soft. For a vegan version, substitute the butter with coconut oil or a plant-based butter. Replace the egg with flaxseed meal mixed with water or a store-bought egg replacer. These changes let everyone enjoy these tasty treats. Pair these cookie bites with a scoop of vanilla ice cream or fresh fruit. The cold ice cream balances the sweet chocolate and creamy filling. For parties, arrange them on a colorful platter. Dusting them with powdered sugar adds a nice touch. You can even add fresh berries or mint leaves for extra color and flavor. These small details make your dessert stand out and impress your guests. To keep your Boston Cream Pie Cookie Bites fresh for up to a week, store them in an airtight container. Place a piece of parchment paper between layers to prevent sticking. Keep them at room temperature, away from direct sunlight. This method helps maintain their soft texture and delicious taste. For long-term storage, you can freeze the cookie bites. First, allow them to cool completely. Then, place them in a single layer on a baking sheet. Freeze them for about an hour. Once frozen, transfer the cookie bites to a freezer-safe bag. Remove as much air as possible before sealing. They can last up to three months in the freezer. To thaw and serve frozen cookies, take them out of the freezer and let them sit at room temperature for about 30 minutes. For a warm treat, you can also warm them in the microwave for 10-15 seconds. This will bring back their soft texture and make them extra tasty. To tell if your cookies have gone stale, check for a hard texture. Fresh cookies should be soft and slightly chewy. If they smell off or have a dry feel, they are likely stale. Always trust your senses; they will guide you in knowing when to enjoy your cookie bites or toss them out. To fill Boston Cream Pie Cookie Bites, use a piping bag. Fill the bag with pastry cream and attach a small round tip. Insert the tip into the top of each cookie and squeeze gently. This method gives you control and fills the cookie evenly. You can also slice the cookie in half and spread the cream inside if you prefer. Yes, you can use store-bought pastry cream. It saves time and effort. Store-bought cream is often smooth and easy to use. However, homemade pastry cream can taste fresher and richer. Making your own allows you to adjust the flavor. Consider your time and taste when choosing between the two. To keep cookies from spreading, chill the dough before baking. After mixing, wrap the dough in plastic wrap and place it in the fridge for 30 minutes. This helps the cookies hold their shape. Also, make sure you use the right amount of flour. Too little flour can lead to flat cookies. If you don't have pastry cream, consider using whipped cream or custard. They can add a creamy texture and flavor. For a simpler option, use Greek yogurt mixed with a bit of sugar. It won't be as rich, but it works in a pinch. You can also try pudding for a quick alternative. Yes, you can make these cookie bites ahead of time. Bake the cookies and store them in an airtight container for up to a week. Fill them with pastry cream on the day you plan to serve them. This keeps the cookies fresh and the filling creamy. You can also freeze the baked cookies and thaw them before filling. Making Boston Cream Pie Cookie Bites combines simple ingredients and steps for big flavor. You learned how to create tasty cookies with pastry cream filling and a chocolate top. Remember, using room temperature ingredients and avoiding overmixing is key. Experimenting with flavors or dietary tweaks can also add your unique twist. Store them correctly to keep their freshness. With these tips, your cookie bites will impress friends and family. Enjoy baking and sharing these delightful treats!

Are you ready for a sweet treat that’s both fun and easy to make? My Easy Boston Cream Pie Cookie Bites are just what you need! Imagine soft, chewy cookies …

Read more

Categories Desserts

Mediterranean Greek Lentil Salad Flavorful and Fresh

May 23, 2025 by Chef Nate
- 1 cup green or brown lentils - 2 1/2 cups water - 1 small red onion - 1 cucumber - 1 bell pepper (red or yellow) - 1 cup cherry tomatoes Lentils are the star here. They are full of protein and fiber. I like using green or brown lentils. They hold their shape well after cooking. - 1/2 cup Kalamata olives - 1/2 cup feta cheese - 1/4 cup fresh parsley - Juice of 1 lemon - 3 tablespoons olive oil - Salt and pepper Kalamata olives add a salty punch. Feta cheese gives a creamy texture. Fresh parsley brightens up the dish. The lemon juice and olive oil create a zesty dressing. They balance the flavors perfectly. - 1 teaspoon dried oregano - Other herbs and spices You can add dried oregano for an extra layer of flavor. Other herbs like basil or dill also work well. Feel free to get creative with spices. Just remember, keep it fresh and vibrant. You can find the complete recipe for Mediterranean Greek Lentil Salad [here](Full Recipe). To start, rinse your lentils under cold water. This helps remove any dirt or grit. Then, in a medium saucepan, combine the lentils and 2 ½ cups of water. Bring the mixture to a boil over medium-high heat. Once it boils, reduce the heat and let it simmer. Cook the lentils for about 20 to 25 minutes. You want them tender but not mushy. After cooking, drain the lentils and let them cool slightly. While the lentils are cooking, prepare your salad ingredients. Start by chopping the small red onion finely. Next, dice the cucumber and bell pepper. For a burst of flavor, halve the cherry tomatoes and Kalamata olives. Finally, crumble the feta cheese into small pieces. This adds a nice, creamy texture to the salad. Now, it’s time to combine everything. In a large mixing bowl, add the cooked lentils, chopped vegetables, olives, and crumbled feta cheese. In a small bowl, whisk together the juice of one lemon, olive oil, dried oregano, salt, and pepper. Pour this dressing over the lentil salad. Gently toss everything together until well mixed. Taste your salad and adjust the seasoning if needed. Garnish with fresh parsley for an extra touch. For the full recipe, check out the details above. Enjoy making this Mediterranean Greek Lentil Salad! How do you cook lentils perfectly? Start by rinsing them under cool water. This removes dust and debris. Next, combine lentils with water in a medium pot. Bring it to a boil over medium-high heat. Once boiling, lower the heat and let them simmer. Cook for about 20 to 25 minutes. You want them tender but not mushy. Drain the lentils and let them cool. To adjust flavors and seasonings, taste your salad before serving. If it lacks flavor, add more lemon juice or olive oil. A pinch of salt can brighten up the taste. Fresh herbs like parsley add a nice touch, too. What are the best pairings with the salad? This lentil salad works well with grilled chicken or fish. You can also serve it with pita bread for a full meal. Pair it with a glass of white wine for a lovely dinner. For creative serving ideas, try using lettuce leaves as wraps. This adds a fun twist and makes it easy to eat. You can also serve it in a bowl with extra feta on top for a colorful look. How many calories are in this salad? One serving has about 250 calories. It has a good mix of carbs, protein, and fats. Lentils are rich in protein and fiber, making them a great choice for health. What are the health benefits of lentils and vegetables? Lentils help with digestion and promote heart health. They are also high in iron, which is good for energy. The fresh veggies add vitamins and antioxidants that support your immune system. For the full recipe, check out the complete instructions above. {{image_2}} You can switch up the lentils in this salad. Try black beans or chickpeas for a new taste. They add protein and fiber too. If you want a vegan option, skip the feta cheese. Use avocado instead for creaminess. You can also try a dairy-free feta cheese. It keeps the flavor while making it plant-based. Adding nuts or seeds can boost the crunch. Walnuts or sunflower seeds work great. They add texture and healthy fats. You can also mix in fresh herbs like mint or dill. These herbs bring a bright taste. They enhance the overall flavor of the salad. Storing this salad is simple. Keep it in an airtight container in the fridge. It stays fresh for about three days. You can easily reheat it if you want. Just warm it gently on the stove. To make this salad a full meal, add proteins like grilled chicken or roasted chickpeas. This makes it more filling and satisfying. Use the Full Recipe for more details on how to prepare this delicious dish! To keep your Mediterranean Greek lentil salad fresh, store it in an airtight container. This will help prevent it from drying out or absorbing other smells in the fridge. The salad lasts up to five days when stored properly. Just remember to keep it chilled. Can you freeze lentil salad? Yes, you can! Freezing is a great way to save leftovers. However, the texture may change a bit once thawed. To prepare for freezing, divide the salad into meal-sized portions. Use freezer-safe bags or containers. When you’re ready to eat it, thaw the salad overnight in the fridge. Serve it cold, or give it a quick toss in a pan to warm it up. The flavors will still shine through. Using leftovers creatively can reduce food waste. Try adding the salad to a wrap or a sandwich. You can also mix it with cooked grains like quinoa or rice for a hearty meal. If you have extra ingredients, use them in other dishes. Toss leftover veggies into an omelet or add olives and feta to pasta. This way, nothing goes to waste, and you get to enjoy new flavors! How to make lentil salad ahead of time? You can prepare lentil salad the day before. Cook the lentils and let them cool. Chop the veggies and mix them together in a bowl. Keep the dressing separate. Mix it all together when you are ready to serve. Can I use canned lentils for this recipe? Yes, you can use canned lentils. They save time and are easy to use. Just rinse them well before adding to the salad. This makes your salad ready in a snap! Is lentil salad healthy? Lentil salad is very healthy. Lentils are high in fiber and protein. They help keep you full and satisfied. Plus, the fresh veggies add vitamins and minerals. This salad is a great choice for a balanced meal. What are the protein content and benefits? One cup of lentils has about 18 grams of protein. This helps build strong muscles and keeps you energized. Eating lentils also helps with digestion. They are low in fat and have many nutrients. Can I add meat to the salad? Yes, you can add meat if you like. Grilled chicken or shrimp works well. Just make sure to cook the meat before adding it to the salad. It adds extra flavor and protein. How can I make it spicier? To make your salad spicier, add jalapeños or red pepper flakes. You could also use a spicy dressing. Experiment until you find the heat level you enjoy. This adds a fun twist to the dish! For the full recipe, check out Mediterranean Greek Lentil Salad. This blog post covered how to create a delicious lentil salad. We discussed the main and extra ingredients, along with step-by-step instructions. You learned tips for perfect cooking, ways to boost flavors, and ideas for meal prep and storage. Lentil salad is nutritious, easy to make, and customizable. Experiment with different veggies or dressings to suit your taste. Enjoy making this tasty dish and feel good knowing its health benefits! Now, grab your ingredients and start cooking your own lentil salad!

Are you ready to elevate your meal game? This Mediterranean Greek Lentil Salad is both flavorful and fresh. Packed with protein-rich lentils and vibrant veggies, this dish bursts with fresh …

Read more

Categories Salads

Cucumber Shrimp Salad Fresh and Flavorful Delight

May 23, 2025 by Chef Nate
To make a refreshing cucumber shrimp salad, you need the following ingredients: - 1 pound shrimp, peeled and deveined - 2 large cucumbers, thinly sliced - 1 cup cherry tomatoes, halved - 1 avocado, diced - 1/4 cup red onion, finely sliced - 2 tablespoons fresh cilantro, chopped - 3 tablespoons olive oil - 2 tablespoons lime juice - 1 teaspoon honey - 1/2 teaspoon garlic powder - Salt and pepper to taste Each ingredient brings its own flavor and texture to the dish. The shrimp add a sweet and ocean-like taste. Cucumbers provide a crunch that feels fresh. Cherry tomatoes burst with juice, while avocado adds creaminess. Red onion gives a slight bite, and cilantro brightens everything up. The dressing, made from olive oil, lime juice, honey, and garlic powder, balances the dish perfectly. You can find the Full Recipe to guide you through the preparation. This salad is light, vibrant, and perfect for warm days! To start, we need to cook the shrimp. Fill a pot with water and add salt. Bring it to a boil. Once boiling, add the shrimp. Cook for 2 to 3 minutes. The shrimp should turn pink when done. Be careful not to overcook! Next, drain the shrimp in a colander. Rinse the shrimp under cold water. This stops the cooking process and cools them off. Set them aside to dry. Now, let’s make the dressing. In a small bowl, add olive oil, lime juice, honey, and garlic powder. I like to add a pinch of salt and fresh ground pepper too. Use a whisk to mix everything together. You want it smooth and well combined. The dressing should taste bright and fresh. In a large mixing bowl, combine all your salad ingredients. Add the cooked shrimp, sliced cucumbers, halved cherry tomatoes, diced avocado, sliced red onion, and chopped cilantro. Gently mix everything so that the shrimp and veggies are evenly spread. Now it's time to dress the salad. Drizzle your prepared dressing over the salad mixture. Use a spatula or spoon to gently toss everything together. Make sure all the ingredients get coated. This step is key for great flavor. Let the salad chill in the refrigerator for about 10 minutes. This helps the flavors blend. After chilling, serve the salad in bowls. It looks great, and it tastes even better! You can serve it as a light meal or a side dish. For the full recipe, check the details above! To cook shrimp just right, focus on timing. Place the shrimp in boiling water. Cook them for only 2 to 3 minutes. They should turn pink and curl gently. Overcooking makes shrimp tough and rubbery. You want them tender and juicy. Always remember to drain and rinse them in cold water. This stops the cooking process. To add more flavor, consider fresh herbs and spices. You can try dill or basil for a fresh twist. A touch of red pepper flakes gives a nice kick. You can also use parsley for a mild taste. Experiment with your favorite flavors. This allows you to make the salad your own. How you serve this salad matters. For a bright look, use a large, white bowl. The colors of the salad will pop. Garnish with extra cilantro for a fresh touch. Serve it with crusty bread or tortilla chips. This adds a nice crunch. You can also pair it with a light white wine for a refreshing meal. {{image_2}} You can switch the shrimp with other proteins. Crab meat brings a sweet taste. Chicken adds heartiness. Both choices work well in this salad. You get a new flavor with each option. Try cooked lobster for a fancy twist. The dressing is key to this salad. You can play with oils and acids. Use avocado oil instead of olive oil for a smooth flavor. For a tangy kick, try apple cider vinegar instead of lime juice. These changes keep your salad fresh and fun. Adapt your salad to the seasons. In summer, use fresh, juicy tomatoes. In fall, add roasted squash for warmth. Winter calls for crunchy cabbage or carrots. Each season offers new tastes and textures. Enjoy the salad all year round with these simple swaps. To keep your Cucumber Shrimp Salad fresh, store it in an airtight container. Make sure the salad is cool before sealing. This helps preserve flavor and texture. If you know you will not eat it soon, consider storing the shrimp and veggies separately. This keeps the cucumbers from getting soggy. When stored correctly, your salad lasts about 2 to 3 days in the fridge. Check for any signs of spoilage before eating. If it smells off or looks strange, it’s best to toss it. Always trust your senses! Reheating shrimp is tricky. It can turn rubbery if heated too long. Instead, enjoy the salad cold. If you need to warm the shrimp, do it gently in a pan over low heat. Add a splash of water or broth to keep it moist. This way, you enjoy the flavors without losing the shrimp's tender texture. Yes, you can use frozen shrimp. Just thaw them first. Place the shrimp in cold water for about 15 minutes. Drain them well before cooking. If you don’t have lime juice, you can use lemon juice. It gives a nice tang. You can also try vinegar for a different flavor. Yes, this salad is gluten-free. All ingredients used are safe for those with gluten issues. Enjoy it without worry. You can prepare the shrimp and chop the veggies. Mix them just before serving. This keeps everything fresh and crisp. Absolutely! You can add bell peppers, radishes, or even corn. Feel free to mix it up based on your taste. This salad is low in calories and high in protein. Shrimp offers omega-3 fatty acids. Cucumbers provide hydration, and avocados add healthy fats. Enjoy this fresh and flavorful delight while eating well! For the full recipe, check out the Crispy Cucumber Shrimp Salad. This blog post guided you through making a refreshing Cucumber Shrimp Salad. We covered each ingredient, cooking steps, and tips for the best results. You learned how to enhance flavors and store leftovers too. This dish is easy to adapt and perfect for any season. Try customizing it to fit your taste. Making this salad is a fun way to enjoy fresh ingredients and flavors. Enjoy your tasty creation and the healthy benefits it brings!

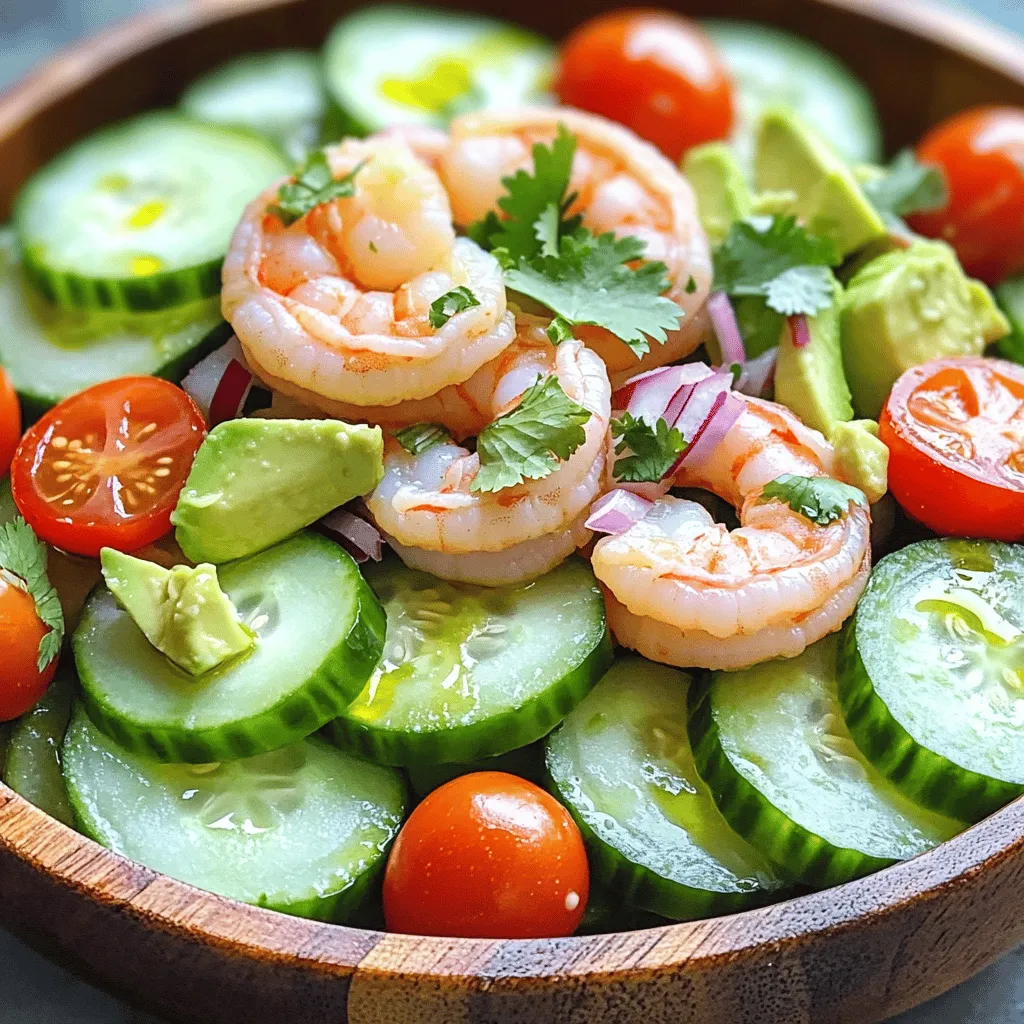
Looking for a fresh, light dish that packs a flavor punch? My Cucumber Shrimp Salad is just the ticket! With juicy shrimp, crisp cucumbers, and zesty lime, it delights your …

Read more

Categories Salads
Older posts
Newer posts
← Previous Page1 … Page79 Page80 Page81 … Page108 Next →

GRILLED FLAVORS

where delicious ideas come to life, from stovetop to backyard. Warm, simple, and always satisfying. 🍽️✨

PAGES

Home About Contact Privacy Policy Terms & Conditions Cookie Policy GDPR Policy Copyright Policy Disclaimer

CATEGORIES

Appetizers Desserts Salads Breakfast Dinner

Contact

  • Pinterest
  • Mail
Copyright © 2026 Grilled Flavors. All rights reserved.