Skip to content
grilledflavors.com
  • Home
  • Appetizers
  • Desserts
  • Salads
  • Breakfast
  • Dinner
  • Privacy Policy
  • Contact
  • About

Chef Nate

Berry Croissant Bake Tasty and Easy Breakfast Delight

May 23, 2025 by Chef Nate
- 4 large croissants, torn into pieces - 2 cups mixed berries (strawberries, blueberries, raspberries) - 3 large eggs - 1 cup milk - 1/2 cup heavy cream - 1/4 cup maple syrup - 1 teaspoon vanilla extract - 1 teaspoon cinnamon - Powdered sugar, for dusting - Fresh mint leaves, for garnish For this berry croissant bake, you need fresh, flavorful ingredients. The croissants add a soft, buttery base. Mixed berries bring sweetness and color. You will also need eggs, milk, and heavy cream to create a rich custard. Maple syrup adds natural sweetness, while vanilla and cinnamon enhance the flavor. Finally, powdered sugar and mint leaves provide a lovely touch when serving. If you can't find croissants, you can use brioche or challah. Both will work well in this recipe. For the berries, feel free to mix your favorites. Blackberries and peaches are great options. If you need a non-dairy choice, use almond or oat milk instead of regular milk. There are many ways to make this dish fit your needs. First, preheat your oven to 350°F (175°C). While the oven warms up, grease a 9x13 inch baking dish with butter or cooking spray. This step helps prevent sticking. Next, take your torn croissant pieces and place them in a large bowl. Add 2 cups of mixed berries to the bowl, which can include strawberries, blueberries, and raspberries. Gently fold the croissants and berries together. This combines the flavors and textures. Once mixed, pour the mixture into your prepared baking dish. In a separate bowl, crack 3 large eggs. Add 1 cup of milk and 1/2 cup of heavy cream. Then, pour in 1/4 cup of maple syrup, 1 teaspoon of vanilla extract, and 1 teaspoon of cinnamon. Use a whisk to blend these ingredients well. The egg mixture should be smooth and creamy. This mixture will soak the croissants, creating a rich flavor. Now, pour the egg mixture evenly over the croissant and berry mixture in the baking dish. Make sure every piece is soaked. Gently press down on the croissants to help them absorb the liquid. Let the mixture rest for about 10 minutes. This waiting period allows the croissants to soak up more moisture. Place the dish in the preheated oven and bake for 30-35 minutes. You’ll know it’s done when the top is golden brown and a knife inserted in the center comes out clean. Once baked, take it out and let it cool for 5-10 minutes. Dust with powdered sugar and garnish with fresh mint leaves before serving. Enjoy your delicious Berry Croissant Bake! To check for doneness, look for a golden top. Stick a knife in the center. If it comes out clean, your bake is ready. If it is gooey, give it a few more minutes. A custard-like center is key. You want it to be soft but not runny. Letting it rest after baking helps set the inside. Spices and extracts boost flavor. Try adding a pinch of nutmeg or cardamom. They add warmth and depth. A splash of almond extract can also elevate your dish. For toppings, powdered sugar is a classic choice. You can also drizzle warm maple syrup or honey for extra sweetness. Fresh whipped cream or yogurt works well too. Serve your Berry Croissant Bake warm. A scoop of vanilla ice cream makes it special. Pair it with a side of fresh fruit for color. For a beautiful presentation, dust with powdered sugar. Add mint leaves for a pop of green. The contrast makes your dish look stunning and inviting. {{image_2}} If you want a nut-free and dairy-free version, it's easy! For heavy cream, use coconut cream. It adds a nice flavor. You can replace milk with almond or oat milk. Both options work well and keep the dish creamy. Just ensure you pick unsweetened versions so the taste stays balanced. Using seasonal fruits can make your dish even better. In spring, try fresh strawberries or cherries. In summer, use blueberries or raspberries. Fall brings great options too, like apples or pears. Each fruit adds a unique taste. Mixing different berries also adds color and fun. You can even try frozen berries if fresh ones aren't available. For a little twist, think about adding chocolate or nuts. Chopped dark chocolate makes everything rich and sweet. You can sprinkle chocolate chips on top before baking. If you prefer nuts, add chopped pecans or walnuts. They add crunch and taste. Adjust these flavors based on what you like best! This Berry Croissant Bake is versatile. You can adapt it with these variations and enjoy new flavors every time. For the full recipe, check out the previous section. To keep your Berry Croissant Bake fresh, store it in the fridge. Place leftovers in an airtight container. This helps prevent drying out. Use a container that fits snugly to keep the moisture in. It is best to eat it within three days. Reheating it in the oven or microwave warms it well. If you want to save some for later, freezing works great. Cut the bake into individual pieces before freezing. Wrap each piece in plastic wrap and then place them in a freezer bag. Remove as much air as you can. This keeps the flavor and texture better. To reheat, thaw overnight in the fridge. Then, warm it in the oven at 350°F (175°C) until heated through. Berry Croissant Bake stays fresh for a few days in the fridge. It lasts about 3 days when stored properly. In the freezer, it can stay good for up to three months. Make sure to check for any freezer burn before using. When reheated, it should smell sweet and taste delicious. Yes, you can make this bake ahead of time. To prepare it in advance, follow these tips: - Assemble the croissant and berry mix in the baking dish. - Whisk the egg mixture and store it separately. - Cover both dishes and keep them in the fridge overnight. - In the morning, pour the egg mixture over the croissants. - Let it sit for 10 minutes, then bake as directed. You can tell when the bake is done by looking and feeling it. Here are some signs: - The top should be golden brown. - The edges will be lightly crisp. - Insert a knife in the center; it should come out clean. - The custard should be set, not runny. Yes, day-old croissants are great for this recipe. Here are some benefits: - They absorb the egg mixture better. - Stale croissants add texture and flavor. - You reduce food waste by using them. Using day-old croissants makes your bake taste even better! This blog post takes you through making a delicious berry croissant bake. We covered ingredients, step-by-step instructions, tips, variations, and storage info. With simple swaps and storage tips, anyone can enjoy this delightful dish. Remember, cooking is about fun and creativity. Don't hesitate to try new flavors or methods. Enjoy your berry croissant bake, and share it with friends or family for a treat!

Ready to elevate your breakfast game? My Berry Croissant Bake is your new go-to! It’s a simple mix of flaky croissants and juicy berries, drenched in a creamy, sweet egg …

Read more

Categories Desserts

Ground Beef Burrito Bowl Easy Flavorful Recipe

May 22, 2025 by Chef Nate
- 1 pound ground beef - 1 cup cooked brown rice - 1 can (15 oz) black beans, rinsed and drained - 1 cup corn (fresh, frozen, or canned) - 1 bell pepper, diced (any color) - 1 small red onion, diced - 2 cloves garlic, minced - 1 tablespoon chili powder - 1 teaspoon cumin - Salt and pepper to taste - 1 cup shredded cheddar cheese - 1 avocado, sliced - ¼ cup fresh cilantro, chopped - ½ cup salsa - Juice of 1 lime When I make a ground beef burrito bowl, I focus on fresh, tasty ingredients. The main star is the ground beef. It gives the dish a rich flavor and nice texture. I cook it until it's browned, which takes about five to seven minutes. Next, I add brown rice. It’s healthy and fills you up. Black beans add protein and fiber, while corn brings a sweet crunch. Choose fresh corn for summer or frozen for year-round ease. For veggies, I love using a bell pepper and red onion. They add color and flavor. I always add garlic too; it makes everything better! The spices, like chili powder and cumin, give the bowl a warm kick. Don’t forget to season with salt and pepper! Finally, the toppings make this dish shine. Shredded cheddar cheese melts over the warm beef. Sliced avocado adds creaminess, while fresh cilantro gives a burst of flavor. A spoonful of salsa and a squeeze of lime juice brighten everything up. These ingredients come together to create a delicious meal. You can find the full recipe for the beefy fiesta burrito bowl in the previous section. Enjoy each bite! To start, heat a large skillet over medium heat. Add 1 pound of ground beef. Cook it until it browns. This should take about 5 to 7 minutes. Make sure to break the meat apart as it cooks. Once browned, drain excess fat from the skillet. Next, add the diced red onion, bell pepper, and minced garlic. Sauté these vegetables until they soften, which takes about 3 to 4 minutes. Now, stir in the spices. Add 1 tablespoon of chili powder and 1 teaspoon of cumin. Sprinkle some salt and pepper to taste. Mix well for about a minute to toast the spices. Then, add the rinsed black beans and corn. Stir until everything heats through. This should take around 2 to 3 minutes. Grab your serving bowls. Start by layering the cooked brown rice at the bottom. Next, spoon the beef and vegetable mixture on top. Add shredded cheddar cheese for a tasty finish. Now, it’s time for garnishes! Top each bowl with sliced avocado, a sprinkle of fresh cilantro, a spoonful of salsa, and a squeeze of lime juice. Serve warm and enjoy your colorful and hearty burrito bowl! For more details, check out the full recipe. To properly brown ground beef, heat your skillet on medium-high. Add the beef, breaking it apart with a spatula. Cook until it gets a rich brown color, about 5 to 7 minutes. Drain excess fat but keep some for flavor. This step adds depth to the dish. For sautéing vegetables, use a bit of oil in the same skillet. Add diced onion and bell pepper, stirring often. Cook until they soften, about 3 to 4 minutes. Add minced garlic last; it cooks fast. This keeps the garlic from burning and losing flavor. For extra zing, try adding spices like paprika or cayenne. A splash of soy sauce can also boost the umami flavor. Don't be shy with the chili powder; it brings warmth and depth to your bowl. Making homemade salsa elevates your dish. Mix chopped tomatoes, onion, cilantro, lime juice, and a pinch of salt. This fresh salsa adds brightness and pairs well with the ground beef. Serve your burrito bowl with tortilla chips or a side of guacamole for crunch. You can also add a fresh green salad for a healthy touch. For creative presentations, stack the ingredients in clear bowls. Layer the rice, beef, and toppings so everyone can see the colors. Garnish with cilantro and lime wedges to make it pop. For the full recipe, check out the Beefy Fiesta Burrito Bowl . {{image_2}} You can easily swap out ground beef for other tasty options. Chicken or turkey work well and keep the dish light. If you're looking for a plant-based choice, try using lentils or a meat alternative. These options still pack a punch of flavor. You can also change the base of your burrito bowl. Instead of brown rice, consider using quinoa. Quinoa is a superfood, full of protein and fiber. It adds a nice texture and can help you feel full longer. Think about adding flavors from different cuisines. A dash of taco seasoning or some chipotle peppers can make your bowl pop. You can also introduce fresh herbs like cilantro or parsley for a burst of flavor. Customizing with seasonal ingredients is a fun way to mix things up. In summer, add fresh corn or tomatoes. In winter, roasted squash or sweet potatoes can add warmth and comfort. If you need gluten-free options, simply choose gluten-free grains or skip the grains altogether. Load your bowl with extra veggies for a satisfying meal. For vegetarian or vegan adaptations, you can replace ground beef with black beans or chickpeas. For cheese lovers, use vegan cheese or skip it entirely. Your burrito bowl will still be delicious and filling. For the full recipe, check out the Beefy Fiesta Burrito Bowl. To store your leftover burrito bowls, let them cool first. Place them in airtight containers. Use glass or plastic containers with tight lids. This keeps the food fresh and prevents spills. Stored this way, your burrito bowls last up to four days in the fridge. When reheating, use the microwave or stovetop. If using a microwave, cover the bowl with a lid or a damp paper towel. This helps keep moisture in. For stovetop heating, add a splash of water and cover the pan. Heat on low to avoid overcooking. Keep an eye on it to make sure everything warms evenly. This way, all your ingredients stay fresh and delicious. You can freeze burrito bowls for later. Portion them in freezer-safe bags or containers. Remove as much air as possible to prevent freezer burn. When ready to eat, thaw overnight in the fridge. Reheat gently to keep the texture nice. Always remember, safe storage is key to enjoying your meals later! You can use several proteins instead of ground beef. Here are some options: - Ground turkey: Leaner than beef, it holds flavor well. - Ground chicken: A lighter choice that is still tasty. - Black beans: A great plant-based protein that suits many diets. - Lentils: Nutty and filling, perfect for a vegetarian bowl. - Tofu: Firm tofu can absorb flavors and add texture. - Seitan: A meat substitute made from wheat, very rich in protein. Using these options can change the taste and feel of your bowl. Experiment with different flavors for new favorites! To kick up the heat, try these tips: - Add jalapeños: Fresh or pickled, they bring a spicy punch. - Use hot salsa: Choose a salsa that packs some heat. - Include cayenne pepper: A little goes a long way in spice. - Stir in chipotle powder: This adds smokiness along with heat. - Top with hot sauce: Drizzle your favorite hot sauce before serving. Adjust the spice level to your taste and enjoy the fiery flavors! Yes, you can prepare burrito bowls ahead of time. Here are my best tips: - Cook ingredients separately: This keeps flavors fresh. - Store in airtight containers: This helps keep food safe and fresh. - Refrigerate for up to four days: Enjoy your meal prep for lunch or dinner! - Reheat gently: Use the microwave or stovetop to warm up. Meal prepping helps save time and lets you enjoy delicious meals all week! For the full recipe, check out the Beefy Fiesta Burrito Bowl. You learned how to make a delicious burrito bowl. We covered key ingredients, step-by-step instructions, and tips for great flavor. You can customize the bowl with your favorite toppings and ingredients. Remember to store leftovers safely or freeze them for later. This meal is not only tasty but also easy to adapt for different diets. Enjoy trying out new variations and sharing the dish with friends. Happy cooking!

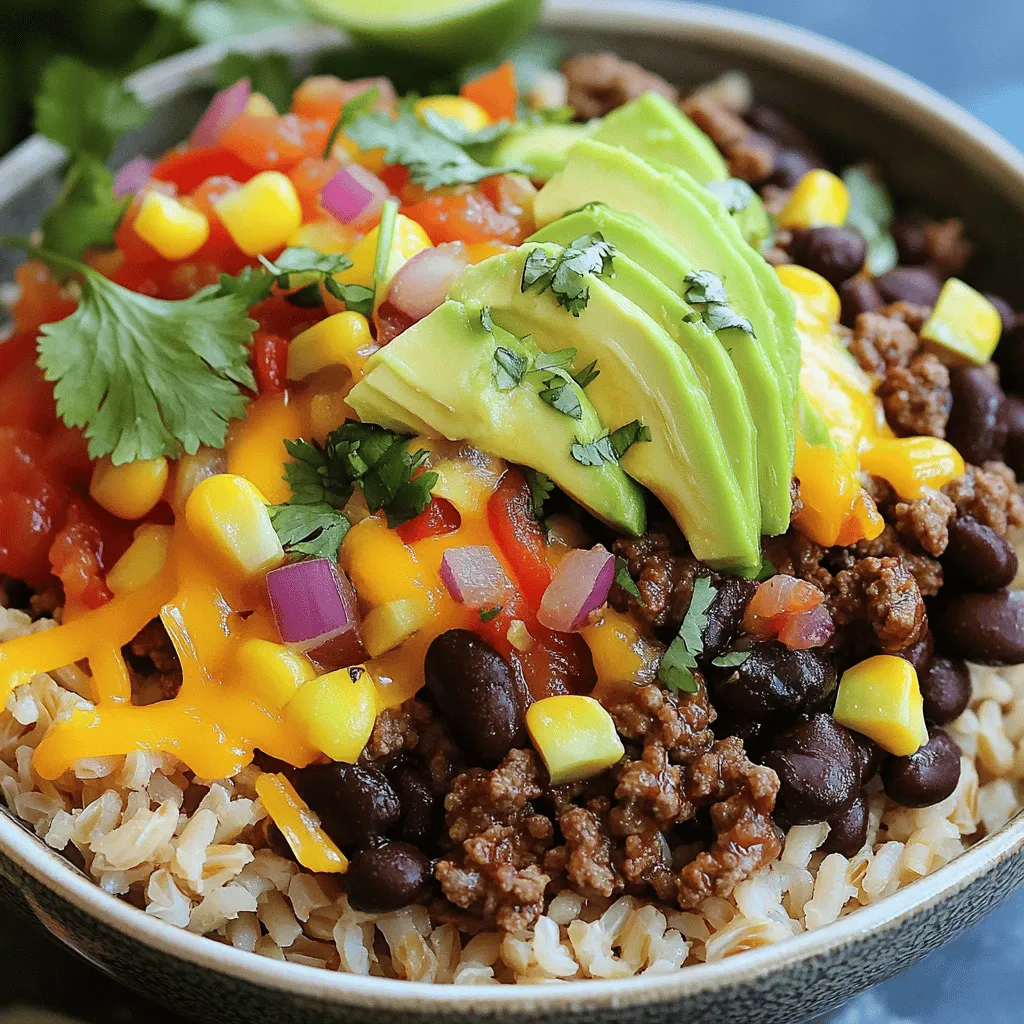
Are you ready to make a meal that’s both easy and full of flavor? My Ground Beef Burrito Bowl recipe packs a punch with fresh ingredients and zesty spices. This …

Read more

Categories Dinner

Creamy Cowboy Butter Chicken Linguine Delightful Dish

May 22, 2025 by Chef Nate
- 8 oz linguine pasta - 1 pound chicken breast, diced - 1 cup heavy cream The main ingredients create the heart of this dish. The linguine pasta provides a great base. Use fresh or dried pasta; both work well. The chicken breast adds protein and flavor. Dicing it helps it cook quickly and evenly. Heavy cream makes the sauce rich and smooth. - 1 teaspoon smoked paprika - 1 teaspoon cumin - ½ teaspoon chili powder Seasonings elevate the dish. Smoked paprika gives a warm, smoky taste. Cumin adds earthiness. Chili powder brings a mild heat. These spices create a balanced flavor profile. Adjust the spice levels to suit your taste. - 1 cup corn kernels - 1 cup cherry tomatoes, halved - ¼ cup grated Parmesan cheese (optional) Fresh additions enhance both taste and texture. Corn adds sweetness and crunch. Cherry tomatoes provide juiciness and a pop of color. If you love cheese, sprinkle in some Parmesan for extra creaminess. These optional ingredients let you customize your dish. For the full recipe, refer to the provided link. To cook the linguine, start with a large pot of salted boiling water. Add the pasta and cook it until it is al dente, which usually takes about 8-10 minutes. Stir the pasta occasionally to keep it from sticking. When it’s done, drain it well and set it aside. To prevent sticking, you can toss it with a little olive oil. This will help keep the strands separate. In a large skillet, melt 2 tablespoons of unsalted butter over medium heat. Add 1 pound of diced chicken breast to the skillet. Season the chicken with salt, black pepper, smoked paprika, cumin, and chili powder. Cook the chicken until it's browned and cooked through, which should take about 5-7 minutes. This step is key for that perfect flavor and texture. Once the chicken is cooked, it’s time to make the creamy sauce. Pour in 1 cup of chicken broth and 1 cup of heavy cream. Stir everything together and let the mixture simmer for about 5 minutes. This allows the flavors to meld wonderfully, creating a rich and creamy sauce for your pasta. Now, add 1 cup of corn kernels and 1 cup of halved cherry tomatoes to the sauce. Stir well and let it simmer for another 3-4 minutes. This will heat everything through and thicken the sauce a bit. Finally, toss the cooked linguine into the skillet, coating it with the sauce. Cook for another minute to ensure everything is heated evenly. If you want an extra touch of richness, stir in some grated Parmesan cheese before serving. Garnish with fresh parsley for a lovely finish. To get the best taste in your dish, adjust the spices. If you want more heat, add extra chili powder. For a smoky touch, add more smoked paprika. You can also play with garlic. Use more cloves for a bolder flavor. To enhance creaminess, stir in grated Parmesan cheese at the end. It adds a rich flavor and makes the sauce even thicker. You can also use cream cheese if you like. Just blend it in well before serving. Serving is key for a great meal. Use shallow bowls for your creamy linguine. This style shows off the dish's color and texture. Garnish with fresh parsley. It adds a nice green touch. A sprinkle of Parmesan cheese on top looks fancy too. You can also add halved cherry tomatoes on top. They add a pop of color and freshness. Arrange everything neatly, and your dish will shine. For the chicken, cook it over medium heat. This method gives a nice brown color. Make sure to cut the chicken into even pieces. This helps it cook through evenly. To avoid overcooking pasta, watch the timer. Cook it just until al dente. This means it should be firm when bitten. Drain it quickly and toss it in the sauce. This keeps it from getting mushy. For the full recipe, check the detailed steps and ingredients. {{image_2}} You can easily switch up the protein in this dish. Shrimp adds a nice twist. You can sauté shrimp just like chicken. Tofu also works well for a vegetarian option. Make sure to press the tofu first to remove extra moisture. When it comes to veggies, feel free to mix things up. Bell peppers add color and sweetness. Zucchini or broccoli can add crunch and nutrition. Using seasonal vegetables keeps your dish fresh and vibrant. Not a fan of spicy? You can lower the chili powder for a milder dish. You can also add more cream to soften the heat. If you want to add some zest, consider lemon juice or zest for a fresh kick. Herbs can change the whole flavor. Fresh basil or thyme can bring a new taste. Adding dried herbs can offer more depth. Experiment with what you have in your kitchen to find your favorite blend. If you need a gluten-free meal, swap the linguine for gluten-free pasta. Many options are available, so pick one that you enjoy. Just cook it according to package instructions. To make the dish dairy-free, choose a dairy-free cream. Almond or coconut cream are great choices. Nutritional yeast can add a cheesy flavor without dairy. This way, everyone can enjoy this creamy goodness. Feel free to check the Full Recipe for more ideas! To keep your creamy cowboy butter chicken linguine fresh, follow these steps: - Cool Down: Let the pasta cool before storing. This helps prevent moisture buildup. - Refrigeration: Place the leftovers in an airtight container. This keeps out air and moisture. - Duration: Store in the fridge for up to three days for best taste. When it's time to enjoy your leftovers, reheating is key. Here are my favorite methods: - Stovetop Method: Heat a skillet over medium-low heat. Add a splash of chicken broth or cream. Stir in the linguine until warm. This keeps it creamy. - Microwave Method: Place the pasta in a microwave-safe bowl. Add a bit of cream or broth. Cover loosely and heat in short bursts, stirring often. This helps maintain moisture. If you want to save some for later, freezing works well: - Freezing: Allow the dish to cool completely. Transfer to a freezer-safe container. Leave some space at the top for expansion. - Thawing: Move the container to the fridge the night before you plan to eat it. For faster thawing, use the microwave at a low setting. - Reheating: Once thawed, use the stovetop method to reheat, adding a little cream or broth to keep it creamy. For the full recipe, you’ll find the perfect balance of flavors and steps to create this delightful dish. If you want a lighter option, use half-and-half. You can also try whole milk mixed with a bit of butter. Coconut cream is a great dairy-free choice. Just remember, these substitutes may change the dish's creaminess and flavor. Yes, you can prepare the chicken and sauce in advance. Cook the pasta fresh to keep it from getting soggy. Store the chicken and sauce in the fridge for up to three days. When ready to serve, heat the sauce, then add the cooked pasta. Creamy Cowboy Butter Chicken Linguine goes well with a simple green salad. Roasted vegetables add a nice crunch and flavor. Garlic bread is also a fantastic choice to soak up the creamy sauce. Try these sides to make a complete meal. This blog post covered a delicious recipe for Creamy Cowboy Butter Chicken Linguine. You learned about the key ingredients and how to cook them just right. We explored helpful tips for flavor, presentation, and cooking techniques. You can also customize the dish to fit your taste or diet. Finally, I shared storage tips so you can enjoy leftovers later. This dish can be easy and fun to make. With these steps and ideas, you can impress your family at dinner. Enjoy your cooking journey!

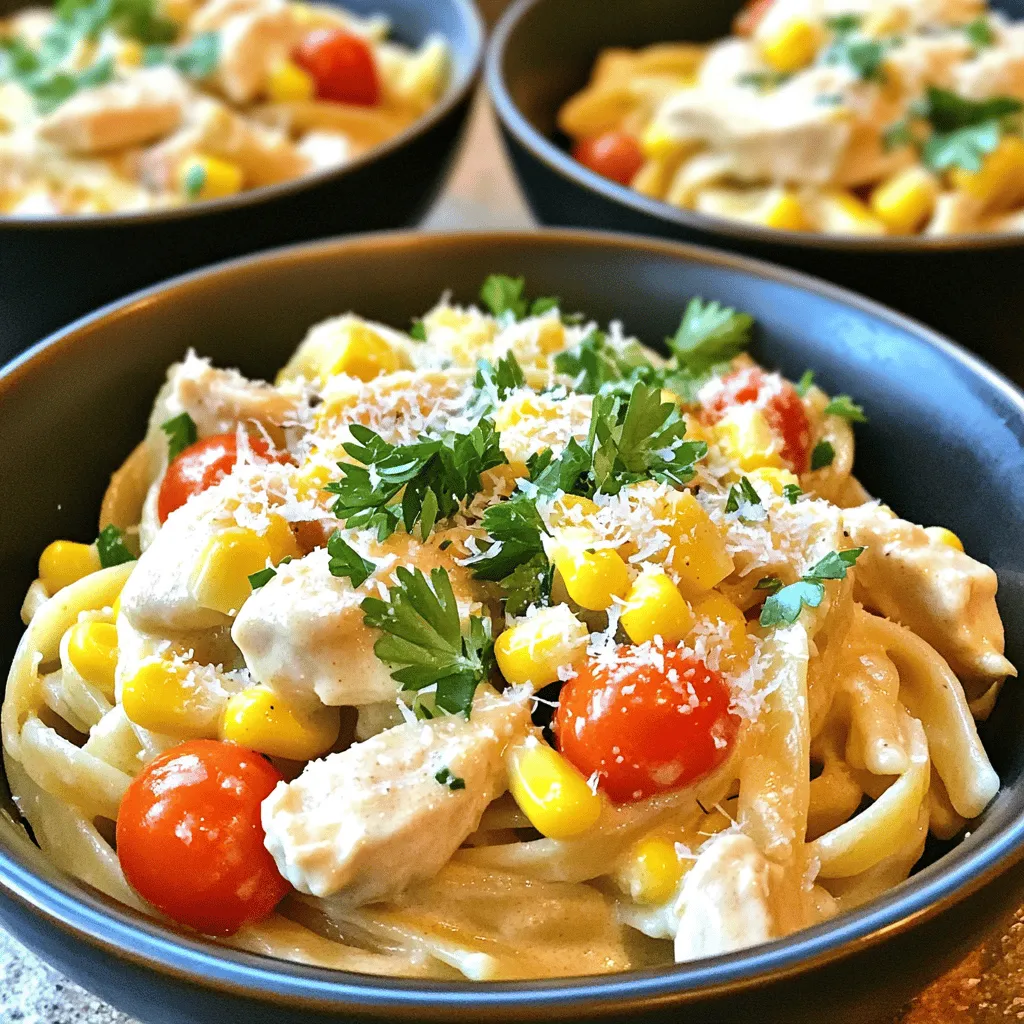
Are you ready to elevate your dinner game? This Creamy Cowboy Butter Chicken Linguine is simple, tasty, and full of rich flavors. With just a few easy steps and common …

Read more

Categories Dinner

Spicy Chili Garlic Deviled Eggs Zesty and Easy Recipe

May 22, 2025 by Chef Nate
- 6 large eggs - 3 tablespoons mayonnaise - 1 teaspoon Dijon mustard - 1 clove garlic, minced - 1 teaspoon chili paste or Sriracha - Salt and pepper to taste - 1 tablespoon fresh cilantro, chopped - 1 teaspoon smoked paprika (optional) These simple ingredients give you a big flavor punch. Each one plays a special role. The eggs are the base, while mayonnaise adds creaminess. Dijon mustard gives a nice tang, and garlic adds depth. Chili paste or Sriracha brings the heat, so adjust it to your taste. Don’t forget salt and pepper! They enhance every other flavor. Fresh cilantro adds a bright touch. Smoked paprika is optional but adds a smoky note. For the full recipe, head to the Full Recipe section. You will love how easy it is to make these spicy chili garlic deviled eggs! - Cover eggs with cold water. - Bring to a boil and then cover and remove from heat. To make deviled eggs, I start by placing the eggs in a saucepan. I fill the pan with cold water, enough to cover the eggs by about an inch. Next, I turn the heat to medium-high and wait for it to boil. Once it boils, I cover the pan, turn off the heat, and let it sit for 12 minutes. This method helps make the eggs cook evenly. - Create an ice water bowl for cooling. - Transfer eggs to ice bath after boiling. While the eggs are cooking, I prepare an ice bath. I fill a large bowl with cold water and ice cubes. After 12 minutes, I carefully transfer the eggs to the ice bath. This cools them quickly and stops the cooking process. I let them sit in the ice bath for about 5 minutes. - Peel and slice eggs in half. - Mix yolks with remaining ingredients until creamy. - Fill egg whites with yolk mixture. After cooling, I gently tap each egg on the counter. I peel them under cold running water. This helps remove the shell easily. Next, I slice the peeled eggs in half lengthwise. I place the yolks in a mixing bowl and mash them with a fork. Then, I add mayonnaise, Dijon mustard, minced garlic, chili paste or Sriracha, and salt and pepper to taste. I mix everything until it’s smooth and creamy. Finally, I fill the egg whites with the yolk mixture. You can use a piping bag or a spoon for this step. For a nice look, I garnish with chopped cilantro and smoked paprika. For the full recipe, check the details above. To get the best deviled eggs, start by boiling your eggs just right. If you want a soft yolk, boil for 9-10 minutes. For a firmer yolk, stick to 12-13 minutes. The timing is key to how the yolks will taste and look in your spicy chili garlic deviled eggs. Cooling the eggs fast helps with peeling. After boiling, move the eggs to an ice bath. Let them sit in the cold water for about 5 minutes. This shock makes the shells pop off easily, which saves you time and frustration. Make your deviled eggs look as good as they taste. Use a piping bag to fill the whites with the yolk mix. This adds a fun touch. For garnish, sprinkle chopped cilantro on top. A dash of smoked paprika gives a nice color too. These small details make your spicy chili garlic deviled eggs stand out on any table. For more details, check out the Full Recipe. {{image_2}} You can change the heat level in your spicy chili garlic deviled eggs. A great way is to swap out the chili paste. Instead of using chili paste, try different hot sauces. Sriracha gives a nice kick, while a milder sauce like Frank’s RedHot adds flavor without too much spice. You can even mix sauces to find your perfect heat level. Just start with a small amount and taste as you go. This way, you can make the dish just right for your taste buds. Adding herbs or spices can make your deviled eggs unique. Fresh herbs like dill or chives add a fresh taste. You could also use a pinch of cumin or smoked paprika for a deeper flavor. Experiment with different combinations to find what you love. Don't forget to mix in some lemon juice for a zesty twist. Each addition brings new life to this classic dish. If you want a vegan version, you can replace the eggs and mayo. Use chickpeas instead of eggs. Mash them well and mix with vegan mayo. This combo gives a similar texture. You can also try avocado, which adds creaminess and healthy fats. For a low-calorie option, use Greek yogurt instead of mayo. This keeps the flavor while cutting down on calories. These swaps ensure everyone can enjoy spicy chili garlic deviled eggs. For the full recipe, check out the earlier section. To store leftover deviled eggs, place them in an airtight container. You can cover them with plastic wrap if you don’t have a container. Keep them in the fridge to keep them fresh. I recommend eating them within a few days for the best flavor. Deviled eggs last about three to four days in the refrigerator. After that, they may lose their taste and texture. Always check for any off smells or changes in appearance before eating. This helps ensure you enjoy the spicy chili garlic deviled eggs at their best! I don’t recommend freezing deviled eggs. Freezing changes the texture of the eggs and filling, making them watery. If you want to make them ahead, just store them in the fridge. You can prepare the filling early and fill the eggs just before serving. This way, they taste fresh and delicious! For the full recipe, check out the Spicy Chili Garlic Deviled Eggs 🧄! To give your deviled eggs a kick, add spicy ingredients. Use chili paste or Sriracha for heat. You can also add minced jalapeños or hot sauce. Mix these with the egg yolks, mayonnaise, and mustard. This will boost the flavor and spice level. - Use chili paste or Sriracha: Start with 1 teaspoon, then adjust to taste. - Add minced jalapeños: A small amount can add heat. - Incorporate hot sauce: A few drops can elevate the flavor. Mix these ingredients well until creamy. Taste and adjust the heat before filling the eggs. It’s all about finding the right balance for your taste buds. Yes, you can prepare deviled eggs in advance. This makes them great for parties or gatherings. The best way to do this is to make the filling and store it separately. Here’s how: - Prepare the eggs: Boil, cool, and peel the eggs. - Make the filling: Mix yolks with the other ingredients. - Store in the fridge: Keep the filling in an airtight container. You can fill the egg whites right before serving. This keeps the eggs fresh and looking great. Avoid filling them too early, as they can get soggy. If you want to swap out mayonnaise, there are some tasty alternatives. You can use Greek yogurt for a healthier option. It adds creaminess with less fat. Another option is avocado, which gives a rich flavor. - Greek yogurt: Creamy and tangy, perfect for deviled eggs. - Avocado: Mash it up for a smooth texture. - Silken tofu: Blend it for a vegan-friendly filling. These alternatives can make your deviled eggs unique and cater to different diets. In this post, we covered how to make tasty deviled eggs. You learned about the right ingredients, proper boiling techniques, and creative ways to make them your own. Remember to adjust spice levels and think about personal flavors when creating your dish. Storing them well keeps them fresh for your next gathering. Deviled eggs are easy and versatile. Enjoy making them for snacks or parties! You have all the tips you need to impress your friends and family. Happy cooking!

Craving a zesty twist on a classic snack? These Spicy Chili Garlic Deviled Eggs pack a flavorful punch! In this easy recipe, I’ll guide you through creating creamy, spicy bites …

Read more

Categories Appetizers

Best Birria Tacos Flavorful and Easy Recipe Guide

May 22, 2025 by Chef Nate
- 2 lbs beef chuck roast or goat meat, cut into chunks - 4 dried guajillo chiles, stems and seeds removed - 2 dried ancho chiles, stems and seeds removed - 1 medium onion, chopped - 4 cloves garlic, minced - 1 teaspoon ground cumin - 1 teaspoon black pepper - 1 tablespoon dried oregano - 2 cups beef broth - 1 tablespoon apple cider vinegar - Salt to taste - Corn tortillas - Fresh cilantro, chopped (for garnish) - Diced onions (for garnish) - Lime wedges (for serving) The meat is key. I love using beef chuck roast for its rich flavor. Goat meat is also great if you want a stronger taste. The dried guajillo and ancho chiles bring depth to the dish. Toast them briefly to unlock their flavor. This small step makes a big difference. Don’t forget your spices! Ground cumin, black pepper, and oregano are essential. They add warmth and aroma. Fresh cilantro and diced onion are perfect for topping. Lime wedges give a zesty kick. - Large pot or Dutch oven - Skillet for frying - Blender for sauce preparation - Slow cooker (optional) I recommend using a large pot or Dutch oven for cooking the meat. This keeps it moist and tender. A skillet helps crisp the tortillas. A blender is a must for making the sauce. It helps blend the chiles and spices into a smooth mixture. If you prefer a hands-off approach, a slow cooker is a great option. It allows the meat to cook slowly and soak up all the flavors. For the full recipe, you can check out my detailed guide. Enjoy making these delicious birria tacos! To start, you need to toast the dried chiles. Take your guajillo and ancho chiles. In a dry skillet, set the heat to medium. Toast the chiles for about 2 minutes. You want them fragrant, but not burnt. Once done, remove them and let them cool. Next, chop your vegetables. Dice one medium onion and mince four cloves of garlic. Measure out your spices: one teaspoon of ground cumin, one teaspoon of black pepper, and one tablespoon of dried oregano. This preparation makes your cooking smooth and easy. Now, it's time to blend your sauce. In a blender, add the toasted chiles, chopped onion, minced garlic, cumin, black pepper, and oregano. Pour in one cup of beef broth. Blend this mixture until it's smooth. If needed, add more broth for a pourable texture. In a large pot or Dutch oven, add your beef chunks. Pour the blended chili sauce over the meat. Add the remaining cup of beef broth and salt to taste. Make sure to stir well to combine everything. Cover the pot and simmer on low heat. Cook for 3 to 4 hours until the meat is tender and shreds easily. If you prefer, you can use a slow cooker for this. Just set it on low for 6 to 8 hours. Once the meat is done, take it out and shred it. Set the meat aside and strain the broth for later. To assemble your tacos, heat a skillet over medium-high heat. Dip a corn tortilla in the reserved broth. Then, add some shredded meat on one side of the tortilla. Fold the tortilla over. Place it in the skillet and cook for about 2 minutes on each side until it's crispy. Repeat this process with the remaining tortillas and meat. Serve your tacos hot, garnished with fresh cilantro and diced onions. Don’t forget lime wedges for squeezing over the tacos. Enjoy your savory birria tacos! For the full recipe, check out the complete instructions. For the best birria tacos, use beef chuck roast or goat meat. These cuts have fat that adds great flavor. If you want a tender bite, slow cooking works wonders. Cook the meat on low heat for hours. This makes it soft and easy to shred. To make your birria pop, consider adding spices like cinnamon or cloves. These spices bring a warm depth to the dish. For the broth, try adding bay leaves or a splash of lime juice. This will lift the flavors and make them vibrant. Top your birria tacos with fresh cilantro and diced onions. These add crunch and freshness. Serve lime wedges on the side for a zesty kick. Enjoy with a cold drink like horchata or a light beer. These pair perfectly with the rich flavors of the tacos. For a complete meal, add rice or beans on the side. If you're ready to dive deeper into making these delectable tacos, check out the Full Recipe for detailed steps! {{image_2}} You can use different meats for birria tacos. If you prefer chicken, try using thighs for a juicy bite. Pork is another great choice. It gives a nice, rich flavor. You can even make birria with jackfruit or mushrooms for a vegetarian or vegan option. These ingredients soak up flavors well and create a tasty dish. Chiles play a big role in birria's taste. You can mix different dried chiles to change the spice level. For less heat, use more ancho chiles. If you want more heat, add a few chipotle chiles. Fresh herbs like cilantro and green onions work well as garnishes. You can also try a spicy salsa for a kick. It adds depth and makes every bite exciting. Birria tacos are fun on their own. But you can explore fusion recipes too. Try birria quesadillas by adding cheese and grilling them until crispy. They are cheesy and full of flavor. Pair birria tacos with rice or beans for a complete meal. The sides add balance and make it more filling. Check out the Full Recipe for more ideas! After you enjoy your birria tacos, store the leftovers right away. This keeps them fresh. Place the meat and broth in an airtight container. Make sure to cool them down first. Store the tortillas separately in a zip-top bag. They need to stay soft and not get soggy. You can refrigerate both for up to three days. If you want to save leftovers for longer, freeze them! For the meat, use freezer-safe bags. Squeeze out the air before sealing. You can freeze the broth in ice cube trays too. This way, you can use just what you need later. When you are ready to enjoy your leftovers, reheating is key. To keep the tacos crispy, use a skillet. Heat it over medium heat, then add the tacos. Heat them for a few minutes on each side. This will make them golden and crunchy again. To bring back that rich flavor, add a splash of broth while reheating. The broth adds moisture and enhances the taste. You can also warm up the meat in a pot with some broth. This will help it stay juicy and flavorful. Enjoy your tasty tacos just like the first time! Birria tacos are a delicious Mexican dish. They come from the state of Jalisco. The dish features tender, slow-cooked meat, often beef or goat, in a rich broth. The meat is served in a corn tortilla and can be garnished with onions and cilantro. The broth is often used as a dip, adding extra flavor. This dish has gained popularity for its savory taste and unique twist on traditional tacos. Yes, you can make birria tacos ahead of time! Here are some tips for prepping in advance: - Cook the meat: Make the birria a day or two before. This helps the flavors develop. - Store the broth: Keep the meat and broth separate. This keeps the tortillas from getting soggy. - Reheat carefully: When ready to eat, reheat the meat and broth gently. This prevents drying out the meat. - Assembly time: Assemble and cook the tacos just before serving for crispiness. You can serve many tasty sides with birria tacos. Here are some ideas: - Rice: A side of Mexican rice pairs well with the rich flavors. - Beans: Refried beans or black beans add protein and flavor. - Salsas: Fresh salsa or a spicy salsa can enhance the meal. - Guacamole: Creamy guacamole adds a fun texture and taste. - Pickled onions: These add a tangy crunch that complements the tacos. If you want to reduce the heat, here are some suggestions: - Use fewer chiles: You can cut back on the dried chiles in the recipe. - Remove seeds: Make sure to remove the seeds from the chiles, as they add heat. - Add sweetness: A bit of sugar can balance out the spice. - Include dairy: Serve with sour cream or crema to cool down the heat. - Adjust spices: Use milder spices or reduce the amount of cumin and black pepper. For the full recipe, check out the details provided earlier. Happy cooking! Birria tacos are a delicious dish made with rich flavor and fun ingredients. From toasting chiles to cooking tender meat, every step is important. You can use various meats or try a vegetarian twist. Explore the best sides and drinks to enhance your meal. Store leftovers properly for future enjoyment. With these tips and tweaks, you can impress friends and family with your birria skills. Enjoy every bite and share the love of cooking!

Are you ready to dive into the delicious world of birria tacos? In this guide, I’ll share my easy recipe for making this flavorful dish at home. With simple ingredients, …

Read more

Categories Dinner

Savory Yum Yum Sushi Bowl Quick and Easy Recipe

May 22, 2025 by Chef Nate
- Sushi Rice: Use 2 cups of sushi rice. This rice is sticky and perfect for sushi bowls. - Proteins: You can choose shrimp, crab, or tofu. Each adds unique flavor and texture. - Fresh Vegetables: Include 1 avocado, 1 cucumber, and 1 carrot. These add crunch and color. - Rice Vinegar and Sugar Mixture: Mix 1 tablespoon of rice vinegar, 1 tablespoon of sugar, and 1 teaspoon of salt. This gives the rice a nice flavor. - Yum Yum Sauce Ingredients: Combine 2 tablespoons of mayonnaise, 2 tablespoons of soy sauce, and 1 teaspoon of sriracha. Adjust the sriracha for spice. - Sesame Seeds: Sprinkle these on top for a nutty flavor. - Nori Sheets: Cut these into strips for a crunchy texture. For the complete recipe, see the [Full Recipe]. To start, rinse 2 cups of sushi rice under cold water. Keep rinsing until the water runs clear. This step removes extra starch. Next, drain the rice well. In a medium saucepan, add the rinsed rice and 2 ½ cups of water. Bring the mixture to a boil over medium heat. Once it boils, reduce the heat to low. Cover the pan and let it simmer for 18 minutes. The water should be fully absorbed. When done, remove the pan from the heat and let it sit, covered, for another 10 minutes. This resting time helps the rice become fluffy. While the rice rests, mix 1 tablespoon of rice vinegar, 1 tablespoon of sugar, and 1 teaspoon of salt in a small bowl. Stir until everything dissolves. After the resting time, gently fold this mixture into the rice. Be careful not to mash the grains. Allow the seasoned rice to cool slightly before assembling your bowl. Now, let’s make the yum yum sauce. In a bowl, combine 2 tablespoons of mayonnaise and 1 teaspoon of sriracha. Mix well until smooth. This sauce adds a creamy and spicy flavor to your bowl. You can change the spice level based on your taste. If you like it spicier, add more sriracha. If you prefer it mild, reduce the amount. Taste as you mix to find the right balance. To assemble your sushi bowl, divide the seasoned rice among serving bowls. On top of the rice, layer the toppings. Start with sliced avocado, then add julienned cucumber, grated carrot, and 4 oz of your choice protein, such as shrimp or crab. Drizzle the yum yum sauce generously over the assembled bowl. Finish by sprinkling sesame seeds on top. For added crunch, include nori strips. This will make your bowl look colorful and appetizing. Enjoy every bite of your Yum Yum Sushi Bowl! For the full recipe, check out the detailed instructions. Cooking Time and Temperature To make sushi rice, you need to cook it just right. Start by rinsing the rice until the water runs clear. Then, use 2 cups of sushi rice and 2 ½ cups of water. Bring the mixture to a boil on medium heat. Once it boils, lower the heat and cover the pot. Let it simmer for 18 minutes. This ensures the rice cooks evenly and becomes sticky. Importance of Resting the Rice After cooking, let the rice rest for 10 minutes without removing the lid. This step is key. It allows the rice to finish cooking and trap steam. The result? Perfectly fluffy rice that holds together well. Substituting Proteins You can change up the proteins in your sushi bowl. Instead of shrimp or crab, try tofu for a vegetarian choice. You could also use cooked chicken or even smoked salmon. Each option brings its own flavor, so choose what you love. Adding Extra Toppings Don’t be shy about toppings! You can add sliced radishes, edamame, or even mango for a twist. Fresh herbs like cilantro or mint can also enhance your bowl. Feel free to mix and match to create your ideal dish. Pairing with Sides To make your meal complete, pair your sushi bowl with sides. A simple miso soup adds warmth and depth. You can also serve pickled ginger or seaweed salad for a burst of flavor. Making it a Meal Prep Option Yum Yum Sushi Bowls are great for meal prep. You can cook the rice and protein ahead of time. Store them in the fridge for quick meals. Just add fresh toppings and sauce when you're ready to eat. This keeps everything fresh and tasty! {{image_2}} You can easily make a Yum Yum Sushi Bowl vegetarian or vegan. - Using Plant-Based Proteins: Swap shrimp or crab for tofu. Firm tofu works best. Press it first to remove moisture, then cube and pan-fry until golden. This gives you a nice texture and flavor. - Enhancing with Extra Veggies: Load your bowl with colorful vegetables. Try bell peppers, radishes, or edamame. These add crunch and nutrients. You can also use pickled veggies for a tangy twist. Want to try something new? Mix in unique ingredients for a fusion twist. - Adding Unconventional Ingredients: Consider using kimchi for a spicy kick. Or try mango for a sweet touch. These flavors blend well with the traditional ingredients. - Regional Variations: Make it your own by adding local flavors. Use barbecue sauce instead of soy sauce for a fun twist. This gives your bowl a whole new vibe. Changing the sauce or seasoning can transform your dish. - Different Sauces to Try: Explore sauces like teriyaki or ponzu. These bring new flavors that excite your taste buds. You can even mix them with the yum yum sauce for a unique blend. - Seasoning Alternatives: Try different seasonings like garlic powder or chili flakes. This can change the flavor without much effort. A sprinkle of lime juice adds a fresh zing that brightens the dish. For those looking for the full recipe, you can find it above to guide you through the steps! Refrigeration Tips Store your Yum Yum Sushi Bowl in an airtight container. This keeps it fresh and safe. Place the bowl in the fridge within two hours of making it. Storage Duration You can enjoy leftovers for up to three days. After that, the rice and veggies may lose their taste and texture. Best Methods for Reheating Ingredients To reheat, use the microwave or a skillet. If using a microwave, heat in short bursts. Stir between each burst to warm evenly. In a skillet, add a splash of water and cover with a lid. Tips for Keeping Rice Fluffy To keep the rice fluffy, add a bit of water when reheating. This helps prevent it from drying out. Stir gently to avoid breaking the rice grains. Freezing Ingredients Separately You can freeze the sushi rice and toppings separately. Cooked shrimp and avocado do not freeze well, so skip those. Wrap the rice tightly in plastic wrap before placing it in a freezer bag. Thawing Guidelines To thaw, place frozen rice in the fridge overnight. Reheat it gently the next day. Enjoy the rest of your Yum Yum Sushi Bowl with fresh toppings! Yum Yum sauce is a creamy, tangy sauce often served with sushi. It blends flavors like mayonnaise, rice vinegar, and sriracha. The sauce is smooth and slightly sweet, with a hint of spice. Ingredients: - 2 tablespoons mayonnaise (preferably Japanese Kewpie mayo) - 1 teaspoon sriracha (adjust to taste) - 1 tablespoon rice vinegar - 1 tablespoon sugar - Dash of garlic powder (optional) This sauce adds richness and a fun kick to your dishes. It's perfect for dipping or drizzling over your bowl. Yes, you can use brown rice. However, you need to adjust your cooking time. Brown rice takes longer to cook than sushi rice. Cooking Adjustments Needed: - Use a 2:1 water-to-rice ratio. - Cook for about 40-45 minutes instead of 18 minutes. - Let it rest for 10 minutes after cooking, just like sushi rice. Brown rice has a nuttier flavor and more fiber. It can make your Yum Yum sushi bowl healthier. Making a Yum Yum sushi bowl takes about 50 minutes in total. Breakdown of Preparation and Cooking Time: - Prep Time: 15 minutes - Cooking Time: 35 minutes You can have a delicious meal ready in less than an hour. It’s quick and fun to make! You can find Yum Yum sushi bowls at many sushi restaurants or Asian bistros. Recommendations for Local or Popular Chains: - Check out local sushi spots in your area. - Popular chains like Poke Bowl or Sushi Stop often feature variations. - Look for restaurants that focus on Asian fusion cuisine. These places often serve tasty bowls that are similar to the recipe you can make at home. You learned how to make a Yum Yum Sushi Bowl with simple steps. We covered ingredients like sushi rice, proteins, and fresh vegetables. You now know how to prepare the rice and make a tasty sauce. Customizing your bowl is easy with various proteins and toppings. Don’t forget to store leftovers properly to enjoy them later. Remember, your Yum Yum Sushi Bowl can be a fun meal. Experiment with different flavors and ingredients to make it your own! Enjoy making this delicious dish.

Are you ready to create a dish that’s as fun to make as it is to eat? This Savory Yum Yum Sushi Bowl is quick and easy, perfect for busy …

Read more

Categories Dinner

Lemon Garlic Shrimp and Asparagus Quick and Tasty Dish

May 22, 2025 by Chef Nate
For this Lemon Garlic Shrimp and Asparagus dish, you will need: - 1 pound large shrimp, peeled and deveined - 1 bunch asparagus, trimmed and cut into 2-inch pieces - 4 cloves garlic, minced - 3 tablespoons olive oil - Zest and juice of 1 large lemon - 1 teaspoon red pepper flakes (optional) - Salt and pepper to taste - Fresh parsley, chopped (for garnish) - Lemon wedges (for serving) These ingredients come together to create a bright and tasty meal. You can easily swap ingredients based on what you have. Here are some ideas: - Shrimp: Use chicken or scallops if you prefer. - Asparagus: Try green beans or broccoli instead. - Olive Oil: Canola or avocado oil works well too. - Lemon: Lime juice gives a different, fresh flavor. - Garlic: Fresh garlic is best, but garlic powder can work in a pinch. Feel free to adjust the recipe to your taste and what you have on hand! Using fresh ingredients makes a huge difference in flavor. Fresh shrimp taste sweeter and have a better texture. Fresh asparagus stays crisp and bright green when cooked right. The zest and juice of a fresh lemon brighten the dish and add zest. Choosing top-quality, fresh ingredients ensures your meal tastes its best. So, always look for freshness when you shop. It leads to a more delicious Lemon Garlic Shrimp and Asparagus dish. You can find the full recipe for this dish to enjoy a delightful meal! To start, gather your ingredients. You will need: - 1 pound large shrimp, peeled and deveined - 1 bunch asparagus, trimmed and cut into 2-inch pieces - 4 cloves garlic, minced - 3 tablespoons olive oil - Zest and juice of 1 large lemon - 1 teaspoon red pepper flakes (optional) - Salt and pepper to taste - Fresh parsley, chopped (for garnish) - Lemon wedges (for serving) Make sure your shrimp are fresh. Rinse them under cold water. Pat them dry with a towel. Next, wash and trim your asparagus. Cut it into 2-inch pieces for even cooking. Mince the garlic finely to release its strong flavor. In a large skillet, heat 2 tablespoons of olive oil over medium heat. Add the minced garlic and red pepper flakes, if you want some heat. Sauté for about 1 minute. Watch closely! You want the garlic fragrant, not brown. Now, increase the heat to medium-high. Add the shrimp to the skillet. Season with salt and pepper. Cook for 2-3 minutes on each side until they turn pink. This bright color shows they are fully cooked. Once done, remove the shrimp and set them aside. In the same skillet, add the last tablespoon of olive oil. Toss in the asparagus pieces. Sauté for about 4-5 minutes. You want them bright green and tender but still crisp. Return the cooked shrimp to the skillet. Add the lemon zest and juice. Toss everything well to mix. Heat everything through for another 1-2 minutes. Check the seasoning. Add more salt, pepper, or lemon juice as you like. Remove the skillet from heat. Garnish with fresh parsley for a pop of color! To serve, place the shrimp and asparagus on a large platter. Add lemon wedges around for an extra zing. Enjoy it over rice or quinoa for a full meal. This is where the magic happens! If you want the full recipe, check out the details provided above. To cook shrimp just right, focus on timing. Shrimp cook fast. You want them pink and firm, not rubbery. Cook them for 2-3 minutes on each side. When they turn pink, they are done. Remove them from heat right away. This keeps them tender. When cooking asparagus, freshness matters. Choose bright green stalks. Trim off the tough ends before cooking. Sauté them for 4-5 minutes. They should stay crisp yet tender. If you overcook them, they become mushy and lose their bright color. To boost flavor, add herbs like thyme or basil. A splash of white wine adds depth. You can also toss in cherry tomatoes for a pop of color and sweetness. If you like heat, more red pepper flakes work well too. For the full recipe, check the link. {{image_2}} You can easily add pasta to this dish. Start by cooking your favorite pasta. While it cooks, follow the original recipe for the shrimp and asparagus. Once both are ready, mix them together. This gives you a filling meal with rich flavors. I love to use fettuccine or spaghetti for this. The noodles soak up the tasty lemon and garlic sauce well. If you prefer less mess, try a one-pan bake. Preheat your oven to 400°F. In a baking dish, mix the shrimp and asparagus with olive oil, garlic, lemon juice, salt, and pepper. Spread them out evenly. Bake for about 15 minutes or until the shrimp are pink and the asparagus is tender. This method makes cleanup a breeze and keeps the flavors intact! For a vegan twist, swap shrimp for tofu. Choose firm tofu for the best texture. Cut it into cubes and sauté it like the shrimp until golden. You can also try tempeh or chickpeas for a protein boost. These alternatives still pair well with lemon and garlic, keeping the dish fresh and tasty. Enjoy experimenting with different proteins to find your favorite! For more ideas, check out the Full Recipe. To store your leftover Lemon Garlic Shrimp and Asparagus, let it cool first. Place it in an airtight container. This helps keep the flavors fresh. Store it in the fridge for best results. If you want to save it for longer, freeze it. Use freezer bags to save space. When you’re ready to eat the leftovers, reheat them gently. You can use a skillet over low heat. Add a splash of water or olive oil to keep it moist. Stir occasionally until warm. You can also microwave it. Just cover the dish and heat in short bursts to avoid overcooking. Lemon Garlic Shrimp and Asparagus lasts about 3 days in the fridge. If frozen, it can last up to 3 months. Always check for any off smells or colors before eating. Enjoy your meal safely! For the full recipe, check out the [Full Recipe]. Yes, you can use frozen shrimp. Just make sure to thaw them first. Run them under cold water for a few minutes. Then, pat them dry with a paper towel. This helps them cook evenly and keeps the dish tasty. You have many options! This dish pairs well with rice or quinoa for a filling meal. You can also serve it with pasta for a fun twist. A fresh salad or garlic bread goes great, too. Add a side of lemon wedges for extra zest! Absolutely! Lemon garlic shrimp and asparagus stores well. You can prepare it ahead of time and keep it in the fridge. Just use an airtight container for the best results. Reheat it gently on the stove or in the microwave. Enjoy a quick meal throughout the week! For the complete recipe, check out the Full Recipe. This blog post covered key steps to cook a delicious Lemon Garlic Shrimp and Asparagus dish. I shared important ingredient choices, cooking tips, and tasty variations. You can customize this meal to fit your needs. Remember, fresh ingredients make a big difference. Store leftovers well to enjoy another day. Don't hesitate to try frozen shrimp or meal prep for convenience. Enjoy creating flavorful meals that fit your lifestyle!

Ready for a quick and tasty meal? This Lemon Garlic Shrimp and Asparagus dish is easy to make and packed with flavor. Whether you’re in a rush or want something …

Read more

Categories Dinner

No-Bake Oreo Cheesecake Minis Delightful Dessert Treat

May 22, 2025 by Chef Nate
- 24 Oreo cookies, crushed (plus extra for topping) - 4 tablespoons unsalted butter, melted - 8 oz cream cheese, softened - 1/2 cup powdered sugar - 1 teaspoon vanilla extract - 1 cup heavy whipping cream - 1/4 cup chocolate ganache (optional for drizzling) - Mini muffin tin - Cupcake liners - Mixing bowls - Electric mixer - Whisk or hand mixer - Spoon or piping bag The ingredients for No-Bake Oreo Cheesecake Minis are simple but full of flavor. First, you need 24 Oreo cookies. Crushing them gives you a great base for the crust. You’ll also need melted unsalted butter to bind the crumbs together. Next, cream cheese adds that rich and creamy texture we all love. Softening it makes blending easy. You will mix in powdered sugar for sweetness and vanilla extract for flavor. The heavy whipping cream is key for a light, airy filling. Whipping it until stiff peaks form gives the cheesecake its delightful texture. For a fun twist, you can drizzle chocolate ganache on top. This adds extra chocolatey goodness! Gather these items before you start. The right tools will make the process smooth. You’ll need a mini muffin tin with cupcake liners, mixing bowls, and an electric mixer. A whisk or hand mixer can work too. Finally, a spoon or piping bag will help you fill the crusts with the cheesecake mixture. With all these ingredients and tools ready, you are set to create a delicious treat. Check the Full Recipe for more details on how to bring these minis to life! - First, combine the crushed Oreo cookies with melted butter in a medium bowl. - Mix them until they look like wet sand. - Line a mini muffin tin with cupcake liners. - Spoon about 1 tablespoon of the Oreo mixture into each liner. - Press the mixture down firmly to create a crust. - In a large mixing bowl, beat the cream cheese until smooth. - Gradually add the powdered sugar and vanilla extract. - Mix until everything is well blended. - In another bowl, whip the heavy cream until stiff peaks form. - Gently fold the whipped cream into the cream cheese mixture. - Spoon or pipe the cheesecake filling over the crusts in the muffin tin. - Fill each liner to the top for a nice dome shape. - Smooth the tops with a spatula. - Refrigerate for at least 4 hours so they set properly. - For extra flair, top with crushed Oreos or drizzle chocolate ganache before serving. For the complete steps, check the Full Recipe to ensure a perfect treat! To get the best texture for your cheesecake minis, whipping the cream is key. Here’s how to whip cream to stiff peaks: - Start with cold cream. Keep it in the fridge until you use it. - Use a clean bowl and whisk. This helps the cream whip better. - Beat on medium speed until soft peaks form, then increase to high speed. Stop when peaks are stiff, not dry. Next, folding is important to keep the light texture. Here’s how to fold without deflating: - Add the whipped cream to the cream cheese mixture in parts. - Use a spatula to gently mix. Scoop from the bottom and fold over. - Be soft and gentle to keep air in the mixture. Enhance your cheesecake minis with fun pairings. Here are some ideas: - Fresh fruits like strawberries or raspberries add a nice touch. - Serve with chocolate or caramel sauce for extra sweetness. - A sprinkle of crushed Oreos on top gives a nice crunch. For garnishing, try these best ways: - Use a piping bag to add a swirl of whipped cream on top. - Drizzle chocolate ganache for a rich finish. - Add a mint leaf for a pop of color and freshness. Avoid these common pitfalls to make perfect cheesecake minis: - Overmixing the filling: Mix just until combined. Overmixing can make it dense. - Not pressing the crust firmly: Press down hard to make a solid base. This helps hold your cheesecake together. By following these tips and tricks, you can make your No-Bake Oreo Cheesecake Minis a delightful treat. For the full recipe, check out the instructions above! {{image_2}} You can change the taste of your No-Bake Oreo Cheesecake Minis easily. Try adding different flavored extracts. Almond or mint extract can bring a fresh twist. Just add a teaspoon to the cream cheese mixture. You can also use other cookies for the crust. Instead of Oreos, try chocolate chip cookies or graham crackers. Each cookie will give a new flavor and texture. If you have dietary restrictions, don't worry! You can make these treats allergy-friendly. Use dairy-free cream cheese and whipped cream for a great taste without dairy. Many brands offer these options now. For gluten-free versions, substitute regular Oreos with gluten-free cookies. These changes make it easy for everyone to enjoy. You can adapt this recipe for different seasons. For fall, add pumpkin puree to the cheesecake filling. It adds a lovely flavor and color. Top with whipped cream and a sprinkle of cinnamon for a festive touch. During the holidays, you can use crushed peppermint candies on top. This adds a fun crunch and a holiday feel. You can modify the recipe to fit any occasion. To store leftovers in the fridge, place the cheesecake minis in an airtight container. This keeps them fresh and stops them from absorbing other fridge smells. You can also use plastic wrap if you do not have a container. Just make sure it covers them well. For storage, use small glass or plastic containers. They are easy to stack and won’t take much room. If you have many, divide them into smaller portions. This way, you can grab just what you need. To freeze the cheesecake minis, first, let them set in the fridge for at least four hours. After they are firm, you can place them in a single layer on a baking sheet. Freeze them for about two hours until solid. Then, move them to a freezer-safe bag or container. Remove as much air as you can to prevent freezer burn. Before serving, thaw the cheesecake minis in the fridge overnight. This keeps their texture smooth and creamy. You can also let them sit at room temperature for about 20 minutes if you need them sooner. In the fridge, these cheesecake minis last for about five days. If you freeze them, they can last for about two months. Just remember, the longer they sit, the more the texture might change. Enjoy them fresh for the best taste! Yes, you can use low-fat cream cheese. However, it may change the texture and flavor. The cheesecake might not be as rich and creamy. It can also be slightly less stable, making it harder to set. You can use other cookies if you want a change. Some great options include chocolate wafer cookies, graham crackers, or even peanut butter cookies. Each will give a unique taste to your cheesecake. To keep the crust from crumbling, make sure to mix the crushed cookies well with melted butter. Press the mixture firmly into the cupcake liners. You can also add a little more butter if needed to help bind the crust. In this article, we explored how to make delicious cheesecake minis with simple ingredients. You learned about the necessary kitchen tools, step-by-step instructions, tips for the perfect texture, and variations to try. Remember, the right mix of flavors and texture makes a big difference. Avoid common mistakes for the best results. Enjoy creating these treats for any occasion. They are sure to impress friends and family. Keep experimenting with flavors and toppings to make them your own.

Craving a sweet treat without turning on the oven? Look no further! These No-Bake Oreo Cheesecake Minis are a perfect delight for any dessert lover. With just a handful of …

Read more

Categories Desserts

Honey Sriracha Salmon Bowls Delightful Dinner Recipe

May 22, 2025 by Chef Nate
- 2 salmon fillets (6 oz each) - 2 tablespoons honey - 2 tablespoons sriracha sauce - 1 tablespoon soy sauce - 1 cup cooked jasmine rice (or brown rice) - 1 cup steamed broccoli florets - 1 cup shredded carrots - 1 avocado, sliced - 1 tablespoon sesame seeds - Fresh cilantro for garnish - Lime wedges for serving When making Honey Sriracha Salmon Bowls, it's essential to choose the best ingredients. The salmon fillets should be fresh and firm. Honey adds sweetness, while sriracha brings heat. The soy sauce rounds it all out with umami. For the base, I recommend jasmine rice for its light flavor. Brown rice is a healthy option too. Fresh toppings are key to this dish's appeal. I love using steamed broccoli florets for crunch and color. Shredded carrots add a sweet touch, and sliced avocado brings creaminess. This mix of textures makes every bite exciting. For garnishes, sesame seeds add a nice crunch. Fresh cilantro gives a burst of flavor, and lime wedges brighten the dish. These extras elevate your meal and make it look beautiful. For the full recipe, check the details above. Enjoy making this delightful dinner! - Preheat your oven to 400°F (200°C). This heat helps cook the salmon well. - Line a baking sheet with parchment paper. This makes for easy cleanup later. - In a small bowl, whisk together the honey, sriracha sauce, and soy sauce. This glaze adds a sweet and spicy kick. - Place the salmon fillets on the baking sheet. You want them to be spaced out. - Generously brush the honey sriracha mixture over the salmon. Make sure to coat it well. - Place the baking sheet in the oven. Bake for 12-15 minutes. The salmon will be done when it flakes easily with a fork. - While the salmon is baking, divide the cooked jasmine rice into two bowls. - Top each bowl with steamed broccoli, shredded carrots, and sliced avocado. - Once the salmon is ready, remove it from the oven and let it rest for a minute. - Place one salmon fillet on each bowl and drizzle any remaining glaze over the top. - Finally, sprinkle sesame seeds and fresh cilantro over the bowls. Serve with lime wedges for a zesty touch. Enjoy your Honey Sriracha Salmon Bowls! For the complete list of instructions, check out the Full Recipe. - Best temperature for baking salmon: I recommend baking salmon at 400°F (200°C). This high heat cooks the fish quickly and keeps it tender. - Ensuring salmon stays moist: To keep salmon moist, brush it with the honey sriracha glaze before baking. This forms a tasty layer that locks in moisture. - Pairing with side dishes: Serve your Honey Sriracha Salmon Bowls with jasmine rice, steamed broccoli, and shredded carrots. These sides add flavor and color. - Enhancing flavor with extra toppings: Top your bowls with sliced avocado and sesame seeds. Fresh cilantro adds a nice touch too, and lime wedges give a zesty kick. - Preparing ingredients in advance: You can chop veggies and make the glaze a day ahead. This saves time when you’re ready to cook. - Storing leftover components: Keep leftover salmon and rice in separate containers. This helps maintain freshness and flavor for your next meal. {{image_2}} You can change the protein in this recipe. Instead of salmon, try chicken, tofu, or shrimp. Chicken works well with the honey sriracha glaze. Tofu absorbs flavors nicely, making it a great plant-based swap. Shrimp cooks fast and adds a fun twist to your meal. For grains, switch jasmine rice for quinoa or farro. Quinoa adds a nutty taste and is gluten-free. Farro gives a chewy texture, making your bowl hearty and satisfying. You can adjust the sweetness or heat levels in the glaze. If you prefer a sweeter bowl, add more honey. For more heat, increase the sriracha. You can also mix in other sauces, like teriyaki or hoisin, for a different flavor profile. Adding spices like garlic powder or ginger can enhance the dish, too. Feel free to add more vegetables to your bowls. Bell peppers, snap peas, or zucchini can add color and crunch. You can also use different bases like rice noodles or soba noodles for variety. Mixing in leafy greens, like spinach or kale, can boost the nutrition. The options are endless, so get creative and make it your own! For the full recipe, check out the earlier sections! After you enjoy your Honey Sriracha Salmon Bowls, let the leftovers cool down. Place the salmon, rice, and veggies in airtight containers. This helps keep them fresh. Make sure to store them in the fridge. Do this within two hours of cooking. For best results, eat them within 2-3 days. To reheat salmon, avoid using high heat. Instead, use a microwave on low power. This keeps the salmon moist and tender. You can also reheat it in a skillet over low heat. For rice and veggies, microwaving works well too. Just add a splash of water to keep them from drying. Cover the bowl to trap the steam while heating. In the fridge, your Honey Sriracha Salmon Bowls last for about 2-3 days. If you need to store them longer, freezing is a great option. You can freeze the salmon and rice separately for better texture. Wrap the items tightly in plastic wrap or use freezer bags. They can last up to 2 months in the freezer. It takes about 25 minutes to make Honey Sriracha Salmon Bowls. - Prep time: 10 minutes - Cooking time: 12-15 minutes This quick time makes it perfect for a weeknight dinner. You can enjoy a healthy meal without spending hours in the kitchen. Yes, you can prepare this recipe in advance. - Meal prep: Cook the salmon and rice ahead of time. - Storage: Keep the salmon and rice in separate containers. Store them in the fridge for up to three days. When you’re ready to eat, just reheat and assemble your bowls. This makes for easy lunches or dinners throughout the week. If you want less heat, try these options: - Chili garlic sauce: It adds flavor with less spice. - Sweet chili sauce: This gives a sweet touch without heat. - Hot sauce: Use any hot sauce you like for a kick. Adjust the amount based on your taste. This way, you can enjoy the dish at your desired spice level while still keeping it delicious. This blog post covered the simple and tasty Honey Sriracha Salmon Bowls. We explored key ingredients like salmon, rice, veggies, and fresh toppings. I shared easy steps to prepare and cook your meal, plus tips for serving, storing, and customizing. You can enjoy this dish any day, and it's perfect for meal prep. With different swaps and variations, you can make it your own. Dive in and create a delicious bowl that's also fun!

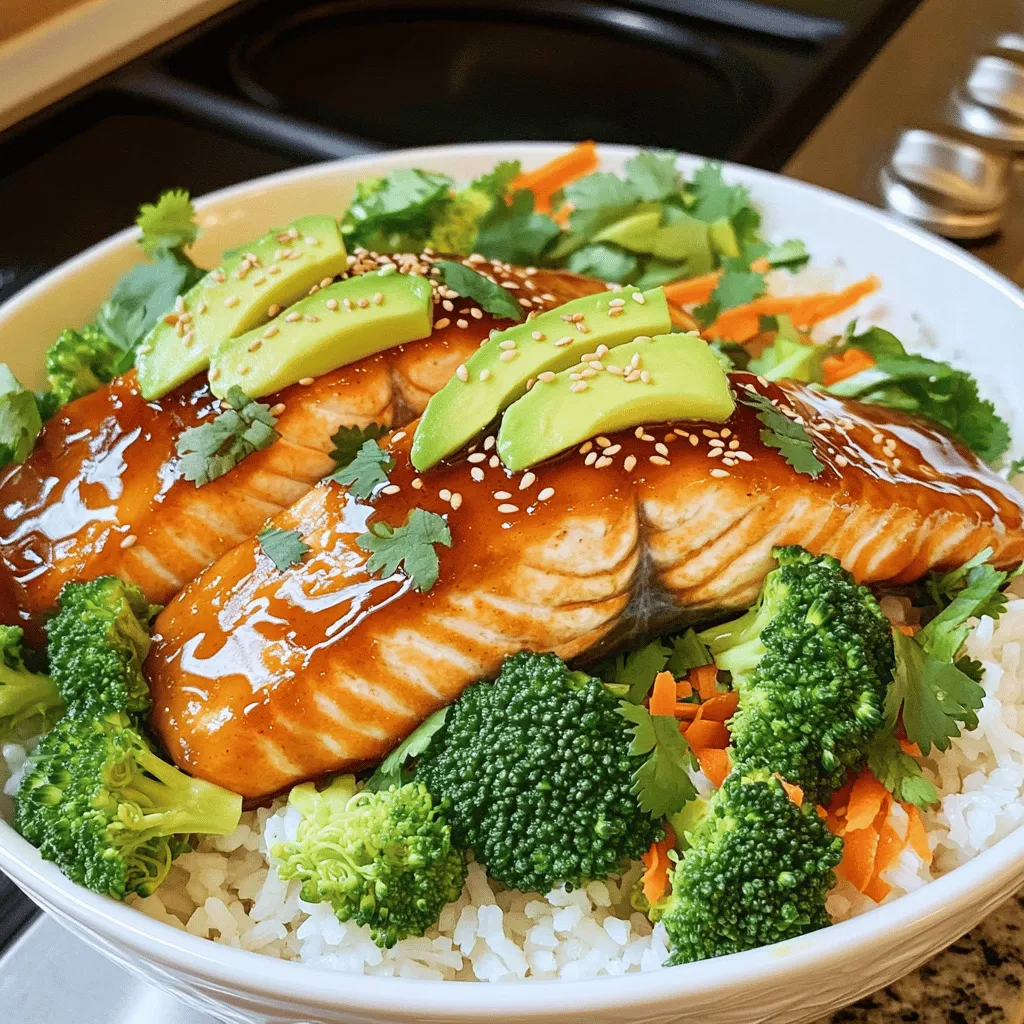
Looking for a delicious and easy dinner? Try these Honey Sriracha Salmon Bowls! This recipe blends sweet and spicy flavors, making your taste buds dance. Fresh veggies, tasty toppings, and …

Read more

Categories Dinner

Cajun Potato Soup Loaded with Flavor and Comfort

May 22, 2025 by Chef Nate
To make this warm and tasty Cajun potato soup, gather these key ingredients: - 4 medium Yukon gold potatoes, peeled and diced - 1 medium onion, finely chopped - 2 cloves garlic, minced - 1 bell pepper (red or green), diced - 2 celery stalks, chopped - 4 cups vegetable broth - 1 cup heavy cream (or coconut milk for a dairy-free option) - 2 tablespoons Cajun seasoning - 1 teaspoon smoked paprika - Salt and pepper to taste - 2 tablespoons olive oil - Fresh parsley for garnish These ingredients work together to create a rich and creamy soup. The Yukon gold potatoes give a nice texture, while the Cajun seasoning adds a kick of flavor. You can play with flavors by adding some optional ingredients. Consider these: - 1 cup corn (fresh or frozen) for sweetness - Chopped green onions for a fresh bite - Cooked bacon bits for a smoky crunch - A splash of hot sauce for added heat These extras can take your soup from good to great. They add different layers of taste and texture. Sometimes, you may need to swap ingredients. Here are some ideas: - Use sweet potatoes instead of Yukon gold for a sweeter flavor. - Swap heavy cream with coconut milk for a lighter option. - If you're out of Cajun seasoning, mix paprika, cayenne pepper, and black pepper. These substitutions keep the soup delicious while accommodating your pantry and dietary needs. If you're ready to make this soup, check out the Full Recipe for all the steps and tips! To start, gather your ingredients. This soup uses simple things you can find easily. Heat 2 tablespoons of olive oil in a large pot on medium heat. Add the chopped onion, garlic, bell pepper, and celery. Sauté these veggies for about 5-7 minutes. They should soften and smell great. Next, stir in the diced Yukon gold potatoes. Add 2 tablespoons of Cajun seasoning and 1 teaspoon of smoked paprika. This step brings out bold flavors. Cook for an extra 2 minutes to toast the spices. Now, pour in 4 cups of vegetable broth. Bring the mix to a boil. Once it boils, lower the heat and let it simmer. This should take about 20-25 minutes. You’ll know it’s ready when the potatoes are fork-tender. Sautéing is key to building flavor. Make sure not to rush this step. If you cook on too high heat, the veggies can burn. Stir often to ensure even cooking. You want them soft and sweet, not brown. If you want more flavor, try adding a pinch of salt when sautéing. This helps draw out the moisture and flavor from the vegetables. For a smooth soup, use an immersion blender. Blend until it’s silky and creamy. If you like some texture, save a few potato chunks. Stir them back in after blending. This gives the soup a nice bite. After blending, add 1 cup of heavy cream or coconut milk. Heat gently for 5 minutes. Adjust the seasoning with salt and pepper to your taste. For the full recipe, you can check the detailed steps and measurements. Enjoy making this delicious Cajun potato soup! To boost the Cajun flavor, use fresh spices. Fresh herbs like thyme and oregano add depth. You can also try adding a splash of hot sauce for extra heat. A squeeze of lemon juice brightens the dish too. Remember, let the spices toast in oil before adding liquid. This step unlocks their full flavor. One common mistake is not seasoning enough. Always taste as you cook. If the soup lacks flavor, try adding more Cajun seasoning or salt. Another mistake is overcooking the potatoes. They should be fork-tender but not mushy. Lastly, don't skip the blending step. A smooth texture makes the soup creamy and delightful. Serve the soup hot in bowls. Garnish with fresh parsley for color and taste. A sprinkle of extra Cajun seasoning on top looks pretty and adds flavor. Pair it with crusty bread for dipping. You can also offer a side salad for a complete meal. For a fun touch, serve in bread bowls for a unique twist. Enjoy every warm, tasty bite! {{image_2}} You can make Cajun potato soup healthier with simple changes. Use less cream or swap it for low-fat milk. Instead of Yukon gold potatoes, try sweet potatoes for added nutrients. You can also add more vegetables like kale or spinach. These greens boost fiber and vitamins. A squeeze of lemon can brighten the flavors without extra calories. For a gluten-free version, use gluten-free broth. Most vegetable broths are already gluten-free, so check the label. To make it dairy-free, coconut milk is a great choice. It adds creaminess and a hint of sweetness. Almond milk can also work, but it may not be as rich. Always ensure your Cajun seasoning is gluten-free as well. You can add protein to your Cajun potato soup for a heartier dish. Cooked chicken, diced sausage, or even beans make great options. If using chicken, add it after sautéing the veggies. For sausage, brown it first for extra flavor. If you prefer beans, canned chickpeas or kidney beans are quick and easy. This makes the soup filling and boosts the flavor. Check the [Full Recipe] for details on how to mix in these proteins! After you finish making your Cajun Potato Soup, let it cool first. Cooling helps keep the soup fresh. Transfer it to a shallow container. This allows it to cool faster. Cover the container once it’s cool. Store it in the fridge. The soup will stay good for about three to five days. If you want to save some soup for later, freezing is a great choice. First, let the soup cool completely. Then, pour it into freezer-safe containers. Leave some space at the top for expansion. Label the containers with the date. You can freeze it for up to three months. When you’re ready to eat, thaw it in the fridge overnight. To enjoy your soup again, reheat it slowly. Use a pot over low heat. Stir often to warm it evenly. If the soup seems thick, add a splash of broth or water. Heat until it is nice and hot. This will help keep all the flavors just right. For extra taste, consider adding a sprinkle of Cajun seasoning before serving. To make your soup spicier, add more Cajun seasoning. You can also toss in chopped jalapeños or cayenne pepper. Start with a small amount, then taste and adjust. You can also use spicy sausage for a tasty kick. Yes, you can make this soup ahead of time. Just follow the recipe, let it cool, and store it in the fridge. It will taste even better the next day! Reheat it on the stove and add a splash of cream for extra flavor. You can serve it with crusty bread or cornbread for dipping. A fresh salad also pairs well with the soup. For a heartier meal, try adding grilled chicken or sausage on the side. The soup works great for lunch or a cozy dinner. For the full recipe, check out the details above! Cajun Potato Soup is tasty and easy to make. We discussed essential ingredients and how to enhance flavor. I shared cooking tips and common mistakes to avoid. You learned about healthy versions and storage methods. Make this soup your own by adding different proteins or spices. Enjoy the warmth and cheer it brings. With these tips and tricks, you will create a bowl of comfort. Share it with family and friends, and savor every bite!

Cajun Potato Soup is the ultimate dish for comfort and flavor. You’ll find the perfect balance of creamy textures and spicy kicks. Whether you want a simple weeknight meal or …

Read more

Categories Dinner
Older posts
Newer posts
← Previous Page1 … Page80 Page81 Page82 … Page108 Next →

GRILLED FLAVORS

where delicious ideas come to life, from stovetop to backyard. Warm, simple, and always satisfying. 🍽️✨

PAGES

Home About Contact Privacy Policy Terms & Conditions Cookie Policy GDPR Policy Copyright Policy Disclaimer

CATEGORIES

Appetizers Desserts Salads Breakfast Dinner

Contact

  • Pinterest
  • Mail
Copyright © 2026 Grilled Flavors. All rights reserved.