Blueberry Cheesecake Swirl Cookies Delightful Treat
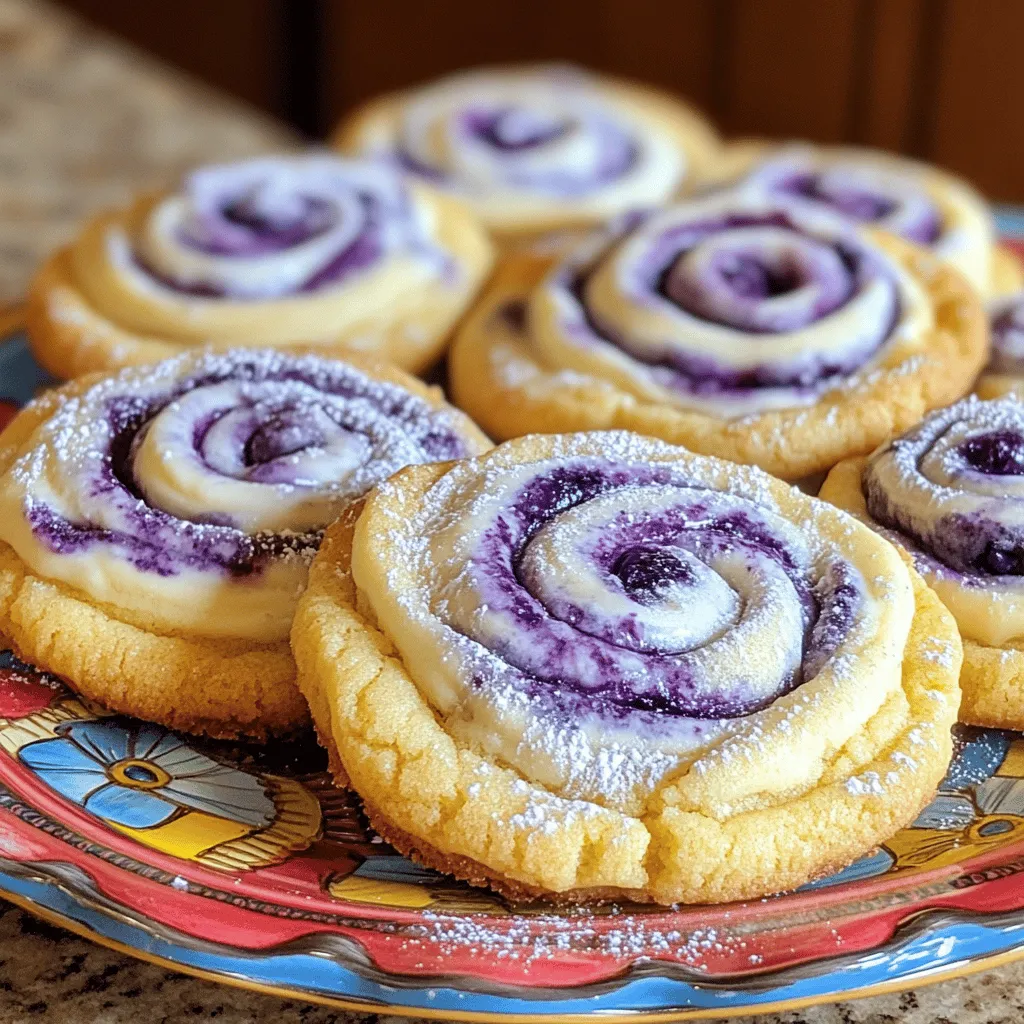
If you love cookies and cheesecake, you’ll adore these Blueberry Cheesecake Swirl Cookies! This recipe combines creamy cheesecake and sweet blueberries into a delightful treat. Perfect for any occasion, these …
![The main ingredients for stuffed potato cakes are simple and tasty. You need: - 2 large russet potatoes, peeled and cubed - 1/2 cup shredded cheddar cheese - 1/4 cup cream cheese, softened - 1/4 cup green onions, finely chopped - 1/2 teaspoon garlic powder - 1/4 teaspoon cayenne pepper (optional) - Salt and pepper to taste - 1 cup breadcrumbs (for coating) - 2 eggs, beaten - Oil for frying These ingredients create a creamy, cheesy filling that blends well with the crispy outside. You can customize your stuffed potato cakes with fun add-ins. Consider adding: - Cooked bacon bits for a smoky flavor - Diced bell peppers for a fresh crunch - Spinach or kale for a healthy twist - Different cheeses like mozzarella or feta for variety Feel free to mix and match to suit your taste! Spices can elevate your potato cakes. Here are some I recommend: - Paprika for a smoky touch - Onion powder for extra flavor - Fresh herbs like parsley or chives for brightness - Italian seasoning for a more complex taste Use these spices to add depth to your filling. They will make your stuffed potato cakes stand out! For the full recipe, check out the [Full Recipe]. Start by boiling the cubed russet potatoes. Place them in a large pot of water. Bring the water to a boil and cook for 15-20 minutes. You want the potatoes to be fork-tender. Once done, drain the water and return the potatoes to the pot. Now, mash the potatoes until they are smooth. Let them cool for a bit. This cooling step helps the filling blend better. In a mixing bowl, combine the smooth mashed potatoes with the tasty filling. Add in shredded cheddar cheese, softened cream cheese, and finely chopped green onions. Sprinkle in garlic powder, cayenne pepper for a kick, and add salt and pepper to taste. Mix everything well until it becomes creamy. The filling should be packed with flavor and smooth enough to form into cakes. Now it's time to shape the cakes. Take a small handful of the filling and form it into a patty about 1/2 inch thick. Repeat this process until you have about 8-10 patties. Next, set up a coating station. Place beaten eggs in one bowl and breadcrumbs in another. Dip each cake into the egg, making sure it’s fully coated. Then, roll it in breadcrumbs until it is evenly covered. Heat oil in a large skillet over medium heat. Carefully place a few cakes in the hot oil but avoid overcrowding. Fry each side for 3-4 minutes, until they turn golden brown and crispy. Once done, transfer the cakes to a paper towel-lined plate to drain excess oil. Serve warm, and feel free to add extra chopped green onions on top for garnish. Enjoy your crispy cheesy stuffed potato cakes! For the full recipe, refer to the recipe section above. To get the perfect texture, use starchy potatoes, like russet. They provide a smooth and fluffy base. After boiling, mash them well. Lumps can lead to uneven cakes. Let the mashed potatoes cool a bit before mixing in the filling. This way, the cheese will melt nicely. One common mistake is over-mixing the filling. Mix just enough to combine the ingredients. If you mix too much, the cakes can be tough. Also, ensure your oil is hot before frying. If it’s not hot enough, the cakes will absorb too much oil. This can make them greasy instead of crispy. Serve these cakes hot and crispy. I love to pair them with sour cream or a spicy dipping sauce. A side of fresh salad adds a nice crunch. You can also sprinkle some fresh herbs on top for color and flavor. For a fun twist, try serving them as a slider. Just add your favorite toppings! For more details, check the Full Recipe. {{image_2}} You can easily make these cakes vegetarian or vegan. For vegetarian options, use cheese made from milk or plant-based cheese. If you want a vegan version, replace dairy cheese with vegan cheese. Use a flaxseed mixture or applesauce instead of eggs for binding. The taste stays great, and you keep it plant-based! You can boost the flavor of your potato cakes. Add spices like cumin or paprika for heat. Try fresh herbs like parsley, dill, or cilantro for freshness. If you love it spicy, add more cayenne pepper. Mix in cooked broccoli or spinach for extra nutrition. Each flavor twist makes the cakes unique and fun! You don't have to fry these cakes to enjoy them! Baking is a healthier choice. Preheat your oven to 400°F (200°C). Place cakes on a baking sheet lined with parchment paper. Bake for 20-25 minutes, flipping halfway through, until golden. You can also use an air fryer! Set it to 375°F (190°C) and cook for about 15 minutes. Both methods yield crispy, tasty cakes without all the oil. For the full recipe, check out the details above! After making stuffed potato cakes, let them cool first. Place them in an airtight container. Use parchment paper to separate layers if stacking. Store in the fridge for up to three days. This keeps them fresh and tasty. To reheat your potato cakes, use a skillet. Heat a small amount of oil over medium heat. Place the cakes in the skillet. Cook for about 3-4 minutes on each side. This method keeps them crispy. You can also use an oven to reheat. Set it to 350°F (175°C) and bake for around 10-15 minutes. This works well if you want to reheat many cakes at once. Freezing is a great way to save leftover cakes. First, let them cool completely. Place them in a single layer on a baking sheet. Freeze until solid, about 1-2 hours. Then, transfer the cakes to a freezer-safe bag. They can last up to three months in the freezer. To cook, thaw them in the fridge overnight. Reheat them as mentioned before for best results. Enjoy your crispy cheesy stuffed potato cakes anytime! For the full recipe, check the earlier sections. Yes, you can make Stuffed Potato Cakes ahead of time. Prepare the cakes and store them in the fridge for up to two days. You can also freeze them for up to three months. Just be sure to wrap them well in plastic wrap or use a freezer bag. When you are ready to cook, thaw them in the fridge overnight. This makes dinner easy! Potato Cakes pair well with many sauces. Here are some great options: - Sour cream adds a nice, creamy touch. - Applesauce gives a sweet twist. - Spicy ketchup adds a kick. - Ranch dressing is always a favorite. - Garlic aioli brings in rich flavor. Feel free to mix and match to find your favorite! You can bake or air fry the cakes for a crispy result without frying. To bake, preheat your oven to 400°F (200°C). Place the coated cakes on a lined baking sheet. Spray them lightly with oil for a golden finish. Bake for about 25-30 minutes, flipping halfway through. For air frying, cook at 375°F (190°C) for around 12-15 minutes, shaking the basket halfway. This method keeps them crispy and delicious! Stuffed potato cakes are easy and fun to make. We covered the main ingredients, step-by-step instructions, and useful tips. You learned about variations, storage, and common questions. Whether you like them spicy or mild, you have many ways to enjoy these cakes. Remember these tips for great texture and flavor. Now, gather your ingredients and start cooking. Enjoy your delicious creations!](https://grilledflavors.com/wp-content/uploads/2025/05/fedfe58b-5aba-4025-addd-f101d5d829f3.webp)


![To create the perfect Blueberry Cream Cheese Puff Pastry, you need simple yet delicious ingredients. Here’s what you’ll need: - 1 sheet of puff pastry, thawed - 8 oz cream cheese, softened - 1/2 cup powdered sugar - 1 teaspoon vanilla extract - 1 1/2 cups fresh blueberries (divided) - 1 egg (for egg wash) - 1 tablespoon milk - Pinch of salt Each ingredient plays a key role in the overall taste and texture of the dish. The puff pastry gives a light and flaky base, while the cream cheese adds a rich, creamy layer. The sweetness of the powdered sugar and the warm notes from the vanilla extract enhance the flavors. Fresh blueberries lend a burst of juiciness and tartness, making every bite a delight. When you gather these ingredients, aim for freshness, especially with the blueberries. They make a big difference in flavor! You can find the full recipe to guide you through the preparation and cooking steps. Enjoy the process of making this treat; it’s as fun as it is rewarding! 1. Preheat your oven to 400°F (200°C). This ensures even baking. Line a baking sheet with parchment paper. It helps prevent sticking. 2. Mix the cream cheese filling. In a medium bowl, take 8 oz of softened cream cheese. Add 1/2 cup powdered sugar, 1 teaspoon vanilla extract, and a pinch of salt. Beat this mixture until it is smooth. This will be your sweet, creamy center. 3. Roll out the puff pastry. On a lightly floured surface, take a sheet of thawed puff pastry. Roll it out gently to smooth any creases. Cut the pastry into 4 equal squares. 1. Fill and seal the pastry squares. Place 2 tablespoons of the blueberry cream cheese mixture in the center of each pastry square. Make sure to leave room at the edges. Fold the corners toward the center to create a pocket. Pinch the edges to seal them well. This keeps the filling inside. 2. Add the egg wash and final blueberries. In a small bowl, whisk together 1 egg and 1 tablespoon of milk. Brush this egg wash on top of each pastry for a golden finish. Finally, top each pastry with the remaining 1/2 cup of blueberries. Press them gently into the tops. 1. Bake the pastries. Place the baking sheet in the preheated oven. Bake for 15-20 minutes. You want the pastries to be puffed and golden brown. 2. Allow the pastries to cool before serving. Once baked, remove them from the oven. Let them cool slightly on the baking sheet. This helps them set a bit before you serve them. For the complete recipe, check out [Full Recipe]. Enjoy making these delightful treats! To get the best texture from your puff pastry, make sure it is cold. Cold pastry puffs up better. When you roll out the dough, be gentle. Too much pressure can flatten the layers. For sealing pastry pockets, pinch the corners tightly. This step stops any filling from leaking out while baking. You can also use a fork to press down the edges. This adds a nice touch and seals the pastry well. To make your pastries look great, dust them with powdered sugar right before serving. You can also add a few fresh blueberries on top for color. Arrange them nicely on a plate to impress your guests. Pair these pastries with a cup of tea or coffee. The sweet blueberry and cream cheese flavors go well with both. You can even serve them with a scoop of vanilla ice cream. It's a delightful treat! One big mistake is overfilling the pastries. Stick to about 2 tablespoons of filling. If you add too much, they can burst open while baking. Another mistake is not preheating the oven. Always heat it to 400°F (200°C) before baking. This step helps the pastries puff up perfectly and achieve that golden brown color. {{image_2}} You can play with the flavors in this recipe. Instead of blueberries, try using raspberries or strawberries. Both fruits add great taste and color. You can also mix fruits for a fun twist. For cream cheese, consider adding lemon zest or using a flavored cream cheese like chive or herb. These small changes can make your dish unique. If you need vegan options, replace the cream cheese with a vegan cream cheese. There are many great brands available now. For puff pastry, look for gluten-free options. Many stores sell gluten-free puff pastry that works well. Always check the label to ensure it fits your needs. Want smaller treats? Cut the puff pastry into mini squares. This makes perfect bite-sized snacks for parties. You can also double the recipe if you have a big gathering. This way, you will have enough for everyone to enjoy. Just remember to adjust the baking time if you make larger batches. To keep your blueberry cream cheese puff pastries fresh, store them in the refrigerator. Place them in an airtight container. This way, they stay moist and tasty. When you want to enjoy them again, reheat in the oven. Set it to 350°F (175°C) for about 10 minutes. This helps them regain their crisp texture. If you have leftovers, you can freeze them. Wrap each pastry tightly in plastic wrap, then place them in a freezer bag. This keeps the flavor and texture intact. When you're ready to eat, thaw them in the fridge overnight. Reheat in the oven for the best results. These pastries last about 3-5 days in the fridge. Check for any signs of spoilage. If they smell sour or look discolored, it's time to toss them. Enjoy your blueberry cream cheese puff pastry delight while they're fresh! For the full recipe, refer back to the earlier section. If you need a dairy-free option, try using cashew cream. Blend soaked cashews until smooth to get a creamy texture. You can also use silken tofu. It has a similar consistency and will work well in this recipe. Just add a bit of lemon juice for a tangy flavor. Yes, you can use frozen blueberries. They work well in this recipe. However, they may release more juice, making the filling a bit runny. This can affect the final pastry's texture. To help with this, thaw the berries and drain any excess juice before mixing them in. If your puff pastry does not puff, check the oven temperature. It should be hot enough to create steam. Also, make sure you didn’t overwork the dough. Handle it gently to keep those layers intact. Lastly, ensure your baking sheet is not overcrowded, which can trap steam. You can prep the filling and store it in the fridge for a day. Roll out the puff pastry and cut it into squares. Store them in the fridge, covered with plastic wrap. Assemble the pastries just before baking for the best results. This keeps them fresh and flaky. This blog post guided you through making delicious puff pastry filled with cream cheese and blueberries. We covered key ingredients, step-by-step instructions, and helpful tips. You learned about variations, storage, and common mistakes to avoid. Remember, practice makes perfect. Use these insights to create tasty treats for yourself or guests. Enjoy the process and share your creations with others. Baking can be fun and rewarding when you know how to make it right!](https://grilledflavors.com/wp-content/uploads/2025/05/e6064316-16a5-4747-95ea-f56202cfa4ce.webp)
![For a delightful batch of red velvet cinnamon rolls, you will need the following ingredients: - 2 cups all-purpose flour, plus more for dusting - 1/2 cup granulated sugar - 2 tablespoons unsweetened cocoa powder - 2 teaspoons baking powder - 1/2 teaspoon baking soda - 1/4 teaspoon salt - 1/2 cup whole milk, warm - 1/2 cup sour cream - 1 large egg - 1 tablespoon red food coloring - 1/4 cup unsalted butter, melted - 1 tablespoon vanilla extract - 1/2 cup brown sugar, packed - 1 tablespoon ground cinnamon - 1/4 cup unsalted butter, softened (for filling) - 1 cup cream cheese (for frosting) - 1 cup powdered sugar (for frosting) - 2 tablespoons milk (for frosting) - 1 teaspoon vanilla extract (for frosting) These ingredients work together to create a soft, sweet treat with a rich flavor and a stunning red hue. The cocoa powder adds depth, while the cream cheese frosting gives it a creamy contrast. Each element plays a role in making these rolls a true delight. For the full recipe, check the details above. - Combine dry ingredients in a bowl. - Mix flour, sugar, cocoa powder, baking powder, baking soda, and salt. - In another bowl, mix wet ingredients until smooth. - Stir warm milk, sour cream, egg, red food coloring, melted butter, and vanilla. - Gradually add wet to dry ingredients, mixing until a soft dough forms. - If too sticky, add a bit more flour as needed. - Turn the dough out onto a floured surface and knead for 2-3 minutes. - Roll out the dough into a rectangle about 1/4 inch thick. - Spread softened butter evenly over the dough. - Sprinkle brown sugar and cinnamon mixture on top. - Starting from one end, roll the dough into a tight log. - Seal the edges by pinching the seam closed. - Cut the log into 12 equal slices. Place them in a greased baking dish. - Cover the rolls with a kitchen towel. - Let them rise in a warm place for about 30 minutes. - Preheat your oven to 350°F (175°C). - Bake the rolls for 25-30 minutes until golden brown. - Combine all frosting ingredients in a mixing bowl. - Add cream cheese, powdered sugar, milk, and vanilla extract. - Beat until creamy and smooth. Try this Red Velvet Cinnamon Roll recipe for a delightful sweet treat! You’ll enjoy every bite. Use room temperature ingredients. This helps the dough rise well. Cold ingredients can slow down yeast activity. Knead the dough for elasticity. Kneading for 2-3 minutes makes it smooth. If the dough feels sticky, add a bit more flour. This will help you get the right consistency. Choose a good red food coloring. Gel colors work best for a vibrant look. You want a deep, rich red. Use quality cocoa powder for a great taste. Dutch-processed cocoa gives a smooth flavor, while regular cocoa offers a richer taste. Both can enhance your rolls. Drizzle the frosting with a spoon for a nice look. Start from the center and move outward. For extra toppings, consider sprinkles or crushed nuts. They add color and texture. You can also use white chocolate shavings for a classy touch. This makes your rolls even more appealing and tasty. For the complete recipe, refer to the Full Recipe. {{image_2}} You can get creative with the filling for your Red Velvet Cinnamon Rolls. One tasty option is to use Nutella or chocolate chips. These add a rich, chocolatey flavor that pairs well with the red velvet base. If you want a crunch, add some chopped nuts, like walnuts or pecans. The nuts will give your rolls a nice texture and extra flavor. If you need a gluten-free version, you can use gluten-free flour. Just make sure to choose a blend that has a good texture. You may need to add a bit more liquid to keep the dough moist. Gluten-free dough can be drier, so keep an eye on it as you mix. Adding a little more milk can help achieve the right texture for your rolls. For bite-sized treats, make mini Red Velvet Cinnamon Rolls. Roll the dough into a smaller rectangle and slice it into smaller pieces. This will create cute, little rolls that are perfect for sharing. Bake them for about 15-20 minutes instead of the usual time. Keep an eye on them to ensure they don’t overbake. For the complete recipe, check the Full Recipe section above. Enjoy exploring these fun variations! To keep your Red Velvet Cinnamon Rolls fresh, start by cooling them. Let the rolls sit at room temperature for about 30 minutes. Once they cool, you can place them in an airtight container. Refrigerate them if you plan to eat them in a few days. This keeps them soft and tasty. If you want to save them for longer, you can freeze the rolls. Wrap each roll in plastic wrap, then place them in a freezer bag. They can last for up to three months in the freezer. When it's time to enjoy your leftover rolls, reheating is key. The best way to reheat them is in the oven. Preheat your oven to 350°F (175°C). Place the rolls on a baking sheet and cover them loosely with foil. Heat for about 10-15 minutes. This keeps the rolls soft and warm. If you’re in a rush, you can use the microwave. Heat each roll for about 15-20 seconds. However, the microwave may make them a bit chewy. Always check for freshness by smelling them before you eat. The cooking time for red velvet cinnamon rolls is about 25 to 30 minutes. Bake them until they are golden brown. Be sure to check them around the 25-minute mark to avoid overbaking. Yes, you can make the dough ahead of time. After you knead it, cover it tightly and store it in the fridge. Let it warm up for about 30 minutes before rolling it out for best results. To keep your cinnamon rolls soft, use room temperature ingredients. Also, avoid overbaking. A warm, moist environment helps them rise and stay fluffy. Cover them with a towel while they cool. Absolutely! A stand mixer makes kneading easy. Just use the dough hook attachment. Mix until the dough is smooth and elastic, which will only take a few minutes. Red velvet desserts started in the 1920s. They gained fame in the South, especially in the 1980s. The eye-catching color comes from cocoa and vinegar reactions, plus food coloring. They became a favorite for special occasions. Yes, you can add cream cheese to the dough. This will give it a rich taste. Just replace a bit of the butter with cream cheese in the dough recipe. It adds creaminess and makes the rolls even better! For the full recipe, check out [Full Recipe]. You now have a complete guide to making delicious red velvet cinnamon rolls. From the list of ingredients to baking and frosting, every step is key for success. Remember to use room temperature ingredients for the best texture. Don’t forget the fun variations and storage tips to make your rolls last. Experiment with different fillings to find your favorite. Enjoy the process and the tasty rewards. These rolls can be a hit at any gathering! Dive into the art of baking with confidence!](https://grilledflavors.com/wp-content/uploads/2025/05/46d00175-2cd2-4e77-9dc7-2180106c48ea.webp)