Roasted Carrots with Whipped Ricotta and Hot Honey Delight
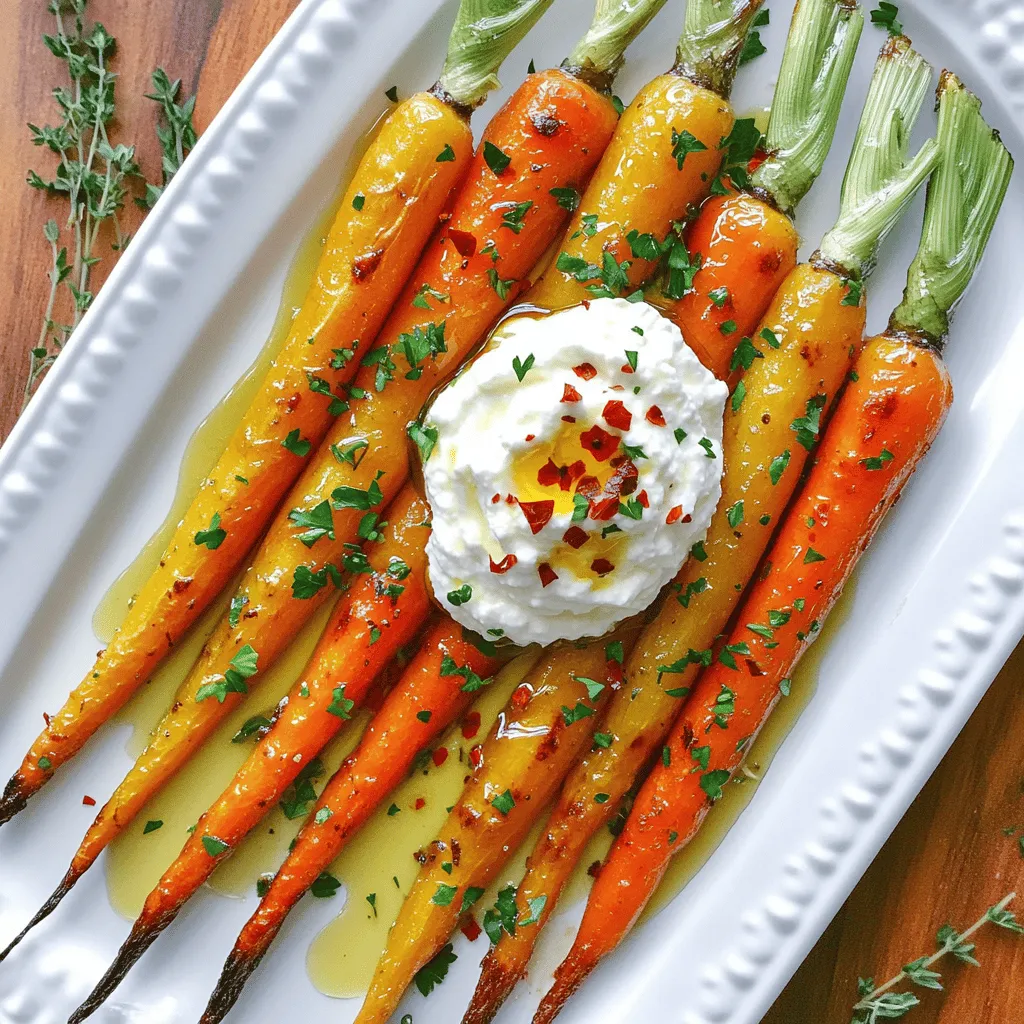
Are you ready to elevate your vegetable game? Today, I’m sharing a simple recipe for Roasted Carrots with Whipped Ricotta and Hot Honey Delight. This dish combines the sweet flavor …
![Here’s what you need to make delicious cruffins. Gather these simple items before you start: - 2 cups all-purpose flour - 1/4 cup granulated sugar - 1 packet (2 1/4 teaspoons) instant yeast - 1/2 teaspoon salt - 1/2 cup whole milk, warmed - 1/4 cup unsalted butter, melted - 1 large egg - 1/2 teaspoon vanilla extract - 1/4 cup brown sugar (for filling) - 1 tablespoon ground cinnamon (for filling) - 1/2 cup unsalted butter, softened (for spreading) - Powdered sugar for dusting (optional) These ingredients blend together to create a soft dough and a sweet filling. The combination of brown sugar and cinnamon gives cruffins their signature taste. The warm milk helps activate the yeast, while melted butter adds richness. Don't forget to have a bit of powdered sugar ready for a lovely finish! For the full recipe, check the details above. To start, you need to combine three key ingredients. In a medium bowl, add the warmed milk, melted butter, and granulated sugar. Stir this mixture well until the sugar dissolves completely. This step helps to create a sweet base for your cruffins. In another bowl, mix together the flour, instant yeast, and salt. Make sure these dry ingredients are blended well. Once combined, you will gradually add the wet mixture from the first bowl. This method ensures the yeast activates properly. Next, it's time to knead the dough. Transfer the combined mixture onto a floured surface. Knead it for about 5 to 7 minutes until the dough feels smooth and elastic. This process is vital, as it develops the gluten structure which gives the cruffins their delightful texture. After kneading, cover the dough with a clean cloth. Place it in a warm area and let it rise until it doubles in size, which usually takes about one hour. The warmth helps the yeast work its magic, making your cruffins light and fluffy. Once the dough has risen, roll it out on a floured surface into a rectangle about 1/4 inch thick. Spread the softened butter evenly over the surface. This adds richness and flavor to every bite. Now, mix brown sugar and cinnamon in a small bowl. Sprinkle this mixture evenly across the buttered dough. This step is crucial because it adds a sweet and spicy layer to your cruffins. Next, fold the dough into thirds, similar to folding a letter. Roll it out again into a rectangle and repeat the butter, brown sugar, and cinnamon process. This layering creates the flaky texture that makes cruffins special. Now, cut the folded dough into rectangles, about 3x4 inches. Take each rectangle and roll it tightly from the short edge to form a log. This step shapes your cruffins and builds their unique spiraled look. Place each cruffin log into a greased muffin tin, spiraling the dough up to fill each cup. This method ensures even baking and a beautiful shape. Allow the cruffins to rise again for about 30 minutes until they become puffy. While they rise, preheat your oven to 375°F (190°C). This temperature is perfect for getting that golden-brown crust. Bake the cruffins for 20 to 25 minutes or until they look delightfully golden. Let them cool slightly before dusting with powdered sugar, if desired. Enjoy your delicious cruffins! For the full recipe, check out the detailed instructions above. Kneading is key to getting the right texture. It helps develop gluten, giving cruffins their flaky layers. I knead the dough for about 5-7 minutes until it feels smooth and elastic. It should spring back when pressed. Next, rising is crucial. I find a warm spot helps the dough double in size. If it's too cold, the yeast won't work well. I often turn my oven on low for a few minutes, then turn it off. This creates a cozy spot for rising. For the perfect golden-brown color, watch your oven closely. I bake my cruffins at 375°F (190°C) for 20-25 minutes. The tops should look rich and toasty. If they brown too quickly, I cover them with foil. After baking, cooling time is important. I let them rest in the tin for about 5 minutes. Then, I move them to a wire rack. This keeps them from getting soggy. Cruffins pair well with coffee or tea. They also taste great with fruit spreads or cream cheese. I love serving them warm with a light dusting of powdered sugar. For special occasions, I arrange them on a beautiful platter. A sprinkle of berries or mint leaves adds a nice touch. Presentation matters, and these treats deserve it! For the full recipe, check out the [Full Recipe]. {{image_2}} You can fill cruffins with many tasty treats. Try chocolate chips for a sweet twist. Fruit preserves, like raspberry or apricot, add a fresh burst of flavor. For a unique touch, use lemon curd or peanut butter. If you're in the mood for something savory, consider cheese and herbs. A mix of goat cheese and sun-dried tomatoes works great. You can also try spinach and feta for a Mediterranean vibe. Each filling brings new joys to the cruffin experience. If you need gluten-free cruffins, use gluten-free flour blends. They work well in this recipe. You might need to adjust the liquid a bit. For vegan cruffins, replace the egg with a flaxseed mixture. Mix one tablespoon of flaxseed meal with three tablespoons of water and let it sit for five minutes. Use almond milk instead of whole milk. Swap butter for coconut oil or vegan margarine. These adjustments keep the cruffins tasty while catering to your needs. Cruffins have made waves around the globe, inspiring different styles. In Australia, bakers add local flavors like Vegemite or Tim Tams. In France, pastry chefs often fill cruffins with rich creams or custards. This makes them more like classic pastries. In contrast, traditional pastries like croissants focus on buttery layers without fillings. Cruffins combine the best of both worlds. They keep the flaky layers while adding delicious fillings. This fusion of styles makes cruffins a delightful treat to explore. For the full recipe, check out the Delicious Cruffins section! To keep your cruffins fresh, store them in an airtight container. This method helps to lock in moisture and flavor. If you want to keep them even longer, wrap them in plastic wrap and then place them in a container. - Recommended storage times: - At room temperature: 1-2 days - In the fridge: up to 5 days - In the freezer: up to 3 months For the best results, reheat cruffins in the oven. This method helps them regain their flaky texture. Preheat your oven to 350°F (175°C). Place cruffins on a baking sheet and heat for about 10 minutes. - Tips for enjoying cruffins later: - You can also use a toaster oven for quick reheating. - If you want a warm treat, try microwaving for 10-15 seconds. But be careful, as this may make them a bit chewy. Enjoy your cruffins warm, and don't forget to check out the Full Recipe for more tips and details! Cruffins are a delightful mix of croissants and muffins. They have flaky layers like croissants but are shaped like muffins. This tasty pastry comes from San Francisco. The idea is to take a classic croissant dough, roll it up, and bake it in a muffin tin. This method gives cruffins their unique shape and texture. You can fill them with sweet or savory fillings, making them very versatile. Yes, you can freeze cruffins! To freeze, let them cool completely. Wrap each cruffin tightly in plastic wrap. Place them in a freezer bag or container. They can stay good for up to three months. When you want to eat them, simply thaw on the counter. Reheat in the oven at 350°F (175°C) for about 10 minutes. This helps them regain their flaky texture. Serve cruffins warm for the best flavor. You can dust them with powdered sugar for a sweet touch. They pair well with coffee or tea. For a fun twist, try adding a scoop of ice cream or fresh fruit on top. You can also spread a bit of butter or jam inside for extra flavor. Absolutely! You can prepare the dough a day in advance. After kneading, cover it and place it in the fridge overnight. In the morning, you can shape and bake them. Just remember to let them rise before baking. This makes breakfast easy and yummy! You can find great cruffins at local bakeries or cafes. Look for places known for their pastries. Some popular spots may include artisanal bakeries or coffee shops. If you're in San Francisco, try the original place where cruffins were born. Many bakeries now offer unique flavors, so keep an eye out for exciting options! For a homemade treat, check out the Full Recipe to create your own cruffins at home. Making cruffins is fun and rewarding. We covered every step, from the ingredients to baking tips. You can create a delicious treat by following this guide. Remember to knead well for texture and let the dough rise fully. Enjoy experimenting with fillings and serving ideas to impress your friends. Whether you choose sweet or savory, cruffins are sure to please. Keep them fresh by storing correctly and reheating them right. Dive in and enjoy your cruffin-making adventure!](https://grilledflavors.com/wp-content/uploads/2025/05/7110c0ae-a37d-4172-80fd-3db0679b5de1.webp)

. It includes all the details you need to make this tasty breakfast treat. These Sausage French Toast Roll-Ups are fun and easy to make. You have a list of key ingredients to get started, along with some optional ones to spice things up. Following the step-by-step instructions will help you create a tasty breakfast. Tips and variations give you ideas for endless flavors, and storage info makes leftovers simple. Overall, these roll-ups are perfect for breakfast or brunch. Try them out and enjoy your cooking!](https://grilledflavors.com/wp-content/uploads/2025/05/8554b2d8-8f94-4826-9ce1-82cc01854b14.webp)
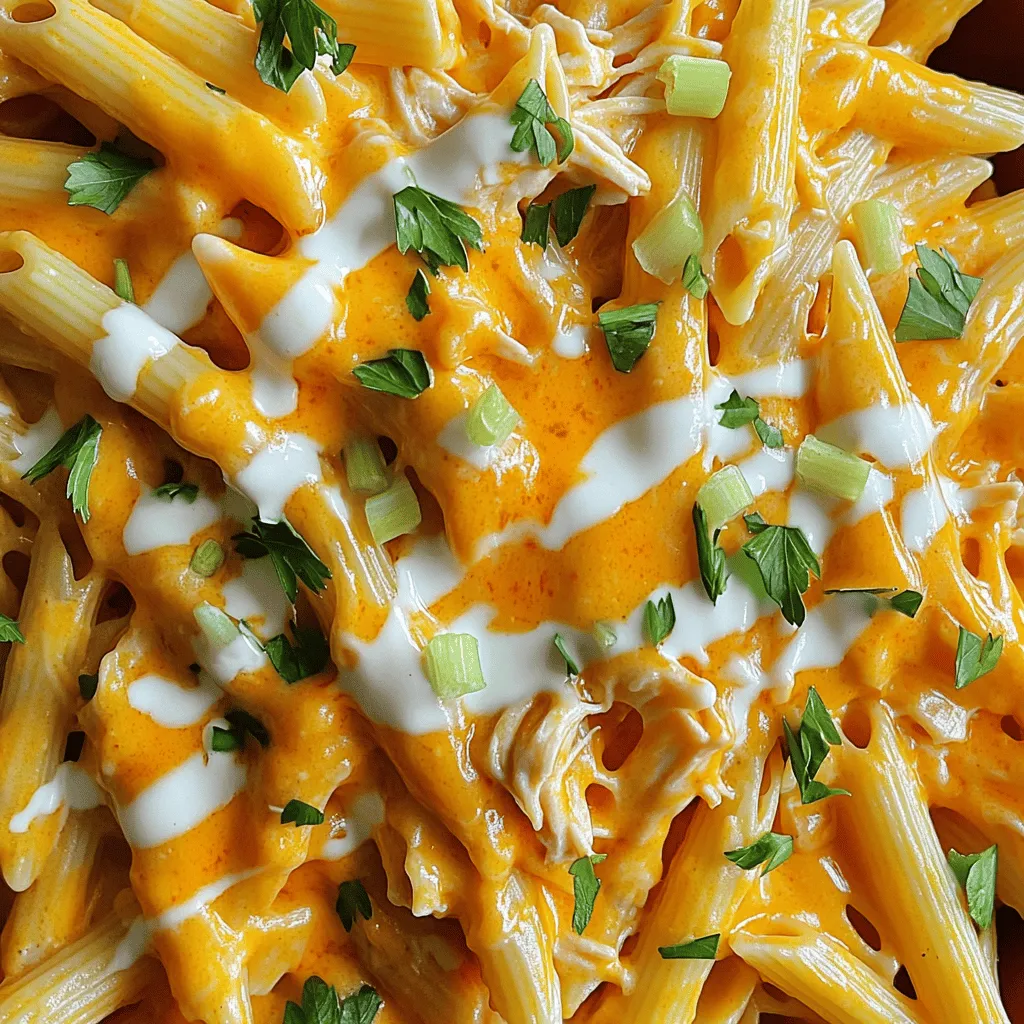
![- 2 boneless, skinless chicken breasts - 3 cups whole wheat penne pasta - 1 tablespoon olive oil - 2 cloves garlic, minced - 1 ½ cups low-fat Greek yogurt - 1 cup grated parmesan cheese - 1 cup broccoli florets - ½ teaspoon Italian seasoning - Salt and pepper to taste - Fresh parsley for garnish This dish is not only tasty but also healthy. Each serving offers a good balance of protein and carbs. The chicken provides lean protein, while the whole wheat pasta adds fiber. Greek yogurt gives a creamy texture and extra protein. Here's a quick breakdown for one serving: - Calories: 400 - Protein: 36g - Carbohydrates: 50g - Fat: 10g - Fiber: 6g High protein foods help build and repair muscles. They keep you full, which can aid in weight management. Chicken is a great source of lean protein. Greek yogurt offers probiotics for gut health. Whole wheat pasta gives you energy without a sugar spike. Combining these ingredients makes a delicious meal that supports a healthy lifestyle. You can enjoy this meal guilt-free, knowing it fuels your body well. For the full recipe, check out the earlier section. To start, marinate the chicken breasts. Mix olive oil, minced garlic, salt, pepper, and Italian seasoning in a bowl. Add the chicken breasts and coat them well. Let the chicken sit for at least 30 minutes. This helps the flavors soak in. Next, heat your grill or grill pan to medium-high. Place the marinated chicken on the grill. Cook for 6-7 minutes on each side. The chicken should no longer be pink in the center. Once done, take it off the grill and let it rest for 5 minutes. Then, slice it into strips. While the chicken grills, bring a pot of water to a boil. Add the whole wheat penne pasta and cook it according to the package instructions, usually about 10-12 minutes. With 3 minutes left, toss in the broccoli florets. This gives them a quick steam. Once cooked, drain the pasta and broccoli together. In a large mixing bowl, combine the low-fat Greek yogurt, half of the grated parmesan cheese, and about ¼ cup of pasta water. Stir well until you get a creamy sauce. The yogurt adds protein and keeps it light. Now, add the drained pasta and broccoli to the sauce. Toss everything together until it's well-coated. Slice the grilled chicken and place it on top of the pasta. Finish by sprinkling the remaining parmesan cheese over the dish. Garnish with fresh parsley and serve hot. Enjoy the creamy goodness packed with protein! Find the [Full Recipe] for all the details on this delicious meal. To grill chicken just right, start with the right heat. Medium-high heat works best. Marinate your chicken for at least 30 minutes. This adds flavor and keeps it moist. Use a meat thermometer. The chicken should reach 165°F to be safe. Let the chicken rest after grilling. This helps keep the juices inside. Slice it just before serving for the best taste. For a creamy Alfredo, Greek yogurt is a game changer. It gives you that rich taste while keeping it healthy. Mix Greek yogurt with parmesan cheese in a bowl. Add a bit of pasta water to thin it out. Stir until smooth. This sauce coats the pasta nicely without being too heavy. You can also add garlic for extra flavor. Add some veggies for color and nutrition. Broccoli florets are a great choice. They cook quickly with the pasta. You can also toss in spinach or peas. For a kick, try adding crushed red pepper flakes. Fresh herbs like parsley elevate the dish’s look and taste, too. A squeeze of lemon juice can brighten it up. Enjoy experimenting with flavors! For the complete dish, check out the Full Recipe. {{image_2}} If you want to skip the chicken, you can use veggies. Try adding mushrooms or zucchini. These give a nice texture. You can also use tofu for protein. Just marinate it like the chicken and grill it. This makes a tasty vegetarian dish. You can switch up the protein in this dish. Try shrimp or turkey for a different taste. Even salmon works well. Each adds unique flavors to your pasta. If you like beans, chickpeas are a great option too. They add protein and fiber. Not a fan of whole wheat penne? You can use other pasta types. Try gluten-free pasta if you need it. Zucchini noodles are a fun choice too. They are low in carbs but still satisfy. You can even use spaghetti or fettuccine for a classic feel. To keep your High Protein Grilled Chicken Alfredo Pasta fresh, store it in an airtight container. Make sure to cool the dish to room temperature before sealing. Place it in the fridge and use it within 3-4 days for the best taste. When you're ready to enjoy your leftovers, heat them gently. You can use a microwave or a stove. If using a microwave, cover the dish to keep moisture. Heat in short bursts, stirring in between. If you're using the stove, add a splash of water to keep it creamy. Stir until it's warm throughout. If you want to save some for later, freezing is a great option. Portion the pasta into small containers, leaving space for expansion. Seal tightly and label with the date. It can last in the freezer for up to 3 months. To thaw, move it to the fridge overnight, then reheat as mentioned above. Enjoy your meal even on busy days! Yes, you can use different types. Whole wheat penne works well, but feel free to try gluten-free pasta or even zoodles (zucchini noodles). Each pasta type brings its own flavor and texture. Just make sure to adjust the cooking time according to the package instructions. To cut calories, use less cheese or switch to low-fat cheese. You can also replace Greek yogurt with low-fat sour cream or skip it altogether. Use less oil when marinating the chicken and serve smaller portions. Adding more veggies can also help fill you up without adding too many calories. This dish pairs great with a fresh salad or steamed vegetables. A light Caesar salad or roasted zucchini can complement the creamy pasta well. Garlic bread is another popular choice if you want something a bit indulgent. Your High Protein Grilled Chicken Alfredo Pasta will last about 3 to 5 days in the fridge. Make sure to store it in an airtight container to keep it fresh. Reheat gently in the microwave or on the stovetop to avoid drying it out. You can easily swap the chicken for shrimp, turkey, or tofu for a veggie option. Each protein brings a different taste and texture. Just adjust the cooking time based on what you choose to ensure it's cooked through. For the full recipe, check out the complete cooking instructions. This blog shared a great recipe for High Protein Grilled Chicken Alfredo Pasta. You learned about the key ingredients, step-by-step cooking, and helpful tips. We also explored tasty variations and storage info. This dish is healthy and satisfying! It’s easy to make and offers room for your own twists. Enjoy creating your version, and don’t forget to share it with family and friends!](https://grilledflavors.com/wp-content/uploads/2025/05/8420953c-4e20-4e03-b034-951804560607.webp)