Appetizers
![- Fresh Celery Stalks - Ripe Avocado - Greek Yogurt - Lemon Juice To start making stuffed celery, you need fresh celery stalks. Choose stalks that are crisp and green. Next, grab a ripe avocado. It should feel soft but not mushy. Greek yogurt adds creaminess and tang. Finally, a squeeze of lemon juice brightens the flavor. - Red Bell Pepper - Red Onion - Fresh Cilantro - Garlic Powder For extra flavor, consider adding some red bell pepper. It adds sweetness and crunch. Red onion gives a nice bite. Fresh cilantro adds a fresh taste. If you want a bit of warmth, sprinkle in garlic powder. - Salt and Black Pepper - Crushed Red Pepper Flakes - Paprika for Presentation Season your filling with salt and black pepper. This brings out the flavors. If you like heat, add crushed red pepper flakes. For a pop of color, sprinkle paprika on top. This makes your dish look even more inviting. For the full recipe, check out [Full Recipe]. - Wash and Cut Celery Start by rinsing the celery under cold water. This removes dirt and pesticides. Next, cut each stalk into 4-inch pieces. This size is easy to handle and eat. - Preparing the Filling Grab a mixing bowl. You will need a ripe avocado, Greek yogurt, lemon juice, red bell pepper, red onion, cilantro, garlic powder, and salt. These ingredients make a tasty and creamy filling. - Mashing Avocado Take the ripe avocado and remove the pit. Use a fork to mash it in the bowl. Leave some chunks for a nice texture. - Combining Ingredients Add Greek yogurt and lemon juice to the mashed avocado. Mix until smooth. Next, stir in the chopped red bell pepper, red onion, cilantro, garlic powder, salt, and pepper. If you like spice, add crushed red pepper flakes. - Filling Methods (Spoon vs. Piping Bag) Now it’s time to fill the celery! You can use a spoon for a quick method. If you want a neat look, use a piping bag. This way, the filling goes in smoothly. - Arranging on Platter Place the stuffed celery on a platter. You can also use individual serving plates. For a nice touch, garnish with extra cilantro and a sprinkle of paprika. These steps make your snack look great! For the complete recipe, visit the Full Recipe section. Enjoy your delicious stuffed celery! - Selecting Fresh Stalks: Look for celery with bright green color and firm stalks. Avoid wilted or yellowing leaves. Fresh celery should snap when you bend it. - Storing Celery Before Use: Keep celery in the fridge in a plastic bag or wrapped in aluminum foil. This helps maintain its crunch for about two weeks. - Adding Protein Options: You can mix in nuts, cheese, or even cooked chicken for a protein boost. Almonds or feta cheese give great flavor and texture. - Spice Up with Flavor Variations: Try adding herbs like dill or spices like cumin. A dash of hot sauce can also give your filling a nice kick. - Ideal Pairings and Accompaniments: Stuffed celery pairs well with hummus, dips, or cheese platters. It makes a great snack at parties or casual gatherings. - Presentation Tips for Parties: Arrange stuffed celery on a colorful platter. Garnish with herbs or a sprinkle of paprika for added flair. Always serve chilled for the best taste. {{image_2}} - Ingredients: - 8 ounces cream cheese, softened - 1 tablespoon fresh dill, chopped - 1 tablespoon fresh chives, chopped - Salt and pepper to taste - Preparation: 1. In a bowl, mix cream cheese with dill and chives. 2. Season with salt and pepper. 3. Fill celery stalks with the cream cheese mix. - Best Uses for This Variation: This filling works well for parties. It adds a creamy texture and fresh taste. Serve it with crackers or as part of a veggie platter. - Suggested Nuts and Ingredients: - 1/2 cup almond butter or peanut butter - 1/4 cup chopped walnuts or pecans - 1 tablespoon honey or maple syrup (optional) - Flavor Enhancements: Mix nuts with nut butter for a crunchy treat. Add a touch of honey for sweetness. This variation packs protein and is great for a quick snack. - Ground Meat Variations (e.g., chicken, turkey): - 1 cup cooked ground chicken or turkey - 1/4 cup cream cheese or Greek yogurt - 1 tablespoon taco seasoning - Cooking Tips for Meat Variants: Combine cooked meat with cream cheese or yogurt. Add seasoning for flavor. Fill celery with this mixture for a heartier snack. These options are perfect for lunchboxes or game day treats. - Short-term Storage in the Fridge: Place your stuffed celery in an airtight container. It stays fresh for 2 to 3 days. Keep it in the main part of the fridge, not the door, to avoid temperature changes. This helps maintain crunchiness. - Long-term Options: Stuffed celery does not freeze well. The texture changes when thawed. It’s best to enjoy it fresh. If you need to prepare ahead, store the filling separately and fill the celery just before serving. - Do’s and Don'ts for Leftovers: Do not reheat stuffed celery. It tastes best cold. If you have leftovers, keep them in the fridge. Avoid adding too much salt when making the filling. This helps keep it tasty even after a day or two. - Maintaining Freshness: Serve stuffed celery chilled. This keeps it crisp and refreshing. If you make it for a party, prepare it an hour before guests arrive. Garnish with extra cilantro or paprika for a colorful touch. For more ideas, check out the Full Recipe for variations you can try! Stuffed celery can last about 3 to 5 days in the fridge. I recommend storing it in an airtight container. This keeps it fresh and crunchy. Always check for any signs of spoilage before eating. You can freeze stuffed celery, but I advise against it. The texture changes after freezing and thawing. If you must freeze it, wrap each piece tightly in plastic wrap. To defrost, place it in the fridge overnight. This helps maintain some crunch. You can get creative with fillings! Here are some ideas: - Cream cheese mixed with herbs - Hummus with spices - Peanut butter with raisins - Tuna salad or chicken salad Mix and match to find your favorite! Yes, stuffed celery is a healthy snack! Celery is low in calories and high in water. The fillings add nutrients. For example: - Avocado provides healthy fats. - Greek yogurt offers protein and calcium. - Bell peppers add vitamins A and C. This snack is tasty and packed with benefits! Stuffed celery is simple and fun. We covered fresh ingredients like celery and avocado, with yogurt and lemon for flavor. You can customize with peppers, onions, or nuts. I showed you easy steps to prepare, fill, and serve. Remember, it’s great to store properly and enjoy later. Stuffed celery can fit many occasions, making it a healthy snack choice. With creativity, you can create a filling for anyone's taste!](https://grilledflavors.com/wp-content/uploads/2025/05/6d17279b-e120-43fc-bd15-0a691f964150.webp)
Stuffed Celery Delight Simple and Tasty Snack
Looking for a quick, tasty snack that’s also healthy? Stuffed celery is your answer! This easy treat combines crunchy celery with delicious fillings, making it
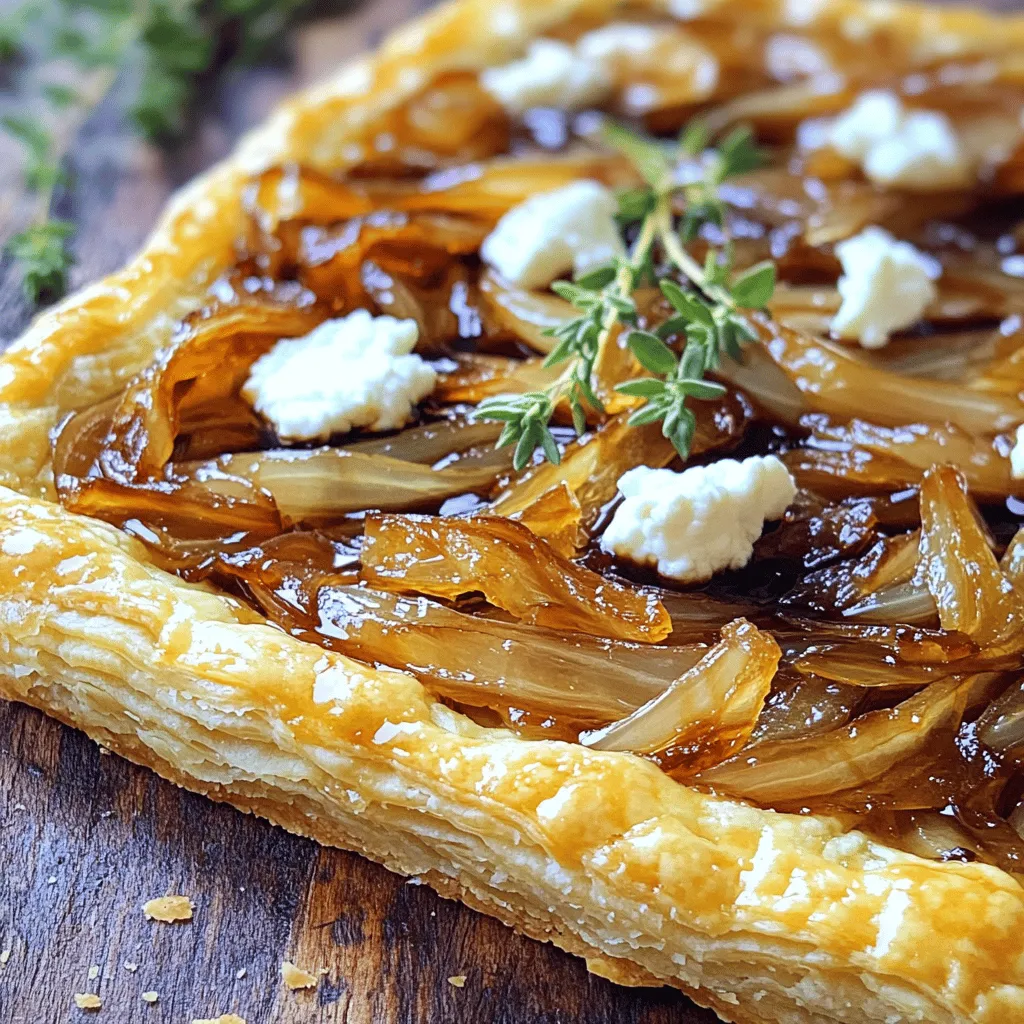
Caramelized Onion Tart Savory and Satisfying Dish
Looking for a dish that feels fancy but is easy to make? The Caramelized Onion Tart is the answer! With just a few simple ingredients,

Crab & Cheese Stuffed Crescent Puffs Savory Delight
Are you ready to impress your friends at your next gathering? My Crab & Cheese Stuffed Crescent Puffs are the perfect blend of flavors. They’re
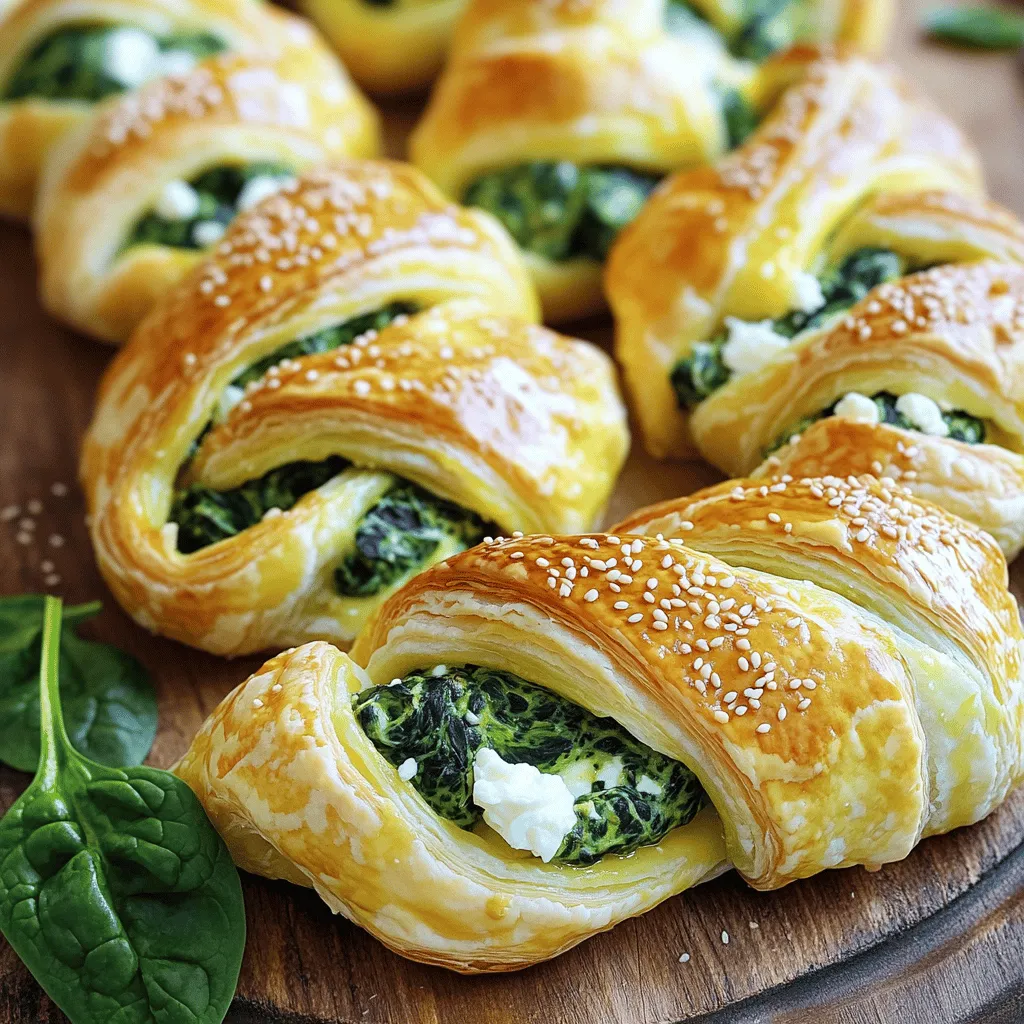
Spinach and Feta Puff Pastry Twists Delightful Snack
Looking for a tasty snack that’s easy to make? Let me introduce you to Spinach and Feta Puff Pastry Twists! This delightful treat combines flaky
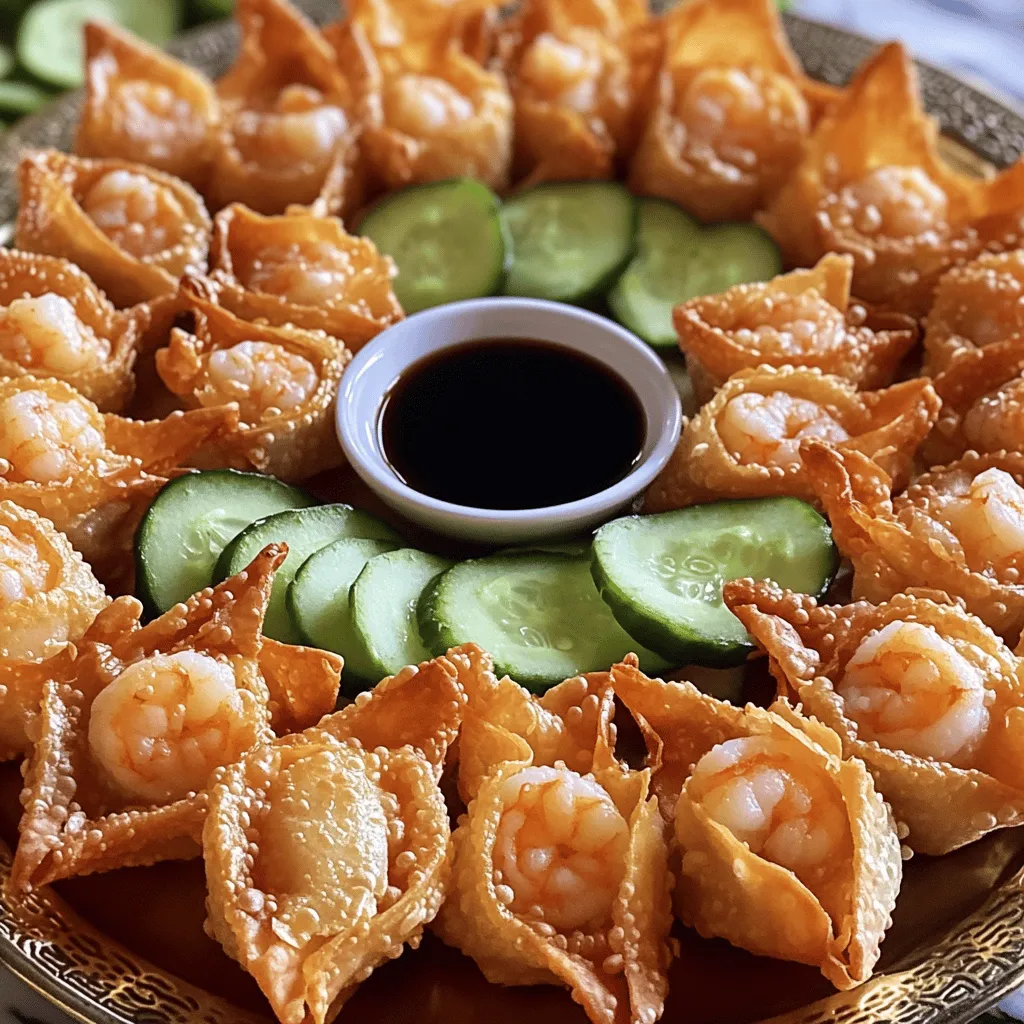
Easy Shrimp Rangoon Crispy and Flavorful Delight
Craving a crispy, flavorful delight that’s easy to make? Look no further! In this post, I’ll guide you through making Easy Shrimp Rangoon that will
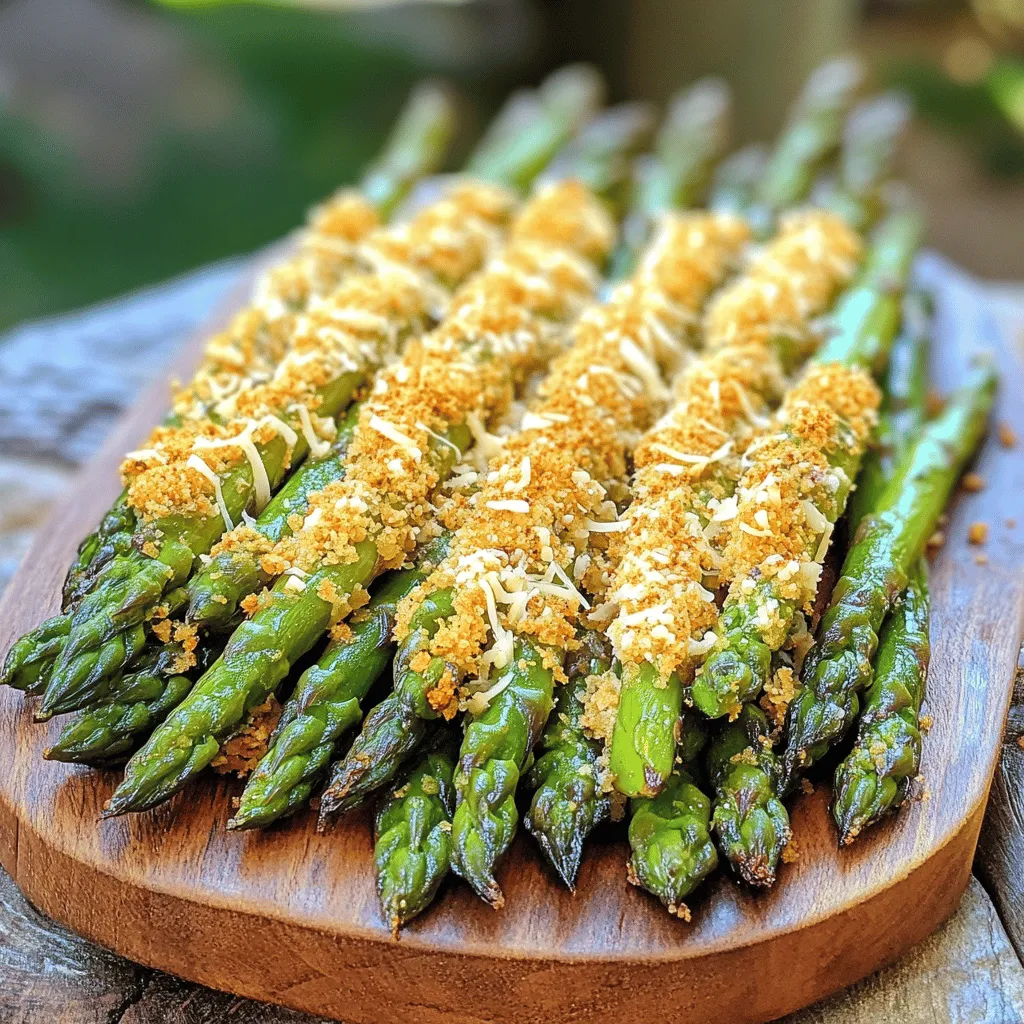
Crispy Asparagus Asiago Spears Tasty and Quick Recipe
Looking for a quick and tasty side dish? I’ve got you covered with my Crispy Asparagus Asiago Spears recipe! It’s simple, fun, and perfect for

Easy Crab Rangoon Egg Rolls Simple and Tasty Snack
Looking for a fun snack that’s simple and delicious? You’ll love these Easy Crab Rangoon Egg Rolls! They blend the creamy goodness of crab Rangoon
![- 1 sheet puff pastry, thawed - 1 bunch asparagus, trimmed - 4 oz cream cheese, softened In this recipe, puff pastry makes the base. It puffs up beautifully when baked. Asparagus adds a nice crunch and fresh flavor. Cream cheese provides a creamy filling that blends well with the herbs. - 1 teaspoon garlic powder - 1 teaspoon lemon zest - 1 tablespoon fresh dill, chopped (or 1 teaspoon dried dill) - Salt and pepper to taste - Sesame seeds (optional, for garnish) These seasonings bring the bundle to life. Garlic powder adds depth, while lemon zest brightens the taste. Fresh dill gives a herbaceous note that pairs perfectly with asparagus. You can adjust salt and pepper based on your taste. Sesame seeds add a nice touch if you want a little crunch. - 1 egg, beaten An egg wash makes the pastry golden and shiny. It helps the bundles look appealing when they come out of the oven. A simple step, but it really boosts the visual appeal. For the full recipe, please check the details above. 1. Preheat your oven to 400°F (200°C). This step is key for even baking. 2. Line a baking sheet with parchment paper. This prevents sticking and makes clean-up easy. 3. On a lightly floured surface, roll out the puff pastry sheet. You want it smooth, with no creases. 4. Cut the pastry into rectangles, about 4 inches by 6 inches. This size fits the asparagus well. 1. In a mixing bowl, combine the cream cheese, garlic powder, lemon zest, dill, salt, and pepper. 2. Mix until everything is smooth and well combined. This filling adds rich flavor. 3. Place about 1 tablespoon of the cream cheese mixture in the center of each pastry rectangle. 4. Lay 2-3 asparagus spears on top of the filling. The asparagus adds crunch and freshness. 5. Fold the pastry over the asparagus. Bring the corners together to create a bundle, then pinch to seal it well. 1. Brush the tops of the bundles with the beaten egg. This gives them a golden color when baked. 2. If you like, sprinkle sesame seeds on top for extra crunch. 3. Place the bundles on the prepared baking sheet and bake for 15-20 minutes. 4. Check for doneness: they should be golden brown and puffed. 5. Remove from the oven and let cool slightly before serving. For the full recipe, check the details above. Enjoy your delicious asparagus puff pastry bundles! To avoid soggy bottoms, make sure you use a preheated oven. This step helps the pastry rise quickly. Always roll out your pastry on a lightly floured surface. This prevents sticking. Cut your puff pastry into rectangles, about 4 inches by 6 inches. This size fits the asparagus well. For added taste, try mixing in some herbs. Fresh thyme or basil can bring a new twist. You can also add grated cheese for a richer flavor. If you don’t have cream cheese, try ricotta or a vegan cream cheese. Both work well and keep that creamy texture. Pair these bundles with a tangy dip. A lemon yogurt sauce or ranch dressing works great. For visuals, arrange your bundles on a colorful platter. Garnish with fresh dill and lemon wedges for a bright touch. Serve them warm for the best experience. {{image_2}} If you want to make these bundles vegan, swap cream cheese for a vegan version. Brands like Tofutti or Daiya offer tasty options. You can also use cashew cream for a rich flavor. For a gluten-free choice, look for gluten-free puff pastry. Many stores carry this now, making it easy to enjoy these treats. Get creative with herbs! Try using thyme, basil, or even rosemary. Each adds a unique twist. You can also add different spices like paprika or cumin for extra warmth. Want to boost nutrition? Consider adding diced bell peppers, spinach, or even cooked chicken to the filling. This makes the bundles heartier and more filling. You can serve these bundles as a main dish. Pair them with a fresh salad for a light meal. For appetizers, slice them into smaller pieces. Arrange them on a platter with dipping sauces like ranch or a tangy dip. This way, they become a fun finger food at parties. Set them out warm for the best taste. For the full recipe, visit the [Full Recipe]. To keep your asparagus puff pastry bundles fresh, follow these tips. First, let the bundles cool completely. This step helps prevent moisture buildup. Next, place them in an airtight container. If you don’t have one, wrap them tightly in plastic wrap. Store them in the fridge. They stay good for about 3 days. After that, their taste and texture may change. You can freeze asparagus puff pastry bundles before or after baking. If you choose to freeze them before baking, follow these steps: 1. Prepare the bundles as per the recipe. 2. Arrange them on a baking sheet lined with parchment paper. 3. Place the baking sheet in the freezer for about 1 hour. This step helps the bundles keep their shape. 4. After the bundles are firm, transfer them to a freezer-safe bag or container. Be sure to label it with the date. To freeze after baking, let the bundles cool first. Then, follow the same steps as above. When ready to enjoy, thaw the bundles in the fridge overnight. Then, reheat them in the oven at 350°F (175°C) for about 10-15 minutes. This method helps restore their crispiness. Enjoy them warm for a tasty treat! You can use phyllo dough for a lighter option. It gives a crispy texture. For a thicker crust, try biscuit dough. You can also use pie crust if you want something simple. Each option changes the final taste and feel, so pick what you like best. Yes, you can prepare the bundles ahead. Assemble the bundles, then cover them tightly and refrigerate. They stay fresh for a day. You can also freeze them before baking. Just remember to thaw them in the fridge before baking. This makes meal prep easy and fun. Look for a golden-brown color on the tops. The pastry should be puffy and crisp. You can also tap the bottom; it should sound hollow. Use these signs to ensure they are perfectly baked. Enjoy your delicious bundles hot from the oven! You learned how to make asparagus bundles with puff pastry. We covered the main ingredients, from puff pastry to seasoning options. You also discovered step-by-step instructions, storage tips, and variations for dietary needs. With these easy methods, your cooking can impress anyone. In the end, enjoy playing with flavors and serving these bundles. They can be fun snacks or elegant meals. Happy cooking!](https://grilledflavors.com/wp-content/uploads/2025/05/c828725f-7ec5-460b-80e4-48c92d3833bb.webp)
Asparagus Puff Pastry Bundles Delightful and Easy Treat
If you’re craving a tasty treat that’s both simple and impressive, you’ll love these Asparagus Puff Pastry Bundles! With flaky pastry and creamy filling, they
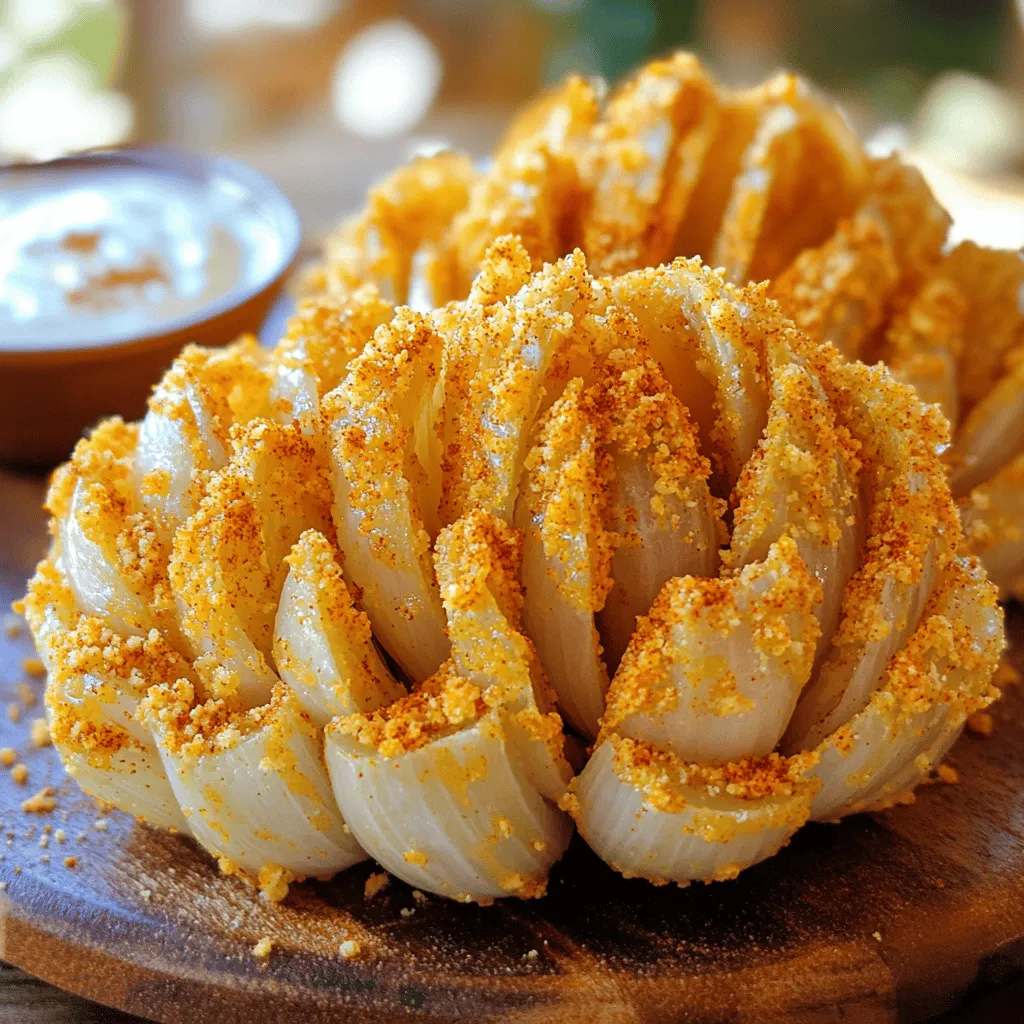
Bite-Sized Blooming Onions Crispy and Flavorful Snack
Are you ready to dive into a crispy and flavorful snack that elevates your appetizer game? Bite-sized blooming onions are fun to make and even
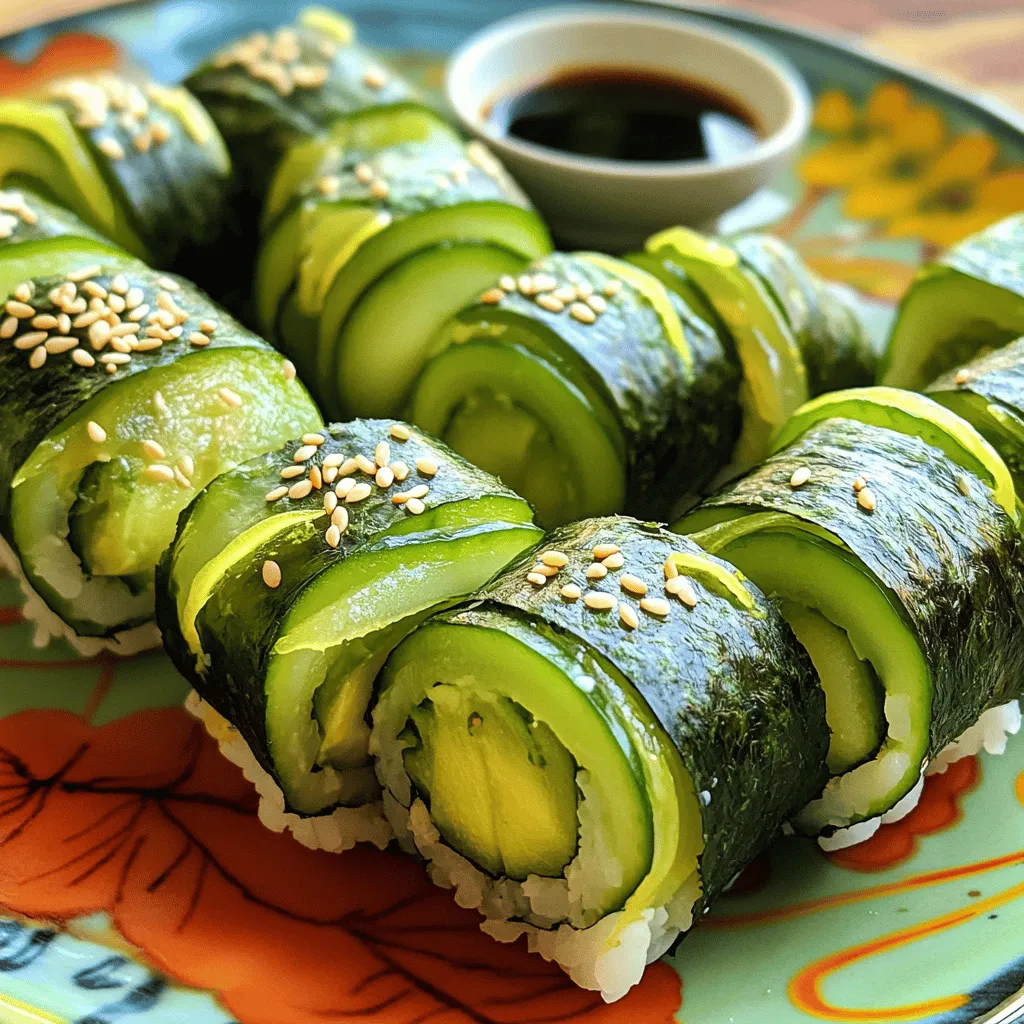
Cucumber Avocado Sushi Rolls Delightful and Fresh Meal
If you’re craving a fresh and tasty meal, Cucumber Avocado Sushi Rolls are a perfect choice! These rolls are not only easy to make, but