Appetizers

- 4 medium-sized bell peppers (any color) - 1 cup fresh spinach, chopped - 1 cup canned artichoke hearts, drained and chopped - 1 cup cream cheese, softened - ½ cup sour cream - 1 cup shredded mozzarella cheese - ½ cup grated Parmesan cheese - 2 cloves garlic, minced - 1 teaspoon onion powder - 1 teaspoon crushed red pepper flakes (optional) - Salt and pepper to taste - Olive oil for drizzling To make Spinach Artichoke Dip Stuffed Peppers, you will need a few simple ingredients. First, choose 4 colorful bell peppers. They add beauty and taste. Fresh spinach gives a nice pop of green. For that creamy dip flavor, grab canned artichoke hearts and cream cheese. Sour cream adds tanginess. Cheese lovers will enjoy the mozzarella and Parmesan. Garlic gives depth, while onion powder enhances flavor. If you like a little heat, add crushed red pepper flakes. Don't forget salt and pepper to taste. Lastly, olive oil will help the peppers roast nicely. - Baking dish - Mixing bowl - Measuring cups and spoons - Oven You will also need basic kitchen tools. A baking dish holds the stuffed peppers. A mixing bowl helps combine all your ingredients. Measuring cups and spoons ensure you use the right amounts. Finally, your oven will bake these delicious stuffed peppers to perfection. Now you are ready to gather your ingredients and equipment. Let’s get cooking! For the full recipe, check [Full Recipe]. - Preheat oven to 375°F (190°C). - Prepare the bell peppers by cutting tops off and removing seeds. Start by preheating your oven. This ensures your peppers cook evenly. Next, take your bell peppers and cut the tops off. Remove the seeds and membranes carefully. This step is key for a good stuffing. - Combine chopped spinach, artichoke hearts, cream cheese, sour cream, half of the mozzarella, Parmesan, garlic, onion powder, and seasonings. In a medium bowl, mix your chopped spinach and artichoke hearts. Add the cream cheese for a rich base. Then, include sour cream to add creaminess. Next, stir in half of the mozzarella and the Parmesan cheese. Don’t forget the minced garlic and onion powder for flavor. Season with salt and pepper to taste. Mix until combined. The filling should be creamy and smooth. - Stuff each pepper with the filling, sprinkle remaining mozzarella, cover with foil, and bake. - Finish baking uncovered for a golden cheese topping. Now it's time to stuff your peppers! Spoon the filling into each pepper, packing it in gently. Make sure they are filled to the top. Next, sprinkle the remaining mozzarella cheese on top. This will give a nice golden finish. Cover your baking dish with foil. Bake for 25 minutes. After that, remove the foil and let them bake for another 10-15 minutes. This will create a bubbly, golden cheese topping that looks amazing. For more details on this delightful recipe, check out the Full Recipe. To create the best stuffed peppers, start with the flavor. Make sure you spread the seasoning evenly. This step helps achieve a balanced taste in each bite. When you pack the filling, do it lightly. This allows the cheese to melt perfectly, creating that delicious creamy texture. For a lovely finish, garnish your peppers with fresh herbs. Basil or parsley adds a pop of color and freshness. You can also drizzle a balsamic reduction for an elegant touch. Serving these peppers warm ensures you get the best flavor and texture. Get creative with your filling by trying different cheese types. Cheddar or pepper jack can add a fun twist. You can also spice things up with your favorite seasonings. If you want more variety, add extra veggies like diced tomatoes or cooked proteins like chicken. The options are endless! For the complete recipe, check out the [Full Recipe]. {{image_2}} Spinach artichoke dip stuffed peppers offer a great base for creativity. You can easily adapt the recipe to fit your taste or dietary needs. You can make these stuffed peppers vegetarian by swapping out the meat. Try using mushrooms, zucchini, or even quinoa as a filling. These vegetables will still keep the dish tasty and satisfying. You can also add more cheese for a richer flavor. Using a mix of veggies adds color and nutrients to your meal. If you want more protein, add cooked chicken or sausage to the filling. Diced rotisserie chicken works great for a quick option. You can also use ground turkey or Italian sausage for bold flavors. This change makes the dish heartier and perfect for a filling dinner or lunch. For a low-carb version, consider using zucchini boats or cauliflower instead of bell peppers. Cut zucchini in half and scoop out the seeds. This creates a perfect vessel for your filling. Cauliflower can be riced and mixed with the spinach and artichoke for a unique twist. Both options keep the flavors vibrant while reducing carbs. For the full recipe, check out the complete guide on Spinach Artichoke Dip Stuffed Peppers. To keep your stuffed peppers fresh, cover them tightly with plastic wrap or foil. Store them in the fridge. This method will help retain their taste and texture. It’s best to consume them within three days for optimal flavor. When you're ready to enjoy your leftovers, reheating them is simple. For the best texture, reheat in the oven at 350°F (175°C) for about 15 minutes. If you're short on time, use a microwave for quick warm-ups. Just be careful not to overheat them, as they can become soggy. If you want to save some for later, freezing is a great option. Place your stuffed peppers in an airtight container. They can last up to three months in the freezer. When you're ready to eat them, thaw them in the fridge overnight before reheating. This helps maintain their delicious taste and texture. Total cooking time is approximately 50 minutes. This includes prep time and baking time. Yes, prepare and stuff peppers, then refrigerate until ready to bake. This makes it easy for meal prep! Greek yogurt, ricotta, or other cream cheeses can be good alternatives. Each gives a unique taste and texture. Yes, this recipe is naturally gluten-free. You can enjoy these without worry. Absolutely! Adding ingredients like nuts or different vegetables can enhance flavor. It’s fun to get creative with your stuffing! Stuffed peppers are a tasty blend of flavors and textures. You learned how to prepare, stuff, and bake them using simple ingredients. The tips and variations provided offer endless options for your meals. Feel free to get creative with fillings. Whether you go for a vegetarian version or add protein, these peppers are sure to please. Remember, leftovers can be stored and reheated with ease, making them a great choice for meal prep. Enjoy your cooking adventure!
Spinach Artichoke Dip Stuffed Peppers Delightful Twist
Are you ready to elevate your appetizer game? These Spinach Artichoke Dip Stuffed Peppers are a fun twist on a classic favorite. Imagine vibrant bell
To make these tasty baked broccoli cheese balls, you need: - 2 cups fresh broccoli florets, finely chopped - 1 cup cheddar cheese, shredded - 1/2 cup breadcrumbs (preferably whole wheat) - 1/4 cup grated Parmesan cheese - 2 large eggs, beaten - 2 cloves garlic, minced - 1 teaspoon onion powder - 1/2 teaspoon paprika - Salt and pepper to taste - Olive oil spray These ingredients create a great mix of flavors and textures. You will love the cheesy goodness paired with the healthy broccoli. You can add more flavor with optional seasonings like: - 1/2 teaspoon of garlic powder - 1 teaspoon of Italian seasoning - A pinch of red pepper flakes for heat These seasonings give the cheese balls a unique twist. Feel free to get creative and use your favorites! If you need substitutions, here are some ideas: - Use frozen broccoli, thawed and drained, instead of fresh. - Swap cheddar cheese with mozzarella or Gouda for a different taste. - Try almond flour instead of breadcrumbs for a gluten-free option. These ideas help you customize the recipe to fit your needs. Remember, cooking should always be fun and flexible, so feel free to experiment! Start by preheating your oven to 400°F (200°C). This helps the cheese balls cook evenly. Next, line a baking sheet with parchment paper. This makes cleanup easy and keeps the balls from sticking. In a large mixing bowl, combine the following: - 2 cups fresh broccoli florets, finely chopped - 1 cup cheddar cheese, shredded - 1/2 cup breadcrumbs (preferably whole wheat) - 1/4 cup grated Parmesan cheese - 2 large eggs, beaten - 2 cloves garlic, minced - 1 teaspoon onion powder - 1/2 teaspoon paprika - Salt and pepper to taste Mix everything until well combined. It should look colorful and smell great. Now, using your hands, form the mixture into small balls that are about 1-2 inches wide. Place them on the baking sheet, leaving space between each ball. This helps them cook well. Before baking, lightly spray the balls with olive oil. This step is key for getting a crisp outer layer. Bake them in the preheated oven for 20-25 minutes. Halfway through, turn the balls for even cooking. They should become golden brown and crispy. Keep an eye on them towards the end. Ovens can vary, so adjust the time as needed. Once they are done baking, remove the cheese balls from the oven. Let them cool slightly before serving. For a nice presentation, arrange the baked cheese balls on a platter. Pair them with marinara sauce or ranch dressing for dipping. A sprinkle of fresh parsley adds a great touch of color. For the complete recipe details, refer to the Full Recipe. To make your baked broccoli cheese balls crisp, use a few simple tricks. First, ensure you chop the broccoli finely. This helps it mix well with the other ingredients. Next, don’t skip the olive oil spray. It adds moisture and helps with browning. Bake them at the right temperature, 400°F (200°C). This high heat gives you that perfect crunch. Turn the balls halfway through baking to ensure even crispiness. You can easily change the flavor of your cheese balls. If you like spice, add some red pepper flakes. For a savory kick, try adding garlic powder or fresh herbs like parsley or basil. You can also mix different cheeses. Mozzarella, gouda, or even feta can change the taste. Just keep the ratio similar to the recipe for best results. Avoid these common mistakes to make perfect cheese balls. First, don’t overmix the ingredients. This can make the balls tough. Second, check your oven temperature; an inaccurate oven can lead to undercooked or burnt balls. Lastly, don’t skip cooling time after baking. Letting them sit for a few minutes helps them firm up and makes them easier to handle. Following these tips will help you enjoy every bite of your baked broccoli cheese balls. For the full recipe, check the details above. {{image_2}} You can switch up the cheese in your broccoli balls. Try mozzarella for a gooey texture. Feta adds a sharp flavor, while gouda offers a smoky taste. Each cheese brings its own fun twist. Mix and match to find your favorite combo! Why stop at broccoli? Feel free to add other veggies. Carrots, bell peppers, or spinach can enhance the flavor and nutrition. Just chop them small and mix them in. This way, you can sneak in more healthy goodness! Want a vegan version? No problem! Swap the eggs for flaxseed meal or applesauce. Use plant-based cheese for that cheesy feel. Whole wheat breadcrumbs can still hold everything together. These changes keep your snack tasty and plant-based. Check out the Full Recipe for more details! You can keep baked broccoli cheese balls at room temperature for about two hours. If you plan to eat them soon, just place them on a plate. Cover them with a clean kitchen towel to keep them warm. Avoid letting them sit out longer. Bacteria can grow if food is left out too long. For longer storage, place the cheese balls in an airtight container. Keep them in the fridge for up to three days. This method helps maintain their taste and texture. When you're ready to eat, just reheat them. Microwaving is quick, but an oven will keep them crispier. You can also freeze baked broccoli cheese balls. Place them in a single layer on a baking sheet and freeze until solid. Then, transfer them to a freezer bag. They can stay frozen for up to three months. To reheat, bake them at 350°F (175°C) for about 15-20 minutes. This will make them warm and crispy again. For the best results, do not thaw before reheating. Check out the Full Recipe for more details! You can serve these cheese balls with many tasty dips. Marinara sauce pairs well. Ranch dressing adds a creamy touch. For a fresh twist, try a yogurt dip. You can also add a side salad for a fun meal. Kids love them with ketchup, too! Yes, you can prepare these cheese balls in advance. Form the balls and place them on a baking sheet. Cover them and store in the fridge for up to a day. You can also freeze them for longer. Just bake them straight from the freezer. Adjust the baking time as needed. You will know the cheese balls are done when they turn golden brown. They should feel firm to the touch. A little crisp on the outside means they are ready. If you want, use a food thermometer. The internal temp should be at least 165°F (74°C) to ensure they are cooked through. Enjoy your delicious Baked Broccoli Cheese Balls! This article covers all you need to make tasty baked broccoli cheese balls. We discussed key ingredients, optional seasonings, and smart substitutions. The step-by-step instructions guide you from prep to baking. I shared tips for crispiness and adjusting flavors while avoiding common mistakes. You also learned about fun variations and essential storage tips. With these insights, you can create a delicious dish that impresses. Enjoy cooking these cheese balls, and don’t hesitate to experiment!
Baked Broccoli Cheese Balls Tasty and Crisp Snack
Are you looking for a fun way to sneak veggies into your snack time? I’ve got just the thing! Baked Broccoli Cheese Balls are crispy,
To make Chicken Wonton Tacos, you need some simple and fresh ingredients. Here’s the list: - Ground Chicken - Soy Sauce - Sesame Oil - Ginger - Garlic - Green Cabbage - Shredded Carrots - Green Onions - Fresh Cilantro - Wonton Wrappers - Cooking Oil - Lime Wedges - Sriracha or Hot Sauce These ingredients create a mix of flavors and textures. The ground chicken gives a savory base. Soy sauce adds depth and umami. Sesame oil brings a nutty taste, while ginger and garlic add warmth and spice. The green cabbage and carrots provide crunch. Green onions and cilantro add freshness. For the wonton wrappers, they become crispy shells when fried. You can find them in most grocery stores. Cooking oil is key for frying, giving that golden color and satisfying crunch. Lime wedges add brightness, and Sriracha gives a spicy kick. Using fresh ingredients makes a big difference. They boost flavor and create a dish everyone loves. You can find the full recipe to guide you through the cooking process. Enjoy each bite of these tasty tacos! - Heat Oil and Brown Chicken First, grab a large skillet. Pour in one tablespoon of sesame oil and heat it on medium. Once hot, add one pound of ground chicken. Cook this chicken until it turns brown, about 5 to 7 minutes. Stir it often and break it up as it cooks. - Add Soy Sauce, Ginger, and Garlic After browning the chicken, stir in one tablespoon of soy sauce, one teaspoon of grated ginger, and two cloves of minced garlic. Cook everything for another 2 minutes. This step fills your kitchen with a great smell! - Mix Chicken Filling with Vegetables In a large bowl, combine the cooked chicken with one cup of shredded green cabbage, half a cup of shredded carrots, a quarter cup of chopped green onions, and one tablespoon of chopped fresh cilantro. Mix well to make sure all flavors blend together. - Assembling the Wontons Take a wonton wrapper and spoon about a tablespoon of the chicken filling into the center. Moisten the edges with water. Fold the wrapper diagonally to form a triangle. Press the edges together to seal. Keep doing this until you fill all 24 wonton wrappers. - Heating Oil for Frying In a deep pan, heat enough cooking oil to cover the bottom, about 1/4 inch deep. Set your heat to medium-high. To test if the oil is hot, drop in a small piece of wonton wrapper. If it sizzles, the oil is ready. - Frying Instructions Carefully fry the wontons in batches. Cook each side for about 2 to 3 minutes until they are golden brown and crisp. Once done, remove them and place them on a paper towel-lined plate to drain excess oil. For a complete guide, check the Full Recipe for Chicken Wonton Tacos. Tips for Wrapping Wontons Wrapping wontons can be fun! Start with a wonton wrapper on a flat surface. Place about one tablespoon of the chicken filling in the center. Moisten the edges with a bit of water. Fold the wrapper diagonally to make a triangle. Press the edges firmly to seal. Be sure there are no air bubbles inside. This step helps keep the filling intact during frying. Best Oil for Frying Choosing the right oil is key for crispiness. I recommend using vegetable oil or canola oil. Both oils have high smoke points. This means they can handle the heat well. Heat your oil to about 350°F for the best results. You can test if it's ready by dropping in a small piece of wonton wrapper. If it sizzles, you’re good to go! Flavor Variations with Sauces Sauces can transform your wonton tacos. You might enjoy dipping them in soy sauce or sweet chili sauce. Try a spicy mayo or a garlic aioli for a twist. Each sauce adds a new layer of flavor. Don’t hesitate to mix and match sauces to find your favorite! Additional Spices to Consider Adding spices can kick up the taste. Try a pinch of five-spice powder for warmth. You can also use chili flakes for some heat. If you like fresh herbs, toss in some basil or mint. These small changes make a big difference in flavor. Explore different spices to create your own unique taste! For the full recipe, check out the Chicken Wonton Tacos recipe. {{image_2}} You can change the protein in chicken wonton tacos. Ground turkey works well as a substitute. It has a similar taste and texture. You can also use tofu for a plant-based option. Just crumble the tofu and cook it like chicken. Shrimp is another great option. It adds a seafood twist. Cook the shrimp until pink and slightly firm. Chop them into small pieces, then mix with your veggies. This brings a fresh flavor to your tacos. If you want vegetarian tacos, try using mushrooms or black beans. Both add great flavor and texture. Sauté the mushrooms until soft, or mash the black beans lightly. You can mix either with your veggies for a tasty filling. For vegan wonton wrappers, look for brands that use no egg. Many stores offer these options now. They are easy to find and work just as well. This way, you can enjoy delicious tacos without any animal products. For the Full Recipe, follow the steps and enjoy your flavorful and crispy creation! Refrigeration Tips I recommend storing leftover chicken wonton tacos in an airtight container. This keeps them fresh for up to three days. Make sure they cool down before you seal the container. This step helps prevent moisture build-up, which can make them soggy. Freezing Instructions If you want to save them longer, you can freeze the wontons. Place them in a single layer on a baking sheet. Freeze them for about an hour, then transfer them to a freezer-safe bag. This method keeps them from sticking together. You can enjoy them for up to three months. Best Methods to Reheat Wontons To reheat your chicken wonton tacos, I suggest using an oven or an air fryer. Preheat your oven to 375°F. Place the tacos on a baking sheet and heat for about 10 minutes. If using an air fryer, set it to 350°F and cook for 5-7 minutes. Both methods help maintain their crispy texture. Maintaining Crispiness To keep the wontons crispy, avoid using a microwave. Microwaving can make them soggy. Instead, always choose a method that uses dry heat, like an oven or air fryer. This way, you can enjoy the delightful crunch again. To make your wonton tacos crispy, oil temperature is key. Heat the oil to about 350°F. You can test it by dropping in a small piece of wonton wrapper; it should sizzle right away. This ensures the wrappers fry quickly, creating a nice crunch. To avoid sogginess, don’t overcrowd the pan. Fry them in small batches. This allows hot oil to circulate around each taco, making them crispy. After frying, place the tacos on a paper towel-lined plate. This helps absorb any extra oil. Yes, you can bake wonton tacos for a healthier option. Preheat your oven to 400°F. Lightly brush the wonton wrappers with oil on both sides. Place them on a baking sheet in a single layer. Bake for about 10-15 minutes, flipping halfway through. Baking gives a different texture. Fried wontons are crispy and golden, while baked ones are a bit chewier. However, they still taste great with the same filling. Wonton tacos taste amazing with various dipping sauces. Some great options include soy sauce, sweet chili sauce, or even a spicy mayo. You can add lime juice for a fresh kick. If you want to make your own dipping sauce, mix equal parts soy sauce and honey. Add a splash of rice vinegar and a pinch of chili flakes for heat. This simple sauce will elevate your tacos and impress your guests. For the full recipe, check out the Chicken Wonton Tacos recipe above. In this article, we explored how to create delicious wonton tacos. We covered the essential ingredients, cooking steps, and creative variations. Remember to choose your proteins wisely and enhance flavors with sauces. Store any leftovers properly to keep them fresh. With these tips, you can enjoy crunchy, tasty snacks anytime. Try new fillings and flavors to make these tacos your own. Now, it’s time to get cooking and impress your friends and family!
Chicken Wonton Tacos Flavorful and Crispy Delight
Are you ready to transform your taco night? These Chicken Wonton Tacos are a tasty twist that combines crispy wontons with a savory chicken filling.
- 1 large round sourdough bread loaf - 1 cup fresh spinach, chopped - 1 cup canned artichoke hearts, drained and chopped - 1 cup cream cheese, softened - 1/2 cup sour cream - 1 cup shredded mozzarella cheese - 1/2 cup grated Parmesan cheese - 2 cloves garlic, minced - 1 teaspoon onion powder - 1/2 teaspoon crushed red pepper flakes (adjust to taste) - Salt and pepper to taste - 2 tablespoons olive oil - Fresh parsley, chopped (for garnish) The sourdough bread forms a crusty and flavorful base. It pairs well with the rich filling. Fresh spinach offers vitamins A and K, boosting your health. Artichoke hearts add fiber and antioxidants. Cream cheese and sour cream create a creamy texture that holds everything together. Mozzarella and Parmesan lend a cheesy, melty goodness. Garlic adds bold flavor while onion powder enhances it without overpowering. For sourdough, I recommend La Brea Bakery or your local artisan bakery. For cream cheese, brands like Philadelphia work great. If you prefer a lighter option, try Greek yogurt instead of sour cream. For cheese, use fresh mozzarella for a creamier taste or grab a pre-shredded blend for ease. If you can't find canned artichokes, frozen artichokes work too; just thaw and chop them. Always season with fresh salt and pepper for the best taste. Start by preheating your oven to 350°F (175°C). Take your large round sourdough bread loaf and place it on a cutting board. Cut off the top, creating a lid. Hollow out the inside, leaving a sturdy shell about one inch thick. Tear the removed bread into small chunks. Set these aside for later use. In a large mixing bowl, combine your softened cream cheese, sour cream, and olive oil. Use a hand mixer or a whisk to blend until the mixture is smooth. Next, fold in the chopped spinach, artichoke hearts, shredded mozzarella, grated Parmesan, minced garlic, onion powder, crushed red pepper flakes, and season with salt and pepper. Mix everything until well combined. Now, stuff this creamy mixture into your hollowed bread. Press down gently to ensure it’s packed well. Place the stuffed bread on a baking sheet. Scatter the reserved bread chunks around it. Brush these pieces with a little olive oil and sprinkle with salt. Cover the stuffed bread with aluminum foil. Bake for 25 minutes, then remove the foil. Continue baking for another 10 to 15 minutes, until the cheese is bubbly and the top is golden brown. Once done, let it cool for a few minutes. Garnish with fresh parsley before serving. For the full recipe, refer to the Spinach and Artichoke Stuffed Bread section above. To create a creamy filling for your Spinach and Artichoke Stuffed Bread, start with softened cream cheese. This makes mixing easy. Blend it with sour cream and olive oil until smooth. If you want extra creaminess, add more sour cream or cream cheese. Mix in the spinach and artichokes gently to keep the texture. Avoid over-mixing, as this can make your filling too dense. Baking times can change based on your oven type. For a conventional oven, bake the stuffed bread for about 35 to 40 minutes. If you use a convection oven, reduce the time by 5 to 10 minutes. Cover the bread with foil for the first half of the bake to keep it moist. Remove the foil to let the top brown nicely. Check for bubbly cheese to know when it’s done. Present your stuffed bread on a wooden cutting board for a rustic touch. Place the toasted bread pieces around it for dipping. You can also drizzle a little olive oil or serve marinara sauce on the side. Garnish with fresh parsley to add color and freshness. This simple setup makes your dish look gourmet and inviting. For the full recipe, you can refer to the earlier section. {{image_2}} You can easily make this dish vegetarian or vegan. To make it vegetarian, just skip the meat and use all plant-based ingredients. For vegan options, swap the cream cheese and sour cream for dairy-free versions. Use cashew cream or tofu for a rich texture. This keeps the flavors intact while making it suitable for everyone. Adding herbs or spices can change the taste a lot. Try adding fresh basil, dill, or thyme to the filling. You can also mix in some sun-dried tomatoes for a tangy kick. If you like heat, more crushed red pepper flakes can spice things up even more. Experimenting with flavors makes it fun and unique. Cheese choice plays a big role in taste and texture. If you want a sharper flavor, try using aged cheddar or gouda instead of mozzarella. Cream cheese can be swapped with ricotta for a lighter filling. Mixing different cheeses can create new textures and layers of flavor. Feel free to get creative! For the full recipe, check out the Spinach and Artichoke Stuffed Bread recipe above. Store any leftover spinach and artichoke stuffed bread in an airtight container. This keeps it fresh. You can also wrap it tightly in plastic wrap or foil. Make sure to keep it in the fridge. Leftovers should stay good for up to three days. To reheat your stuffed bread, preheat the oven to 350°F (175°C). Place the bread on a baking sheet. Cover it lightly with foil to prevent burning. Heat for about 15-20 minutes or until warm. This keeps the bread soft and the filling creamy. You can freeze the stuffed bread if you want to keep it longer. Wrap it well in plastic wrap and then in foil. This helps prevent freezer burn. It can last up to three months in the freezer. To enjoy, thaw it in the fridge overnight before reheating. Yes, you can use fresh artichokes. First, clean and cook them until tender. This may take longer than canned artichokes. Once cooked, chop them into small pieces. Fresh artichokes add a vibrant taste. However, they require more prep time. If you love that fresh flavor, it’s worth the effort! You can prepare the filling a day before. Mix the spinach, artichokes, and cheeses. Store it in the fridge. On the day you want to serve, hollow out the bread. Stuff it with the filling, then bake. This saves time and makes for a quick meal. Just remember to let it come to room temperature before baking for best results. This dish pairs well with many sides. Try serving it with a crisp salad. A light vinaigrette complements the rich flavors well. You can also offer marinara sauce or extra olive oil. These add a nice dip option for the bread pieces. Enjoy with friends for a fun gathering! You learned about making Spinach and Artichoke Stuffed Bread in this post. We covered the ingredients, step-by-step instructions, and useful tips. You can also explore variations and storage options. Remember, perfecting this dish takes practice. Don't hesitate to try new flavors or methods. Enjoy sharing this tasty bread with your friends and family. Your efforts will surely impress them!
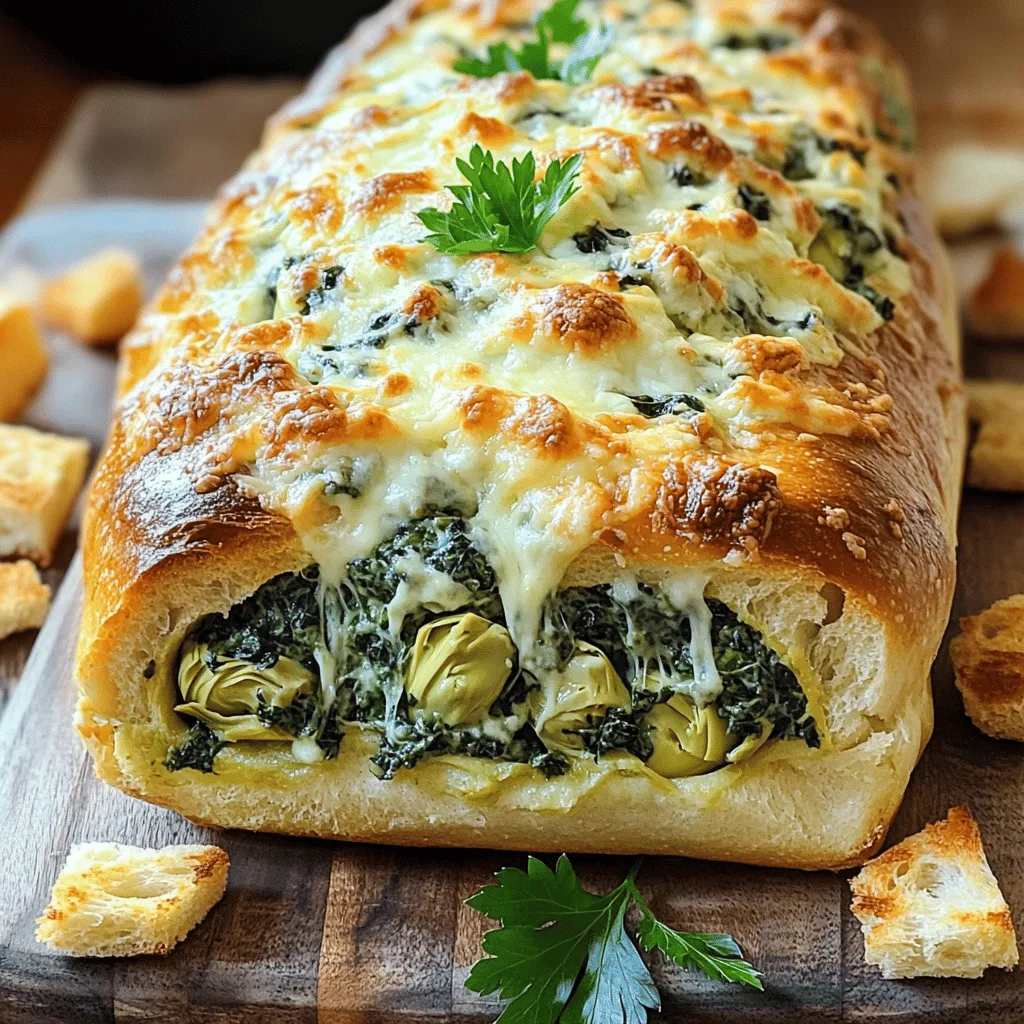
Spinach and Artichoke Stuffed Bread Delightful Recipe
Get ready to impress your friends and family with my Spinach and Artichoke Stuffed Bread recipe. This dish is a perfect blend of creamy, cheesy
To make mouthwatering honey garlic salmon bites, you need simple, fresh ingredients. These work together to create a tasty flavor that everyone loves. Here’s what you will need: - 1 lb fresh salmon fillet, skin removed and cut into bite-sized cubes - 1/4 cup honey - 3 tablespoons soy sauce - 3 cloves garlic, minced - 1 tablespoon fresh ginger, grated - 1 tablespoon sesame oil - 2 green onions, sliced (for garnish) - 1 tablespoon sesame seeds (for garnish) - Salt and pepper to taste These ingredients are easy to find at any grocery store. The salmon is the star of this dish, while the honey adds sweetness. Garlic and ginger bring a warm, rich flavor that levels up the taste. The soy sauce gives it a savory touch, making it hard to resist. The sesame oil adds a nutty finish, while green onions and sesame seeds make for a beautiful garnish. If you want to create your dish, feel free to adjust the ingredients. You can add more garlic for a stronger taste or less honey if you prefer a savory flavor. For the full recipe, just follow the steps, and you’ll have a delightful meal ready in no time! Whisk together honey, soy sauce, minced garlic, grated ginger, sesame oil, salt, and pepper. This mix makes a sweet and savory marinade. Next, add your salmon cubes to the bowl. Make sure each cube is well coated. Cover the bowl and refrigerate for 20 to 30 minutes. This step infuses the salmon with flavor. Preheat your oven to 400°F (200°C) or heat a skillet over medium-high heat. If you choose to bake, line a baking sheet with parchment paper. Arrange the marinated salmon bites in a single layer on the sheet. If pan-frying, place the salmon directly in the hot skillet. Bake for 12 to 15 minutes or pan-fry for 8 to 10 minutes. Turn the salmon halfway through cooking. This helps it cook evenly and become crunchy. Once your salmon is cooked, let it rest for a couple of minutes. This keeps it juicy. Transfer the salmon bites to a serving plate. To make it look great, garnish with sliced green onions and a sprinkle of sesame seeds. This adds both flavor and crunch. You can find the full recipe in the article for easy reference. Enjoy your delicious honey garlic salmon bites! Using fresh ingredients is key. Fresh salmon gives the best taste. Honey adds sweetness, while soy sauce brings saltiness. Adjust these two to find your perfect balance. A little extra honey makes it sweeter. A dash more soy sauce adds salt. Don’t overcrowd the pan when you cook. If you crowd the pan, the salmon won’t sear right. It can steam instead. Leave space between each piece. Always check for doneness. Salmon should be opaque and flake easily. Overcooking can make it dry. Serve your salmon bites on a colorful plate. This makes the dish pop. Garnish with green onions and sesame seeds for a fun touch. A sprinkle of herbs adds color, too. Use your creativity to make it look great. A nice presentation makes every meal feel special. For the full recipe, check the section above. {{image_2}} You can swap salmon for chicken or tofu. Chicken bites taste great with honey garlic sauce. Just cut the chicken into small pieces and follow the same steps. Tofu works well too. Use firm or extra-firm tofu for the best texture. Press it to remove excess water, then cut it into cubes. Marinate like the salmon and enjoy! Want to spice it up? Add red pepper flakes to your marinade for some heat. Start with a pinch, then add more to suit your taste. If you prefer a bright flavor, try adding citrus zest. Lemon or lime zest can brighten the dish. Just mix it in with the other marinade ingredients. These honey garlic bites are super versatile. Serve them with rice for a filling meal. Quinoa is a great option that adds protein too. If you're in the mood for something fresh, pair them with a simple salad. Think mixed greens with a light dressing. Each option makes a perfect match for these tasty bites. For the complete experience, check out the Full Recipe. Store any leftover salmon bites in an airtight container. They will stay fresh for up to 3 days. Make sure to let them cool before sealing. This helps keep the bites tasty and safe. To freeze salmon bites, let them cool completely first. Place them in a single layer on a baking sheet. Freeze until solid, then transfer to a freezer-safe bag. They can stay frozen for up to 2 months. For the best thawing practice, move the bag to the fridge overnight before cooking. This way, they thaw slowly and keep their flavor. To reheat salmon bites, use a skillet over medium heat. Add a little oil to the pan to prevent sticking. Heat the bites for about 3-5 minutes, turning gently. You can also use an oven set to 350°F (175°C). Place the bites on a baking sheet and cover with foil. Bake for 10 minutes to keep them moist. Avoid the microwave, as it can dry them out. Yes, but ensure it’s fully thawed and patted dry before marinating. This step helps the marinade soak into the salmon better. If you skip it, the extra moisture can make the dish watery. Thaw the salmon in the fridge overnight for best results. Use tamari instead of soy sauce. Tamari is a great gluten-free option that gives you the same rich flavor. Always check the label to make sure it’s gluten-free. This way, everyone can enjoy the dish without worry. I love serving these bites with fresh vegetables, grains, or salads. Here are some ideas: - Vegetables: Steamed broccoli or roasted asparagus add great color and nutrients. - Grains: Try serving with fluffy rice or quinoa for a filling meal. - Salads: A crisp green salad or a refreshing cucumber salad can balance the rich flavors. These combinations enhance the taste and make your meal complete. Check out the Full Recipe for more tips! This blog post shared a simple and tasty recipe for honey garlic salmon bites. We covered marinating, cooking, and garnishing for the best flavor. Remember to use fresh ingredients to heighten taste. You can swap salmon for chicken or tofu if you prefer. Don't forget to store leftovers properly for later enjoyment. With easy steps and helpful tips, you can impress anyone with this dish. Enjoy making these bites and share them with friends and family!
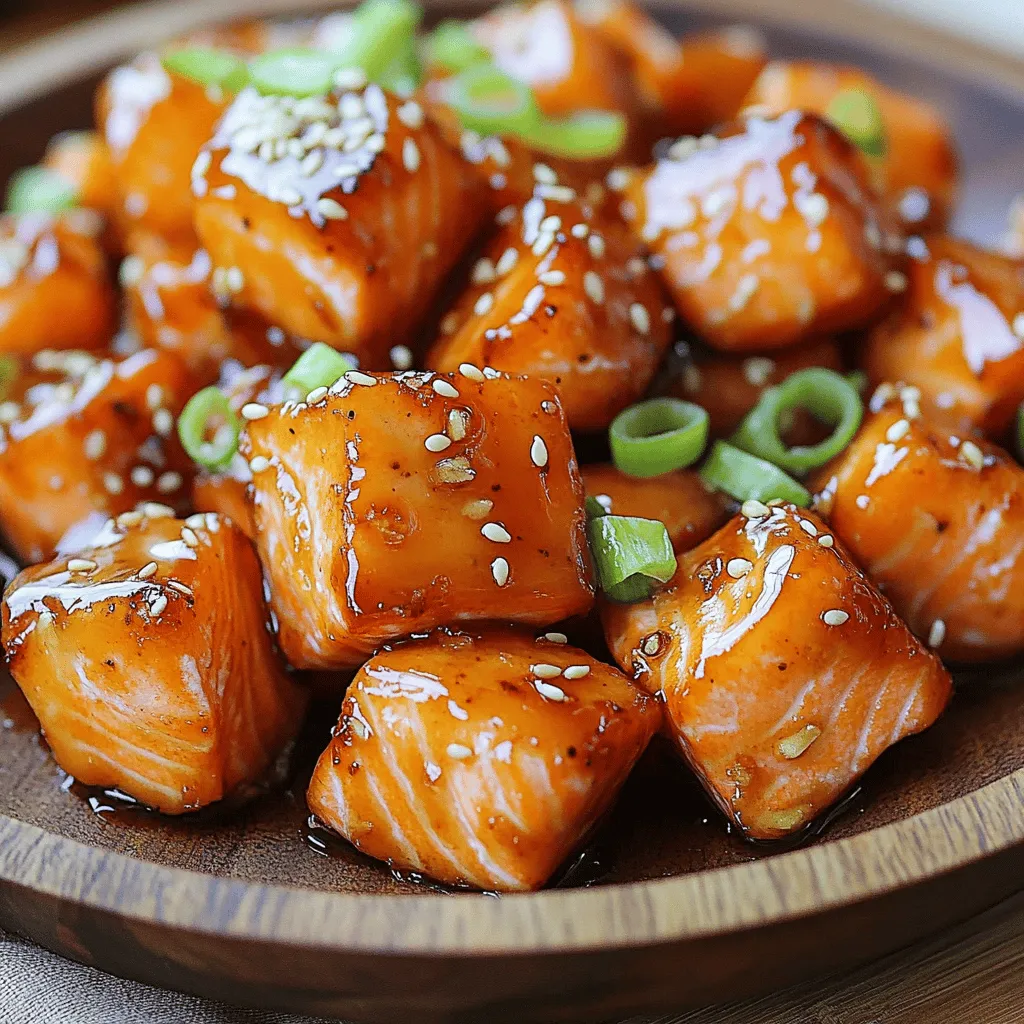
Mouthwatering Honey Garlic Salmon Bites Quick Delight
Looking for a quick and tasty snack? Try my Mouthwatering Honey Garlic Salmon Bites! These savory morsels combine sweet honey and bold garlic for a
- 1 lb fresh salmon fillet, skin removed and cut into bite-sized cubes - 1 cup panko breadcrumbs - 1/2 cup all-purpose flour - 2 large eggs, beaten - 1 teaspoon garlic powder - 1 teaspoon smoked paprika - 1/2 teaspoon salt - 1/4 teaspoon black pepper - Oil for frying (vegetable or canola oil) - 1/2 cup mayonnaise - 2 tablespoons sweet chili sauce - 1 tablespoon Sriracha (adjust to taste) - 1 tablespoon lime juice - 1 teaspoon honey - Salt to taste The ingredients for Crispy Bang Bang Salmon Bites are fresh and simple. Using quality salmon matters a lot. Fresh salmon fillets bring a nice flavor to the dish. I always prefer panko breadcrumbs for that extra crunch. They make the bites crispy and light. When you mix all-purpose flour with seasonings, you create a tasty coating for the salmon. Garlic powder and smoked paprika add depth. Salt and pepper help bring out the flavor. For the Bang Bang sauce, mayonnaise gives it creaminess. The sweet chili sauce adds a touch of sweetness. I like to add Sriracha for heat, but you can adjust it to your taste. Lime juice brightens the flavors, and honey adds a hint of sweetness. With these ingredients, you will create a dish that is both tasty and fun to eat. Check out the Full Recipe for all the steps to make these crispy bites! First, you need to prepare the salmon. Take your salmon fillet and cut it into bite-sized cubes. Then, pat the cubes dry with paper towels. This step is key. Removing moisture helps the salmon get crispy when cooked. After drying, season the bites with salt and pepper. This simple seasoning adds flavor to the fish. Next, set up your breading station. You will need three bowls. In the first bowl, mix the all-purpose flour, garlic powder, smoked paprika, salt, and black pepper. In the second bowl, beat the eggs. In the third bowl, place the panko breadcrumbs. Now, it’s time to coat the salmon. First, dip each salmon cube in the flour mixture. Make sure it’s fully coated, then shake off any extra flour. Next, dip it in the beaten eggs. Finally, coat it in the panko breadcrumbs, pressing gently so they stick well. This process is what gives your salmon bites that crispy texture. Now, let’s cook those salmon bites. In a large pan or deep fryer, heat about half an inch of oil over medium-high heat. To check if the oil is ready, drop in a small piece of bread. If it sizzles right away, the oil is hot enough. Carefully add the breaded salmon bites to the oil in batches. Do not overcrowd the pan. Fry them for about three to four minutes on each side. You want them to turn golden brown and crispy. Once cooked, use a slotted spoon to remove the bites. Place them on a plate lined with paper towels to drain any extra oil. For the full recipe, follow the detailed steps above. These methods will help you create a delicious treat! To make your Crispy Bang Bang Salmon Bites shine, remove excess moisture before frying. This helps them get that wonderful crunch. I always pat the salmon pieces dry with paper towels. This small step makes a big difference. Next, pay attention to the frying temperature. Heat the oil to medium-high. Drop in a small piece of bread. If it sizzles right away, your oil is ready. Too low of a temperature can make the bites greasy instead of crispy. For a beautiful presentation, garnish your salmon bites with fresh lime wedges. A sprinkle of chopped green onions also adds color and flavor. Place the bites on a nice platter to impress your guests. When it comes to sides, consider serving them with a crunchy slaw. A simple salad with cucumbers and radishes works well too. You can also serve these bites with rice or a light dip. The Bang Bang sauce pairs perfectly, giving each bite a tasty kick. For the complete recipe, check out the Full Recipe. {{image_2}} You can easily swap some ingredients in this recipe. If you want a different sauce, use Greek yogurt instead of mayonnaise. It adds creaminess with less fat. For a spicier kick, add more Sriracha or some red pepper flakes. You can also switch the sweet chili sauce with honey mustard. This gives a sweet and tangy flavor that pairs well. If salmon isn’t available, try using other fish like cod or tilapia. Both cook well and taste great when fried. Just ensure the fish is fresh for the best results. You can prepare these salmon bites in different ways. Frying is the classic method, giving you that golden, crispy texture. If you prefer a healthier option, oven-baking is great. Preheat your oven to 400°F (200°C). Place the breaded salmon bites on a baking sheet lined with parchment paper. Lightly spray them with cooking oil. Bake for about 12-15 minutes until they are crispy and cooked through. Another healthy choice is using an air fryer. Set it to 375°F (190°C). Arrange the salmon bites in a single layer. Cook for about 8-10 minutes, flipping halfway. This method yields a similar crunch without much oil. For full details on how to make the crispy bang bang salmon bites, check out the Full Recipe. To keep your Crispy Bang Bang Salmon Bites fresh, store them in an airtight container. Place a paper towel in the container to absorb moisture. This helps maintain crispiness. Refrigerate them within two hours of cooking. They should stay good for about three days. When you want to reheat them, use the oven. Preheat the oven to 375°F (190°C). Place the salmon bites on a baking sheet. Heat them for about 10 to 15 minutes. This method helps keep them crispy. Avoid using the microwave, as it can make them soggy. If you want to freeze your salmon bites, do so before frying. Wrap each piece in plastic wrap or aluminum foil. Place them in a freezer bag and remove as much air as possible. You can freeze them for up to three months for the best quality. To thaw, move the frozen salmon bites to the fridge overnight. This keeps them safe and flavorful. After thawing, you can fry them as per the full recipe. Enjoy the same crispy texture and taste! Crispy Bang Bang Salmon Bites stay fresh in the fridge for about three days. Make sure to store them in an airtight container. This keeps them from drying out. The flavor stays nice if you eat them within this time. Yes, you can use frozen salmon. Just make sure to thaw it first. To thaw, place it in the fridge overnight or use the microwave. After thawing, pat the salmon dry with paper towels. This helps keep the bites crispy when you fry them. These salmon bites pair well with many sides. You can serve them with: - Steamed rice - A fresh salad - Roasted veggies - Sweet potato fries - Coleslaw These options add color and flavor to your meal. To make these bites gluten-free, swap the all-purpose flour and panko breadcrumbs. Use gluten-free flour and gluten-free breadcrumbs instead. They work well and still give you that nice crunch. Always check labels to ensure ingredients are gluten-free. You’ve learned how to make Crispy Bang Bang Salmon Bites from scratch. We discussed the key ingredients like fresh salmon and the zesty bang bang sauce. I shared detailed steps to prepare, bread, and cook these bites, ensuring they turn out perfectly crispy. You also got tips for serving and storage. Remember, even small changes can enhance your dish. Enjoy experimenting with flavors and methods for your best version. Happy cooking!
Crispy Bang Bang Salmon Bites Flavorful and Easy Treat
If you crave a tasty snack that’s both easy and fun to make, you’ll love Crispy Bang Bang Salmon Bites! These bites pack a bold
To make Parmesan Corn on the Cob, you need the following items: - 4 ears of fresh corn, husked - 1/2 cup grated Parmesan cheese - 1/2 cup unsalted butter, melted - 1 tablespoon garlic powder - 1 teaspoon smoked paprika - 1/4 teaspoon cayenne pepper (optional) - Salt and black pepper to taste - Fresh parsley, chopped, for garnish You can add a few items to boost the flavor. Consider using: - Lime juice for a zesty kick - Fresh herbs like basil or cilantro - Chili flakes for extra heat These can make your dish even more special. Always choose fresh corn for the best taste. Look for: - Bright green husks that are tightly wrapped - Plump kernels that feel full when you squeeze - A sweet smell, which means it's fresh Fresh corn makes your Parmesan Corn delightful and tasty. {{ingredient_image_1}} Start with fresh corn. Husk four ears of corn, removing all the silky threads. Rinse them under cool water to remove any dirt. Pat them dry with a clean towel. This step helps the butter stick better. Fresh corn adds sweet flavor and crunch, making this dish shine. In a bowl, combine half a cup of melted unsalted butter with garlic powder, smoked paprika, cayenne pepper, salt, and black pepper. Mix well until all ingredients blend. This mixture adds flavor and richness. Taste it and adjust the spices if needed. You want a balance of flavors that will enhance the corn. Preheat your grill to medium-high heat. Brush each ear of corn generously with the butter mixture. Make sure to coat all sides for the best flavor. Place the corn on the grill grates. Grill for 10 to 15 minutes, turning them often. Look for nice grill marks and tender kernels. Once done, remove the corn and sprinkle grated Parmesan cheese over each ear right away. The heat will help melt the cheese. Garnish with fresh parsley for color and flavor. Enjoy this tasty treat! Grilling corn is simple and fun. First, preheat your grill to medium-high heat. This helps cook the corn evenly. Use fresh ears of corn for the best taste. Husk the corn and remove all the silk. Brush each ear with your butter mixture. Place the corn directly on the grill grates. Turn the corn every few minutes. Grill for about 10-15 minutes. Look for tender corn and nice grill marks. To get the cheese to melt just right, sprinkle the Parmesan right after grilling. The heat from the corn will help it melt. Use grated Parmesan for even coverage and quicker melt. This step adds a creamy taste to your corn. If you like extra flavor, try adding some extra cheese on top after the first sprinkle. Serve your Parmesan corn with a sprinkle of fresh parsley for color. This adds a nice touch to your plate. Pair it with grilled meats or fresh salads. It also goes well with summer picnics or BBQs. For a gourmet touch, add a squeeze of lemon juice. This gives a fresh and zesty flavor. Enjoy your corn as a side or a main dish! Pro Tips Choose Fresh Corn: Select ears of corn that are bright green and tightly wrapped in husks. The fresher the corn, the sweeter and more flavorful your dish will be. Grill with Care: Keep an eye on the corn while grilling. Turn it frequently to ensure even cooking and prevent burning. Experiment with Cheese: While Parmesan is delicious, try mixing in other cheeses like feta or cotija for a different flavor profile. Add a Zing: For a more zesty flavor, squeeze fresh lime juice over the corn right before serving to enhance the dish. {{image_2}} You can switch up the cheese for new flavors. Try using feta for a tangy bite. Goat cheese adds a creamy texture. For a stronger taste, use aged cheddar or blue cheese. Each cheese brings its own twist to the dish. Experiment to find your favorite! If you love heat, add more cayenne pepper. You can also use chili powder for a different kick. For a milder version, skip the cayenne and use just smoked paprika. Adjusting spices gives you control over the flavor. Don’t be shy to taste as you go! For a vegetarian version, replace the butter with olive oil. This keeps it rich while staying plant-based. For a vegan option, use vegan butter and dairy-free cheese. There are many great brands that melt well. These swaps make the dish suitable for all diets! After enjoying Parmesan corn on the cob, you may have some left. To keep it fresh, let the corn cool to room temperature. Wrap each ear tightly in plastic wrap or foil. This helps keep moisture in and prevents the corn from drying out. Store the wrapped corn in the fridge. It will last for about 3-4 days. When you’re ready to enjoy the leftovers, I suggest reheating them on the grill or in the oven. For the grill, heat it to medium. Place the corn on the grill for about 5 minutes, turning often. This method keeps the corn juicy. If using the oven, preheat it to 350°F (175°C). Wrap the corn in foil and heat for 10-15 minutes. The cheese melts nicely this way. If you want to save corn for later, freezing is a good option. First, cook the corn as per the recipe. Let it cool completely. Then, wrap each ear in plastic wrap. Place the wrapped corn in a freezer bag. Squeeze out excess air before sealing. You can store it in the freezer for up to 6 months. When you’re ready to eat, thaw it in the fridge overnight and reheat as mentioned. You know corn is done when it is tender. Look for bright yellow kernels. They should also have nice grill marks. Cooking time is about 10-15 minutes. Turn the corn every few minutes for even cooking. If you poke a kernel with a fork, it should feel soft. This shows it is ready to enjoy. Yes, you can make Parmesan corn in the oven. Start by preheating your oven to 400°F (200°C). Husk the corn and place it on a baking sheet. Brush the corn with the butter mixture as you would for grilling. Cover the corn with foil to keep it moist. Bake for about 20-25 minutes. After baking, add the Parmesan cheese while hot. This method yields a tender and tasty corn. You can use many fun seasonings for corn on the cob. Try chili powder for a kick. Italian seasoning adds a nice touch. A squeeze of lime juice freshens up the flavor. You can also mix in some herbs like basil or cilantro. Experiment with different spices to find your favorite combo. The goal is to keep it tasty and exciting! We covered the key ingredients for grilling corn, from the basic ones to flavor enhancers. I shared handy steps for prepping, buttering, and grilling corn. You learned useful grilling tips and variations for cheese and spice levels. Storing leftovers and reheating properly were also discussed. Finally, I answered common questions about grilling corn. With these insights, you can now make the best grilled corn at home. Happy grilling!
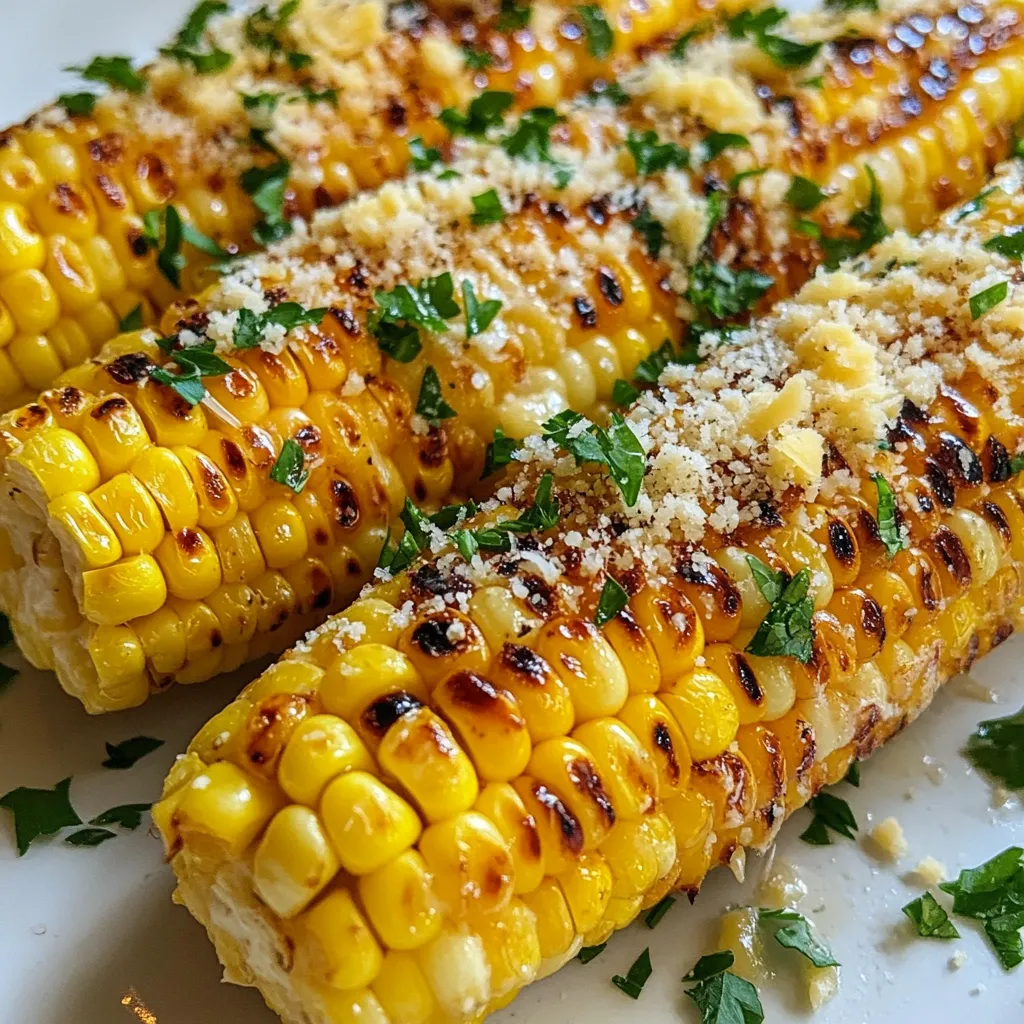
Parmesan Corn on the Cob Simple and Tasty Recipe
If you love sweet, juicy corn on the cob, you’re in for a treat! My Parmesan Corn on the Cob recipe brings simple ingredients together
For Spicy Honey Lime Chicken Wings, you will need: - 2 lbs chicken wings - 1/4 cup honey - 3 tablespoons sriracha sauce - 2 tablespoons lime juice (freshly squeezed) - 2 tablespoons soy sauce (low sodium) - 1 tablespoon garlic powder - 1 teaspoon onion powder - 1 teaspoon smoked paprika - Salt and pepper to taste These main ingredients give the wings their sweet, spicy, and tangy flavor. The honey adds sweetness, while sriracha brings heat. Lime juice adds freshness and a zesty note. The marinade is key to flavor. Here is what you add: - Honey - Sriracha sauce - Lime juice - Soy sauce - Garlic powder - Onion powder - Smoked paprika - Salt and pepper Mix these together for a rich sauce. The marinade should soak into the wings for the best taste. I recommend letting them sit for at least 30 minutes. For a nice touch, consider these garnishes: - Chopped green onions - Lime wedges These add color and extra flavor. The green onions give a fresh crunch, while lime wedges add a nice zing when served on the side. Enjoy the full experience with these simple garnishes! {{ingredient_image_1}} First, you need to preheat your oven to 400°F (200°C). This temperature helps the wings cook evenly. Next, line a baking sheet with aluminum foil. This makes cleanup easy. Place a wire rack on top of the baking sheet. The rack keeps the wings elevated, allowing air to circulate. In a large bowl, mix the marinade ingredients. Start with 1/4 cup of honey. Add 3 tablespoons of sriracha sauce for heat. Then, squeeze in 2 tablespoons of fresh lime juice. Pour in 2 tablespoons of low-sodium soy sauce. Sprinkle in 1 tablespoon of garlic powder, 1 teaspoon of onion powder, and 1 teaspoon of smoked paprika. Finally, add salt and pepper to taste. Mix all the ingredients until well combined. Add 2 pounds of chicken wings to the marinade. Toss the wings well to coat them evenly. For the best flavor, let them marinate in the fridge for at least 30 minutes. You can marinate them for up to 2 hours if you have time. This helps the flavors soak into the chicken. Arrange the marinated wings in a single layer on the wire rack. Bake them in the preheated oven for 25-30 minutes. Halfway through, flip the wings to ensure even cooking. For an extra crispy finish, switch your oven to broil for 2-3 minutes. Watch closely to prevent burning. Once done, remove the wings from the oven. Let them rest for a few minutes before serving. Sprinkle some chopped green onions on top for a fresh touch. Serve the wings with lime wedges on the side. This adds a zesty kick that everyone will enjoy. To get crispy wings, use a wire rack. This allows air to circulate around the wings while they bake. Preheat your oven to 400°F. Bake for 25 to 30 minutes. Flip the wings halfway through for even cooking. For extra crunch, broil the wings for 2 to 3 minutes at the end. Watch closely to avoid burning. The total cooking time is about 30 minutes. Bake the wings for 25 to 30 minutes. For best results, always check their internal temperature. The wings should reach 165°F to ensure they are safe to eat. Using a meat thermometer helps take the guesswork out of cooking. To add more spice, increase the sriracha sauce in the marinade. You can also add cayenne pepper or red pepper flakes. For a sweeter note, try adding more honey. Fresh herbs like cilantro can elevate the dish. A sprinkle of lime zest before serving brings a fresh twist. Pro Tips Marinate Longer for Flavor: For the best flavor, marinate the wings for at least 2 hours or overnight. This allows the spices to penetrate the meat thoroughly, resulting in a more flavorful bite. Use a Wire Rack: Placing the wings on a wire rack allows the heat to circulate around them, ensuring they cook evenly and become crispy on all sides. Adjust the Heat: If you prefer a milder flavor, reduce the amount of sriracha sauce or substitute it with a milder hot sauce to control the spice level to your liking. Watch While Broiling: When broiling, keep a close eye on the wings as they can burn quickly. It's best to stay nearby and check them frequently for the perfect crispy finish. {{image_2}} You can swap chicken wings for other proteins. Try chicken thighs or drumsticks for a different taste. If you want a leaner option, use turkey wings. For a plant-based twist, consider tofu or cauliflower. Both work well with the spicy honey lime marinade. Just remember to adjust cooking times to avoid overcooking. Adjust the heat to fit your taste. If you love heat, add more sriracha sauce. For milder wings, reduce the sriracha to one tablespoon. You can also add other hot sauces for fun flavors. Try adding chili flakes or cayenne pepper to the marinade for extra kick. Always taste the marinade first to find your perfect heat level. To make this dish gluten-free, use tamari instead of soy sauce. Tamari has a similar taste with no gluten. Always check the labels on your ingredients to ensure they are gluten-free. You can also serve the wings with a gluten-free dipping sauce for extra flavor. Enjoy these wings without worry while keeping your diet in mind. After you enjoy your spicy honey lime chicken wings, don’t waste leftovers. Let the wings cool down. Place them in an airtight container. Store the container in your fridge. Wings can last for about 3 to 4 days. If you want to keep them longer, freezing is a great option. When you are ready to eat your wings again, reheating is simple. Preheat your oven to 350°F (175°C). Spread the wings on a baking sheet. Heat them for about 10-15 minutes or until hot. You can also use an air fryer. Set it to 350°F (175°C) and heat for about 5-7 minutes. This keeps them crispy and tasty. If you want to freeze the wings, wrap them well. Use plastic wrap or foil, then place them in a freezer bag. Make sure to remove as much air as you can. Wings can last up to 3 months in the freezer. When you want them, just thaw them overnight in the fridge before reheating. Enjoy the same great flavor later! Yes, you can make these wings ahead of time. Prepare the marinade and coat the wings. Then, place the wings in a sealed bag or container. Store them in the fridge for up to two hours. For the best flavor, marinate overnight. When ready to cook, just bake them as directed. These wings pair well with many sides. Try serving them with: - Celery sticks - Carrot sticks - Blue cheese dip - Ranch dressing - A fresh salad - French fries These sides balance the heat and add freshness to your meal. Adjusting the spice level is easy. To make them milder, reduce the sriracha sauce. You can also add more honey to balance the heat. If you want more spice, add extra sriracha or add some cayenne pepper. Just taste the marinade before adding the wings. Yes, you can definitely grill these wings! Preheat your grill to medium heat. Place the marinated wings directly on the grill. Cook for about 20-25 minutes. Flip them often for even cooking. Keep an eye on them to avoid burning. Grilling gives a nice smoky flavor that complements the sauce. This article covered how to make delicious Spicy Honey Lime Chicken Wings. I shared the main ingredients, the steps for marinating and baking, and tips for the best texture. I also discussed variations, like using different proteins and spice levels. Storing and reheating options were explained too. Now you have a clear path to wing perfection. Enjoy making your dish unique and tasty!
Spicy Honey Lime Chicken Wings Flavorful and Easy Recipe
Are you ready to add some zing to your game day? My Spicy Honey Lime Chicken Wings are the perfect blend of sweet heat. This
To make these tasty pretzel bites, gather the following ingredients: - 1 ½ cups warm water (110°F) - 1 packet (2 ¼ teaspoons) active dry yeast - 1 tablespoon brown sugar - 4 cups all-purpose flour - 1 teaspoon salt - 4 tablespoons unsalted butter, melted - 1 cup baking soda (for the water bath) - 1 egg (for egg wash) - 2 tablespoons coarse sea salt - 1 tablespoon fresh rosemary, chopped - 2 cloves garlic, minced Using fresh ingredients makes a big difference. Fresh rosemary adds a bright, fragrant note. Minced garlic gives a strong, savory flavor. When chopping rosemary, be sure to use a sharp knife. This helps keep the aroma intact. For garlic, mince it finely to spread the flavor evenly. The better your ingredients, the better your pretzel bites will taste. Quality ingredients matter in any recipe. Using good flour helps your dough rise well. Active dry yeast must be fresh for the best results. If your yeast is old, it may not foam properly. This can lead to dense pretzel bites. Always check your ingredients before starting. When you pay attention to quality, you create a more delicious snack! {{ingredient_image_1}} To start, gather your ingredients. Mix 1 ½ cups warm water with 1 packet of yeast and 1 tablespoon of brown sugar in a medium bowl. Let this sit for about 5 minutes. You want it to get foamy. This shows your yeast is active. Next, in a big bowl, mix 4 cups of flour with 1 teaspoon of salt. Pour in your melted 4 tablespoons of butter and the foamy yeast mix. Stir everything until the dough begins to form. Then, knead the dough on a floured surface for 5 to 7 minutes. You need a smooth and elastic dough. After kneading, put your dough in a greased bowl. Cover it with a damp cloth. Let it rise in a warm spot for about 1 hour. It should double in size. Once your dough has risen, it’s time to shape the pretzel bites. Punch the dough down gently to let out air. Divide the dough into 20 equal pieces. Roll each piece into a rope that is about 1 inch thick. Twist each rope into a pretzel shape. Make sure to pinch the ends well to keep the shape. Place the shaped pretzels on a baking sheet lined with parchment paper. Now, prepare for boiling. In a large pot, mix 1 cup of baking soda with 8 cups of water. Bring this to a gentle simmer. Boil each pretzel for about 30 seconds. Use a slotted spoon to remove them and place them back on the baking sheet. In a small bowl, beat 1 egg. Brush this egg wash over each pretzel. Then, sprinkle them with coarse sea salt, chopped rosemary, and minced garlic. Preheat your oven to 450°F. Bake the pretzels for 12 to 15 minutes. You want them golden brown and crispy. Once done, let them cool a bit before serving. To get the best texture, start with warm water. It helps the yeast grow. The dough should feel soft and smooth after kneading. Knead for 5-7 minutes. If the dough feels too sticky, add a tiny bit of flour. Letting the dough rise is key. It should double in size. This step makes the pretzel light and airy. For that perfect golden color, preheat your oven to 450°F. After boiling the pretzel bites, brush them with an egg wash. This adds shine and helps with browning. Make sure to watch them closely as they bake. They should take about 12-15 minutes to turn golden. If they look too pale, give them a few more minutes. Serve these pretzel bites warm for the best taste. A rustic basket lined with parchment paper looks nice. Pair them with garlic herb butter or a tangy mustard dip. You can also serve them with a mix of olive oil and balsamic vinegar. These flavors enhance the garlic and rosemary. Don't forget to share them while they're fresh! Pro Tips Perfectly Warm Water: Ensure your water is at the right temperature (110°F) for optimal yeast activation—too hot can kill the yeast, while too cool may not activate it properly. Kneading Technique: Knead the dough until it’s smooth and elastic to develop gluten, which gives your pretzels their chewy texture. Baking Soda Bath: Don’t skip the baking soda bath; it’s essential for that signature pretzel flavor and chewy crust! Flavor Boost: For added flavor, experiment with toppings like everything bagel seasoning or grated Parmesan cheese along with the rosemary and garlic. {{image_2}} You can take your pretzel bites to the next level by adding cheese. Simply roll your dough into small balls. Before sealing them, insert a cube of your favorite cheese. Cheddar or mozzarella works great. Then, twist and shape them as usual. This cheesy delight melts during baking, creating a gooey center. It adds richness that pairs well with rosemary and garlic. If you crave some heat, try spicy garlic pretzel bites. Add red pepper flakes and extra minced garlic to the dough. You can also mix in some diced jalapeños for an extra kick. After boiling, sprinkle with coarse sea salt. This will give each bite an exciting flavor that makes your taste buds dance. For herb lovers, get creative! Mix in fresh herbs like thyme, parsley, or chives with the rosemary and garlic. You can even use dried herbs if fresh ones are not available. Adjust the amount to your liking. This will give your pretzel bites a fragrant, flavorful twist. The mix of herbs can make each bite feel special and unique. These variations are easy to make and add fun to your snack time. Enjoy experimenting! You might not finish all the pretzel bites. That’s okay! To store leftovers, let them cool first. Place them in an airtight container. They’ll stay fresh in the fridge for up to three days. If they start to feel soft, don’t worry. A quick reheat will bring back their crunch. When it comes to reheating, the oven is your best friend. Preheat it to 350°F (175°C). Place the pretzel bites on a baking sheet. Heat them for about 5-10 minutes. This method keeps them crispy on the outside. If you're in a hurry, you can use the microwave. Just remember to keep it short, around 20 seconds each. They won’t be as crispy, but they’ll still taste good! If you want to save some for later, freezing is a great option. Let the pretzel bites cool completely after baking. Then, lay them out in a single layer on a baking sheet. Freeze them for about an hour. Once they are firm, transfer them to a freezer bag. They can last up to three months in the freezer. Just remember to thaw them in the fridge before reheating. Enjoy your pretzel bites anytime! Yes, you can use active dry yeast. Just make sure to activate it first. Mix it with warm water and sugar. Let it sit for about five minutes. You will see bubbles forming, which means it is ready. This step helps the yeast wake up and works well in the recipe. To boost flavor, add herbs and spices. Mixing in garlic powder or onion powder can add depth. You can also try different cheeses. A sprinkle of smoked paprika can give a nice twist. Using fresh herbs, like thyme or oregano, can also enhance the taste. Pretzel bites taste great with many dips. Classic mustard is a favorite. You can also use cheese sauce for a rich option. Garlic herb butter is a delicious choice too. For a spicy kick, try sriracha or hot honey. Each dip adds a fun twist to your snack! You now know how to create delicious rosemary garlic pretzel bites. We covered the key ingredients and the step-by-step process to make them. I shared helpful tips for texture and finish, as well as tasty variations to explore. You also learned how to store and reheat leftovers for the best taste. Pretzel bites are fun and tasty snacks that everyone loves. Enjoy making them!
Rosemary Garlic Pretzel Bites Savory and Simple Snack
If you’re craving a tasty snack that’s easy to make, you’re in the right place. These Rosemary Garlic Pretzel Bites blend bold flavors with simple
To make Cheesy Veggie Stromboli, you need a few simple ingredients. Here’s what you’ll need: - Pizza dough (store-bought or homemade) - 1 cup shredded mozzarella cheese - 1/2 cup ricotta cheese - 1 cup spinach, chopped - 1/2 bell pepper, diced (any color) - 1/2 zucchini, shredded - 1/4 cup red onion, finely chopped - 1/2 teaspoon garlic powder - 1/2 teaspoon oregano - 1/2 teaspoon crushed red pepper flakes (optional) - 1 egg, beaten (for egg wash) - Olive oil for brushing - Salt and pepper to taste Each ingredient plays a key role. The pizza dough serves as the tasty shell. Mozzarella and ricotta add a creamy and melty touch. Spinach, bell pepper, zucchini, and red onion provide a fresh and colorful mix. The seasonings enhance flavor, while the egg wash gives a nice golden finish. Don’t forget to season with salt and pepper! These ingredients come together to create a dish that's not only easy to make but also packed with flavor. You can adjust the veggies to your taste. Want more crunch? Use extra bell pepper or add some mushrooms. The choice is yours! {{ingredient_image_1}} - Preheat your oven to 400°F (200°C). Line a baking sheet with parchment paper. - In a large bowl, mix spinach, bell pepper, zucchini, onion, mozzarella, ricotta, garlic powder, oregano, and red pepper flakes. Add salt and pepper to taste. Stir until well combined. - Roll out the pizza dough on a floured surface. Shape it into a rectangle about 14x10 inches. - Spread the veggie and cheese mix evenly over the rolled-out dough. Leave a small border around the edges. - Starting from one long side, roll the dough inward to form a log. Seal the edges as you roll and pinch seams to keep the filling inside. - Place the stromboli seam-side down on the prepared baking sheet. Brush the top with the beaten egg and drizzle with olive oil. - Cut a few slits on top of the stromboli for steam to escape. - Bake in the oven for 20-25 minutes. The dough should turn golden brown and be fully cooked. - After baking, let it sit for 5 minutes before slicing. Enjoy this tasty treat warm, paired with a dipping sauce for extra flavor! - Ensuring proper dough thickness Roll the pizza dough to about ¼ inch thick. This thickness keeps the stromboli soft but firm. If it’s too thick, it may not cook all the way. - Alternatives for cheese and vegetables Feel free to swap cheeses! Try cheddar or feta for a different taste. You can also use any veggies you love. Think mushrooms or broccoli for a tasty twist. - Slicing and garnishing suggestions Slice the stromboli into 1-inch pieces. This size is easy to handle and great for sharing. Garnish with fresh basil or parsley for a pop of color. - Dipping sauce recommendations Serve with warm marinara sauce or garlic butter on the side. These sauces add extra flavor and make each bite even better! Pro Tips Use Fresh Ingredients: For the best flavor, use fresh vegetables instead of frozen. Fresh spinach, zucchini, and bell peppers will enhance the overall taste of your stromboli. Experiment with Cheese: While mozzarella and ricotta are classic choices, feel free to mix in other cheeses like feta or provolone for a unique flavor profile. Don’t Overfill: Be mindful not to overload your stromboli with filling. Too much can cause it to burst during baking. A nice even layer is key! Let it Rest: After baking, allow the stromboli to rest for a few minutes before slicing. This helps the cheese set slightly, making it easier to cut and serve. {{image_2}} You can easily make this stromboli fit your needs. If you want a gluten-free meal, try gluten-free pizza dough. Many stores sell great options. For veggies, feel free to mix and match. You can use mushrooms, broccoli, or carrots. Just chop them up small so they cook well. Want to boost the protein? You can add tofu or tempeh. Just cube them and mix them in with your veggies. This adds a nice texture and flavor. You can also change the spices. Try adding basil or thyme for a fresh taste. For more heat, add more crushed red pepper flakes. Experiment until you find your favorite blend! After you enjoy your cheesy veggie stromboli, save any leftovers for later. Use an airtight container to keep the stromboli fresh. If you do not have one, a plastic wrap also works well. Store it in the fridge for up to three days. Make sure it cools down before putting it in the fridge. This way, it won’t create steam and make the dough soggy. To reheat the stromboli, the oven works best. Preheat your oven to 350°F (175°C). Place the stromboli on a baking sheet. Heat it for about 10-15 minutes or until warm. This keeps the crust crispy. You can also use a microwave, but it may make the dough soft. If you choose the microwave, heat it for 30 seconds at a time. Check if it's warm enough after each interval. Enjoy your tasty meal again! Can I make the stromboli ahead of time? Yes, you can prepare the stromboli ahead of time. Just follow the steps until you roll it up. Wrap it tightly in plastic wrap. Store it in the fridge for up to 24 hours. When you’re ready, bake it as directed. How do I know when it's fully cooked? You can tell if the stromboli is done when it is golden brown. Look for a crisp crust. You can also check the internal temperature. It should reach 190°F (88°C) if you have a food thermometer. Can I freeze the stromboli? Yes, freezing the stromboli is easy. After you roll it up, wrap it tightly in foil. Place it in a freezer-safe bag. It will last for about three months. To bake, just thaw it overnight in the fridge and follow the baking steps. What to serve with cheesy veggie stromboli? I love serving stromboli with marinara sauce. It adds great flavor. A fresh salad or garlic bread also pairs well. You can even enjoy it with homemade dipping sauces for extra taste. You’ve learned how to make a tasty, cheesy veggie stromboli. From choosing the right ingredients to baking it just right, each step plays a key role. Remember to mix your veggies and cheese, and roll the dough evenly. Don't skip the egg wash for a beautiful crust. For storage, use airtight containers and reheat carefully. With these tips and tricks, you will impress your family and friends. Enjoy this easy dish and feel free to customize it to your taste!
Cheesy Veggie Stromboli Flavorful and Simple Meal
Are you craving a meal that’s both delicious and easy to make? I hear you! This Cheesy Veggie Stromboli is the perfect choice. Imagine warm