Appetizers

To make Lemon Garlic Shrimp Skewers, you will need: - 1 lb large shrimp, peeled and deveined - 3 tablespoons olive oil - 3 tablespoons fresh lemon juice - 4 cloves garlic, minced - 1 teaspoon smoked paprika - 1 teaspoon dried oregano - Salt and pepper to taste These ingredients bring out the bright flavor of lemon and the warmth of garlic. Each shrimp gets a lovely coat of marinade, making every bite juicy and zesty. For garnishing, you will want: - Fresh parsley, chopped - Lemon wedges, for serving Chopped parsley adds a fresh touch. Lemon wedges give you a chance to add more zing right before eating. To cook these skewers, you will need: - Skewers (wooden or metal) - Grill or grill pan If you use wooden skewers, soak them in water before grilling. This step helps prevent burning. A good grill or grill pan gives you those perfect grill marks and keeps the shrimp juicy. {{ingredient_image_1}} To start, gather your mixing bowl. In it, combine three tablespoons of olive oil and three tablespoons of fresh lemon juice. Add in four minced garlic cloves, one teaspoon of smoked paprika, and one teaspoon of dried oregano. Season with salt and pepper to taste. Whisk these together until they blend well. This marinade gives the shrimp a bright flavor that shines through. Next, add your one pound of peeled and deveined shrimp to the marinade. Toss the shrimp gently until each piece is coated in the mix. Cover the bowl with plastic wrap or a lid. Place it in the fridge for at least thirty minutes. This step lets the flavors soak into the shrimp, making them more tasty. If you're using wooden skewers, soak them in water for ten to fifteen minutes. This helps prevent burning on the grill. While the skewers soak, preheat your grill or grill pan to medium-high heat. Lightly oil the grates if you're using a grill. Now, thread four to five marinated shrimp onto each skewer. Place the skewers on the grill. Cook them for two to three minutes on each side. Keep an eye on the shrimp; they should turn pink and opaque when done. Avoid overcooking, as shrimp can become tough. Once cooked, let the skewers rest for a minute. Garnish with fresh chopped parsley and serve with lemon wedges for extra zest. Enjoy your delicious lemon garlic shrimp skewers! When picking shrimp, size matters. Look for large shrimp, about 16-20 per pound. Fresh shrimp should smell like the ocean, not fishy. Check for a firm texture and a shiny look. If you can, buy shrimp that is wild-caught. It often tastes better and is more sustainable. To grill shrimp well, preheat your grill or pan on medium-high heat. This step ensures that you get a good sear. Lightly oil the grill grates or the skewers to stop sticking. Place the shrimp on the grill and cook for 2-3 minutes on each side. You want them to be pink and opaque. Avoid overcooking; shrimp can turn rubbery. For the best flavor, marinate shrimp for at least 30 minutes. This time allows the shrimp to soak in the lemon and garlic goodness. If you have more time, marinating for up to 2 hours is even better. Just keep it in the fridge to stay fresh. Don’t marinate too long, as the acid from the lemon can change the shrimp's texture. Pro Tips Fresh Shrimp: Always opt for the freshest shrimp available. Fresh shrimp not only taste better but also have a firmer texture that holds up well on the grill. Marinade Time: For best flavor, marinate the shrimp for at least 30 minutes, but not more than 2 hours. This ensures they absorb the flavors without becoming mushy. Skewering Technique: To prevent shrimp from spinning on the skewers, thread them through the tail and body. This will help them stay in place while grilling. Grill Temperature: Make sure your grill is preheated properly. Grilling shrimp on too low a heat can lead to uneven cooking and a rubbery texture. {{image_2}} To add some heat, try spicy lemon garlic shrimp skewers. Just mix in some red pepper flakes or diced jalapeños to the marinade. This gives a nice kick that pairs well with the lemon and garlic. The spice enhances the shrimp's flavor and makes each bite exciting. You can also make lemon garlic shrimp skewers with vegetables. Bell peppers, zucchini, and cherry tomatoes work well. Simply cut the veggies into chunks and add them to the skewers with the shrimp. They soak up the marinade and add color to your dish. This option makes the meal more filling and adds extra nutrition. If you don't have a grill, you can still enjoy these skewers. You can cook them in the oven or under the broiler. Preheat the oven to 400°F (200°C). Place the skewers on a baking sheet lined with foil. Cook for about 6-8 minutes, flipping halfway through. For the broiler, place the skewers on the top rack and broil for 2-3 minutes on each side. This method gives you that charred flavor without a grill. After enjoying your shrimp skewers, let them cool to room temperature. Place the skewers in an airtight container. This keeps them fresh and tasty. You can store them in the fridge for up to 3 days. If you want to keep them longer, consider freezing. To reheat the shrimp, use your grill or a skillet. Heat the grill to medium. Place the skewers on the grill for about 1-2 minutes per side. This warms them without drying them out. If using a skillet, heat it on medium-low. Cook for 2-3 minutes, turning once. Always check that the shrimp are hot all the way through. To freeze shrimp skewers, wrap each skewer in plastic wrap. Place them in a freezer-safe bag. They can last up to 3 months in the freezer. When ready to eat, remove the skewers and place them in the fridge overnight. Once thawed, reheat them using the methods shared above. Enjoy your shrimp like they were just cooked! Yes, you can use frozen shrimp. Just make sure to thaw them first. Place the shrimp in the fridge overnight or run them under cold water for quick thawing. Once thawed, peel and devein if needed. This will help the shrimp absorb the marinade better. These shrimp skewers pair well with many sides. Here are a few ideas: - Steamed rice - Quinoa salad - Grilled vegetables - Garlic bread - A fresh green salad These options will balance the flavors of the shrimp and make for a complete meal. Marinate the shrimp for at least 30 minutes. This time allows the shrimp to soak in the flavors. If you have more time, marinating for 1-2 hours will enhance the taste even more. Just don’t marinate too long, or the shrimp can become tough. You can use wooden or metal skewers. If you choose wooden skewers, soak them in water for 10-15 minutes first. This step prevents burning on the grill. Metal skewers are great too, as they don’t require soaking and can be reused. Lemon garlic shrimp skewers offer a tasty meal made with simple steps. You learned about essential ingredients, marinating tips, and grilling techniques. Variations like adding veggies or spice can change the dish. Proper storage ensures you enjoy leftovers later. With all this at hand, you can create a delicious meal. Enjoy cooking and impressing friends and family with your new skills!
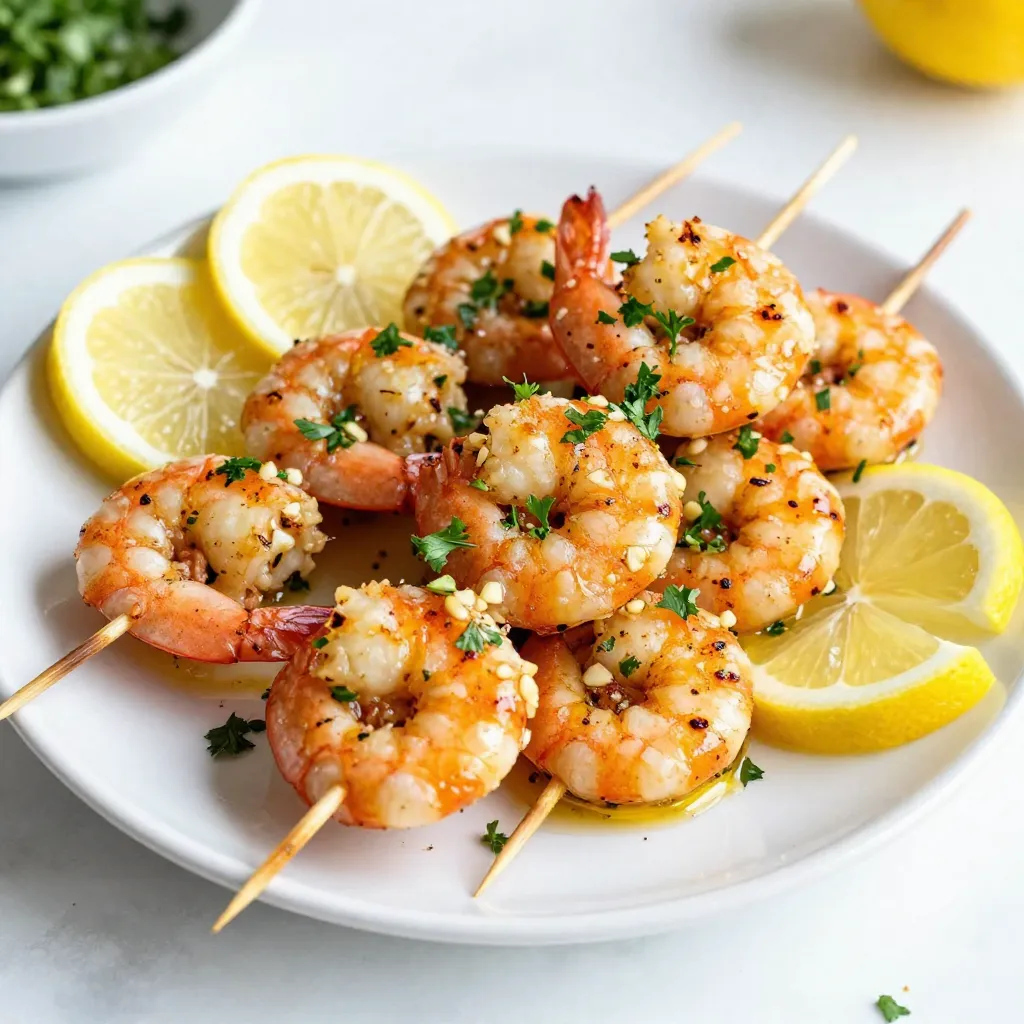
Lemon Garlic Shrimp Skewers Easy and Flavorful Recipe
Looking for a quick and tasty meal? You’ll love these Lemon Garlic Shrimp Skewers! They are loaded with bold flavors, easy to make, and perfect
To make crispy baked zucchini fries, you need simple yet tasty ingredients. Here’s what you will use: - 2 medium zucchini, cut into fries - 1 cup breadcrumbs (panko gives extra crunch) - 1/2 cup grated Parmesan cheese - 1 teaspoon garlic powder - 1 teaspoon onion powder - 1 teaspoon paprika - 1/2 teaspoon salt - 1/4 teaspoon black pepper - 2 large eggs - 1 tablespoon olive oil These ingredients create a perfect balance of flavor and texture. The zucchini stays tender while the coating gets nice and crispy. You can add a few extra touches to boost the flavor. Here are some great ideas: - Fresh herbs like parsley can add a bright taste. - You can sprinkle some crushed red pepper for heat. - Try adding a bit of lemon zest for a fresh zing. These add-ins can turn a simple dish into something special. If you have dietary needs, don’t worry! There are tasty alternatives. For gluten-free options, use gluten-free breadcrumbs. For a dairy-free version, skip the Parmesan or use nutritional yeast. You can also swap zucchini for sweet potatoes or carrots to change it up. These options keep the fun without losing flavor! {{ingredient_image_1}} Start by preheating your oven to 425°F (220°C). This step is key for crispiness. While the oven heats, line a baking sheet with parchment paper. This makes cleanup easy and helps the fries not stick. In a bowl, combine the breadcrumbs, grated Parmesan cheese, garlic powder, onion powder, paprika, salt, and black pepper. Mix these well. You want every bit of the coating to be tasty. This mix gives the fries their crunchy and flavorful bite. In another bowl, whisk the eggs and olive oil until frothy. Dip each zucchini fry into the egg mix. Let any extra drip off. Next, coat the fry in the breadcrumb mix. Press lightly to help it stick. Arrange the breaded fries in a single layer on your baking sheet. Make sure they don’t touch. Bake for 20 to 25 minutes. Flip them halfway through for even cooking. They should turn golden brown and crispy. Once done, take them out and let them cool for a few minutes. If you like, garnish with fresh herbs for a pop of color. Enjoy your crunchy snack! To make your zucchini fries crispy, use panko breadcrumbs. They add crunch. Make sure to coat each fry well in the breading mix. Press it on gently to stick better. Arrange the fries in a single layer on the baking sheet. This helps them crisp up. Avoid overcrowding the pan. Flip them halfway through baking for even browning. One common mistake is not drying the zucchini. Pat them with a towel to remove extra moisture. Also, don’t skip the egg wash. It helps the breadcrumbs stick. Another mistake is using too much oil. Just a little olive oil is enough. Lastly, ensure your oven is preheated. This helps achieve that golden color. Zucchini fries pair well with many dips. Try classic ranch for a creamy taste. Marinara sauce offers a nice tang. For a kick, use spicy ketchup or sriracha. You can also mix yogurt with herbs for a fresh dip. Each sauce brings out different flavors in the fries. Pro Tips Use Panko Breadcrumbs: For an extra crispy texture, opt for panko breadcrumbs instead of regular ones. They create a delightful crunch! Season Generously: Don't be shy with the seasoning! Feel free to add more spices like cayenne pepper or Italian herbs to elevate the flavor. Double-Dip for Extra Crunch: For an even crispier finish, double-dip the zucchini fries by repeating the egg and breadcrumb process. Serve with Dipping Sauce: Pair your crispy zucchini fries with a tasty dipping sauce, like marinara or ranch, for added flavor and enjoyment. {{image_2}} You can change the taste of your zucchini fries easily. Try adding herbs like oregano or thyme. A dash of cayenne pepper gives a nice kick. If you love a smoky flavor, smoked paprika is a great choice. Experimenting with different spices keeps your fries exciting. If you want a lighter version, skip the breadcrumbs. Instead, use crushed nuts like almonds or walnuts. They add a great crunch and flavor. For a gluten-free option, try using cornmeal or gluten-free breadcrumbs. Each method gives a unique twist to the classic recipe. Serve these fries with a tasty dip for fun. A simple yogurt sauce with dill or a spicy mayo pairs well. You can also try ketchup or ranch dressing for a classic touch. Adding a sprinkle of fresh herbs on top makes the dish even more appealing. Sharing these fries at parties will impress your friends! You can store leftover zucchini fries in an airtight container. Make sure to let them cool first. Place a paper towel in the bottom. This helps absorb moisture. Keep the container in the fridge. They will stay fresh for about 2 to 3 days. To reheat your zucchini fries, use the oven for the best crunch. Preheat the oven to 400°F (200°C). Place the fries on a baking sheet. Bake them for about 10 minutes. Check them often to avoid burning. This method keeps them crispy and tasty. If you want to freeze your zucchini fries, do it before baking. Once you coat them, lay them on a baking sheet. Freeze them for about 1 hour. Then, transfer the fries to a freezer bag. They can last for up to 3 months in the freezer. When you’re ready to enjoy, bake them straight from the freezer! Add a few extra minutes to the baking time for best results. Yes, you can use other vegetables! Carrots, sweet potatoes, or eggplant work well. Cut them into fry shapes like zucchini. Keep the cooking time in mind, as some veggies may take longer to bake. Experiment with your favorites for fun flavors. To make gluten-free zucchini fries, swap regular breadcrumbs for gluten-free ones. Check the label to ensure they are certified gluten-free. You can also use crushed cornflakes or almond flour for a tasty crunch. Both options work great and keep the fries delicious. Zucchini fries go well with many dipping sauces. Try ranch, marinara, or garlic aioli for a tasty treat. You can also mix Greek yogurt with herbs for a fresh dip. The options are endless, so feel free to get creative with your favorite flavors! In this post, we covered how to make delicious zucchini fries from scratch. We discussed key ingredients, step-by-step instructions, and tips for the perfect fry. You learned about flavor variations and storage methods, too. Don’t forget to try different vegetables or dipping sauces to change things up. Zucchini fries are a fun and healthy snack that anyone can enjoy. Get creative and enjoy your cooking!
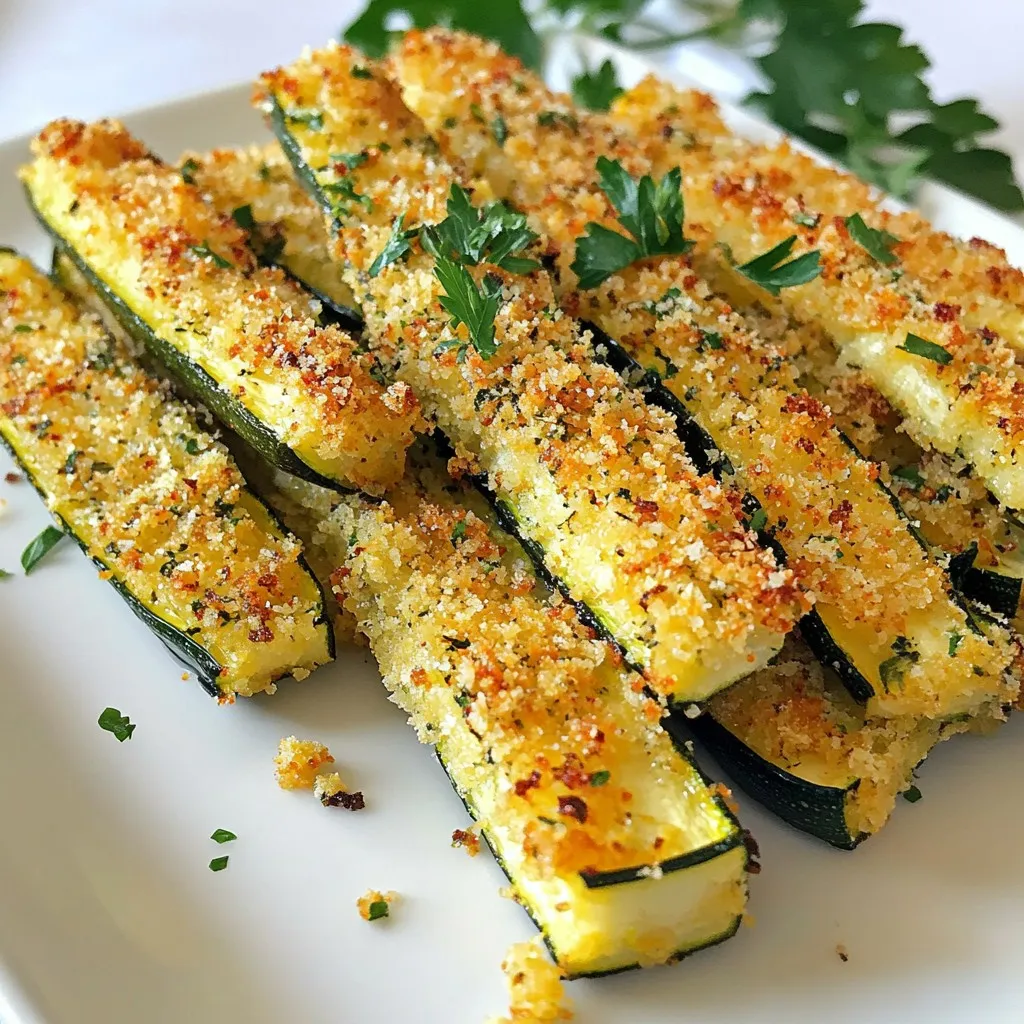
Crispy Baked Zucchini Fries Flavorful and Fun Snack
Are you ready to snack smarter? These crispy baked zucchini fries are a game-changer! They’re fun, flavorful, and a perfect way to enjoy veggies without
For the Rainbow Fruit Kabobs, you need a mix of fruits that look vibrant and taste great. Here is what you'll need: - 1 cup strawberries, hulled and halved - 1 cup pineapple, cubed - 1 cup kiwi, peeled and sliced - 1 cup blueberries - 1 cup green grapes - 1 cup watermelon, cubed These fruits bring bright colors and flavors to your kabobs. You can mix and match based on what you like or have on hand. For the yogurt dip, gather these simple ingredients: - 1 cup plain Greek yogurt - 2 tablespoons honey - 1 teaspoon vanilla extract This dip adds a creamy touch to your kabobs. It balances the sweet fruit perfectly. You can also add optional garnishes to enhance your dish: - Fresh mint leaves for garnish (optional) These mint leaves not only add color but also a refreshing taste. They make your kabobs look even more appealing on the plate. {{ingredient_image_1}} Start by washing all your fruit. Rinse strawberries, grapes, and blueberries under cold water. For larger fruits like pineapple, kiwi, and watermelon, peel them carefully. Cut them into bite-sized pieces. Aim for similar sizes to help with even threading on skewers. - Strawberries: Hulled and halved. - Pineapple: Cut into 1-inch cubes. - Kiwi: Peeled and sliced into rounds. - Blueberries: Keep whole. - Green grapes: Leave them whole. - Watermelon: Cut into 1-inch cubes. To keep your fruit fresh, store it in the fridge. Use airtight containers to avoid browning. In a small bowl, whisk together the plain Greek yogurt, honey, and vanilla extract. Mix until smooth. This dip should be creamy but not too thick. Taste it to adjust sweetness. - For a thicker dip, add more yogurt. - For a sweeter dip, add more honey. Grab a skewer and start threading the fruit. Aim for a colorful pattern. A fun order might be strawberry, pineapple, kiwi, blueberry, grape, and watermelon. Fill each skewer with about 5-6 pieces of fruit. Make sure to press the fruit gently to keep it secure. Balance your skewer by alternating heavier and lighter fruits. This keeps the kabob from tipping. Once you finish, arrange the kabobs on a platter. Serve the yogurt dip in a small bowl on the side. Enjoy the vibrant colors and fresh flavors! - Arrange your kabobs in a rainbow pattern. This makes them fun to look at. - Use a large white platter for a clean and bright display. - Add some fresh mint leaves around the kabobs. This adds color and freshness. - For extra flair, try using colorful skewers. They can brighten up the dish. - To change the taste, add a splash of lemon juice. It gives a nice zing. - Try using maple syrup instead of honey. It adds a unique flavor. - You can mix in cinnamon or nutmeg for warmth. These spices can enhance the dip. - For a fruity twist, add a few mashed berries to your yogurt. It adds flavor and fun colors. Pro Tips Choose Ripe Fruits: Selecting ripe and seasonal fruits will enhance the flavor and sweetness of your kabobs. Soak Wooden Skewers: If using wooden skewers, soak them in water for at least 30 minutes to prevent burning on the grill. Mix Up the Patterns: Get creative with the arrangement of your fruits for a visually appealing presentation that excites the palate. Chill Before Serving: Refrigerate the kabobs for a short time before serving for a refreshing, cool treat, especially on warm days. {{image_2}} You can switch up the fruits based on what you like or what’s in season. Here are some tasty ideas: - Seasonal Fruits: Try peaches in summer or apples in fall. Cherries and figs are great in late spring. - Berries and Melons: Mix strawberries, raspberries, and blueberries for a berry burst. Add cantaloupe or honeydew for a refreshing melon twist. - Favorite Fruits: Use your go-to fruits. If you love mango, replace pineapple with it. If you enjoy bananas, cut them into slices and add them in. The yogurt dip is just the start. You can try many other dips: - Yogurt Dip Variations: Use flavored yogurts like strawberry or coconut for a fun twist. You can mix in spices or zest for more taste. - Other Dips: Hummus works well with fruit too. You can also try whipped cream or cream cheese for a sweeter option. - Nut Butter Options: Peanut butter or almond butter adds a nutty flavor. For a treat, dip the fruit in chocolate sauce instead. These variations make your Rainbow Fruit Kabobs fun and exciting for any gathering. To keep your rainbow fruit kabobs fresh, store them in a container with a lid. This helps prevent air from drying out the fruit. Place a damp paper towel in the container to maintain moisture. Refrigerate the kabobs right after serving. They last about 2 to 3 days in the fridge. The yogurt dip needs a separate container. It can also stay fresh for about 3 to 5 days. You can make kabobs in advance, but avoid adding the yogurt dip until serving. This keeps the fruit crisp and prevents sogginess. You can prepare the yogurt dip ahead of time. Just mix the Greek yogurt, honey, and vanilla extract, and store it in the fridge. For storage, use airtight containers. Glass or plastic containers both work well. This keeps everything fresh and ready for when you want to serve. Yes, you can use frozen fruit for kabobs. However, fresh fruit often tastes better. Frozen fruit can be watery and soft. If you choose to use frozen fruit, thaw it first. Pat it dry with a paper towel. This helps keep your kabobs from becoming soggy. You can also use frozen fruit for smoothies or desserts. Just remember, the taste and texture may differ from fresh fruit. Rainbow fruit kabobs stay fresh for about 24 hours in the fridge. After that, they may get mushy or lose flavor. Factors that affect freshness include the type of fruit and how you store them. Store kabobs in an airtight container to keep them fresh longer. If you notice any fruit getting brown or mushy, it’s best to eat it quickly. You can use many fruits for kabobs! Try bananas, peaches, or mangoes. Grapefruit and cherries also add fun flavors. When choosing fruit, think about the texture. Softer fruits can break apart easily on skewers. Mixing sweet and tart fruits can create a delightful taste. Always cut fruits into similar sizes for even cooking and easy eating. You learned how to create fun and tasty fruit kabobs. We covered the right fruits, yogurt dip, and how to make everything look great. Remember, you can mix fruits and dips to keep it exciting. Store leftovers carefully to enjoy later. Fruit kabobs make a healthy snack or treat for any occasion. With these tips, you can impress guests or enjoy them on your own. Enjoy making your colorful kabobs!
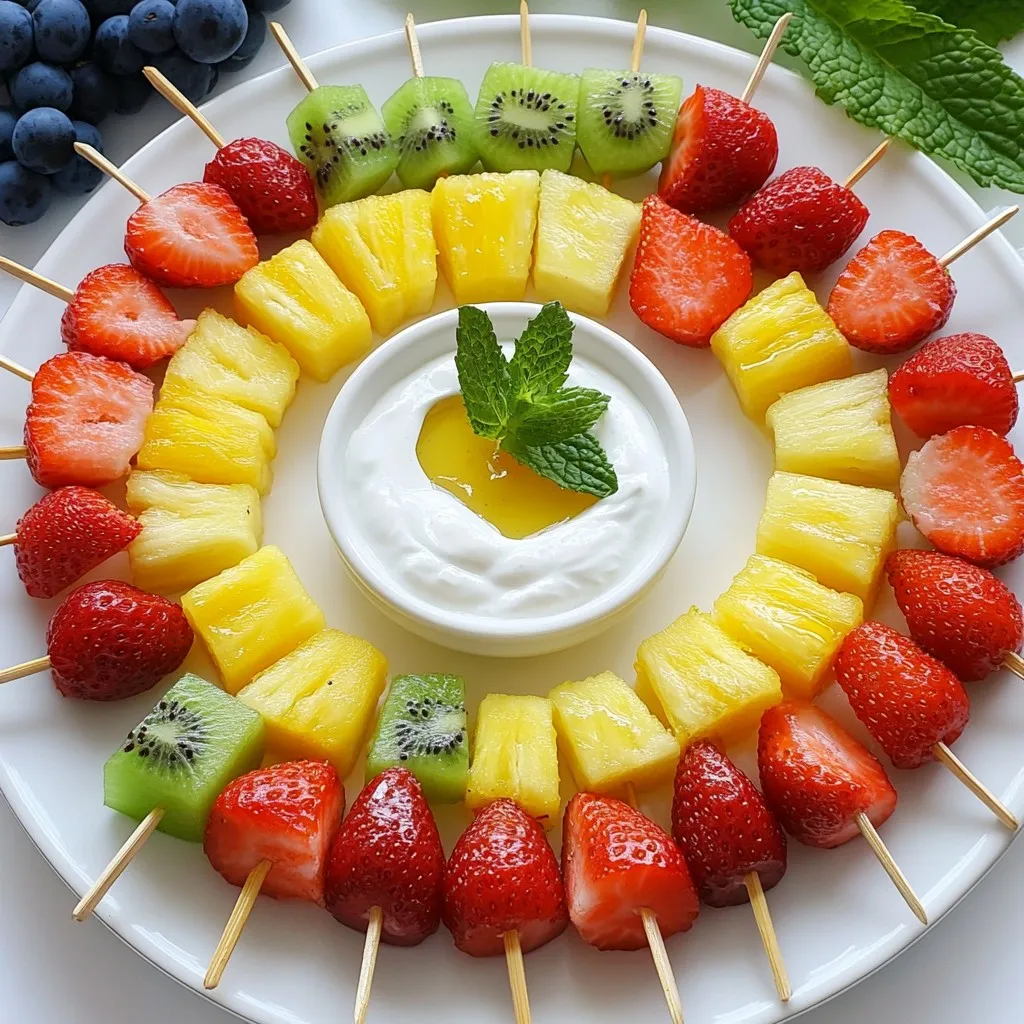
Rainbow Fruit Kabobs with Yogurt Dip Delight
Get ready to brighten your snack time with Rainbow Fruit Kabobs and a tasty yogurt dip! These vibrant, fun kabobs are easy to make and
- 4 large eggs - 1/4 cup soy sauce - 2 tablespoons rice vinegar - 1 tablespoon sriracha sauce - 2 cloves garlic, minced - 1 teaspoon sesame oil - 1 green onion, finely chopped (for garnish) - Red pepper flakes (to taste) You can swap soy sauce with tamari for a gluten-free option. If you want less heat, use mild chili sauce instead of sriracha. For a tangy twist, try apple cider vinegar in place of rice vinegar. If you lack sesame oil, olive oil can work, but the flavor will change. - Small saucepan for boiling eggs - Bowl for ice bath - Mixing bowl for marinade - Plastic wrap for covering the eggs - Sharp knife for cutting the eggs - Serving plate to present your eggs This setup will make your cooking process smooth and simple. The right tools help you focus on flavor and fun. Enjoy your cooking! {{ingredient_image_1}} First, get a small saucepan. Place 4 large eggs in it. Cover the eggs with cold water. Turn the heat to medium and bring the water to a boil. Once it boils, cover the pan and turn off the heat. Let the eggs sit for 6-7 minutes. This time gives you soft-boiled eggs. While the eggs cook, you can prepare the marinade. In a bowl, mix together 1/4 cup soy sauce, 2 tablespoons rice vinegar, and 1 tablespoon sriracha sauce. Add 2 cloves of minced garlic and 1 teaspoon sesame oil to the bowl. Stir everything until it blends well. This marinade gives the eggs a spicy kick. When the eggs are done, transfer them to a bowl of ice water. This stops the cooking. Let them sit for about 5 minutes. After that, tap each egg gently on the countertop. Roll it lightly to crack the shell. Peel the eggs under running water to help remove the shell easily. Now, place the peeled eggs in a shallow dish. Pour the marinade over the eggs, making sure they are fully coated. Cover the dish with plastic wrap. Let the eggs marinate in the fridge for at least 30 minutes. For a deeper flavor, you can leave them for up to 4 hours. To serve, take the marinated eggs out of the dish. Cut each egg in half. Place the halves on a serving plate. Sprinkle chopped green onions on top and add red pepper flakes to taste. This adds heat and makes the dish beautiful. Enjoy your spicy garlic ramen eggs! To get the perfect soft-boiled egg, start with cold water. Place the eggs in a small pot and cover them with water. Heat the pot on medium until it boils. When it starts boiling, turn off the heat and cover the pot. Let the eggs sit for 6-7 minutes. This timing gives you a creamy yolk without being runny. You can test a few times to find your ideal time. Remember, the cooking time changes based on the egg size. Larger eggs may need a bit more time. Want to kick up the flavor? Try adding different spices or sauces. You can add more sriracha for heat or even a dash of hoisin sauce for sweetness. If you like garlic, use more minced garlic in the marinade. Some people enjoy adding a splash of lime juice for a zesty touch. Green onions are great for garnish, but you can also try sesame seeds or chopped cilantro. Make your spicy garlic ramen eggs look as good as they taste. After marinating, cut each egg in half. Place them on a nice plate. Sprinkle chopped green onions and red pepper flakes on top. For extra flair, you can serve them on a bed of greens or alongside ramen noodles. A drizzle of sesame oil can add a beautiful shine. Serve with chopsticks for an authentic touch! Pro Tips Perfect Egg Timing: For the best soft-boiled eggs, it’s crucial to stop the cooking process promptly. Use an ice bath immediately after boiling to lock in the perfect texture. Marination Time: Allowing the eggs to marinate for longer enhances the flavor. If you can, let them sit for up to 4 hours or even overnight for a richer taste. Customize the Heat: Adjust the amount of sriracha and red pepper flakes to your taste. If you prefer milder flavors, reduce the sriracha or use sweet chili sauce instead. Garnish with Freshness: Adding fresh herbs like cilantro or basil along with green onions can elevate the dish. Experiment with different garnishes for a unique twist. {{image_2}} You can change the heat in your ramen eggs. Want it hotter? Add more sriracha or red pepper flakes. You can also try chili oil for a different kick. If you prefer less heat, reduce the sriracha. You can also skip the red pepper flakes. This way, everyone can enjoy the eggs just how they like. Mix things up with other marinades. You can use teriyaki sauce instead of soy sauce. This adds a sweet twist. For a tangy flavor, try adding lime juice or apple cider vinegar. You can also add ginger to the marinade for a fresh taste. Experimenting with different flavors keeps it fun and tasty. Garnishes add color and flavor. Besides green onions, try sesame seeds for crunch. You can also use cilantro or parsley for a fresh touch. If you like a bit of sweetness, thinly slice radishes. These little changes can brighten up your dish and make it even more delightful. To store leftover ramen eggs, place them in an airtight container. Pour any leftover marinade over the eggs. This helps keep them moist and flavorful. Store the container in the fridge. Make sure to enjoy them within a few days for the best taste. You can freeze ramen eggs, but the texture may change. To freeze, place the eggs in a freezer-safe bag or container. Remove as much air as possible. When ready to use, thaw them in the fridge overnight. Avoid using a microwave, as this can make the eggs tough. Ramen eggs last about 3 to 4 days in the fridge. For best results, eat them within this time. Always check for any off smells before eating. If you notice anything unusual, it’s best to discard them. Storing them in their marinade helps keep them fresh longer. To peel soft-boiled eggs, start by tapping them gently on a hard surface. Roll the egg to crack the shell all around. Then, peel the shell off while running it under cool water. The water helps separate the shell from the egg, making it easier to remove. Yes, you can use this marinade for chicken, tofu, or fish. Just make sure to adjust the marinating time based on the protein you choose. For chicken, marinate for about 1-2 hours. For tofu, a shorter time of 30 minutes works well. This marinade adds great flavor! Marinated eggs can be stored in the fridge for up to 4 days. Keep them in an airtight container to maintain freshness. The longer they sit, the more flavor they absorb from the marinade, which is fantastic! Absolutely! To lower the spice level, reduce or skip the sriracha and red pepper flakes. You can still enjoy the garlic and soy sauce flavors without the heat. Experiment until you find the right balance for your taste buds! Now you know how to make perfect ramen eggs. We covered ingredients, substitutions, and tools you need. You learned step-by-step instructions and gained tips for the best eggs. You saw variations to try on flavors and garnishes. I also shared storage tips and answered common questions. With this guide, you can impress anyone with your cooking skills. Try making these tasty eggs today. Enjoy every bite!
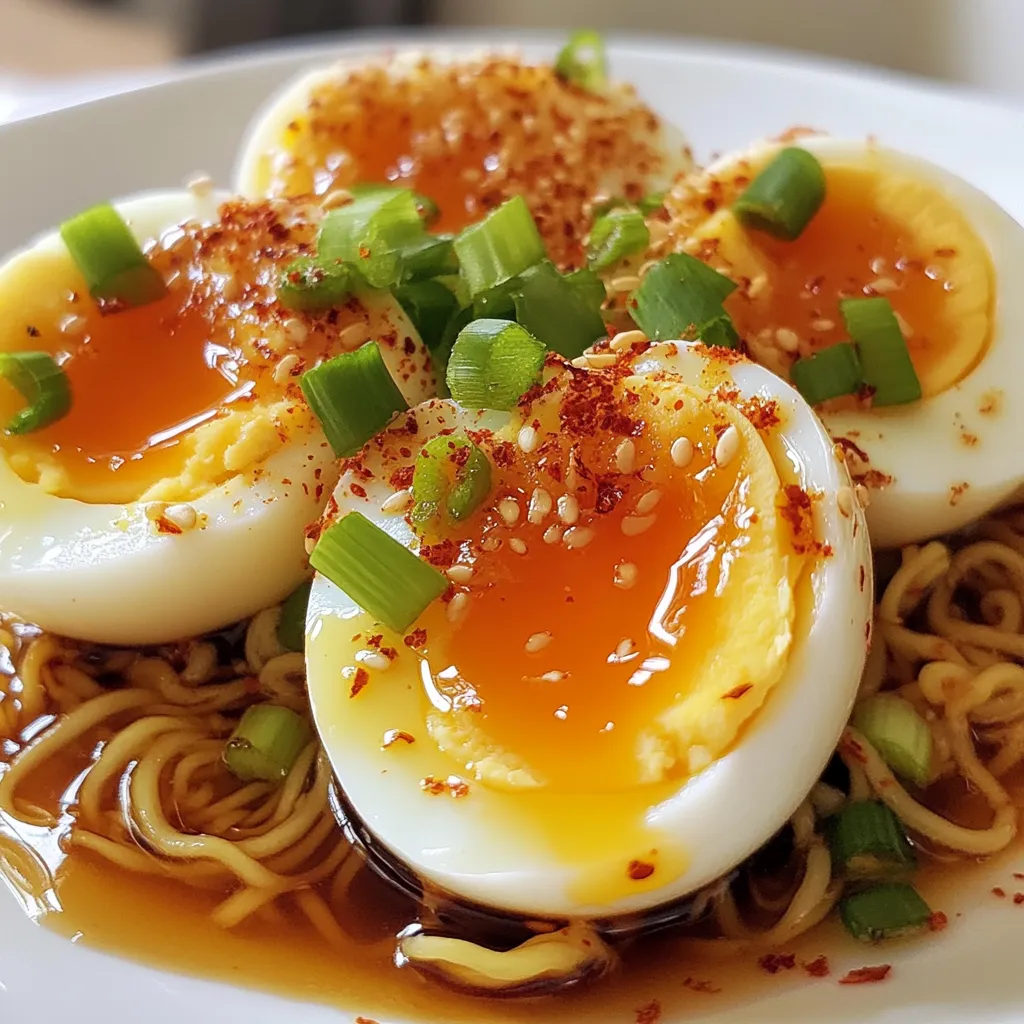
Spicy Garlic Ramen Eggs Flavorful and Easy Recipe
If you love ramen, you need to try spicy garlic ramen eggs. They add a burst of flavor to your bowl and are easy to
To make Garlic Herb Pull-Apart Bread, you need these key ingredients: - 3 cups all-purpose flour - 2 teaspoons active dry yeast - 1 teaspoon sugar - 1 teaspoon salt - 1 cup warm milk (about 110°F or 43°C) - 3 tablespoons unsalted butter, melted - 4 cloves garlic, minced - 1 tablespoon fresh parsley, chopped - 1 tablespoon fresh rosemary, chopped - 1 tablespoon fresh thyme, chopped - 1/2 teaspoon black pepper - Extra melted butter for brushing These ingredients work together to create a soft, flavorful bread. The flour gives the bread its structure. The yeast helps it rise, making it fluffy. You can add these ingredients for extra taste: - 1/4 cup grated Parmesan cheese - Additional fresh herbs like basil or chives Parmesan adds a rich, savory note. Fresh herbs boost the flavor and aroma. Feel free to mix and match herbs to suit your taste. If you don't have some ingredients, here are swaps you can use: - Use bread flour instead of all-purpose flour for a chewier texture. - Almond milk or oat milk can replace regular milk for a dairy-free option. - Any fresh herb can replace parsley, rosemary, or thyme. These substitutions allow you to customize the recipe while keeping it delicious. Always adjust cooking times based on your changes to ensure perfect results. {{ingredient_image_1}} To start, you must activate the yeast. In a small bowl, mix warm milk, sugar, and active dry yeast. Use milk that feels warm to your touch, about 110°F or 43°C. After mixing, let it sit for about 5-10 minutes. You want it to get frothy. This shows the yeast is alive and ready to work. Next, we make the dough. In a large mixing bowl, combine the all-purpose flour and salt. Once the yeast mixture is frothy, add it to the flour. Mix until a shaggy dough forms. Then, pour in the melted butter. Knead the dough for about 8-10 minutes. You want it to be smooth and elastic. If it feels sticky, add a bit more flour. After kneading, place the dough in a lightly greased bowl. Cover it with a kitchen towel and let it rise in a warm spot for about 1 hour. It should double in size. While it rises, prepare the garlic herb mixture. In a bowl, mix minced garlic, fresh herbs, black pepper, and Parmesan cheese. Once the dough has risen, punch it down. Divide it into small balls, about 1 inch each. Roll each ball in the garlic herb mixture to coat it well. Next, grease a bundt pan or a round cake pan. Layer the coated dough balls in the pan, stacking them on top of each other. Let the dough rise again for about 30 minutes. Now it’s time to bake. Preheat your oven to 375°F (190°C). Brush the top of the bread with melted butter. Bake for 25-30 minutes. The bread should turn golden brown and smell amazing. Once done, cool it in the pan for 10 minutes. Carefully turn it onto a serving platter. For extra flavor, brush it with more melted butter before serving. To get the best rise, keep your dough warm. Yeast loves heat. A sunny spot or a warm oven works well. Make sure your milk is warm, not hot. Hot milk can kill the yeast. Wait until your dough doubles in size. This can take about an hour. Patience is key! Use fresh herbs for great taste. The mix of garlic, parsley, rosemary, and thyme adds depth. You can also add grated cheese. Parmesan gives a lovely salty kick. Brush the bread with melted butter before baking. This adds flavor and helps it brown nicely. For extra crunch, sprinkle some coarse salt on top. Kneading helps develop gluten, making your bread chewy. Use a clean, floured surface to knead. Press down and fold the dough over itself. Keep kneading for about 8-10 minutes. The dough should feel smooth and elastic. If it sticks to your hands, add more flour. Don’t rush this step; it makes a big difference! Pro Tips Use Fresh Herbs: Fresh herbs can significantly enhance the flavor of your pull-apart bread. Consider using a mix of your favorites like basil or oregano along with the recommended herbs for a unique twist. Perfect Yeast Activation: Ensure your milk is warm but not too hot; around 110°F (43°C) is ideal. If the milk is too hot, it can kill the yeast, preventing the dough from rising. Flour for Kneading: Dust your work surface with flour while kneading to prevent sticking. However, avoid adding too much flour, as this can make the bread dense. Customize the Cheese: Feel free to experiment with different cheeses such as mozzarella or cheddar for a different flavor profile. Adding cheese will make the bread extra decadent! {{image_2}} You can make this bread even better by adding cheese. Try using mozzarella for a gooey center. Cheddar adds a sharp taste. Feta gives a nice tang. Use a mix of cheeses for more flavor. Just make sure to adjust the amount of garlic and herbs to match. Feel free to switch up the herbs in your bread. Basil and oregano work well for a pizza twist. Dill adds a fresh, vibrant taste. You can even use mint for a unique flavor. Mix and match to find your favorite combination. Just keep the total amount of herbs the same for best results. If you like some heat, add red pepper flakes to the garlic herb mix. This gives the bread a spicy kick. You can also use smoked paprika for a subtle warmth. Experiment with different spices, like cumin or coriander, to create your own blend. Just remember to taste as you go! To keep your leftover garlic herb pull-apart bread fresh, store it in an airtight container. You can also wrap it in plastic wrap or foil. This helps keep out air, which can make the bread dry. Store it at room temperature for up to three days. If you want to keep it longer, consider freezing. When you're ready to enjoy your leftover bread, reheating it is key to bringing back its fresh taste. Preheat your oven to 350°F (175°C). Place the bread on a baking sheet and cover it loosely with foil. Heat for about 10-15 minutes. This keeps the bread soft while warming it through. You can also microwave individual pieces for 15-20 seconds, but this may make the bread a bit chewy. Freezing is a great option if you have extra bread. Allow the bread to cool completely. Wrap it tightly in plastic wrap, then in aluminum foil. This double wrap prevents freezer burn. You can freeze the bread for up to three months. When you're ready to eat it, thaw the bread in the fridge overnight. Then reheat it in the oven for the best taste. You can serve this bread with many tasty sides. A small bowl of marinara sauce makes a great dip. Garlic butter also adds a rich flavor. You can pair it with soup or salad too. It matches well with Italian dishes like pasta. Add some fresh herbs on top for a nice touch. Yes, you can make this bread ahead of time. You can prepare the dough and let it rise. After the first rise, shape the dough and place it in the pan. Cover it and store it in the fridge overnight. When you're ready, let it rise for 30 minutes before baking. This saves time and still gives you fresh bread. To check if the bread is fully baked, look for a golden brown color. Tap the top gently; it should sound hollow. You can also use a toothpick. Insert it into the bread; it should come out clean. If you see dough on the toothpick, bake it a little longer. These methods ensure you have perfect Garlic Herb Pull-Apart Bread every time. You learned about making Garlic Herb Pull-Apart Bread. We covered the best ingredients, steps, and useful tips. You now know how to enhance flavor and try different variations. Proper storage keeps the bread fresh longer, and you can even reheat it easily. This bread is a fun treat for any meal. Enjoy the baking process and share your results with friends. You have the skills to make this dish a hit. Dive in and enjoy your delightful creation!
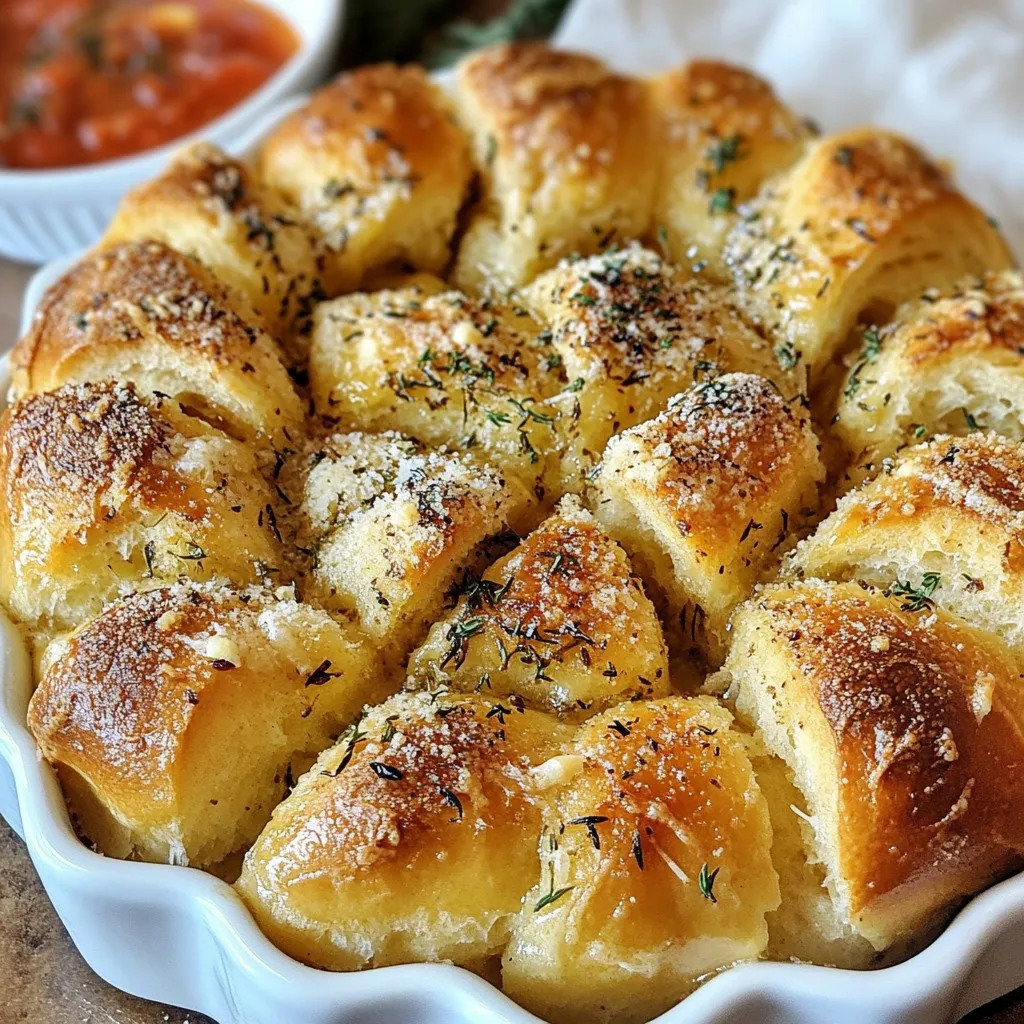
Garlic Herb Pull-Apart Bread Irresistible and Easy Recipe
Are you ready to impress your family and friends with a simple yet delicious treat? This Garlic Herb Pull-Apart Bread is the answer! With its
To make Buffalo Chicken Flatbread, gather these key ingredients: - 1 large flatbread or naan - 1 cup cooked chicken, shredded - 1/2 cup buffalo sauce - 1/2 cup mozzarella cheese, shredded - 1/4 cup blue cheese crumbles (optional) - 1/4 cup ranch or blue cheese dressing - 1/4 cup green onions, sliced - Salt and pepper to taste - Olive oil for brushing These main ingredients combine to create a tasty, spicy dish that is loved by many. The flatbread acts as a perfect base, holding all the flavors together. The chicken, coated in buffalo sauce, gives it a nice kick. Feel free to get creative with more toppings! Here are a few ideas: - Fresh cilantro - Sliced jalapeños - Avocado - Different cheese blends like cheddar or pepper jack You can also swap out the ranch for other dressings. Consider using yogurt-based dressings for a lighter option. Each topping adds its own flavor and texture, making your flatbread unique. If you want to change things up, you can easily substitute ingredients: - Instead of flatbread, you can use pita bread or a tortilla. - Any cooked chicken works. You can use rotisserie chicken or leftover grilled chicken. - If you prefer a milder taste, use less buffalo sauce or a milder dressing. - For a dairy-free version, try vegan cheese or omit cheese altogether. These substitutes keep the dish flexible. You can adjust it to fit your taste or diet needs. {{ingredient_image_1}} To start, you will want to preheat your oven to 400°F (200°C). This step is key for a perfect bake. While your oven heats, prepare your baking sheet by lining it with parchment paper. This makes cleanup easy and helps prevent sticking. Next, take a mixing bowl and add 1 cup of shredded chicken. Pour in 1/2 cup of buffalo sauce. Mix these together well, so every piece of chicken gets coated. You can add salt and pepper to taste. This mix gives the chicken a spicy kick. Now, grab your flatbread or naan. Place it on the lined baking sheet. Use a brush to lightly coat the flatbread with olive oil. This will help it get nice and crispy when baking. Once your chicken is mixed and your flatbread is ready, it's time to layer. Spread the buffalo chicken evenly over the flatbread. This ensures every bite is full of flavor. Next, sprinkle 1/2 cup of shredded mozzarella cheese on top. If you like blue cheese, add 1/4 cup of blue cheese crumbles too. This adds a nice tangy flavor that pairs well with the buffalo sauce. Bake the flatbread in the oven for about 10 to 12 minutes. You want the cheese to be bubbly and the edges of the flatbread to turn golden brown. Keep an eye on it to prevent burning. Once baked, take the flatbread out and let it cool for a minute. Drizzle 1/4 cup of ranch or blue cheese dressing over the top. This adds creaminess that balances the heat from the buffalo sauce. For a fresh touch, sprinkle sliced green onions on top. They add color and a mild onion flavor. Slice the flatbread into pieces and serve it warm. For a great presentation, place the flatbread on a wooden board. Adding extra buffalo sauce and ranch dressing on the side makes for a fun dipping experience. If you have fresh cilantro, a sprinkle of that adds a nice pop of color. To make your Buffalo chicken flatbread pop, start with fresh ingredients. Use high-quality buffalo sauce for the best taste. You can mix in spices like garlic powder or smoked paprika for a kick. Brush the flatbread with olive oil before baking. This helps it get crispy and adds a nice flavor. Don't skimp on cheese; it melts into a gooey, tasty topping. For a zesty finish, drizzle ranch or blue cheese dressing after baking. One common mistake is overcooking the chicken. Make sure it is just heated through, not dry. Another error is using too much buffalo sauce. A half-cup is perfect; too much may make it soggy. Avoid using cold flatbread; let it come to room temperature for even baking. Lastly, don't forget to slice the green onions thinly. This helps them mix well and adds a fresh taste. You don’t need fancy tools to make this dish. A good mixing bowl is key to combining the chicken and sauce. A baking sheet lined with parchment paper makes cleanup simple. Use a sharp knife for slicing the flatbread and green onions. A basting brush helps evenly apply olive oil. Finally, an oven thermometer ensures your oven is at the right temperature for perfect baking. Pro Tips Use Fresh Ingredients: Freshly cooked chicken and high-quality buffalo sauce will elevate the flavor of your flatbread significantly. Customize Your Heat: Adjust the amount of buffalo sauce to match your heat preference. For a milder version, use less sauce or mix in some ranch dressing. Perfect Cheese Melt: For the best cheese melt, consider adding the mozzarella halfway through baking to prevent it from browning too quickly. Optimal Crispiness: Ensure your flatbread is brushed with olive oil to achieve a crispy texture. You can also bake it on a pizza stone for extra crunch. {{image_2}} You can change the flavor of your Buffalo chicken flatbread with different sauces. Try barbecue sauce for a sweet twist. A garlic sauce can add a nice touch, too. If you want heat, use spicy sriracha instead of buffalo sauce. For cheese, mozzarella is classic, but you can mix it up. Try pepper jack for a kick or gouda for its creamy texture. Each sauce and cheese choice brings its own unique taste to the flatbread. If you prefer a meatless option, you can easily adapt this recipe. Use roasted cauliflower or chickpeas instead of chicken. Toss them in buffalo sauce to keep that spicy flavor. You can also use grilled veggies like bell peppers and zucchini. These add great texture and taste. Make sure to add plenty of cheese or a vegan cheese for a creamy finish. This way, everyone can enjoy a tasty flatbread. Buffalo chicken flatbread can be as spicy or mild as you like. For a mild version, reduce the buffalo sauce. You can mix it with ranch dressing to tone down the heat. Adding more cheese can also help make it milder. On the other hand, if you love spice, add jalapeños or a dash of hot sauce to the top. You can even sprinkle crushed red pepper for an extra kick. Customize it to fit your taste! To keep your buffalo chicken flatbread fresh, let it cool first. Wrap the flatbread in plastic wrap or foil. You can also use an airtight container. Store it in the fridge for up to three days. This way, the flavors stay nice and bold. When you’re ready to eat, preheat your oven to 350°F (175°C). Place the flatbread on a baking sheet. Heat it for about 10 minutes. This will make the flatbread warm and crisp again. You can also use a microwave. Just heat for about 30 seconds to 1 minute. But be careful; the flatbread may get soft. If you want to save some for later, freezing works well. Wrap the flatbread tightly in plastic wrap, then foil. You can freeze it for up to three months. When you’re ready to eat, take it out and thaw in the fridge overnight. Then, reheat it in the oven for the best taste. Enjoy your leftovers! Buffalo chicken flatbread is a tasty dish. It combines soft flatbread with shredded chicken and spicy buffalo sauce. You also add cheese and toppings. The mix creates a savory and satisfying meal. It's great for sharing or as a snack. Yes, you can make buffalo chicken flatbread ahead of time. Prepare the chicken and sauce, then store them in the fridge. Just assemble the flatbread when you're ready to bake. This makes it easy for a quick meal later. Many restaurants serve buffalo chicken flatbread. You can find it at casual dining spots and pizzerias. Popular chains often have their own versions. Check local menus for unique takes on this tasty dish. Buffalo Chicken Flatbread is a fun meal to make at home. We covered the main ingredients, the cooking steps, and helpful tips. You can enhance flavors and avoid mistakes easily. Variations let you explore new tastes, like vegetarian or spicy options. Lastly, I shared how to store, reheat, and freeze leftovers. In conclusion, this dish is tasty and adaptable. Enjoy this easy recipe with friends and family.
Buffalo Chicken Flatbread Flavorful and Easy Recipe
If you’re craving a spicy, savory dish, Buffalo Chicken Flatbread is a must-try. This easy recipe combines tender chicken, zesty sauce, and fresh toppings on
To make cheesy chicken fritters, gather these items: - 2 cups cooked chicken, shredded - 1 cup shredded cheddar cheese - 1/2 cup all-purpose flour - 1/2 cup breadcrumbs - 1/4 cup grated Parmesan cheese - 2 large eggs - 2 green onions, finely chopped - 1 teaspoon garlic powder - 1 teaspoon onion powder - Salt and pepper to taste - Olive oil, for frying These ingredients create a tasty and crunchy snack. The chicken gives protein, while the cheese adds a creamy touch. You can swap some ingredients if needed. Here are a few ideas: - Use cooked turkey instead of chicken for a different flavor. - Swap cheddar cheese for mozzarella or pepper jack for extra spice. - Replace breadcrumbs with crushed cornflakes for a crunchier texture. - Use whole wheat flour instead of all-purpose flour for a healthier option. These changes keep the dish exciting and can fit your pantry items. When you shop for ingredients, look for the best quality: - Choose fresh chicken from a trusted source. Cooked rotisserie chicken works well. - Select block cheese and shred it yourself for better taste. Pre-shredded cheese often has additives. - Look for breadcrumbs that are made from whole grain for added nutrition. - Pick fresh green onions with bright green tops and firm bases. High-quality ingredients make a big difference in flavor and texture. Enjoy your cooking journey! {{ingredient_image_1}} Start by gathering your ingredients. You will need 2 cups of cooked chicken, shredded. I like to use leftover rotisserie chicken for added flavor. Next, get 1 cup of shredded cheddar cheese, 1/2 cup of all-purpose flour, and 1/2 cup of breadcrumbs. These help bind the fritters and give them texture. You will also need 1/4 cup of grated Parmesan cheese and 2 large eggs for richness. Don’t forget 2 green onions, finely chopped, 1 teaspoon of garlic powder, and 1 teaspoon of onion powder. Lastly, add salt and pepper to taste. In a large mixing bowl, combine all the shredded chicken, cheddar cheese, flour, breadcrumbs, Parmesan cheese, and green onions. Mix these well to combine. In a separate bowl, beat the eggs. Add the garlic powder, onion powder, salt, and pepper into the eggs. This adds flavor to the fritters. Now, pour the egg mixture into the chicken mixture. Mix them well until they form a dough-like consistency. This step is crucial for a good texture. Next, heat a non-stick skillet over medium heat. Add enough olive oil to coat the bottom of the pan. You want the oil hot enough to fry but not smoking. While the oil heats, use your hands to form small patties, about the size of your palm. Once the oil is hot, carefully place the patties in the skillet. Make sure not to overcrowd the pan. Fry them in batches if needed. Cook each fritter for about 4-5 minutes on each side. They should turn golden brown and crispy. Adjust the heat if they cook too fast. When they are done, transfer the fritters onto a paper towel-lined plate. This helps absorb any extra oil. To get that perfect crunch, ensure your oil is hot before adding the fritters. If the oil is not hot enough, the fritters will soak up too much oil and become soggy. Also, don’t skip the breadcrumbs; they add a great texture and crunch. If you want an extra crispy finish, you can double coat the fritters. First, coat them in flour, then dip them in egg, and finally coat again in breadcrumbs before frying. For serving, enjoy these warm with your favorite dipping sauce, such as ranch or spicy aioli. A sprinkle of chopped parsley on top can also add a fresh touch! To get that golden, crispy outside on your fritters, heat the oil well. Use a non-stick skillet and coat it with olive oil. Test the oil by dropping a tiny bit of the batter in. If it sizzles, your oil is ready. Fry in batches to avoid overcrowding. This keeps the oil hot and helps them fry evenly. If you want a softer fritter, add a bit more flour. For a crunchier bite, increase the breadcrumbs. You can also play with flavors. Try adding herbs like parsley or basil for freshness. Adjust the garlic and onion powders to match your taste. Remember, seasoning is key! These fritters shine when served warm. Pair them with ranch or spicy aioli for dipping. A sprinkle of chopped parsley adds a nice touch. You can also serve them with a side salad for a balanced meal. Enjoy your fritters while they’re fresh for the best flavor! Pro Tips Use Leftover Chicken: These fritters are perfect for using up leftover rotisserie chicken, which adds great flavor and saves time. Adjust the Seasoning: Feel free to tweak the spices according to your taste; adding smoked paprika or cayenne pepper can give them an extra kick! Check Oil Temperature: Make sure the oil is hot enough before adding the patties; a drop of batter should sizzle immediately when it hits the oil. Experiment with Cheese: Try using different cheeses like pepper jack or mozzarella for a unique flavor twist in your fritters. {{image_2}} You can make your cheesy chicken fritters even better by adding veggies. Chop up some bell peppers, zucchini, or spinach. They add color and taste. Fresh herbs like parsley or cilantro also work great. Just mix them in with the chicken. This gives you more flavor and makes the fritters even healthier. While cheddar cheese is a classic choice, feel free to switch it up. You can use mozzarella for a milder taste. Feta cheese adds a salty kick and pairs well with herbs. If you want something sharp, try aged gouda. Mix and match to find your favorite combo. The right cheese can change the whole dish. You don’t have to fry your fritters. You can use an air fryer for a lighter option. Set it to 375°F and cook for about 10-12 minutes. Flip halfway through for even crispiness. If you prefer the oven, preheat it to 400°F. Place fritters on a baking sheet and cook for 15-20 minutes. Both methods yield yummy, crispy fritters with less oil. To keep your cheesy chicken fritters fresh, store them in an airtight container. Place a paper towel at the bottom to soak up any moisture. This will help maintain their crispiness. Keep the container in the fridge. They will last for about three days. When you're ready to enjoy the leftovers, reheat them for the best taste. Use a skillet over medium heat. Add a bit of olive oil to keep them crispy. Heat each side for about two to three minutes. You can also use an oven. Preheat it to 350°F (175°C) and bake for about 10 minutes. This method will make them warm and crispy again. If you want to save fritters for a longer time, freezing is a great option. First, let them cool completely. Then, place them on a baking sheet in a single layer. Freeze them for about two hours. Once frozen, transfer them to a freezer-safe bag. Mark the date on the bag. They can stay good for up to three months. When you’re ready to eat, thaw them in the fridge overnight before reheating. No, you should not use raw chicken. This recipe needs cooked chicken. You can use leftover chicken or rotisserie chicken. Cooked chicken makes the fritters tender and tasty. Raw chicken will not cook evenly in the fritters. Always ensure your chicken is fully cooked before mixing it into the batter. To make these fritters healthier, you can try a few simple swaps: - Use whole wheat flour instead of all-purpose flour. - Replace some of the cheese with chopped vegetables like spinach or bell peppers. - Use a non-stick spray instead of oil for frying. - Bake the fritters instead of frying them. Just place them on a baking sheet and bake at 400°F for about 20 minutes, flipping halfway through. These changes keep the flavor while cutting down on fat and calories. You have many options for dipping sauces! Here are some great choices: - Ranch dressing for a classic taste. - Spicy aioli for a kick. - Honey mustard for sweetness. - Barbecue sauce for a smoky flavor. These sauces will enhance the deliciousness of your cheesy chicken fritters! You’ve learned about the best ingredients and how to prepare tasty chicken fritters. Plus, I shared tips for frying and serving them. By substituting ingredients, you can make these fritters your own. Variations can boost flavor and freshness. Finally, proper storage ensures your fritters stay delicious for days. With these tips, you can create great meals for family and friends. Enjoy your cooking journey and make it fun!
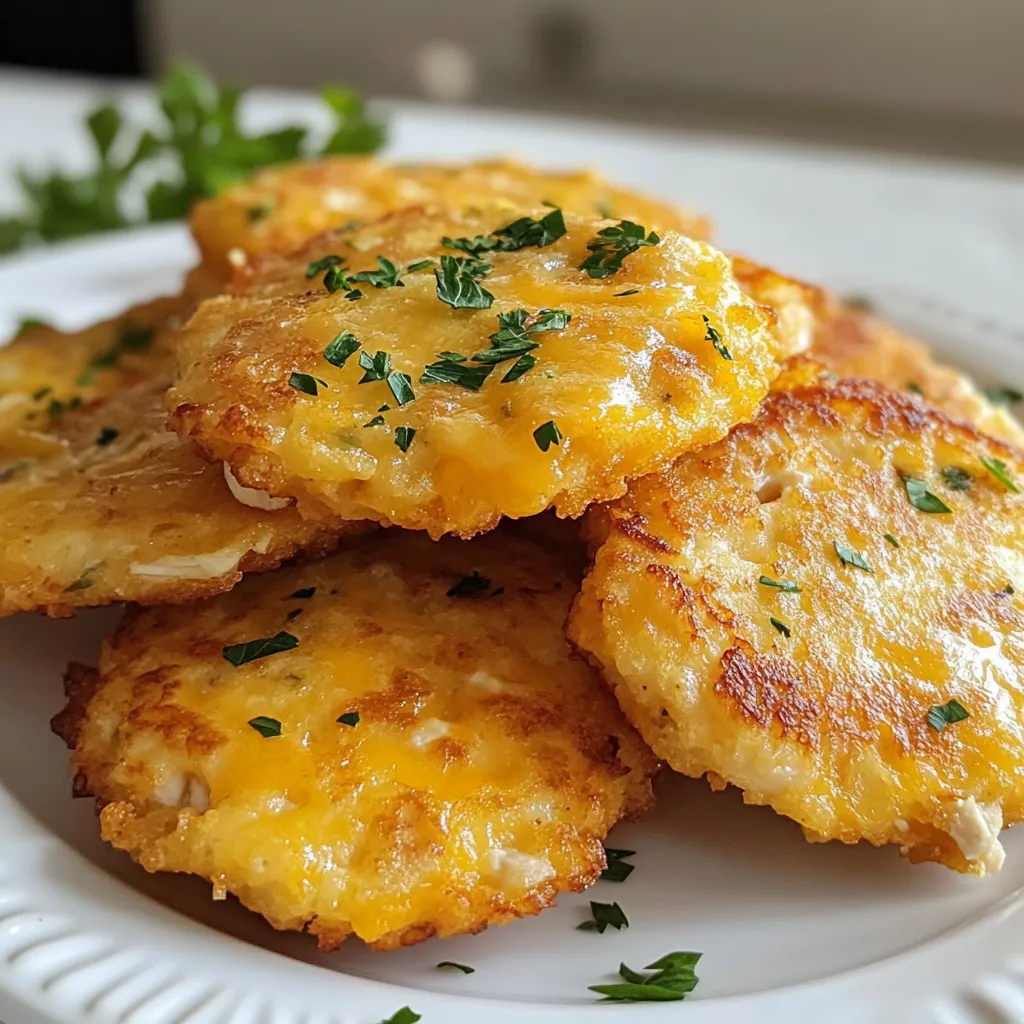
Cheesy Chicken Fritters Crispy and Delicious Snack
Welcome to your new favorite snack: Cheesy Chicken Fritters! These crispy bites are full of flavor, easy to make, and sure to thrill your taste
- 1 lb Brussels sprouts, trimmed and halved - 4 tablespoons olive oil - 4 cloves garlic, minced - 1/2 cup grated Parmesan cheese - Salt and freshly ground black pepper, to taste - 1 teaspoon red pepper flakes (optional) - 2 tablespoons balsamic vinegar (for drizzling) - Fresh parsley, chopped for garnish Gathering the right ingredients makes all the difference in your dish. Start with fresh Brussels sprouts. Trim them well and slice them in half. This helps them cook evenly. Next, grab your olive oil and minced garlic. They add rich flavor and a nice aroma. For the seasonings, you'll need grated Parmesan cheese. This cheese brings a salty, nutty taste that pairs well with Brussels sprouts. Don't forget salt and pepper to enhance the flavors. If you like some heat, toss in red pepper flakes. They are optional, but they add a nice kick. If you want to elevate your dish, consider balsamic vinegar. A drizzle before serving gives a sweet tang. Finally, chop some fresh parsley. It adds color and freshness to the plate. With these ingredients ready, you're on your way to making a delicious dish. {{ingredient_image_1}} - Preheat the oven to 400°F (200°C). - In a large bowl, mix the halved Brussels sprouts with olive oil, minced garlic, salt, black pepper, and red pepper flakes. Toss well until the sprouts are fully coated. - Spread the Brussels sprouts in a single layer on a baking sheet. - Roast them for about 25 to 30 minutes. Shake the pan halfway through cooking. This helps them cook evenly. They should turn golden brown and crispy. - When the Brussels sprouts are almost done, sprinkle the grated Parmesan cheese evenly on top. - Return them to the oven for an extra 5 to 7 minutes. This allows the cheese to melt and become slightly crispy. - If you like, drizzle balsamic vinegar over the sprouts before serving. - Garnish with fresh chopped parsley for a nice color contrast. Serve warm and enjoy! To get crispy, golden brown Brussels sprouts, follow these steps: - Use a hot oven: Preheat your oven to 400°F (200°C). This helps to caramelize the sprouts. - Single layer: Spread the Brussels sprouts on the baking sheet in a single layer. Crowding them will make them steam instead of roast. - Shake it up: Halfway through cooking, shake the pan. This ensures even cooking and browning. If you want a softer texture, you can lower the heat to 375°F (190°C) and roast them longer. This will help them cook through without burning. You can make your Brussels sprouts even more tasty by trying new flavors: - Seasoning swaps: Besides garlic and Parmesan, mix in smoked paprika or cayenne for a kick. - Fresh herbs: Adding lemon zest brightens the dish. Try thyme or rosemary for earthy notes. - Heat it up: If you like spice, sprinkle in red pepper flakes for extra warmth. Experimenting with flavors keeps this dish fresh and exciting! How you serve your Brussels sprouts can make them shine: - Plating tips: Use a large, white plate to contrast the green and golden colors. This makes the dish pop! - Garnishing: Chop fresh parsley and sprinkle it on top. This adds color and a fresh flavor. - Drizzle balsamic: A light drizzle of balsamic vinegar adds a glossy finish. It also gives a sweet and tangy contrast. These simple touches will impress anyone at your table! Pro Tips Choose Fresh Brussels Sprouts: Look for bright green, firm Brussels sprouts. Avoid any that are yellowing or have blemishes for the best flavor. Don't Skimp on Olive Oil: Generous amounts of olive oil help to achieve that crispy, caramelized exterior. Ensure each sprout is well coated before roasting. Experiment with Cheese: While Parmesan adds great flavor, feel free to mix in other cheeses like Pecorino Romano or a sharp cheddar for a unique twist. Serve Immediately: For the best taste and texture, serve the Brussels sprouts right after they come out of the oven. They’ll be at their crispiest! {{image_2}} You can switch up the cheese in this dish. Asiago gives a nice sharp taste. Gruyère melts well and adds a creamy texture. If you want a vegan option, try nutritional yeast. It has a cheesy flavor without dairy. Just sprinkle it on before roasting. If you want to save time, air frying works great. It cooks Brussels sprouts quickly while keeping them crispy. Just toss them in oil and seasonings, then set your air fryer to 375°F for about 15-20 minutes. Shake the basket halfway through for even cooking. Another method is steaming before roasting. This gives a softer texture inside while the outside gets crispy. Steam the sprouts for 5 minutes, then toss them with oil and seasonings. Spread them on a baking sheet and roast as usual. Mix in seasonal veggies for extra flavor. Carrots, sweet potatoes, or butternut squash can be great. They add color and taste. You can also throw in nuts like almonds or walnuts for crunch. Dried fruits like cranberries or raisins can add a sweet touch. These additions make the dish more fun and tasty. To store leftovers, let the Brussels sprouts cool first. Place them in an airtight container. You can keep them in the fridge for up to four days. This way, they stay fresh and tasty. To reheat, use the oven for best results. Preheat it to 350°F (175°C). Spread the sprouts on a baking sheet. Heat for about 10-15 minutes until they are warm and crispy again. You can also use a microwave, but the texture may change. Yes, you can freeze Brussels sprouts. First, roast them and let them cool. Then, place them in a freezer-safe bag. Press out as much air as you can. They will last for about three months. When ready to eat, thaw in the fridge overnight before reheating. Roast Brussels sprouts for 25 to 30 minutes at 400°F. This gives them a nice, crispy edge. Make sure to shake the pan halfway through. This helps them cook evenly. You know they are done when they turn golden brown. Yes, you can use frozen Brussels sprouts! Just thaw and drain them first. This helps remove excess moisture. Toss them with olive oil and seasonings like fresh ones. Keep in mind, they may not get as crispy. So, roast them a bit longer, about 30 to 35 minutes. These Brussels sprouts pair well with many dishes. Try them with grilled chicken or salmon for a tasty meal. They also go great with pasta or a grain salad. For a fun twist, serve them with a dipping sauce or a creamy dressing. Enjoy your meal! Roasting Brussels sprouts is easy and fun. You learned the key steps: prepping, tossing, and roasting to perfection. The right seasonings and toppings, like Parmesan and balsamic vinegar, add great flavor. You can also try different cheeses and cooking methods for variety. Store leftovers properly to enjoy them later. With these tips, you can create a tasty dish that impresses anyone. Get creative and have fun in the kitchen!
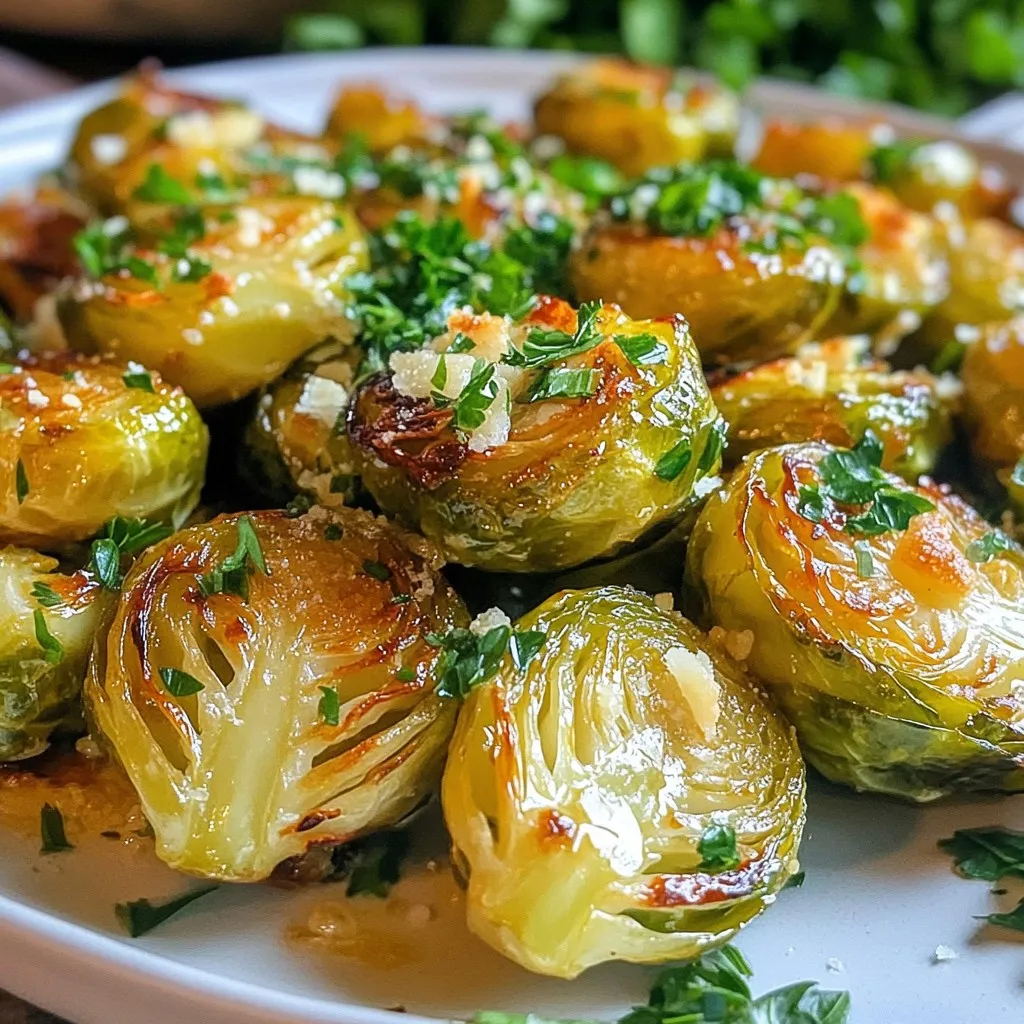
Garlic Parmesan Roasted Brussels Sprouts Delight
If you think Brussels sprouts are boring, think again! My Garlic Parmesan Roasted Brussels Sprouts will change your mind. These crispy bites are packed with
- Fresh or frozen edamame in pods - Garlic - Soy sauce - Sesame oil - Chili flakes - Honey or agave syrup - Sesame seeds - Green onions - Salt To make spicy garlic edamame, you need simple, fresh ingredients. Let’s dive into what you should gather: 1. Edamame: Choose fresh or frozen pods. Both work well. If using frozen, they cook fast. 2. Garlic: Use four cloves. Minced garlic gives great flavor. 3. Soy Sauce: This adds saltiness and depth. It’s your umami booster. 4. Sesame Oil: One tablespoon adds a nutty taste. Use it to sauté the garlic. 5. Chili Flakes: Use one teaspoon, or more for heat. Adjust to your taste. 6. Honey or Agave Syrup: This adds a sweet balance. One teaspoon is enough. 7. Sesame Seeds: These are for garnish. They add crunch and look great. 8. Green Onions: Finely chop two for garnish. They bring freshness and color. 9. Salt: Just a pinch to taste. Don’t forget to check the flavor! These ingredients come together to create a tasty snack. Each one plays a role in the final dish. Prepare them before you start cooking. That makes the process smooth and fun! {{ingredient_image_1}} First, fill a pot with water. Bring it to a boil. If you use frozen edamame, add it to the pot. Cook the edamame for about 5 minutes. You want them tender but not mushy. Once cooked, drain the edamame in a colander. Set them aside while you prepare the spicy garlic mix. Next, grab a medium skillet and heat 1 tablespoon of sesame oil over medium heat. This oil adds a nice nutty flavor. Once the oil is hot, add 4 cloves of minced garlic. Sauté the garlic for about 1 to 2 minutes. Keep an eye on it to prevent burning. You want it fragrant, not brown. Now, stir in 2 tablespoons of soy sauce, 1 teaspoon of honey or agave syrup, and 1 teaspoon of chili flakes. Mix well and cook for another minute. This lets the flavors blend. After that, add the cooked edamame to the skillet. Toss everything together until the edamame is well coated. Cook for an extra 2 to 3 minutes. This helps the edamame soak up all the spicy goodness. Taste and add salt if needed before serving. - Adjust the chili flakes to your taste. If you like it hot, add more. If you prefer mild, use less. - You can substitute soy sauce with tamari for a gluten-free option. Use coconut aminos for a sweeter taste. - Avoid burning the garlic. Cook it just until fragrant, about 1-2 minutes. Stir it often to keep it from browning. - To ensure the edamame absorbs the flavors, toss them well in the spicy mixture. Cook for an extra 2-3 minutes after adding them. - Serve the edamame in a large bowl for sharing. This makes it fun for everyone. - Garnish with sesame seeds and chopped green onions. This adds color and a fresh crunch. Pro Tips Fresh Edamame for Best Flavor: If possible, use fresh edamame instead of frozen for a more vibrant flavor and better texture. Adjust Spice Level: Feel free to modify the amount of chili flakes according to your heat preference. Start with less if you’re unsure! Garnish for Visual Appeal: Adding the sesame seeds and green onions not only enhances flavor but also adds a pop of color to the dish. Serving Suggestions: Serve these edamame as a snack, appetizer, or as a side dish to complement Asian-inspired meals. {{image_2}} To make this dish vegan, replace honey with agave syrup. Agave syrup has a similar sweetness. It blends well with the other flavors. This swap keeps the dish plant-based while still tasting great. You can make your Spicy Garlic Edamame even better by adding extra ingredients. Consider incorporating vegetables like bell peppers or carrots. These add color and crunch. You might also want to add protein options like tofu or tempeh. These choices turn your appetizer into a heartier dish. For those who enjoy heat, consider using different types of chili. You can try fresh chilies or chili paste for more depth. Experimenting with sauces can also bring new flavors. For example, sriracha or sambal can elevate the spice level. Mix and match to find your perfect heat balance. Store your spicy garlic edamame in an airtight container. This keeps them fresh and tasty. Leftovers last about 3 days in the fridge. Make sure to cool them down before sealing. This prevents moisture build-up, which can make them soggy. You can freeze edamame too. First, let them cool completely. Then, place them in freezer-safe bags. Remove as much air as possible before sealing. They can stay good for up to 3 months. When you're ready to eat, take out the amount you need. To defrost, place them in the fridge overnight. You can also microwave them for a few minutes. To reheat, use the stovetop or microwave. If using the stovetop, heat them in a pan over low heat. This helps keep their texture firm. If using the microwave, cover them with a damp paper towel. This keeps them from drying out. Avoid high heat to prevent a mushy texture. Enjoy every bite! You can serve Spicy Garlic Edamame with many dishes. It pairs well with rice or noodles. You can also enjoy it with sushi or as part of a vegetable platter. If you like a protein, try chicken or tofu. A light salad can also balance the spice. Yes, you can prepare this recipe ahead of time. Cook the edamame and store it in the fridge. Keep the garlic mixture separate. When you are ready to serve, just warm them both up and combine. This keeps the flavors fresh and tasty. No, edamame pods are not edible. They are tough and fibrous. Only eat the beans inside the pods. The beans are safe and healthy to eat. They are full of protein and fiber, making them a great snack. Select edamame that feels firm in the pod. Look for bright green color without brown spots. If buying frozen, choose bags with no ice crystals. Fresh edamame should have a slight sheen. These tips ensure you get quality beans for your dish. In this post, we explored how to make spicy garlic edamame, starting with fresh ingredients. Boiling the edamame and mixing it with a spicy garlic sauce creates a tasty dish. I shared tips for adjusting flavor, cooking techniques, and fun serving ideas. You can even try vegan options or add extra veggies to shake things up. Remember, proper storage and reheating keep your leftovers tasty. Enjoy making this dish, and let your creativity shine in the kitchen!
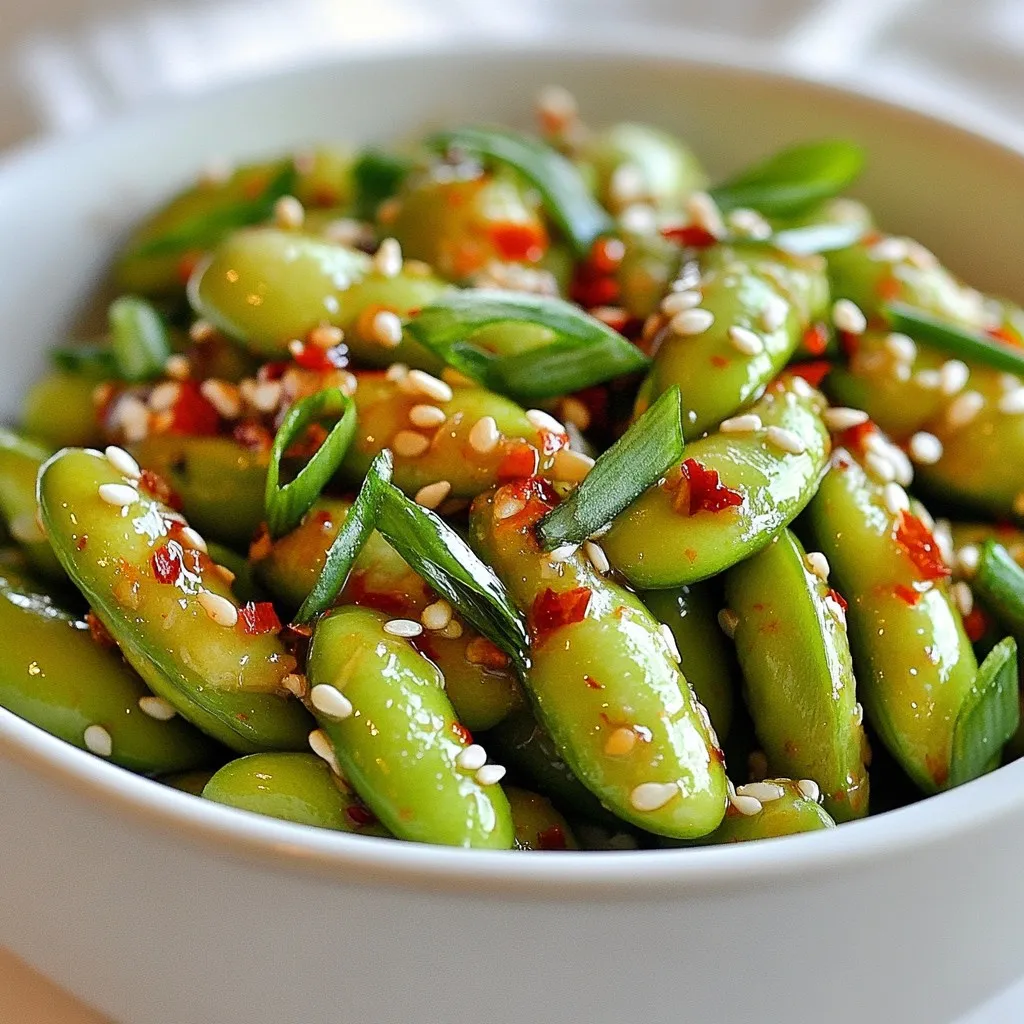
Spicy Garlic Edamame Flavorful Appetizer Recipe
If you love bold flavors and healthy snacks, you’ll adore this Spicy Garlic Edamame recipe! It’s simple to make and perfect for any get-together. Using
- 1 large loaf of sourdough or Italian bread - 1 cup shredded mozzarella cheese - 1 cup shredded sharp cheddar cheese - 6 tablespoons unsalted butter, melted - 4 cloves garlic, minced - 2 tablespoons fresh parsley, chopped (or 1 tablespoon dried parsley) - 1 teaspoon Italian seasoning - ½ teaspoon salt - ¼ teaspoon black pepper The main ingredients for cheesy pull-apart garlic bread are quite simple. You need a big loaf of sourdough or Italian bread. The bread holds all the cheese and flavors well. Next, mozzarella and sharp cheddar cheese give that gooey, tasty bite. You will also need unsalted butter, which adds richness. The garlic makes it all pop with flavor. Fresh parsley or dried parsley adds a nice touch of color and taste. Italian seasoning, salt, and black pepper enhance the flavors even more. - ½ teaspoon red pepper flakes for a spicy kick - Variations on cheese types For a bit of heat, you can add red pepper flakes. This spice works well if you like a kick. You can also switch up the cheese types. Try using gouda, provolone, or even pepper jack. Mixing cheeses can create a fun twist on this dish. Feel free to get creative with your ingredients. Cheesy pull-apart garlic bread is all about personal taste! {{ingredient_image_1}} 1. Preheating the oven: Start by setting your oven to 375°F (190°C). This step is key for perfect baking. 2. Making diagonal cuts in the loaf: Take a large loaf of sourdough or Italian bread. Place it on a cutting board. Make diagonal cuts about 1 inch apart. Cut downwards but don’t cut all the way through. Then, make similar cuts in the opposite direction. This creates a nice diamond pattern, which helps with stuffing. 1. Combining ingredients in a bowl: In a small bowl, add 6 tablespoons of melted butter. Next, add 4 minced garlic cloves, 2 tablespoons of chopped parsley, 1 teaspoon of Italian seasoning, ½ teaspoon of salt, and ¼ teaspoon of black pepper. If you like spice, you can add ½ teaspoon of red pepper flakes. Mix these ingredients well. 2. Flavor enhancements: The garlic butter brings a rich taste. The herbs add freshness. This mixture makes the bread super tasty. 1. Brushing the butter mixture into cuts: Take a brush and dip it into your garlic butter mix. Brush it generously into each cut of the bread. Make sure every cut gets some butter. 2. Packing cheese into the bread: Now it’s time to add the cheese! Take 1 cup of shredded mozzarella and 1 cup of sharp cheddar. Gently stuff the cheese into the cuts. Press it in well to ensure every bite is cheesy and delicious. 1. Wrapping the bread in foil: Wrap the stuffed bread tightly in aluminum foil. This helps the cheese melt evenly and keeps the bread soft. 2. Baking and toasting tips: Place the foil-wrapped bread on a baking tray. Bake it in the oven for 15-20 minutes. After 20 minutes, remove the foil. Bake for an extra 10-15 minutes. This step makes the bread crispy and the cheese bubbly. Once done, let it cool slightly before serving. To get the best melt from your cheese, wrap your bread in foil. This helps keep the heat in while it bakes. Make sure the foil is tight around the loaf. This way, the cheese melts evenly without drying out. Adjust the baking time based on your oven. If your bread is larger or thicker, add a few more minutes. Keep an eye on it! You want the cheese to bubble and the bread to toast just right. For a great presentation, serve your cheesy pull-apart garlic bread on a wooden cutting board. Sprinkle chopped parsley on top for color. It looks nice and adds fresh flavor. Consider adding a small bowl of marinara sauce or a spicy dipping sauce on the side. This adds a fun twist to every bite. It's perfect for sharing at parties or enjoying with family. Pro Tips Use Fresh Ingredients: Always opt for fresh garlic and parsley to enhance the flavor profile of your garlic bread. Cheese Variations: Feel free to experiment with different cheese types like pepper jack or gouda for a unique twist on flavor. Prevent Sogginess: To prevent the bread from getting soggy, make sure to brush off excess garlic butter before stuffing with cheese. Serving Suggestions: Pair with marinara sauce or a spicy aioli for dipping to complement the cheesy goodness. {{image_2}} You can play with different cheese types for your pull-apart bread. Try using provolone or gouda for a unique twist. A mix of cream cheese and cheddar adds a rich flavor. You can also use pepper jack for a spicy touch. Mixing cheese types creates layers of flavor. Just ensure they melt well. Changing the herbs and spices can elevate your bread. Fresh basil or oregano brings a fresh taste. Try thyme for a warm, earthy flavor. You can also add a pinch of smoked paprika for depth. Red pepper flakes can add a nice kick. Feel free to combine different spices to make it your own. To keep your cheesy pull-apart garlic bread fresh, use an airtight container. This helps lock in moisture and flavor. If you don't have one, wrap the bread tightly in plastic wrap. Store it at room temperature for up to two days. If you need to keep it longer, freeze it! Just wrap it well in aluminum foil or plastic wrap, and it can last up to three months. When it's time to enjoy your leftovers, the best way to reheat them is in the oven. Preheat your oven to 350°F (175°C). Place the bread on a baking sheet. Cover it with foil to keep the cheese from drying out. Heat for about 10-15 minutes. If you want a crispier crust, remove the foil for the last few minutes. This helps maintain that perfect cheesy texture and brings back the bread's original glory. How do I prevent the bread from getting soggy? To keep the bread from getting soggy, avoid over-soaking it with the garlic butter. Use just enough to coat the cuts. Also, wrapping the bread in foil prevents steam from making it wet. This method keeps the crust nice and crispy while the cheese melts inside. Can I make this recipe ahead of time? Yes, you can make this recipe ahead. Prepare the bread and stuff it with cheese and garlic butter. Wrap it tightly in foil and store it in the fridge. When you're ready to bake, just pop it in the oven. Adjust the time if baking from cold. What can I substitute for garlic? If you want to skip garlic, try using garlic powder or garlic salt. You could also use onion powder for a different flavor. Fresh herbs like thyme or rosemary can also add great taste without garlic. Can I use a different bread type? Absolutely! You can use any bread you like. French bread, ciabatta, or even whole grain bread work well. Just make sure the bread is sturdy enough to hold the cheese and butter mixture. This blog post covered the ingredients and steps to make cheesy garlic bread. You learned about different bread, cheese, and optional spices. We discussed tips to ensure perfect cheese melting and how to store leftovers. You can experiment with variations for a unique touch. In the end, making this dish can bring comfort and joy to any meal. With a few simple steps, you can impress your family and friends. Enjoy your cheesy creation!
Cheesy Pull-Apart Garlic Bread Tasty and Simple Delight
If you crave a warm, cheesy treat that’s easy to make and hard to resist, you’re in for a delicious surprise! This Cheesy Pull-Apart Garlic