Appetizers
![To make the best homemade salsa ever, you need the following fresh ingredients: - 4 ripe tomatoes, diced - 1 small red onion, finely chopped - 1 jalapeño, deseeded and minced - 1/4 cup fresh cilantro, chopped - 2 cloves garlic, minced - 2 tablespoons lime juice - 1 teaspoon ground cumin - Salt and pepper to taste Choosing fresh ingredients is key to great salsa. Look for vibrant tomatoes that feel firm. A good tomato should have a rich red color. The onion should be crisp and slightly sweet. For jalapeños, select ones that are shiny and firm. Fresh cilantro should be bright green, with no yellow or brown spots. These choices will enhance your salsa's taste and texture. Feel free to make this salsa your own! You can add a pinch of sugar for sweetness. A splash of vinegar can give it a tangy kick. You might also try adding fruits like mango or pineapple for a sweeter twist. If you love extra heat, consider adding more jalapeños or even a serrano pepper. Customize to fit your taste! For the full recipe, check here: [Full Recipe]. To make the best homemade salsa, you need fresh ingredients. Start with four ripe tomatoes. Dice them into small pieces. Next, take a small red onion. Finely chop it to bring out its strong flavor. A jalapeño adds heat, so remove the seeds and mince it carefully. You can adjust the amount based on your spice preference. Don't forget the garlic; two cloves minced will add a nice punch. In a medium bowl, combine the diced tomatoes, chopped onion, minced jalapeño, and garlic. Mix them gently to keep the tomatoes intact. Next, add 1/4 cup of fresh cilantro, chopped finely. The cilantro adds a fresh taste. Pour in two tablespoons of lime juice for zing. Then, sprinkle one teaspoon of ground cumin for warmth. Finally, season with salt and pepper to taste. Stir everything together until well mixed. For the best flavor, let your salsa rest. This time helps the flavors meld. I suggest letting it sit for at least 30 minutes. You can cover the bowl with plastic wrap. If you have time, letting it rest longer enhances the taste even more. For the full recipe, check the details above. Enjoy your fresh salsa with tortilla chips or on tacos! Cutting tomatoes and onions can be tricky. To start, pick ripe tomatoes. Use a sharp knife for clean cuts. Cut the tomato in half, then make slices from top to bottom. Turn the tomato and slice again to make small cubes. For onions, cut off both ends first. Peel off the skin, then cut it in half. Slice from top to bottom, then chop. This helps avoid tears and keeps your salsa fresh. Spice is key in salsa. If you like it hot, keep the seeds from the jalapeño. For a milder taste, remove all seeds and the white part. You can also swap jalapeños for bell peppers. They add flavor without much heat. Always taste your salsa as you mix. If it’s too spicy, add more diced tomatoes or avocado to cool it down. To keep your salsa fresh, store it in an airtight container. This stops air from getting in and keeps it tasty. Put it in the fridge and use it within three days for the best flavor. If you want to save it longer, consider freezing it. Just make sure to leave space in the container for expansion. This way, you can enjoy your homemade salsa anytime! For the complete recipe, check out the Full Recipe section. {{image_2}} Do you love heat? You can make spicy salsa easily. Add more jalapeños or use serrano peppers. For a smoky flavor, add chipotle peppers in adobo sauce. Try a pinch of cayenne for extra kick. Each choice gives a unique twist. Adjust the spice to match your taste. Want something sweet? Fruit-infused salsa is a fun choice. Dice mango, pineapple, or peaches for a fresh burst. These fruits add sweetness that balances the heat. You can mix them with tomatoes for a tasty blend. It’s a great way to use seasonal fruits, too! This salsa is already vegan! But you can make it allergy-friendly, too. If you have a nightshade allergy, substitute tomatoes with roasted zucchini. This adds a rich flavor without the risk. You can also skip the jalapeño if you prefer mild salsa. Enjoy delicious salsa without worry. For the full recipe, check out Best Homemade Salsa Ever. To keep your salsa fresh, store it in an airtight container. Glass jars work great. Make sure to press out any air before sealing. This helps prevent spoilage. Always keep your salsa in the fridge. Avoid leaving it out at room temperature. Homemade salsa lasts about 5 to 7 days in the fridge. The flavors can change over time. Use it within this time for the best taste. If you see any mold, throw it out right away. Always trust your senses; if it smells off, it's time to discard it. You can freeze salsa for longer storage. Pour it into freezer-safe bags or containers. Remove as much air as possible. Salsa can last up to 3 months in the freezer. When ready to use, thaw it in the fridge overnight. It may be a bit watery. Just stir it well before serving. For the best flavor, enjoy it as soon as possible after thawing. You can find the full recipe for the best homemade salsa ever in the earlier sections. Homemade salsa can last in the fridge for about 5 to 7 days. To keep it fresh, store it in an airtight container. Make sure to check for any signs of spoilage before using it. If it smells off or looks different, it's best to toss it. The flavors will get better as it sits, but don't wait too long! Yes, you can use canned tomatoes in your salsa. This option can save time and still taste great. Look for canned tomatoes that are low in sodium and without added sugars. Drain the tomatoes well before using them. This helps keep your salsa from being too watery. Fresh tomatoes give a brighter flavor, but canned can work well in a pinch. There are many great options to serve with homemade salsa. Here are a few ideas: - Tortilla chips - Tacos or burritos - Grilled chicken or fish - Quesadillas - Nachos You can also use salsa as a topping for eggs or mix it into salads. It adds a fresh kick to any meal! For the full recipe, check out the Best Homemade Salsa Ever. To make great salsa, start with fresh, quality ingredients. Follow the steps for perfect prep and combining. Remember the best tips for cutting and storing. Don’t forget to explore tasty variations to suit your taste. In conclusion, homemade salsa is easy and fun. With these simple steps, you’ll create salsa everyone loves. Enjoy your fresh salsa with friends or family. You’ll impress them with your skills!](https://grilledflavors.com/wp-content/uploads/2025/07/5cf70b75-f08e-4637-b5d8-3890a8a82959.webp)
Best Homemade Salsa Ever Flavorful Fresh Recipe
Are you ready to elevate your snack game? I’m excited to share the Best Homemade Salsa Ever recipe, packed with flavor and freshness! This salsa

Scarecrow Crunch Snack Mix Tasty Halloween Treat
Get ready for Halloween fun with my Scarecrow Crunch Snack Mix! This tasty treat combines popcorn, pretzels, and candy corn for a sweet and salty
. How long should I let the pickles ferment? You should let the pickles ferment for 1 to 2 days at room temperature. This time allows the flavors to develop. After that, move the jars to the fridge. The pickles will taste better if you let them sit for a week or more. Can I reuse the pickling brine? Yes, you can reuse the pickling brine once. Just make sure you strain it well. The second batch may not taste as strong, but it can still work well. What types of cucumbers are best for pickling? Pickling cucumbers are the best choice. They are small, crisp, and have fewer seeds. Varieties like Kirby or Persian cucumbers work great too. How to tell if pickles have spoiled? Look for any off smells or changes in color. If you see mold or bubbles, it’s best to throw them away. Fresh pickles should smell tangy and fresh. Can I can these pickles for longer shelf life? Yes, you can can pickles for longer storage. Just use a water bath canning method. This will help keep them safe to eat for months. For the full recipe, check out the Crunchy Dill Pickles recipe. You can find more ideas for pickling and adding flavor to your meals. You’ve learned the essentials of pickle-making, focusing on ingredients, preparation, and fermentation. Remember to choose fresh cucumbers and the right brine mix for tasty results. Avoid overcrowding jars to ensure a good seal and flavor. Don't be afraid to experiment with different spices for unique flavors. With proper storage, your homemade pickles can last and delight for months. Enjoy the fun of pickling and savoring your crunchy creations!](https://grilledflavors.com/wp-content/uploads/2025/07/9953803f-2adc-4302-af6d-9b7b7cb9f863.webp)
The Best Sour Pickles Recipe Simple and Tasty Guide
Are you ready to make the best sour pickles? This simple and tasty guide will show you how. I’ll share my favorite ingredients, easy steps,
![- 4 large portobello mushrooms, cleaned and stems removed - 4 tablespoons balsamic vinegar - 2 tablespoons olive oil - 2 garlic cloves, minced - 1 teaspoon dried thyme - 1 teaspoon dried oregano - Salt and pepper to taste - Fresh parsley, chopped (for garnish) When selecting portobello mushrooms, look for large, firm caps. They should be smooth and free from dark spots. Fresh mushrooms have a rich, earthy smell. Avoid any that feel slimy or have a strong odor. Quality balsamic vinegar is key. Choose one that is thick and sweet. This will add depth to your dish. If you can't find it, you can use red wine vinegar, but the flavor will change. For the herbs, you can switch dried thyme and oregano with fresh ones if you have them. Use three times the amount of fresh herbs. You can also try rosemary or basil for a different taste. To start, gather your ingredients for the marinade. In a small bowl, mix: - 4 tablespoons balsamic vinegar - 2 tablespoons olive oil - 2 minced garlic cloves - 1 teaspoon dried thyme - 1 teaspoon dried oregano - Salt and pepper to taste Whisk these together until smooth. This will add a rich flavor to your mushrooms. Let the mushrooms soak in this marinade for at least 30 minutes. This time allows the flavors to soak in deeply. If you have more time, marinate them for up to two hours for even more flavor. After marinating, it’s time to grill. Preheat your grill to medium-high heat. This helps get those nice grill marks. Next, place the mushrooms on the grill, gill side down. Grill them for 5-7 minutes. This will give them a beautiful texture and flavor. Once the first side is done, flip the mushrooms over. Grill for another 5 minutes. They should be tender and have nice marks. When ready to serve, carefully take the mushrooms off the grill. Let them rest for a couple of minutes to keep their juices. For plating, lay the grilled mushrooms on a wooden board or a nice plate. Drizzle any leftover balsamic marinade over them. This adds a shiny finish. Garnish with freshly chopped parsley for a pop of color. It makes your dish look even more inviting. Enjoy your flavorful grilled portobello mushrooms! - Best grill temperatures for portobello mushrooms: Aim for medium-high heat, around 400°F (200°C). This temperature helps the mushrooms cook evenly and get those beautiful grill marks. - How to avoid sticking on the grill: Brush the grill grates with oil before placing the mushrooms. This simple step helps prevent sticking and makes flipping easier. - Additional spices or herbs to consider: Besides thyme and oregano, try adding rosemary or smoked paprika for extra depth. These spices bring out the umami in the mushrooms. - Ways to elevate the dish with sides and toppings: Pair grilled mushrooms with a fresh salad or serve them on a warm bun as a burger. Top with feta cheese or avocado for a creamy touch. - Overcooking vs. undercooking: Keep an eye on cooking time. Overcooking makes the mushrooms tough, while undercooking leaves them rubbery. Look for a tender texture. - Improper marination techniques: Make sure to coat the mushrooms fully in the marinade. Let them sit for at least 30 minutes. This helps them absorb all the great flavors. Remember to check the [Full Recipe] for all the details and instructions! {{image_2}} You can change up the marinade for your grilled portobello mushrooms. For a soy sauce twist, mix: - 4 tablespoons soy sauce - 2 tablespoons sesame oil - 2 garlic cloves, minced - 1 teaspoon grated ginger This adds a savory depth. You can also try citrus flavors. Squeeze fresh lemon or orange juice into the mix. It brightens the mushrooms. If you like heat, add crushed red pepper flakes or cayenne. This brings a nice kick to the dish. Adjust the spice level to suit your taste. Grilled portobello mushrooms pair well with many dishes. Serve them as a main or a side. They work great on burgers or in salads. For a vegetarian meal, serve them with quinoa and roasted veggies. For a vegan option, top them with avocado and salsa. They also shine on a pasta dish with olive oil and garlic. You can use other mushrooms if you can't find portobello. Cremini or shiitake mushrooms are great substitutes. They offer similar textures and flavors. If you want to swap balsamic vinegar, try a savory glaze. Red wine vinegar or apple cider vinegar adds a unique tang. You can also use teriyaki sauce for a sweet flavor. Experiment with what you have on hand! To keep your grilled portobello mushrooms fresh, let them cool first. Place them in an airtight container. Glass containers work best because they keep moisture in and let you see what's inside. You can also use plastic containers with secure lids. Store them in the fridge for up to three days. When you want to enjoy leftovers, gently reheat them. The best way is in a skillet over low heat. This method warms them through and keeps their flavor. You can also use the microwave, but heat in short bursts. Check often to avoid making them rubbery. Can you freeze grilled portobello mushrooms? Yes! You can freeze them for later use. First, cool them completely and place them in a freezer-safe bag. Remove as much air as possible before sealing. They can last up to three months in the freezer. To use them, thaw in the fridge overnight and reheat as described above. This way, you can enjoy your grilled portobello mushrooms even when you are short on time. Grilling time depends on the size of the mushrooms. For large portobellos, grill for 5-7 minutes on one side, then flip and grill for another 5 minutes. Smaller mushrooms may require less time. Always check for tenderness and nice grill marks. Yes, you can prepare some parts ahead. Marinate the mushrooms up to a day before grilling. Just store them in the fridge. This helps the flavors soak in. When ready, grill them fresh for the best taste. Grilled portobello mushrooms pair well with many sides. Try serving them with a fresh salad, roasted veggies, or quinoa. They also work great in burgers or as a topping for pasta. For detailed preparation steps and cooking tips, check the [Full Recipe]. Grilling portobello mushrooms is simple and delicious. You learned about the key ingredients, marinades, and grilling techniques. Choosing fresh mushrooms and quality vinegar is crucial. Remember, proper marination and grilling times make all the difference. I encourage you to get creative with flavors and variations. Use these tips to serve a great dish with your favorite sides. Enjoy your next meal with tasty grilled mushrooms!](https://grilledflavors.com/wp-content/uploads/2025/07/93ad31da-030e-440d-b353-ce5046ba350a.webp)
Grilled Portobello Mushrooms with Balsamic Glaze Delight
Get ready to delight your taste buds with Grilled Portobello Mushrooms with Balsamic Glaze! These savory mushrooms are easy to prepare and pack a flavor
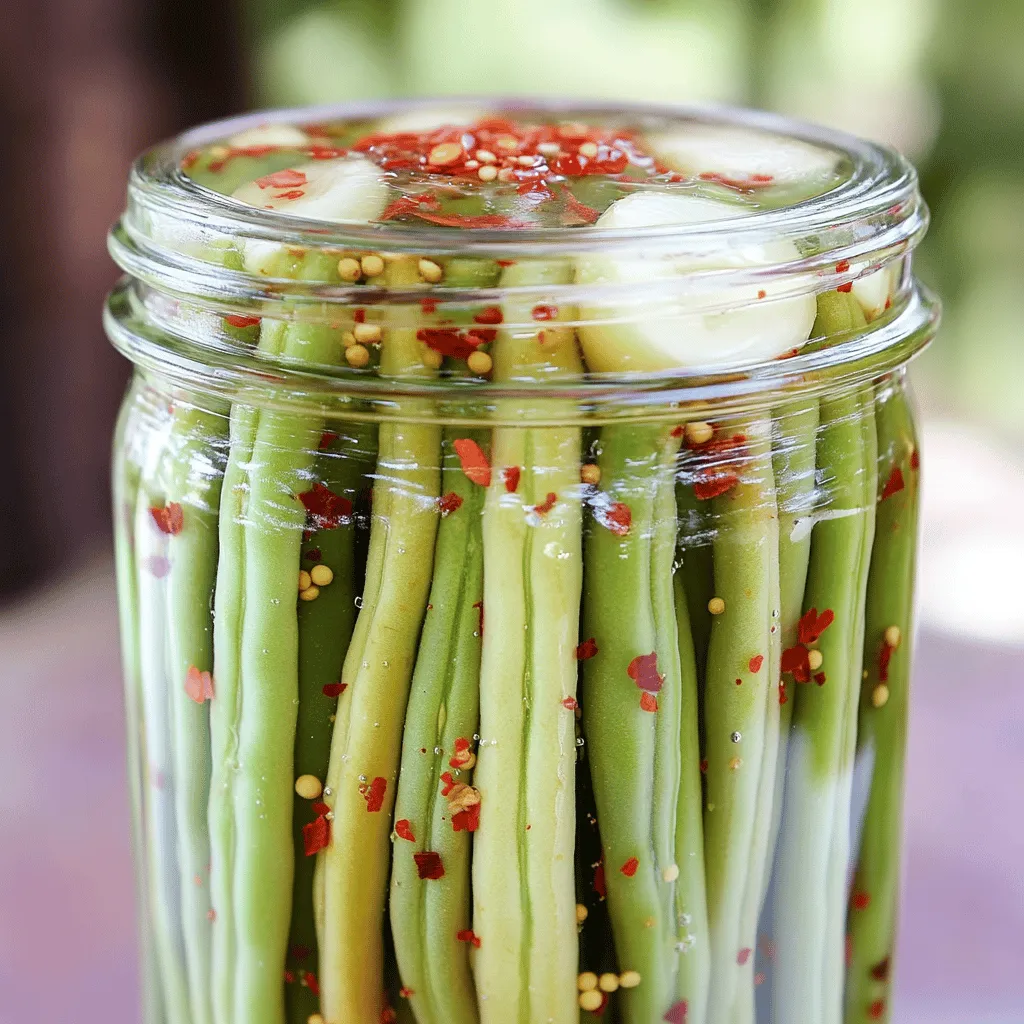
Quick Pickled Green Beans Crunchy and Flavorful Snack
Looking for a crunchy and flavorful snack? Quick pickled green beans are the answer! They’re easy to make and packed with taste. In this blog

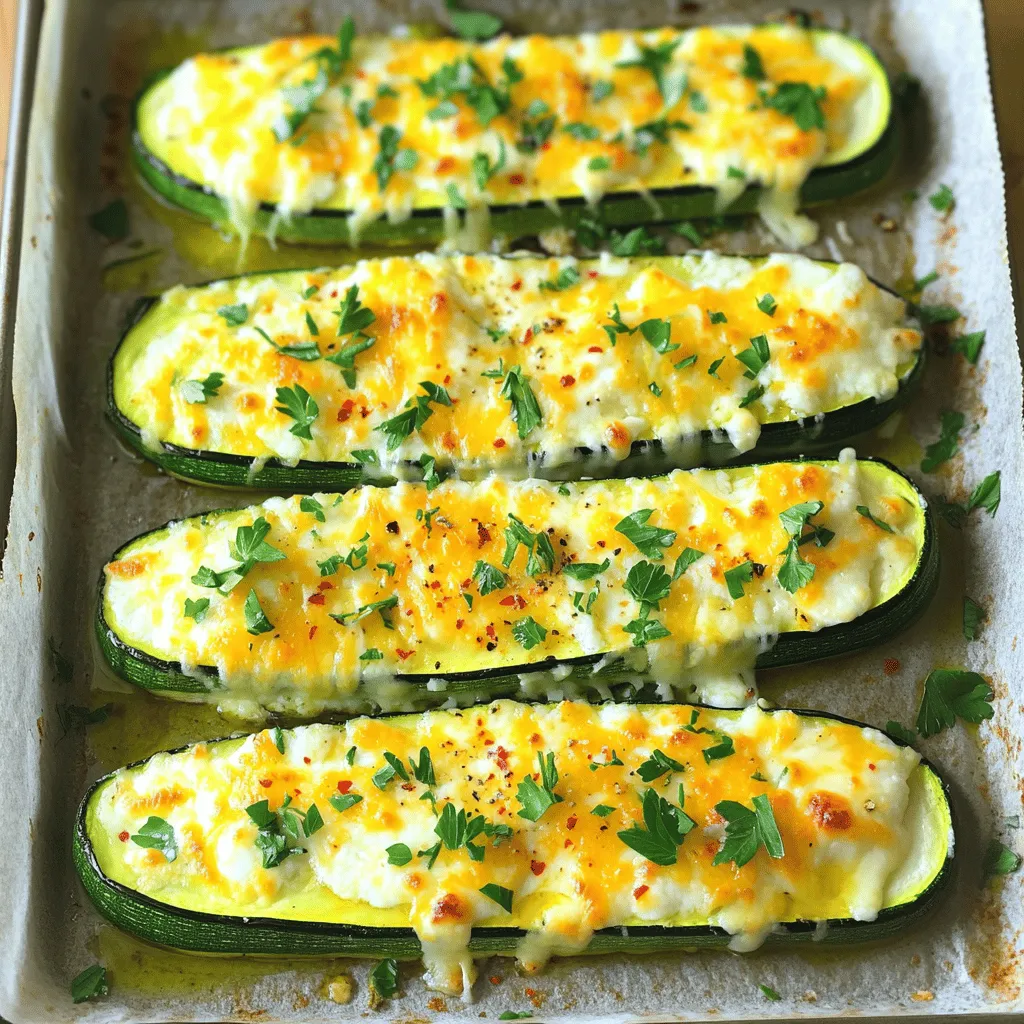
Grilled Zucchini with Balsamic Glaze Tasty and Fresh
Looking for a fresh and tasty side dish? Grilled Zucchini with Balsamic Glaze is simple and delicious! By mixing firm zucchini with garlic, Italian herbs,
![Zucchini is the star of this dish. It is low in calories and high in nutrients. Zucchini is full of vitamins A and C. It also has fiber, which is great for digestion. The best part? Zucchini has a mild taste that soaks up flavors well. Cheese plays a big role too. The blend of mozzarella and Parmesan gives a rich, creamy texture. Mozzarella melts perfectly, while Parmesan adds a nice sharp flavor. Together, they make each bite delightful. Spices elevate the taste of these steaks. I use garlic for its strong, aromatic flavor. Olive oil adds richness and helps the cheese melt well. Dried oregano brings a touch of earthiness. If you like heat, red pepper flakes give a nice kick. Don't forget to season with salt and pepper to balance everything. Here’s a quick look at the key ingredients you'll need for this recipe: - 2 large zucchinis - 1 cup shredded mozzarella cheese - 1/2 cup grated Parmesan cheese - 4 cloves garlic, minced - 3 tablespoons olive oil - 1 teaspoon dried oregano - 1/2 teaspoon red pepper flakes (optional) - Salt and pepper to taste - Fresh parsley, chopped (for garnish) For the full recipe, check out the recipe section. How to Cut Zucchini for Perfect Steaks Cutting zucchini into steaks is easy. First, wash your zucchinis well. Then, slice them lengthwise. Aim for about 1/2 inch thick. This thickness helps them cook evenly. If they are too thin, they may get mushy. If they are too thick, they might stay firm. Making the Garlic and Oil Mixture In a small bowl, combine minced garlic and olive oil. Add dried oregano, red pepper flakes, salt, and pepper. Mix well until everything blends together. This mixture adds great flavor to the zucchini steaks. Make sure to coat each steak well for the best taste. Optimal Baking Temperature for Cheese Melting Preheat your oven to 400°F (200°C). This temperature is perfect for melting cheese. It helps the mozzarella turn golden and bubbly. The zucchini becomes tender but not mushy. Tips for Checking Zucchini Doneness Bake the zucchini for 20-25 minutes. To check if they are done, poke a steak with a fork. If it goes in easily, they are ready. The cheese should be melted and slightly browned. Let them cool for a few minutes before serving. This helps the flavors settle. For the full recipe, see the earlier section. Enjoy your cheesy garlic zucchini steaks! To avoid soggy zucchini, start with fresh, firm zucchinis. Cut them into thick steaks, about 1/2 inch thick. Thin slices will get mushy. Lay the slices on a baking sheet lined with parchment paper. This helps with even cooking. When baking, preheat your oven to 400°F (200°C). This high heat helps the cheese melt perfectly. Bake for 20 to 25 minutes. Check the zucchini for tenderness, but don’t let it get too soft. Using cheese is key to adding flavor to your zucchini steaks. I recommend mozzarella for its creamy melt and Parmesan for a salty kick. You can mix them for a great taste. If you prefer dairy-free options, use vegan cheese shreds. Look for brands that melt well. Nutritional yeast is a great substitute too. It adds a cheesy flavor without dairy. For the full recipe, check the [Full Recipe]. {{image_2}} Adding Different Herbs and Spices You can boost the flavor of cheesy garlic zucchini steaks with fresh herbs. Basil, thyme, or rosemary add a nice twist. Try mixing in some fresh basil for a sweet touch. Oregano is another great choice for a classic taste. You can also use spices like smoked paprika for a warm kick. Just sprinkle these herbs on top before baking. Substitute Ingredients for Unique Twists Substituting ingredients can make this dish your own. Swap mozzarella for cheddar or gouda for a sharper taste. You can even try vegan cheese if you're looking for a dairy-free option. Use almond-based cheese or cashew cheese for a creamy finish. Mixing in cherry tomatoes or bell peppers adds color and flavor. Ideal Pairings for Cheesy Garlic Zucchini Steaks These zucchini steaks pair well with grilled chicken or fish. Serve them alongside a fresh salad for a light meal. You can also enjoy them with rice or quinoa for a hearty dish. A tangy dipping sauce, like ranch or balsamic glaze, enhances the flavor too. Serving as a Main Dish vs. a Side Dish Cheesy garlic zucchini steaks can shine as both a main and a side dish. As a main dish, serve a larger portion with sides. For a side, cut the steaks smaller to complement your main meal. Either way, they offer a tasty, veggie-packed option. For the full recipe, check the link provided. To keep your cheesy garlic zucchini steaks fresh, store them in the fridge. Place the leftover steaks in an airtight container. This helps prevent moisture loss and keeps them tasty. They will last for up to three days. If you want to save them for later, freezing is a great option. Lay the zucchini steaks in a single layer on a baking sheet. Freeze them for about one hour. Once frozen, transfer them to a freezer-safe bag. Remove as much air as possible before sealing. Frozen zucchini steaks can stay good for up to three months. To enjoy your leftovers, reheating is key. The best way to reheat zucchini steaks is in the oven. Preheat it to 350°F (175°C). Place the steaks on a baking sheet and cover them with foil. This helps keep them moist. Heat for about 10 to 15 minutes until warm. You can also use a microwave, but be careful. Microwaving can make the zucchini soggy. If you choose this method, heat them in short bursts of 30 seconds. This way, you can check if they are warm enough. To ensure the cheese stays melted, consider adding a splash of water to the microwave dish. The steam helps keep the cheese gooey. With these tips, you can keep enjoying your cheesy garlic zucchini steaks! For the full recipe, check out the section above. Can I make Cheesy Garlic Zucchini Steaks ahead of time? Yes, you can prep these zucchini steaks ahead of time. Cut the zucchinis and mix the garlic oil. Brush the mixture on the steaks and cover them. Store in the fridge for up to 24 hours. When ready, add cheese and bake as directed in the Full Recipe. How do I know when zucchini is fully cooked? Zucchini is done when it becomes tender but not mushy. You can test it with a fork. If the fork goes in easily, it is cooked. The cheese should also be melted and golden brown, adding to the dish's appeal. What are some gluten-free options for this recipe? This recipe is naturally gluten-free. Just ensure your cheese and any added spices are gluten-free. You can also try using gluten-free breadcrumbs on top for added crunch if you want. This keeps the dish safe for those with gluten issues while adding texture. This blog post covers how to make tasty cheesy garlic zucchini steaks. We explored key ingredients and their benefits, from zucchini to spices. I shared step-by-step instructions for preparation and cooking. You learned tips for perfect texture and cheese choices, plus fun variations to try. Remember, storing and reheating your leftovers correctly keeps them fresh and delicious. Whether you serve these as a main dish or side, the options are endless. Enjoy making this easy, flavorful dish!](https://grilledflavors.com/wp-content/uploads/2025/07/693a3dc5-8c22-4816-9325-3189f61b6072.webp)
Cheesy Garlic Zucchini Steaks Flavorful and Easy Recipe
Looking for a tasty dish that’s quick and easy? Try my Cheesy Garlic Zucchini Steaks! This recipe highlights fresh zucchini, creamy cheese, and simple spices.
 for detailed instructions. Start by preheating your oven to 375°F (190°C). Next, take your zucchinis and cut them in half lengthwise. Use a spoon to scoop out the center, making them look like little boats. Save the scooped-out flesh; we’ll use it later for the filling. This is a fun part! Make sure you don’t cut through the skin as you scoop. Now let's make the filling. In a skillet, add one tablespoon of olive oil and heat it over medium heat. Once hot, add one clove of minced garlic. Sauté it for about 30 seconds, or until it smells great. Then, toss in one cup of diced mushrooms. Cook them for 5 to 7 minutes until they are tender and browned. Add the reserved zucchini flesh and two cups of chopped spinach to the skillet. Stir everything together and cook until the spinach wilts, which should take about 2 to 3 minutes. Once done, remove the skillet from the heat and let it cool a little. In a medium bowl, mix one cup of ricotta cheese, half a cup of grated Parmesan cheese, one teaspoon of dried oregano, half a teaspoon of salt, and a quarter teaspoon of black pepper. If you like heat, add a quarter teaspoon of red pepper flakes. Combine the spinach and mushroom mix with the ricotta mixture. Stir until everything is well mixed. Now, it’s time to fill the zucchinis! Spoon the filling into each zucchini boat. Pack it in slightly to fit all that deliciousness. Place the stuffed zucchinis in a baking dish and cover them with foil. Bake them in your preheated oven for 25 to 30 minutes. For the last 10 minutes, remove the foil. This will let the tops brown nicely. Once they are done baking, take them out of the oven. Let them cool for a few minutes. Garnish with fresh basil before serving. You can find the Full Recipe for more details! To stuff zucchini well, choose medium-sized zucchinis. They hold the filling better. Cut them in half and scoop out the inside gently. Leave some flesh to mix into your filling. This adds flavor! Use a spoon to pack the filling in tightly. Make sure it overflows a bit. This looks great and adds taste. I recommend baking your stuffed zucchinis at 375°F (190°C). This temperature helps cook them evenly. Bake for 25-30 minutes. In the last 10 minutes, remove the foil. This browns the tops, making them look yummy. Check if they are soft by poking them with a fork. If they are tender, they are ready! When serving, place the stuffed zucchinis on a nice plate. Garnish with fresh basil for color. You can drizzle some olive oil on top for shine. For extra flair, sprinkle some grated Parmesan cheese. This adds a nice touch and makes the dish look fancy. Your guests will love the look and taste! For the full recipe, check out the details above. {{image_2}} You can keep this dish fully vegetarian. Swap the ricotta with a vegan cheese. Use cashew cream or tofu instead. You can also add more veggies. Try bell peppers or diced tomatoes for extra flavor. This makes the dish colorful and healthy. If you want more protein, add chicken or tofu. Cook diced chicken in the skillet first. Then, mix it with the spinach and mushroom filling. For tofu, use firm tofu. Crumble it and sauté until golden. Both options make the dish heartier and filling. To change the flavor, add spices. Try cumin or paprika for a warm kick. You can also use fresh herbs like thyme or parsley. They add a nice touch to the filling. Experiment to find your favorite spice blend. This way, each time you make it, it feels new. For the complete recipe, check out the Full Recipe. After you enjoy your spinach, mushroom, and ricotta stuffed zucchini, store any leftovers in the fridge. Place them in an airtight container. This helps keep the flavors fresh. Your dish will last about 3 to 4 days in the refrigerator. When you’re ready to eat, check for any signs of spoilage. You can freeze stuffed zucchini if you want to save some for later. Wrap each stuffed zucchini in plastic wrap or foil. Place them in a freezer-safe bag or container. This helps prevent freezer burn. They can last up to 3 months in the freezer. When you’re ready to enjoy them, let them thaw overnight in the fridge before reheating. To reheat your stuffed zucchini, you can use the oven or microwave. For the oven, preheat to 350°F (175°C). Place the zucchini on a baking sheet and cover them with foil. Bake for about 15-20 minutes until heated through. If you use a microwave, heat them for 2-3 minutes on a microwave-safe plate. Keep an eye on them to avoid overcooking. Enjoy your delicious meal again! Check out the Full Recipe for more details on making this dish. Stuffed zucchinis last about 3 to 5 days in the fridge. Make sure to store them in an airtight container. This keeps them fresh and tasty. Always check for any signs of spoilage before eating. If they look or smell off, throw them away. Yes, you can make stuffed zucchini ahead of time. Prepare the zucchinis and the filling. You can stuff the zucchinis and then refrigerate them. Just cover them well. When you're ready to eat, bake them straight from the fridge. This makes meal prep easy and saves time. These stuffed zucchinis go well with many sides. Here are some ideas: - A fresh garden salad - Garlic bread or toast - Quinoa or brown rice - Roasted veggies for extra color and flavor These options make a complete meal. You can mix and match based on what you have. For the full recipe, check the recipe section. This blog post covered how to make delicious stuffed zucchini. We explored the ingredients, cooking steps, and tips for perfecting your dish. I shared variations to suit your taste and storage tips to keep leftovers fresh. Remember, you can swap ingredients or add proteins to make it your own. Try different spices to change the flavor. With these steps, you can impress your family and friends. Get cooking, and enjoy a tasty meal that’s easy to make!](https://grilledflavors.com/wp-content/uploads/2025/07/195afe36-ad37-4461-b7ba-a6c33c383cd6.webp)
Spinach, Mushroom, And Ricotta Stuffed Zucchini Delight
If you’re looking for a tasty and healthy dish, you’re in the right place! Spinach, Mushroom, and Ricotta Stuffed Zucchini brings flavor and nutrition together
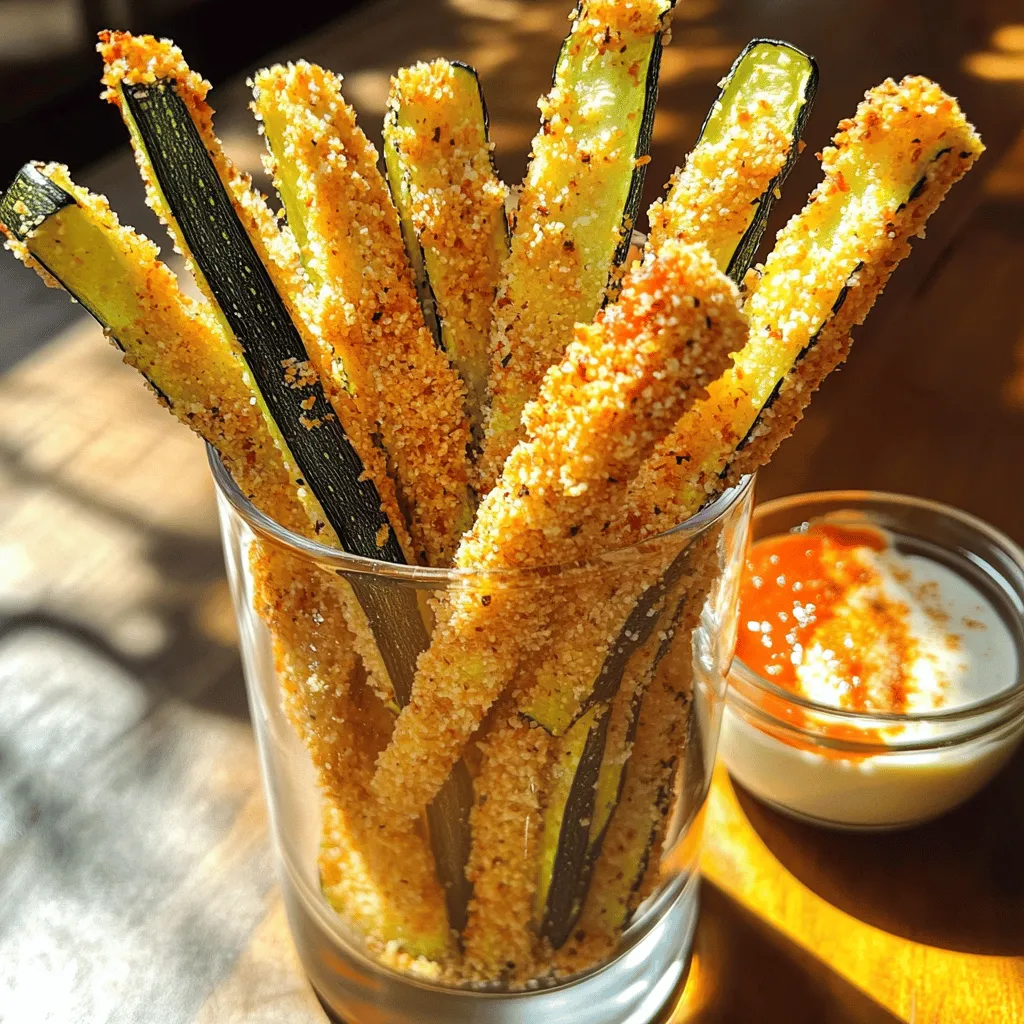
Baked Zucchini Fries Crispy and Flavorful Snack
Craving a healthy snack that’s crispy and full of flavor? Baked zucchini fries are the answer! With just a few simple ingredients, you can whip
Cheesy Garlic Zucchini Steaks Flavorful and Easy Recipe
Are you ready for a delicious veggie side that steals the show? My Cheesy Garlic Zucchini Steaks are packed with flavor and super easy to