Appetizers
 for step-by-step instructions and tips. Start by preheating your oven to 425°F (220°C). This high temperature helps make the fries crispy. While the oven heats, line a baking sheet with parchment paper. This keeps the fries from sticking and makes cleanup easy. In a shallow dish, mix together the almond flour, grated Parmesan cheese, garlic powder, onion powder, dried oregano, salt, and pepper. This blend gives the fries a tasty crust. Make sure to mix well so every bite is flavorful. Take each zucchini stick and dip it in the whisked eggs. Make sure each side is coated. Next, roll the zucchini sticks in the almond flour mixture. Press lightly to ensure they are well coated. This step is key for a crunchy texture. Place the coated zucchini fries on your prepared baking sheet. Arrange them in a single layer for even cooking. Lightly spray them with olive oil to enhance crispiness. Bake in your preheated oven for 20-25 minutes. Flip them halfway through to ensure both sides get golden brown. Once done, let them cool for a few minutes before serving. For the full recipe, check out the steps above. To make your zucchini fries extra crispy, follow these tips: - Proper oven temperature and placement: Always preheat your oven to 425°F (220°C). This high heat helps to crisp the fries. Place the baking sheet in the middle of the oven. This ensures even cooking. - Importance of coating the fries thoroughly: After dipping the zucchini in eggs, coat them well in the almond flour mixture. Make sure every side has a good layer. This creates a nice crunch when baked. Zucchini fries are more than just a snack; they shine when served right. Here are some ideas: - Ideal dipping sauces: Try marinara sauce for a classic touch. Ranch or garlic aioli also work well. They add flavor and moisture. - Presentation tips for an appealing look: Serve the fries in a basket lined with parchment paper. This adds a rustic feel. Arrange them neatly for a beautiful display. Want to make the recipe fit your needs? Here are some easy swaps: - Vegan substitutions for eggs: You can use flaxseed meal mixed with water instead of eggs. Mix 1 tablespoon of flaxseed meal with 2.5 tablespoons of water. Let it sit until it thickens. - Nut-free alternatives to almond flour: If you need a nut-free option, use sunflower seed flour. It gives a similar texture without the nuts. {{image_2}} You can easily change the taste of your zucchini fries by using different herbs or spices. Try adding smoked paprika for a smoky kick. You might also like using Italian herbs like basil or thyme for a fresh twist. Another great option is to sprinkle in some chili powder if you enjoy heat. For a cheesier flavor, add nutritional yeast to your almond flour mix. This will give your fries a nice umami taste without using dairy. You can also mix in some grated cheese to enhance the flavor even more. If you want a healthier option, try cooking your zucchini fries in an air fryer. Set your air fryer to 400°F (200°C) for about 10 to 15 minutes. Shake the basket halfway through for even crispiness. If you prefer a traditional method, you can pan-fry your zucchini fries. Heat some olive oil in a skillet over medium heat. Fry the coated zucchini sticks for about 3 to 4 minutes on each side until golden brown. Zucchini isn’t the only vegetable you can use for this recipe. Eggplant makes a great substitute, giving a rich and hearty texture. Just slice it into fry shapes and follow the same steps. Carrots are another fun option; they add a sweet crunch. You can adapt the recipe to fit your taste. Each vegetable will bring its own flavor and texture, so feel free to experiment! For the full recipe, check the earlier sections. To keep your leftover zucchini fries fresh, store them in an airtight container. Make sure the fries are completely cool before sealing. This helps keep moisture out and keeps them crispy. You can store them in the fridge for up to three days. If you want to enjoy them later, it's best to reheat them instead of eating them cold. To bring back the crispiness of your fries, use the oven or an air fryer. Preheat your oven to 400°F (200°C). Spread the fries evenly on a baking sheet. Heat them for about 10 minutes, flipping halfway through. This method helps to keep them crispy. Avoid using the microwave, as it makes them soggy. You can freeze zucchini fries before or after cooking. If you freeze them before cooking, lay them out on a baking sheet. Freeze until solid, then transfer to a freezer bag. They can last up to three months this way. If you prefer to freeze them cooked, let them cool completely first. Then, store them in an airtight container. Just remember, the texture may change a bit after freezing. To make zucchini fries crispy, follow these tips: - Use almond flour for a crunchy coating. - Coat the zucchini well in the egg and flour mixtures. - Bake at 425°F (220°C) for the best crunch. - Flip the fries halfway through baking for even crisping. These steps help achieve a perfect crunch. I find that using a light spray of olive oil also helps. Yes, you can prepare zucchini fries ahead of time. Here’s how: - Cut the zucchini and bread them as per the recipe. - Place them on a baking sheet in a single layer. - Cover and refrigerate for up to 24 hours. - When ready, bake them straight from the fridge. Making them ahead saves time and keeps them fresh. Zucchini fries pair well with various dips. Here are a few great options: - Marinara sauce for a classic touch. - Ranch dressing for a creamy flavor. - Garlic aioli for a bold taste. - Spicy sriracha mayo for a kick. These dips add fun and flavor to your zucchini fries. Gluten-free zucchini fries are low in carbs. Here’s a quick breakdown: - Each serving has about 10 grams of carbs. - The almond flour and zucchini are the main sources. This makes zucchini fries a great choice for low-carb diets. Yes, you can use other flours. Here are some alternatives: - Coconut flour gives a slightly sweet taste. - Chickpea flour adds protein and fiber. - Oat flour works well for a different texture. Each flour will change the flavor and crunch, so choose based on your taste! For the best results, stick to the original recipe using almond flour. For more details, check the Full Recipe. Zucchini fries are easy to make and delicious. You learned about key ingredients, steps, and tips that help you create crispy fries. Remember to coat the zucchini well and serve with your favorite dips. You can use different vegetables or cooking methods for fun twists. Storing and reheating them properly keeps your fries tasty. Feel free to explore flavors and share with others. Enjoy your zucchini fries as a healthy snack or side dish!](https://grilledflavors.com/wp-content/uploads/2025/06/55d56466-0e2b-4439-86f8-09046dfa51c2.webp)
Gluten Free Low Carb Zucchini Fries Easy and Delicious
Are you searching for a tasty snack that’s both gluten-free and low-carb? Look no further! I’m excited to share my easy and delicious recipe for
![To make the best zucchini salsa, you need these key ingredients: - 2 medium zucchinis, diced - 1 cup ripe tomatoes, diced - 1/2 red onion, finely chopped - 1 jalapeño, seeds removed and minced - 1 clove garlic, minced - 1/4 cup fresh cilantro, chopped - Juice of 1 lime - 1 teaspoon ground cumin - Salt and pepper to taste These ingredients create a bright and fresh flavor. The zucchinis add a nice crunch. The tomatoes give it a juicy base. The onion and garlic add depth to the taste. Jalapeño adds just the right amount of heat. You can customize your zucchini salsa with some optional add-ins. Here are a few ideas: - Diced bell peppers for extra crunch - Corn for sweetness and texture - Black beans for protein - Avocado for creaminess - Chopped green onions for a fresh touch These add-ins can change the flavor and texture. Feel free to mix and match based on your taste. Using fresh ingredients is key for a great salsa. Fresh zucchinis and tomatoes have better flavor. They also provide better texture. Fresh cilantro brightens up the dish. The taste of fresh lime juice adds a zing. Always choose ripe and firm vegetables for the best results. When everything is fresh, you get a salsa that pops with flavor. For the full recipe, check out the [Full Recipe]. To make the best zucchini salsa, start with fresh ingredients. First, wash the zucchinis and tomatoes. Then, dice the zucchinis and tomatoes into small, even pieces. This step helps the salsa taste great and look nice. Next, finely chop the red onion and remove the seeds from the jalapeño. Mince the jalapeño to add spice. Finally, mince the garlic and chop the cilantro. Each ingredient plays a key role in flavor and texture. In a large mixing bowl, combine the diced zucchinis, tomatoes, chopped red onion, minced jalapeño, and minced garlic. This mix of veggies creates a colorful base. Next, add the chopped cilantro for a fresh taste. Squeeze the juice of one lime over the veggies. Sprinkle in the ground cumin, salt, and pepper. Then, gently stir the mixture until all the ingredients are well combined. Let the salsa sit for at least 15-30 minutes. This resting time helps the flavors blend better. For the best flavor, always use ripe tomatoes and fresh herbs. Fresh ingredients make a big difference. If you want more heat, leave some seeds in the jalapeño. You can also mix in other spices, like paprika or coriander, for extra depth. When serving, use a colorful bowl to make your salsa pop. Garnish with extra zucchini strips or cilantro sprigs. Enjoy it with tortilla chips, or use it as a topping over grilled chicken. For the full recipe, check the main section. To make your zucchini salsa pop, use fresh, ripe ingredients. Fresh tomatoes and herbs bring out the best taste. Add a pinch more lime juice for a zesty kick. A touch of honey can balance the heat from the jalapeño. Letting the salsa sit for 15-30 minutes helps the flavors blend. This makes each bite burst with flavor. One mistake is chopping the zucchini too large. This can lead to uneven texture. Avoid using canned tomatoes; fresh ones taste much better. Don't rush the marinating time. If you serve it right away, the flavors won’t be as rich. Lastly, be careful with salt. Taste as you go to prevent over-seasoning. You will need a sharp knife and a cutting board for chopping. A large mixing bowl is essential for combining ingredients. A zester or juicer will help with the lime juice. Use measuring spoons for ground cumin and salt. Finally, a spoon or spatula is great for mixing everything together. {{image_2}} If you want to add some heat, try these spicy options. You can use more jalapeño or add a few sliced serrano peppers. For extra flavor, include a splash of hot sauce. You might also consider adding chipotle peppers in adobo sauce. This gives a smoky taste and packs a punch! Fruits can make zucchini salsa special. Try adding diced mango or peach for sweetness. They balance the heat and add juicy flavor. Pineapple also works well; it adds a tropical touch. Mix in fruits right before serving to keep them fresh and bright. Switching up herbs can change the taste of your salsa. Fresh basil or mint can offer a fresh twist. You can also try dill for a unique flavor. For spices, consider smoked paprika or chili powder. These add depth and warmth to your dish. For more ideas and a complete guide, check out the Full Recipe. To keep your zucchini salsa fresh, store it in an airtight container. Glass jars work great for this. Make sure the lid seals tightly. This keeps out air and moisture, which can spoil the salsa. Place it in the fridge right after making it. Fresh salsa tastes best, but proper storage helps it last longer. Zucchini salsa lasts about 3 to 5 days in the fridge. If you want to keep it longer, freezing is a great option. Use freezer-safe bags or containers. Leave some space in the bag for expansion. Zucchini salsa can stay good in the freezer for up to 3 months. When you're ready to use it, thaw it in the fridge overnight. You can enjoy zucchini salsa cold or warm. For a warm option, gently heat it in a pan over low heat. Stir it often to avoid burning. Serve it with tortilla chips, on tacos, or over grilled meats. For a fun twist, try it on eggs or with pasta. To make it look fancy, garnish it with extra cilantro or zucchini strips. This adds a nice touch and makes it more appealing! For the full recipe, check out The Best Zucchini Salsa. Zucchini salsa lasts about 3 to 5 days in the fridge. Keep it in an airtight container. After a few days, the flavors may change. If it looks or smells off, it's best to toss it. Yes, you can add many other vegetables to zucchini salsa. Bell peppers, corn, or even carrots work well. Just remember to chop them small, so they mix well. This lets you customize the salsa to your taste! Serve zucchini salsa chilled for the best flavor. Use a colorful bowl for a nice touch. It pairs great with tortilla chips or grilled chicken. You can also top tacos or nachos with it for extra zest. For the full recipe, check out the instructions above. Zucchini salsa shines with fresh, vibrant flavors. We explored key ingredients and optional add-ins, highlighting the importance of freshness. Step-by-step instructions helped you prepare, mix, and enhance your salsa. I shared pro tips, mistakes to avoid, and essential kitchen tools. Variations can add a spicy kick or fruity twist to your salsa. Lastly, knowing how to store it properly ensures you get the best taste over time. Celebrate your cooking with delicious zucchini salsa, ready to impress. Enjoy every bite!](https://grilledflavors.com/wp-content/uploads/2025/06/742047d1-5223-4899-93cd-ed16cad2c474.webp)
The Best Zucchini Salsa Fresh and Flavorful Recipe
Looking for a fresh twist on salsa? Try my best zucchini salsa recipe! Zucchini shines here, mixing with bright veggies and spices to create a
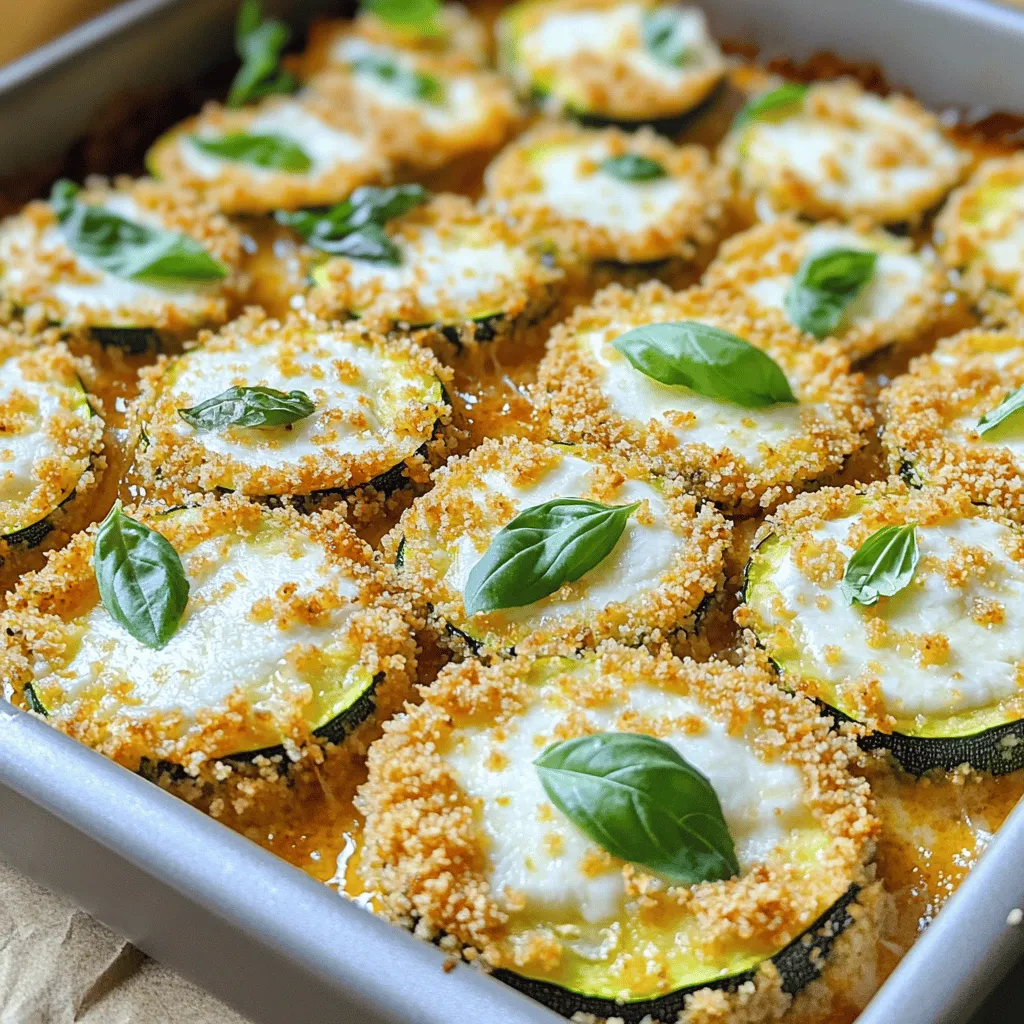
Zucchini Parmesan Crispy and Flavorful Bake Recipe
If you’re craving a tasty dish that’s both crispy and healthy, look no further! My Zucchini Parmesan recipe packs layers of flavor with simple ingredients.
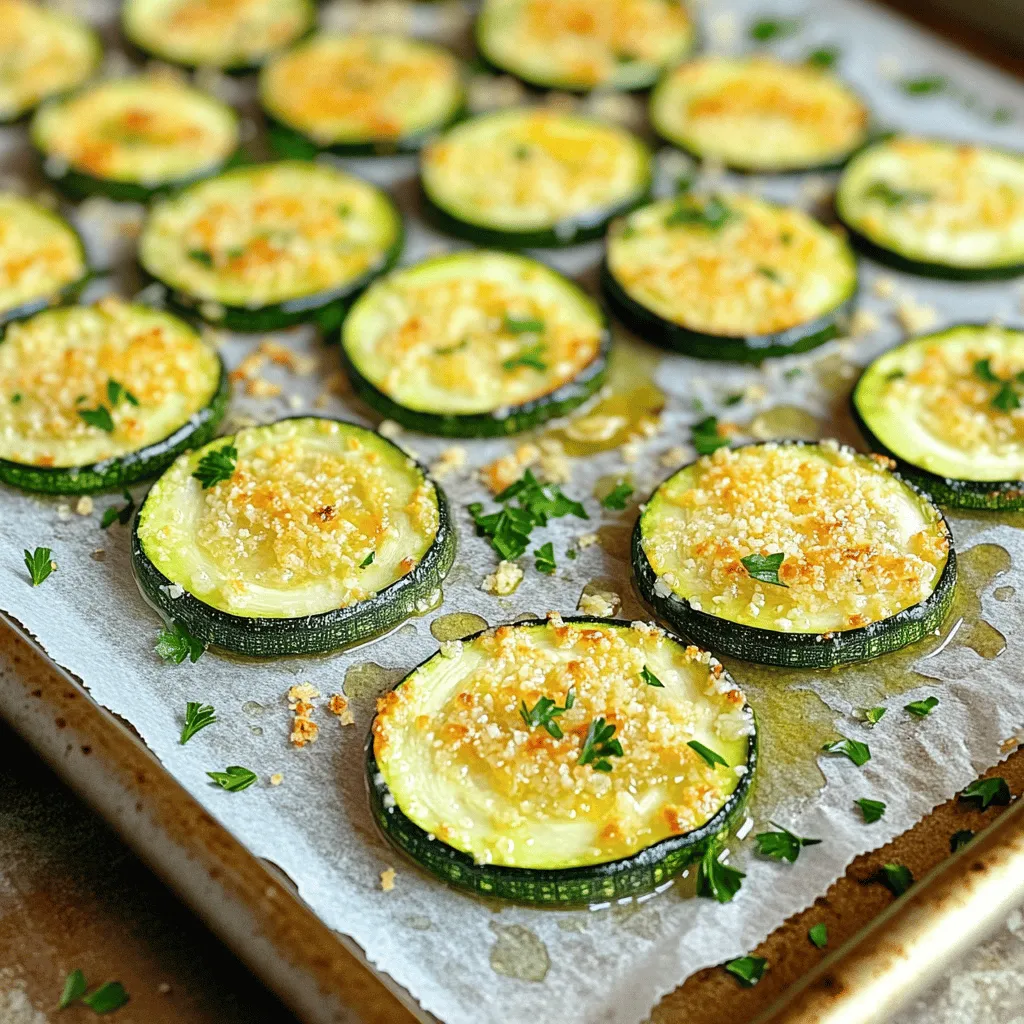
Quick Roasted Parmesan Zucchini Delightful Veggie Treat
Are you ready to enjoy a crunchy, cheesy veggie dish? Quick Roasted Parmesan Zucchini is a simple treat that packs a great flavor punch. With
![- 2 medium zucchinis, grated - 1 cup breadcrumbs (panko recommended for extra crunch) - 1/2 cup grated Parmesan cheese - 2 cloves garlic, minced - 2 large eggs, beaten - 1/4 cup fresh parsley, chopped - 1/2 teaspoon onion powder - 1/2 teaspoon baking powder - Salt and pepper to taste - Olive oil spray (for cooking) When making zucchini garlic bites, using fresh ingredients is key. Zucchini brings moisture and a mild flavor. Breadcrumbs, especially panko, give a great crunch. Parmesan cheese adds a salty, rich touch. Garlic gives it a kick that everyone loves. Eggs bind everything together, while parsley adds freshness. Onion powder enhances the taste without being too strong. Baking powder helps the bites rise and stay fluffy. Finally, salt and pepper round out the flavors. For the best results, choose firm zucchinis. Look for ones with smooth skin. Fresh herbs like parsley add vibrant color and taste. Keep your ingredients ready before starting. This makes the process smoother and more fun. You can find the full recipe later in this article. Enjoy crafting these bites! 1. Preheat your oven to 400°F (200°C). Line a baking sheet with parchment paper. This step helps keep the bites from sticking. 2. Grate the zucchinis using a box grater. Place the grated zucchini in a bowl. Add a pinch of salt and let it sit for 10 minutes. This draws out moisture, making your bites crispier. 3. After 10 minutes, grab a clean kitchen towel. Squeeze the zucchini to remove as much water as you can. This is key for crunch. 4. In the same bowl, add the breadcrumbs, Parmesan cheese, minced garlic, beaten eggs, parsley, onion powder, baking powder, salt, and pepper. Mix everything until it’s well combined. You want a nice, sticky mixture that holds together. 5. Now, use your hands to form small patties. Each should be about 2 inches wide. Place them on the prepared baking sheet, leaving space between each one. 1. Bake the bites in the oven for 20 to 25 minutes. Keep an eye on them. You want them to be golden brown and crispy. 2. To achieve that perfect golden brown, you can lightly spray the tops with olive oil spray before baking. This helps them crisp up nicely. Following these steps will lead you to delicious Zucchini Garlic Bites! For the complete recipe, check the [Full Recipe]. To make your zucchini garlic bites truly crisp, start by squeezing out extra moisture. After grating the zucchini, sprinkle it with salt and let it sit for about 10 minutes. This step helps pull out water. Then, use a clean kitchen towel or cheesecloth to wring out as much liquid as you can. This will make your bites crunchier. For the best baking results, set your oven to 400°F (200°C). Bake the bites for 20 to 25 minutes. Watch them closely. You want them golden brown and crispy on the outside, not burnt. Mixing the right ingredients ensures great flavor. Combine grated zucchini, breadcrumbs, Parmesan cheese, garlic, eggs, parsley, onion powder, baking powder, salt, and pepper. Stir until everything blends well. This mix creates a tasty bite that everyone will love. Your zucchini garlic bites pair well with dips and sauces. Try serving them with yogurt dip or marinara sauce. The tangy flavors will enhance the bites. For creative plating, arrange the bites on a colorful platter. Drizzle with extra virgin olive oil and sprinkle fresh parsley on top. This adds a nice touch. You can also serve them with a side salad for a complete meal. For the full recipe, check out the link above. {{image_2}} You can easily switch up the cheese in zucchini garlic bites. Try mozzarella for a melty texture or feta for a tangy kick. Each cheese brings a unique taste. You can also add spices to change the flavor. Consider paprika for smokiness or Italian herbs for a fresh twist. Experimenting with spices can lead to fun surprises. To make these bites gluten-free, swap breadcrumbs with almond flour or gluten-free panko. This keeps the texture while catering to dietary needs. If you want vegetarian or vegan options, use flaxseed meal mixed with water instead of eggs. This change binds the ingredients well. You can also use nutritional yeast for a cheesy flavor without dairy. These substitutions let everyone enjoy this delicious treat. To store your leftover Zucchini Garlic Bites, first let them cool completely. Then, place them in an airtight container. A good tip is to layer them with parchment paper to keep them from sticking. Store them in the fridge for up to three days. This way, you can enjoy a tasty snack later without losing flavor. When you're ready to eat your leftover bites, the best way to reheat them is in the oven. Preheat your oven to 350°F (175°C). Place the bites on a baking sheet and heat for about 10-15 minutes. This method keeps them crisp. If you're short on time, you can use a microwave, but this may make them a bit soggy. To keep the taste and texture, oven reheating is best. For a quick fix, you can also pan-fry them briefly in a little olive oil until warm. Enjoy your bites just like fresh from the oven! To make zucchini bites crispy, squeeze out as much moisture as you can. After grating the zucchini, let it sit with salt for ten minutes. This draws out water. Then, use a towel to press the zucchini. Also, use panko breadcrumbs instead of regular ones for extra crunch. A light spray of olive oil on top before baking helps too. Yes, you can freeze zucchini garlic bites. After baking, let them cool completely. Place them in a single layer on a baking sheet and freeze for one hour. Then, transfer them to a freezer bag. They will keep for up to three months. When ready to eat, bake them directly from the freezer. You can mix in different ingredients to change the flavor. Try adding shredded cheese like mozzarella or cheddar for a cheesy twist. You can also add chopped sun-dried tomatoes or olives for a Mediterranean touch. Fresh herbs like basil or dill can brighten the taste too. Zucchini bites are done when they are golden brown on the outside. You can test by inserting a toothpick into the center. If it comes out clean, they are ready. The cooking time is usually about 20 to 25 minutes at 400°F (200°C). Enjoy them warm for the best flavor. For the full recipe, check out the Zucchini Garlic Bites section above. In this post, I shared a simple recipe for zucchini garlic bites. We covered essential ingredients, prep steps, and cooking tips to make them perfect. I also included variations for dietary needs and how to store leftovers. When made right, these bites are not just tasty but healthy too. Enjoy experimenting with flavors and dipping sauces. With practice, you'll master this dish and impress everyone with your cooking skills. Happy baking!](https://grilledflavors.com/wp-content/uploads/2025/06/dc333eac-a466-4b53-9f4c-d47e8699ceba.webp)
Zucchini Garlic Bites Tasty and Easy Appetizer Recipe
Looking for a simple yet delicious appetizer? You’ll love these Zucchini Garlic Bites! They’re crispy on the outside, soft on the inside, and packed with
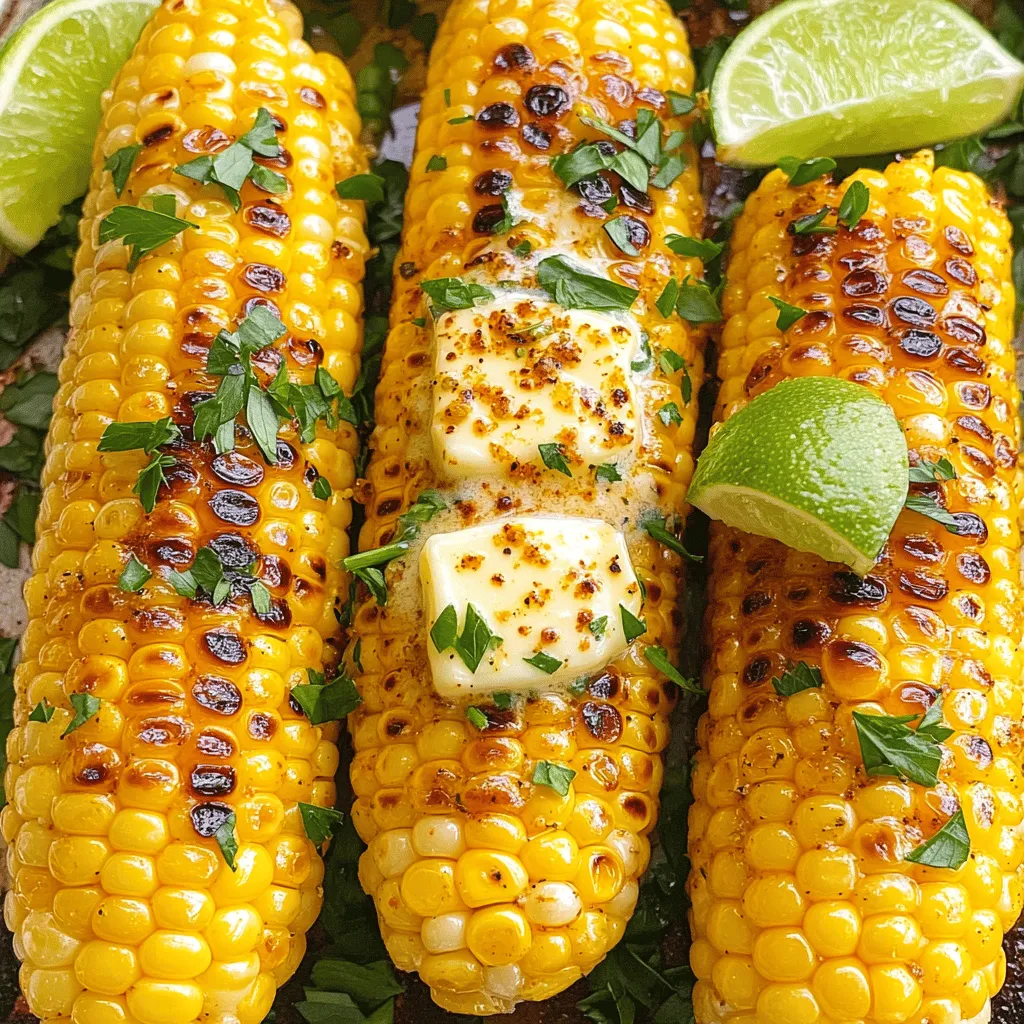
Cajun Corn On The Cob Flavorful BBQ Delight
Summer BBQs call for something special, and Cajun Corn On The Cob is just that! You’ll love this tasty twist on a classic favorite. With
. Boil the corn until tender. Fill a large pot with water. Bring it to a boil. Once boiling, add the husked corn. Cook for about 5-7 minutes. The corn should be tender. Drain and let it cool slightly. In a small bowl, combine melted butter and minced garlic. Mix well. Set it aside to allow the flavors to infuse. This step is key for rich taste. Once the corn is cool enough to handle, brush or spoon the garlic butter mixture on the corn. Make sure to coat it well. Next, sprinkle with Parmesan cheese and spices. The cheese adds a great flavor and texture. To get the best flavor, grill the corn. Preheat your grill to medium-high heat. Place the butter-coated corn directly on the grill. Cook for about 6-8 minutes. Turn the corn occasionally. You can also bake it in the oven. Set your oven to 400°F (200°C). Bake for about 10 minutes until golden. Once cooked, remove the corn from the grill or oven. Garnish with chopped parsley before serving. This adds a fresh color and flavor. Enjoy your cheesy garlic butter corn on the cob hot! For the full recipe, check out the recipe section. - Use fresh ingredients for best taste. Fresh corn gives you sweetness and crunch. - Let garlic butter sit longer for enhanced flavor. This step makes the garlic taste brighter. - Avoid overcooking the corn to maintain texture. Cook it just until tender, around 5-7 minutes. - Grill with the husk on for a smoky flavor. The husk helps keep moisture in while cooking. - Pair with grilled meats or salads. The rich flavor of the corn complements many dishes. - Serve at summer barbecues or family gatherings. This dish is always a hit with everyone. {{image_2}} You can swap Parmesan with feta or cheddar. Each cheese brings a unique taste. Feta adds a tangy bite, while cheddar gives a rich flavor. Mixing different cheeses can create fun new flavors. Try mozzarella for a creamier texture or gouda for a smoky twist. Want a spicy kick? Add chopped jalapeños or a sprinkle of chili powder. Red pepper flakes come in many types. You can choose mild, medium, or hot. This allows you to control the heat level. Experiment to find your perfect spice balance. Herbs can change the dish's flavor profile. Try cilantro or chives for a fresh twist. You can also squeeze in lime juice for a zesty kick. Fresh herbs brighten the taste and add a pop of color. Feel free to mix and match herbs to your liking. After enjoying your cheesy garlic butter corn on the cob, store any leftovers in an airtight container. This keeps the corn fresh and tasty. It tastes best if you eat it within 2-3 days. Beyond that, you might lose some of the flavor and texture. When you want to enjoy your leftovers, use the microwave for a quick reheat. Just place the corn on a microwave-safe plate and heat for about 30 seconds. If you prefer to keep that nice crunch, reheat them in the oven. Preheat your oven to 350°F (175°C) and warm the corn for about 10 minutes. You can freeze the corn before or after cooking it. If you freeze it before cooking, just husk and clean the corn, then wrap it tightly. For cooked corn, let it cool down first. Then, flash freeze it on a tray. Once frozen, transfer the ears into freezer bags. This method helps with portion control and makes it easy to pull out just what you need later. To get tender corn, boil it for 5-7 minutes. Make sure the water is at a rolling boil before adding the corn. To test if it’s done, pierce a kernel with a fork. It should feel soft but still have a slight crunch. Yes, you can prep this dish in advance. Boil the corn and let it cool. Then, wrap it in foil and store it in the fridge. You can make the garlic butter ahead too. Just mix it and store it in a jar. This corn pairs well with grilled meats like chicken or steak. A fresh salad or coleslaw can add a nice crunch. You can also serve it with baked beans for a hearty side. Yes, you can swap the butter for a plant-based spread. Use a vegan cheese or nutritional yeast instead of Parmesan. This will keep the dish tasty and plant-based. Frozen corn works fine but changes the texture. If you use frozen corn, boil it for a few extra minutes. Fresh corn gives the best flavor, but frozen is a quick option. Grilling takes about 6-8 minutes. Preheat your grill to medium-high. Turn the corn every couple of minutes to get even grill marks. If you want a smoky flavor, grill it with the husk on. For the full recipe, check it out here: [Full Recipe]. This blog post covered how to make cheesy garlic butter corn on the cob. We discussed key ingredients like fresh corn, garlic, and butter. You learned step-by-step instructions, cooking methods, and even tips for storing leftovers. In closing, you can make this dish uniquely yours. Experiment with different cheeses, herbs, or spices. Enjoy this easy and tasty treat at your next gathering!](https://grilledflavors.com/wp-content/uploads/2025/06/ec9040e1-4fce-4c1a-adcb-de799d98668a.webp)
Cheesy Garlic Butter Corn on the Cob Savory Delight
Get ready to elevate your summer barbecues with my cheesy garlic butter corn on the cob. This easy recipe turns fresh corn into a savory
![Fresh tomatoes bring a bright flavor to your fritters. Choose ripe tomatoes for the best taste. They add moisture and natural sweetness, making each bite juicy. Flour and cornmeal are key for the right texture. Flour gives a soft base, while cornmeal adds crunch. Together, they create a perfect blend. Seasoning is crucial for flavor. Garlic powder gives a savory punch. Onion powder adds depth, and smoked paprika brings a hint of smokiness. These spices make the fritters truly tasty. Fresh basil is a great addition. It adds a nice herbal note to your fritters. Just chop it up and mix it in. If you like cheese, Parmesan is an excellent option. It adds a rich, nutty flavor that complements the tomatoes. For frying, choose a good vegetable oil. Canola or sunflower oil works well because they have high smoke points. You’ll need a deep skillet or frying pan to fry the fritters. A slotted spoon is handy for removing them from the oil. Make sure to have paper towels ready to drain excess oil. For the full recipe, you can check the section above. To start, gather your ingredients. In a large mixing bowl, combine the diced tomatoes with the dry ingredients. Use 1 cup of all-purpose flour, 1/2 cup of cornmeal, 1 teaspoon baking powder, 1 teaspoon garlic powder, 1/2 teaspoon onion powder, and 1/2 teaspoon smoked paprika. Don’t forget to add salt and pepper to taste! Next, add 1/4 cup of chopped fresh basil and, if you like, 1/2 cup of grated Parmesan cheese. Mix everything well. Then, slowly add in 1/2 cup of water, or adjust as needed. Your goal is to create a thick batter. It should be spoonable, not too runny. If it seems too thick, add a little more water. Now, it’s time to heat the oil. Use about 1 inch of vegetable oil in a deep skillet. Set your stove to medium heat. To check if the oil is ready, drop a small bit of the batter in. If it sizzles, you’re good to go! Safety is key while frying. Avoid splashing hot oil, and keep a lid nearby in case of flare-ups. Always stay near the stove and use long tongs or a slotted spoon to handle the fritters. When the oil is hot, drop spoonfuls of the batter into the oil. Make small fritters to ensure even cooking. Fry them in batches for about 3 to 4 minutes on each side. Look for a golden brown color and a crispy texture. To check for doneness, cut one fritter open. It should be cooked through with no raw batter inside. Once done, remove the fritters from the oil and place them on paper towels to drain excess oil. Enjoy them warm with your favorite dipping sauce or a dollop of sour cream. For the complete recipe, check the Full Recipe section. To make great tomato fritters, you need the right batter. If the batter is too thick, it won’t cook well. If it’s too thin, your fritters will fall apart. You should adjust the water until the mixture is thick but spoonable. Start with 1/2 cup of water, then add more as needed. Next, keep your fritters the same size. This helps them cook evenly. Use a spoon or small scoop for uniform portions. Aim for fritters about 2 inches wide. This size cooks well in hot oil. One common mistake is overcrowding the frying pan. If you add too many fritters at once, the temperature drops. This makes them greasy instead of crispy. Fry in small batches, giving each fritter space to cook. Another mistake is using oil that’s not hot enough. If the oil is too cool, the fritters absorb more oil. To check the oil, drop in a small bit of batter. If it sizzles, you’re ready to fry! When your fritters are ready, serve them warm. They taste great with dips. I recommend sour cream or a spicy aioli. You can also try a fresh salsa for a zesty touch. For a fun presentation, stack fritters on a plate. Add a sprinkle of fresh herbs on top. This not only looks great but also adds flavor. Your guests will love the visual and taste appeal! For the full recipe, check out the section above. {{image_2}} You can make tomato fritters gluten-free. Use almond flour or rice flour instead of regular flour. These flours give a nice texture. They also keep the fritters light and crispy. For a vegan option, replace the cheese with a dairy-free version. You can also use flax eggs instead of regular eggs. Just mix one tablespoon of flaxseed meal with three tablespoons of water. Let it sit for a few minutes to thicken. This will bind your fritters well. Spices can add a fun kick to your fritters. Try adding cayenne pepper or chili powder for heat. You can also mix in cumin for a warm flavor. Seasonal veggies or fresh herbs boost taste too. Try zucchini, bell peppers, or corn. Fresh herbs like cilantro or dill can brighten the dish. This makes the fritters more colorful and tasty. Tomato fritters shine as appetizers or snacks. Serve them warm with a dip like ranch or spicy mayo. You can also enjoy them as a main course. Pair them with a fresh salad for a light meal. For a complete meal, think about side dishes. Roasted veggies or a simple rice pilaf can balance the meal. You can also serve a tangy slaw on the side for crunch. Check out the [Full Recipe] for step-by-step instructions! After cooking, let the fritters cool. Place them in an airtight container. This keeps them fresh. Store in the fridge for up to three days. They lose crunch over time. So, enjoy them soon! To freeze fritters, first let them cool completely. Then, arrange them in a single layer on a baking sheet. Freeze for about an hour. Once firm, transfer them to a freezer bag. Squeeze out air and seal. To reheat, bake them at 375°F for 15-20 minutes. They will be crispy again! Use glass or plastic containers with tight lids. These materials keep moisture out. Label your containers with the date. This helps you track freshness. Proper storage keeps fritters tasty and safe to eat. Tomato fritters can stay fresh for about 2 to 3 days in the fridge. To keep them tasting good, store them in an airtight container. The main factors that affect shelf life include moisture and temperature. If fritters sit out too long, they can get soggy. Always check for any off smell or odd texture before eating. Yes, you can bake tomato fritters! Baking will make them lighter but may not be as crispy. Preheat your oven to 400°F (200°C). Place fritters on a baking sheet lined with parchment paper. Bake for about 20-25 minutes, flipping halfway through. They will be golden and firm, but expect a different texture compared to frying. For a complete meal, pair your fritters with a fresh salad. A mixed greens salad with a light vinaigrette works well. You can also serve them with grilled chicken or fish. For dipping, try sour cream or a spicy aioli. This adds flavor and makes the meal more filling. To add some heat, mix in diced jalapeños or crushed red pepper flakes. You can also use spicy paprika instead of smoked paprika. Another option is to add hot sauce into the batter. Start with a small amount, then taste and adjust as needed. This way, you can control the spice level to your liking. Tomato fritters are a delicious way to showcase fresh tomatoes. You learned about essential ingredients, from flour and cornmeal for texture to spices that add flavor. I shared step-by-step instructions for making perfect fritters, plus common mistakes to avoid. You can explore variations, from gluten-free options to exciting flavor combos. Store leftovers properly to enjoy them later. Use this guide to make tasty tomato fritters and impress your family and friends. Enjoy your cooking journey!](https://grilledflavors.com/wp-content/uploads/2025/06/6336ad0e-f529-472e-9e9c-3db0051fdce7.webp)
Tomato Fritters Crispy and Flavorful Snack Recipe
Are you ready to elevate your snack game? These Tomato Fritters are your new go-to treat! Bursting with fresh flavors and a crispy texture, they
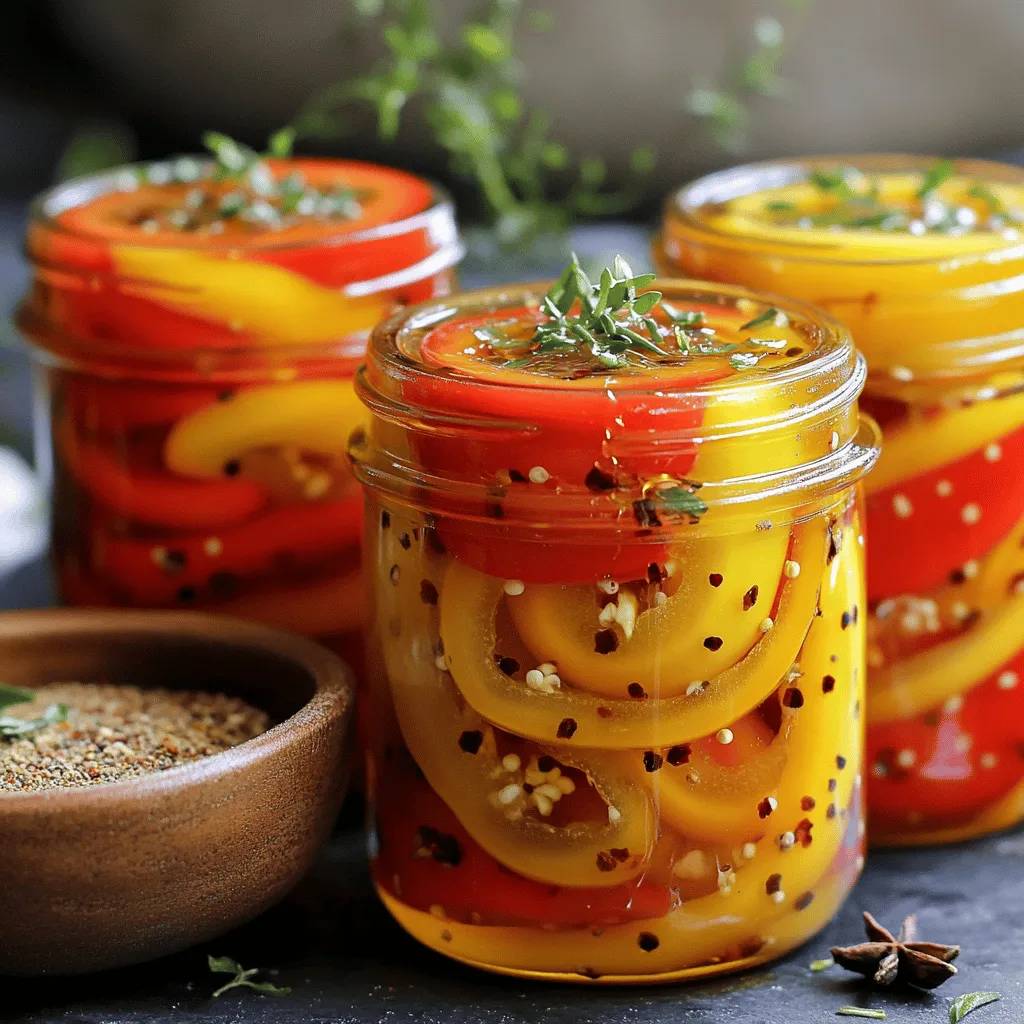
Sweet and Spicy Pickled Peppers Flavorful Jarred Treat
Are you ready to add a burst of flavor to your meals? Sweet and Spicy Pickled Peppers are a perfect way to achieve that! These
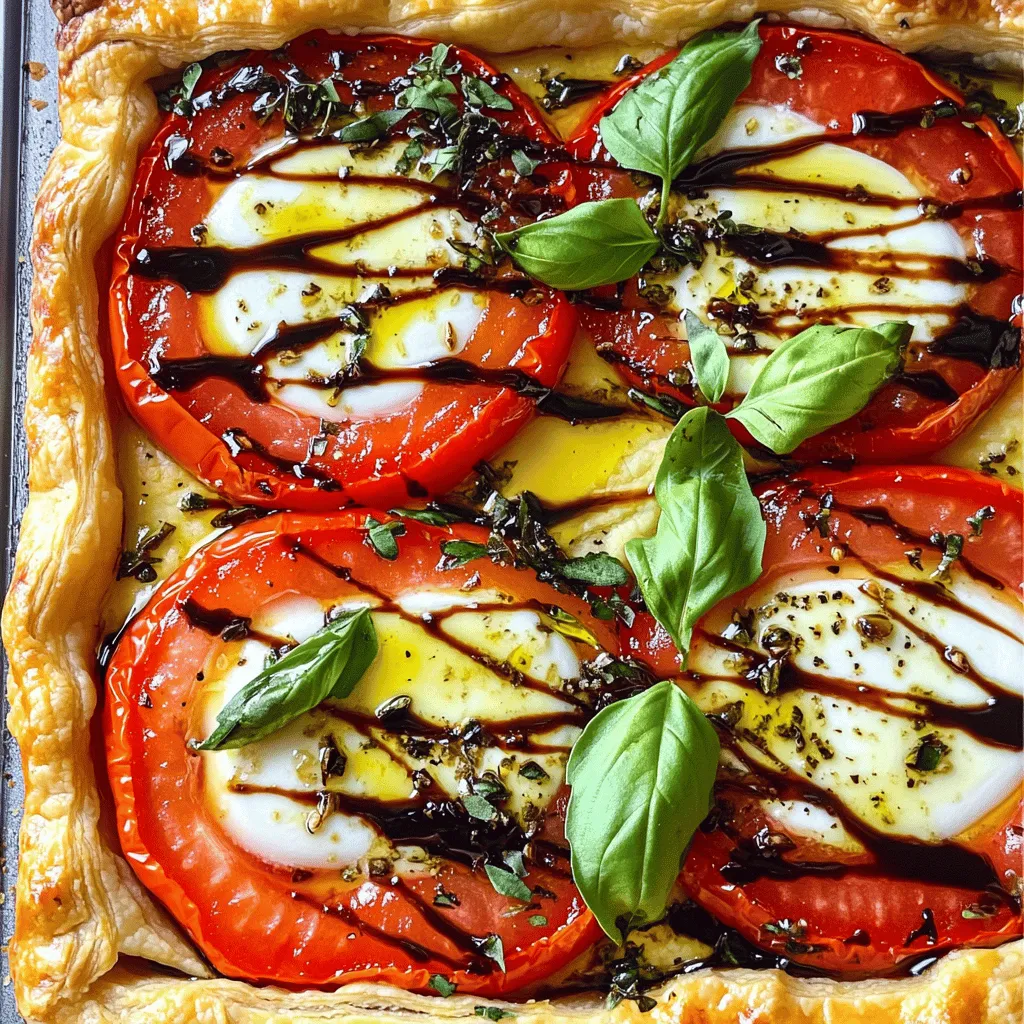
Tomato Mozzarella Basil Tart Easy and Flavorful Recipe
Looking for a delicious and simple dish that impresses? This Tomato Mozzarella Basil Tart is your answer! With fresh ingredients and a flaky crust, it