Appetizers
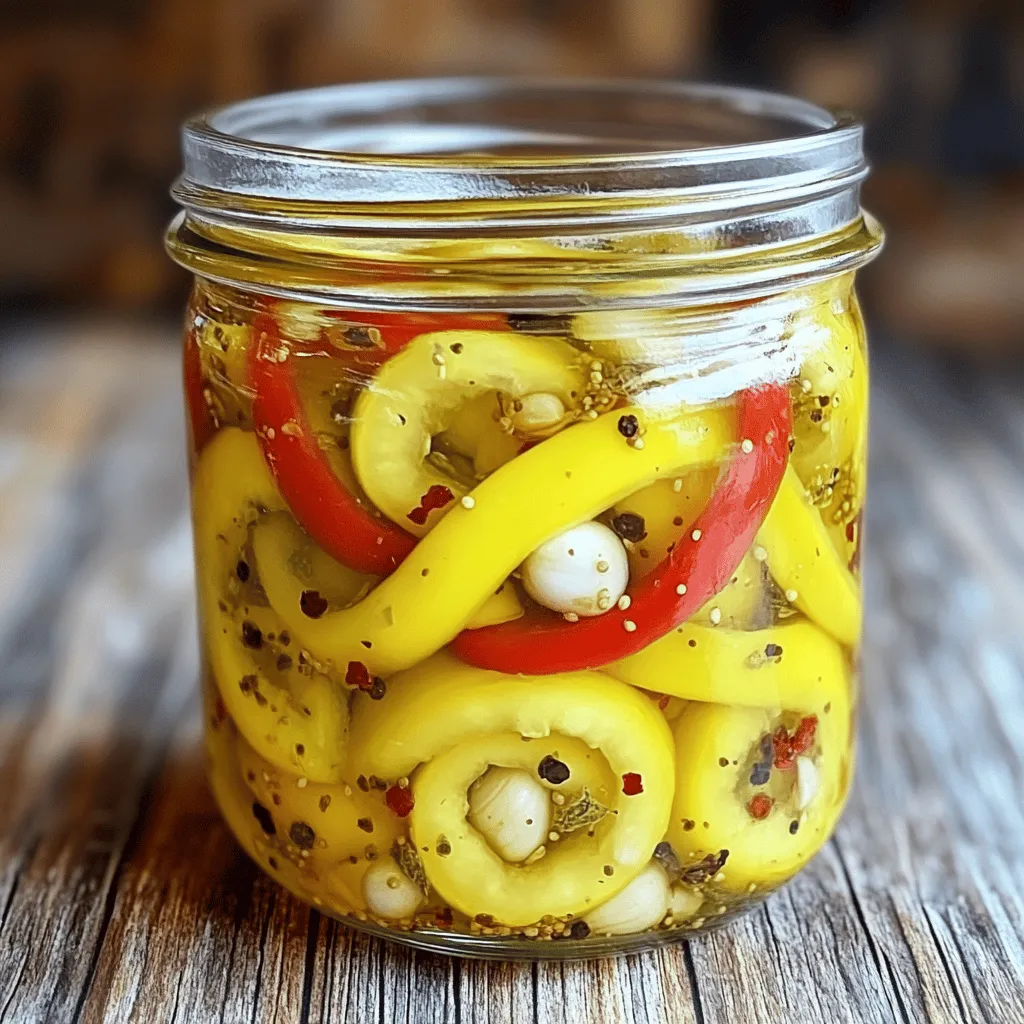
Easy Pickled Banana Peppers Tasty and Simple Recipe
Looking to add some zing to your meals? Try my easy pickled banana peppers! This simple recipe transforms fresh banana peppers into a tangy condiment
![To make the best peach bruschetta with whipped ricotta, you need: - 1 French baguette, sliced into 1/2 inch pieces - 2 ripe peaches, diced - 1 cup ricotta cheese - 2 tablespoons honey - 1 teaspoon vanilla extract - 1 tablespoon fresh lemon juice - Fresh basil leaves, for garnish - Olive oil, for drizzling - Salt and freshly cracked pepper, to taste You can switch some ingredients if needed. Try using: - Whole grain bread instead of a French baguette for a nutty flavor. - Goat cheese or cream cheese in place of ricotta for a different taste. - Maple syrup instead of honey for a vegan option. - Any stone fruit like plums or nectarines instead of peaches. Fresh ingredients make a big difference in taste. Here are some tips: - Choose ripe peaches that feel slightly soft when pressed. This means they are sweet. - Use high-quality ricotta for a creamy texture. Look for brands with few additives. - Fresh basil leaves should be fragrant and bright green. Avoid wilted or brown leaves. - Select a baguette that is crusty on the outside but soft on the inside for the best bite. For the full recipe of peach bruschetta with whipped ricotta, check out the [Full Recipe]. To start, you need a French baguette. Slice it into 1/2 inch pieces. This thickness gives a nice crunch. Next, preheat your oven to 400°F (200°C). Lay the baguette slices on a baking sheet. Brush each slice lightly with olive oil. This adds flavor and helps them crisp up. Bake the bread for about 5-7 minutes. Look for a golden color and a slight crunch. While the bread bakes, it's time for the whipped ricotta. Grab a medium bowl and add 1 cup of ricotta cheese. Next, mix in 2 tablespoons of honey, 1 teaspoon of vanilla extract, and 1 tablespoon of fresh lemon juice. These ingredients create a rich and sweet flavor. Use a hand mixer or whisk to whip it all together. Aim for a creamy and smooth texture. Add a pinch of salt and freshly cracked pepper to taste. This will balance the sweetness. Now it's time to bring it all together. Once your baguette slices are toasty, spread a generous layer of the whipped ricotta on each slice. Next, take 2 ripe peaches that you diced earlier and top each slice. The peaches add a fresh and juicy bite. For a pop of color and flavor, garnish each bruschetta with fresh basil leaves. Drizzle a little olive oil on top, and finish with a crack of fresh pepper. Serve the bruschetta right away for the best taste. Enjoy this peach bruschetta with whipped ricotta delight! You can find the full recipe to guide you through every step. To make the best whipped ricotta, start with room temperature cheese. This helps it whip up smoothly. Use a hand mixer for a light and airy texture. If you prefer a thicker mix, reduce the lemon juice. A pinch of salt adds a nice balance to the sweetness. Always taste as you mix. Adjust sweetness by adding more honey if needed. Serve this bruschetta as a snack or a light meal. It shines at parties and gatherings. Place the bruschetta on a large platter for a beautiful display. Add extra basil leaves for color and flavor. You can also drizzle a little balsamic glaze for added zest. Enjoy it fresh to keep the flavors bright. This peach bruschetta pairs well with light drinks. Try a chilled white wine or sparkling water with lemon. If you like cocktails, a peach mojito complements the dish nicely. For a non-alcoholic option, serve iced herbal tea. Each drink enhances the sweet and savory notes of the bruschetta. {{image_2}} You can swap peaches for other fruits. Try ripe strawberries or juicy nectarines. Both add a fresh taste. You might also enjoy a mix of berries. Blueberries and raspberries look great on the plate. The flavor will be sweet and tart. Always choose fresh fruit for the best taste. You can get creative with toppings. Add a drizzle of balsamic glaze for a tangy kick. Crushed nuts, like pistachios or walnuts, add crunch. You can also sprinkle some feta cheese for a salty balance. Don’t forget about herbs! Mint or rosemary can bring a new twist. If you want a vegan option, use cashew cream instead of ricotta. Soak cashews in water for a few hours. Blend them with a bit of lemon juice and maple syrup. This will give you a creamy texture. You can also find store-bought vegan ricotta. Just check the ingredients to ensure it fits your diet. For the best flavor, use fresh herbs as a garnish. Feel free to explore these variations to make this dish your own. For the full recipe, check out the Peachy Whipped Ricotta Bruschetta! To keep your peach bruschetta fresh, store leftovers in an airtight container. Place it in the fridge. Enjoy the bruschetta within two days for the best taste. The bread will soften, but the flavor remains. If you have extra whipped ricotta, store it in a separate container. This way, it stays fresh longer. Reheating bruschetta can be tricky. The bread will lose its crispness. To reheat, use an oven. Preheat it to 350°F (175°C). Place the bruschetta on a baking sheet. Warm it for about 5 minutes. This helps restore some crunch. Avoid the microwave, as it will make the bread soggy. Freezing bruschetta is not ideal but possible. I recommend freezing the whipped ricotta and peaches separately. Spread the ricotta in a small container. Freeze it for up to one month. For the peaches, freeze them in a single layer on a baking sheet. Once frozen, transfer them to a zip-top bag. This method keeps them from sticking together. When ready to use, thaw in the fridge overnight and assemble fresh. For the best flavor, enjoy your peach bruschetta soon after making it. Check out the Full Recipe for more details! You can prepare the whipped ricotta and the peaches in advance. Store them separately in the fridge. This keeps the flavors fresh. Toast the baguette just before serving. It stays crisp this way. Assemble the bruschetta quickly when you are ready to eat. Yes, you can use canned peaches. Choose peaches packed in juice or water. Drain them well before use. Fresh peaches give a better flavor, but canned peaches work in a pinch. Just add a bit more honey for sweetness if needed. Look for peaches that are slightly soft to the touch. They should smell sweet and fruity. Avoid peaches with bruises or dark spots. Color is key; look for a warm, golden hue. If they are hard, leave them at room temperature for a few days. Enjoy the best taste with ripe peaches! This blog post covered everything you need for a great bruschetta. We explored the key ingredients, offered tips for texture, and shared fun variations. Remember that using fresh ingredients makes a big difference in taste. Keep these easy steps in mind for perfect results. Enjoy creating your bruschetta and feel free to experiment with flavors. You'll impress your friends with your tasty creations. Well-prepared bruschetta can be a true delight at any gathering. Happy cooking!](https://grilledflavors.com/wp-content/uploads/2025/06/b0c80505-72ba-4a0e-af4b-a670e428606b.webp)
Best Peach Bruschetta With Whipped Ricotta Delight
Are you ready to impress your guests with a tasty appetizer? My Best Peach Bruschetta with Whipped Ricotta will do just that! This easy recipe
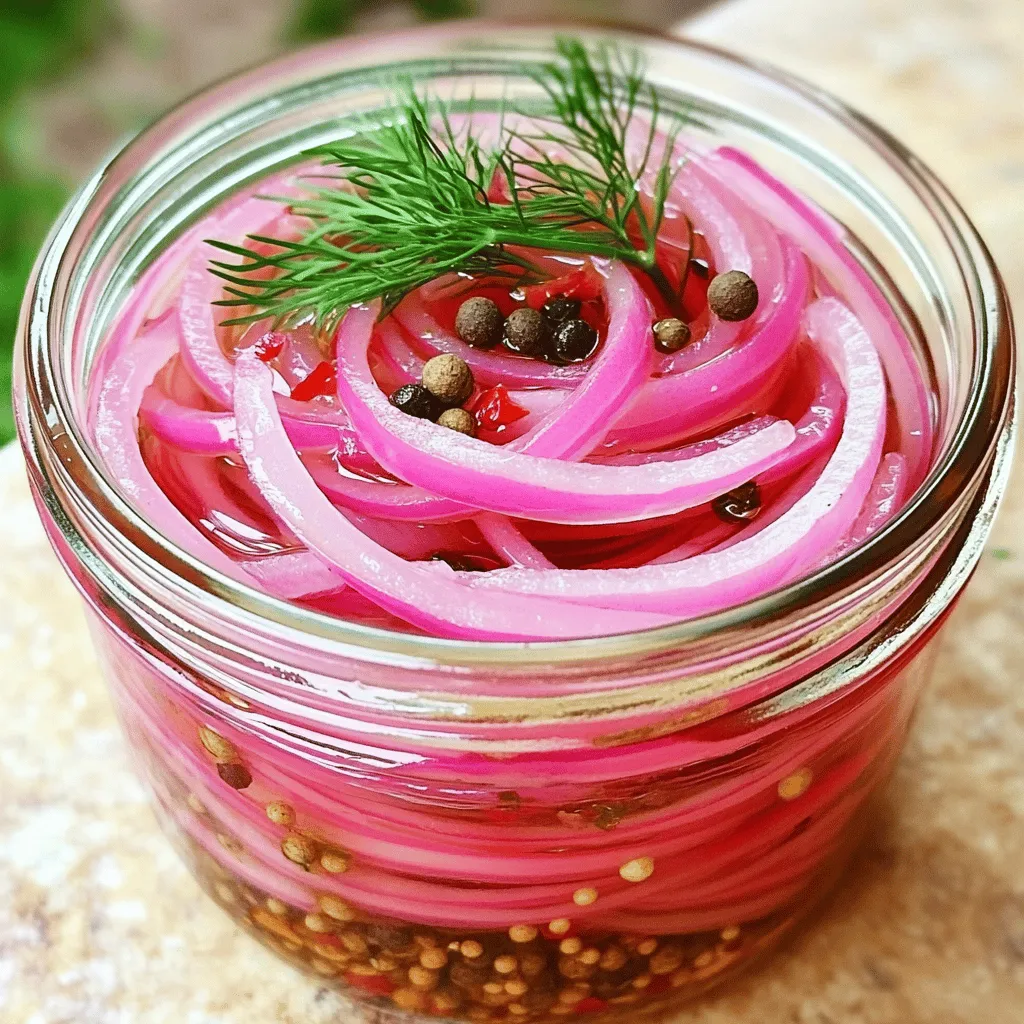
20-Minute Quick Pickled Onions Easy and Tasty Recipe
Craving a burst of tangy flavor in your meals? Try my 20-Minute Quick Pickled Onions! This easy recipe transforms simple ingredients into a zesty topping
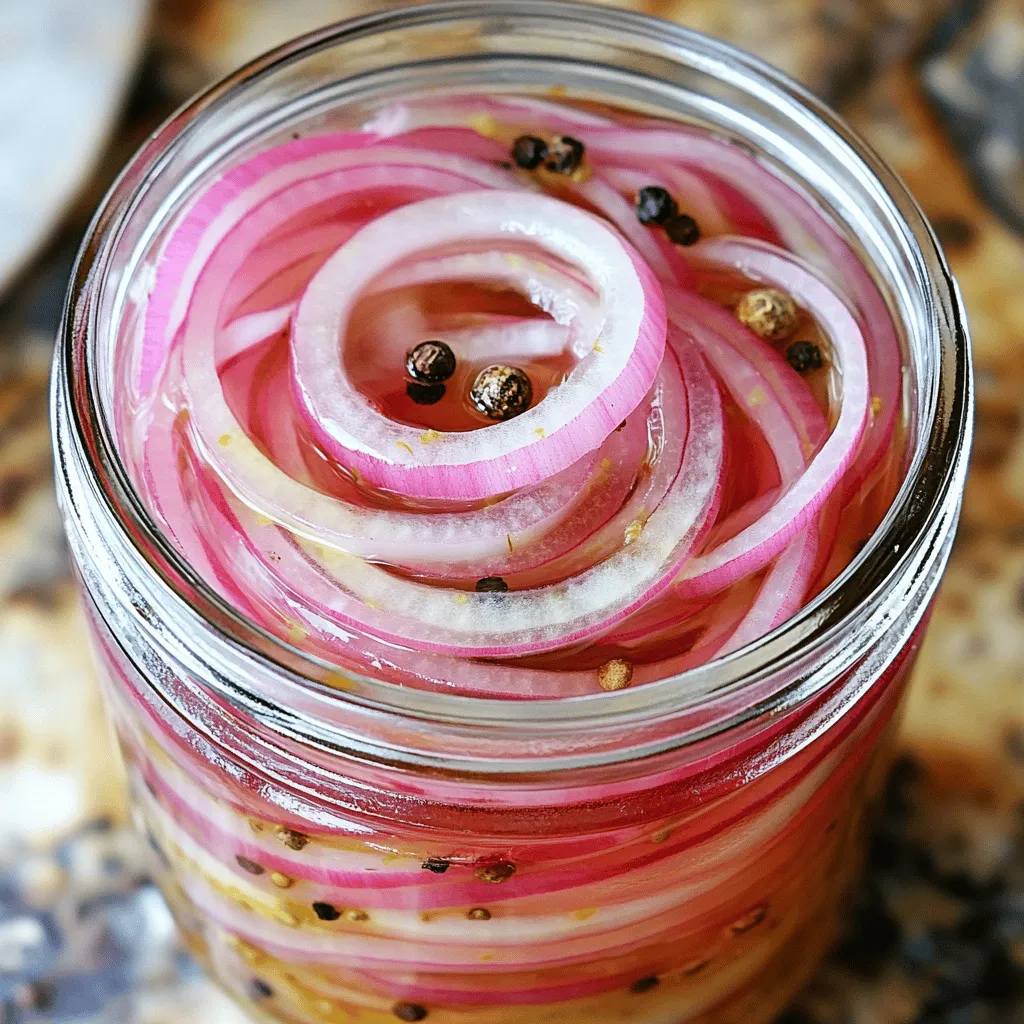
Quick Pickled Red Onions Simple and Flavorful Recipe
Looking to brighten your meals in a snap? My quick pickled red onions recipe is simple and bursting with flavor. With just a handful of
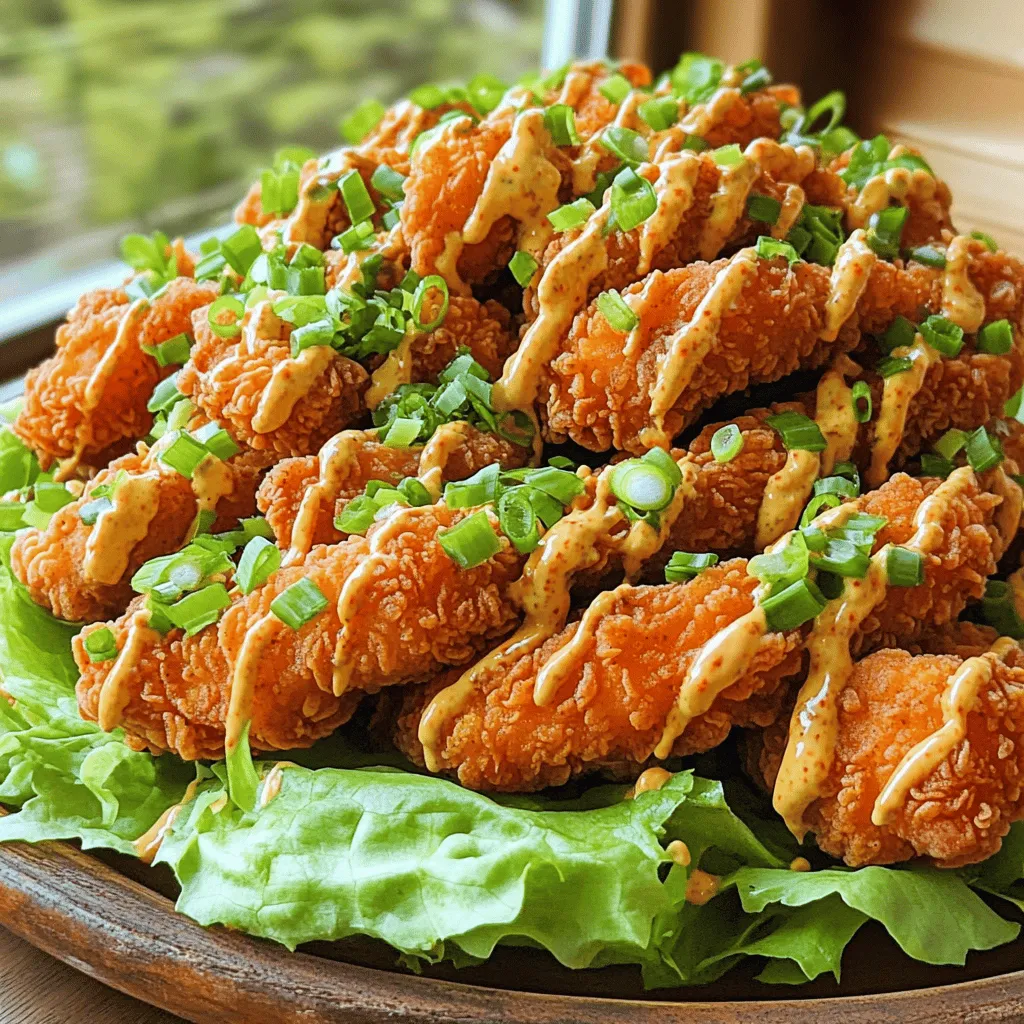
Bang Bang Chicken Flavorful Recipe to Try Today
Are you ready to dive into a dish that packs a punch? Bang Bang Chicken is not just tasty; it’s a flavor explosion! In this
![- Fresh corn on the cob - Unsalted butter - Fresh herbs: parsley, basil, and chives - Seasoning: garlic powder, lemon juice, salt, pepper, optional chili powder When making grilled corn-on-the-cob, fresh ingredients matter. Choose bright green corn with tight husks. The kernels should look plump and full. This ensures a sweet, juicy bite. For the herb butter, I prefer unsalted butter. This lets the herbs shine through. The fresh herbs, like parsley, basil, and chives, add a bright flavor. Garlic powder adds a nice kick, while lemon juice brings brightness. Salt and pepper are must-haves for seasoning. If you like heat, chili powder is a fun option. - Additional spices for flavor - Grated cheese or lime for serving - Alternative butters: garlic butter, spicy butter After you grill the corn, you can dress it up. Try adding spices like smoked paprika or cumin for depth. A sprinkle of grated cheese can make the corn even richer. Lime juice adds a zesty twist that pairs well with butter. You can also mix up your butter choices. Garlic butter or spicy butter can change the whole flavor profile. Each option offers a new taste adventure. For the full recipe, check the complete guide. Enjoy experimenting with these ingredients! To start, preheat your grill to medium-high heat. If you use a gas grill, simply turn it on and set it to medium-high. For charcoal grills, light the coals and wait until they glow. This heat gives the corn a nice char. Maintaining that medium-high heat is key. It helps the corn cook evenly. High heat will cook the corn fast, but it may burn. You want sweet, tender kernels, not charred bits. Now, let’s make the herb butter. In a small bowl, combine the softened butter with parsley, basil, chives, garlic powder, lemon juice, salt, and pepper. Mix until well blended. You can add some chili powder if you like heat. This butter adds a fresh taste to the corn. If you want a smoother texture, use a fork or small whisk to mix. Next, prepare the corn. Husk the corn, removing all silk and excess leaves. Rinse the ears with cool water and pat them dry. Then, wrap each ear in aluminum foil. Make sure to seal them well. This keeps the steam in while grilling. Place the wrapped corn directly on the grill. Close the lid and grill for about 15-20 minutes. Turn the corn occasionally. After 15 minutes, carefully unwrap one ear to check for doneness. The kernels should be tender and slightly charred. If they need more time, grill for an extra 5 minutes. Once done, remove the corn from the grill. Carefully unwrap the foil, as steam will escape. Use tongs to hold each ear and slather the herb butter all over the hot corn. Optionally, sprinkle more salt and pepper on top for extra flavor. Enjoy this flavorful summer delight! For the complete recipe, check the Full Recipe section. To pick fresh corn, look for bright green husks. The silk should be brown and slightly sticky. The kernels should feel firm and plump. It's best to buy corn in late summer when it's in season. Store corn in the fridge to keep it fresh for longer. Use it within a few days for the best flavor. You can grill corn using direct or indirect heat. Direct heat gives you a nice char and smoky flavor. Indirect heat cooks it more evenly and keeps it juicy. To get the perfect char, turn the corn every few minutes. Aim for about 15 to 20 minutes on the grill. Present your grilled corn in fun ways. You can place it on a colorful platter with fresh herbs. Try sprinkling cheese or chili powder for added flavor. Pair it with grilled meats or a fresh salad for a complete meal. Grilled corn adds a sweet and smoky touch to any summer dish. For the complete cooking process, check the Full Recipe. {{image_2}} To make Mexican street corn, you need simple ingredients. Here’s what you’ll need: - 4 ears of corn - 1/2 cup mayonnaise - 1/2 cup crumbled cotija cheese - 1 teaspoon chili powder - 1 lime, cut into wedges - Fresh cilantro for garnish To cook, start by grilling your corn as usual. Once it's done, brush on the mayonnaise. Then sprinkle cotija cheese and chili powder on top. Squeeze lime over everything and add cilantro. This adds a fresh taste. Herb butters can take your corn to the next level. Here are some flavor ideas: - Garlic and rosemary - Lemon and dill - Spicy chili and lime To make compound butters, mix softened butter with your chosen herbs and spices. Just blend until smooth and chill until ready to use. Once your corn is grilled, spread this butter over it. The heat will melt it, adding rich flavor. Grilled corn also shines in salads. You can mix it with these ingredients: - Diced tomatoes - Chopped cucumber - Red onion - Avocado - Lime juice For a dressing, try mixing olive oil, lime juice, salt, and pepper. Toss everything together for a bright and fresh dish. Serve this salad chilled for a cool summer treat. For full details, check out the [Full Recipe]. To keep your grilled corn-on-the-cob fresh, follow these steps: - Let the corn cool down to room temperature. - Wrap each ear tightly in plastic wrap or aluminum foil. - Place the wrapped corn in an airtight container. This helps to keep moisture in and prevents drying out. Store your corn in the fridge for up to three days. When you want to enjoy the leftovers, you can easily reheat them. The best way is to use the grill again. Preheat it to medium heat. Unwrap the corn and place it on the grill for about 5 minutes. Turn it halfway through for even heating. You can also microwave it for 1-2 minutes, but the grill gives better flavor. If you have extra corn, freezing is a great option. Here’s how to do it: - Allow the grilled corn to cool completely. - Cut the kernels off the cob using a sharp knife. Be careful and use a cutting board. - Place the kernels in a freezer-safe bag. Remove as much air as possible before sealing. To preserve flavor and texture, try to freeze the corn within 24 hours of grilling. You can keep it frozen for up to six months. When you want to use it, thaw it in the fridge overnight or heat it directly from the freezer in a skillet. Enjoy the sweet taste of summer all year long! For detailed cooking steps, check the Full Recipe for Grilled Corn-On-The-Cob with Herb Butter. Grilling corn on the cob takes about 15 to 20 minutes. Preheat your grill to medium-high heat. Wrap each ear in foil to trap steam. After 15 minutes, check for tenderness. If not done, grill for an extra 5 minutes. Yes, you can grill corn in the husk. This method keeps the corn moist. The husk acts as a natural barrier, protecting the kernels. However, it may limit the char flavor. If you want that smoky taste, husking first is best. Here are some simple seasoning ideas for grilled corn: - Classic Butter: Just use plain butter and salt. - Spicy Kick: Mix butter with chili powder for heat. - Zesty Twist: Add lime juice and zest for brightness. - Herb Blend: Combine garlic, parsley, and basil in your butter. - Cheesy Delight: Top with grated Parmesan or feta after grilling. For more detailed flavors, check out the Full Recipe for Grilled Corn-On-The-Cob with Herb Butter. Grilling corn-on-the-cob is simple and fun. You need fresh corn, butter, herbs, and seasonings. Preheat your grill to the right temperature, then wrap the corn and grill it. You can try different toppings, such as cheese or flavored butters, to make it special. Don’t forget to check for freshness when choosing corn. Enjoy your grilled corn this summer as a tasty side. Remember, you can get creative with seasonings and serving ideas. Grilled corn is a delicious treat that everyone will love!](https://grilledflavors.com/wp-content/uploads/2025/06/65d8f3ba-93bf-40c7-b92d-79c60dbc5cf6.webp)
Grilled Corn-On-The-Cob Flavorful Summer Delight
Summer is here, and it’s time to fire up the grill! Grilled corn-on-the-cob is a simple yet delicious treat that brings joy to any gathering.
![To make crispy fried chicken tenders, you'll need: - 1 pound chicken breast, cut into strips - 1 cup buttermilk - 1 tablespoon hot sauce (optional) - 1 cup all-purpose flour - 1 cup breadcrumbs (preferably panko for extra crunch) - 1 teaspoon garlic powder - 1 teaspoon onion powder - 1 teaspoon paprika - ½ teaspoon cayenne pepper (adjust to taste) - Salt and pepper to taste - Vegetable oil for frying These ingredients work together to create a flavorful and crispy coating that makes these chicken tenders irresistible. When frying, the type of oil you use matters. Here are some great options: - Vegetable oil - Canola oil - Peanut oil These oils have high smoke points, making them perfect for frying. For best results, heat the oil to 350°F (175°C). You can check this by dropping a pinch of breadcrumbs into the oil. If it sizzles, you're ready to fry. This temperature ensures the chicken cooks evenly and gets that perfect golden color. For the full recipe, refer to the detailed instructions above. 1. Start by marinating the chicken strips. In a medium bowl, mix 1 cup of buttermilk with 1 tablespoon of hot sauce if you want a kick. Add the chicken strips, making sure they are fully covered. Cover the bowl and place it in the fridge for at least one hour. For better flavor, let it marinate overnight. 2. Next, prepare the coating. In a shallow dish, combine 1 cup of all-purpose flour, 1 cup of breadcrumbs, 1 teaspoon of garlic powder, 1 teaspoon of onion powder, 1 teaspoon of paprika, and ½ teaspoon of cayenne pepper. Add salt and pepper to taste. Mix everything well so that the spices are evenly distributed. 1. Heat vegetable oil in a deep frying pan over medium heat. Aim for a temperature of 350°F (175°C). To test if the oil is ready, drop a pinch of breadcrumb in it. If it sizzles, you are good to go! 2. Remove the chicken strips from the buttermilk, letting the excess drip off. First, coat each strip in the flour mixture, then dip it back into the buttermilk, and finally into the breadcrumb mixture. Press firmly so the crumbs stick well. 3. Carefully place the breaded chicken strips into the hot oil, making sure not to overcrowd the pan. Fry them for 5 to 7 minutes until they turn golden brown. Turn them halfway for even cooking. 1. Once cooked, remove the chicken tenders from the oil and place them on a plate lined with paper towels. This helps drain the excess oil. Let the tenders rest for a few minutes to become even crispier. 2. For serving, arrange the crispy fried chicken tenders on a platter and pair them with dipping sauces like honey mustard, barbecue sauce, or ranch dressing. A garnish of fresh parsley or lemon wedges adds a nice touch to your presentation. This step-by-step guide will help you create crispy fried chicken tenders that are easy to make and packed with flavor. For the full recipe, check out the details provided above. To get the best crunch, start with dry chicken. Pat your chicken strips with a paper towel. This helps the coating stick better. Next, use the double-dipping method. Dip the chicken in the flour mix, then the buttermilk, and back to the flour mix. This extra layer gives your tenders a thicker, crunchier coat. You can take the flavor up a notch with simple changes. Try adding more spices to the flour mix. For a kick, add extra cayenne or a pinch of black pepper. You can also mix in dried herbs like oregano or thyme. These add depth and aroma to your chicken. Using the right tools makes frying easier. A heavy-bottomed frying pan or a deep pot works best. It holds the heat better and cooks evenly. For breading, a shallow dish is key. It helps you coat the chicken without making a mess. A pair of tongs also helps to flip the chicken gently in hot oil. This keeps your hands safe and the tenders intact. For the full recipe, check the earlier section. {{image_2}} You can change the flavor of your chicken tenders with different marinades. Try soy sauce, lemon juice, or even yogurt. Each will add a unique taste. You can also use various seasoning blends. Think garlic herb, lemon pepper, or even a spicy Cajun mix. For those needing gluten-free options, use rice flour or chickpea flour. These alternatives will still give you that crispy texture without the gluten. You can also use crushed cornflakes or gluten-free breadcrumbs for a crunchy coating. You don’t have to fry your chicken tenders. Baking is a healthier method. To get crispy results, preheat your oven to 425°F (220°C). Lightly coat the tenders with oil and bake for about 20-25 minutes. Flip them halfway to ensure even browning. You can also use an air fryer. This method cooks quickly and gives a great crunch. Set your air fryer to 400°F (200°C) and cook for about 10-12 minutes. Make sure to shake the basket halfway through for even cooking. Pair your chicken tenders with classic sides. French fries are always a favorite. You can also serve coleslaw for a crunchy contrast. Another great option is mac and cheese for a comfort meal. Dipping sauces can elevate your meal. Honey mustard, barbecue sauce, and ranch dressing are popular choices. You can even make a spicy mayo by mixing mayo with sriracha. These options will make your chicken tenders even more delicious. To keep your chicken tenders fresh, follow these steps: - Refrigeration: Place leftover chicken tenders in an airtight container. Store them in the fridge for up to three days. This helps prevent drying out and keeps them tasty. - Freezing: For longer storage, freeze the chicken tenders. Wrap them in plastic wrap and then place them in a freezer bag. They can stay frozen for up to three months. Make sure to label the bag with the date so you know when to use them. To enjoy your chicken tenders again, reheating is key. Here are some methods to keep them crispy: - Oven: Preheat your oven to 400°F (200°C). Place the tenders on a baking sheet. Heat for about 10-15 minutes. This method helps restore their crispiness. - Air Fryer: Set the air fryer to 375°F (190°C). Cook the tenders for about 5-8 minutes. This is a quick way to get them hot and crispy again. - Skillet: Heat a little oil in a skillet over medium heat. Add the tenders and cook for 3-4 minutes on each side. This method adds a nice crunch. Using these techniques keeps your chicken tenders delicious. Enjoy them just like they were fresh! For the full recipe, check out the [Full Recipe]. Yes, you can use frozen chicken breast. Thaw it first for the best results. To thaw, place the chicken in the fridge overnight. If you're in a hurry, you can use the microwave's defrost setting. After thawing, ensure the chicken is dry before marinating. To keep the breading intact, follow these tips: - Pat the chicken dry before coating. This helps the breading stick. - Double-dip the chicken strips. First, coat with flour, then buttermilk, and finally breadcrumbs. - Press the breadcrumbs firmly onto the chicken. This makes sure they adhere well. If you don't have buttermilk, here are some great substitutes: - Mix 1 cup of milk with 1 tablespoon of vinegar or lemon juice. Let it sit for 5 minutes. - Use plain yogurt mixed with water to thin it out. - Sour cream can also work well in place of buttermilk. Frying chicken tenders takes about 5 to 7 minutes. Cook them until they turn golden brown and reach an internal temperature of 165°F (75°C). Make sure to turn them halfway to cook evenly. Chicken tenders pair well with many sides. Here are some tasty options: - Crispy fries or sweet potato fries. - Fresh coleslaw for a crunchy contrast. - Dipping sauces like honey mustard, ranch, or barbecue. You now have all the details to make delicious chicken tenders. Start with fresh ingredients like chicken breast and buttermilk. Use the right oils and temperatures for frying. Follow the steps carefully for marinating, coating, and cooking. Remember, tips on crispiness and flavor can elevate your dish further. Don't forget to store your leftovers correctly and revisit those reheating methods for best results. Enjoy your tasty, homemade chicken tenders and explore different flavors and sides to keep things exciting!](https://grilledflavors.com/wp-content/uploads/2025/06/b9403fd0-a97f-4e1b-b1d0-724fb2a82eed.webp)
Crispy Fried Chicken Tenders Easy and Flavorful Recipe
You can make crispy fried chicken tenders at home that are simple and tasty. With just a few ingredients and easy steps, you’ll impress everyone
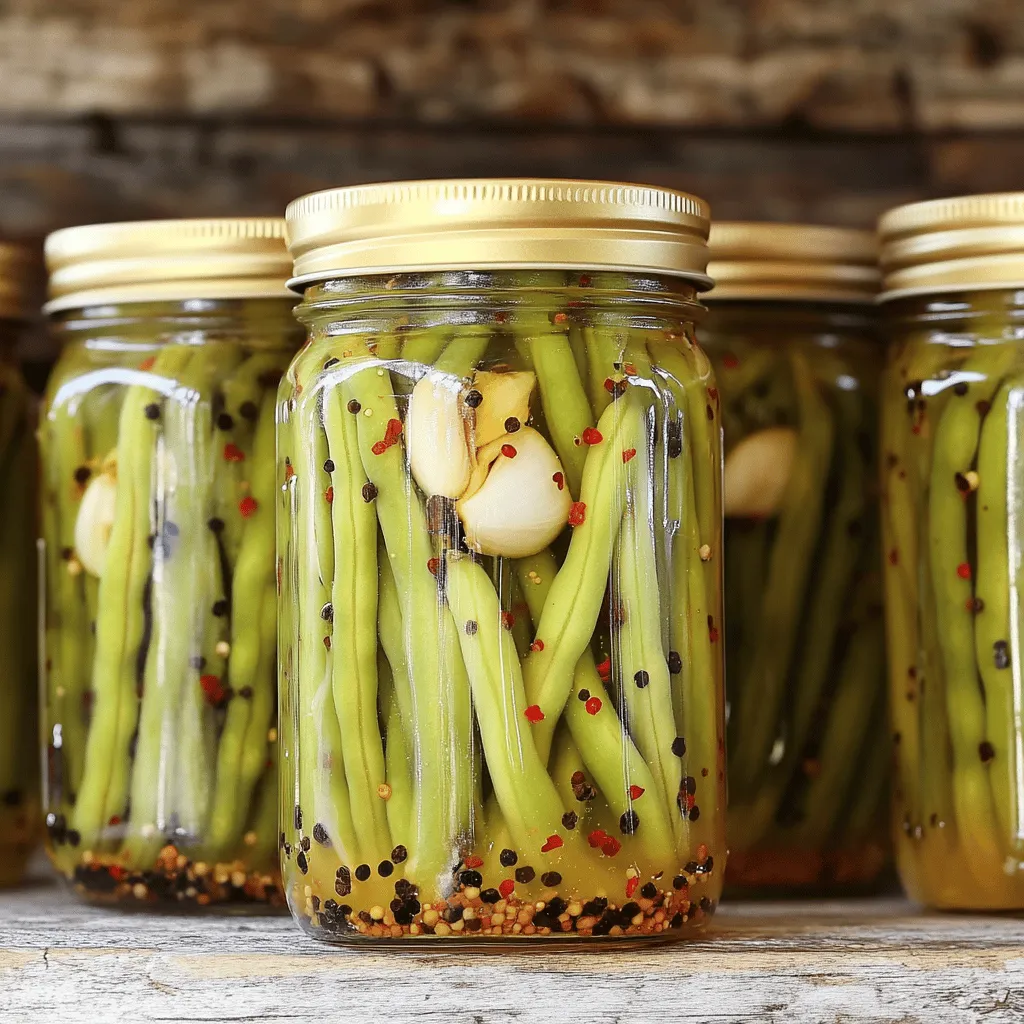
Spicy Pickled Green Beans Bold Flavor Recipe Guide
Ready to elevate your snacking game? In this Spicy Pickled Green Beans Bold Flavor Recipe Guide, I’ll show you how to make crunchy, zesty pickled
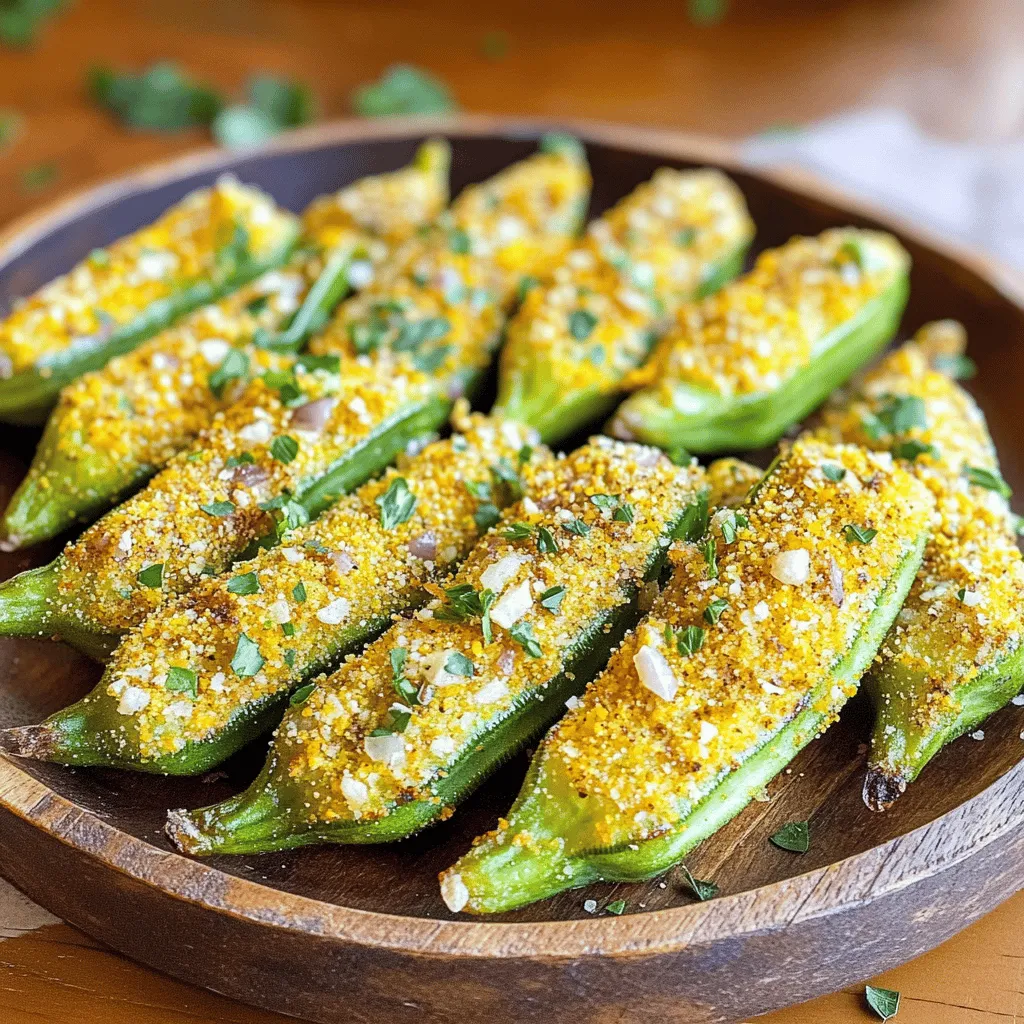
Crispy Air Fryer Okra Quick and Easy Recipe
Looking for a tasty, healthy snack? You’ve got to try crispy air fryer okra! This easy recipe transforms fresh okra into a delightful dish that’s
![- 2 cups cooked macaroni - 2 cups shredded sharp cheddar cheese - 1/2 cup cream cheese, softened - 1/2 cup grated Parmesan cheese - 1 teaspoon garlic powder - 1/2 teaspoon onion powder - 1/2 teaspoon smoked paprika - Salt and pepper to taste - 2 large eggs - 1 cup all-purpose flour - 2 cups breadcrumbs (Panko for extra crunch) - Oil for frying Gathering the right ingredients is key for crispy fried mac and cheese balls. Start with cooked macaroni. This gives you a sturdy base. Next, sharp cheddar cheese adds a rich flavor. Cream cheese helps bind everything together for that creamy center. Grated Parmesan provides an extra layer of taste. For seasoning, garlic powder, onion powder, and smoked paprika bring warmth and depth. Don’t forget to add salt and pepper to enhance the flavors. Breading is where the magic happens. Eggs create a sticky layer. Flour helps the breadcrumbs cling better. Panko breadcrumbs give that extra crunch we all love. Finally, hot oil is essential for frying. It ensures a crispy outer layer while keeping the inside creamy. With all these ingredients ready, you will create a dish that is truly irresistible. Don’t forget to check the [Full Recipe] for detailed steps and tips! First, gather your cooked macaroni and cheeses. In a large bowl, combine: - 2 cups cooked macaroni - 2 cups shredded sharp cheddar cheese - 1/2 cup cream cheese, softened - 1/2 cup grated Parmesan cheese - 1 teaspoon garlic powder - 1/2 teaspoon onion powder - 1/2 teaspoon smoked paprika - Salt and pepper to taste Mix them well until everything is combined. It should look creamy and cheesy. Next, place the bowl in the fridge. Chill the mixture for at least 1 hour. This helps it firm up, making it easier to shape later. Once the mixture is chilled, it’s time to shape the balls. Scoop about 1 tablespoon of the chilled mix. Roll it in your hands to form a ball. Repeat this until you use all the mixture. Place these balls on a baking sheet. Make sure they are evenly spaced. Now, let's set up a breading station. You will need three bowls for this step: - One with 1 cup all-purpose flour - One with 2 large beaten eggs - One with 2 cups breadcrumbs (use Panko for extra crunch) Take each mac and cheese ball. First, dip it in the flour. Make sure to shake off any excess flour. Next, dip it in the eggs. Finally, roll it in the breadcrumbs. Ensure each ball is fully coated. For frying, heat oil in a deep pan over medium-high heat. Aim for about 350°F (175°C). Carefully add the balls in batches. Do not overcrowd the pan; this prevents them from getting crispy. Fry each batch for about 3-4 minutes. They should turn golden brown and crispy. Once done, place them on a paper towel-lined plate to drain excess oil. Enjoy them fresh and hot with your favorite dipping sauce. For the full recipe, check out the recipe section above. To get that creamy inside, use a mix of cheeses. The sharp cheddar adds great flavor, while cream cheese makes it smooth. Make sure to chill the mixture for at least one hour. This helps the balls hold their shape while frying. For a crispy coating, use Panko breadcrumbs. They create a crunchier texture than regular breadcrumbs. Coat each ball evenly and shake off any extra crumbs. This step is key to achieving that perfect crunch. The best oil for frying is vegetable oil. It has a high smoke point, which helps prevent burning. Make sure to heat the oil to about 350°F (175°C). Use a thermometer to check the temperature. This ensures even cooking and a nice golden color. To maintain oil temperature, fry in small batches. If you add too many balls at once, the oil cools down. This can lead to soggy balls. Fry for about 3 to 4 minutes, or until they’re golden brown. Dipping sauces can elevate your crispy fried mac and cheese balls. Marinara sauce is a classic choice. Ranch dressing also pairs well, adding a creamy touch. For serving, arrange them on a platter while they're hot. This makes them more inviting. You can also sprinkle some herbs on top for a pop of color. Enjoy these delicious bites at parties or as a fun snack! For the full recipe, check out the [Full Recipe]. {{image_2}} You can enhance your mac and cheese balls with different cheeses. Try gouda for a smoky taste or mozzarella for extra stretch. Mixing in cream cheese gives them a rich, creamy texture. Adding herbs can also boost flavor. Fresh parsley or chives can add a nice touch. Try Italian seasonings for a twist. If you want a lighter version, consider baking instead of frying. Baked balls can be just as tasty and crispy, especially if you spray them with oil. You can also use gluten-free breadcrumbs. This option makes them suitable for those with gluten allergies. It keeps the crunch while being healthier. Want to spice things up? Add jalapeños for a kick! They give a nice heat that pairs well with the cheese. For a sweet twist, try making dessert balls. Use sweetened cream cheese and crushed cookies. These sweet variations can surprise your guests and satisfy your sweet tooth. For the full recipe, check the section above! To keep your leftover crispy fried mac and cheese balls fresh, place them in an airtight container. This helps prevent them from drying out. You can store them in the fridge for up to three days. If you want them to last longer, freezing is the way to go. You have two main options for reheating: the oven or the microwave. The oven keeps the crispy texture better. Preheat your oven to 350°F (175°C). Bake the balls for about 10-15 minutes. If you use a microwave, they may get soft. Heat them for about 1-2 minutes, but they might lose crunch. To keep them crispy, you can also use an air fryer. Set it to 350°F and cook for about 5 minutes. If you want to freeze the balls before frying, first shape them and place them on a baking sheet. Make sure they don’t touch each other. Freeze until solid, then transfer them to a freezer bag. They can last up to three months in the freezer. For the best taste, try to fry them while still frozen. This keeps them crispy and delicious. Yes, you can make these ahead of time. You can prepare the mac and cheese mixture and shape it into balls. After that, place the balls on a baking sheet and cover them. Store them in the fridge for up to 24 hours. This way, you can fry them fresh when you are ready to eat. If you want to store them longer, you can freeze them. Just freeze the balls on the baking sheet, then transfer them to a bag. You can fry them straight from the freezer. Panko breadcrumbs are different from regular breadcrumbs in texture. Panko has a larger, flakier shape. This gives your mac and cheese balls a crunchier outside when fried. Regular breadcrumbs are finer and denser. They do not provide the same crispiness. Using Panko can really elevate the dish, making each bite more enjoyable. Look for a golden brown color on the outside. This means they are crispy and ready to eat. If you see bubbles around the balls, that’s a good sign too. You can also check the temperature inside. If it reaches 165°F, they are done. They should be hot and gooey on the inside. Yes, there are easy vegetarian alternatives. You can use plant-based cheese for a dairy-free option. Also, try using vegan cream cheese instead of regular cream cheese. For the breadcrumbs, make sure to choose a brand without animal products. This way, you can enjoy crispy fried mac and cheese balls and keep it vegetarian. For more details, check the Full Recipe. In this blog post, we explored how to make crispy fried mac and cheese balls. We covered the key ingredients, step-by-step instructions, and helpful tips to ensure success. Remember, the right seasoning and frying techniques bring out the best flavors. Don’t hesitate to get creative with different cheeses and add-ins. Whether for a snack or a party, these bites are sure to impress. Enjoy your cooking adventure and savor each crunchy, cheesy bite!](https://grilledflavors.com/wp-content/uploads/2025/06/4b49bc78-c7fb-4984-9b8d-8cf9fa8c465f.webp)
Crispy Fried Mac and Cheese Balls Irresistible Treat
Craving a snack that’s both cheesy and crunchy? You’ve landed in the right place! These Crispy Fried Mac and Cheese Balls are an irresistible treat