Appetizers

Cheesy Garlic Chicken Wraps That Everyone Will Love
Looking for a quick and tasty meal that the whole family will love? My Cheesy Garlic Chicken Wraps are the perfect solution! Packed with flavor
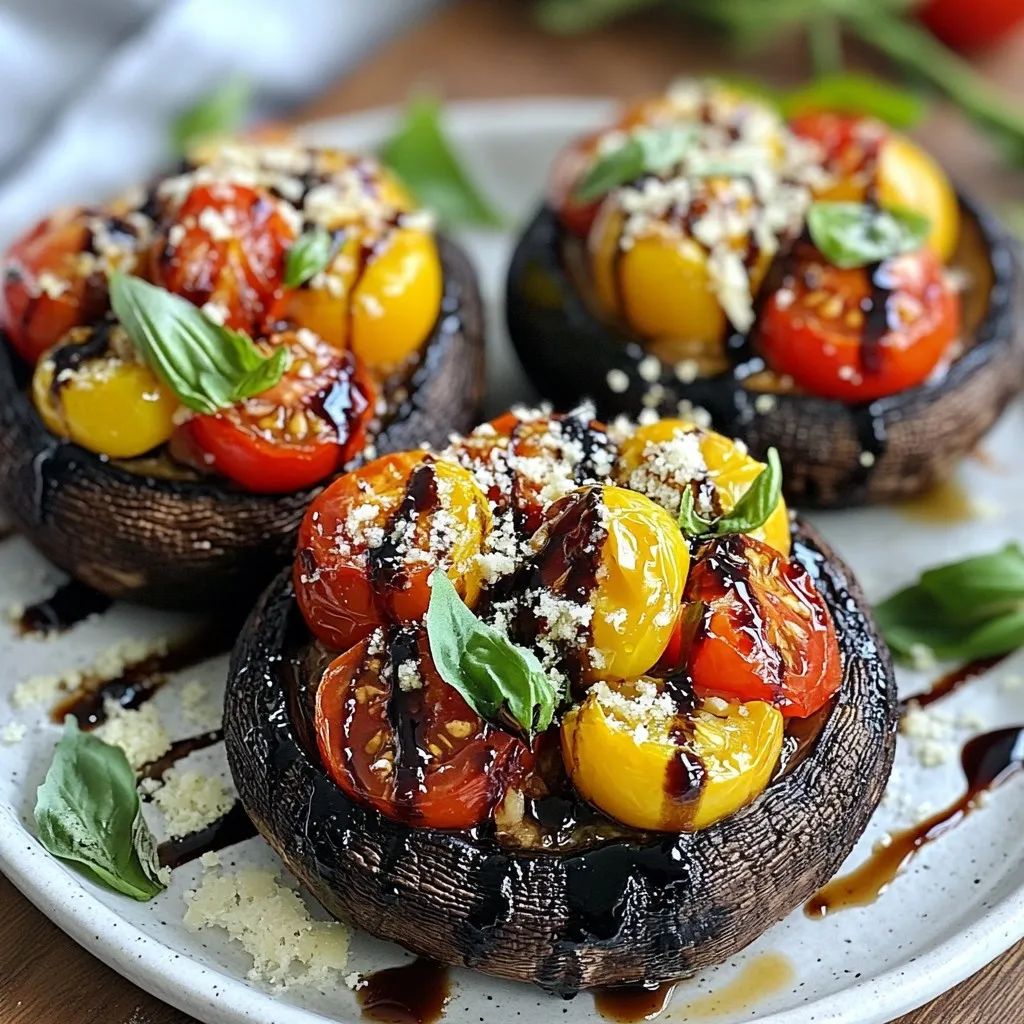
Caprese Stuffed Portobello Mushrooms Flavorful Delight
Are you ready to indulge in a tasty treat? Caprese Stuffed Portobello Mushrooms are not just delightful; they’re a burst of fresh flavors! In this

Korean BBQ Meatballs with Spicy Mayo Dip Delight
Are you ready to spice up your dinner plans? Korean BBQ Meatballs with Spicy Mayo Dip are here to bring excitement to your table. These
![- 1 lb salmon fillet, skin removed and cut into bite-sized cubes - 1/2 cup cornstarch - 1/4 cup honey - 1/2 teaspoon salt - 1/2 teaspoon black pepper - 1/2 teaspoon garlic powder - 1 tablespoon fresh ginger, grated - 2 tablespoons soy sauce (low sodium) - 1 tablespoon sesame oil - 2 garlic cloves, minced - 2 green onions, chopped (for garnish) - Sesame seeds (for garnish) Crispy Honey Garlic Salmon Bites start with fresh salmon. I love using a firm fillet, as it holds its shape well when cooked. The cornstarch gives the bites a crunchy outer layer. Honey adds a sweet touch, balancing the savory flavors. For seasoning, salt and pepper are must-haves. They enhance the natural taste of the salmon. Garlic powder adds a nice depth. Fresh ginger brings a zing that brightens the dish. The sauce is where the real magic happens. Soy sauce gives it a rich umami kick. Sesame oil adds a nutty flavor, while minced garlic rounds everything out. Don't forget to garnish with green onions and sesame seeds for extra texture and color. For the full recipe, check out the instructions provided. You will enjoy making these tasty bites! Coating the salmon bites First, take your salmon fillet and cut it into bite-sized cubes. In a bowl, mix cornstarch, salt, black pepper, and garlic powder. Add the salmon cubes to the bowl. Toss them gently until each piece is fully coated. The cornstarch helps create that crispy texture you want. Making the honey garlic sauce Now, let's make the sauce. In another bowl, whisk together honey, soy sauce, grated ginger, minced garlic, and sesame oil. This sauce will give your salmon bites a delicious flavor. Make sure to blend it well so all the flavors mix together. Heating the skillet Heat a non-stick skillet over medium-high heat. Once it’s hot, add about two tablespoons of oil. You can use vegetable or olive oil. This oil helps the salmon get crispy. Cooking times for crispy texture Carefully place the coated salmon bites in the skillet. Don't overcrowd them; this helps them cook evenly. Cook for about 2-3 minutes on each side. You want them golden brown and crispy. Once done, remove them from the skillet and place them on a paper towel to absorb any extra oil. Tossing in the sauce In the same skillet, pour in your honey garlic sauce. Let it simmer for about 2-3 minutes while stirring. This thickens the sauce and enhances the flavor. Final presentation tips Return the crispy salmon bites to the skillet. Toss them in the sauce until they are well-coated. Cook for one more minute to heat through. Finally, place the honey garlic salmon bites on a serving platter. Garnish with chopped green onions and sesame seeds for that perfect touch. For the full recipe, check out the details above. To get that crispy outside, choose the right oil. I suggest using vegetable oil or canola oil. Both have high smoke points, which means they fry well. Avoid overcrowding the skillet. If you add too many salmon bites at once, they will steam instead of fry. Cook them in batches. This will keep them crispy and golden. You can adjust the sweetness and saltiness of the sauce. If you want it sweeter, add more honey. For a saltier taste, add a little more soy sauce. Taste it as you go! If you need a substitute for soy sauce, try coconut aminos or tamari. Both give a nice flavor without gluten. For side dishes, steamed broccoli or rice works great. These sides complement the salmon bites well. If you have leftovers, try making a salmon salad. Just flake the salmon and mix it with greens and a light dressing. It’s a quick and tasty meal! For the full recipe, check out the Crispy Honey Garlic Salmon Bites section. {{image_2}} You can enjoy crispy honey garlic bites with other proteins. If you want to swap salmon, use chicken or tofu. Both options work well. Chicken gives a hearty flavor, while tofu absorbs the sauce nicely. Shrimp is another great choice. Just peel and devein fresh shrimp. Cook them in the same way as salmon. They will become crispy and flavorful. Each protein brings a unique taste to this dish. Want to spice things up? Add chili sauce to your honey garlic mix. This will give a nice kick. You can adjust the heat level based on your taste. Incorporating vegetables can also enhance flavor. Try bell peppers, snap peas, or carrots. They add color and crunch. Stir them into the sauce or cook them alongside your protein. If you're looking for a gluten-free option, use tamari instead of soy sauce. This simple swap keeps the dish tasty without gluten. For vegetarian adaptations, replace the salmon with eggplant or cauliflower. Both can soak up the honey garlic sauce. They deliver a satisfying, flavorful bite. For the full recipe, check out the details above. To store leftovers, let the salmon bites cool to room temperature. Place them in an airtight container. This helps keep them fresh. Try to use them within 2-3 days for the best taste. Recommended containers include glass or BPA-free plastic. These materials prevent leaks and keep your food safe. Avoid using metal containers, as they can react with the sauce. To freeze salmon bites, first, let them cool completely. Arrange the bites in a single layer on a baking sheet. Freeze them for about 1-2 hours until solid. After that, transfer the bites to a freezer-safe bag. Remove as much air as possible to prevent freezer burn. For reheating, you can bake or pan-fry them. If baking, preheat your oven to 375°F (190°C). Place the bites on a baking sheet and heat for about 10-15 minutes. This method keeps them crispy. If pan-frying, use a little oil in a hot skillet for about 3-5 minutes. Enjoy your crispy honey garlic salmon bites again! For the full recipe, check out [Full Recipe]. To make your salmon bites crispy, follow these key steps: - Use cornstarch: This helps create a nice crust. Toss the salmon in a mix of cornstarch and spices. - Preheat your skillet: Make sure it’s hot before adding the salmon. This sears the outside quickly. - Avoid overcrowding: Cook in batches. If you add too much salmon, it will steam instead of fry. - Use enough oil: This helps achieve that golden brown color. Following these steps will give you perfectly crispy salmon bites every time! Yes, you can make the sauce ahead of time! Here’s how to store it: - Cool it down: Let the sauce reach room temperature first. - Use an airtight container: This keeps flavors fresh and prevents spills. - Refrigerate: The sauce can last for up to a week in the fridge. When you’re ready to use it, just heat it on the stove. It’s simple and saves time! Pair your salmon bites with these tasty sides: - Steamed rice: The simple flavor balances the sauce well. - Roasted vegetables: Broccoli or snap peas add some crunch. - Salad: A fresh green salad can lighten the meal. These options will complete your dinner and make it even more enjoyable! For the full recipe, check out the details above. In this blog post, we covered how to make crispy honey garlic salmon bites step by step. You learned about the essential ingredients, from salmon and cornstarch to soy sauce and sesame oil. We explored key tips for perfect texture and ways to customize your dish. Finally, remember that cooking should be fun and creative. Try different proteins, flavors, and sides. With these techniques, your meals will impress and satisfy. Enjoy your cooking adventure!](https://grilledflavors.com/wp-content/uploads/2025/06/52e2bdb1-678c-41f5-bfc9-f1c7f7ae3c3e.webp)
Crispy Honey Garlic Salmon Bites Tasty Dinner Option
Looking for a quick and tasty dinner? Crispy Honey Garlic Salmon Bites are the answer! This dish combines crunchy salmon with sweet honey and garlic
![To make these breadsticks, you need a few key items. Here’s the list: - 1 lb ground beef or thinly sliced steak - 1 cup bell peppers (mixed colors), diced - 1 small onion, finely chopped - 1 cup provolone cheese, shredded - 1 cup mozzarella cheese, shredded - 1 teaspoon garlic powder - 1 teaspoon onion powder - Salt and pepper, to taste - 1 tablespoon olive oil - 1 package of refrigerated pizza dough (about 13.8 oz) - 1 egg, beaten (for egg wash) These ingredients bring rich flavors and create a great filling for the breadsticks. You can add or swap a few ingredients to make the recipe your own. Here are some ideas: - Mushrooms for added earthiness - Spinach for a pop of color and nutrients - Different types of cheese like cheddar or pepper jack - Hot sauce for a spicy kick Mix and match these options to fit your taste. To keep your ingredients fresh, consider these tips: - Choose fresh vegetables: Look for bright colors and firm textures. - Use high-quality cheese: Freshly shredded cheese melts better than pre-packaged. - Check the dough: Make sure your pizza dough is within its expiration date. By following these tips, you’ll ensure that your Philly cheesesteak stuffed cheesy breadsticks are top-notch. For the full recipe, check out the section above. To start, heat a large skillet over medium heat. Add one tablespoon of olive oil. Once hot, toss in one small onion, finely chopped, and one cup of mixed bell peppers, diced. Cook these veggies until they soften, which takes about five minutes. If you're using ground beef, add one pound to the skillet. Cook it until browned. If you choose thinly sliced steak, add it now and sauté until just cooked. Season with one teaspoon of garlic powder, one teaspoon of onion powder, and salt and pepper to taste. After cooking, remove the skillet from heat and let it cool a bit. Now, roll out one package of refrigerated pizza dough on a floured surface. Aim for a rectangle about one-fourth inch thick. Cut the dough into long strips, each about four inches wide. On one end of each strip, place a spoonful of your meat and veggie mixture. Top it with a generous amount of provolone and mozzarella cheese, about one cup of each. Next, carefully roll the dough over the filling until you reach the other end. Pinch the edges to seal tightly. Place each stuffed breadstick seam side down on a baking sheet lined with parchment paper. Before you bake, preheat your oven to 425°F (220°C). Brush the tops of the breadsticks with one beaten egg. This will give them a nice golden color. Bake in the preheated oven for about 12 to 15 minutes. Keep an eye on them until they turn golden brown and the cheese bubbles. Once baked, let them cool for a few minutes before serving. Enjoy these cheesy delights fresh for the best taste! For the full recipe, check out the details above. To get the best breadsticks, follow these simple tips. First, make sure your oven is fully preheated. This helps the breadsticks rise and brown evenly. Second, do not overcrowd the baking sheet. Leave space between each breadstick for air to circulate. Lastly, keep an eye on the time. Ovens can vary, so check them a minute or two early. Melted cheese makes these breadsticks special. Use a mix of provolone and mozzarella for great flavor and texture. To help the cheese melt nicely, cut it into small pieces. This way, it will melt quickly and evenly. Also, avoid overstuffing the breadsticks. If they are too full, the cheese may not melt well. Serve your cheesy breadsticks hot from the oven. Pair them with warm marinara sauce for dipping. It adds a great flavor contrast. You can also sprinkle some fresh parsley on top for a pop of color. If you want extra crunch, serve with a side salad. This adds freshness and balances the meal. For more fun, try using different dipping sauces like ranch or garlic butter. Enjoy your creation! For the full recipe, check out the detailed instructions. {{image_2}} You can make these breadsticks vegetarian by swapping the meat. Use mushrooms, zucchini, or eggplant instead of beef or steak. Sauté these veggies just like you would the meat. This option is tasty and keeps the breadsticks hearty. Add extra cheese for a creamy texture. You can also toss in some spinach or kale for added nutrition. Cheese is the star of these breadsticks. While provolone and mozzarella are classic, you can mix it up! Try adding cheddar for a sharper taste. Swiss cheese can bring a nutty flavor that pairs well with the filling. For a fun twist, add some pepper jack for a spicy kick. Experiment with different cheese blends to find your favorite combination. If you like heat, add jalapeños or red pepper flakes to the meat filling. This will give your breadsticks a spicy kick. You can also use spicy sausage instead of beef for more flavor. Another option is to serve the breadsticks with a spicy dipping sauce. This will take your cheesy breadsticks to the next level. Enjoy the extra zing in every bite! For the full recipe, check out the detailed instructions in the [Full Recipe]. To store leftover breadsticks, let them cool first. Place them in an airtight container. You can also wrap them in plastic wrap. Keep them in the fridge for up to three days. This will help keep them fresh and tasty. When you want to eat your leftover breadsticks, reheating is key. Preheat your oven to 350°F (175°C). Place the breadsticks on a baking sheet. Heat them for about 10 minutes. This method keeps them crispy and warm. You can also use a microwave, but they may get a bit soft. So, if you want the best taste, stick to the oven. Freezing is a great option for long-term storage. After cooling, wrap each breadstick in plastic wrap. Then, place them in a freezer bag. Remove as much air as you can. These can last up to three months in the freezer. When you're ready to eat, just thaw them in the fridge overnight. Reheat them in the oven for a fresh taste. Enjoy your cheesy breadsticks anytime with this simple method! Yes, you can make the dough from scratch if you want. Use flour, yeast, water, and salt for a simple recipe. Mix and knead it until smooth. Let it rise for one hour. This gives you fresh dough full of flavor. However, using store-bought dough saves time and effort. You can prepare the filling and dough in advance. Cook the meat and veggies, then let them cool. Roll out the dough and fill it as usual. Cover and store them in the fridge for up to 24 hours. When ready, bake them directly from the fridge. This keeps them fresh and tasty. These breadsticks pair well with many sauces. Marinara sauce is a classic choice. You can also try ranch dressing or garlic butter. If you like spice, sriracha mayo adds a nice kick. Choose your favorite for a fun dip. Enjoy experimenting with different flavors! You learned how to make easy Philly cheesesteak stuffed cheesy breadsticks. This recipe uses fresh ingredients for great taste. Use optional ingredients for your own twist. Follow the step-by-step guide for perfect results every time. Remember the tips for melting cheese and serving. Feel free to try vegetarian options and spicy flavors. Store leftovers carefully and use my reheating tips for the best taste. These breadsticks will be a hit with everyone. Enjoy your baking and the smiles it brings!](https://grilledflavors.com/wp-content/uploads/2025/06/b6a560fe-d742-4dd2-b39c-abf12c13156f.webp)
Easy Philly Cheesesteak Stuffed Cheesy Breadsticks Recipe
Get ready to delight your taste buds with my Easy Philly Cheesesteak Stuffed Cheesy Breadsticks. This recipe brings together the classic flavors of a Philly

Crispy Ham & Cheese Puff Pastry Stacks Delight
Are you ready to impress your guests with a quick, tasty treat? Crispy Ham & Cheese Puff Pastry Stacks combine flaky pastry with savory ham
. To keep your stuffed bread from getting soggy, brush the inside with olive oil. This step helps create a barrier. You also want to hollow out the bread carefully. Remove excess bread but leave enough crust to hold the filling. Avoid packing too much filling, as it can make the bread wet. When mixing your ingredients, start with the cream cheese, sour cream, and mayonnaise. Blend them until smooth. This mix should be creamy for the best texture. Gradually add in the spinach, artichokes, and cheeses. Stir gently to keep everything combined without breaking the artichokes too much. Don’t forget to season with garlic and onion powder for added flavor. This dish shines as a snack or appetizer. Serve it warm, cut into wedges. Pair it with a light salad for a fuller meal. You can also offer dips like marinara or ranch on the side. A sprinkle of fresh parsley on top adds a nice touch. For the full recipe, check out Spinach and Artichoke Stuffed Bread. {{image_2}} To mix things up, try different cheeses in your stuffed bread. You can swap mozzarella for gouda or cheddar for a bold flavor. Cream cheese works well, but you can also use ricotta or goat cheese for a creamier texture. Each cheese adds a unique taste. Experiment with blends to find your favorite! If you want a vegetarian version, keep the ingredients as they are. For a vegan option, replace cream cheese, sour cream, and mayonnaise with plant-based alternatives. Use cashew cream or tofu for a creamy base. You can also add nutritional yeast to give it a cheesy flavor without dairy. Enhance the flavor of your stuffed bread with herbs and spices. You can add fresh basil, dill, or thyme for a fresh taste. A pinch of red pepper flakes brings heat, while smoked paprika adds depth. Don’t be afraid to play with flavors to make it your own. For the full recipe, click [Full Recipe]. To store leftover stuffed bread, wrap it tightly in plastic wrap. Place the wrapped bread in an airtight container or a resealable bag. This keeps the bread fresh for up to three days in the fridge. If you want to eat it later, storing it properly prevents it from drying out. When reheating, I recommend using an oven. Preheat the oven to 350°F (175°C). Remove the wrapping and place the bread on a baking sheet. Heat it for about 10-15 minutes. This method keeps the bread crust crispy. You can also use a microwave, but it may make the bread soft. If you use the microwave, heat it for 30 seconds at a time until warm. If you want to keep the stuffed bread longer, freezing is a great option. Wrap the leftover bread in plastic wrap, then in aluminum foil. Label the package with the date. It can stay in the freezer for up to three months. When ready to eat, thaw it in the fridge overnight. Reheat it in the oven for the best texture. This way, you enjoy your spinach and artichoke stuffed bread when you crave it! For the full recipe, check the main section. I recommend using a large round sourdough bread loaf. Sourdough has a chewy crust and a soft inside. Its texture holds the filling well without getting soggy. Other good options include Italian or French bread. Just make sure the bread is sturdy enough to hold the filling. Yes, you can prepare it ahead. Mix the filling a day before and store it in the fridge. Hollow out the bread and keep it covered. When you’re ready to bake, just fill the bread and pop it in the oven. This saves time and makes it easy for gatherings. To make this dish gluten-free, choose gluten-free bread. Many brands offer gluten-free sourdough or Italian bread. Ensure all other ingredients are also gluten-free. This way, everyone can enjoy this delightful treat without worry. In this blog post, we explored making delicious Spinach and Artichoke Stuffed Bread. We covered ingredients, substitutes, and equipment needed. You learned how to prepare the filling, hollow out the bread, and bake it perfectly. I shared tips to avoid sogginess and ways to serve it. We also discussed various cheese options and how to store leftovers. This recipe is versatile and easy to customize. Enjoy creating your own stuffed bread masterpiece, and share it with family and friends. You’ll impress everyone with your tasty creation!](https://grilledflavors.com/wp-content/uploads/2025/06/7e7d15c4-c101-4af4-809c-a7e7e2be52c1.webp)
Spinach and Artichoke Stuffed Bread Simple Delight
Are you ready to elevate your snack game? Spinach and Artichoke Stuffed Bread is a simple delight that blends creamy goodness with fresh flavors. This

Quick & Easy Stuffed Potato Cakes for Tasty Meals
Looking for a quick and easy meal that packs a punch? These stuffed potato cakes are your answer. With a few simple ingredients, you can
![- 1 medium cauliflower, cut into florets - 1 cup all-purpose flour - 1 cup water - 1 teaspoon garlic powder - 1 teaspoon onion powder - 1 teaspoon paprika - Salt and pepper to taste - 1 cup panko breadcrumbs - 1/2 cup sweet chili sauce - 1 tablespoon soy sauce - 1 teaspoon sesame oil - 1 tablespoon sesame seeds (for garnish) - Fresh cilantro (for garnish) To make sweet chili cauliflower wings, you need fresh ingredients. Start with a medium cauliflower. Cutting it into florets makes it easy to handle. The batter needs flour and water, mixed with garlic powder, onion powder, and paprika. This gives a nice flavor. Don't forget salt and pepper to taste! Panko breadcrumbs create a crunchy outside. For the sauce, sweet chili sauce, soy sauce, and sesame oil blend well. Finally, sesame seeds and fresh cilantro add a lovely touch for garnish. A serving has about 250 calories, with 7 grams of protein, 36 grams of carbs, and 10 grams of fat. Cauliflower brings many health benefits. It is low in calories and high in fiber. It also contains vitamins C and K, which support your immune system. - Baking sheet - Mixing bowls - Whisk - Spatula Having the right tools makes cooking easier. A baking sheet helps the cauliflower wings crisp up. Mixing bowls are essential for making the batter. A whisk helps blend everything smoothly. Use a spatula to flip the wings and serve them. These tools will help you create the perfect sweet chili cauliflower wings. For the full recipe, check out the detailed steps above. First, cut the cauliflower into small florets. This helps them cook evenly. Rinse the florets under cold water to clean them well. Next, preheat your oven to 425°F (220°C). This high heat gives the wings a nice crisp. In a large bowl, mix 1 cup of all-purpose flour with 1 cup of water. Add 1 teaspoon of garlic powder, 1 teaspoon of onion powder, 1 teaspoon of paprika, salt, and pepper to taste. Whisk until the batter is smooth. It should not be too thick or too runny. The right consistency helps the batter stick to the cauliflower. Now, dip each cauliflower floret into the batter. Let the extra batter drip off. Then, roll the coated florets in 1 cup of panko breadcrumbs. This gives them a crunchy texture. Place the coated florets on a baking sheet. Bake in the preheated oven for 25-30 minutes. Flip them halfway through to get even cooking. After they turn golden brown, take them out. In a small saucepan, combine 1/2 cup of sweet chili sauce, 1 tablespoon of soy sauce, and 1 teaspoon of sesame oil. Heat gently until mixed. Once the cauliflower is baked, toss it in the sweet chili sauce. Make sure all the florets get coated. Return them to the baking sheet and bake again for 5-7 minutes. This step helps the sauce caramelize and adds more flavor. Enjoy your crispy and flavorful snack! For the complete recipe, follow the [Full Recipe]. To get those crispy wings, you must coat the cauliflower well. The batter needs to stick to each floret. Make sure to let any excess batter drip off before coating in panko. This helps create a crunch when baked. Bake at a high temperature of 425°F (220°C) for the best results. Flip the wings halfway through to cook evenly. This ensures every side gets that nice golden brown color. Adding spices to the batter can boost the flavor of your wings. Try adding a bit of cayenne for heat or smoked paprika for depth. You can also mix in some dried herbs like oregano or thyme. For dipping sauces, sweet chili sauce pairs perfectly, but you can also try ranch or a tangy yogurt sauce. These dips add a creamy contrast to the crispy texture of the wings. When serving your sweet chili cauliflower wings, think about pairing them with drinks. A cold beer or a refreshing iced tea works well. You can also serve them with a side of fresh veggies for a balanced meal. For presentation, arrange the wings on a colorful platter. Garnish with sesame seeds and chopped cilantro for a pop of color. This makes the dish look as good as it tastes! {{image_2}} To make this recipe vegan, you can swap the all-purpose flour and water for chickpea flour. Chickpea flour provides a nice texture and flavor. Mix it with enough water to form a thick batter. This keeps the wings crispy and adds more protein. You can also use flaxseed meal mixed with water as a binding agent. Just combine one tablespoon of flaxseed meal with three tablespoons of water. Let it sit for a few minutes until it thickens. If you love heat, add sriracha to the sweet chili sauce. Start with a tablespoon and mix it in well. Taste it, then add more if you want. You can also sprinkle cayenne pepper into the batter for a spicy kick. Adjust the heat level to your liking. Remember, you can always add more spice, but you can't take it out! You can use other veggies like broccoli or zucchini. They work well in this recipe. Just cut them into similar sizes as the cauliflower. Cooking times may change, so keep an eye on them. Broccoli may need about 20-25 minutes, while zucchini might be done in 15-20 minutes. Always check for crispiness before taking them out of the oven. To keep your sweet chili cauliflower wings fresh, store them in the fridge. Place the wings in an airtight container. This helps prevent moisture loss and keeps them crispy. Allow the wings to cool to room temperature before storing. They will stay good for about three to four days. When it comes to reheating, the oven is best. Preheat your oven to 350°F (175°C). Spread the wings on a baking sheet. Heat for about 10-15 minutes until they are crispy again. If you're in a hurry, you can use a microwave, but the wings won't be as crispy. Heat them in short bursts and check often to avoid sogginess. You can freeze your wings before or after baking. If you freeze them before baking, coat the florets and place them on a baking sheet. Freeze them until solid, then transfer to a freezer bag. If you freeze them after baking, let them cool first. Store in an airtight container or freezer bag. When you're ready to enjoy them, thaw overnight in the fridge. Reheat in the oven for the best texture. You can use gluten-free flour options. Try almond flour or chickpea flour. These flours work well and keep the batter light. Mix with water just like regular flour. This keeps the texture crispy and tasty. Yes, you can use frozen cauliflower. Just thaw and drain it well. This helps remove excess moisture. Pat the florets dry with a paper towel. This step is key for crispiness. These wings stay fresh for about 3 to 4 days in the fridge. Store them in an airtight container. Always check for any signs of spoilage before eating. Yes, you can prepare the wings ahead. Coat them and bake them. Let them cool, then store in the fridge. When you’re ready, just reheat them in the oven. This keeps them crispy. Great dips include ranch, blue cheese, or yogurt-based dips. These cool dips balance the heat from the sweet chili sauce. You can even try a tangy lime dip for a fresh twist. Check out the Full Recipe for more ideas! This article covered how to make delicious sweet chili cauliflower wings. You learned about the key ingredients, step-by-step instructions, and helpful tips for cooking. I shared variations, including vegan and spicy options, plus how to store and reheat leftovers. In my view, mastering this recipe gives you a great snack or appetizer. With some practice, you’ll create a dish that impresses. Enjoy your cooking journey and the tasty results!](https://grilledflavors.com/wp-content/uploads/2025/06/cc310fa6-5951-4b64-91c9-1bbe16e680c1.webp)
Sweet Chili Cauliflower Wings Crispy and Flavorful Snack
Looking for a tasty snack that’s both crispy and packed with flavor? Try my Sweet Chili Cauliflower Wings! This simple recipe turns cauliflower into a

Air-Fryer Asian BBQ Cauliflower Wings Flavor Feast
Craving a tasty snack that’s both healthy and satisfying? Dive into my Air-Fryer Asian BBQ Cauliflower Wings Flavor Feast! These crispy bites are perfect for