Breakfast

Fluffy Blueberry Zucchini Muffins Healthy Morning Treat
Start your day on a delicious note with my Fluffy Blueberry Zucchini Muffins! These healthy treats pack a punch of flavor while sneaking in some
Protein-Packed Blueberry Muffins for Healthy Snacking
Looking for a tasty way to boost your protein intake? Try these Protein-Packed Blueberry Muffins! They offer a delightful blend of flavors and nutrients, making
![- 1 cup grated zucchini - 1 cup whole wheat flour - 1/2 cup rolled oats - 1/2 cup honey or maple syrup - 1 large egg - 1/4 cup unsweetened applesauce - 1/4 cup Greek yogurt - 1 teaspoon baking powder - 1/2 teaspoon baking soda - 1 teaspoon ground cinnamon - 1/4 teaspoon nutmeg - 1/4 teaspoon salt - Optional: 1/2 cup chopped walnuts or pecans, 1/2 cup raisins or dark chocolate chips The ingredients for zucchini muffins are simple and healthy. The star is zucchini. It adds moisture and a subtle taste. Whole wheat flour gives a nutty flavor and fiber. Rolled oats add texture and heartiness. Honey or maple syrup serves as a natural sweetener, making these muffins sweet yet healthy. The egg binds everything together. Applesauce keeps the muffins moist while reducing fat. Greek yogurt adds creaminess and protein, making these muffins more filling. Baking powder and baking soda help the muffins rise. Cinnamon and nutmeg bring warmth and spice to each bite. Feel free to customize your muffins. You can add nuts for crunch or chocolate chips for sweetness. The Full Recipe provides all the details you need to make these delightful treats. - Calories per muffin: About 120 - Breakdown of macronutrients: - Carbohydrates: 20g - Protein: 3g - Fat: 2g - Health benefits of main ingredients: - Zucchini is low in calories and high in vitamins. - Whole wheat flour offers more nutrients than white flour. - Oats are great for heart health and keep you full. These muffins are not just tasty; they are good for you too! First, set your oven to 350°F (175°C). This preheating step is key for even baking. While the oven warms up, grab a muffin tin. You can line it with paper liners or lightly grease it with oil. This will help the muffins come out easily after baking. Next, take a large mixing bowl. Add 1 cup of grated zucchini, 1/2 cup of honey or maple syrup, 1 large egg, 1/4 cup of unsweetened applesauce, and 1/4 cup of Greek yogurt. Mix these until they blend well. The zucchini adds moisture, while the honey gives sweetness. Now, grab another bowl. Whisk together 1 cup of whole wheat flour, 1/2 cup of rolled oats, 1 teaspoon of baking powder, 1/2 teaspoon of baking soda, 1 teaspoon of ground cinnamon, 1/4 teaspoon of nutmeg, and 1/4 teaspoon of salt. These dry ingredients will give your muffins structure and flavor. It’s time to combine! Gradually add the dry mixture to the wet mixture. Stir gently until everything is just mixed. Avoid overmixing; this helps keep your muffins light and fluffy. If you want, you can fold in 1/2 cup of chopped walnuts or pecans and 1/2 cup of raisins or dark chocolate chips for extra texture and flavor. Spoon the batter into the prepared muffin tin, filling each cup about 3/4 full. Bake your muffins for 20 to 25 minutes. To check for doneness, insert a toothpick into the center. If it comes out clean, your muffins are ready. Let them cool in the tin for about 5 minutes before moving them to a wire rack. Enjoy the warm, fresh scent! For the complete recipe, check out the [Full Recipe]. To make moist zucchini muffins, use key ingredients. Grated zucchini adds moisture. Applesauce and Greek yogurt also help keep them soft. Honey or maple syrup adds sweetness and moisture. When you mix these ingredients, they create a lovely, tender muffin. Every oven is different. For best results, check your muffins a few minutes early. If you make mini muffins, reduce the baking time. Bake them for about 12-15 minutes. For larger muffins, you may need up to 30 minutes. Always use a toothpick to test for doneness. It should come out clean when muffins are ready. Overmixing can ruin the texture. Mix just until the wet and dry ingredients blend. Too much mixing makes muffins dense. Measuring ingredients correctly is vital. Use a kitchen scale for accuracy. This ensures perfect outcomes every time. Following these tips will lead to great zucchini muffins. For the complete recipe, refer to the Full Recipe. {{image_2}} You can easily make gluten-free zucchini muffins. To do this, swap the whole wheat flour with a gluten-free flour blend. You might also use almond flour or coconut flour. Make sure the blend contains xanthan gum for texture. Use certified gluten-free oats if you want to keep the oats in the recipe. This simple change keeps the muffins tasty and safe for those with gluten sensitivities. To make these muffins vegan, you can replace the egg and dairy. For the egg, try using a flax egg. Just mix one tablespoon of ground flaxseed with three tablespoons of water. Let it sit for five minutes until it forms a gel. Replace the Greek yogurt with silken tofu or more applesauce. This keeps the muffins moist and fluffy, ensuring you don't miss the dairy at all. You can add your favorite spices or fruits for fun flavors. Try adding a teaspoon of vanilla extract for sweetness. You can also mix in a teaspoon of nutmeg or ginger for a warm taste. Nuts like walnuts or pecans add crunch. Dried fruits like cranberries or blueberries can bring a fresh twist. For a richer flavor, add dark chocolate chips. These additions make each muffin unique and exciting. Explore different combinations to find your favorite! To keep your zucchini muffins fresh, place them in an airtight container. This method keeps moisture in and air out. You can also wrap them in plastic wrap. Store them at room temperature for up to three days. If you want them to last longer, consider the freezer. Freezing zucchini muffins is simple. First, let the muffins cool completely. Then, wrap each muffin in plastic wrap. Place the wrapped muffins in a freezer bag. Make sure to remove as much air as possible. Label the bag with the date. You can freeze them for up to three months. To enjoy your muffins again, reheat them in the oven. Preheat the oven to 350°F (175°C). Place the muffins on a baking sheet. Heat for about 10 minutes. You can also microwave a muffin for 20-30 seconds. This method makes them warm and soft. For the best taste, enjoy them fresh after reheating. Yes, you can use other types of flour. Almond flour or oat flour works well. Each flour changes the texture. Almond flour gives a nutty taste. Oat flour makes muffins soft and moist. You may need to adjust liquids. Start with less and add more as needed. Dense muffins often come from overmixing the batter. Mixing too long traps air and makes them heavy. Using too much flour can also cause density. Always measure flour accurately. If you add too many wet ingredients, it may lead to dense muffins too. Absolutely! Mini muffins are fun and easy. Use the same batter but adjust cooking time. Bake for about 10-15 minutes. Check with a toothpick to see if they are done. They should be golden and spring back when touched. These muffins stay fresh for about 3-4 days. Store them in an airtight container. You can also freeze them for up to three months. Just thaw them in the fridge before eating. Enjoy them warm for the best taste! You’ve now learned how to make tasty and healthy muffins. We covered the main ingredients, and how to mix and bake them. I shared tips for keeping them moist and avoiding common mistakes. Plus, you saw how to make variations for different diets and flavors. With these steps, you'll surely impress everyone. Enjoy baking and tasting these yummy muffins!](https://grilledflavors.com/wp-content/uploads/2025/07/9d3b43e2-514b-4673-bbea-4a000de55582.webp)
Zucchini Muffins – Easy and Healthy Recipe Delight
Are you ready to bake something delicious and healthy? Zucchini muffins might be just what you need! Packed with nutrients and flavor, these easy muffins

Crustless Zucchini Quiche Simple and Tasty Recipe
Looking for a quick and tasty dish? This Crustless Zucchini Quiche is your answer! With fresh zucchini, creamy cheese, and simple spices, it’s easy to

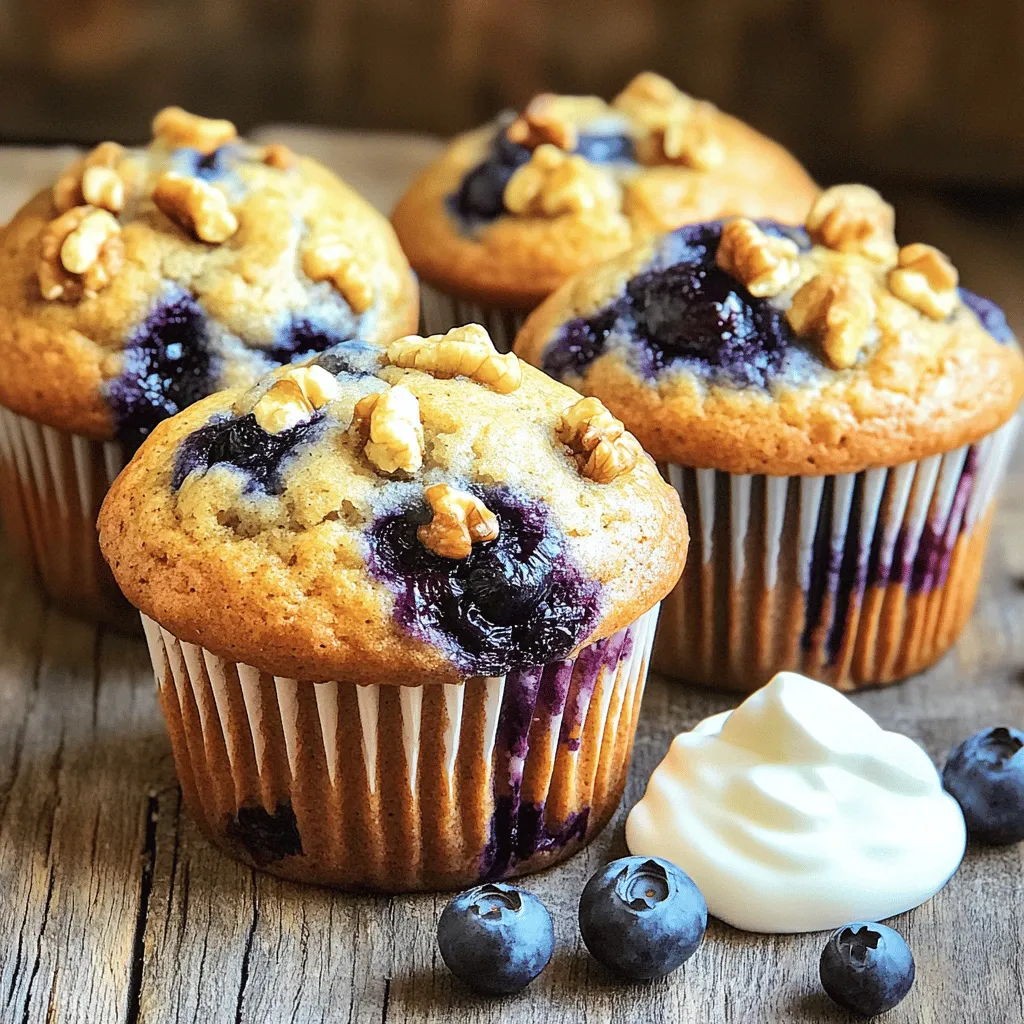
Healthy Blueberry Zucchini Muffins Simple and Tasty
Looking for a delicious way to sneak veggies into your breakfast? You’re in the right place! My Healthy Blueberry Zucchini Muffins are easy to make
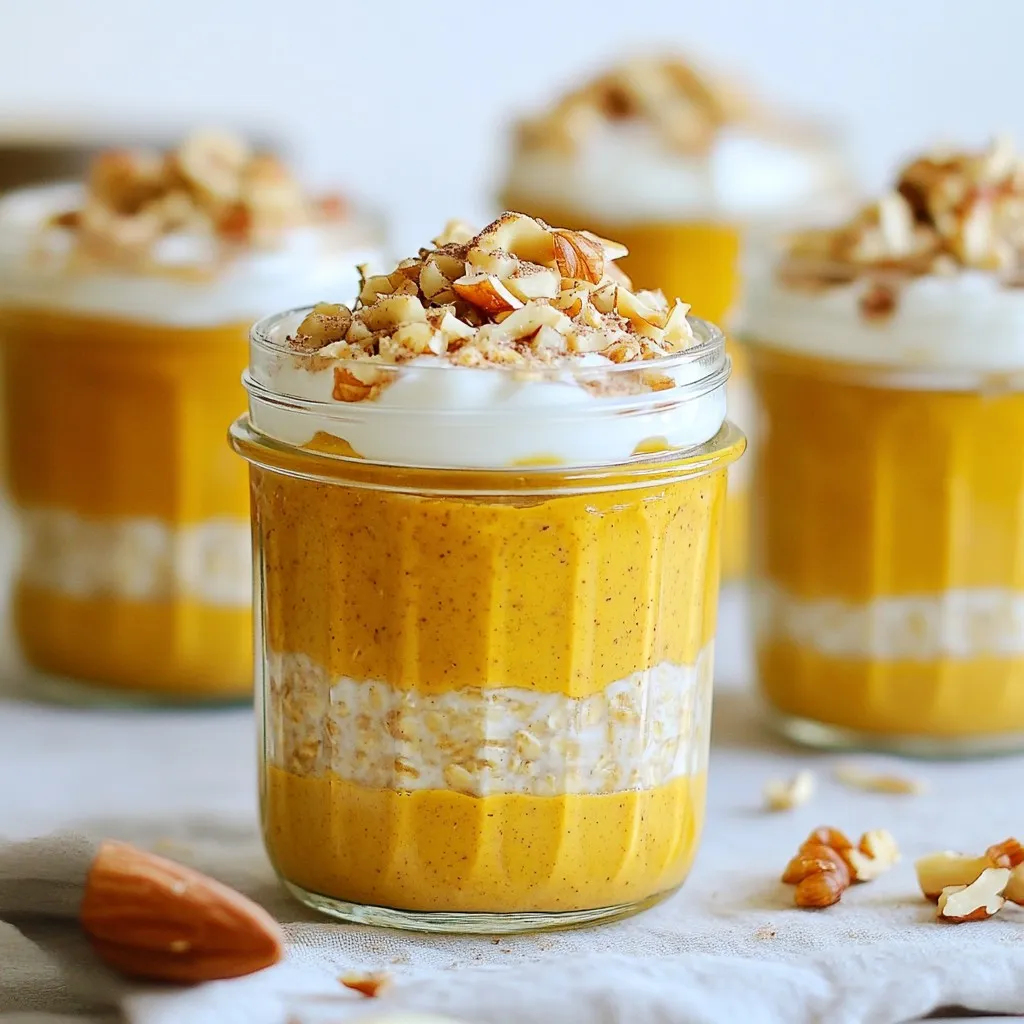
Pumpkin Spice Overnight Oats Simple and Healthy Recipe
Are you ready to embrace fall with a tasty twist? Pumpkin Spice Overnight Oats are simple, healthy, and perfect for busy mornings. In this article,
![- 6 large eggs - 1 cup spinach, chopped - 1/2 cup bell peppers (red and yellow), diced - 1/2 cup zucchini, grated - 1/2 cup cherry tomatoes, halved - 1/4 cup red onion, finely chopped - 1/4 cup feta cheese, crumbled (optional) - 1 tablespoon olive oil - Salt and pepper to taste - Fresh basil for garnish (optional) When making a healthy vegetable frittata, choose fresh ingredients. Eggs are the base. They add protein and flavor. Spinach offers nutrients and a vibrant green color. Bell peppers add sweetness and crunch. Zucchini provides moisture and a mild taste. Cherry tomatoes give a burst of juiciness. Red onion brings a sharp flavor. Feta cheese adds a creamy touch, but it’s optional. Olive oil helps cook the veggies and adds richness. Finally, salt and pepper enhance all the flavors. - Calories per serving: Approximately 150 - Macronutrient breakdown: - Protein: 10g - Fat: 10g - Carbohydrates: 5g Each serving of this frittata is light yet filling. You get a good mix of protein, healthy fats, and carbs. This meal fits into many diets. You can enjoy it for breakfast, lunch, or dinner. - Seasonal recommendations: Choose veggies that are in season for the best taste. - Types of vegetables to use: Look for bright colors and firm textures. Fresh spinach, vibrant peppers, and crisp zucchini work well. Avoid any wilted or bruised produce. By picking fresh ingredients, you improve the flavor and nutrition of your frittata. Try this recipe for a quick, healthy meal. For the full recipe, check out the details above! First, set your oven to 375°F (190°C). This temperature helps the eggs cook evenly. Use an oven-safe skillet for great results. A cast-iron skillet works best, as it holds heat well. Next, let’s prepare the veggies. Start by heating olive oil in your skillet over medium heat. Add red onion and bell peppers first. Sauté them for about 3-4 minutes until they soften. This order is key. Cooking the onion first brings out its sweet flavor. Then, add grated zucchini and spinach. Cook them for 2-3 minutes until the spinach wilts. Finally, stir in halved cherry tomatoes and cook for just one more minute. This will keep their fresh taste. Now, pour your whisked eggs over the veggies. Fold gently to mix. If you want, sprinkle feta cheese on top. Transfer the skillet to your preheated oven. Bake for 20-25 minutes. Keep an eye on it. You know it’s done when the eggs are set and the top is slightly golden. Check doneness by gently shaking the skillet. If the eggs jiggle, it needs more time. Once baked, cool for a minute before slicing. Enjoy your colorful, tasty frittata! For the complete recipe, see the [Full Recipe]. To make a great frittata, avoid common mistakes. First, do not overcook your veggies. They should be tender but not mushy. Also, don't skip whisking the eggs well. This adds air and lightness. If you forget, your frittata can be dense and heavy. Adjust cooking times based on your oven. Every oven is different. Check your frittata a few minutes early. It should be firm in the center but still moist. Pair your frittata with a fresh salad. A simple green salad can add crunch and brightness. You can also serve it with roasted potatoes. Place your frittata slices on a colorful platter. Garnish with cherry tomatoes and fresh herbs. This makes it look more appealing. A vibrant presentation can make any dish pop! Making a dairy-free frittata is easy. Just skip the cheese or use a dairy-free alternative. You can also try silken tofu for creaminess. If you're vegan, replace the eggs with chickpea flour. Mix with water to create a batter. This gives a similar texture to eggs. The flavor will still be great with your chosen veggies. {{image_2}} You can easily change the vegetables in your frittata. Here are some ideas: - Broccoli florets - Mushrooms, sliced - Carrots, grated - Asparagus, chopped These swaps make the dish unique each time. You can also switch up the cheese. Instead of feta, try: - Cheddar - Goat cheese - Mozzarella To take your frittata to the next level, add some spices or herbs. Here are some options: - Oregano - Thyme - Paprika - Chili flakes Each will bring a new taste. You can also explore different cuisines. For a Mexican twist, add cumin and jalapeños. For Italian flair, use basil and sun-dried tomatoes. If you want smaller servings, consider mini frittatas. Use a muffin tin to bake them. This makes for easy portion sizes. Adjust your baking time to about 15-20 minutes. Check them with a toothpick. If it comes out clean, they are done! These mini versions are perfect for snacks or brunch. You can serve them warm or cold. For the full recipe, check out the Rainbow Veggie Frittata. To keep your frittata fresh, store it in the fridge. Place it in an airtight container. This helps keep it moist and prevents drying out. Make sure it cools to room temperature first. You can also cut it into slices for easy serving. For freezing, wrap individual slices tightly in plastic wrap. Then place them in a freezer-safe bag. This way, you can grab one whenever you want a quick meal. Just remember to label the bags with the date. When reheating, the oven works best for keeping the frittata's texture. Preheat your oven to 350°F (175°C). Place the frittata on a baking sheet and cover it with foil. Heat for about 10-15 minutes until warm. If you use a microwave, be careful. It can make the frittata rubbery. Heat on medium power for 1-2 minutes, checking every 30 seconds. This helps avoid overcooking. In the fridge, your frittata lasts about 3-4 days. Keep an eye on it, though. If you see any mold or off-smells, it’s time to toss it out. Signs of spoilage include a change in color or texture. If it looks dry or has a strange odor, don’t eat it. Always trust your senses when it comes to food safety. A frittata is an Italian egg dish. It is like an open-faced omelet. You mix eggs with vegetables, cheese, or meats. Then, you cook it slowly. It can be baked or cooked on the stove. The key features are its fluffy texture and colorful veggies. To make your frittata fluffy, you need to whisk your eggs well. Whisking adds air to the eggs. This air makes the frittata light. You can also bake it at a lower temperature. This helps it rise gently. Yes, you can make a frittata ahead of time. Cook it fully, then let it cool. Store it in the fridge for up to three days. You can also freeze it for longer storage. Just slice it before freezing. Some great vegetables for a frittata are: - Spinach - Bell peppers - Zucchini - Cherry tomatoes - Red onion These veggies add color and flavor. You can mix and match based on what you like. For more ideas, check the Full Recipe. In this post, I covered how to make a delicious frittata. We explored key ingredients, cooking steps, and tips for perfection. Fresh veggies enhance both taste and nutrition. I shared ways to customize your frittata and best storage practices. Remember, cooking is about experimenting and having fun. Try new flavors, learn from mistakes, and enjoy your tasty creations!](https://grilledflavors.com/wp-content/uploads/2025/06/f6b79faf-46f2-4fd6-9831-3fc1bbdb0719.webp)
Healthy Vegetable Frittata Flavorful and Satisfying Meal
Looking for a quick and healthy meal? This Healthy Vegetable Frittata is packed with flavor and nutrition. It’s an easy dish that you can whip
![- 6 large eggs - 1/4 cup milk - 1/2 cup feta cheese, crumbled - 1/2 cup cherry tomatoes, halved - 1/2 cup bell peppers (mix of red and yellow), diced - 1/2 small red onion, finely chopped - 1/2 cup baby spinach - 2 tablespoons fresh basil, chopped - 1 tablespoon olive oil - Salt and pepper to taste When I make a Mediterranean frittata, I love to use fresh and colorful ingredients. The eggs give the dish a rich base. The milk makes it creamy and light. Feta cheese adds a tangy flavor that balances the eggs well. Next, I add my fresh vegetables. Cherry tomatoes bring a sweet burst. The bell peppers add crunch and color. Red onion gives a bit of sweetness, while baby spinach adds a lovely green touch. I finish with fresh herbs and seasoning. Basil gives a bright, herbal note. Olive oil helps to cook the veggies perfectly. A sprinkle of salt and pepper brings all the flavors together. This combination of ingredients makes a delicious and healthy meal. You can find the full recipe above to guide you through each step! - Preheat your oven to 400°F (200°C). - In a large bowl, whisk together the eggs and milk. Season with salt and pepper. - Heat olive oil in an oven-safe skillet over medium heat. - Add chopped red onion and bell peppers. Sauté until they soften, about 3-4 minutes. - Stir in halved cherry tomatoes and baby spinach. Cook for 2 more minutes until the spinach wilts. - Pour the egg mixture over the veggies. Gently stir to blend. - Sprinkle crumbled feta cheese and chopped basil on top. - Cook on the stovetop for about 5 minutes, until edges begin to set. - Transfer the skillet to the oven. Bake for 10-12 minutes until puffed and golden. - Remove from the oven and let it cool for a couple of minutes. - Slice the frittata and serve warm. Enjoy it with fresh basil if you like. For the full recipe, check the Mediterranean Frittata section above. - Use fresh ingredients for the best flavor. Fresh veggies and herbs make a big difference. - Don't overcook the eggs to maintain a creamy texture. This keeps your frittata soft and fluffy. - Pair with a fresh green salad. The crunch adds a nice balance to the frittata. - Add a wedge of lemon for brightness. A squeeze of lemon lifts the flavors. - Oven-safe skillet or cast-iron pan. This helps you cook and bake in one dish. - Whisk and mixing bowl. These are essential for mixing your ingredients well. For a detailed guide, check the Full Recipe for the Mediterranean Frittata. {{image_2}} You can swap out feta cheese for goat cheese or ricotta. Goat cheese gives a tangy twist. It melts nicely and adds creaminess. Ricotta is soft and rich, making the frittata fluffy. Both cheeses work well with the other flavors. For extra taste, try adding zucchini or mushrooms. Zucchini adds moisture and a mild taste. Sauté it until it softens before adding the eggs. Mushrooms bring a delicious earthy flavor. Just remember to cook them a bit to release their juices. Want more protein? Add cooked sausage or chicken. Sausage gives a savory kick. Use spicy or mild, depending on your taste. Chicken is a lighter option that blends well with the frittata. Just make sure it’s cooked and diced before mixing in. For the full recipe, check out Mediterranean Frittata. Store leftovers in an airtight container for up to 3 days. This helps keep the frittata fresh. You can enjoy it again for breakfast or lunch. Just make sure it cools before you store it. You can reheat the frittata in a microwave or heat it in a skillet. When using a skillet, add a little olive oil to maintain texture. This way, it stays moist and tasty. You can freeze the frittata for up to 2 months. Just slice it and wrap each piece in plastic wrap. When you want to eat it, reheat directly from frozen. It’s a great meal prep option to save time! A Mediterranean frittata is a tasty dish inspired by Mediterranean flavors. It features fresh vegetables and creamy cheese. You can use ingredients like bell peppers, tomatoes, and spinach. Feta cheese adds a rich, tangy flavor. This dish is not only colorful but also full of nutrients. It's perfect for breakfast or a light lunch. Yes, you can make a frittata ahead of time. It stores well in the refrigerator. Just let it cool completely before placing it in an airtight container. You can enjoy it cold or heat it up later. This makes it a great option for meal prep. To prevent sticking, use a well-seasoned skillet. You can also coat the pan with a little olive oil. This helps the frittata slide out easily after cooking. This way, you get perfect slices every time. Enjoy cooking your Mediterranean frittata with these easy tips! For the full recipe, check out the [Full Recipe]. This blog post details how to create a delicious Mediterranean frittata. You learned about the key ingredients, from eggs to fresh veggies and herbs. I shared step-by-step cooking instructions and tips to ensure your frittata turns out perfectly. With variations and storage info, this dish is easy to adapt for your tastes. Enjoy making this tasty and healthy meal. It’s a simple way to impress family or friends while enjoying great flavors. Happy cooking!](https://grilledflavors.com/wp-content/uploads/2025/06/a20ece44-c893-4106-a464-d4cb0eeba9d9.webp)
Mediterranean Frittata Wholesome and Flavorful Dish
Are you craving a meal that is both wholesome and full of flavor? Look no further than a Mediterranean frittata! This dish is packed with

Easy Vegetable Frittata Quick and Tasty Recipe Guide
Looking for a quick and tasty meal that’s as nutritious as it is delicious? You’re in the right place! This Easy Vegetable Frittata recipe offers
. To get the best texture in your asparagus frittata, focus on the eggs. Whisk them well with milk. This adds air and makes your frittata light. Cook on medium heat to avoid burning the bottom. The edges should set first, while the center remains slightly soft. This ensures a creamy bite. Many people overcook their frittatas. This makes them dry and rubbery. Avoid this by checking the center with a toothpick. If it comes out clean, it's done. Also, don’t skip the resting time after baking. Letting it sit for a few minutes enhances the flavor and texture. Lastly, if you forget the salt and pepper, the taste will lack depth. Serve the frittata warm on individual plates. Garnish with fresh basil leaves for color. A drizzle of extra virgin olive oil adds richness and flavor. You can pair it with a simple salad or crusty bread for a full meal. This dish is perfect for brunch or a light dinner. For more ideas, check the Full Recipe. {{image_2}} You can make great vegetarian versions of the asparagus frittata. Just leave out any meat. Use more fresh vegetables instead. Spinach, bell peppers, and zucchini work well. You can also add herbs like parsley or chives for added flavor. These small changes can make your frittata just as tasty! If you like meat, think about adding bacon or ham. Bacon gives a nice crunch and smoky taste. Just cook it first and set it aside. Then, use the same skillet to cook your veggies. Add the cooked bacon back in before you pour the egg mix. Ham is another good choice. It adds a savory flavor that pairs well with asparagus. You don’t have to stick to asparagus. Try other veggies too! Broccoli, mushrooms, or even spinach can be great swaps. Each vegetable offers a unique taste and texture. You can mix and match based on what you have. This way, the frittata stays fresh and exciting every time you make it. Check the [Full Recipe] for more ideas and tips! To store leftover frittata, let it cool first. Once cool, slice it into pieces. Place the pieces in an airtight container. This keeps the frittata fresh for up to three days. If you want to keep it longer, consider freezing it. When you're ready to eat the leftover frittata, you can reheat it easily. Preheat your oven to 350°F (175°C). Place the frittata on a baking sheet. Heat it for about 10-15 minutes, or until warm. You can also use the microwave for quicker reheating. Just warm it for 1-2 minutes. Make sure it is hot all the way through. Freezing frittata is a great way to save it for later. First, let the frittata cool completely. Then, wrap each slice in plastic wrap. Place the wrapped slices in a freezer bag or container. This keeps them safe from freezer burn. You can freeze the frittata for up to three months. When you want to eat it, thaw it overnight in the fridge. Reheat as mentioned above for a tasty meal. Yes, you can use frozen asparagus for this recipe. Make sure to thaw and drain it first. Frozen asparagus is often blanched, which means it cooks faster. This can save you time. Just chop it into small pieces and add it to the skillet. It will still taste great in the frittata! Asparagus frittata is tasty on its own but pairs well with many sides. You can serve it with a crisp green salad. A light vinaigrette will add some zing. Slices of fresh bread or toast are also good options. For a heartier meal, try serving it with some roasted potatoes. You can tell the frittata is done when it puffs up. Insert a toothpick into the center. If it comes out clean, your frittata is ready. The edges should be set, but the center can be slightly soft. It will continue to cook as it cools. Enjoy your delicious dish! You can find the full recipe in the earlier section. In this blog post, we explored how to make a tasty asparagus frittata. We covered all the necessary ingredients, gave you step-by-step cooking instructions, and shared helpful tips for success. You learned about variations and how to store or reheat leftovers. Now, you have all the tools to create this dish at home. Enjoy experimenting with different ingredients and flavors. A frittata is simple yet full of style. Share it with friends and family for a delightful meal. Happy cooking!](https://grilledflavors.com/wp-content/uploads/2025/06/342d2b4a-970f-4ed2-b1fe-3b6ccb7f895f.webp)
Asparagus Frittata Simple and Flavorful Dish
If you’re looking for a simple yet delicious dish, try my Asparagus Frittata! This recipe combines fresh asparagus with eggs for a meal that’s quick