Breakfast

Let's gather our key ingredients for these delicious Cinnamon Sugar French Toast Roll-Ups. Here's what you'll need: - 6 slices of bread (white or whole grain) - 3 large eggs - 1/4 cup milk (or non-dairy alternative) - 1 tsp vanilla extract - 1 tsp ground cinnamon - 1/2 cup sugar - 4 tablespoons butter - Optional fillings: Nutella or cream cheese - Optional toppings: Fresh berries Each ingredient plays a special role in making these roll-ups tasty. The bread is the base, providing a fluffy texture. Eggs and milk create a rich custard that soaks into the bread. Cinnamon and sugar give the roll-ups their sweet, warm flavor. Butter helps them brown and adds a nice crisp. Feel free to get creative with fillings. Nutella adds a chocolatey twist, while cream cheese gives a creamy touch. Fresh berries on top add a burst of color and flavor. You can find the full recipe for these roll-ups above. To start, take six slices of your chosen bread. I like to use white or whole grain. Use a rolling pin to flatten each slice. Flattening makes them easy to roll. If you want, you can remove the crusts for a smoother bite. This step is optional but fun. Next, grab a shallow bowl. In it, combine three large eggs, a quarter cup of milk, one teaspoon of vanilla extract, and one teaspoon of ground cinnamon. Whisk these ingredients together until they blend well. This mixture makes the toast flavorful and rich. Now it’s time to assemble. Dip each roll-up into the egg mixture. Make sure every part gets coated. Let the excess drip off. In a large skillet, melt one tablespoon of butter over medium heat. Place two to three roll-ups in the skillet. Cook them for two to three minutes on each side. You want them golden brown. Repeat this with the rest of the roll-ups, adding more butter as needed. While they’re still warm, roll each in a cinnamon sugar mix until fully coated. You can find the full recipe earlier for more details. Enjoy these warm with fresh berries if you like! To roll your French toast without breaking, start with thin slices of bread. A rolling pin helps flatten the bread evenly. Remove crusts for a smooth roll if you like. When you roll, start at one end and keep it tight. This helps the roll hold its shape. For a crispy exterior, use a hot skillet. Adding more butter adds flavor and crunch. Keep your skillet on medium heat. Too high, and the outside burns while the inside stays raw. Too low, and you’ll lose that golden color. To know when to flip, look for a golden brown color on the bottom. Gently lift the roll-up with a spatula. If it moves easily, it’s time to flip. For fun fillings, try peanut butter or jam. You can also add sliced bananas or apples for a fruity twist. To make it vegan, swap eggs with flax eggs and use non-dairy milk. For gluten-free options, choose gluten-free bread. These simple swaps keep your roll-ups tasty and fun. Check the Full Recipe for all the details! {{image_2}} You can make these roll-ups even better with Nutella or cream cheese. To do this, spread a thin layer on one side of each bread slice. This adds a rich, creamy taste that makes each bite special. After spreading the filling, roll the bread tightly. The filling melts and mixes beautifully with the cinnamon sugar. Want to jazz up your roll-ups? Think about adding different spices. You can mix in nutmeg or cardamom for a warm taste. A splash of almond extract gives a nice twist too. For a fruity hint, try adding orange or lemon zest. These small changes can make your roll-ups unique and exciting. While white and whole grain bread work well, you can try other types too. Brioche or challah adds a rich flavor and soft texture. Gluten-free bread is a great option if you need it. Each type of bread brings its own taste, so feel free to experiment. To keep your cinnamon sugar French toast roll-ups fresh, store them in the fridge. Place them in an airtight container. They will last for about three days. If you want to save them longer, freezing is an option. Wrap each roll-up tightly in plastic wrap. Then, place them in a freezer bag. They can stay frozen for up to two months. When it's time to enjoy leftover roll-ups, reheating is key. You can use an oven for the best results. Preheat your oven to 350°F (175°C). Place the roll-ups on a baking sheet and cover them with foil. Heat for about 10-15 minutes. This method keeps them warm and crispy. You can also use a microwave for a quick fix. Place a roll-up on a plate and cover it with a damp paper towel. Heat for 20-30 seconds. However, this may make them a bit softer. Enjoy your roll-ups warm, and they will taste just as good as when you first made them! To make Cinnamon Sugar French Toast Roll-Ups vegan, swap out the eggs and milk. Use a plant-based milk like almond or soy. Instead of eggs, use a flaxseed or chia seed mixture. Combine 1 tablespoon of ground flaxseed or chia seeds with 2.5 tablespoons of water. Let it sit for 5 minutes to thicken. This will help bind the roll-ups without eggs. You can also use vegan butter for frying. Yes, stale bread works well for this recipe. It absorbs the egg mixture better. Fresh bread can become too mushy. Stale bread gives a nice, chewy texture. Just make sure it’s not moldy. If the bread is very hard, you may want to soak it in the egg mixture a bit longer. To add more sweetness, consider extra toppings. Maple syrup is a classic choice. You can drizzle it over the roll-ups before serving. Whipped cream also adds a nice touch. For a fun twist, sprinkle powdered sugar on top. Fresh berries can add sweetness and color too. This blog post covered the ingredients and steps needed to make delicious French toast roll-ups. You learned to prepare the right egg mixture, cook the roll-ups, and explore variations like Nutella filling. Remember to use tips for perfecting the texture and making it vegan or gluten-free. Impress friends and family with this fun dish. Enjoy your time in the kitchen and share your tasty roll-ups!
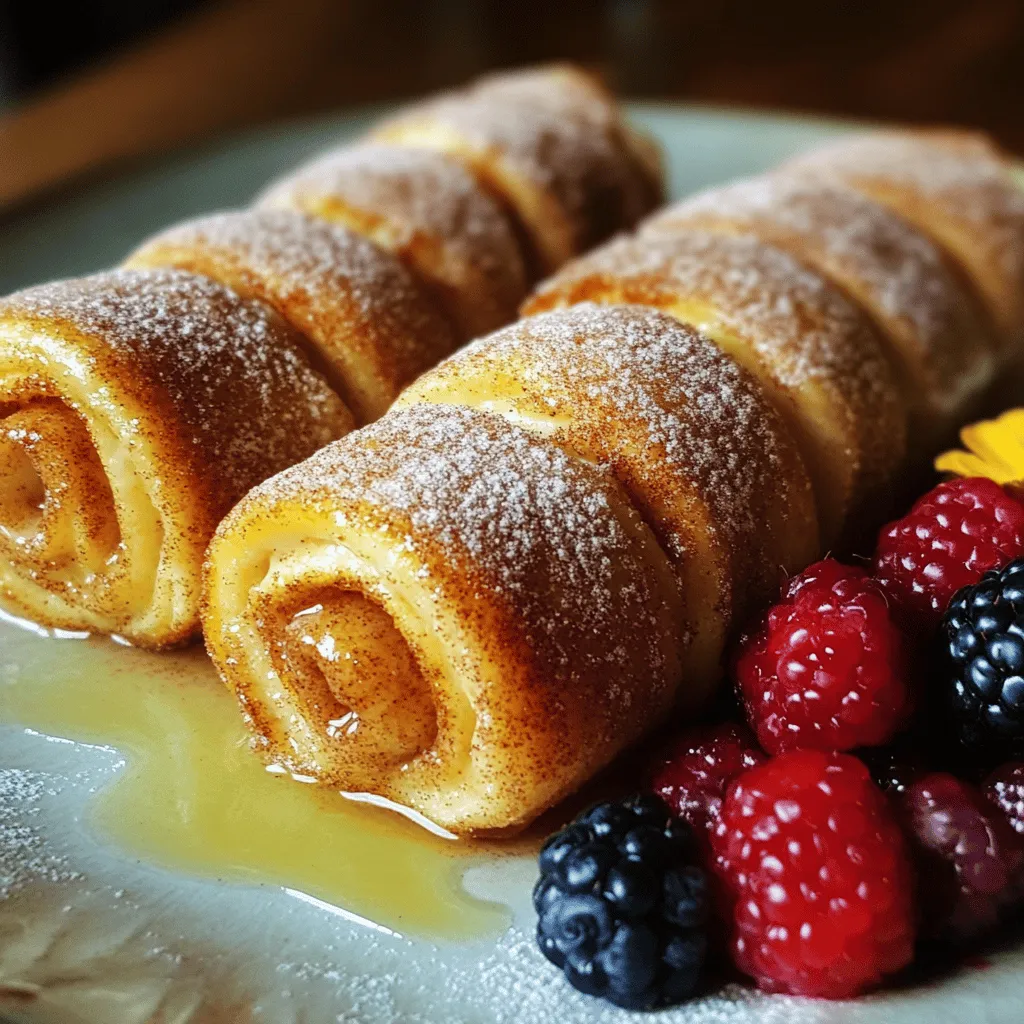
Cinnamon Sugar French Toast Roll-Ups Simple Delight
Are you ready to impress your taste buds? Cinnamon Sugar French Toast Roll-Ups are the perfect blend of sweet and savory. With just a few
For Cinnamon Roll French Toast Bites, gather these simple items: - 4 cinnamon rolls (store-bought or homemade) - 2 large eggs - 1/2 cup milk - 1 tablespoon vanilla extract - 1 teaspoon ground cinnamon - 2 tablespoons butter - 1/4 cup powdered sugar (for dusting) - Maple syrup (for serving) - Fresh berries (optional, for garnish) You can swap some ingredients for a twist. Here are a few ideas: - Use almond milk instead of regular milk for a nutty flavor. - Replace eggs with flaxseed meal mixed with water for a vegan option. - Try using nutmeg instead of cinnamon for a different spice note. Toppings add fun and flavor. Consider these extras: - Drizzle chocolate syrup for a sweet touch. - Sprinkle chopped nuts for crunch. - Add whipped cream for creaminess. - Top with sliced bananas or apples for fruitiness. These ingredients and tips will help you make the best Cinnamon Roll French Toast Bites. Check out the Full Recipe for step-by-step instructions! Start with your cinnamon rolls. If you use store-bought rolls, bake them as per the package. Let them cool for a few minutes. If you make them from scratch, give them time to cool after baking. Once they cool, cut each roll into bite-sized pieces. Aim for quarters to ensure they fit well in your skillet. Grab a large bowl for the egg mixture. Crack two large eggs into the bowl. Add half a cup of milk, one tablespoon of vanilla extract, and one teaspoon of ground cinnamon. Whisk the mixture well until it is smooth and creamy. This mix is key for coating your bites, so make sure it is well combined. Now, it’s time to cook. Heat two tablespoons of butter in a large skillet over medium heat. Wait until the butter bubbles before adding the cinnamon roll pieces. Dip each piece into the egg mixture, coating it fully but not soggy. Place them in the skillet in a single layer. Cook each side for about three to four minutes. You want them golden brown and slightly crispy. Once done, dust them with powdered sugar while they are still warm. Serve with maple syrup and fresh berries if you like. For the full recipe, check out the section above. Enjoy these tasty bites! To get that perfect bite, start with your cinnamon rolls. Use fresh rolls for the best taste. If you use store-bought ones, follow the package steps closely. After baking, let them cool slightly. This step helps keep them from getting too soggy. When cutting them, make sure the pieces are not too big. Smaller bites cook more evenly and get that nice crisp outside. One common mistake is soaking the rolls too long in the egg mix. Just a quick dip is all you need. If they sit too long, they can fall apart. Another mistake is cooking on too high heat. Keep the heat at medium. This way, the bites cook through and get golden brown without burning. Don’t crowd the skillet; you want space for even cooking. To boost the flavor, consider adding a pinch of nutmeg to the egg mix. It pairs well with cinnamon and gives a warm taste. You can also swap vanilla extract for almond extract for a different twist. For extra sweetness, drizzle honey or agave syrup on top. Fresh berries can add a nice tartness to balance the sweetness. For a fun crunch, sprinkle some chopped nuts before serving. For the full recipe, check out the details above. {{image_2}} You can make Cinnamon Roll French Toast Bites in many tasty ways. Try adding chocolate chips to the egg mixture for a sweet twist. You could also mix in some nutmeg for a warm spice flavor. Use flavored syrup, like caramel or hazelnut, to change things up. If you love fruit, chop up some apples or pears and cook them with the bites. This gives a fresh taste. You can even add a touch of orange zest for a bright finish. If you need a gluten-free option, use gluten-free cinnamon rolls. Many brands offer these, and they taste great! For a dairy-free version, swap out regular milk for almond or oat milk. You can also use a dairy-free butter alternative. Check labels to ensure all your ingredients fit your diet. These simple swaps keep the flavor but meet your needs. Seasonal ingredients can enhance your bites. In fall, add pumpkin puree to the egg mix. This adds a rich flavor and creamy texture. In winter, mix in some grated ginger for a warm spice. In summer, fresh berries can be mixed in or used as a topping. They add color and a burst of freshness. Using seasonal items helps your dish feel special and exciting. You can find the full recipe above to get started on these delicious bites! After making Cinnamon Roll French Toast Bites, let them cool completely. Place them in an airtight container. You can store them in the fridge for up to three days. This keeps them fresh and tasty for your next breakfast. To reheat your bites, use a skillet over medium heat. Heat them for about two to three minutes on each side. This will help restore their crispy texture. You can also use a microwave. Just heat for 20 to 30 seconds. Keep an eye on them to avoid drying out. If you want to save some for later, freezing works well. First, let the bites cool completely. Then, place them in a single layer on a baking sheet. Freeze them for about one hour. Once frozen, move the bites to a freezer-safe bag. They can last up to two months in the freezer. When you're ready to eat, thaw them in the fridge overnight. Reheat as usual for a warm morning treat. Yes, you can use day-old cinnamon rolls. They work great! In fact, stale rolls soak up the egg mixture better. Just cut them into bite-sized pieces and proceed with the recipe. They will taste delicious, and you won't waste food. To make this recipe ahead, prepare the egg mixture the night before. Store it in the fridge. You can also cut the cinnamon rolls and keep them in an airtight container. In the morning, just dip the pieces into the egg mixture, cook, and enjoy. It saves time and still tastes fresh. You can serve these bites with warm maple syrup for drizzling. Fresh berries add a nice touch and color. For extra sweetness, dust with powdered sugar. You might even try adding whipped cream or a scoop of ice cream for a fun twist. These bites are perfect for brunch or special mornings. For the full recipe, check the section above. You learned how to make delicious Cinnamon Roll French Toast Bites. We covered ingredients, recipe steps, and tips for the best results. Remember the importance of texture and flavor. Try different variations to suit your taste. Store leftovers for a quick treat later. With these ideas, you can impress anyone. Enjoy your tasty bites!
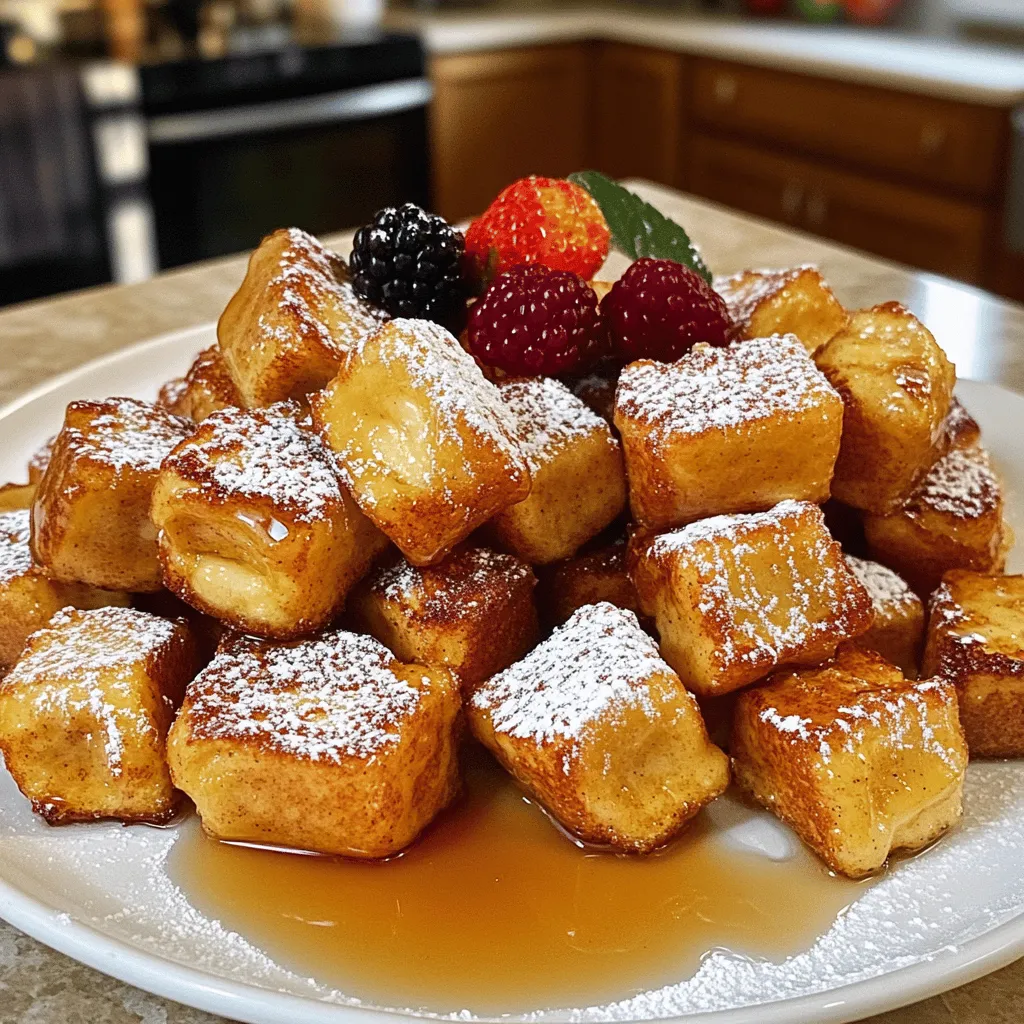
Cinnamon Roll French Toast Bites Tasty Morning Treat
Start your day with a delicious twist on breakfast! Cinnamon Roll French Toast Bites blend the warm, gooey goodness of cinnamon rolls with the crispy
To make your easy homemade granola bars, gather the following ingredients: - 2 cups rolled oats - 1 cup mixed nuts (almonds, walnuts, pecans), roughly chopped - 1/2 cup seeds (pumpkin, sunflower) - 1/2 cup unsweetened coconut flakes - 1/2 cup honey or maple syrup - 1/4 cup almond butter or peanut butter - 1/2 teaspoon vanilla extract - 1/2 teaspoon cinnamon - 1/4 teaspoon salt - 1/2 cup dried fruits (raisins, cranberries, or apricots), chopped These ingredients work together to create a tasty and healthy snack. The rolled oats form the base and give the bars a chewy texture. Mixed nuts add crunch and healthy fats. Seeds provide extra nutrients. Unsweetened coconut flakes give sweetness without added sugar. Honey or maple syrup serves as a natural sweetener. Almond or peanut butter adds richness and helps bind everything. The vanilla extract and cinnamon enhance the flavor. A touch of salt balances the sweetness, while dried fruits add a burst of flavor. For a complete guide on making these delicious bars, check out the Full Recipe. 1. Preheat the oven and prepare the baking pan Start by preheating your oven to 350°F (175°C). While that warms up, grab an 8x8 inch baking pan. Line it with parchment paper. Let the paper hang over the edges. This makes it easy to lift out the bars later. 2. Mix dry ingredients in a large bowl In a big bowl, add 2 cups of rolled oats, 1 cup of roughly chopped mixed nuts, 1/2 cup of seeds, and 1/2 cup of coconut flakes. Don’t forget to sprinkle in 1/2 teaspoon of cinnamon and 1/4 teaspoon of salt. Stir it all well. This mix gives your granola bars texture and flavor. 3. Melt the wet ingredients and combine In a small saucepan, combine 1/2 cup of honey (or maple syrup) and 1/4 cup of almond (or peanut) butter. Heat it on low. Stir until it melts and becomes smooth. Remove it from the heat and add 1/2 teaspoon of vanilla extract. This sweet mixture will bind your bars. 4. Transfer the mixture to the pan Pour your warm honey-nut mixture over the dry ingredients. Mix it all up until everything gets coated. Gently fold in 1/2 cup of chopped dried fruits. Now, transfer this thick mix into your prepared baking pan. Press it down evenly using a spatula. It should be firm. 5. Bake and cool the bars Place the pan in your preheated oven. Bake for about 20-25 minutes. Look for golden brown edges. When done, take it out and let it cool in the pan for 10 minutes. Then, use the parchment paper to lift it out. Cool the bars completely on a wire rack. Once cool, cut into bars or squares. Store these snacks in an airtight container for a tasty treat on the go. For the full recipe, check the ingredients and preparation steps above! To get the perfect texture in your granola bars, you need to follow a few key steps. First, press the mixture firmly into the pan. This helps the bars hold together. If you want chewy bars, bake them for less time. For crunchy bars, bake them until the edges turn golden. Mixing your ingredients is also important. I suggest combining the dry ingredients first. This means oats, nuts, seeds, and coconut. Stir them well before adding the wet mix. When you pour in the honey or maple syrup and nut butter, make sure to coat everything evenly. This ensures each bite has great flavor. If you want to change things up, feel free to swap nuts and seeds. You can use sunflower seeds instead of pumpkin seeds. Try cashews instead of almonds or walnuts. Each nut brings its own taste, making your bars unique. For sweeteners, honey is great, but maple syrup works too. You can use agave syrup for a vegan option. If you like a less sweet bar, reduce the sweetener by a little. Always taste your mixture before baking. Adjust to your preference for the best result. {{image_2}} You can make your granola bars even better with a few fun twists. One great option is to add chocolate chips. Just stir in about half a cup before you press the mixture into the pan. This will give your bars a sweet surprise. You can also use nut butter. Try mixing in almond or peanut butter for a creamier texture and richer taste. Dried fruit is another fun way to change the flavor. You can use raisins or cranberries, but don't stop there! Try apricots, figs, or even goji berries. Each fruit adds its unique taste and texture. By mixing different fruits, your bars will be different every time. If you want vegan options, it's easy! Swap honey for maple syrup. This keeps the sweetness but makes it plant-based. You can also use almond butter or peanut butter, as they are vegan-friendly. For gluten-free granola bars, make sure to choose certified gluten-free oats. Most nuts, seeds, and dried fruits are gluten-free too. You can enjoy these tasty bars without worry. Adjusting for dietary needs does not mean losing flavor. You can enjoy great snacks while sticking to your diet. Make sure to check out the Full Recipe to explore more ideas! To keep your homemade granola bars fresh, use an airtight container. Glass jars or plastic containers work well. Make sure they seal tightly to keep out air. This helps prevent them from getting stale. Your granola bars can last up to one week at room temperature. If you want to keep them longer, consider freezing them. For long-term storage, wrap each bar tightly in plastic wrap. Then, place the wrapped bars in a freezer-safe bag. This protects them from freezer burn. You can freeze the bars for up to three months. When you are ready to eat one, take it out and let it thaw at room temperature. For a quick fix, you can microwave it for 10-15 seconds. Enjoy your snack anytime! Can I skip the nuts? Yes, you can skip the nuts. Use seeds or extra dried fruit instead. This change keeps the bars tasty and crunchy. Just adjust the amount to keep the texture right. How can I make them chewy instead of crunchy? To make chewy bars, add more nut butter or honey. You can also reduce the baking time. This way, they stay soft and are easier to chew. Are these granola bars healthy? Yes, these granola bars are healthy! They contain oats, nuts, and seeds. These ingredients provide fiber, protein, and healthy fats. You can also choose to use less sweetener for a healthier option. For the full recipe, check out the Crunchy Nutty Granola Bars . Making homemade granola bars is simple and fun. We covered the ingredients you'll need, from rolled oats to dried fruits. You learned step-by-step how to mix, bake, and cool your bars. There are also tips for perfect texture and ingredient swaps. Don't forget the variations for flavor and dietary needs! Finally, we discussed the best ways to store your bars. With these easy steps, you can enjoy tasty, healthy snacks anytime. Embrace your creativity and make your granola bars unique. Happy baking!
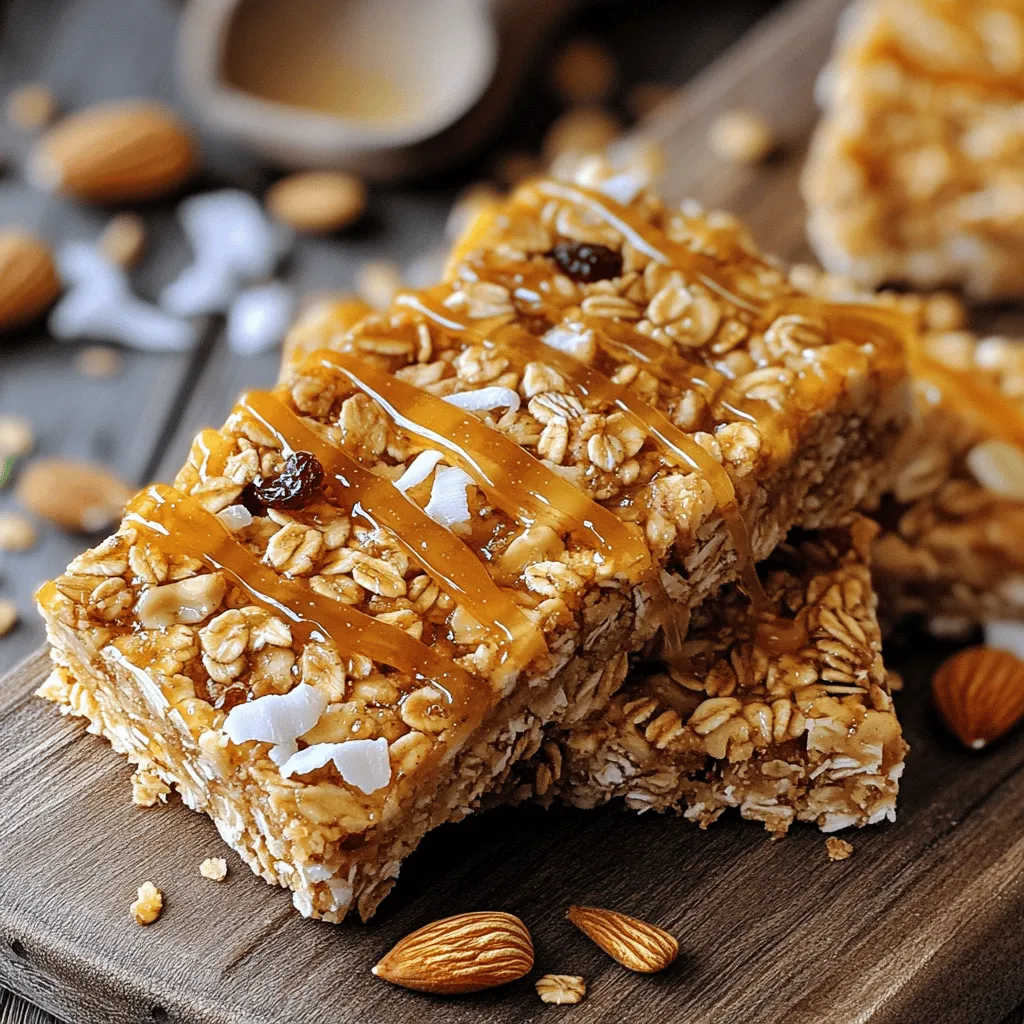
Easy Homemade Granola Bars Healthy Snack Recipe
Are you tired of store-bought snacks loaded with sugar? You can make easy homemade granola bars that are not only tasty but also healthy. With
- 8 slices of bread (your choice, white or whole grain) - 4 sausages (cooked and crumbled) - 4 large eggs - 1/2 cup milk - 1 teaspoon vanilla extract - 1 teaspoon ground cinnamon - 1/4 cup sugar (optional) - Butter or cooking spray for frying - Maple syrup or honey for drizzling - Powdered sugar for dusting (optional) Let’s dive into the ingredients! To make the perfect Sausage French Toast Roll-Ups, you'll need 8 slices of bread. You can use white or whole grain bread, depending on your taste. Next, grab 4 cooked and crumbled sausages. Italian or breakfast sausages work great here. For the egg mixture, gather 4 large eggs and 1/2 cup of milk to create a rich base. You can enhance the flavor by adding optional ingredients. A teaspoon of vanilla extract and ground cinnamon can add warmth. If you like a touch of sweetness, consider 1/4 cup of sugar. Don’t forget butter or cooking spray to fry the roll-ups. Finally, maple syrup or honey makes a great drizzle. You can dust with powdered sugar for a fun finish! For the full recipe, check out the section where I guide you through each step. To start, you need to flatten the bread. Use a rolling pin to roll each slice. This helps make the bread soft and easy to roll. Aim for about a quarter-inch thickness. Next, spread the filling. Place a spoonful of crumbled sausage on one edge of the flattened bread. Don’t overfill; a little goes a long way. Roll the bread tightly around the sausage. If it doesn’t stay closed, use a toothpick to keep it secure. Now, let’s make the egg mixture. In a large bowl, whisk together the eggs, milk, vanilla extract, cinnamon, and sugar. Mix until everything blends well. This mixture gives the roll-ups their rich, tasty flavor. First, coat the roll-ups. Dip each one in the egg mixture. Make sure every side gets a good coating. This step is key for a delicious crust. Next, choose your cooking method. You can use a skillet or a griddle. Heat it over medium heat. Add a bit of butter or spray with cooking spray. Once hot, place the roll-ups seam side down. Cook for about 3-5 minutes. You want them golden brown. Turn them to brown all sides evenly. For finishing touches, remove the roll-ups from the skillet. If you like, dust them with powdered sugar. Drizzle some maple syrup or honey on top. Enjoy your tasty breakfast treat! You can find the full recipe at the beginning of this article. - Ensuring Even Browning: Heat your skillet to medium. If it’s too hot, the roll-ups can burn. If it’s too low, they won’t brown well. Place the roll-ups seam side down first. This helps them stay closed and brown evenly. - Achieving the Right Crispiness: Use enough butter or cooking spray. This adds flavor and helps crisp the outside. Cook each roll-up for about 3-5 minutes per side. Rotate them gently to get all sides golden. - Presentation Ideas: Arrange the roll-ups neatly on a large platter. Garnish with fresh berries for a pop of color. Add a small dish of syrup on the side for dipping. This makes the dish look inviting and fun. - Pairing with Sides: Consider serving with scrambled eggs or fruit salad. These sides add balance and nutrition. You can also serve a light yogurt for a creamy touch. - Using Different Sausage Types: Try Italian sausage for a spicy kick. Breakfast sausage adds a mild, sweet flavor. You can even use turkey or chicken sausage for a lighter option. - Additional Flavoring Options: Add cheese like cheddar or cream cheese for a rich taste. You can sprinkle in herbs like chives or parsley for freshness. A pinch of nutmeg can also elevate the dish's flavor profile. For the full recipe, check out my complete guide on making Sausage French Toast Roll-Ups! {{image_2}} You can switch up the fillings in Sausage French Toast Roll-Ups. Try adding vegetables like spinach or bell peppers. Cheese also makes a great filling. Cream cheese or cheddar can add a nice twist. If you need gluten-free options, use gluten-free bread. Many brands offer tasty varieties. Just make sure it’s thick enough to hold the filling. You can create sweet or savory roll-ups. For sweet, add a bit of sugar or chocolate chips. For savory, try using herbs and spices like garlic or oregano. Seasonal ingredients can also change the game. In fall, pumpkin spice adds warmth. In summer, fresh fruit like berries can brighten the dish. Baking is a great way to make these roll-ups. Preheat your oven to 375°F. Place the roll-ups on a baking sheet. Bake for about 10-15 minutes until golden brown. If you have an air fryer, use it! Set it to 375°F and cook for 8-10 minutes. This method gives a nice crisp without much oil. For the full recipe, check out the details above. Enjoy your tasty breakfast treat! Keep your leftovers tasty by cooling them first. Let the roll-ups sit at room temperature for about 30 minutes. This helps prevent sogginess. Then, place them in an airtight container. This keeps them fresh for up to three days in the fridge. The best way to reheat is in a skillet. Heat it over medium heat for about three to five minutes. This keeps the roll-ups crispy on the outside. You can also use a toaster oven for a similar effect. Avoid the microwave, as it can make them mushy. You can freeze these roll-ups for later. First, let them cool completely. Then, wrap each roll-up in plastic wrap. Place them in a freezer-safe bag or container. They can stay frozen for up to three months. When you're ready to eat, thaw them in the fridge overnight. Reheat them in a skillet or toaster oven for the best results. Enjoy the tasty goodness from the freezer! For the full recipe, see the first section. You can prepare the roll-ups ahead of time. After cooking, let them cool. Then, store them in an airtight container in the fridge. You can also assemble them but wait to cook until you are ready to eat. This keeps them fresh and tasty. Yes! You can use many types of bread. White, whole grain, or even brioche works well. Each type will give a unique flavor and texture. Try a thick-cut bread for a hearty bite or a soft one for a delicate roll-up. To keep your roll-ups intact, roll them tightly. Make sure the seam is down when you cook them. You can also use a toothpick to hold them together. This extra step helps them stay rolled during cooking. You can keep the roll-ups in the fridge for about three days. Store them in an airtight container to keep them fresh. If you want to save them longer, consider freezing them. Absolutely! You can swap sausage for a mix of vegetables or cheese. Spinach and feta make a great combo. You can also use plant-based sausage for a similar taste. You can find the full recipe for Sausage French Toast Roll-Ups [here](#). It includes all the details you need to make this tasty breakfast treat. These Sausage French Toast Roll-Ups are fun and easy to make. You have a list of key ingredients to get started, along with some optional ones to spice things up. Following the step-by-step instructions will help you create a tasty breakfast. Tips and variations give you ideas for endless flavors, and storage info makes leftovers simple. Overall, these roll-ups are perfect for breakfast or brunch. Try them out and enjoy your cooking!
Sausage French Toast Roll-Ups Tasty Breakfast Treat
Looking for a fun and tasty breakfast that’s easy to make? Try Sausage French Toast Roll-Ups! This dish is perfect for busy mornings or weekend
- 8 slices of brioche or challah bread - 4 large eggs - 2 cups milk (whole or almond) - 1/2 cup molasses - 1 teaspoon ground ginger - 1 teaspoon ground cinnamon - 1/2 teaspoon ground nutmeg - 1/4 teaspoon ground cloves - 1 tablespoon vanilla extract - 1/4 teaspoon salt - 1/2 cup chopped pecans (optional) - Maple syrup for serving - Powdered sugar for garnish (optional) These ingredients create a warm, cozy dish. Brioche or challah bread gives a soft base, while the spices add warmth. The molasses deepens the flavor, making it festive. Eggs and milk bind everything, forming a custard. Chopped pecans bring crunch and flavor. You can skip them if you want. Maple syrup adds sweetness, and powdered sugar makes it pretty. Each bite is a mix of soft bread and rich spices. Make sure to gather everything before starting. This helps the process feel smooth. You’ll enjoy the fun of making this dish with ease. Plus, the lovely smell fills your kitchen! {{ingredient_image_1}} Start by taking a large bowl. Add 4 large eggs and 2 cups of milk. You can use whole or almond milk. Whisk these together until smooth. Next, stir in 1/2 cup of molasses. This adds a deep, rich flavor. Then, add the spices: 1 teaspoon of ground ginger, 1 teaspoon of ground cinnamon, 1/2 teaspoon of nutmeg, and 1/4 teaspoon of ground cloves. Don’t forget 1 tablespoon of vanilla extract and 1/4 teaspoon of salt. Mix everything well. You want a well-combined custard mixture. Now, grab your baking dish, a 9x13 inch one works best. Grease it lightly. Take 8 slices of brioche or challah bread. Lay them in a single layer in the dish. If you like nuts, sprinkle 1/2 cup of chopped pecans over the bread. This adds great crunch and flavor. Next, pour your custard mixture evenly over the bread. Make sure each slice is coated. Press down gently. This helps the bread soak up the custard. Cover the dish with plastic wrap and place it in the fridge overnight. This is key for the best flavor. The next day, preheat your oven to 350°F (175°C). Remove the wrap and bake the French toast for 30 to 35 minutes. Look for a golden top and a puffed texture. It should smell amazing! When making Overnight Gingerbread French Toast, choose the right bread. Brioche is rich and buttery. It gives a soft texture. Challah is a bit sweeter with a nice crust. Both options work well. For gluten-free options, look for gluten-free bread. Many brands offer tasty choices. Check the label for texture and flavor. You want something that holds up well in custard. The custard flavor is key to your dish. You can adjust sweetness by adding more or less molasses. If you want a spicier taste, add extra ginger or cinnamon. To maximize flavor, let the mixture sit for a bit before using it. This helps the spices blend well. Make sure to whisk everything together until smooth. When serving, think about toppings. Maple syrup is a classic choice. You can also add fresh fruit, like berries or bananas. A sprinkle of powdered sugar adds a nice touch too. For drinks, consider hot cocoa or a warm spiced apple cider. They pair perfectly with the gingerbread flavor. Enjoy your festive meal! Pro Tips Use Day-Old Bread: For the best texture, use bread that is a day or two old. This helps it absorb the custard mixture without becoming too soggy. Add Spice Variations: Feel free to experiment with spices! A pinch of cardamom or allspice can add a unique twist to your French toast flavor. Let It Soak: Allow the bread to soak for at least 4 hours, but overnight is ideal. This ensures a rich, custardy inside and a perfectly baked exterior. Serve Warm: For the best experience, serve the French toast warm right out of the oven, topped with fresh fruit and a drizzle of maple syrup. {{image_2}} You can change the flavor of Overnight Gingerbread French Toast easily. Adding chocolate chips or fresh fruit like berries makes it fun and sweet. You can also mix in different spices. Try cardamom for a warm taste, or swap cinnamon for allspice. Each choice gives a new twist to this classic dish. If you want a nut-free version, pick the right bread. Look for nut-free brioche or challah. When using milk, choose almond or oat milk if you like. For pecans, try pumpkin seeds or sunflower seeds instead. These options keep the crunch without nuts. For a plant-based meal, replace the eggs with flaxseed meal or chia seeds. Mix 1 tablespoon of either with 2.5 tablespoons of water. Let it sit for a few minutes until it thickens. Use non-dairy milk like almond or coconut milk. You can sweeten it with maple syrup or agave nectar to keep the flavor rich. To store leftover Overnight Gingerbread French Toast, place it in a sealed container. You can also cover the dish tightly with plastic wrap. This keeps the toast fresh and prevents it from drying out. The French toast lasts in the fridge for about 3 to 4 days. When it’s time to enjoy your leftovers, the best way to reheat them is in the oven. Preheat your oven to 350°F (175°C). Place the slices on a baking sheet and cover them with foil. Bake for about 10-15 minutes. This method helps keep the toast warm and soft. You can also reheat slices in the microwave. Just heat them for 30 seconds to 1 minute. However, this might make them a bit chewy. If you want to freeze your French toast, first let it cool completely. Then, wrap each slice tightly in plastic wrap. Put the wrapped slices in a freezer-safe bag or container. This helps to keep them fresh. You can freeze them for up to 2 months. To thaw, take the slices out and place them in the fridge overnight. If you need them fast, you can also thaw them in the microwave. Just use the defrost setting for a few minutes until soft. You can make this dish gluten-free by choosing gluten-free bread. Look for gluten-free brioche or challah options. Many stores offer these types of bread now. You can also use gluten-free sandwich bread. Just make sure it’s fresh for the best texture. The rest of the ingredients remain the same. You won’t lose flavor, and your French toast will still taste great. Yes, you can. If you don’t have molasses, you can use honey or maple syrup. Both add sweetness and a nice flavor. You can also use brown sugar mixed with a bit of water for a similar taste. Adjust the amount based on your sweetness preference. The French toast will still be delicious without molasses. Yes, you can double this recipe easily. Use a larger baking dish to fit all the bread. Just make sure to mix the custard well so all the bread gets soaked. You may need to bake it a little longer. Check for doneness by making sure the top is golden. Enjoy serving more people with this festive dish! This blog covered how to make Overnight Gingerbread French Toast. We discussed the ingredients, step-by-step instructions, and helpful tips. Plus, I shared different variations and storage methods. In closing, this dish is a delightful way to impress at breakfast. Its rich flavors and easy prep make it a winner. Enjoy experimenting with your own twists. Happy cooking!
Overnight Gingerbread French Toast Festive and Easy
Are you ready to make mornings magical? This Overnight Gingerbread French Toast recipe is not only festive but also super easy to prepare. With just
To make Lemon Ricotta Pancakes, you need these key items: - 1 cup ricotta cheese - 1/2 cup milk - 3 large eggs - Zest of 1 lemon - 1 tablespoon lemon juice - 1 cup all-purpose flour - 2 tablespoons sugar - 1 tablespoon baking powder - 1/2 teaspoon salt - Butter or oil for cooking These ingredients work together to create a fluffy, flavorful pancake. The ricotta adds creaminess, while the lemon brings a fresh zing. You can enhance your pancakes with these extras: - Fresh berries (like strawberries, blueberries, or raspberries) - Maple syrup These toppings not only add sweetness but also color and texture to your dish. For this recipe, gather these tools: - Large mixing bowl - Whisk - Two mixing bowls (one for wet, one for dry) - Non-stick skillet or griddle - Measuring cups and spoons - Spatula Having the right tools makes cooking easier. They help you mix well and cook perfectly. {{ingredient_image_1}} 1. Mix Wet Ingredients: Start by taking a large bowl. Add 1 cup of ricotta cheese, 1/2 cup of milk, and 3 large eggs. Then, add the zest of 1 lemon and 1 tablespoon of lemon juice. Whisk everything until it is smooth and well blended. 2. Combine Dry Ingredients: In another bowl, mix 1 cup of all-purpose flour, 2 tablespoons of sugar, 1 tablespoon of baking powder, and 1/2 teaspoon of salt. This mix gives our pancakes their fluffy texture. 3. Combine Wet and Dry Ingredients: Gradually add the dry mix into the wet mix. Stir gently until just combined. Remember, it’s okay if some lumps remain; overmixing can make your pancakes tough. 1. Heat the Skillet: Place a non-stick skillet or griddle over medium heat. Add a small amount of butter or oil to coat the surface. This helps prevent sticking. 2. Pour the Batter: For each pancake, pour 1/4 cup of the batter onto the skillet. 3. Cook the Pancakes: Watch for the edges to set and small bubbles to form on top. This takes about 2-3 minutes. 4. Flip and Finish Cooking: Carefully flip each pancake. Cook for another 2-3 minutes until they are golden brown. 5. Repeat Cooking: Keep pouring and cooking the remaining batter. Add more butter or oil as needed for each batch. - Flipping Tips: Use a thin spatula to get under the pancake. Flip quickly to keep it intact. - Serving Tips: Stack your pancakes on a plate. Top with fresh berries and drizzle with maple syrup. For a fun touch, add a lemon slice on the side. This makes the dish colorful and inviting! To get soft and fluffy pancakes, use fresh ricotta cheese. It should be creamy and moist. When mixing, combine the wet and dry ingredients gently. Overmixing makes the pancakes tough. A few lumps in the batter are okay. Let the batter rest for a few minutes before cooking. This helps make the pancakes fluffier. Add a pinch of cinnamon for warmth. You can also try vanilla extract for a sweeter taste. Fresh herbs like basil or mint can add a unique twist. For extra zest, use more lemon juice or zest. Serve with fresh berries to add color and taste. Maple syrup is a classic choice, but honey works well too. Don’t skip the resting time for the batter. This can lead to flat pancakes. Make sure your skillet is hot but not smoking. If it’s too hot, the pancakes will burn outside and stay raw inside. Use a 1/4 cup measure for even-sized pancakes. This helps them cook evenly. Lastly, don’t stack hot pancakes right away; let them cool slightly for better texture. Pro Tips Use Room Temperature Ingredients: For the best texture, let the ricotta cheese and eggs come to room temperature before mixing, ensuring a smoother batter. Don’t Overmix: When combining the wet and dry ingredients, mix just until combined. A few lumps are fine; overmixing can lead to tough pancakes. Control the Heat: Keep your skillet at medium heat. If it’s too hot, the pancakes may burn on the outside while remaining uncooked inside. Experiment with Flavors: Try adding vanilla extract or a pinch of cinnamon to the batter for an extra layer of flavor that complements the lemon. {{image_2}} You can make your lemon ricotta pancakes even better with fruit. Berries are a great choice. Try blueberries, strawberries, or raspberries. Just fold in about a cup of fresh or frozen berries into the batter. This adds color and a burst of flavor. You can also use banana slices or diced apples. The fruit will cook perfectly and make each bite juicy. If you need gluten-free pancakes, swap the all-purpose flour for a gluten-free blend. Many blends work well and keep the pancakes fluffy. Rice flour or almond flour are great choices too. Just make sure to check that your baking powder is gluten-free. This way, everyone can enjoy these tasty pancakes without worry. Want to try something new? Make savory lemon ricotta pancakes. Skip the sugar and add herbs like chives or dill. You can also mix in grated cheese, such as parmesan. This gives a wonderful twist to the dish. Serve these savory pancakes with a dollop of sour cream or yogurt. It’s a delightful change that brings more flavor to your meal. To store leftover pancakes, let them cool first. Then, stack them with parchment paper between each pancake. Place the stack in an airtight container. This helps keep them fresh. You can store them in the fridge for up to three days. Remember to seal the container well to avoid moisture. Reheating pancakes is easy. You can use a microwave or a skillet. For the microwave, place pancakes on a plate and cover them with a damp paper towel. Heat for about 20-30 seconds. For the skillet, warm it over low heat. Add a little butter or oil, then heat each pancake for about 1-2 minutes on each side until warm. Freezing pancakes is a great option for meal prep. To freeze, let them cool completely. Then, stack them with parchment paper in between. Wrap the stack tightly in plastic wrap or foil. Place the wrapped stack in a freezer bag and remove as much air as you can. You can freeze pancakes for up to two months. When ready to eat, thaw them in the fridge overnight before reheating. Yes, you can! Ricotta cheese is key, but you can swap it with cottage cheese. If you need a dairy-free option, try almond or soy yogurt. Use any milk you like, such as almond or oat milk. You can also replace all-purpose flour with a gluten-free blend. Just make sure to adjust the liquid if needed. To make these pancakes healthier, use whole wheat flour instead of all-purpose flour. This adds fiber and nutrients. You can reduce sugar by using mashed bananas or applesauce for sweetness. Adding chia seeds or flaxseeds can boost nutrition too. You can also use less butter or oil for cooking. Serve these pancakes with fresh berries like strawberries, blueberries, or raspberries. A drizzle of maple syrup adds sweetness. You can also top them with yogurt or a sprinkle of nuts for crunch. A dollop of whipped cream makes them even more special! In this article, we explored the key ingredients for delicious Lemon Ricotta Pancakes. We went through essential and optional ingredients, along with the tools you'll need. I shared step-by-step cooking instructions and key tips for perfect texture and flavor. Plus, we looked at fun variations and smart storage tips. Remember, a little creativity can make your pancakes shine! Enjoy these tasty treats anytime.
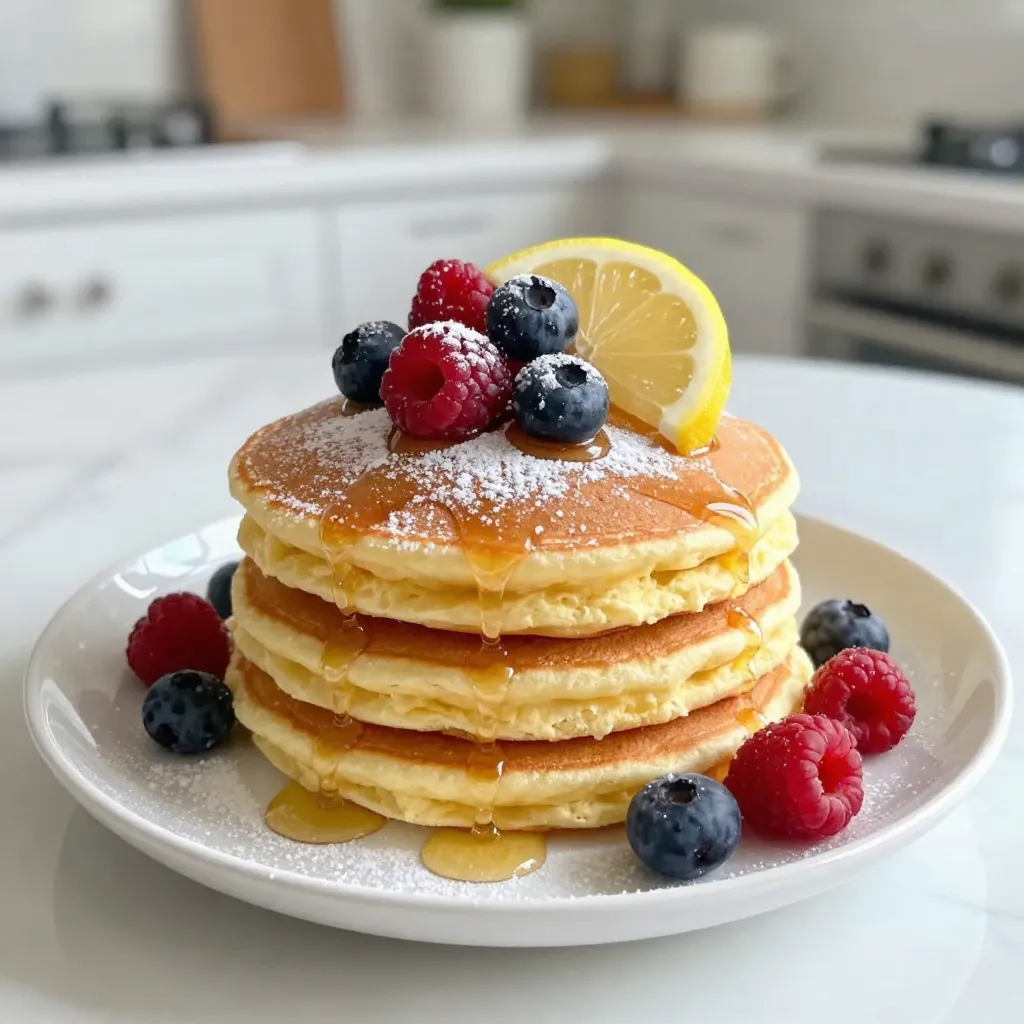
Lemon Ricotta Pancakes Fluffy and Flavorful Delight
Get ready to enjoy a fluffy and flavorful treat with my Lemon Ricotta Pancakes! These light, zesty pancakes are not only easy to make but
To make Cranberry Orange Overnight Oats, gather these ingredients: - 1 cup rolled oats - 2 cups almond milk (or any non-dairy milk) - 1/2 cup fresh or dried cranberries - Zest of 1 orange - Juice of 1 orange - 1 tablespoon maple syrup (adjust to taste) - 1/2 teaspoon vanilla extract - 1/4 teaspoon cinnamon - A pinch of salt You can add extra flavor and texture with these toppings: - Sliced almonds - Additional cranberries - Fresh orange segments - A dollop of yogurt Each ingredient brings unique benefits: - Rolled oats: They are high in fiber, which aids digestion and keeps you full. - Almond milk: It is low in calories and rich in vitamin E, promoting healthy skin. - Cranberries: They are packed with antioxidants that support your immune system. - Orange zest and juice: These add vitamin C, which helps your body fight infections. - Maple syrup: A natural sweetener that provides minerals like manganese and zinc. - Vanilla extract: It can help reduce stress and enhance mood. - Cinnamon: This spice may help lower blood sugar levels and reduce inflammation. - Salt: A small amount enhances flavor and balances the sweetness. These ingredients not only create a delicious meal but also offer health benefits. Enjoy crafting this nourishing dish! {{ingredient_image_1}} Start by gathering all your ingredients. You need rolled oats, almond milk, cranberries, orange zest, orange juice, maple syrup, vanilla extract, cinnamon, and salt. In a large bowl, mix the rolled oats and almond milk. Add the cranberries, orange zest, and orange juice. Then, pour in the maple syrup, vanilla extract, cinnamon, and a pinch of salt. Stir well until everything is mixed. Make sure the oats soak in the milk. This is key for great texture. Next, divide the mixture into Mason jars or airtight containers. Seal them tightly and place them in the fridge overnight. This allows the oats to soak and soften, absorbing all those lovely flavors. When morning comes, stir the oats in the jars. If you like it sweeter, add more maple syrup. You can serve the oats right in the jars. Top them off with sliced almonds, extra cranberries, orange segments, or a dollop of yogurt. This adds flavor and a nice look to your meal. Enjoy your tasty and simple breakfast! To make your oats just right, start with one tablespoon of maple syrup. After mixing, taste the oats. If you want it sweeter, add more syrup a little at a time. You can also try honey or agave syrup if you like. Each person has a different sweet tooth, so make it your own! Soaking oats overnight helps them get soft and creamy. Use a large bowl to mix everything well. Make sure all oats are covered in the liquid. This step helps the oats absorb the flavors. If you need a quicker soak, let them sit for at least 30 minutes before eating. One common mistake is not stirring enough. If you don’t mix well, some oats may stay dry. This can lead to uneven texture. Another mistake is using too little liquid. If the oats are too thick in the morning, just add more milk. Lastly, don’t skip on the toppings! They add flavor and texture that make your meal special. Pro Tips Use Fresh Ingredients: Fresh cranberries and oranges will enhance the flavor profile of your overnight oats, making them more vibrant and delicious. Experiment with Milk Alternatives: While almond milk is a great choice, feel free to try coconut milk or oat milk for a different flavor and texture. Customize Sweetness: Adjust the amount of maple syrup according to your taste preference; you can also use honey or agave syrup for a different sweetness level. Prep in Batches: Make a larger batch and store in the fridge for up to 4 days for a quick and healthy breakfast option throughout the week. {{image_2}} You can switch up the fruits in your overnight oats for fun. Berries like strawberries and blueberries add a sweet burst of flavor. Bananas give the dish a creamy texture and natural sweetness. You could also try apples or peaches for a different taste. Each fruit brings its own unique flavor and nutrients, making your dish exciting. You have choices when it comes to milk. Almond milk is great, but you can also use oat milk or soy milk. Each type of milk will change the flavor a bit. If you prefer dairy, whole or skim milk works too. Choose what fits your diet and taste best. You can boost the flavor of your overnight oats easily. A pinch of nutmeg adds warmth and depth. Honey brings extra sweetness and pairs well with orange. Cinnamon is another great option for a cozy touch. Feel free to mix and match these additions to find your favorite flavor profile. To store leftover cranberry orange overnight oats, first, seal them in an airtight jar or container. Make sure the lid is tight to keep the oats fresh. If you are using glass jars, they work great. Just remember to leave some space at the top. This allows for expansion as the oats soak up the liquid. The shelf life of these oats in the refrigerator is about three to five days. After this time, the oats may start to lose their flavor and texture. If you notice any strange smells or changes in color, it is best to throw them out. Always trust your nose and eyes. You can freeze your cranberry orange overnight oats if you want to keep them longer. To do this, divide the oats into smaller portions. Use freezer-safe containers or bags. Leave some space for expansion, as freezing can cause liquids to expand. When you are ready to eat, thaw the oats overnight in the fridge. You can also heat them up in the microwave for a quick breakfast. Yes, you can easily make this recipe vegan. Just use almond milk or any non-dairy milk. All other ingredients are already plant-based. Overnight oats can last up to five days in the fridge. Store them in airtight containers. Just give them a stir before eating. Absolutely! You can heat them in the microwave or on the stove. Just add a splash of milk to keep them creamy. If you prefer, you can use honey, agave nectar, or any sweetener you like. Adjust to your taste. Soaking oats overnight helps them soften and absorb flavors. However, you can soak for just 30 minutes if you're in a hurry. You’ve learned how to make cranberry orange overnight oats. We covered the key ingredients, step-by-step instructions, and helpful tips. You now know how to adjust sweetness, store leftovers, and explore variations. Remember, personalizing your oats makes them more enjoyable. With these insights, you can create tasty and healthy meals. Enjoy your time experimenting with flavors and textures to find your perfect recipe!
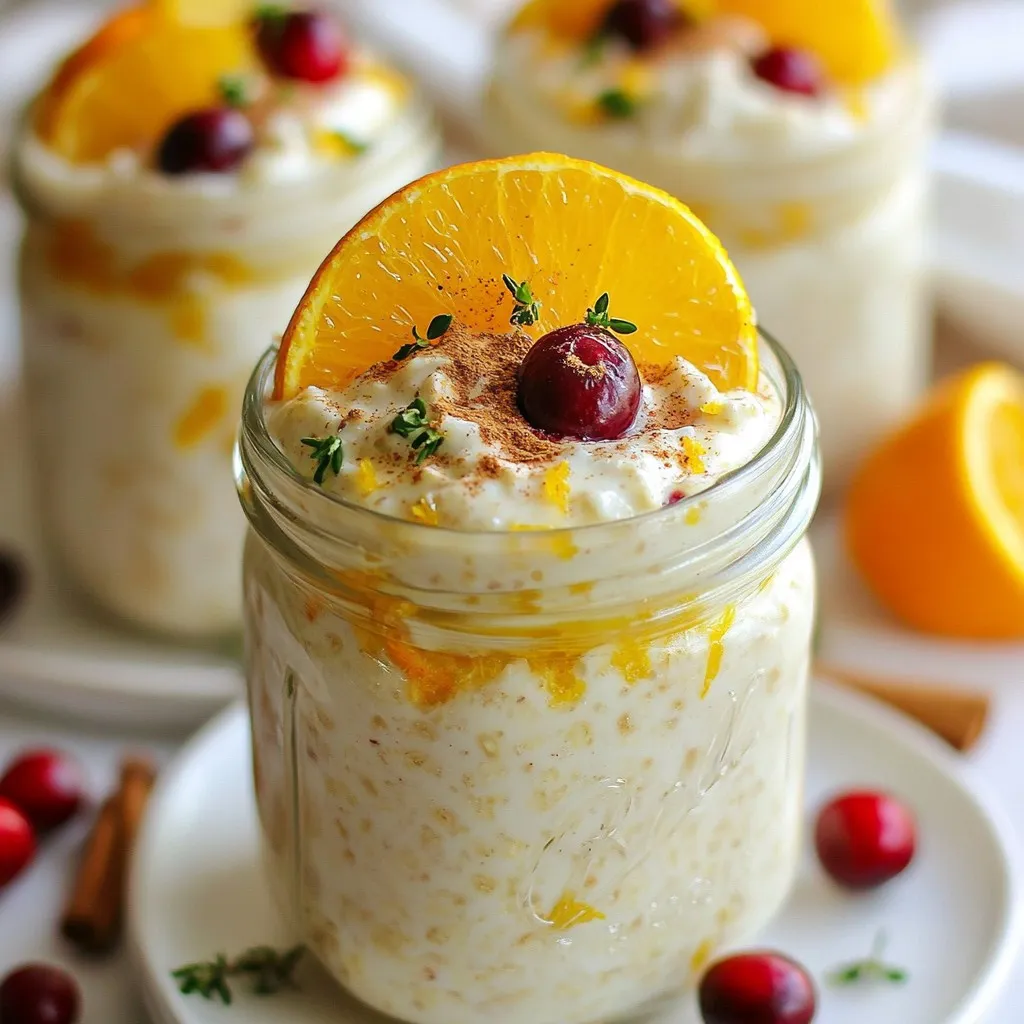
Cranberry Orange Overnight Oats Delicious and Simple
Cranberry Orange Overnight Oats are a tasty and easy way to start your day. Packed with fruity flavors, these oats are not just delicious; they’re
- 2 cans (8 oz each) refrigerated cinnamon rolls - 6 large eggs - 1 cup milk - 1/2 cup heavy cream The main ingredients form the base of our dish. The refrigerated cinnamon rolls add sweetness and ease. Eggs bind everything together while giving a rich texture. Milk and heavy cream create a creamy custard that soaks into the rolls. - 1 teaspoon vanilla extract - 1 teaspoon ground cinnamon - 1/4 teaspoon nutmeg - 2 tablespoons maple syrup (plus extra for drizzling) The flavor enhancers make this dish special. Vanilla extract brings warmth and sweetness. Ground cinnamon and nutmeg add a cozy spice note. Maple syrup gives a touch of sweetness, perfect for drizzling on top. - 1/2 cup chopped pecans (optional) - Powdered sugar for dusting Optional additions let you customize your bake. Chopped pecans add a nice crunch and nutty flavor. A dusting of powdered sugar makes it look fancy and sweet. These little touches can really elevate your dish. {{ingredient_image_1}} First, preheat your oven to 350°F (175°C). This step is key for getting a nice bake. Next, take a 9x13 inch baking dish and grease it well. This helps prevent sticking. Now, open the two cans of refrigerated cinnamon rolls. Cut each roll into quarters. Arrange the pieces evenly in the greased dish. In a large bowl, whisk together six large eggs. Add one cup of milk and half a cup of heavy cream. Then, mix in one teaspoon of vanilla extract. Sprinkle in one teaspoon of ground cinnamon and a pinch of nutmeg. Finally, add two tablespoons of maple syrup. Whisk until the mixture is smooth and well blended. Pour the egg mixture over the cinnamon roll pieces. Make sure every piece gets soaked. If you like a bit of crunch, sprinkle half a cup of chopped pecans on top. Cover the baking dish tightly with foil. Place it in the fridge overnight or for at least four hours. This step allows the flavors to meld and the rolls to soak up the egg mixture. When you are ready to bake, remove the dish from the fridge. Uncover it and place it in your preheated oven. Bake for 25 to 30 minutes. You want the rolls to puff up and turn golden brown. Once done, let it cool for a few minutes. Drizzle with maple syrup and dust with powdered sugar before serving. Enjoy your delicious bake! To ensure even cooking, cut the cinnamon rolls into quarters. Spread them evenly in the baking dish. This helps each piece soak in the egg mixture. Check for doneness by looking for a golden brown top. A toothpick can help too. Insert it into the center. If it comes out clean, it's done! Serve straight from the baking dish for an inviting look. Add an extra drizzle of maple syrup on top. Dust lightly with powdered sugar for a sweet finish. Pair it with fresh fruit for color and freshness. Berries or sliced bananas work great! Get creative with your flavors! You can add fruits like berries or bananas for a fresh twist. Chocolate chips also make a tasty addition. For spices, try cardamom or allspice instead of cinnamon. These will give your dish a unique flavor. Don’t be afraid to experiment! Pro Tips Use Day-Old Rolls: For the best texture, use day-old cinnamon rolls. They will absorb the egg mixture better and yield a fluffier bake. Customize Your Spices: Feel free to experiment with spices like cardamom or allspice to add a unique twist to the flavor profile. Make It Ahead: This dish is perfect for breakfast gatherings; prepare it the night before and just bake it in the morning for a hassle-free start. Serving Suggestions: Pair with whipped cream or a scoop of vanilla ice cream for a decadent dessert option. {{image_2}} You can switch things up by using different types of bread. Instead of cinnamon rolls, try using traditional bread like brioche or challah. These breads soak up the egg mixture well and give a soft texture. If you need gluten-free options, use gluten-free bread. Many brands offer tasty gluten-free loaves. Just ensure they are fresh to get the best flavor. Add a twist to your dish with different flavors. For a bright taste, mix in some citrus zest. Lemon or orange zest can really wake up the dish. It adds a fresh note that pairs well with the sweetness of the rolls. You can also explore spiced variations. Try adding cardamom or allspice to the egg mixture. Both spices enhance the warmth of cinnamon and give a unique depth to your bake. Want to make it vegan? You can swap the eggs with flaxseed meal mixed with water. Use almond milk or coconut milk instead of dairy milk and cream. This keeps the dish tasty and plant-based. For a fun twist, bake single servings in muffin tins. This makes them easy to serve and great for kids. Just adjust the baking time to about 15-20 minutes for these mini bakes. Each one will have a nice golden top and be perfect for breakfast or brunch. To keep your Overnight Cinnamon Roll French Toast Bake fresh, place it in an airtight container. This helps maintain its flavors and texture. You can store it in the fridge for up to 3 days. If you want it to last longer, consider freezing it. To reheat your dish, you can use either the oven or microwave. For the oven, preheat it to 350°F (175°C). Cover the bake with foil and heat for about 15 minutes. This keeps it moist. If using a microwave, place a single serving on a microwave-safe plate. Heat on medium for 1-2 minutes, checking until warm. Yes, you can freeze this dish! To freeze, let it cool completely after baking. Then, place it in a freezer-safe container. It can be stored in the freezer for up to 2 months. When you're ready to enjoy it, move it to the fridge to thaw overnight. After thawing, reheat it using the methods described above. This keeps the dish tasty and ready to serve. Yes, you can make this dish the same day. To do this, start by cutting the cinnamon rolls into quarters. Then, mix the eggs, milk, and other ingredients in a bowl. Pour the egg mix over the cinnamon roll pieces. Let it soak for at least 30 minutes. This allows the rolls to absorb the flavors. After soaking, bake it in a preheated oven at 350°F for 25-30 minutes. Keep an eye on it. You want it to puff and turn golden brown. If you need a substitute for heavy cream, try using milk instead. You can also mix milk with a bit of butter. A 1/4 cup of butter mixed with 3/4 cup of milk works well. Coconut cream is another great option. It adds a nice flavor and is dairy-free. Adjust the amount based on your taste and needs. To make this dish dairy-free, use almond milk or oat milk in place of regular milk. For heavy cream, use coconut cream or a dairy-free cream option. Ensure your cinnamon rolls are dairy-free, too. Check the label before buying. You can still enjoy the same great taste with these swaps. The dish combines refrigerated cinnamon rolls, eggs, and creamy flavors for a delightful breakfast. You learned how to prepare and bake it step-by-step, along with storage tips. You can enhance flavors with spices or customize with fruits. Remember, using gluten-free or different bread adds variety. This dish is fun to make and easy to adapt to your taste. Enjoy experimenting with new ideas to share and delight your friends and family!
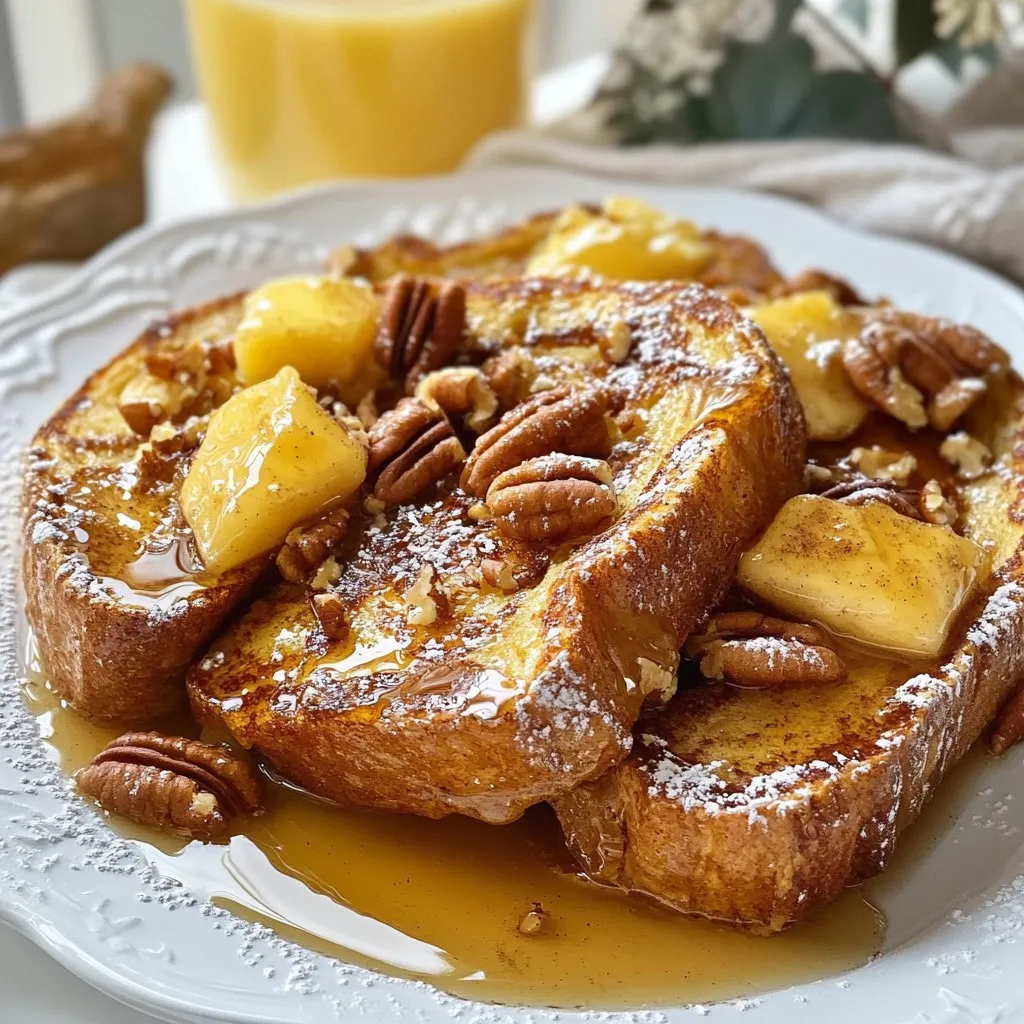
Overnight Cinnamon Roll French Toast Bake Delight
Imagine waking up to the delicious scent of cinnamon rolls and French toast. This Overnight Cinnamon Roll French Toast Bake brings those two favorites together