Desserts
![- 2 cups all-purpose flour - 1 cup canned pumpkin puree - 1/4 cup granulated sugar - 1 teaspoon active dry yeast - 1/2 teaspoon baking soda - 1/2 teaspoon baking powder - 1/2 teaspoon salt - 1/2 teaspoon ground cinnamon - 1/4 teaspoon ground nutmeg - 1/4 cup milk (warm) - 1/2 teaspoon vanilla extract - 1/4 cup unsalted butter, melted - 1/2 cup brown sugar (for filling) - 1 tablespoon cinnamon (for filling) - 1 cup powdered sugar - 2 tablespoons brewed coffee (cooled) - 1 tablespoon maple syrup - 1 tablespoon unsalted butter (softened) Gathering the right ingredients is key to making these pumpkin cinnamon rolls shine. You want to start with fresh, quality items. The all-purpose flour gives the rolls a nice, soft texture. Canned pumpkin puree provides a rich flavor and moisture. Granulated sugar adds sweetness, while the yeast helps the dough rise. Baking soda and baking powder work together for a light roll. Salt and spices like cinnamon and nutmeg bring warmth and depth to the rolls. For the frosting, powdered sugar creates the right sweetness. Brewed coffee adds an extra kick, and maple syrup gives a lovely, unique flavor. Unsalted butter helps blend everything into a smooth, creamy topping. If you follow the Full Recipe, you're on your way to a delicious treat. Enjoy the process and let your kitchen fill with warm, inviting scents! Activating the yeast Start by grabbing a bowl. Pour in warm milk, granulated sugar, and active dry yeast. Mix it gently. Let it sit for 5-7 minutes until it bubbles up. This means your yeast is ready to work. Mixing dry ingredients In another bowl, whisk together the flour, baking soda, baking powder, salt, ground cinnamon, and nutmeg. This blend adds flavor and helps the dough rise well. Combining wet and dry mixtures Next, take your yeast mixture and add pumpkin puree, vanilla extract, and melted butter. Mix this well. Then, gradually add your dry mix. Stir until a soft dough forms. This might take a few minutes. Kneading the dough Turn the dough onto a floured surface. Knead it for about 5 minutes. You want it to feel smooth and elastic. Rolling out and filling the dough Now, roll the dough into a big rectangle, about 12x18 inches. Spread the brown sugar and cinnamon mixture evenly over the dough. This is where the magic happens! Cutting the rolls Carefully roll the dough up from the long side. Slice the roll into 12 equal pieces, about 1.5 inches each. Place the rolls in a greased baking dish, making sure they fit snugly. First rise and second rise Cover the rolls with a cloth. Let them rise in a warm spot for 30 minutes. They will puff up nicely. Preheating the oven While the rolls rise, preheat your oven to 350°F (175°C). Baking to perfection Bake the rolls for 20-25 minutes. They should turn golden brown. Enjoy the aroma filling your kitchen! For the complete recipe, refer to the [Full Recipe]. To make great pumpkin cinnamon rolls, the dough must be just right. A common issue is dough that is too sticky. If this happens, add a little more flour. You want a soft and smooth texture, not a dry one. Knead the dough for about five minutes. This helps develop gluten, which gives the rolls their structure. Another tip is to let the dough rise in a warm place. A warm kitchen or an oven set to low works well. This helps the yeast work better. If your dough doesn’t rise much, it may be due to inactive yeast. Always check your yeast's expiration date. The coffee maple frosting should be smooth and creamy. If it’s too thick, add a bit more brewed coffee. If it’s too thin, mix in more powdered sugar. The right consistency makes it easy to drizzle over the rolls. For a fun twist, try other frostings. Cream cheese frosting adds a tangy flavor. A simple vanilla glaze works well too. Each option gives the rolls a different taste, so feel free to experiment. For the full recipe, check out the complete guide on making these delightful pumpkin cinnamon rolls. {{image_2}} You can easily change up your pumpkin cinnamon rolls to match the season. Adding nuts or raisins gives a nice crunch and chew. Chopped pecans or walnuts work well. They add a rich flavor that pairs with the pumpkin. You might also spice it up with different flavors. Try adding ginger or cloves for a warm kick. A touch of orange zest can brighten the flavors too. Experimenting with these additions makes each batch unique. If you're looking for healthier options, there are some easy swaps you can make. You can use whole wheat flour instead of all-purpose flour. This adds fiber and nutrients. You can also reduce the sugar by using honey or maple syrup. For a vegan version, replace the butter with coconut oil and use almond milk. You can swap the egg with a flaxseed mix. Simply mix one tablespoon of flaxseed meal with three tablespoons of water. Let it sit for about five minutes until it thickens. These changes keep the taste while making it better for you. For the full recipe, check out the Pumpkin Cinnamon Rolls with Coffee Maple Frosting. To keep your pumpkin cinnamon rolls fresh, use these tips: - Refrigerating leftovers: Place the rolls in an airtight container. They will stay fresh for about 3 days. You can also cover them with plastic wrap. This keeps the moisture in and prevents drying out. - Freezing options for longer shelf life: If you want to save them for later, freeze the rolls. Wrap each roll tightly in plastic wrap and then place them in a freezer bag. They can last up to 2 months in the freezer. Just make sure to label the bag with the date. To enjoy your cinnamon rolls warm again, follow these methods: - Best methods to reheat cinnamon rolls: The best way to reheat is in the oven. Preheat your oven to 350°F (175°C). Place the rolls on a baking sheet and cover them with foil. Heat for about 10-15 minutes. This keeps them soft and warm. - Maintaining texture and flavor: You can also use the microwave. Heat them for about 15-20 seconds. However, this may make them a bit chewier. For the best flavor, the oven is the way to go. Enjoy your treats warm with that delicious Coffee Maple Frosting from the Full Recipe! How can I make my rolls fluffier? To make your rolls fluffier, use fresh yeast. Ensure your yeast is active and bubbly. Let the dough rise in a warm place. Knead it well to develop gluten. This will trap air and make your rolls light. Can I use fresh pumpkin instead of canned? Yes, you can use fresh pumpkin. Just cook and puree it first. Make sure to drain any excess water. This helps keep your dough from getting too wet. Fresh pumpkin adds a rich flavor. What should I do if my dough doesn’t rise? If your dough doesn’t rise, check the yeast. It may be old or inactive. Warm up your dough in a cozy spot. If it still doesn’t rise, knead it more and try again. You can also add a bit more warm water to help. Pairing ideas with beverages These pumpkin cinnamon rolls pair well with coffee or chai tea. The warm spices in the rolls blend nicely with these drinks. Try serving them with a glass of cold milk too. It balances the sweetness of the frosting. Ideal occasions for serving Pumpkin Cinnamon Rolls with Coffee Maple Frosting Serve these rolls at brunch or holiday gatherings. They make a great treat for fall celebrations. You can also enjoy them on lazy Sunday mornings. Their warm, cozy flavors fit perfectly with festive cheer. This blog post covered the essential ingredients and steps to make delicious pumpkin cinnamon rolls. You learned how to prepare the dough, shape the rolls, and bake them to perfection. I shared tips for achieving the right texture and frosting consistency. You can also explore variations and find the best storage practices. These rolls are a unique treat for any occasion. Enjoy your baking journey and let your creativity shine!](https://grilledflavors.com/wp-content/uploads/2025/07/9cc6fc33-a67c-4963-b3d8-1f74cd52c190.webp)
Pumpkin Cinnamon Rolls with Coffee Maple Frosting Delight
Are you ready to indulge in a warm, cozy treat that screams fall? My Pumpkin Cinnamon Rolls with Coffee Maple Frosting will bring joy to
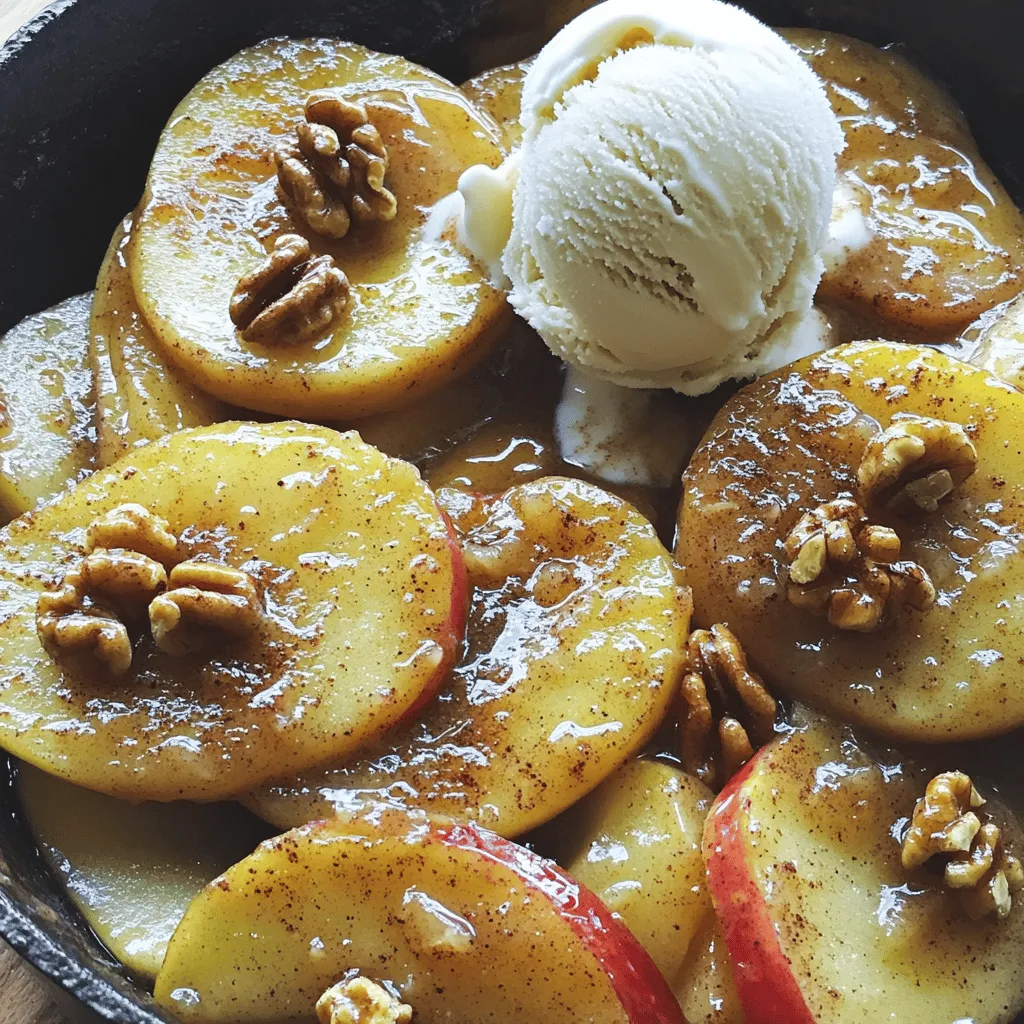
Cinnamon Apples Delightful and Easy Sweet Treat
If you love sweet treats, you’re in for a real treat! In this post, I’ll show you how to make delicious cinnamon apples. This recipe
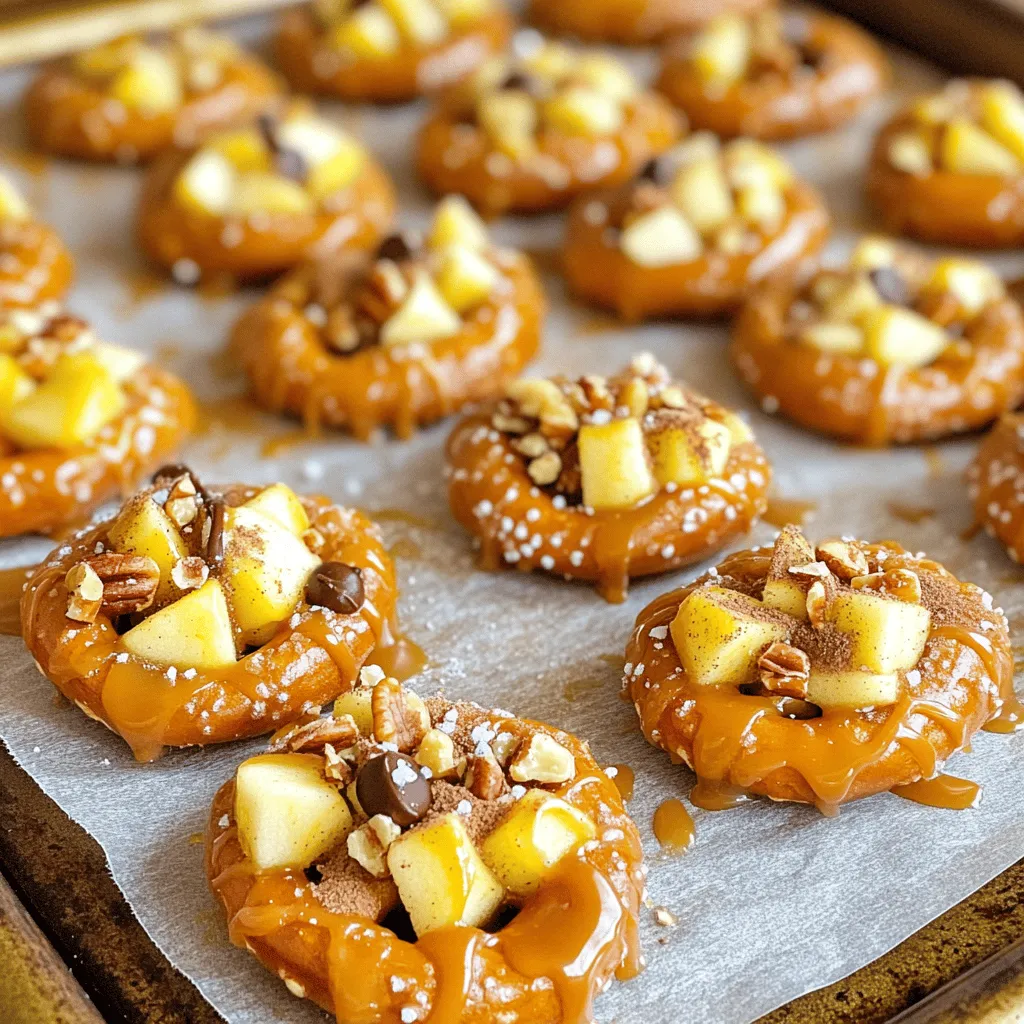
Caramel Apple Pretzel Bites Irresistible Sweet Treats
Looking for a sweet snack that’s both crunchy and chewy? You’ll love these Caramel Apple Pretzel Bites! They’re a fun twist on flavors you know
. You now have all the details to make delicious pumpkin coffee cake cookies. We covered ingredients, baking steps, and helpful tips. You learned how to adapt for diet needs and storage options. Don't forget the fun variations, like gluten-free and vegan recipes. Take these basics and get creative in your kitchen. Enjoy baking and sharing these tasty treats with friends and family!](https://grilledflavors.com/wp-content/uploads/2025/07/bd73a130-d1e8-4025-92f2-51e0922cd6e6.webp)
Pumpkin Coffee Cake Cookies Delightful Treat Recipe
Are you ready for a cozy treat that combines two favorites: coffee cake and cookies? These Pumpkin Coffee Cake Cookies are rich, soft, and packed
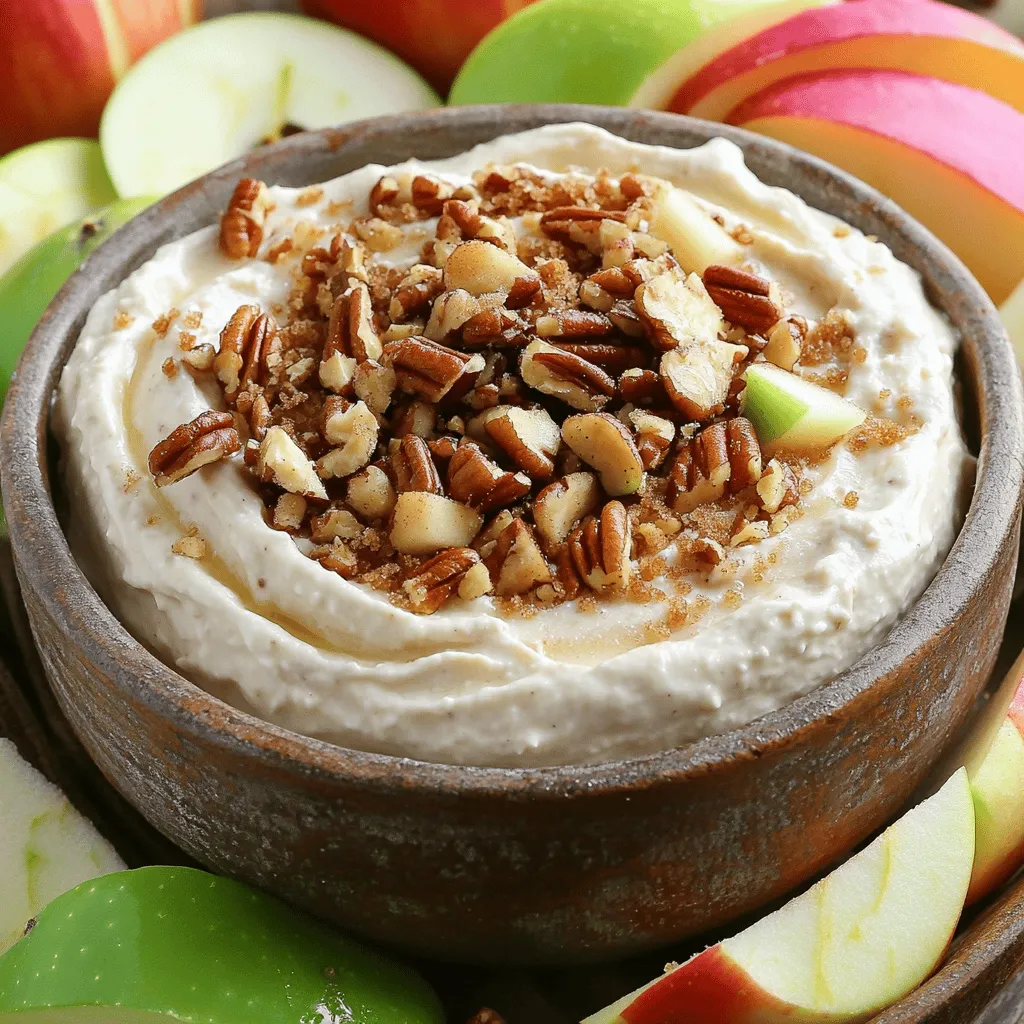
Apple Toffee Dip Irresistible and Easy Recipe
If you’re looking for a quick and tasty treat, you’ve found it! My Apple Toffee Dip recipe is both easy to make and incredibly delicious.
![- Milk and cream components - 4 cups whole milk - 1 cup heavy cream - Pumpkin and chocolate ingredients - 1 cup pumpkin puree - 1/2 cup semi-sweet chocolate chips - 1/4 cup cocoa powder - Spices and sweeteners - 1 teaspoon vanilla extract - 3 tablespoons brown sugar (adjust to taste) - 1 teaspoon ground cinnamon - 1/2 teaspoon nutmeg - 1/4 teaspoon salt - Whipped cream, for serving - Pumpkin spice or cocoa powder, for garnish This warm drink needs simple yet tasty ingredients for a cozy feel. Whole milk and heavy cream create a rich base. The pumpkin puree gives it a nice fall flavor. Semi-sweet chocolate chips and cocoa powder add chocolatey goodness. For sweetness, I use brown sugar. You can adjust this to fit your taste. Ground cinnamon and nutmeg bring warmth and spice. A pinch of salt enhances all the flavors. Finally, whipped cream on top makes it special. You can sprinkle pumpkin spice or cocoa powder for a pretty finish. Check out the Full Recipe for more details on how to combine these ingredients into a delightful treat. 1. Mixing the base ingredients Start by pouring 4 cups of whole milk and 1 cup of heavy cream into your crockpot. Stir them together until they blend well. This creamy base is the heart of your hot chocolate. 2. Adding the pumpkin and chocolate mixture Next, add 1 cup of pumpkin puree, 1/2 cup of semi-sweet chocolate chips, and 1/4 cup of cocoa powder. Mix everything well. Watch as the chocolate melts and the mixture becomes smooth and rich. 3. Cooking and heating in the crockpot Now, add 1 teaspoon of vanilla extract, 3 tablespoons of brown sugar, 1 teaspoon of ground cinnamon, 1/2 teaspoon of nutmeg, and 1/4 teaspoon of salt. Stir until fully combined. Set your crockpot to low and cover it. Let it cook for about 2 to 3 hours. Stir occasionally so it heats evenly. 4. Final adjustments and serving instructions Once the hot chocolate is warm, taste it. Adjust the sweetness or spices to your liking. Serve it hot in mugs. Top each serving with whipped cream and a sprinkle of pumpkin spice or cocoa powder for a lovely touch. For the full recipe, check the previous section. Enjoy your cozy drink! To make your Crockpot Pumpkin Hot Chocolate just right, think about sweetness and spice. For sweetness, start with 3 tablespoons of brown sugar. Taste it after cooking. If you want it sweeter, add more sugar. You can also try maple syrup for a new flavor. Spices add warmth. Use cinnamon and nutmeg to enhance the pumpkin. If you like more spice, add an extra dash of cinnamon or even a pinch of ginger. This mix brings out the fall vibes in every sip! When serving, consider adding whipped cream on top. You can sprinkle pumpkin spice or cocoa powder for a nice touch. Serve it with cookies or warm pastries for a cozy treat. Slow cooking is key for this drink. Set your crockpot to low. This lets the flavors blend well. Stir every so often to avoid burning. It usually takes about 2 to 3 hours to heat through. For perfect consistency, make sure to mix thoroughly when adding ingredients. If it seems too thick, add a bit more milk. If it's too thin, let it cook longer to thicken. The right texture turns this drink into a comforting hug on a cold day. For the full recipe, check [Full Recipe]. {{image_2}} You can change the recipe to fit your needs. For a dairy-free version, use almond milk or oat milk instead of whole milk and heavy cream. These options still create a creamy drink. You might also try coconut milk for a tropical twist. You can also switch up the chocolate. Instead of semi-sweet chocolate chips, go for dark chocolate. This will give your drink a richer taste. If you prefer white chocolate, use that instead. It offers a sweet and creamy flavor that pairs well with pumpkin. To make your hot chocolate more exciting, add spices like ginger or cloves. These spices bring warmth and depth to the drink. A pinch of cayenne can add a nice kick, too, if you enjoy a little heat. Using flavored extracts is another fun way to mix things up. Try adding peppermint extract for a wintery touch. Almond extract can also add a unique flavor that pairs well with pumpkin. Just a few drops can change the whole drink. For the full recipe, check out the Cozy Crockpot Pumpkin Hot Chocolate section. To keep your leftover pumpkin hot chocolate fresh, I recommend using an airtight container. This helps prevent any unwanted odors from your fridge. Make sure to cool the hot chocolate to room temperature before you store it. You can place it in the fridge for up to three days. If you want to enjoy it later, freezing is a great option. Pour the cooled hot chocolate into freezer-safe bags or containers, leaving some space for expansion. It can last up to two months in the freezer. When you're ready to enjoy your hot chocolate again, reheating is simple. For the best results, use a saucepan on the stove over low heat. Stir often to ensure it warms evenly. If you prefer, you can also use the microwave. Heat it in short bursts of 30 seconds, stirring in between. This helps to avoid any hot spots. Adjust sweetness or spices if needed before serving. Enjoy your cozy drink with whipped cream and a sprinkle of pumpkin spice! How can I make the hot chocolate less sweet? You can cut back on brown sugar. Start with less, then taste it. You can also skip the sweet chocolate chips. Using unsweetened cocoa powder can help too. Can I use a different type of milk? Yes! You can use almond, oat, or coconut milk. Each will add a unique flavor. Just make sure to choose a creamy option for the best taste. How long does the crockpot hot chocolate keep? This hot chocolate stays good for up to three days in the fridge. Make sure to store it in an airtight container. What’s the best way to thicken the hot chocolate? To thicken it, add more chocolate chips or some cornstarch. Mix cornstarch with a little cold water first, then stir it in. Can I make this recipe in advance? You can! Make it a day ahead, then heat it up when ready to serve. Just stir well before serving. How do I make a smaller batch? To make a smaller batch, cut all ingredients in half. This way, you still enjoy that creamy pumpkin flavor without leftovers. What's the secret to creamy hot chocolate? The key is using a mix of whole milk and heavy cream. The cream adds richness and smoothness. Can I add alcohol for an adult version? Absolutely! Try adding a splash of rum or bourbon. It adds warmth and depth to the drink. This blog post gives you all you need to make great hot chocolate. We covered ingredients, step-by-step instructions, and tips for flavor and consistency. You'll feel ready to create warm drinks for any occasion. Remember to adjust sweetness and try different types of chocolate for fun twists. With proper storage and reheating, you can enjoy your hot chocolate for days. So, grab your crockpot and start mixing. Your perfect cup of cocoa awaits!](https://grilledflavors.com/wp-content/uploads/2025/07/f8778001-f699-4ef9-9666-7ef89e0ccab5.webp)
Crockpot Pumpkin Hot Chocolate Cozy Winter Drink
As winter sets in, nothing warms the soul like a cozy cup of Crockpot Pumpkin Hot Chocolate. This creamy, spiced drink combines pumpkin’s rich flavor
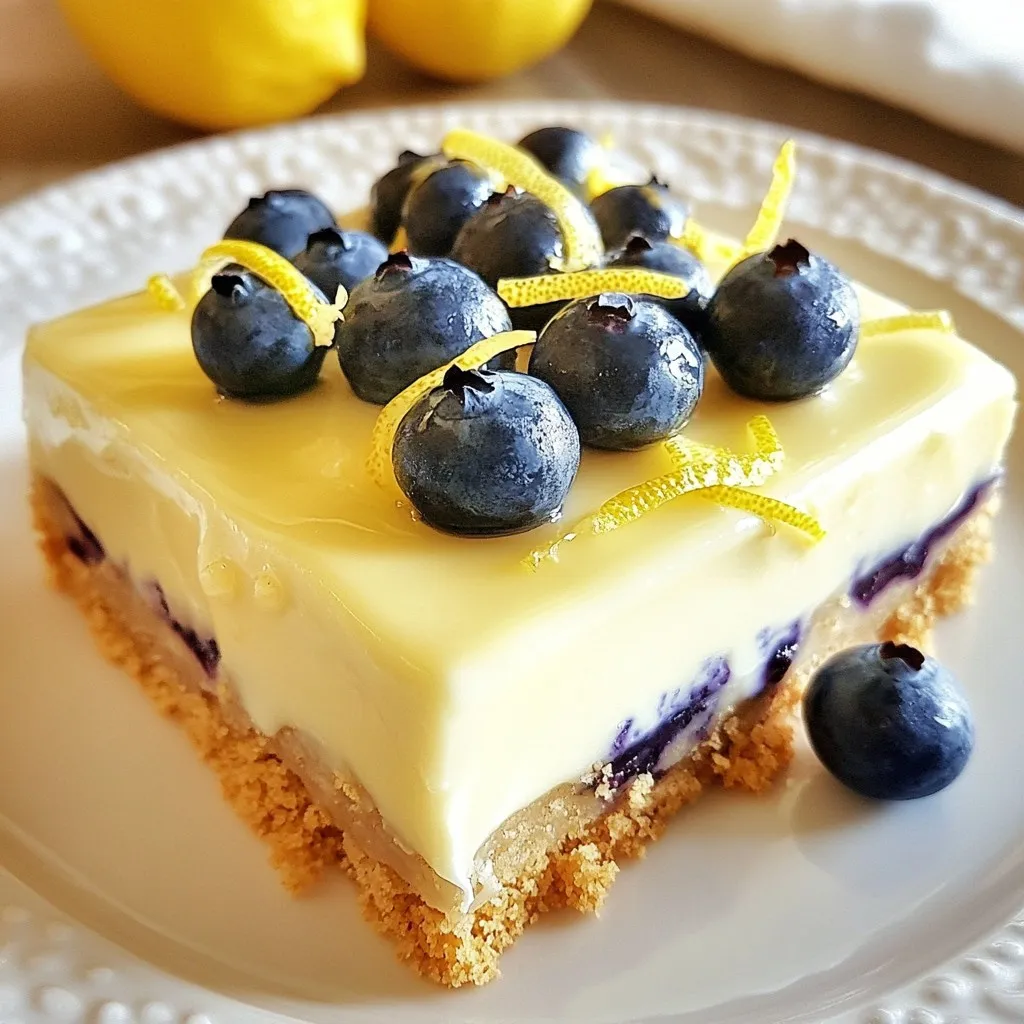
Lemon Blueberry Cheesecake Bars Easy and Delicious Treat
Are you ready to make a dessert that wows everyone? Lemon Blueberry Cheesecake Bars are simple, delicious, and perfect for any occasion. You’ll enjoy a
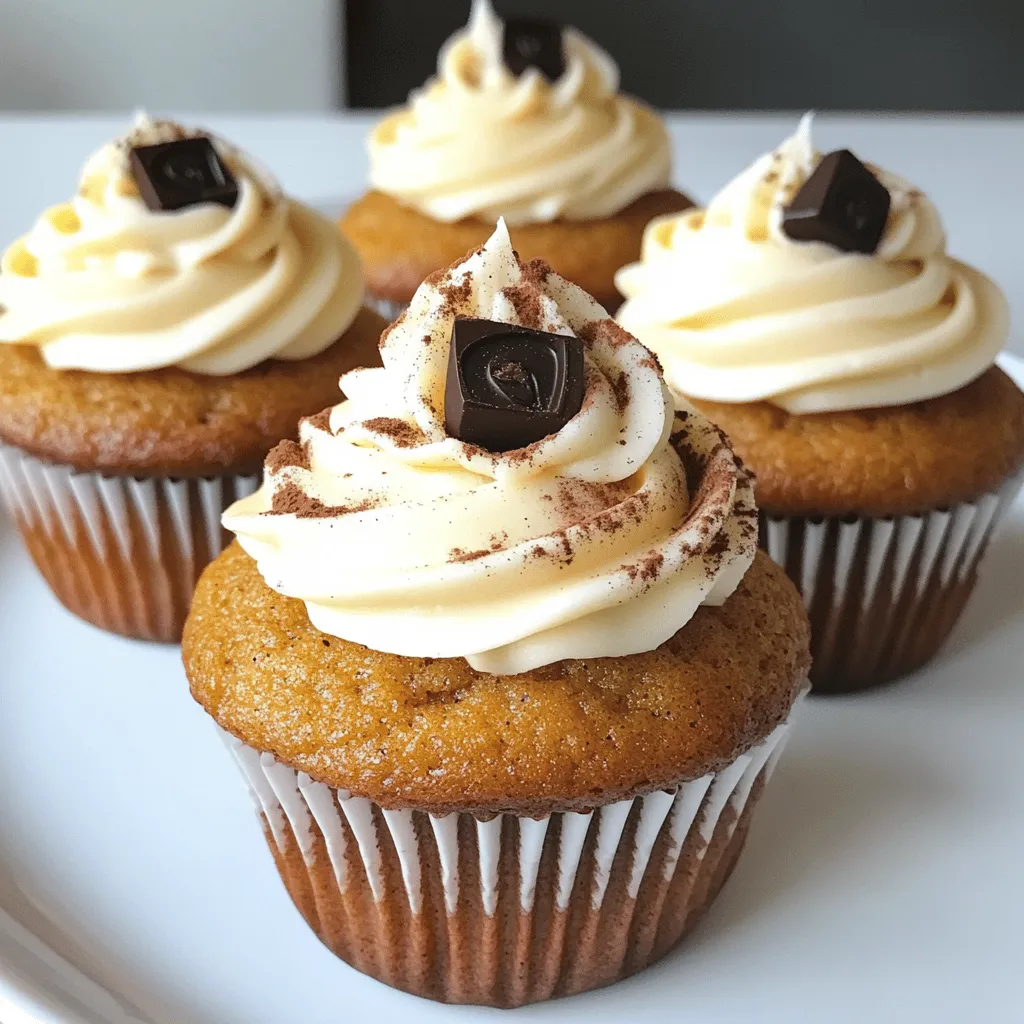
Brown Butter Dirty Chai Cupcakes Flavorful Delight
If you’re craving a treat that’s full of flavor and warmth, Brown Butter Dirty Chai Cupcakes are your answer. These moist cupcakes blend rich brown
![The core of these donut holes is simple yet flavorful. Here’s what you need: - 1 cup canned pumpkin puree - 1/4 cup unsweetened applesauce - 1/4 cup granulated sugar - 1/4 cup brown sugar, packed - 1 large egg - 2 cups all-purpose flour - 1 tsp baking powder - 1/2 tsp baking soda - 1 tsp ground cinnamon - 1/2 tsp ground nutmeg - 1/4 tsp ground ginger - 1/4 tsp salt - 1/2 cup vegetable oil (for frying) - 1/2 cup granulated sugar (for coating) - 2 tsp ground cinnamon (for coating) These ingredients create a warm, spiced flavor that makes each bite irresistible. While the key ingredients shine on their own, a few optional add-ins can take these donut holes to a new level. Consider adding: - A splash of vanilla extract for a sweet aroma. - Chopped nuts like walnuts or pecans for added crunch. - Mini chocolate chips for a fun twist. These enhancements can make your donut holes unique and tailored to your taste. If you’re missing some items, don’t worry! Here are easy swaps: - Use homemade pumpkin puree instead of canned if you prefer fresh flavors. - Replace applesauce with mashed bananas for a different sweetness. - Try coconut oil in place of vegetable oil for frying to add a hint of coconut flavor. These substitutions make the recipe flexible, so you can cook with what you have. For the full recipe, check out the details above. To make these donut holes, start by mixing wet ingredients. In a big bowl, combine 1 cup of canned pumpkin puree, 1/4 cup of applesauce, 1/4 cup of granulated sugar, 1/4 cup of brown sugar, and 1 large egg. Stir until it’s smooth. In another bowl, whisk together the dry stuff. You’ll need 2 cups of flour, 1 tsp of baking powder, 1/2 tsp of baking soda, 1 tsp of ground cinnamon, 1/2 tsp of nutmeg, 1/4 tsp of ginger, and 1/4 tsp of salt. Be sure to mix well. Gradually add the dry mix to the wet mix. Stir gently until everything is just combined. Don’t overmix! This step is key for soft donut holes. Chill the dough for 30 minutes in the fridge. It helps with shaping. Heat vegetable oil in a large pot or deep fryer to 350°F (175°C). This temperature is vital for crispy donut holes. Use a small cookie scoop or your hands to take about 1 tablespoon of dough. Roll it into a ball. Carefully drop the balls into the hot oil in small groups. Fry them for 3-4 minutes until they turn golden brown. Use a slotted spoon to turn them gently. This ensures even cooking. Avoid overcrowding the pot to keep the oil hot. Once fried, remove the donut holes and let them drain on paper towels. This step removes excess oil. In a shallow bowl, mix 1/2 cup of granulated sugar with 2 tsp of ground cinnamon for the coating. While the donut holes are still warm, roll them in this mixture. Make sure they are well coated. This adds a sweet touch that makes them irresistible. Enjoy these warm delights from the [Full Recipe]. When making cinnamon sugar pumpkin donut holes, avoid overmixing the dough. This can make them tough. Also, don’t skip chilling the dough. It helps the donut holes hold their shape. Fry in small batches to keep the oil temperature steady. If you crowd the pan, they may not cook evenly. Lastly, roll them in sugar while they are warm. This helps the coating stick better. To get a light and fluffy texture, measure your flour properly. Too much flour can lead to dense donut holes. Use the spoon and level method. Spoon flour into a measuring cup and level off with a knife. Mixing your wet and dry ingredients just until combined also helps. The dough should be slightly sticky but manageable. You will need a few handy tools for this recipe. A mixing bowl is vital for combining ingredients. A whisk makes blending dry ingredients easy. Use a cookie scoop to portion the dough evenly. This ensures uniform donut holes. A slotted spoon helps you turn and remove them from the hot oil. Finally, have paper towels ready to drain excess oil after frying. For the full recipe, check out the cooking instructions above. {{image_2}} You can add more warmth with pumpkin spice. Just mix in extra spices like clove or allspice. This gives a cozy fall flavor. Use about 1 teaspoon of each spice for the best taste. These donut holes become a true seasonal treat with that extra kick. If you love chocolate, try a chocolate glaze. Melt 1 cup of chocolate chips with a bit of cream. Dip the warm donut holes into this glaze. You can then sprinkle them with crushed nuts or sprinkles. This twist brings a rich taste to your pumpkin donuts. You can play with the coatings too! Instead of cinnamon sugar, roll your donut holes in powdered sugar. For a fun twist, coat them in coconut flakes or crushed graham crackers. You can also try a maple glaze for a sweet contrast. The options are endless, so get creative! For the full recipe, you can explore how to make these delicious donut holes. To keep your donut holes fresh, store them in an airtight container. Use parchment paper between layers to avoid sticking. This method helps maintain their fluffy texture. Place the container in a cool, dry place. Avoid storing them in the fridge, as this can make them dry. You can freeze these donut holes for a later treat. First, let them cool completely. Then, place them in a single layer on a baking sheet. Freeze for about an hour, then transfer to a heavy-duty freezer bag. When you're ready to enjoy them, reheat in a 350°F oven for 5-7 minutes. This will bring back their warmth and softness. Homemade donut holes stay fresh for about 2-3 days at room temperature. If stored properly in an airtight container, they can last up to a week in the fridge. However, the best taste comes when enjoyed fresh. With proper freezing, they can last for up to 2 months. Always check for any signs of spoilage before eating. For the full recipe, check out the detailed instructions to make these delightful treats. If you can't find canned pumpkin puree, use fresh pumpkin. Cook the pumpkin until soft. Then, mash it well to get a smooth texture. You can also use butternut squash puree as a tasty alternative. Both options give a similar flavor and texture. Yes, you can bake these donut holes for a healthier twist! Preheat your oven to 350°F (175°C). Place the rolled donut holes on a baking sheet lined with parchment paper. Bake for about 15-20 minutes or until they are golden. Keep an eye on them to avoid over-baking. To check if the oil is ready, use a thermometer. The ideal temperature is 350°F (175°C). If you don't have a thermometer, drop a small piece of dough into the oil. If it bubbles and rises, the oil is hot enough. Fry in small batches to keep the temperature steady. This article covered how to make cinnamon sugar pumpkin donut holes from start to finish. You learned about the key ingredients, the steps for perfect frying, and helpful tips along the way. I shared variations and best storage practices too. Now you have all the tools to create these tasty treats. Enjoy experimenting with flavors and impress your friends and family with your delicious donut holes!](https://grilledflavors.com/wp-content/uploads/2025/07/aa08d20b-f820-467a-89a6-5a734a9e29ca.webp)
Cinnamon Sugar Pumpkin Donut Holes Irresistible Treat
Fall is the perfect time to whip up Cinnamon Sugar Pumpkin Donut Holes. These tasty treats combine warm spices and sweet pumpkin for a cozy
![- 1 ½ cups all-purpose flour - 1 teaspoon baking powder - 1 teaspoon baking soda - ½ teaspoon salt - 1 teaspoon ground cinnamon - ½ teaspoon ground nutmeg - ½ teaspoon ground ginger - ½ cup unsalted butter, softened - 1 cup granulated sugar - 2 large eggs - 1 cup canned pumpkin puree - ½ teaspoon vanilla extract - ½ cup brown sugar - 8 oz cream cheese, softened - ½ cup unsalted butter, softened - 1 teaspoon vanilla extract - 2 cups powdered sugar - ¼ cup caramel sauce (store-bought or homemade) Every ingredient plays a key role in making these cupcakes great. The dry ingredients create the base. Flour provides structure while baking powder and baking soda help them rise. The spices add warmth and flavor. For the wet ingredients, butter gives richness and moisture. Sugar adds sweetness. Eggs bind everything together. Pumpkin puree brings a lovely texture and flavor. It also keeps the cupcakes moist. The frosting ingredients are just as important. Cream cheese and butter create a smooth base. The vanilla adds a nice touch. Powdered sugar sweetens the frosting and gives it the right consistency. Finally, caramel sauce adds that extra layer of flavor we all love. Check out the Full Recipe to see how to combine these ingredients into delicious pumpkin cupcakes with caramel cream cheese frosting. - Preheat your oven to 350°F (175°C). - Line a cupcake tray with paper liners. - In a bowl, whisk together: - 1 ½ cups all-purpose flour - 1 teaspoon baking powder - 1 teaspoon baking soda - ½ teaspoon salt - 1 teaspoon ground cinnamon - ½ teaspoon ground nutmeg - ½ teaspoon ground ginger - Set this mix aside for later use. - In a large bowl, beat together: - ½ cup unsalted butter, softened - 1 cup granulated sugar - Mix until creamy and light. This takes about 3 to 4 minutes. - Add 2 large eggs, one at a time. Mix well after each egg. - Stir in: - 1 cup canned pumpkin puree - ½ teaspoon vanilla extract - Mix until smooth. - Gradually add the dry ingredients to the wet mix. Stir gently. Avoid overmixing. - Fill each cupcake liner about 2/3 full with batter. - Bake in the preheated oven for 18 to 20 minutes. - Check doneness with a toothpick. It should come out clean. - Let the cupcakes cool in the tray for 5 minutes. - Transfer them to a wire rack to cool completely. - In a mixing bowl, beat together: - 8 oz cream cheese, softened - ½ cup unsalted butter, softened - Mix until creamy and smooth. - Add 1 teaspoon vanilla extract. - Gradually mix in: - 2 cups powdered sugar - Keep mixing until you get your desired sweetness and consistency. - Fold in: - ¼ cup caramel sauce - Once the cupcakes are cool, generously frost each one with the caramel cream cheese frosting. - For an extra treat, drizzle some additional caramel sauce on top. For the complete recipe, check out the [Full Recipe]. To make moist pumpkin cupcakes, start with fresh ingredients. Fresh ingredients boost flavor and texture. Always check dates on baking items. Use the right measuring techniques. Spoon flour into your measuring cup, then level it off. This avoids too much flour in your mix, which can dry out cupcakes. For a creamy frosting, ensure your butter and cream cheese are at room temperature. This step is key for a smooth blend. If they’re too cold, the frosting can be lumpy. Adjust the sweetness to your taste by adding powdered sugar slowly. This helps you find the perfect balance for your caramel cream cheese frosting. Check your oven temperature for accuracy. An oven thermometer can help with this. If your oven runs hot, cupcakes may bake too fast and dry out. Avoid overmixing your batter. Mix until just combined to keep your cupcakes light and fluffy. Too much mixing can make them tough. These tips will guide you toward making the best pumpkin cupcakes with caramel cream cheese frosting. For the complete recipe, check [Full Recipe]. {{image_2}} If you want to switch up the frosting on your pumpkin cupcakes, try these options: - Whipped cream frosting: This light and airy frosting adds a fluffy touch. Just whip heavy cream with a bit of sugar and vanilla until soft peaks form, then pipe it onto the cupcakes. - Maple cream cheese frosting: For a twist, mix maple syrup into the cream cheese base. This adds a rich, sweet flavor that pairs well with pumpkin. You can adjust the recipe for different diets: - Gluten-free flour options: Use a gluten-free all-purpose flour blend. This way, you can enjoy these cupcakes without gluten. - Vegan substitutions: Replace eggs with applesauce or flaxseed meal mixed with water. Use vegan butter and dairy-free cream cheese for a completely plant-based treat. Add some extra fun to your cupcakes with these ideas: - Adding chocolate chips: Fold in a cup of chocolate chips into the batter for a sweet surprise with each bite. - Incorporating nuts: Chopped walnuts or pecans can add a nice crunch and nutty flavor. Sprinkle them in the batter or on top of the frosting for an extra touch. These variations let you personalize your pumpkin cupcakes. Feel free to mix and match to find your favorite combination! For the complete recipe, check out the Full Recipe section. To keep your pumpkin cupcakes fresh, store them properly. You can keep them at room temperature or refrigerate them. If you choose room temperature, place them in an airtight container. This helps keep them moist. For refrigeration, it’s best to use the same airtight container. This method prevents them from drying out. How long do these pumpkin cupcakes last? If stored correctly at room temperature, they can stay fresh for up to three days. In the fridge, they can last up to a week. Look for signs of spoilage. If you see mold or a strange smell, it’s time to toss them. Freezing is a great option if you want to save these treats for later. First, let the cupcakes cool completely. Then, wrap each one tightly in plastic wrap. Place them in a freezer-safe bag or container. To thaw, simply take them out and leave them at room temperature for a few hours. This helps keep their flavor intact. Enjoy them later along with the full recipe! Yes, you can make these cupcakes a day ahead. Bake and cool them fully. Then, place them in an airtight container. Keep them at room temperature. Frost them just before serving for the best taste. To frost pumpkin cupcakes, use a piping bag with a star tip. This gives a nice swirl. If you don't have a piping bag, a simple offset spatula works well. Start from the center and swirl outwards. Yes, homemade caramel sauce adds a special touch. To make it, melt sugar slowly until it turns golden. Then, add butter and cream carefully. Stir until smooth. Let it cool before using in the frosting. You can use applesauce or mashed bananas instead of pumpkin puree. Both give moisture and flavor. Sweet potato puree is another great option. Each of these adds a nice taste to your cupcakes. Check for doneness by inserting a toothpick into the center. If it comes out clean or with a few crumbs, they’re done. You can also gently press the tops; they should spring back. If they sink, they need more time. These pumpkin cupcakes combine simple ingredients and steps for great results. Start with a mix of dry and wet ingredients that creates a rich batter. Follow the easy instructions to bake and cool the cupcakes, then make a creamy frosting. Add your choice of flavors or modifications to make them unique. Remember to store them well to keep your treats fresh. Enjoy these tasty delights at any gathering. You’ll impress everyone with your baking skills!](https://grilledflavors.com/wp-content/uploads/2025/07/a806c365-c9bb-4231-9f6c-a094719cd902.webp)
Pumpkin Cupcakes with Caramel Cream Cheese Frosting Delight
Get ready to satisfy your sweet tooth with my Pumpkin Cupcakes with Caramel Cream Cheese Frosting! These cupcakes burst with flavor and warmth, perfect for