Desserts
![To make a Neapolitan Rose Cake, you need some key ingredients. Here’s what you will need: - 2 cups all-purpose flour - 1 ½ cups granulated sugar - ½ cup unsalted butter, softened - 1 cup milk - 3 large eggs - 2 teaspoons baking powder - 1 teaspoon vanilla extract - 1 cup strawberry puree (fresh or frozen) - 1 cup chocolate syrup - 1 cup whipped cream (for frosting) - Fresh strawberries and edible rose petals (for decoration) These ingredients create three delicious layers: vanilla, chocolate, and strawberry. Each layer brings its own flavor and charm. Using quality ingredients makes a big difference. Here are some tips: - Choose fresh strawberries for purees. They give a bright flavor. - Use real vanilla extract instead of imitation for a richer taste. - Select high-quality chocolate syrup. This enhances the chocolate layer. - For butter, choose unsalted. This lets you control the saltiness. - Use whole milk for a creamier texture in the cake. These small choices can elevate your cake from good to great! If you want to add some fun twists, try these optional add-ins: - Mix in lemon zest for a fresh, zesty flavor. - Add almond extract for a nutty touch. - Incorporate crushed nuts or chocolate chips for added texture. - Swirl in some raspberry puree for a tart punch. These options can help you personalize your cake and surprise your guests. Start by preheating your oven to 350°F (175°C). This step is key for a good bake. Grease and flour two 9-inch round cake pans. This will help the cake release easily later. In a large bowl, cream the softened butter and sugar. Mix them until light and fluffy, about 3 to 4 minutes. Next, add the eggs one by one. Mix well after adding each egg. Then, pour in the vanilla extract for flavor. In another bowl, whisk the flour and baking powder together. Gradually add this mixture to the butter mixture, alternating with the milk. Mix until just combined. Do not overmix. Now, divide the batter into three equal parts. In one part, stir in the strawberry puree. In the second part, mix in the chocolate syrup. Leave the last part plain. Pour each batter into the prepared pans. You will have layers of strawberry, chocolate, and vanilla. Bake for 25 to 30 minutes. Check with a toothpick; it should come out clean. Let the cakes cool for 10 minutes in the pans. Then transfer them to wire racks to cool completely. Once the cakes have cooled, it's time to stack them. Start with the vanilla layer on a cake plate. Spread a thick layer of whipped cream on top. Place the chocolate layer next. Again, add more whipped cream. Finally, add the strawberry layer on top. To keep the layers even, use a serrated knife to trim the tops of the cakes. This will help them sit flat. Make sure to press down gently to avoid breaking the layers. Now, you can frost the cake. Use a spatula to spread whipped cream on the top and sides. Don't worry if it’s not perfect; a little texture adds charm. To create a smoother look, dip your spatula in warm water before smoothing the frosting. For decoration, add fresh strawberries and edible rose petals on top. This gives the cake a lovely touch. For extra flair, place the cake on a nice stand. Add a drizzle of chocolate syrup on the plate for a beautiful presentation. Follow the Full Recipe for all the details. When making your Neapolitan Rose Cake, avoid overmixing the batter. This can make your cake dense and tough. Also, do not skip greasing and flouring the pans. It helps prevent sticking. Always check your oven temperature with an oven thermometer. An oven that is too hot can burn the edges while leaving the center raw. Lastly, let the cakes cool fully before frosting. This step is key for a clean finish. To keep your cake moist, use fresh ingredients. The butter should be softened but not melted. Use room-temperature eggs and milk for better mixing. Adding strawberry puree into the batter also adds moisture and flavor. After baking, you can brush simple syrup on the layers. Mix equal parts sugar and water, heat until the sugar dissolves, and let it cool. This enhances flavor and keeps the layers moist longer. To make your Neapolitan Rose Cake shine, use fresh strawberries and edible rose petals. Place the strawberries around the top edge. Arrange the petals in a circular pattern for a beautiful look. You can also drizzle chocolate syrup on the cake and the plate for extra flair. A simple cake stand can elevate the whole presentation. Get creative with colors and shapes, and make it your own! {{image_2}} You can change the flavors in your Neapolitan Rose Cake. Try using raspberry puree instead of strawberry for a fun twist. You can also mix in lemon zest to add a fresh zing. Consider using white chocolate instead of regular chocolate syrup. This adds a creamy taste to the cake. Each flavor will give your cake a unique touch! To make this cake gluten-free, swap the all-purpose flour for a gluten-free blend. Look for one that works well in baking. For dairy-free options, use coconut milk instead of regular milk. Use dairy-free butter and whipped cream too. These swaps keep the cake tasty while meeting dietary needs. Making mini cakes is a fun idea! Use muffin tins or small cake pans for these treats. Divide the batter into smaller portions. Bake them for a shorter time, about 15-20 minutes. Layer and frost them just like the big cake. Mini cakes are perfect for parties or special events. They are easy to serve and look adorable! For the full recipe, click [Full Recipe]. To keep your Neapolitan Rose Cake fresh, store it in an airtight container. This method helps prevent the cake from drying out. If you do not have a container, wrap the cake in plastic wrap. Place it in a cool, dry spot away from sunlight. Avoid storing it in the fridge unless it has whipped cream on top. The fridge can dry it out. To maintain the cake's flavor, you can add a layer of plastic wrap around the cake. This extra layer keeps the moisture locked in. If you plan to eat the cake within two days, keep it at room temperature. If you need to store it longer, the fridge is a better option. Just remember to bring it back to room temperature before serving. This way, the flavors will shine. To freeze Neapolitan Rose Cake, first, cool it completely. Wrap each slice in plastic wrap tightly. Then, place the slices in a freezer-safe bag or container. Label the bag with the date. You can freeze the cake for up to three months. When ready to eat, take it out and let it thaw in the fridge overnight. Enjoy the same great taste as when it was fresh. For the best results, frost the cake after thawing. For the full recipe, check out the complete guide! Neapolitan Rose Cake offers a lovely mix of flavors. You get sweet strawberry, rich chocolate, and light vanilla. Each bite is soft and creamy. The whipped cream adds a nice touch. The fresh strawberries and rose petals give it a fresh taste. Overall, it's a delightful cake that pleases many palates. Yes, you can use store-bought strawberry puree. It saves time and effort. Just make sure it's pure and has no added sugar. This will keep the cake sweet but not too sweet. If you want a fresher taste, try making your own. Blend fresh strawberries until smooth for the best flavor. You can keep the Neapolitan Rose Cake for about 3-4 days. Store it in the fridge to keep it fresh. Make sure to cover it well with plastic wrap. This will help keep it moist and tasty. If you want to keep it longer, you can freeze it. Just slice it first and wrap each slice tightly. The Neapolitan Rose Cake combines quality ingredients, a precise baking process, and smart tips. You learned how to create moist layers and stunning decorations. I shared fun variations and storage tips to keep your cake fresh. Now you can enjoy making this cake for any occasion. With these insights, you’ll impress friends and family with your baking skills. Remember, practice makes perfect, and every cake is a new chance to learn.](https://grilledflavors.com/wp-content/uploads/2025/07/1cb81bf8-823f-454d-ac85-2aa3ff55226d.webp)
Neapolitan Rose Cake Delightful and Easy Recipe
Welcome to my easy guide on making a Neapolitan Rose Cake! This cake is not just beautiful; it’s also delicious and fun to make. You’ll
Vegan Zucchini Muffins Easy Healthy Snack Idea
If you’re looking for a tasty and healthy snack, you’ve found it! These Vegan Zucchini Muffins are simple to make and packed with flavor. With
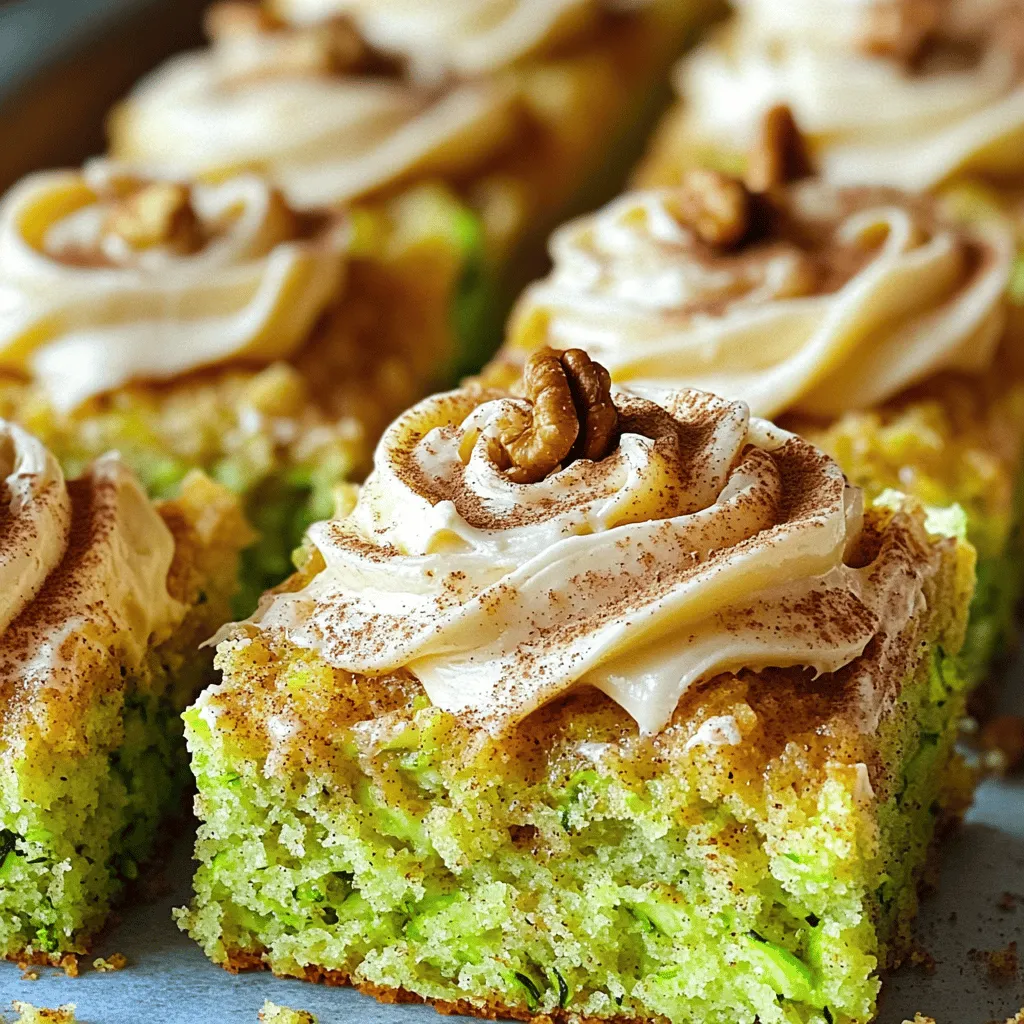
Zucchini Cake with Cinnamon Cream Cheese Frosting Delight
Are you ready to whip up a delicious treat that combines sweet and savory? My Zucchini Cake with Cinnamon Cream Cheese Frosting is here to
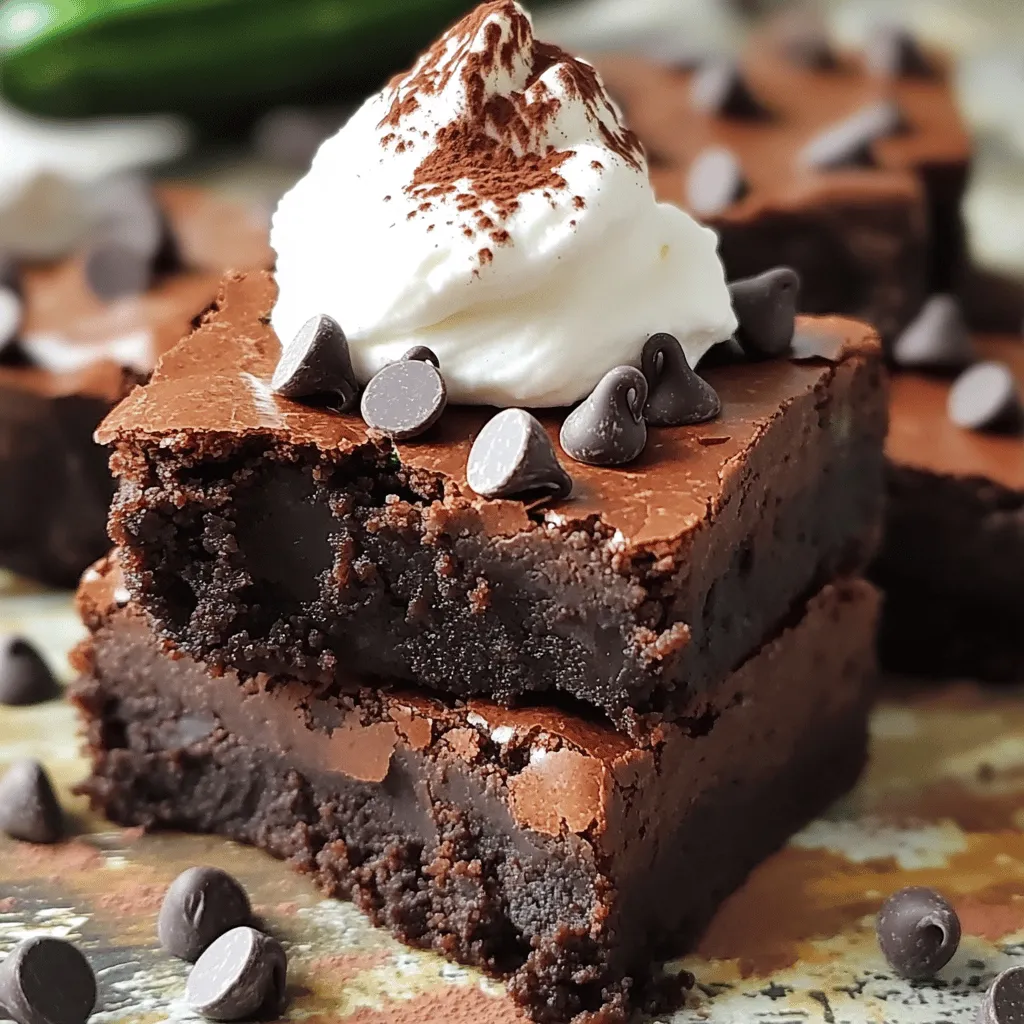
Fudgy KETO Zucchini Brownies Irresistibly Delicious Treat
Are you craving a rich, chocolatey treat that keeps your KETO diet on track? Look no further! These Fudgy KETO Zucchini Brownies are not just
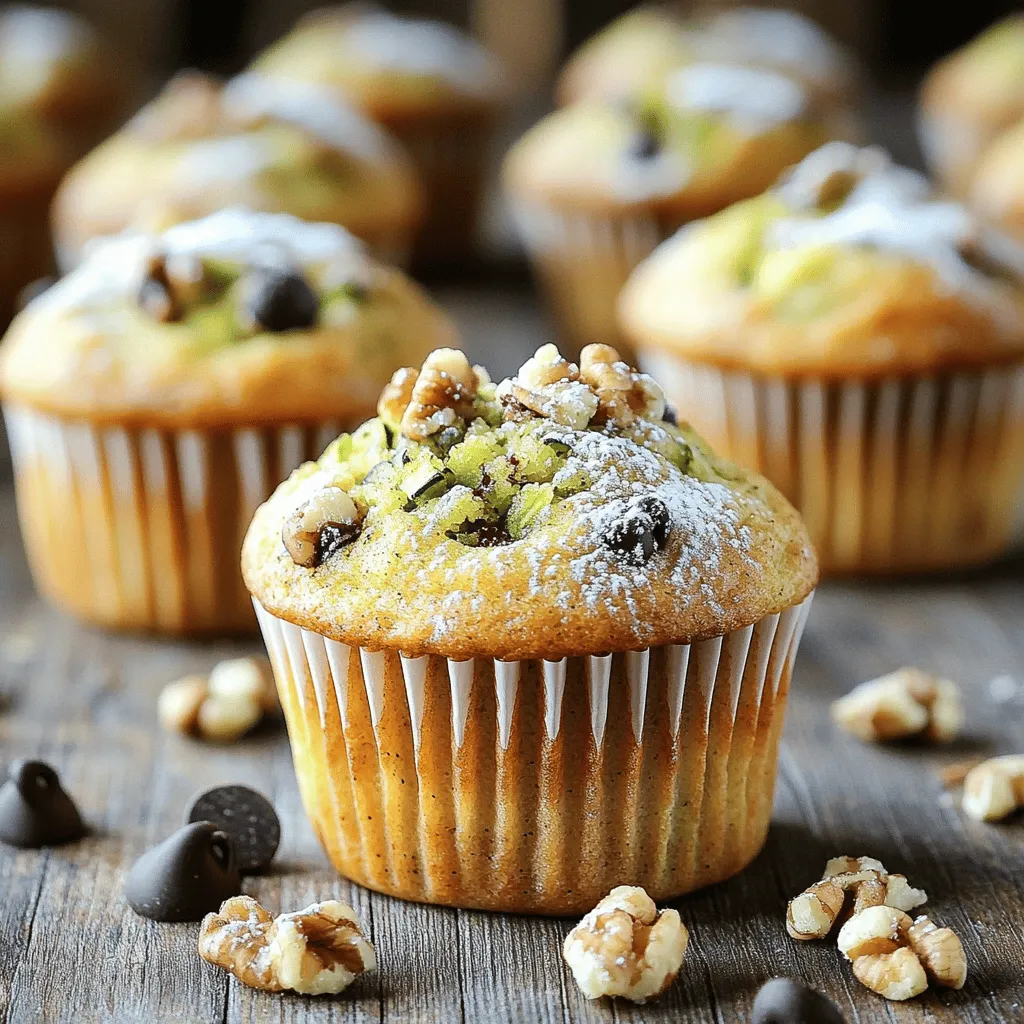
![- Shredded Zucchini - All-Purpose and Whole Wheat Flour - Sugars (Granulated & Brown) - Baking Ingredients (Soda, Powder, Salt, Cinnamon) - Wet Ingredients (Eggs, Oil, Vanilla) - Chocolate Chips (Semi-sweet or Dark) - Optional Add-ins (Nuts) When you make zucchini chocolate chip muffins, the ingredients make all the difference. First, you need shredded zucchini. One medium zucchini gives you about 1 ½ cups. It keeps the muffins moist and adds nutrients. Next, you’ll mix two types of flour: all-purpose and whole wheat. Using both adds great texture and flavor. Aim for 1 cup of all-purpose flour and ½ cup of whole wheat flour. For sweetness, you need sugars. I use ½ cup of granulated sugar and ½ cup of brown sugar. The brown sugar adds a rich flavor. Now, let’s talk about baking ingredients. You need 1 teaspoon of baking soda, ½ teaspoon of baking powder, ½ teaspoon of salt, and 1 teaspoon of cinnamon. These help your muffins rise and add warmth to the taste. Next, wet ingredients come into play. Use 2 large eggs, ⅓ cup of vegetable oil or melted coconut oil, and 1 teaspoon of vanilla extract. These make the batter smooth and flavorful. What’s a muffin without chocolate? Use 1 cup of chocolate chips. You can choose semi-sweet or dark. They melt beautifully and add sweetness. Lastly, if you want a crunch, add nuts. I like to use ¼ cup of chopped walnuts or pecans. This is optional but gives a nice texture. For the full recipe, check out the details above. First, set your oven to 350°F (175°C). This temperature will help the muffins rise well. Next, grab a muffin tin. You can use paper liners or spray it with cooking spray. This step keeps the muffins from sticking. In a large bowl, take two eggs and whisk them. Add granulated sugar and brown sugar, mixing until smooth. Pour in the vegetable oil or melted coconut oil, followed by the vanilla extract. Whisk until you have a creamy blend. This mixture binds the muffins together. In another bowl, combine all-purpose flour, whole wheat flour, baking soda, baking powder, salt, and cinnamon. Stir them well. This step is key for even flavor. Make sure there are no lumps. Now, fold the shredded zucchini into the wet mixture. Mix gently until the zucchini is evenly distributed. Next, slowly add the dry mixture to the wet one. Stir until just combined. Do not overmix here; it can make the muffins tough. Spoon the batter into the prepared muffin cups. Fill each one about two-thirds full. Bake them for 18-22 minutes. Check for doneness with a toothpick. If it comes out clean, your muffins are ready! Let the muffins cool for 5 minutes in the tin before moving them to a wire rack. Enjoy your delicious zucchini chocolate chip muffins! For the full recipe, see above. To keep your muffins moist, use fresh zucchini. Grate it finely, and don’t squeeze out the water. Zucchini holds moisture well, giving your muffins a soft texture. If you want extra flavor, try adding a touch of lemon zest. This brightens up the taste while keeping it moist. Mixing is key, but too much can make tough muffins. When you combine wet and dry ingredients, stir gently. It’s okay if there are small lumps. This keeps the muffins light and fluffy. Remember, the goal is to just combine everything, not to stir until smooth. For the best results, preheat your oven properly. Use an oven thermometer to check the temperature. Line your muffin tin with paper liners or grease it well. This helps with easy removal after baking. Bake until a toothpick comes out clean; this usually takes 18-22 minutes. To make your muffins look great, consider adding a sprinkle of chocolate chips on top before baking. Once baked, let them cool a bit, then dust with powdered sugar. Serve them warm for a cozy touch. These little details make your muffins not just tasty, but also lovely to look at. For the full recipe, check out the details above! {{image_2}} You can make these muffins healthier without losing taste. Instead of all-purpose flour, use oat flour or almond flour. These options add nutrients and a different texture. You can also swap granulated sugar for honey or maple syrup. This change adds natural sweetness and moisture. For a lower fat option, replace the oil with unsweetened applesauce. It keeps your muffins moist and delicious. To boost flavor, add spices like nutmeg or ginger. They give a warm kick that pairs nicely with chocolate. You can also mix in a teaspoon of espresso powder. This adds depth to the chocolate flavor. For a fresh twist, add a splash of orange or lemon zest. The citrus brightens up the muffins and adds a nice aroma. Get creative by adding different mix-ins. You can use nuts like walnuts or pecans for crunch. Dried fruits like cranberries or raisins also work well. For extra chocolatey goodness, try using chocolate chunks or cocoa nibs. Top your muffins with a sprinkle of sea salt before baking. This adds a savory touch that contrasts with the sweetness. You can find the full recipe [here]. You want to keep your zucchini chocolate chip muffins fresh and tasty. The best way is to store them in an airtight container. This keeps moisture in and prevents them from drying out. You can layer parchment paper between the muffins to avoid sticking. For longer storage, consider freezing them. If you leave your muffins at room temperature, they last about 2 to 3 days. Make sure to keep them in a cool, dry place. Avoid direct sunlight, as heat can change their texture. If you wait longer, you may notice them getting stale. For extra freshness, you can refrigerate your muffins. They will stay good for about a week in the fridge. Wrap them in plastic wrap or place them in a container. If you have leftover muffins, freezing is a great option. Place them in a freezer bag, and they can last up to 3 months. Just remember to thaw them before eating. You can reheat them in the oven or microwave for a warm treat. For the full recipe, check out the details above. Yes, you can use frozen zucchini! Just make sure to thaw it first. Then, drain any extra water before adding it to your mix. This helps keep your muffins moist but not too soggy. Frozen zucchini works well, especially if you have some leftover in your freezer. I recommend using semi-sweet or dark chocolate chips. They melt nicely and offer a rich flavor. If you prefer a sweeter muffin, go for the semi-sweet variety. You can also try milk chocolate chips for a creamier taste. If you like a darker flavor, use dark chocolate chips. To make these muffins vegan, replace the eggs with flax eggs. Mix one tablespoon of ground flaxseed with three tablespoons of water for each egg. Let it sit until it thickens. You can also swap the regular oil for coconut oil or any plant-based oil. Use a plant-based milk, like almond or soy, instead of regular milk. Absolutely! Just adjust the baking time. Mini muffins usually take about 10-15 minutes to bake. Check them often with a toothpick to avoid overbaking. This recipe is perfect for mini muffins, and they are great for snacks or lunchboxes. Enjoy a bite-sized treat! For the full recipe, check out Chocolatey Zucchini Delight Muffins. To wrap up, we explored the key ingredients, steps, and helpful tips for baking delicious muffins. Remember to use fresh zucchini for moisture and avoid overmixing for the best texture. You can try variations with healthier substitutes or different add-ins to suit your taste. Proper storage ensures your muffins stay fresh longer. With these tips, you can create tasty muffins every time. Happy baking!](https://grilledflavors.com/wp-content/uploads/2025/07/937fd8d4-8906-481e-b916-19f8a0e22633.webp)
Zucchini Chocolate Chip Muffins Easy and Delicious Treat
Looking for a quick and tasty treat? These Zucchini Chocolate Chip Muffins will wow your taste buds! Packed with moist zucchini and rich chocolate, they’re
 - Check out these related recipes: zucchini muffins, blueberry pancakes, or banana bread. This article covered everything you need for blueberry zucchini bread. We discussed key ingredients like fresh blueberries and grated zucchini. We reviewed step-by-step instructions to guide your baking. I shared tips to help you perfect the bread and variations to try. Lastly, we talked about the best ways to store and freeze your leftovers. I hope this inspires you to bake some delicious bread today!](https://grilledflavors.com/wp-content/uploads/2025/07/92303b39-76e2-4c7a-9caa-bad45db0b9c1.webp)
Best Blueberry Zucchini Bread Simple and Tasty Recipe
Are you ready to discover the best blueberry zucchini bread recipe? This simple and tasty treat combines fresh blueberries and grated zucchini for a moist,
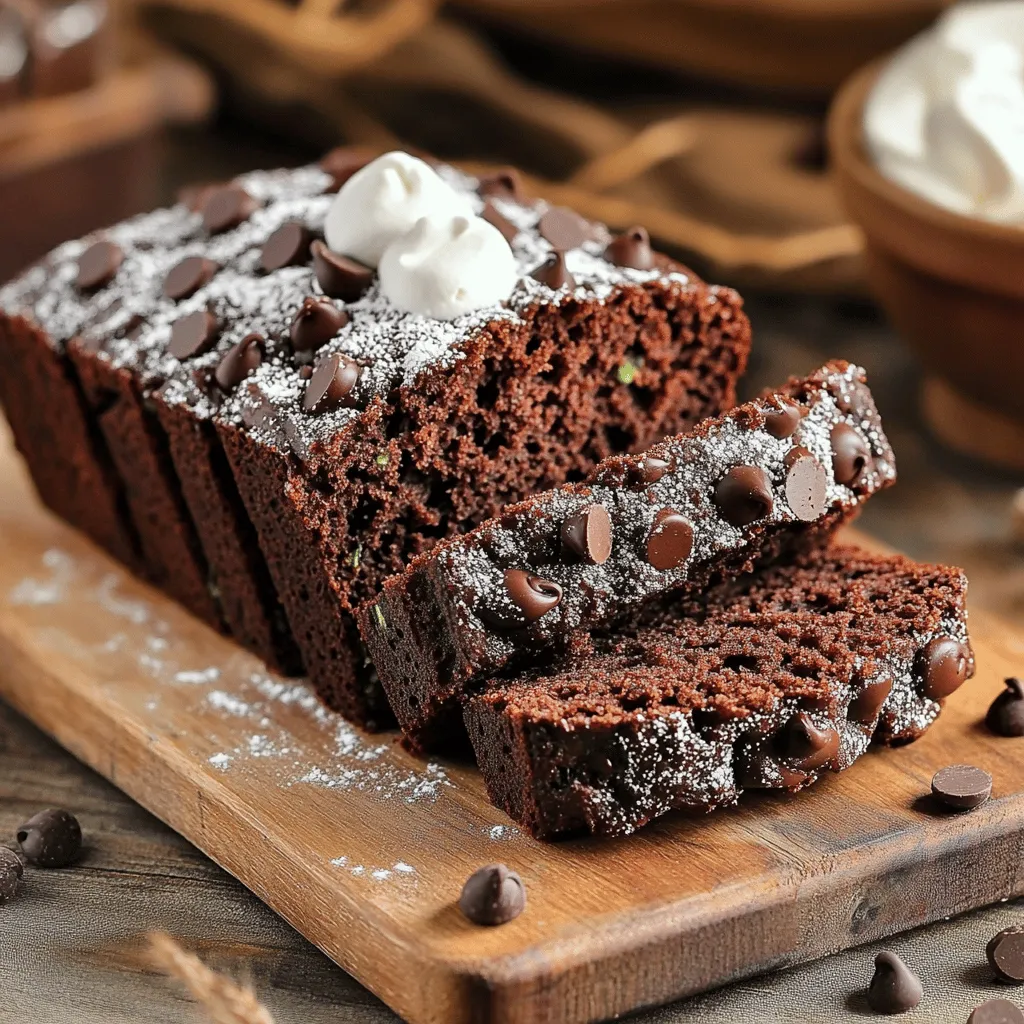
Double Chocolate Zucchini Bread Rich and Moist Delight
Are you ready to treat yourself to a rich and moist delight? This Double Chocolate Zucchini Bread brings together sweet chocolate goodness and hidden veggies.
![When making zucchini bread muffins, the right ingredients make all the difference. Here’s what you need: - 2 cups grated zucchini (about 2 medium zucchinis) - 1 ½ cups all-purpose flour - 1 teaspoon baking powder - ½ teaspoon baking soda - ½ teaspoon salt - 1 teaspoon ground cinnamon - ½ teaspoon ground nutmeg - ½ cup granulated sugar - ½ cup packed brown sugar - ½ cup vegetable oil (or applesauce for a lower-fat version) - 2 large eggs - 1 teaspoon vanilla extract - ½ cup walnuts or pecans (chopped, optional) - ½ cup chocolate chips (optional, for a sweet twist) These ingredients work together to create a soft, moist muffin that is full of flavor. The zucchini adds moisture without being too sweet. The spices, like cinnamon and nutmeg, give a warm taste. You can mix in nuts or chocolate chips for extra crunch or sweetness. Using vegetable oil keeps the muffins light and fluffy. If you want a healthier version, swap the oil for applesauce. It makes the muffins just as moist while cutting down on fat. This recipe is easy to follow and perfect for using up any extra zucchini you might have. For the full recipe, check below. - Preheat your oven to 350°F (175°C). - Line a muffin tin with paper liners or grease with cooking spray. - In a large bowl, combine grated zucchini, granulated sugar, brown sugar, and vegetable oil. - Stir until the sugars dissolve. - Add eggs and vanilla extract, mixing until combined. - In another bowl, whisk together flour, baking powder, baking soda, salt, cinnamon, and nutmeg. - Gradually fold the dry ingredients into the wet ingredients. - Be careful not to overmix. - If you want, fold in walnuts or pecans and chocolate chips for extra flavor. - Divide the batter evenly among the muffin cups. - Bake for 20-25 minutes, or until a toothpick comes out clean. - Cool in the pan for 5 minutes, then transfer to a wire rack. Check out the Full Recipe for more tips on these delightful muffins! To make your muffins moist, avoid overmixing the batter. When you mix too much, the muffins can turn out dense. Just mix until the wet and dry ingredients combine. Another key tip is to check doneness with a toothpick. Insert it in the center of a muffin. If it comes out clean, your muffins are ready! Using fresh zucchini is vital for the best taste. Look for firm, shiny zucchinis for your recipe. You can also experiment with spices like ginger or allspice. These spices can add a warm, cozy flavor to your muffins. Just a little pinch can make a big difference! Serve your muffins warm, perhaps with a pat of butter or a sprinkle of powdered sugar. This adds a nice touch and enhances the flavor. You can also pair them with coffee or tea for a delightful snack. Enjoy the muffins fresh from the oven or save some for later! For the full recipe, check the link above. {{image_2}} You can make your muffins even more fun! Consider adding dried fruits like raisins or cranberries. These fruits add sweetness and a nice chew. You can also swap chocolate chips for peanut butter chips. This gives a twist to the classic flavor. Both options will make your muffins special. If you're looking to cut some calories, try substituting applesauce for oil. This change makes the muffins moist but less fattening. You can also use whole wheat flour instead of all-purpose flour. Whole wheat flour adds fiber and makes the muffins more filling. These swaps keep the taste great while being a bit healthier. Want to brighten the taste? Experiment with lemon or orange zest. A little zest adds a fresh note to your muffins. You can also incorporate unsweetened cocoa powder for a chocolate version. This adds richness and depth to the flavor. Both ideas let you create your own unique twist on zucchini muffins. For the full recipe, click [Full Recipe]. To keep your zucchini bread muffins fresh, store them in an airtight container at room temperature. This method keeps them moist and flavorful. If you want them to last longer, place them in the fridge. The cool air helps maintain their freshness for a few extra days. You can freeze these muffins for later enjoyment. Place them in individual bags or containers. Be sure to seal them well to prevent freezer burn. When you are ready to eat, thaw them at room temperature. If you're in a hurry, use the microwave to warm them up quickly before serving. The best way to reheat these muffins is in an oven. Preheat the oven to 350°F (175°C) and warm them for a few minutes. This method keeps them soft and tasty. If you need a fast option, microwave each muffin for 10-15 seconds. This will give you a nice warm treat in no time. Yes, just make sure to drain excess moisture. Frozen zucchini can work well in muffins. It saves time and reduces waste. They last about 3-5 days at room temperature. Store them in an airtight container. This keeps them fresh and tasty. Absolutely! Adjust baking time to about 10-15 minutes. Mini muffins are great for snacks or lunchboxes. Use a gluten-free flour blend to make it gluten-free. This way, everyone can enjoy these tasty muffins. Consider using it in soups, stir-fries, or zucchini fritters. These dishes let you enjoy zucchini in different ways. Zucchini noodles, casseroles, pancakes, or fritters are all great options. Each recipe highlights zucchini's unique flavor and texture. For the full recipe of zucchini muffins, check the section above. This blog covers a simple and tasty zucchini muffin recipe. You learned about the ingredients, step-by-step instructions, and tips for perfecting your muffins. Remember to mix gently and check for doneness with a toothpick. Feel free to experiment with different add-ins and flavors. Store your muffins in an airtight container for maximum freshness. With these tips and tricks, you can enjoy delicious homemade zucchini muffins anytime!](https://grilledflavors.com/wp-content/uploads/2025/07/3abe356b-0060-4435-9a76-614b8a54ebf9.webp)
Have Too Much Zucchini? Try These Zucchini Muffins
Zucchini lovers, rejoice! If your garden has produced more zucchini than you can handle, I have the perfect solution: Zucchini Muffins! These delicious treats are
![To make these delicious brownies, you need: - 1 cup grated zucchini (about 1 medium zucchini) - 1/2 cup unsweetened cocoa powder - 1/2 cup all-purpose flour These main ingredients are key to creating the perfect texture and flavor. Grated zucchini adds moisture without being too wet. Cocoa powder provides that rich, chocolatey taste. All-purpose flour helps bind everything together. You will also need: - 1/2 cup granulated sugar - 1/2 cup brown sugar, packed - 1/2 cup vegetable oil The combination of granulated and brown sugar gives a nice balance of sweetness. Brown sugar adds a hint of caramel flavor. Vegetable oil keeps the brownies moist and tender. If you want to elevate your brownies, consider these options: - 1/2 cup chocolate chips - 1/2 cup chopped nuts Adding chocolate chips gives extra richness. Chopped nuts add a delightful crunch. You can mix and match based on your tastes. For the complete recipe, check out the [Full Recipe]. Enjoy baking! - Preheat your oven to 350°F (175°C). - Grease or line an 8-inch square baking pan with parchment paper. - In a large bowl, combine 1 cup of grated zucchini, - 1/2 cup of granulated sugar, - 1/2 cup of brown sugar, - 1/2 cup of vegetable oil, - 2 large eggs, and - 1 teaspoon of vanilla extract. - Whisk these ingredients together until smooth. - In another bowl, sift together: - 1/2 cup of cocoa powder, - 1/2 cup of all-purpose flour, - 1/2 teaspoon of baking powder, - 1/4 teaspoon of baking soda, and - 1/4 teaspoon of salt. - Mix well to ensure everything is combined. - Gradually fold the dry ingredients into the wet mixture. - Stir until just combined; avoid overmixing. - If desired, you can add 1/2 cup of chocolate chips or 1/2 cup of chopped nuts for extra texture and flavor. - Pour the brownie batter into the prepared pan. - Spread it evenly with a spatula. - Bake for 25-30 minutes. - Check for doneness by inserting a toothpick; it should come out with a few moist crumbs. - Allow the brownies to cool in the pan for about 10 minutes. - Then, transfer them to a wire rack to cool completely. - Once cool, cut them into squares. - For a lovely finish, serve on a rustic board and dust with powdered sugar. - Enjoy these chocolate zucchini brownies for any occasion! - You can find the complete method in the Full Recipe. To make your brownies moist and rich, start by properly grating the zucchini. Use a box grater or food processor. Make sure to squeeze out excess water using a clean kitchen towel. This step helps keep the brownies from being too wet. Next, do not overmix the batter. Stir the wet and dry ingredients until they just come together. Overmixing can lead to tough brownies, which you want to avoid. You can change the flavor of your brownies by using different types of sugar. Try using coconut sugar or maple sugar for a unique taste. Each sugar type brings its own sweetness and depth. Also, using high-quality cocoa powder makes a big difference. Look for cocoa that is rich and dark. It will boost the chocolate flavor in your brownies. When it comes to serving, presentation matters. Serve your brownies on a rustic wooden board for a homey feel. Dust them with powdered sugar for an elegant touch. You can also add fresh berries or a scoop of vanilla ice cream on the side. These garnishes not only add color but also create a stunning dessert platter. You can find the full recipe to guide you through the steps of making these delicious brownies. {{image_2}} When making chocolate zucchini brownies, you can easily change up the recipe to suit your needs. Here are some great options to try. - Substitute with whole wheat flour: This swap adds fiber and nutrients. Whole wheat flour gives the brownies a nutty taste. - Use unsweetened applesauce: Replace some oil with applesauce. This makes the brownies moist and lowers the fat content. - Gluten-free alternatives: Use a gluten-free flour blend instead of all-purpose flour. This keeps your brownies tasty and safe for those who cannot eat gluten. - Vegan options: Replace eggs with flaxseed meal or chia seeds mixed with water. This makes the brownies plant-based and still delicious. - Adding spices like cinnamon or nutmeg: These spices give a warm and cozy flavor. Just a pinch can make a big difference! - Swapping chocolate chips for other mix-ins: Try nuts, dried fruit, or peanut butter chips. This adds new textures and flavors to your brownies. These variations keep your chocolate zucchini brownies fun and exciting. You can mix and match to create your perfect treat! For the full recipe, click [Full Recipe]. To keep your Chocolate Zucchini Brownies fresh, store leftovers in an airtight container. This keeps moisture in and prevents them from drying out. You can also wrap each brownie in plastic wrap for extra protection. These brownies last up to four days at room temperature. If you store them in the fridge, they can last up to a week. Just remember, refrigeration can make them a bit firmer. To enjoy leftovers, reheat them in the microwave for 10-15 seconds. This warms them up and keeps them soft. Another great option is to use the oven. Preheat it to 350°F (175°C) and heat the brownies for about 5-7 minutes. This helps keep them moist and tasty. Yes, you can use frozen zucchini in this recipe. Thaw it first and drain any extra water. Fresh zucchini has a better texture, but frozen works well too. To check if your brownies are done, use the toothpick test. Insert a toothpick into the center. If it comes out with a few moist crumbs, your brownies are ready. If wet batter sticks to it, bake them a bit longer. Absolutely! To make these brownies nut-free, simply skip the chopped nuts. You can still enjoy a rich, chocolatey flavor without them. Adding zucchini to brownies provides moisture and nutrients. Zucchini is low in calories and high in fiber. It also adds vitamins like A and C. Plus, it sneaks in some veggies for a healthier treat! Enjoy these brownies guilt-free by checking the full recipe. This blog post covered how to make delicious zucchini brownies. We explored the main ingredients, like grated zucchini and cocoa powder. I shared step-by-step instructions for mixing and baking. You found tips for keeping your brownies moist and ideas for variations. In conclusion, baking zucchini brownies is simple and fun. You can enjoy them healthier or with different flavors. Remember to store leftovers properly for the best taste. Enjoy your baking journey!](https://grilledflavors.com/wp-content/uploads/2025/07/8179f242-f67a-4c06-8c24-b3b80d92c510.webp)
Chocolate Zucchini Brownies Perfect for Any Occasion
Looking for a delicious twist on traditional brownies? My Chocolate Zucchini Brownies are the answer! These moist and rich treats hide a secret ingredient that
![To make Healthy Peanut Butter Stuffed Brownies, gather these key items: - 1 cup almond flour - 1/2 cup cocoa powder - 1/2 cup maple syrup - 1/3 cup unsweetened applesauce - 1/4 cup coconut oil, melted - 3/4 teaspoon baking soda - 1/2 teaspoon sea salt - 1/2 cup natural peanut butter (smooth) - 1/4 cup dark chocolate chips (optional) - 1/2 teaspoon vanilla extract These ingredients help create a rich, moist brownie that satisfies your sweet tooth. You may need to adjust these ingredients based on your diet or allergies. Here are some ideas: - For gluten-free options, use oat flour instead of almond flour. - If you want a vegan treat, replace the eggs with a flaxseed mixture. - For nut-free variations, use sunflower seed butter instead of peanut butter. These substitutes keep the brownies tasty while meeting dietary needs. Let's break down the nutrition of these brownies: - Caloric breakdown: Each brownie offers about 150 calories. - Key vitamins and minerals: Almond flour provides vitamin E, magnesium, and calcium. Cocoa powder adds iron and antioxidants. - Health benefits of ingredients: Almond flour is low in carbs and high in healthy fats. Natural sweeteners like maple syrup are better than refined sugars. These brownies not only taste great but also offer some health benefits. You can enjoy them guilt-free! For the full recipe, check [Full Recipe]. First, preheat your oven to 350°F (175°C). Grease an 8x8 inch baking dish or line it with parchment paper for easy removal. This step helps the brownies not stick to the pan. Next, grab a large mixing bowl. In this bowl, combine the almond flour, cocoa powder, baking soda, and sea salt. Whisk these dry ingredients together until they blend well. This mix is the foundation of your brownies. Now, let’s move to the wet ingredients. In another bowl, mix the maple syrup, unsweetened applesauce, melted coconut oil, and vanilla extract. Stir these until smooth. It is key to mix just enough. You want everything to combine without overmixing. Overmixing can make your brownies tough, not soft. Time to layer the brownies. Pour half of the brownie batter into the prepared baking dish. Spread it evenly to create a solid base layer. Next, using a spoon, dollop the natural peanut butter over this layer. Then, gently spread it out. It’s okay if some brownie batter mixes in with the peanut butter. After that, pour the rest of the brownie batter over the peanut butter layer. Smooth it out with a spatula. If you want, sprinkle dark chocolate chips on top for extra flavor. Now, it’s baking time! Place the dish in the preheated oven. Bake for 20-25 minutes. To check if they are done, insert a toothpick. It should come out clean with a few moist crumbs. Once baked, let the brownies cool in the pan for at least 10 minutes. After cooling, slice them into squares. Enjoy these healthy peanut butter stuffed brownies! For the complete recipe, refer to the Full Recipe section. To get the best texture for your brownies, follow a few simple tips. Use almond flour for a moist and chewy base. Make sure to mix your dry ingredients well. If you don't mix enough, the batter may not rise. The key is to combine just until there are no dry spots. Avoid overmixing the batter. This can make your brownies tough. Stir gently and stop as soon as everything is blended. Also, keep an eye on your baking time. Every oven is different. Start checking your brownies at 20 minutes. A toothpick should come out clean, with a few moist crumbs—perfect! You can boost the flavor of your brownies with a few easy tweaks. Try adding a pinch of cinnamon or a splash of vanilla extract for warmth. These flavors mix well with chocolate. You can also add a hint of espresso powder to deepen the chocolate taste. For toppings, consider adding dark chocolate chips on top. They melt and create a delicious layer. You can also sprinkle nuts or sea salt for added texture. These options make your brownies even more delightful. Brownies are great on their own, but you can make them even better. Serve your healthy peanut butter stuffed brownies warm. Add a scoop of Greek yogurt for creaminess. This pairs well with the rich chocolate flavor. You can also drizzle some chocolate sauce over the top. It adds a sweet touch that everyone loves. For a fun twist, try serving brownies with fresh fruit like berries. The freshness balances the richness of the brownies. Enjoy these ideas to make your treat even more special! {{image_2}} You can make your brownies even better by adding nuts or fruits. Chopped walnuts, pecans, or almonds bring a nice crunch. Dried cherries or bananas give a sweet twist. You can also try mixing in some fresh berries for a fruity burst. Experimenting with chocolate types can change the flavor too. Use dark chocolate for a rich taste. Milk chocolate can make them sweeter. You might like white chocolate for a creamy finish. Each choice gives a new and tasty layer to your brownies. If you're following a keto diet, you can easily adjust this recipe. Swap out maple syrup for a keto-friendly sweetener like erythritol. You can also use unsweetened cocoa powder, which is low in carbs. With these changes, you still keep the flavor while lowering the carbs. For a low-sugar version, use ripe bananas instead of sweeteners. They add natural sweetness and moisture. Applesauce works well too. These options help keep your brownies tasty without extra sugar. Incorporating seasonal ingredients makes your brownies special. In fall, add pumpkin puree and spices like cinnamon. In spring, use fresh strawberries or rhubarb for a bright flavor. These ingredients keep your treats fresh and fun all year. You can also create themed brownies for holidays. For Halloween, add orange food coloring and spooky sprinkles. For Christmas, mix in peppermint extract and crushed candy canes. These themes make your treats festive and exciting for any occasion. For the full recipe, check out the Healthy Peanut Butter Stuffed Brownies. To keep your Healthy Peanut Butter Stuffed Brownies fresh, store them in an airtight container. This will help prevent them from drying out. I recommend using a glass or plastic container with a tight seal. Place parchment paper between layers to avoid sticking. If you have leftovers, freezing them is easy. First, let the brownies cool completely. Then, cut them into squares. Wrap each piece in plastic wrap, and place them in a freezer bag. Squeeze out as much air as possible before sealing. To thaw, leave them in the fridge overnight or at room temperature for a few hours. This method keeps them soft and tasty. These brownies last about a week at room temperature. If you store them in the fridge, they can stay fresh for up to two weeks. Watch for signs of spoilage, like an off smell or mold. If you notice any, it’s best to throw them away. Enjoy your delicious treat while they are fresh! For the full recipe, check out the earlier section. Yes, you can make these brownies vegan! To replace the egg, use a flaxseed meal mixture. Mix one tablespoon of flaxseed meal with three tablespoons of water. Let it sit for five minutes until it thickens. For dairy, use plant-based milk or a non-dairy yogurt instead of applesauce. This swap keeps the texture moist and delicious without any animal products. To check if your brownies are done, use a toothpick. Insert it into the center and pull it out. If it comes out clean or with a few moist crumbs, your brownies are ready. If it’s wet with batter, they need more time. Bake them for an additional two to five minutes and test again. If you want to switch up the peanut butter, you have many options. Almond butter, cashew butter, or sunflower seed butter work well. Each option adds a unique flavor. Choose one that fits your taste or dietary needs. In this article, we explored key ingredients for delicious brownies, including almond flour and cocoa powder. We discussed substitutes for various diets and shared nutritional insights about your favorite treats. You learned step-by-step instructions for making perfect brownies, along with tips for consistency and flavor. We even covered storage tips and creative variations. Remember, making brownies can be simple and fun. Experiment with flavors and adapt recipes to suit your needs. Enjoy your baking journey and savor every bite!](https://grilledflavors.com/wp-content/uploads/2025/07/8d55388f-9886-4f5e-9206-d0f85e0059ea.webp)
Healthy Peanut Butter Stuffed Brownies Delightful Treat
Looking for a guilt-free dessert that still satisfies your chocolate cravings? These Healthy Peanut Butter Stuffed Brownies are the answer! Packed with wholesome ingredients like