Desserts
![- 1 cup unsweetened Greek yogurt - 1/2 cup almond flour - 1/4 cup coconut flour - 1/2 cup erythritol or preferred keto sweetener - 3 large eggs - 1 teaspoon baking powder - 1/2 teaspoon baking soda - 1 teaspoon vanilla extract - Zest of 1 lemon - Pinch of salt - Optional toppings: 1/4 cup fresh blueberries or raspberries This cake is simple to make and uses basic ingredients. The Greek yogurt keeps the cake moist while adding protein. Almond flour and coconut flour are great low-carb options. Erythritol is a popular choice for a keto sweetener. It helps keep the cake sweet without the carbs. You can add fresh berries on top or mix them in for fun flavor. The lemon zest brightens the cake and adds a nice touch. Each ingredient plays a role, making this cake not just low-carb, but also tasty and satisfying. - Calories per serving: Approximately 120 - Carbohydrates: 5 grams - Fiber: 2 grams - Protein: 5 grams - Fat: 8 grams This cake fits well into a keto diet. It has low carbs, high protein, and healthy fats. With the right balance, you can enjoy dessert without guilt. The nutritional facts may vary based on your choices of sweeteners and toppings. Check the [Full Recipe] for more specifics. - Preheat your oven to 350°F (175°C). Grease a 9-inch round cake pan with coconut oil or line it with parchment paper. - In a large bowl, mix 1 cup of Greek yogurt, 1/2 cup of erythritol, and 3 large eggs. Whisk until smooth. - Add 1 teaspoon of baking powder, 1/2 teaspoon of baking soda, 1 teaspoon of vanilla extract, and the zest of 1 lemon to the wet mix. Stir until well combined. - Gradually add 1/2 cup of almond flour and 1/4 cup of coconut flour. Mix gently to avoid overmixing. If you want, fold in 1/4 cup of fresh blueberries or raspberries. - Pour the batter into your prepared pan. Smooth the top with a spatula. - Bake for 25-30 minutes. Use a toothpick to check if it’s done; it should come out clean. - Let the cake cool in the pan for 10 minutes. Then, move it to a wire rack to cool completely. You can find the full recipe linked above for more details. Enjoy your baking! - Overmixing the batter: Mixing too much leads to a tough cake. Fold the ingredients gently. - Incorrect oven temperature: Check your oven with a thermometer. A wrong temp can ruin the cake. - Importance of ingredient temperature: Use room temperature ingredients. Cold ingredients can lead to uneven baking. - Use of fresh versus frozen berries: Fresh berries hold their shape better. Frozen berries may make the cake soggy. - Garnishing ideas with fresh fruits and powders: Top the cake with fresh berries and a dusting of powdered erythritol. This adds color and flavor. - Pairing with keto-friendly toppings: Consider whipped cream or a dollop of Greek yogurt. These toppings keep it keto and add creaminess. For the complete recipe, check out the Full Recipe section. {{image_2}} You can easily boost the taste of your keto yogurt cake. Adding spices like cinnamon or nutmeg gives it warmth. You can also change the yogurt flavor. Try vanilla, lemon, or berry for a fresh twist. Each option changes the cake's charm and keeps it exciting. Keto-friendly sweeteners are a must for this cake. Erythritol works well, but you have options. Others like stevia or monk fruit can also fit in. Adjust the sweetness to match your taste. If you like it sweeter, add more sweetener. If you prefer less, cut back a bit. Ensure all your ingredients are gluten-free for a safe treat. Check that your flours and sweeteners meet this need. You can substitute almond or coconut flour with other gluten-free flours. Options like oat flour or a gluten-free blend can work. Each choice may slightly change the cake's texture, but it will still be delicious. To keep your keto yogurt cake fresh, use airtight containers. Glass or plastic containers work well. Make sure the cake is cool before storing. It stays good in the fridge for about five days. You can also freeze it for longer storage. Wrap slices in plastic wrap, then place them in a freezer bag. This way, the cake can last up to three months. For the best taste, reheat your cake in the oven. Preheat the oven to 300°F (150°C) and place the cake on a baking sheet. Heat it for about 10-15 minutes. This keeps it moist and yummy. You can also use a microwave, but be careful. Heat it in short bursts of 10 seconds. Check often to avoid drying it out. Enjoy your delicious cake warm! This cake is keto-friendly due to its low-carb ingredients. Here’s what we use: - Unsweetened Greek yogurt: This yogurt is low in carbs and high in protein. - Almond flour: This flour contains fewer carbs than regular flour. - Coconut flour: A great low-carb alternative that adds fiber. - Erythritol: This sweetener has zero carbs and does not spike blood sugar. Using these ingredients, you can enjoy a tasty dessert while staying on a keto diet. Yes, you can swap the yogurt. Here are some options: - Regular yogurt: It will add some carbs but can still work. - Skyr: This is thicker and higher in protein. - Plant-based yogurt: Use almond or coconut yogurt for a dairy-free option. Each change can affect the flavor and texture, so choose what you like best. Absolutely! To make this cake dairy-free, consider these swaps: - Dairy-free yogurt: Use coconut or almond yogurt. - Egg replacements: Use flaxseed meal or chia seeds mixed with water. - Coconut oil: Instead of butter, use coconut oil to grease the pan. These changes keep the cake tasty without dairy. To make a moist cake, try these tips: - Add more yogurt: A little extra yogurt can enhance moisture. - Include applesauce: This adds moisture without many carbs. - Don’t overbake: Keep an eye on your cake; remove it when a toothpick comes out clean. Following these steps helps ensure your cake is soft and moist. For the full recipe, check out [Full Recipe]. This blog post covered a delicious keto-friendly cake recipe. You learned about key ingredients, preparation steps, and tips for great texture. I shared variations and storage info to keep your cake fresh. Remember, avoiding common mistakes helps achieve the best results. Simple swaps can also suit your taste. By following these steps, you can enjoy a tasty treat while sticking to your dietary goals. Happy baking!](https://grilledflavors.com/wp-content/uploads/2025/07/0242bc3f-e925-4f45-b14f-bd8d0a31f17b.webp)
Keto Yogurt Cake Delightful Low-Carb Dessert Recipe
Looking for a delicious way to satisfy your sweet tooth while staying keto? This Keto Yogurt Cake is a delightful low-carb dessert that’s easy to
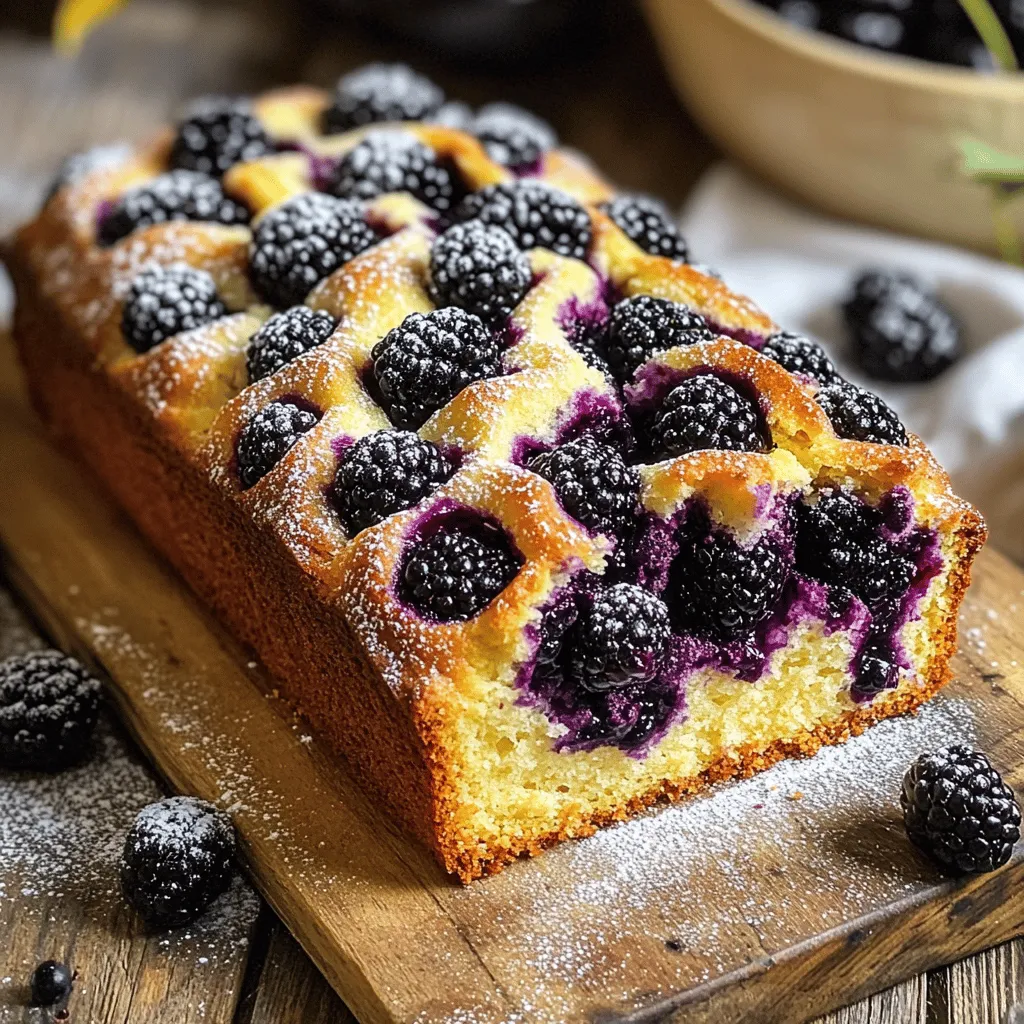
Easy Blackberry Loaf Moist and Flavorful Recipe Guide
Are you ready to bake a delicious treat? This Easy Blackberry Loaf will make your kitchen smell amazing. With simple ingredients and a few easy
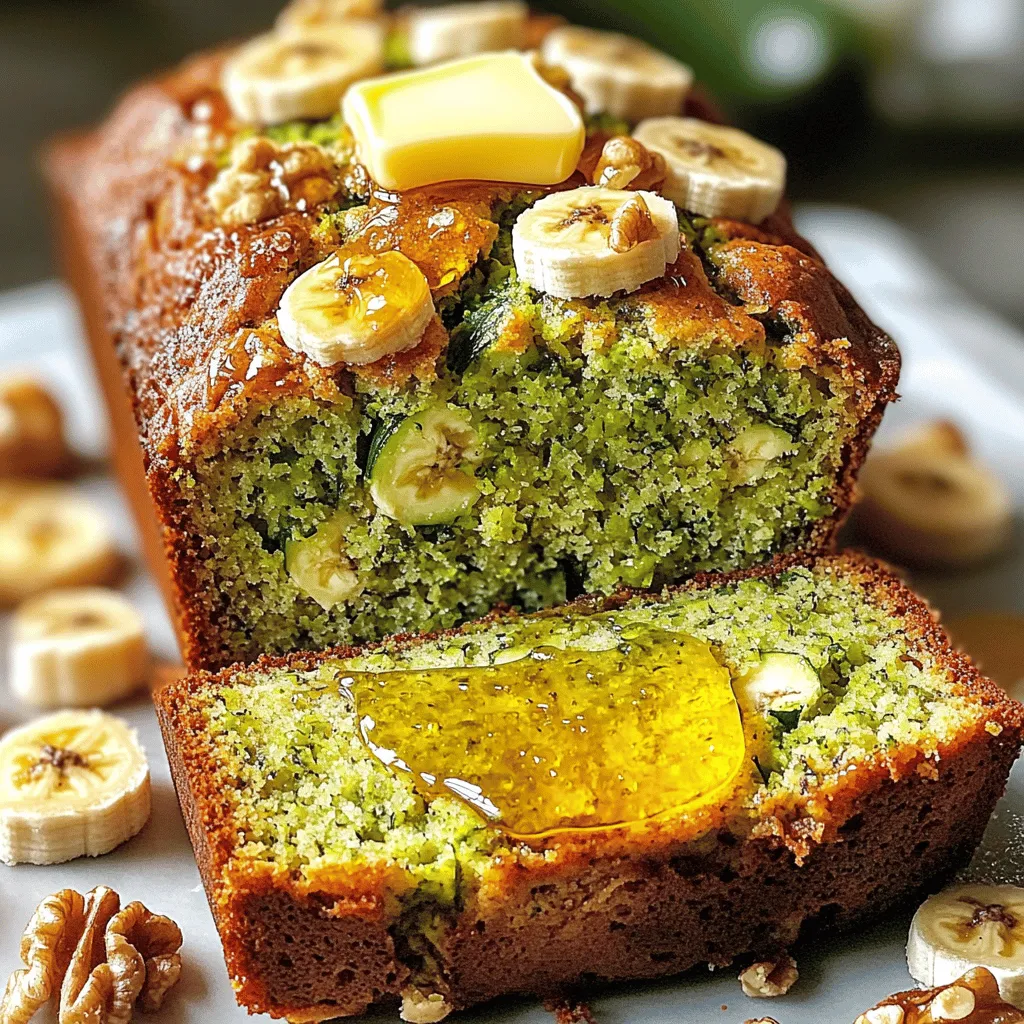
Delicious Zucchini Banana Bread Easy and Flavorful Recipe
Welcome to my kitchen! Today, we are making a fun and tasty treat—Zucchini Banana Bread. This easy recipe blends the flavors of ripe bananas and
![Here are the ingredients you need for my zesty lemon zucchini bread. Each one plays a key role in making this treat delicious. - Grated zucchini: You need 2 medium zucchinis. Grate them well to mix easily. - All-purpose flour: Use 1 cup for a light texture. - Whole wheat flour: Add 1 cup for a nutty flavor. - Baking soda: You’ll need 1 teaspoon to help it rise. - Baking powder: Use 1 teaspoon along with the baking soda. - Salt: Just ½ teaspoon will balance the sweetness. - Ground cinnamon: 2 teaspoons add warm spice. - Granulated sugar: Use 1 cup for sweetness. - Brown sugar: ½ cup packed gives depth of flavor. - Eggs: 3 large eggs help bind everything together. - Vegetable oil: ½ cup keeps the bread moist. - Vanilla extract: 1 teaspoon enhances the taste. - Lemon zest: The zest of 1 lemon brightens the flavor. - Fresh lemon juice: ¼ cup adds a tangy kick. - Optional add-ins: You can add ½ cup of chopped walnuts or pecans for crunch. With these ingredients, you can create a flavorful and easy homemade delight. For detailed steps, check the full recipe. 1. Preheat your oven to 350°F (175°C). Grease a 9x5 inch loaf pan or line it with parchment paper. 2. In a medium bowl, mix together the all-purpose flour, whole wheat flour, baking soda, baking powder, salt, and ground cinnamon. Whisk until well combined. 3. In a large bowl, beat the granulated sugar, brown sugar, eggs, and oil until creamy and smooth. 4. Stir in the lemon zest and lemon juice with the grated zucchini. Mix until just blended. 5. Gradually add the dry ingredients to the wet mixture. Stir gently to combine. Be careful not to overmix. You can fold in the chopped walnuts or pecans if you like. 6. Pour the batter into the prepared loaf pan and smooth the top with a spatula. 7. Bake in the oven for about 50-60 minutes. Check with a toothpick in the center; it should come out clean. 8. Once baked, take the loaf out of the oven. Let it cool in the pan for 10 minutes. Then, transfer it to a wire rack to cool completely. This recipe is easy and fun to make. You will enjoy the delightful aroma while it bakes! For the complete recipe, refer to the [Full Recipe]. Adjusting baking time is key when using different ovens. Ovens can vary in heat. If your oven runs hot, check the bread early. Use a toothpick to test for doneness. Insert it in the center of the loaf. If it comes out clean, your bread is ready. Another tip is to rotate the pan halfway through baking. This helps the bread bake evenly. If the top browns too fast, cover it with foil. This way, it won’t burn while the inside cooks. Choosing the right zucchini makes a big difference. Select firm zucchinis with shiny skin. Avoid soft or wrinkled ones as they lack flavor. For flour, mix all-purpose and whole wheat for a hearty texture. If you want healthier options, try substitutes. Use applesauce instead of oil for less fat. You can also swap out sugar with honey or maple syrup. Adjust the quantity as needed, since these sweeteners are liquid. For those watching carbs, almond flour is a great choice. It adds a nutty flavor and cuts carbs. You can also add flaxseed meal for extra fiber. These swaps help you enjoy zucchini bread while sticking to your health goals. For more details, check out the Full Recipe. {{image_2}} You can easily switch up the flavor of zucchini bread. One fun way is by adding chocolate chips. This gives your bread a sweet twist that delights both kids and adults. Simply fold in a cup of semi-sweet or dark chocolate chips into your batter before baking. Another option is to incorporate fresh herbs for a savory version. Basil or thyme works well and adds a unique taste. Just chop a few leaves and mix them into the batter. This new twist makes the bread perfect for brunch or as a side dish. To change the texture, consider adding nuts. Walnuts or pecans add a nice crunch. You can use half a cup of your chosen nuts. Fold them in gently to keep the bread light. Dried fruits also make great add-ins. Cranberries or raisins can add a burst of sweetness. You can mix in half a cup of dried fruits into the batter. This not only enhances flavor but also adds a chewy texture that contrasts nicely with the soft bread. Feel free to explore these variations in your baking. Each twist can make your zucchini bread exciting and new. Check out the Full Recipe for more ideas! To keep your zucchini bread fresh, wrap it tightly in plastic wrap or foil. This way, it stays moist and tasty. You can also place it in an airtight container. Store it at room temperature for up to four days. If you want to keep it longer, freezing is a great option. To freeze, slice the bread first. Then, wrap each slice in plastic wrap and place them in a freezer bag. This makes it easy to grab a slice when you want it. When you want to enjoy the frozen bread, take it out and let it thaw. You can leave it on the counter for a few hours. For a quicker method, use the microwave on low power for about 30 seconds. This will warm it up nicely. Zucchini bread lasts for about three to four days at room temperature. Keep it in a cool, dry place away from direct sunlight. If you store it in the fridge, it can last up to a week. Refrigeration helps slow down spoilage. However, it may dry out quicker than when stored at room temperature. Always check for any signs of mold before eating. Enjoy your flavorful homemade delight! Can you use frozen zucchini in the recipe? Yes, you can use frozen zucchini. Thaw it first and drain excess water. This helps keep your zucchini bread moist. Fresh zucchini works best, but frozen is a good option if fresh is not available. What can I serve with zucchini bread? Zucchini bread pairs well with many items. You can spread cream cheese or butter on top. A drizzle of honey adds sweetness. Fresh fruit or a light salad can also complement your meal. Can I substitute honey for sugar? You can substitute honey for sugar, but adjust the amount. Use about ¾ cup of honey for every cup of sugar. Reduce the liquid in the recipe by about ¼ cup. Honey adds moisture and a unique flavor to your bread. How to adjust the recipe for mini loaves? For mini loaves, reduce the baking time. Bake for about 30 to 35 minutes. Check for doneness by inserting a toothpick. It should come out clean. Mini loaves are perfect for gifts or sharing with friends. What are the health benefits of zucchini? Zucchini is low in calories and packed with nutrients. It has vitamins A and C, which boost your immune system. Zucchini also has fiber, which helps with digestion. This makes it a nutritious addition to your diet. Is zucchini bread a healthy choice? Zucchini bread can be a healthy choice, especially when made with whole grains. It provides fiber and essential vitamins. To make it even healthier, consider using less sugar or adding nuts. This boosts protein and healthy fats. The recipe I mentioned is a great way to enjoy a tasty treat without guilt. In this post, we covered how to make delicious zucchini bread. You learned about the key ingredients like grated zucchini and various flour types. We explored preparation and baking steps, plus tips for success and variations. Remember, choosing the right zucchini and flour matters, and you can customize your loaf with nuts or chocolate. Zucchini bread is not just tasty; it offers health benefits too. Now, roll up your sleeves and start baking. Enjoy sharing your homemade zucchini bread with family and friends.](https://grilledflavors.com/wp-content/uploads/2025/07/8c094816-506e-43d3-af51-469b6c05843b.webp)
Zucchini Bread Flavorful and Easy Homemade Delight
Are you ready to bake a delicious treat? This easy homemade zucchini bread is full of flavor and packed with fresh ingredients. Whether you’re a

One-Bowl Lemon Blueberry Loaf Delightful and Simple
If you’re craving something sweet and tangy, you’re in for a treat! This One-Bowl Lemon Blueberry Loaf is both delightful and simple to make. With
![To make a tasty zucchini bread, you need some key ingredients. Here’s what you will need: - 2 cups grated zucchini (about 2 medium zucchinis) - 1 ½ cups all-purpose flour - 1 teaspoon baking soda - ½ teaspoon baking powder - ½ teaspoon salt - 1 teaspoon ground cinnamon - ½ teaspoon grated nutmeg - ¾ cup granulated sugar - ¼ cup brown sugar, packed - 2 large eggs, beaten - ½ cup vegetable oil - 1 teaspoon vanilla extract These ingredients create a soft, moist loaf full of flavor. The zucchini adds moisture and a nice texture, while the spices give it warmth. You can customize your zucchini bread with optional add-ins. Here are some great choices: - ½ cup chopped walnuts or pecans - ½ cup chocolate chips Adding nuts gives the bread a nice crunch. Chocolate chips make it sweeter and fun! You can mix and match to find your favorite taste. Having the right tools makes baking easy and fun. Here’s what you need: - A box grater or food processor for grating zucchini - A mixing bowl for the wet ingredients - A separate bowl for the dry ingredients - A whisk for mixing - A loaf pan (9x5 inches) for baking - A toothpick to test doneness With these tools, you can prepare and bake your zucchini bread with ease. Start by gathering your ingredients. You will need 2 cups of grated zucchini, 1 ½ cups of flour, and a few more items. First, wash the zucchinis. Then, grate them using a box grater. Place the grated zucchini in a bowl. Add a pinch of salt and let it sit for 10 minutes. This helps draw out water. After 10 minutes, use a clean towel to squeeze out extra moisture. This step keeps your bread from getting too soggy. In a medium bowl, whisk together the flour, baking soda, baking powder, salt, cinnamon, and nutmeg. This mix gives your bread its flavor. In a larger bowl, mix the granulated sugar, brown sugar, and eggs. Beat these until they are light and fluffy. Then, stir in the vegetable oil and vanilla. Next, slowly add the dry mix to the wet mix. Make sure to mix gently. Overmixing can make your bread tough. Finally, fold in the squeezed zucchini. If you want, add walnuts or chocolate chips at this stage. Mix until evenly distributed. Now, pour your batter into a greased and floured loaf pan. Smooth the top with a spatula. Preheat your oven to 350°F (175°C). Place the pan in the oven and bake it for 50-60 minutes. To check if it’s done, insert a toothpick in the center. If it comes out clean, your bread is ready. Once baked, let it cool in the pan for 10 minutes. After that, transfer it to a wire rack to cool completely. Enjoy this delightful bread warm or at room temperature. You can find the Full Recipe for more details. To squeeze zucchini, first grate it with a box grater. Place the grated zucchini in a bowl and sprinkle a little salt on top. Let it sit for about ten minutes. The salt draws out water, which helps in squeezing. After ten minutes, take a clean kitchen towel or cheesecloth. Place the zucchini in the center and gather the edges. Twist and squeeze to remove the water. This step makes your bread less soggy and gives it a nice texture. For the best texture, use fresh zucchini. Overripe zucchini can lead to a mushy bread. Grate the zucchini finely for even blending in the batter. When mixing, be gentle. Overmixing can make the bread tough. Mix just until the dry and wet ingredients are combined. This keeps the bread light and fluffy. If you want a denser loaf, add a little more flour, but don’t overdo it. To bake evenly, make sure your oven is preheated to the right temperature. Grease and flour your loaf pan well to prevent sticking. Place the pan in the center of the oven for even heat distribution. Check the bread about ten minutes before the timer ends. If it browns too quickly, cover it with foil. A toothpick should come out clean when it’s done. Let it cool in the pan for a bit before transferring it to a wire rack. This helps set the texture and makes slicing easier. Enjoy making your zucchini bread with these tips! For the full recipe, check out the [Full Recipe]. {{image_2}} You can make gluten-free zucchini bread easily. Just swap the all-purpose flour for a gluten-free blend. I recommend using a mix that contains xanthan gum. It helps bind the ingredients. This change keeps the bread moist and delicious. You can follow the same instructions from the Full Recipe. Want to add some extra flavor? Try adding herbs or spices. A teaspoon of dried basil or rosemary gives a nice twist. You can also add a pinch of cayenne for a kick. Another great option is adding citrus zest. Lemon or orange zest brightens the bread. Mix these flavors in with the dry ingredients. You’ll create a unique taste that everyone will love. Cutting back on sugar and oil is easy. You can reduce both by one-third without losing taste. Try substituting applesauce for some of the oil. It adds moisture and keeps the bread soft. Using honey or maple syrup instead of granulated sugar works well too. Just remember, if you use liquid sweeteners, you may need to cut back on other liquids in the recipe. Adjustments keep the bread light and healthy while still tasting great. Store your zucchini bread in an airtight container. Keep it at room temperature for up to three days. If you want to keep it longer, move it to the fridge. This helps it last about a week. For the best taste, warm it slightly before eating. To freeze zucchini bread, first let it cool completely. Wrap it tightly in plastic wrap. Then, place it in a freezer-safe bag. You can freeze it for up to three months. When ready to eat, thaw it in the fridge overnight. Reheat slices in the oven or microwave for a fresh taste. This method keeps the bread moist. Look for signs that your zucchini bread has spoiled. If you see mold or dark spots, throw it away. A sour smell is another sign of spoilage. If the texture feels too dry or hard, it might not taste good. Trust your senses. Enjoy your zucchini bread fresh! Yes, you can make zucchini bread without eggs. Use unsweetened applesauce or mashed bananas instead. One egg equals about 1/4 cup of applesauce or mashed banana. This keeps the bread moist and adds flavor. You can also use flaxseed meal mixed with water. Mix one tablespoon of flaxseed meal with three tablespoons of water for each egg. You can tell your zucchini bread is done by checking with a toothpick. Insert a toothpick into the center of the bread. If it comes out clean or with a few crumbs, it’s ready. The bread should also spring back when you gently touch the top. If it looks golden brown on the outside, it’s a good sign too. You can use melted coconut oil or unsweetened applesauce as a substitute for vegetable oil. Both options keep the bread moist. If you want a richer flavor, use melted butter. Just keep in mind that the texture may change slightly. You can also use yogurt or sour cream for a tangy twist. Zucchini bread is easy and fun to make. We covered the key ingredients, step-by-step steps, and useful tips. You can adjust the recipe with add-ins or try gluten-free options. Store leftovers well and check for spoilage signs. Remember, you can tweak the recipe to fit your needs. Baking can be simple and rewarding. Enjoy your zucchini bread with friends or family! Happy baking!](https://grilledflavors.com/wp-content/uploads/2025/07/e3be6163-5978-449e-9e31-943622367df5.webp)
Zucchini Bread Flavorful and Easy Recipe Guide
Are you ready to bake something delicious and easy? My Zucchini Bread recipe is just what you need. It’s moist, flavorful, and perfect for breakfast

Chocolate Zucchini Sheet Cake Delightfully Moist Treat
Ready to indulge in a delicious treat that’s both sweet and sneaky? My Chocolate Zucchini Sheet Cake is the perfect balance of rich chocolate flavor

Chocolate Zucchini Cake Moist and Delicious Recipe
Are you ready to enjoy a moist and delicious treat that will impress everyone? My Chocolate Zucchini Cake recipe combines rich chocolate flavors with hidden

Easy & Flavorful Zucchini Cake Simple and Sweet Recipe
Looking for a simple dessert that brings a burst of flavor? This Easy & Flavorful Zucchini Cake is your answer! Made with fresh zucchini, it’s
![- 2 ripe bananas, mashed - 3 cups almond flour - 1/2 teaspoon baking soda - 1 teaspoon baking powder - 1/4 teaspoon salt - 3 large eggs - 1/4 cup honey or maple syrup - 1 teaspoon vanilla extract - 1/2 cup chopped walnuts or pecans - 1/2 teaspoon cinnamon (optional) To make the best moist almond flour banana bread, you need a few key items. The bananas must be ripe. Their natural sugars give the bread sweetness and moisture. Almond flour is crucial. It brings a nutty flavor and a tender crumb. Baking soda and baking powder help the bread rise. The eggs add richness and bind everything together. Honey or maple syrup gives a touch of sweetness and moisture. Vanilla adds flavor, while nuts or cinnamon are fun extras. When you gather your ingredients, make sure they are fresh. Fresh ingredients make a big difference in taste. Using high-quality almond flour also enhances the flavor. This recipe is simple, yet it needs the right components to shine. For the full recipe, follow the steps carefully to ensure your banana bread turns out perfectly. 1. Preheat your oven to 350°F (175°C). Grease a 9x5-inch loaf pan. You can also line it with parchment paper for easy removal. 2. In a large mixing bowl, add the dry ingredients: almond flour, baking soda, baking powder, salt, and cinnamon if you like. Mix them well. This step ensures even flavor throughout. 3. In another bowl, mash the ripe bananas. Then, add the eggs, honey or maple syrup, and vanilla extract. Whisk until smooth. This mix adds sweetness and moisture. 1. Pour the wet ingredients into the bowl with dry ingredients. Stir gently. We want to mix until just combined. Don’t overmix; a few lumps are okay. 2. If you want a nutty crunch, fold in the chopped walnuts or pecans. This step adds texture and flavor to your bread. 1. Once mixed, pour the batter into the prepared loaf pan. Smooth the top with a spatula. 2. Bake for 50-60 minutes. To check for doneness, insert a toothpick in the center. It should come out clean. If it has wet batter, give it more time. For the full recipe, please refer to the main section. Enjoy your baking! Using ripe bananas is key to moist banana bread. They bring natural sweetness and moisture. Look for bananas with brown spots. The more spots, the sweeter and softer they are. This helps the bread stay moist. Mixing is also important. When combining wet and dry ingredients, mix just until they come together. Overmixing can make the bread tough. Lumps in the batter are fine. This technique keeps the texture light and fluffy. To present your banana bread beautifully, slice it neatly. Use a wooden board for a rustic feel. Drizzle honey on top for added sweetness. Garnish with banana slices and walnuts for color. Serve warm or toasted with a pat of butter. If your banana bread is dry, it may have baked too long. Check it with a toothpick a few minutes early. If it comes out clean, it’s done. You can also add a bit more banana or honey next time. This helps with moisture. For even baking, make sure your oven is preheated. Rotate the loaf pan halfway through baking. This ensures all sides bake evenly. If the top browns too fast, cover it with foil. This protects it while baking through. {{image_2}} If you want to skip nuts, you can still enjoy this bread. Use sunflower seed flour or oat flour as a base. These options keep the bread moist and tasty. You can also add seeds like pumpkin or sunflower for crunch. For flavor, try using vanilla or coconut extract instead of nuts. You can elevate your banana bread with fun add-ins. Chocolate chips are always a hit—use dark or dairy-free for a lighter touch. Dried fruits like raisins or cranberries add sweetness. You can sprinkle cinnamon or nutmeg for warmth. If you want it sweeter, add a bit more honey or maple syrup. Adjust it to your taste! This recipe is gluten-free, thanks to almond flour. For a vegan version, replace the eggs with flax eggs. Mix one tablespoon of ground flaxseed with three tablespoons of water. Let it sit for a few minutes until it thickens. Always check ingredients for allergens, especially if serving guests. You can safely enjoy this banana bread with these simple swaps! For the full recipe, check out the [Full Recipe]. To keep your banana bread fresh, store it at room temperature. Wrap it tightly in plastic wrap or place it in an airtight container. This helps it stay moist for up to three days. If you live in a hot area, it's best to refrigerate it. In the fridge, it can last up to a week. Just remember to let it come to room temperature before enjoying. For longer storage, you can freeze banana bread. First, slice it into pieces for easy thawing. Wrap each slice in plastic wrap and then place them in a freezer bag. This method keeps the bread fresh for up to three months. To enjoy, take a slice out and let it thaw at room temperature or warm it gently in the microwave. Reheating banana bread is simple. You can use a microwave or an oven. For the microwave, heat a slice for about 10-15 seconds. If using the oven, preheat it to 350°F (175°C) and warm the bread for 10-15 minutes. To keep it moist, cover it with foil while reheating. This helps the bread stay soft and delicious. What makes almond flour banana bread moist? Almond flour has a high oil content. This adds moisture to the bread. Ripe bananas also help. They bring natural sweetness and moisture. This combo creates a soft and rich texture. Can I use regular flour instead of almond flour? Yes, you can use regular flour. But it will change the texture. Almond flour gives a nutty flavor and moistness. Regular flour will make the bread lighter and less dense. Adjust the liquid if you switch flours. How long does it take to ripen bananas? It takes about 2 to 7 days. Place them in a warm spot. They ripen faster when in a paper bag. Check daily until they are soft and brown. Can I make this banana bread ahead of time? Yes, you can make it in advance. It tastes great stored in the fridge. Wrap it well to keep it fresh. You can also freeze it. This way, you can enjoy it later. Why isn’t my banana bread rising? If your banana bread isn’t rising, check your baking powder. It might be old or inactive. Ensure you mix the batter well but don’t overmix. Overmixing can lead to a dense loaf. Can I omit the eggs in this recipe? You can omit the eggs, but it will change the texture. Use a flaxseed or chia seed egg instead. Mix one tablespoon of seeds with three tablespoons of water. Let it sit for a few minutes to thicken. This acts as a good binder. For the perfect recipe, refer to the Full Recipe. This blog post shared how to create delicious almond flour banana bread. We covered essential ingredients, key preparation steps, and baking tips. I also shared ways to store your bread and answer common questions. Banana bread is fun to make and easy to tweak. You can mix in your favorite flavors or adjust for diets. Now, you have all the tools to bake a tasty loaf. Enjoy your baking adventure!](https://grilledflavors.com/wp-content/uploads/2025/07/ea669ab4-24dc-40b3-82d7-253dd513f0d7.webp)
Moist Almond Flour Banana Bread Simple Recipe
Looking for a delicious way to use up ripe bananas? I’ve got just the recipe for you! This Moist Almond Flour Banana Bread is easy