Desserts
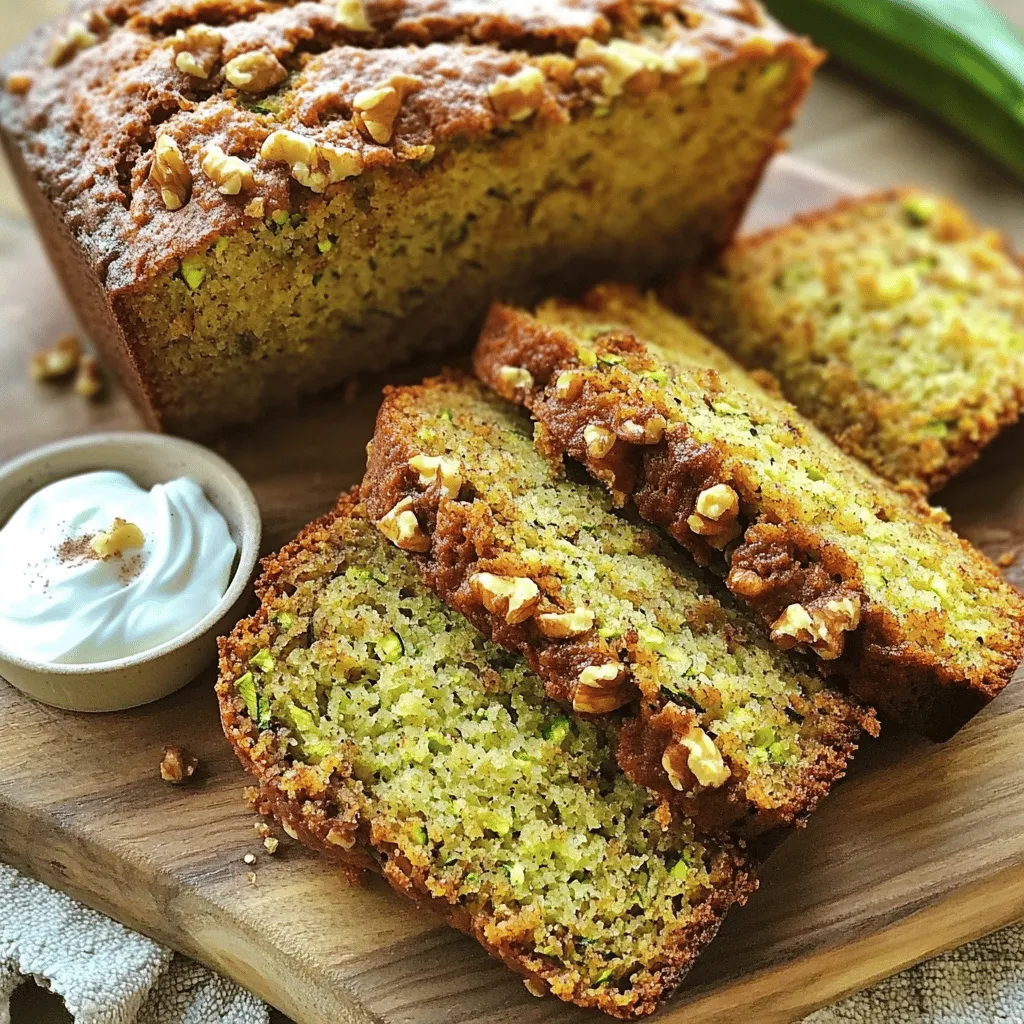
![To make lemon zucchini bread, you need these main ingredients: - 1 cup grated zucchini (about 1 medium zucchini) - 1 cup granulated sugar - 1/2 cup unsalted butter, softened - 2 large eggs - 1 teaspoon vanilla extract - 1 tablespoon lemon zest - 1/4 cup fresh lemon juice - 1 and 1/2 cups all-purpose flour - 1 teaspoon baking powder - 1/2 teaspoon baking soda - 1/4 teaspoon salt These ingredients create a moist and flavorful bread that blends sweet and tangy notes. You can enhance your lemon zucchini bread with these optional ingredients: - 1/2 teaspoon ground cinnamon - 1/2 cup chopped walnuts or pecans Adding cinnamon gives warmth, while nuts add crunch. Both make your bread even tastier. If you need alternatives, consider these substitutes: - Use coconut oil instead of unsalted butter for a dairy-free option. - Replace eggs with flaxseed meal (1 tablespoon flaxseed meal + 2.5 tablespoons water = 1 egg). - For gluten-free bread, swap all-purpose flour with a 1:1 gluten-free flour blend. These swaps help accommodate different diets while keeping the flavor intact. You can find the full recipe to get started on this delightful treat! First, preheat your oven to 350°F (175°C). This step warms up your oven, so your bread bakes evenly. Next, grab a 9x5 inch loaf pan. You can grease it with butter or line it with parchment paper. This helps the bread come out easily. In a large bowl, start by creaming together the softened butter and granulated sugar. Mix until the mixture is light and fluffy. This should take about 2-3 minutes. Then, add the eggs one at a time. Make sure to beat well after each egg. Now stir in the vanilla extract, lemon zest, and fresh lemon juice. Mix until everything is well combined. In another bowl, combine the all-purpose flour, baking powder, baking soda, salt, and ground cinnamon if you choose to use it. Stir these dry ingredients together. This helps them mix well and ensures even baking. Now it’s time to fold in the grated zucchini and walnuts or pecans, if you want. Use a spatula to gently mix them into the batter. Be careful not to overmix. You want to keep your bread light and fluffy. Pour the batter into your prepared loaf pan. Smooth the top with a spatula to make it even. Place the pan in your preheated oven. Bake for 50-60 minutes. Check for doneness by inserting a toothpick in the center. If it comes out clean, your bread is ready. Once the bread is baked, remove it from the oven. Let it cool in the pan for about 10 minutes. Then, transfer it to a wire rack to cool completely. This step keeps the bread from getting soggy. Enjoy the wonderful smell of lemon and zucchini as it cools! To check if your lemon zucchini bread is done, use a toothpick. Insert it into the center of the loaf. If it comes out clean, your bread is ready. If it has batter on it, bake a little longer. This simple test helps prevent gooey centers. To keep your zucchini bread light, do not overmix the batter. Mix just until the dry ingredients are combined. Fold in the zucchini gently. Also, use fresh zucchini for moisture. If it’s too watery, pat it dry with a paper towel before adding. You can boost the lemon flavor in your bread. Add more lemon zest for a stronger taste. A splash of lemon extract can also help. For a twist, try adding lemon oil. It brings an intense citrus aroma. These small changes can make your lemon zucchini bread truly special. For the complete cooking process, check the Full Recipe. {{image_2}} You can make gluten-free lemon zucchini bread easily. Use gluten-free flour instead of all-purpose flour. Many brands offer great options. Make sure the flour blend has xanthan gum for good texture. The taste will still be fresh and bright. Turn your bread into muffins for a quick snack. Use the same batter but pour it into muffin tins. Bake for about 20-25 minutes. You will get soft, tasty muffins. They are perfect for breakfast or lunch boxes. Try adding herbs or spices to change the flavor. Fresh basil or mint can add a nice touch. You can also use nutmeg or ginger for warmth. These variations will keep your baking exciting and new. Explore the [Full Recipe] for the basics, and let your creativity shine! To keep your lemon zucchini bread fresh, wrap it well. Use plastic wrap or foil. Store it at room temperature for up to three days. If you want it to last longer, put it in the fridge. This will keep it good for about a week. Make sure it cools down before you store it. This helps to prevent sogginess. Freezing is a great way to save extra bread. First, slice the bread once it cools. Wrap each slice tightly in plastic wrap. Then, place the slices in a freezer bag. Remove as much air as you can. You can freeze it for up to three months. When you're ready to eat, just thaw it in the fridge overnight. To enjoy that fresh taste, reheat your bread before serving. You can use an oven or a microwave. For the oven, preheat to 350°F (175°C). Place the bread on a baking sheet and heat for about 10 minutes. If using a microwave, warm a slice for about 15-20 seconds. Enjoy it warm for the best flavor. For more detailed steps, check the Full Recipe. Yes, you can use frozen zucchini. Thaw it and drain excess water before using. Fresh zucchini adds a better texture, but frozen works fine in a pinch. Just ensure you squeeze out the liquid so your bread doesn't get soggy. If you need an egg substitute, try using unsweetened applesauce. Use 1/4 cup for each egg. You can also use flaxseed meal mixed with water. Mix 1 tablespoon of flaxseed with 3 tablespoons of water. Let it sit for a few minutes until it thickens. Both options work well in this recipe. Lemon Zucchini Bread lasts about 3 to 4 days at room temperature. Keep it in an airtight container or wrap it in plastic wrap. For longer storage, you can freeze it. It stays fresh for up to three months in the freezer. Absolutely! Adding chocolate chips can make this bread even more delightful. Fold in about 1/2 cup of your favorite chocolate chips before baking. The sweet chocolate pairs well with the tangy lemon. Any zucchini works, but smaller ones are best. They have a sweeter taste and less water. Look for firm, shiny zucchini without blemishes. Green or yellow zucchini both work well in this recipe. Enjoy experimenting with your Lemon Zucchini Bread! For the full recipe, check the earlier section. Lemon zucchini bread is a delightful treat with many ways to make it. You learned about key ingredients and fun twists for flavor. I shared tips for baking and storage to keep it fresh. Remember, you can try substitutes based on your diet. In the end, this recipe offers variety and easy methods for all skill levels. Let your creativity shine with each loaf or muffin. Enjoy your baking journey and share this tasty joy with others!](https://grilledflavors.com/wp-content/uploads/2025/06/7b0a3ab1-74ef-406e-9b00-cf6e3519adbd.webp)
Lemon Zucchini Bread Simple and Flavorful Recipe
If you’re looking for a delicious, easy-to-make treat, try my Lemon Zucchini Bread. This recipe combines the freshness of lemon with the moistness of zucchini
Amazing Low Sugar Zucchini Bread Simple and Delicious
Are you craving a tasty treat that’s low in sugar? If so, you’ll love my Amazing Low Sugar Zucchini Bread! It’s simple to make and

The BEST Peach Pie Recipe Simple and Delicious Treat
Are you ready to make the best peach pie you’ve ever tasted? This simple recipe uses fresh peaches and easy ingredients to create a sweet,
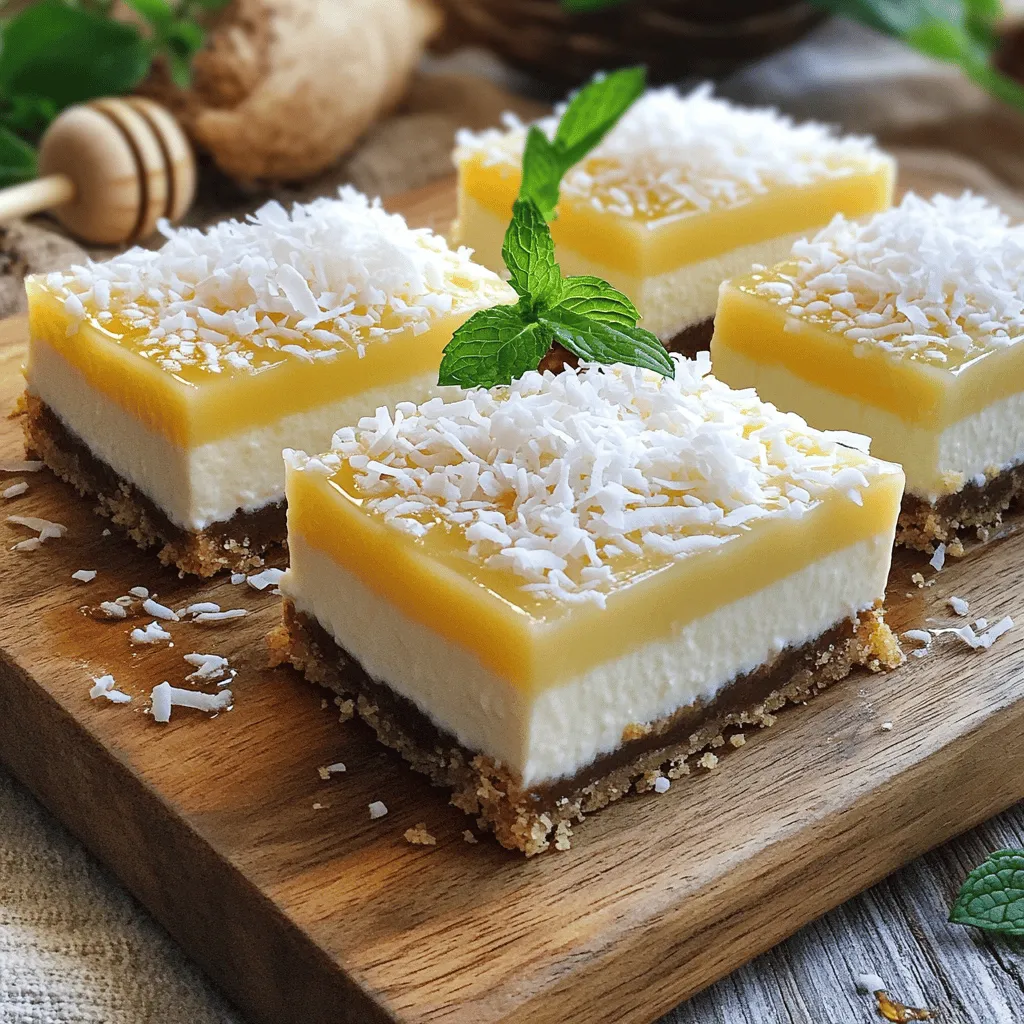
Skinny Coconut Cheesecake Bars Delightfully Simple Treat
If you crave a yummy yet healthy dessert, these Skinny Coconut Cheesecake Bars are for you! They’re easy to make and full of coconut goodness.
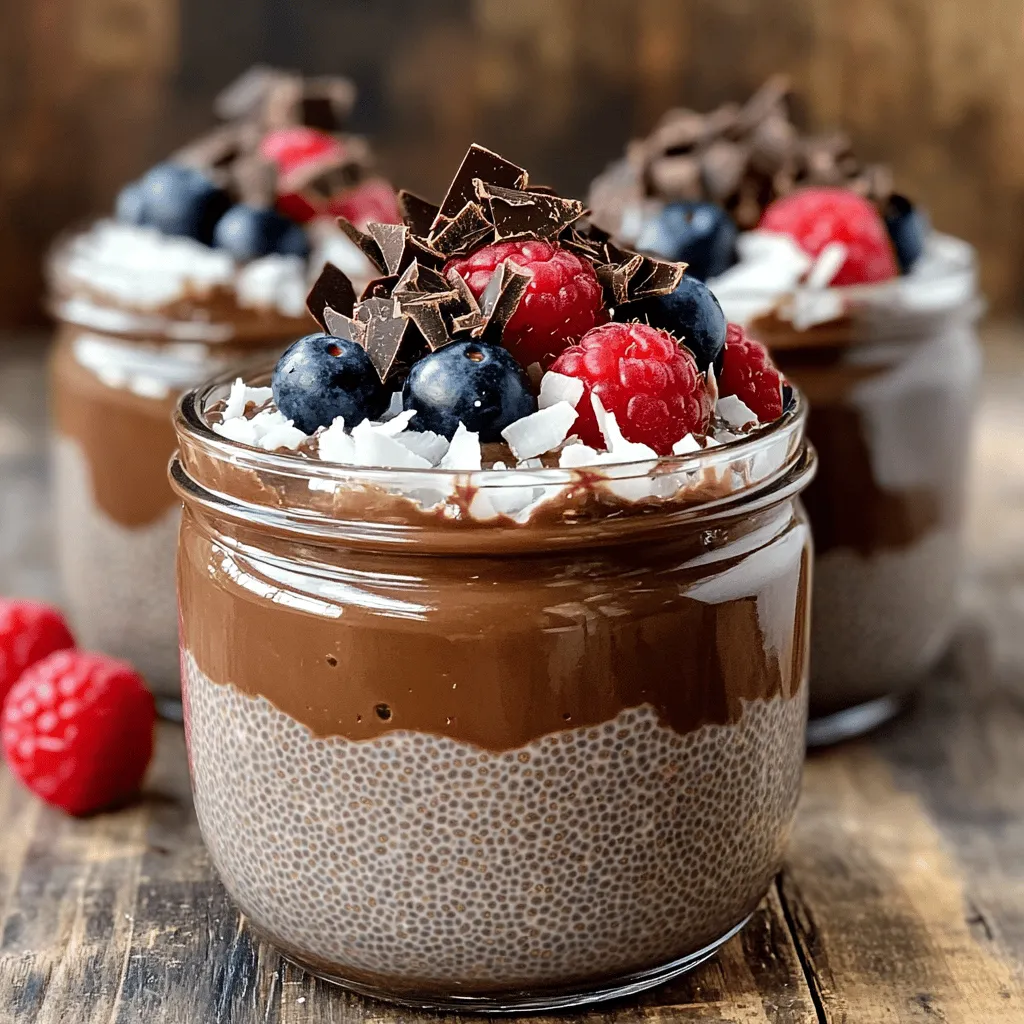
Chocolate Chia Pudding Rich and Creamy Delight
Are you ready to indulge in a treat that’s both delicious and healthy? Our Chocolate Chia Pudding is rich, creamy, and simple to make. With

Lemon Raspberry Cookies Delightful and Easy Recipe
Are you ready to bake something simple yet delicious? These Lemon Raspberry Cookies pack a bright punch of flavor, making them perfect for any occasion.

Pumpkin Spice Energy Bites Tasty and Healthy Snack
Fall is here, and that means it’s time to enjoy pumpkin spice! In this post, I’ll share a simple recipe for Pumpkin Spice Energy Bites.

No Bake Peanut Butter Oat Cups Easy and Tasty Snack
Looking for a quick, tasty snack? Try my No Bake Peanut Butter Oat Cups! These delicious bites are easy to make and perfect for satisfying
![To make delicious funnel cake bites, you need a few simple ingredients. These items are easy to find and make the process fun. Here’s what you need: - 1 cup all-purpose flour - 2 tablespoons granulated sugar - 1/2 teaspoon baking powder - 1/4 teaspoon baking soda - 1/4 teaspoon salt - 1 large egg - 1 cup buttermilk - 1 teaspoon vanilla extract - Oil for frying - Powdered sugar for dusting - Optional toppings: chocolate sauce, strawberry jam, or whipped cream These ingredients come together to create a sweet treat. Each one plays an important role. The flour gives structure. The sugar adds sweetness. The baking powder and baking soda help them rise and become light. The egg and buttermilk keep the bites moist and tasty. You can choose your toppings based on what you like. Chocolate sauce is rich and sweet, while strawberry jam adds fruity flavor. Whipped cream is light and fluffy, making it a great choice too. You can mix and match for your own perfect bite! For the full recipe, check out the details above. Enjoy making these funnel cake bites! First, grab a mixing bowl. Sift together the flour, sugar, baking powder, baking soda, and salt. This step helps blend the dry ingredients well. Mixing them well keeps the bites light and fluffy. In another bowl, whisk the egg until it’s smooth. Add in the buttermilk and vanilla extract. Mix these ingredients until they blend nicely. The liquid mix brings moisture to the bites. Now, pour the wet mix into the dry bowl. Stir gently until just combined. You want a few lumps; don’t overmix. This keeps the bites tender and delicious. Heat about 2 inches of oil in a deep pot. Aim for 350°F (175°C). Use a piping bag or a squeeze bottle to drizzle the batter into the hot oil. Make small spirals about 2-3 inches wide. Fry for 1-2 minutes until golden brown, turning halfway for even cooking. After frying, use a slotted spoon to lift the bites from the oil. Place them on a plate lined with paper towels to drain. Dust with powdered sugar and add your favorite toppings. Try chocolate sauce, strawberry jam, or whipped cream for extra fun. Enjoy your funnel cake bites! For the complete recipe, check [Full Recipe]. - Temperature control for perfect bites: Heat the oil to 350°F (175°C). This keeps the bites crispy. If the oil is too hot, they will burn. If it’s too cold, they will soak up oil and become greasy. Use a thermometer for accuracy. - Using the right oil for frying: Choose oils with high smoke points, like vegetable or canola oil. These oils work best for frying because they can handle high heat without burning. To get that light and airy texture, mix your batter gently. Overmixing can make the bites tough. Letting the batter rest for a few minutes helps too. This allows the ingredients to meld. You want a thick but pourable batter. Serve your funnel cake bites warm. Dust them with powdered sugar for a sweet touch. You can also offer toppings like chocolate sauce, strawberry jam, or whipped cream. For a fun twist, try serving them in small paper cones for easy snacking. Add a side of fresh fruit for a burst of flavor. For the full experience, check out the Full Recipe. {{image_2}} Funnel cake bites are fun to make, and you can change them up in many ways. Here are some tasty variations you can try. You can make your funnel cake bites even better with fun toppings. Here are a few ideas: - Chocolate sauce - Strawberry jam - Whipped cream These toppings add sweetness. They also make your bites look pretty. Drizzle chocolate sauce on top for a rich taste. Use strawberry jam for a fruity twist. A dollop of whipped cream adds a creamy finish. You can add more flavor to the batter. Here are some options: - Cinnamon - Nutmeg - Fruit purees Cinnamon gives a warm spice. Nutmeg adds depth. Fruit purees like berry or banana can make your bites fruity and fresh. Mix these into the batter before frying for a new twist. Try serving your funnel cake bites in fun ways. Here are some ideas: - With a scoop of ice cream - With fresh fruit on the side Ice cream makes them a great dessert. Fresh fruit adds a healthy touch. You can even create a mini dessert platter for guests. These ideas make your bites more exciting and delicious. For the full recipe, check out the [Full Recipe]. Enjoy making your funnel cake bites! Store leftover funnel cake bites in an airtight container. Place a paper towel at the bottom to absorb moisture. This helps keep them crispy. You can keep them at room temperature for one day. If you want to keep them longer, move them to the fridge. They stay fresh for up to three days. To reheat your funnel cake bites, use an oven or an air fryer. Preheat the oven to 350°F (175°C). Place the bites in a single layer on a baking sheet. Heat for about five to seven minutes. If using an air fryer, set it to 350°F and heat for three to five minutes. This keeps them crunchy and warm. You can freeze funnel cake bites if you have leftovers. First, let them cool completely. Then, place them in a single layer on a baking sheet. Freeze them for about an hour. Once frozen, transfer them to a freezer bag. They can last for up to three months. When ready to eat, reheat them straight from the freezer. Enjoy your tasty treat anytime! Yes, you can make Funnel Cake Bites in an air fryer. First, prepare the batter as usual. Then, spoon small amounts of batter onto the air fryer basket. Make sure to space them out. Cook them at 350°F for about 8-10 minutes. Keep an eye on them. They will turn golden brown. This method uses less oil, making it a lighter option. To check if the oil is hot enough, use a thermometer. Heat the oil to 350°F (175°C). If you don’t have a thermometer, drop a small piece of batter into the oil. If it bubbles and rises, the oil is ready. If it sinks, let it heat longer. This step is crucial for crispy bites. Funnel cake is a larger, flat cake made by drizzling batter into hot oil. It often looks like a big web. In contrast, Funnel Cake Bites are smaller, bite-sized pieces. They are easier to eat and perfect for sharing. Both have a similar taste but offer different eating experiences. Yes, you can make Funnel Cake Bites gluten-free. Simply swap the all-purpose flour for a gluten-free flour blend. Make sure to check other ingredients too. Some baking powders may contain gluten. This way, everyone can enjoy them, regardless of dietary needs. You can find Funnel Cake Bites at fairs, carnivals, and some festivals. Many food trucks also sell them. If you prefer, you can make them at home with the Full Recipe. This way, you can enjoy them anytime! In this post, we covered how to make tasty funnel cake bites. We started with the ingredients, followed by step-by-step mixing and frying instructions. Then, I shared helpful tips for perfect frying and serving ideas. You can also try fun variations, such as adding different toppings and flavors. Making these bites is easy and fun. Enjoy sharing them with friends and family. Remember, you can always get creative with your toppings and flavors!](https://grilledflavors.com/wp-content/uploads/2025/06/4ff23fe8-20b9-41d6-9b79-efe9c67a30f0.webp)
Funnel Cake Bites Delightful and Easy to Make Treat
Craving a sweet, crispy treat? Funnel cake bites are easy to make and oh-so-delicious. In this post, I’ll guide you through each simple step to
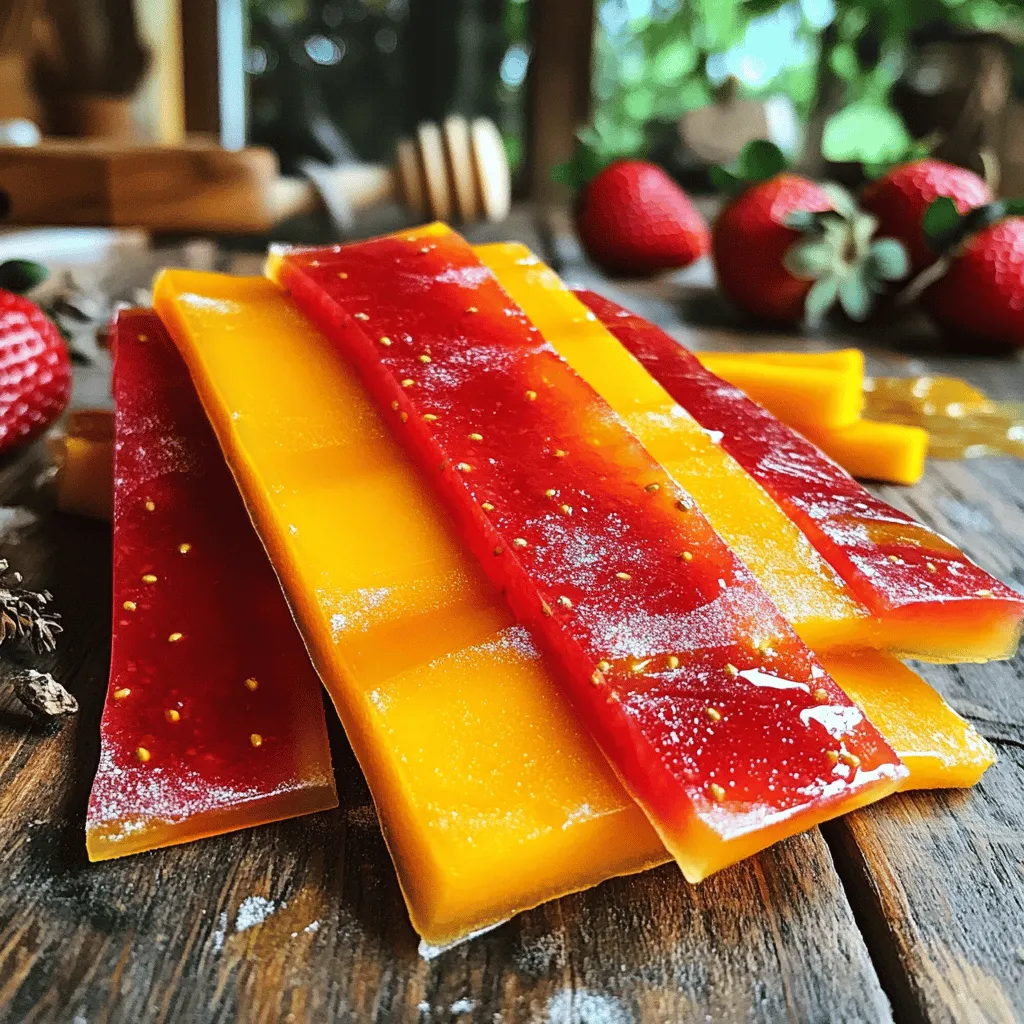
3-Ingredient Fruit Leather Tasty and Simple Snack
Looking for a tasty snack that’s easy to make? I’ve got you covered with my 3-Ingredient Fruit Leather! This recipe uses fresh fruit, a hint