Desserts
![Here’s what you need to make these tasty salted caramel chocolate cookies. - 1 cup all-purpose flour - 1/2 cup unsweetened cocoa powder - 1/2 teaspoon baking soda - 1/4 teaspoon salt - 1/2 cup unsalted butter, softened - 1 cup brown sugar, packed - 1/4 cup granulated sugar - 1 large egg - 1 teaspoon vanilla extract - 1 cup chocolate chips (semi-sweet or dark) - 1/2 cup salted caramel sauce (store-bought or homemade) - Sea salt for sprinkling These ingredients create a rich, chocolatey dough that pairs perfectly with the sweet and salty caramel. Each bite bursts with flavor. The combination of chocolate chips and salted caramel makes these cookies a unique treat. You can use store-bought caramel or make your own for an extra touch. When measuring your flour and cocoa powder, spoon them into your measuring cup. This helps avoid packing, which can lead to dry cookies. Remember to let your butter soften at room temperature for the best texture. This step also helps the sugars cream well with the butter. Lastly, sprinkle a little sea salt on top before the cookies cool. This adds a lovely contrast to the sweetness. For the full recipe, check out the Salted Caramel Chocolate Heaven section. Enjoy crafting these delicious cookies! 1. Preheat your oven to 350°F (175°C). Line a baking sheet with parchment paper. 2. In a medium bowl, mix together: - 1 cup all-purpose flour - 1/2 cup unsweetened cocoa powder - 1/2 teaspoon baking soda - 1/4 teaspoon salt Set this dry mix aside. 3. In a large bowl, cream together: - 1/2 cup unsalted butter, softened - 1 cup brown sugar, packed - 1/4 cup granulated sugar Beat until light and fluffy, about 2-3 minutes. 4. Add 1 large egg and 1 teaspoon vanilla extract to the butter mix. Stir until well combined. 5. Gradually add the dry ingredients to the wet mix. Stir until just combined. Don’t overmix! 6. Fold in 1 cup chocolate chips, making a thick, chocolatey dough. 7. Scoop tablespoon-sized amounts of dough. Roll them into balls and place them on the baking sheet. Leave space between each ball. 8. Press a small indentation in the center of each ball. Fill this with about 1 teaspoon of salted caramel sauce. 9. Bake in the oven for 10-12 minutes. The edges should be set, but the centers remain soft. 10. When done, remove cookies and sprinkle a small pinch of sea salt on top while they are warm. 11. Allow the cookies to cool on the baking sheet for 5 minutes. Then transfer them to a wire rack to cool completely. For the full recipe, check out the detailed instructions above. Enjoy your baking! To avoid overmixing, mix until just combined. This helps keep your cookies soft. When you add the dry mix to wet, stop once you don't see flour. This ensures a tender cookie. For the right dough consistency, it should be thick and slightly sticky. If your dough is too dry, add a bit of milk. If it's too wet, add a bit of flour. The perfect dough helps your cookies bake evenly and taste great. For serving, use tiered stands or decorative plates. This makes your cookies look fancy. Place them in a way that shows off their shape. You can drizzle extra salted caramel on top for added appeal. This not only looks stunning but adds more flavor. Your guests will love the extra touch! Store cookies in an airtight container to keep them fresh. This helps them stay soft and tasty. If you want to keep them longer, use the freezer. Just make sure to wrap them well. For reheating, place cookies in the oven for a few minutes. This helps restore their soft texture. You can also use the microwave for a quick warm-up. Just be careful not to overheat them! {{image_2}} You can add nuts or caramel bits to your cookies. Chopped pecans or walnuts give a nice crunch. You can also mix in caramel bits for a sweeter taste. Try using different types of chocolate. Dark chocolate adds richness, while milk chocolate offers a creamy touch. Experiment with flavors to find your favorite blend! For a gluten-free option, use almond flour or coconut flour. These flours can give a nice texture without gluten. If you want a vegan version, swap the egg with a flax egg. Just mix one tablespoon of ground flaxseed with three tablespoons of water. Let it sit until it thickens. You can also use dairy-free butter and chocolate chips. Add spices for a hint of seasonal flavor. A pinch of cinnamon or nutmeg works well in fall. For winter holidays, try ginger or peppermint extracts. You can also create themed cookies for special occasions. Use cookie cutters to shape the dough for holidays like Halloween or Christmas. These small changes make your cookies stand out and taste great! For the complete recipe, check out the [Full Recipe]. To keep your salted caramel chocolate cookies fresh, use an airtight container. This method helps prevent moisture loss. You can also freeze them if you want to save some for later. To freeze, place cookies in a single layer in a freezer bag. They can last up to three months in the freezer. For best taste, eat them within one month. To reheat cookies, use an oven or a microwave. For the oven, preheat it to 350°F (175°C). Place cookies on a baking sheet and warm them for about 5 minutes. This keeps the texture soft. If using a microwave, heat a cookie for about 10-15 seconds. Serve them warm for a gooey treat. Check for changes in smell or texture. If the cookies feel hard or dry, they may be stale. Look for any visible mold or discoloration. If you notice these signs, it’s best to throw them away. Always trust your senses to ensure freshness. How can I make cookies chewier? To make cookies chewier, use more brown sugar than white sugar. Brown sugar has more moisture. You can also slightly underbake the cookies. This keeps the centers soft. Can I use homemade salted caramel? Yes, you can use homemade salted caramel. It adds a personal touch to your cookies. Just make sure it’s thick enough to hold its shape when baked. What substitutions can I make for allergens? For allergens, you can use gluten-free flour instead of regular flour. For dairy, try coconut oil or a vegan butter. Use flax eggs as an egg substitute. Can I adjust the sweetness levels? Yes, you can adjust sweetness by lowering the sugar. Start with a small amount and taste the dough. Keep in mind that cookies may not be as sweet. How do I know when to take cookies out of the oven? Take cookies out when the edges are set but the centers look soft. They will continue to cook on the baking sheet after you remove them. Why are my cookies flat? Flat cookies often happen due to too much butter or not enough flour. Make sure you measure your ingredients correctly. Chilling the dough can also help. How to fix dry cookie dough? If your dough is dry, add a tablespoon of milk or water. Mix it in slowly. You can also add an extra egg yolk for moisture. You learned how to make delicious salted caramel cookies, from ingredients to baking. Remember the key steps: mix, form, fill, and bake. Use my tips for perfect texture and storage. Feel free to switch things up with flavors or dietary needs. Keep your cookies fresh and enjoy them longer with proper storage methods. With a bit of practice, you’ll impress everyone with your baking skills. Now it’s time to bake and savor the yummy results!](https://grilledflavors.com/wp-content/uploads/2025/05/35e01217-11f5-4c30-ad08-8efb0510c9a8.webp)
Salted Caramel Chocolate Cookie Recipe Delight
Are you ready to bite into the ultimate treat? My Salted Caramel Chocolate Cookie Recipe combines rich chocolate with a sweet and salty twist. This
![- 1 ¾ cups all-purpose flour - 1 ¾ cups granulated sugar - ¾ cup unsweetened cocoa powder - 1 ½ teaspoons baking powder - 1 ½ teaspoons baking soda - 1 teaspoon salt - 2 large eggs - 1 cup whole milk - ½ cup vegetable oil - 2 teaspoons vanilla extract - 1 cup boiling water - Optional dark chocolate chips When you bake this cake, each ingredient plays a key role. The flour gives structure. The sugar adds sweetness. Cocoa powder gives that rich chocolate flavor. Baking powder and baking soda help the cake rise. Salt enhances all the flavors. Eggs bind the mixture and add moisture. Whole milk creates a tender cake. Vegetable oil keeps it moist. Vanilla extract adds warmth. Boiling water helps mix everything well and makes the cake light. Adding dark chocolate chips gives extra chocolatey goodness. You might want to change a few ingredients, and that’s okay! You can swap all-purpose flour with gluten-free flour if needed. For sweeteners, consider using coconut sugar or honey for a different taste. If you need dairy-free options, try almond milk or oat milk instead of whole milk. You can also use coconut oil in place of vegetable oil. To make this cake, you will need a few important tools: - 9-inch round cake pans - Mixing bowls and whisk - Oven thermometer Having the right equipment makes baking easier and more fun. Use 9-inch round cake pans for even baking. Mixing bowls help you combine your ingredients well. A whisk is great for blending dry and wet items. An oven thermometer ensures your oven is at the right temperature. This helps your cake bake perfectly. You can find the Full Recipe for more detailed steps to make this cake. Enjoy baking! 1. Preheat the oven: Start by setting your oven to 350°F (175°C). This step is key for even baking. 2. Prepare the pans: Grease and flour two 9-inch round cake pans. This prevents the cake from sticking. 3. Mix dry ingredients: In a large bowl, combine: - 1 ¾ cups all-purpose flour - 1 ¾ cups granulated sugar - ¾ cup unsweetened cocoa powder - 1 ½ teaspoons baking powder - 1 ½ teaspoons baking soda - 1 teaspoon salt Whisk them together until well mixed. 4. Mix wet ingredients: In another bowl, add: - 2 large eggs - 1 cup whole milk - ½ cup vegetable oil - 2 teaspoons vanilla extract Beat these together for about two minutes. 5. Combine mixes: Pour the wet mixture into the dry ingredients. Stir until the batter is combined. 6. Add boiling water: Slowly mix in 1 cup of boiling water. The batter will be thin, and that’s okay! This step helps create a moist cake. 7. Optional step: If you want extra rich flavor, stir in 1 cup of dark chocolate chips. 8. Bake the cakes: Divide the batter evenly between the prepared pans. Bake for 30-35 minutes. Check with a toothpick; it should come out clean. 9. Cool properly: Once baked, let the cakes cool in the pans for 10 minutes. Then, transfer them to wire racks to cool completely. This helps avoid soggy cakes. Follow these steps carefully, and you'll create a delicious cake! For a complete guide, check the Full Recipe. To make a light and fluffy cake, start by mixing the dry ingredients well. This helps create a good rise. When adding wet ingredients, mix just enough to combine. Overmixing can make the cake dense. Use a hand mixer on low speed. For your baking pans, grease them well and dust with flour. This step helps the cake come out easily. You can also line the bottom with parchment paper for extra protection. The best frosting for chocolate cake is chocolate buttercream. It pairs perfectly with rich chocolate. Cream cheese frosting also adds a nice twist. You can get creative with decorations! Add fresh berries on top for a pop of color. Chocolate shavings or sprinkles make it look fancy. Drizzling melted chocolate adds an extra touch of decadence. If your cake turns out dry, check your oven’s temperature. An oven that is too hot can dry it out fast. Adding a bit more liquid next time can help too. For a dense cake, ensure you measure your ingredients accurately. Also, avoid packing the flour down in the measuring cup. If your cake sinks in the middle, try baking it longer. A toothpick should come out clean from the center. Using these tips will help you create the best chocolate cake ever, making it a simple and delicious treat for anyone! For the full recipe, check out the Decadent Chocolate Dream Cake. {{image_2}} You can change the flavor of your chocolate cake easily. A simple way is to add espresso or coffee. This will give your cake a rich taste. Just use a small amount. Start with one tablespoon mixed into the boiling water. You can also try different types of cocoa powder. Dark cocoa will give you a bolder flavor. You can even mix regular cocoa with dark cocoa for more depth. The frosting can change your cake’s taste a lot. Try cream cheese frosting instead of buttercream. This frosting is tangy and pairs well with chocolate. You can also use whipped cream for a light touch. If you want something rich, go for ganache. You can make ganache by melting chocolate with cream. It’s simple and oh-so-delicious! Not everyone can eat regular cake. For a gluten-free option, use almond flour or a gluten-free mix. Make sure to check the package for the right measurements. If you want a vegan cake, swap eggs for applesauce or flax eggs. Use almond milk instead of whole milk. These changes keep the cake tasty and moist. To keep your chocolate cake fresh for 2-3 days, cover it well. Use plastic wrap or aluminum foil. You can also place it in an air-tight container. Store it at room temperature. Avoid putting it in direct sunlight. If you have leftover frosting, keep it in a separate container. This keeps the cake moist and tasty. For long-term storage, freezing is a great option. Wrap each cake layer in plastic wrap tightly. Then, wrap them in aluminum foil. This helps prevent freezer burn. You can freeze it for up to three months. To thaw, take the cake out of the freezer. Leave it in the fridge overnight. This keeps it moist and fresh. Choose air-tight containers for the best results. They keep moisture in and air out. Non-air-tight containers allow air in, which can dry out the cake. If you don’t have an air-tight container, cover the cake with plastic wrap. This helps as a backup. Always check that the container is clean and dry before storing. To keep your chocolate cake moist, follow these tips: - Use fresh ingredients. Old flour or baking powder can affect moisture. - Measure flour correctly. Too much flour makes the cake dry. - Add boiling water to the batter. This helps create a soft texture. - Don’t overbake. Check the cake a few minutes early. A toothpick should come out clean. - Consider using vegetable oil instead of butter. Oil adds moisture that butter may lack. Yes, you can make this cake in advance. Here’s how: - Bake the cake layers and let them cool completely. - Wrap each layer in plastic wrap. This keeps them fresh. - Store them in the fridge for up to three days. - For longer storage, freeze the layers. They last up to three months. - Thaw the layers in the fridge before frosting. To make cupcakes from this chocolate cake recipe: - Preheat your oven to 350°F (175°C). - Line a cupcake pan with paper liners. - Fill each liner about two-thirds full with batter. - Bake for 18-20 minutes. Check with a toothpick for doneness. - Allow cupcakes to cool before frosting. They will be delicious and cute! Avoid these common mistakes: - Using cold ingredients. Bring eggs and milk to room temperature first. - Not measuring ingredients accurately. This can ruin texture and taste. - Skipping the cooling step. Frosting a warm cake can make it soggy. - Opening the oven door too often. This can cause the cake to sink. - Using low-quality cocoa powder. Good cocoa makes a big difference in flavor. For the complete recipe, check out the [Full Recipe]. Enjoy your baking! This blog covered everything you need for a perfect chocolate cake. You learned about crucial ingredients and their substitutes. We discussed essential tools and provided clear, step-by-step baking instructions. Plus, I shared tips for texture, frosting ideas, and how to store your cake. Remember, baking is both fun and rewarding. Feel free to experiment with flavors and decorations. Enjoy your chocolate cake journey!](https://grilledflavors.com/wp-content/uploads/2025/05/299407a2-d779-417a-a1c4-45a2288c8770.webp)
Best Chocolate Cake Recipe Simple and Delicious Treat
If you’re looking for a chocolate cake recipe that’s both simple and scrumptious, you’re in the right spot! I’ll share my favorite recipe that guarantees
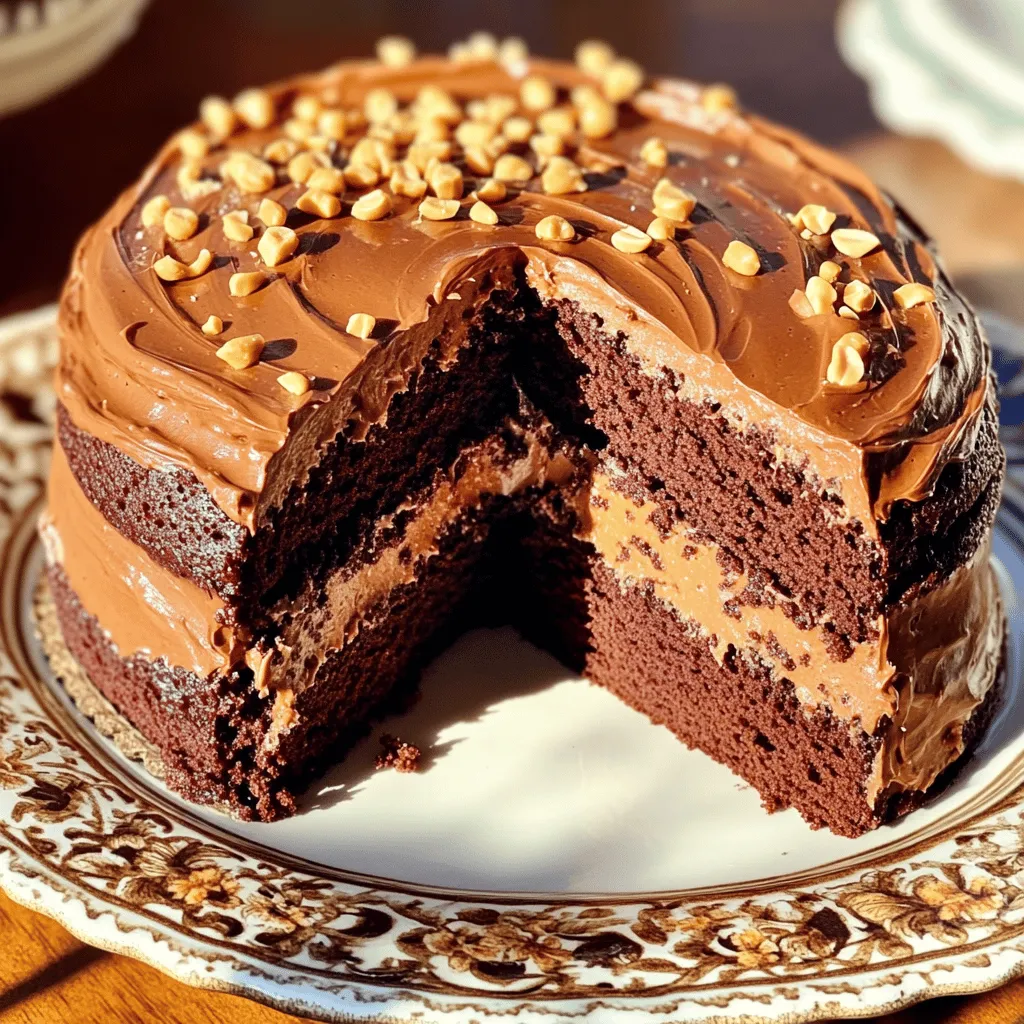
Extra Moist Chocolate Peanut Butter Cake Delight
Indulge in the rich, creamy goodness of my Extra Moist Chocolate Peanut Butter Cake Delight. This recipe blends the classic flavors of chocolate and peanut
![To make the Easy Boston Cream Pie Cookie Bites, you need simple ingredients that pack a lot of flavor. Here’s the list you’ll need: - 1 ½ cups all-purpose flour - ½ teaspoon baking powder - ¼ teaspoon baking soda - ½ teaspoon salt - ½ cup unsalted butter, softened - ¾ cup granulated sugar - 1 large egg - 1 teaspoon vanilla extract - ¼ cup milk - ½ cup chocolate chips (for melting) - ½ cup pastry cream (store-bought or homemade) - Powdered sugar (for dusting) Each ingredient plays a key role. The flour gives structure, while the butter adds richness. Sugar is key for sweetness, and the egg helps bind everything together. The baking powder and baking soda help the cookies rise. Pastry cream adds that creamy filling, and chocolate chips bring a delicious touch when melted. I recommend using high-quality chocolate for melting. It makes a big difference in taste. If you want to make your pastry cream, you can find a simple recipe in the Full Recipe section. It’s worth the extra step for that homemade touch! - Preheat the oven to 350°F (175°C). - Line a baking sheet with parchment paper. Start by preheating your oven. This gets it ready for baking. Next, line your baking sheet with parchment paper. This helps cookies not stick. - Whisk together dry ingredients. - Cream butter and sugar until light and fluffy. - Incorporate wet ingredients gradually. In a bowl, whisk together the flour, baking powder, baking soda, and salt. This mixes the dry ingredients well. In another bowl, cream the softened butter and sugar. Use a mixer for 3-5 minutes until it’s light and fluffy. This step adds air to the dough. Next, add the egg and vanilla extract to the butter mixture. Mix well until combined. Gradually pour in the milk and stir until smooth. Finally, slowly mix in your dry ingredients. Stop when it’s just combined to keep the cookies soft. - Scoop dough onto the baking sheet. - Bake until edges are golden. - Fill cookies with pastry cream. Using a small scoop, place rounded tablespoons of dough on the baking sheet. Leave space between each scoop. Bake for 10-12 minutes or until the edges turn golden. Let the cookies cool for 5 minutes on the sheet. Then, move them to a wire rack. Once they are cool, it’s time to fill them! Use a piping bag to fill each cookie with pastry cream. You can also slice the cookies in half to fill them. - Melt chocolate chips. - Drizzle or dip cookies in melted chocolate. - Dust with powdered sugar after setting. In a microwave-safe bowl, melt chocolate chips. Heat them in 20-second intervals, stirring until smooth. Drizzle or dip the tops of each filled cookie in the melted chocolate. Let the excess chocolate drip off. Place the cookies back on the wire rack. Once the chocolate sets, you can dust the cookies with powdered sugar. This adds sweetness and makes them look nice. For the full recipe, check out the link. Enjoy your Easy Boston Cream Pie Cookie Bites! Room temperature ingredients make a big difference. When butter and eggs are at room temp, they blend better. This helps create a light and fluffy dough. Cold ingredients can lead to dense cookies. Always plan ahead and let your butter sit out for about 30 minutes before using it. Do not overmix your dough. Overmixing makes the cookies tough. Mix just until you see no dry flour. This way, your cookie bites will be soft and tender. To achieve a neat chocolate drizzle, use a fork. Dip it in melted chocolate and move your wrist back and forth. This creates a lovely pattern. You can also use a piping bag for more control. If you want a change from chocolate, try white chocolate or caramel. Both add a nice twist. You can even use colorful candy melts for a fun look. Underbaking is a common mistake. If your cookies are too soft, they won't hold the filling. Bake until the edges are golden, and check for a firm center. Overbaking can also ruin your treats. If you leave them in too long, they will be dry. Keep an eye on the timer! Lastly, be careful when filling the cookies. Use a piping bag to insert pastry cream. If you slice the cookies, make sure the filling stays inside. This keeps each bite rich and creamy. For the full recipe, check out the [Full Recipe]. {{image_2}} You can make your Boston Cream Pie Cookie Bites even more fun by changing a few things. Adding citrus zest, like lemon or orange, to the dough gives a fresh taste. The zesty flavor pops and brightens every bite. You can also try using flavored extracts, such as almond or coconut. These extracts add a unique twist that surprises the taste buds. Just swap out the vanilla extract for your favorite flavor. If you need to make these cookie bites gluten-free, use gluten-free flour instead of all-purpose flour. Many blends work well and keep the cookie's texture light and soft. For a vegan version, substitute the butter with coconut oil or a plant-based butter. Replace the egg with flaxseed meal mixed with water or a store-bought egg replacer. These changes let everyone enjoy these tasty treats. Pair these cookie bites with a scoop of vanilla ice cream or fresh fruit. The cold ice cream balances the sweet chocolate and creamy filling. For parties, arrange them on a colorful platter. Dusting them with powdered sugar adds a nice touch. You can even add fresh berries or mint leaves for extra color and flavor. These small details make your dessert stand out and impress your guests. To keep your Boston Cream Pie Cookie Bites fresh for up to a week, store them in an airtight container. Place a piece of parchment paper between layers to prevent sticking. Keep them at room temperature, away from direct sunlight. This method helps maintain their soft texture and delicious taste. For long-term storage, you can freeze the cookie bites. First, allow them to cool completely. Then, place them in a single layer on a baking sheet. Freeze them for about an hour. Once frozen, transfer the cookie bites to a freezer-safe bag. Remove as much air as possible before sealing. They can last up to three months in the freezer. To thaw and serve frozen cookies, take them out of the freezer and let them sit at room temperature for about 30 minutes. For a warm treat, you can also warm them in the microwave for 10-15 seconds. This will bring back their soft texture and make them extra tasty. To tell if your cookies have gone stale, check for a hard texture. Fresh cookies should be soft and slightly chewy. If they smell off or have a dry feel, they are likely stale. Always trust your senses; they will guide you in knowing when to enjoy your cookie bites or toss them out. To fill Boston Cream Pie Cookie Bites, use a piping bag. Fill the bag with pastry cream and attach a small round tip. Insert the tip into the top of each cookie and squeeze gently. This method gives you control and fills the cookie evenly. You can also slice the cookie in half and spread the cream inside if you prefer. Yes, you can use store-bought pastry cream. It saves time and effort. Store-bought cream is often smooth and easy to use. However, homemade pastry cream can taste fresher and richer. Making your own allows you to adjust the flavor. Consider your time and taste when choosing between the two. To keep cookies from spreading, chill the dough before baking. After mixing, wrap the dough in plastic wrap and place it in the fridge for 30 minutes. This helps the cookies hold their shape. Also, make sure you use the right amount of flour. Too little flour can lead to flat cookies. If you don't have pastry cream, consider using whipped cream or custard. They can add a creamy texture and flavor. For a simpler option, use Greek yogurt mixed with a bit of sugar. It won't be as rich, but it works in a pinch. You can also try pudding for a quick alternative. Yes, you can make these cookie bites ahead of time. Bake the cookies and store them in an airtight container for up to a week. Fill them with pastry cream on the day you plan to serve them. This keeps the cookies fresh and the filling creamy. You can also freeze the baked cookies and thaw them before filling. Making Boston Cream Pie Cookie Bites combines simple ingredients and steps for big flavor. You learned how to create tasty cookies with pastry cream filling and a chocolate top. Remember, using room temperature ingredients and avoiding overmixing is key. Experimenting with flavors or dietary tweaks can also add your unique twist. Store them correctly to keep their freshness. With these tips, your cookie bites will impress friends and family. Enjoy baking and sharing these delightful treats!](https://grilledflavors.com/wp-content/uploads/2025/05/5de4d42e-6098-442f-b597-aea2c62d474e.webp)
Easy Boston Cream Pie Cookie Bites Delicious Treat
Are you ready for a sweet treat that’s both fun and easy to make? My Easy Boston Cream Pie Cookie Bites are just what you
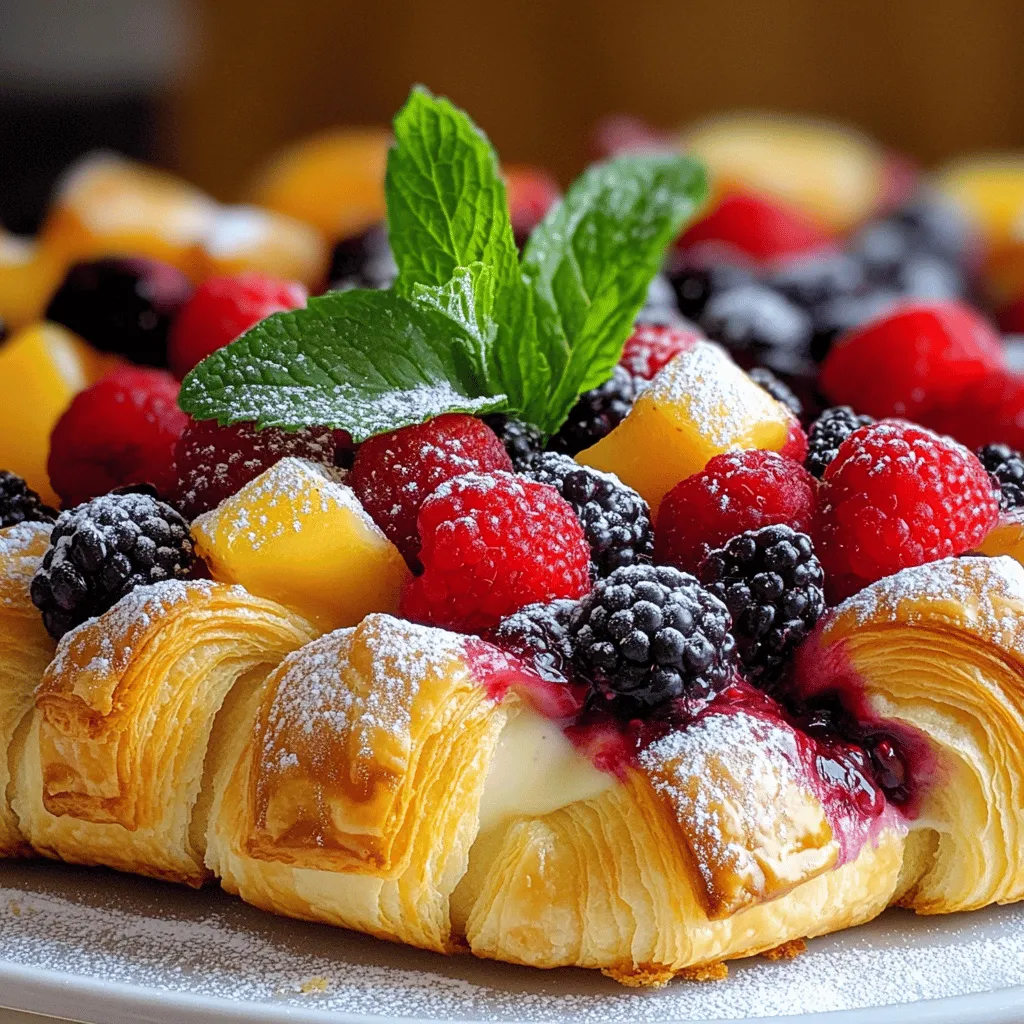
Berry Croissant Bake Tasty and Easy Breakfast Delight
Ready to elevate your breakfast game? My Berry Croissant Bake is your new go-to! It’s a simple mix of flaky croissants and juicy berries, drenched

No-Bake Oreo Cheesecake Minis Delightful Dessert Treat
Craving a sweet treat without turning on the oven? Look no further! These No-Bake Oreo Cheesecake Minis are a perfect delight for any dessert lover.

Death by Chocolate Cake Divine Dessert Recipe
If you love chocolate, get ready for a treat! My Death by Chocolate Cake is the ultimate dessert for any chocoholic. This rich, moist cake
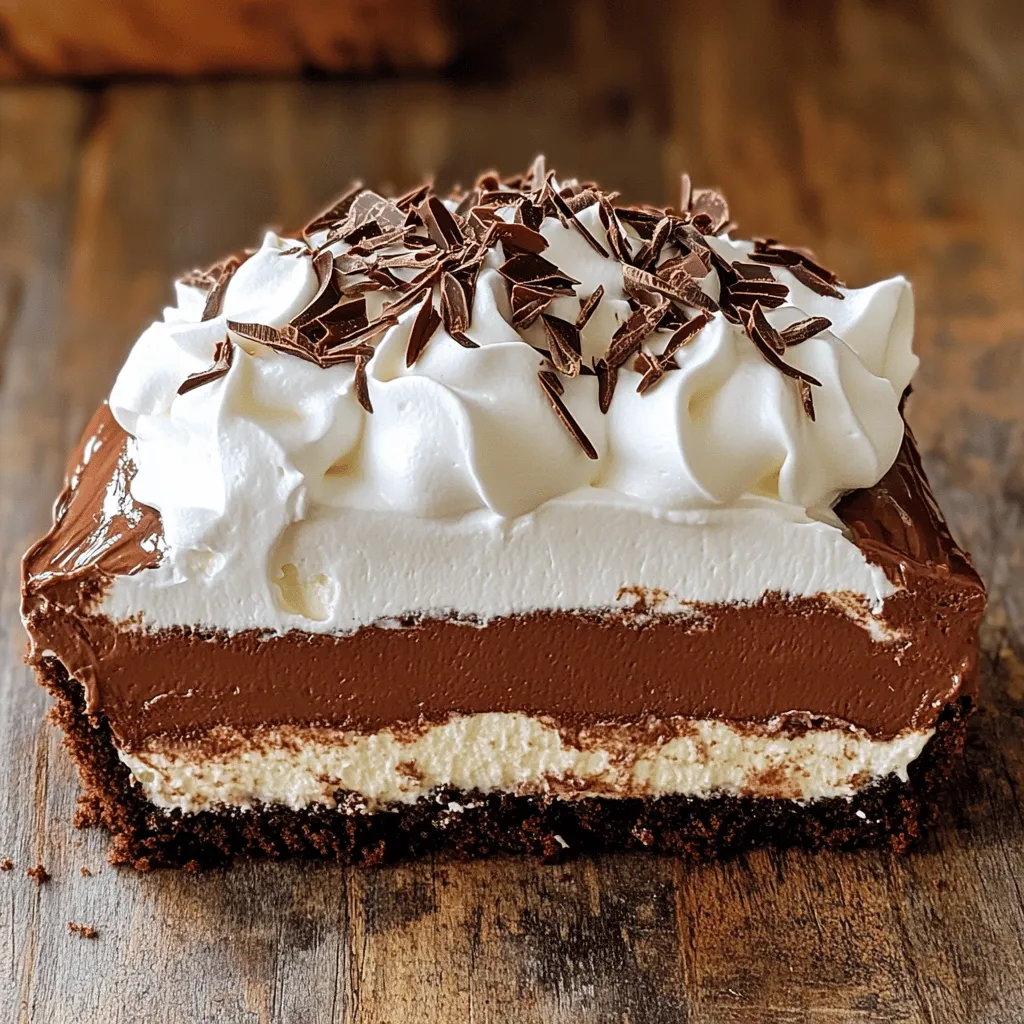
French Silk Pie Cake Delightful Chocolate Indulgence
If you crave rich, chocolatey desserts, you’re in for a treat! My French Silk Pie Cake is the perfect blend of classic flavors and textures.
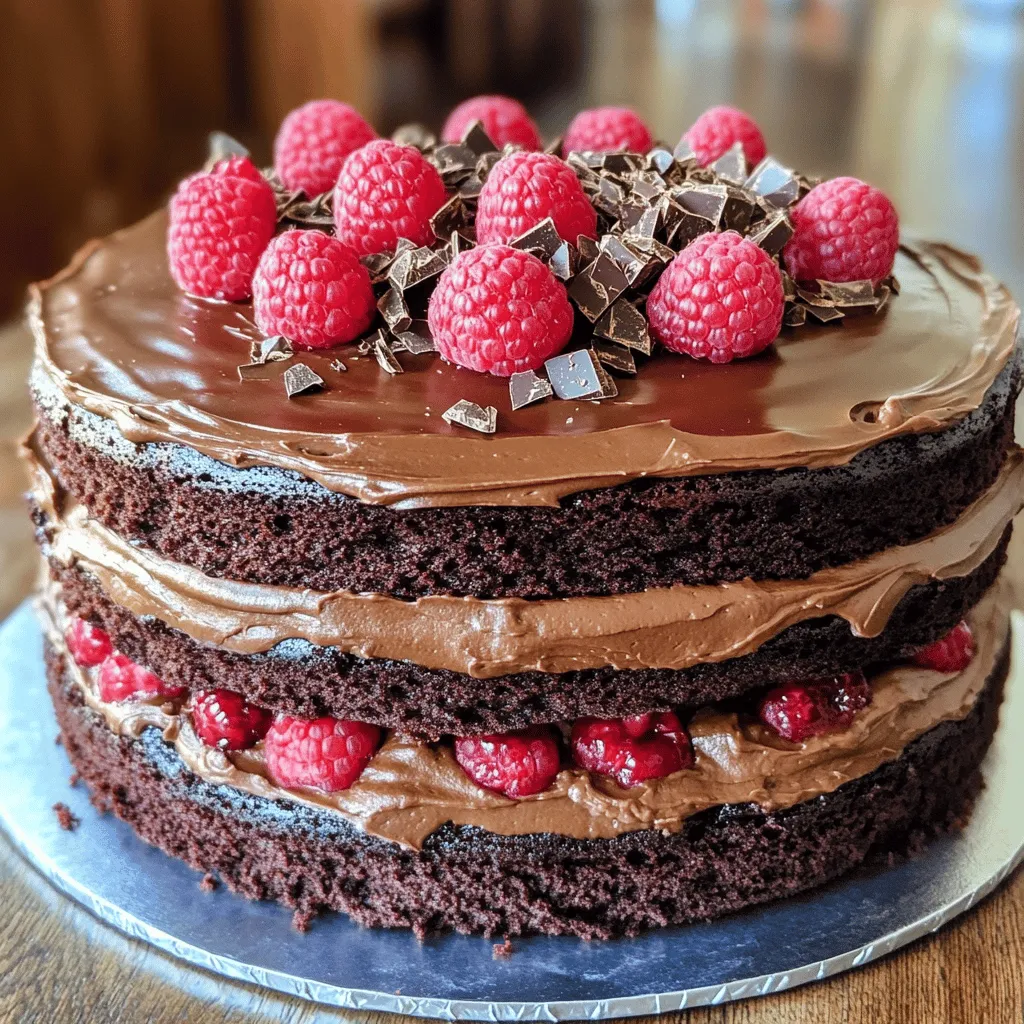
Chocolate Raspberry Cake Delightfully Rich Recipe
If you love sweet treats that wow your taste buds, you’re in for a delight! This Chocolate Raspberry Cake recipe is rich, simple, and sure
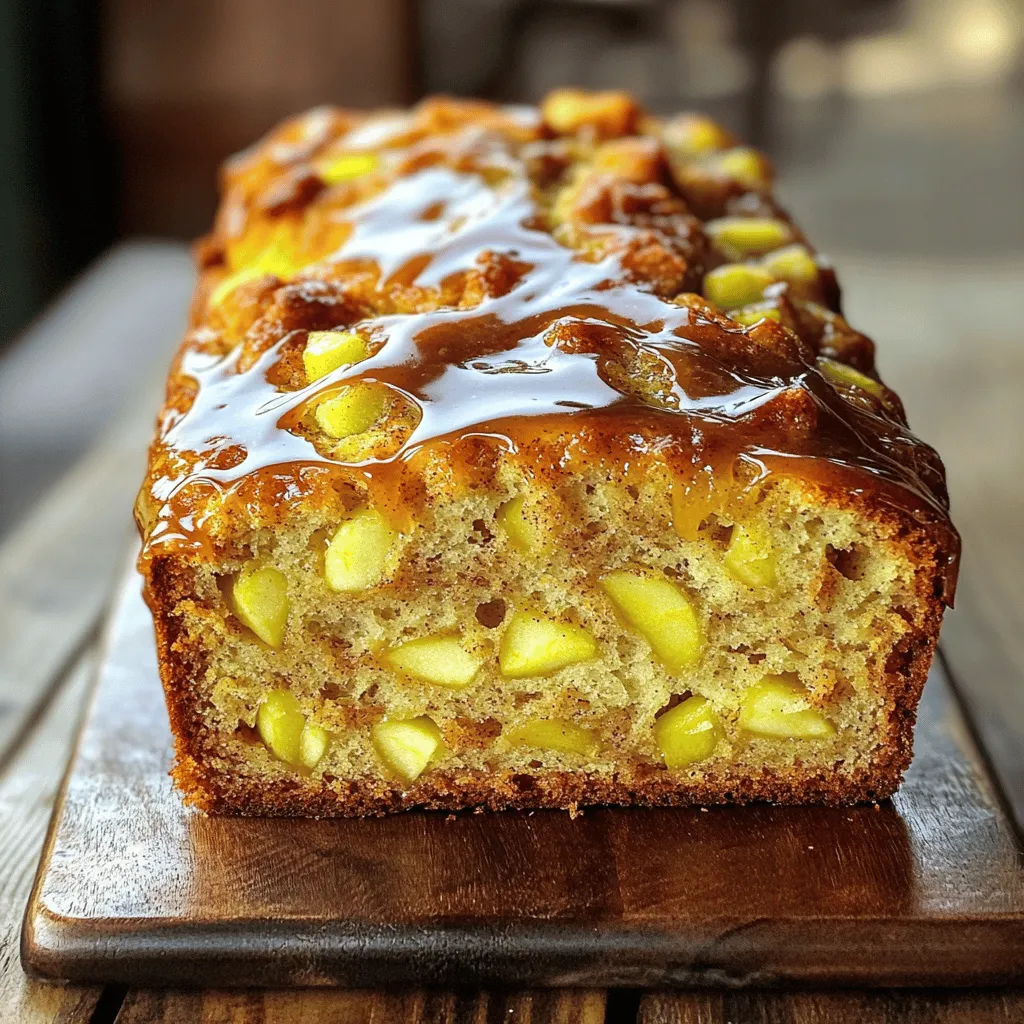
Easy Amish Apple Fritter Bread Delightfully Tasty Recipe
Craving a sweet and warm treat? You’ll love this Easy Amish Apple Fritter Bread! This simple recipe combines juicy apples with a fluffy bread that’s