Desserts
![To make these tasty maple donut bars, you need a few key items: - 1 ½ cups all-purpose flour - 1 tsp baking powder - ½ tsp baking soda - ½ tsp salt - ½ tsp ground cinnamon - ¼ tsp ground nutmeg - ½ cup unsalted butter, softened - ½ cup brown sugar, packed - ½ cup granulated sugar - 2 large eggs - ½ cup buttermilk - 1 tsp pure vanilla extract - ½ cup maple syrup (plus extra for drizzling) - 1 cup powdered sugar (for glaze) These ingredients work together to create soft, fluffy bars with a rich maple flavor. The spices add warmth and depth. Using both brown and granulated sugar gives the bars the perfect balance of sweetness. You can make your maple donut bars even better with some fun toppings: - Additional maple syrup for drizzling - Nuts or sprinkles Drizzling more maple syrup adds extra sweetness and a lovely shine. You can also top them with chopped nuts for crunch or colorful sprinkles for a festive touch. Play around with these options to make your bars unique! For the full recipe, check out the detailed instructions. 1. First, preheat your oven to 350°F (175°C). This step is key for even baking. 2. Next, grease and line an 8x8 inch baking pan with parchment paper. Leave some overhang for easy lifting. 3. In a mixing bowl, whisk together the dry ingredients. This includes flour, baking powder, baking soda, salt, cinnamon, and nutmeg. Mix until well combined. 1. In a large bowl, cream the softened butter with brown and granulated sugars. Use an electric mixer on medium speed. Mix for about 3-4 minutes until it looks light and fluffy. 2. Next, add the eggs one at a time to the butter mixture. Mix well after each egg. Then, add buttermilk and vanilla extract. Stir until everything is combined. 3. Gradually add the dry ingredients to the wet mix. Keep the mixer on low speed and mix until just combined. Be careful not to overmix; this keeps the bars light. 1. Now, pour the batter into your prepared baking pan. Spread it evenly with a spatula. Bake for 25-30 minutes. Check if a toothpick comes out clean to know when it's done. 2. After baking, let the bars cool in the pan for about 10 minutes. Then, transfer them to a wire rack to cool completely. 3. For the glaze, mix powdered sugar and maple syrup in a small bowl. Stir until smooth. Adjust the thickness by adding more syrup or sugar if needed. 4. Drizzle the glaze over the cooled bars. You can use a spoon or a piping bag for a pretty finish. If you like, add chopped nuts or sprinkles for extra flair. 5. Finally, cut the bars into pieces and enjoy this tasty treat! For the full recipe, refer back to the section above. - Ingredient temperature matters. Use room temperature butter and eggs. It helps your batter mix well and bake evenly. Cold ingredients can lead to dense bars. - Avoid overmixing. Once you combine wet and dry ingredients, mix just until smooth. Overmixing can make your bars tough. You want them soft and fluffy. - Adjust glaze thickness. For a thicker glaze, use more powdered sugar. For a thinner glaze, add more maple syrup. Aim for a nice drizzle over your bars. - Add decorative elements. Chopped nuts or colorful sprinkles can make your bars pop. They add texture and fun. Use your favorite toppings to make them yours. You can find the full recipe for these delightful Maple Donut Bars above. Enjoy creating your sweet treats! {{image_2}} You can make maple donut bars even more fun by adding new flavors. Here are two tasty ideas: - Chocolate maple donut bars: To make these, add cocoa powder to the batter. Use 1/3 cup of unsweetened cocoa powder. This gives your bars a rich, chocolatey taste. Top with a chocolate glaze for a double treat. - Spiced maple bars: For a warm twist, add more spices like ginger or allspice. You can use 1/4 teaspoon of each spice. This will give your bars a cozy flavor, perfect for chilly days. If you have dietary needs, you can still enjoy these tasty bars. Here are some easy swaps: - Gluten-free maple donut bars: Use gluten-free all-purpose flour instead of regular flour. Make sure your baking powder is gluten-free too. This way, everyone can enjoy them. - Vegan maple donut bars: To make these vegan, replace the eggs with flax eggs. Mix one tablespoon of ground flaxseed with three tablespoons of water for each egg. Use plant-based butter and non-dairy milk instead of buttermilk. These swaps keep the bars soft and moist. Explore these variations to find your favorite way to enjoy maple donut bars! For the full recipe, check out the [Full Recipe]. To keep your maple donut bars fresh, store them at room temperature. Place them in an airtight container. This method works well for about 3-4 days. You can also use parchment paper between layers to prevent sticking. If you want longer freshness, refrigeration is the way to go. Just remember, chilling can change the texture slightly. Wrap the bars tightly in plastic wrap or foil before placing them in the fridge. They should last for about a week this way. Freezing is a great option if you want to enjoy your maple donut bars later. Cut them into individual bars first. Then, wrap each bar tightly in plastic wrap. Place the wrapped bars in a freezer-safe bag or container. They can stay frozen for up to three months. When you're ready to eat, just take a bar out and let it thaw at room temperature. If you prefer a warm treat, you can also reheat them in the microwave for about 15-20 seconds. Enjoy your tasty bars anytime! How long do homemade maple donut bars last? Homemade maple donut bars stay fresh for about 3 to 5 days. Store them in an airtight container at room temperature. This keeps them moist and tasty. If you see any signs of spoilage, it’s best to toss them. Can I use a different type of flour? Yes, you can use other flours. For a gluten-free option, try almond flour or a gluten-free blend. Keep in mind that the texture may change a bit. You might need to adjust the liquid in the recipe too. What can I substitute for buttermilk? You can replace buttermilk with regular milk. Just add one tablespoon of vinegar or lemon juice to the milk and let it sit for 5 minutes. This makes a quick buttermilk substitute. You can also use yogurt or sour cream mixed with water. For the complete recipe, check out the Full Recipe. In summary, we explored how to make delicious maple donut bars. I shared key ingredients, from flour to eggs. You learned step-by-step instructions for mixing and baking. I offered tips for perfect bars and glazing. Plus, we covered fun variations and how to store them. Enjoy trying the recipes and make them your own. Remember, baking is about experimenting and having fun. You’ll create a treat everyone will love!](https://grilledflavors.com/wp-content/uploads/2025/05/b2f18fe0-8625-459b-820d-4f8b8571a440.webp)
Maple Donut Bars Tasty Treat for Any Occasion
If you’re craving a sweet treat that’s perfect for any occasion, you’ll love these Maple Donut Bars! With their soft texture and rich flavor, they’re
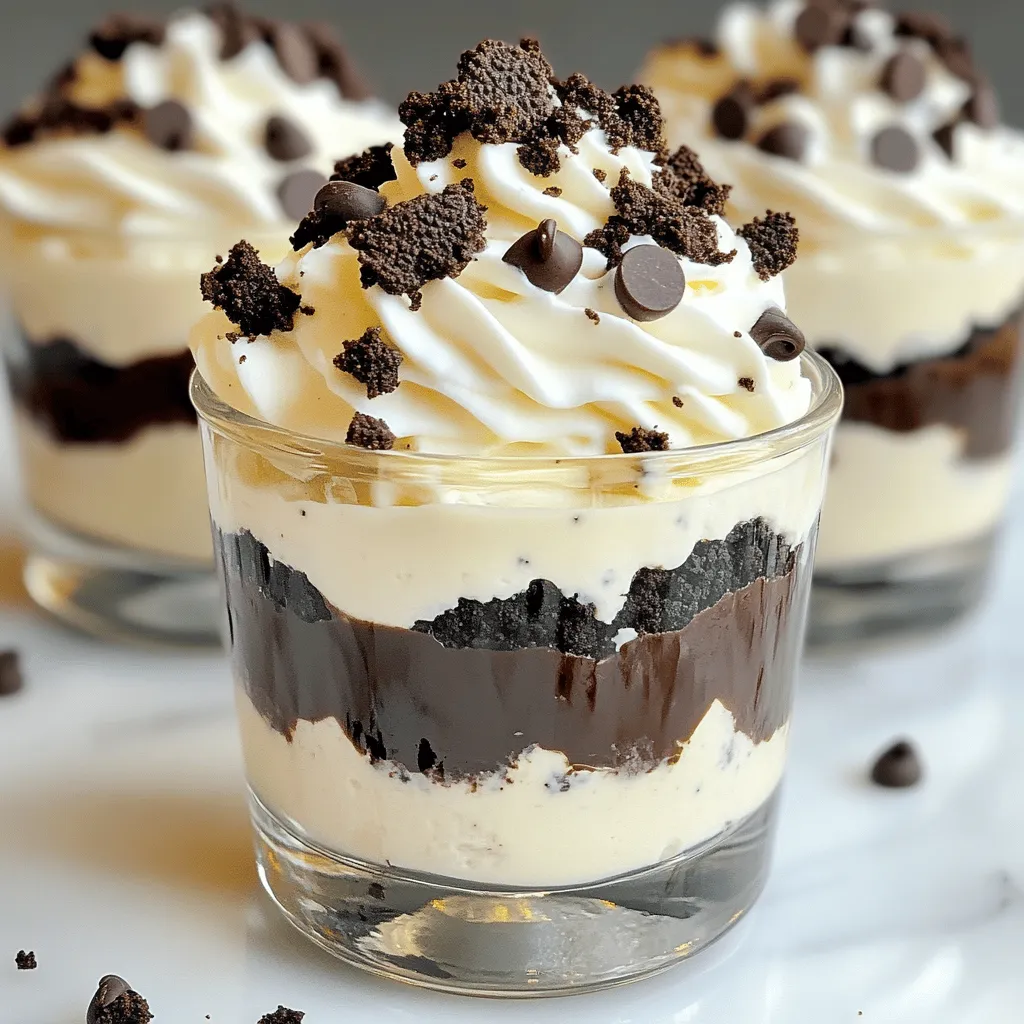
Oreo Dessert Cups Simple and Tasty Treat Recipe
Indulge your sweet tooth with my easy Oreo Dessert Cups recipe! This treat combines the classic Oreo flavor with creamy layers that will make your
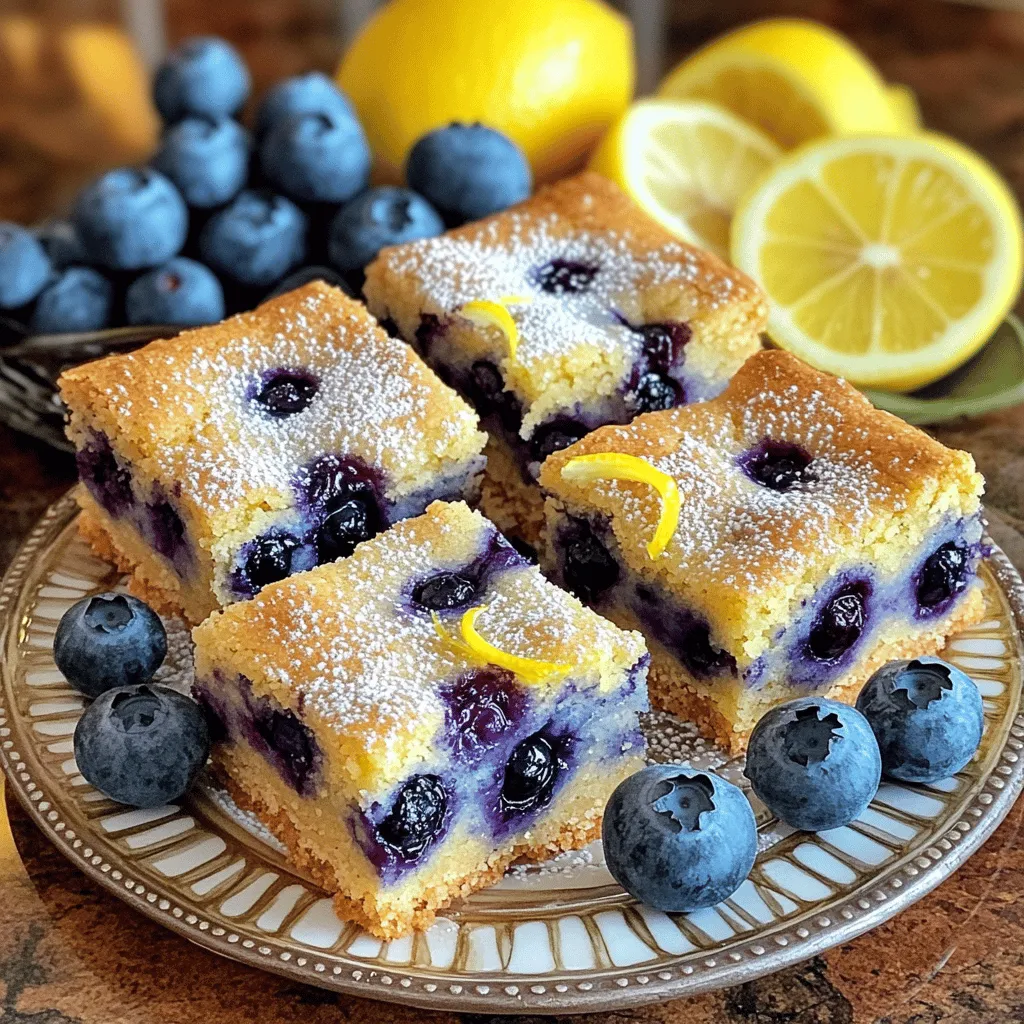
Blueberry Lemon Cookie Bars Delightful and Easy Recipe
Welcome to a burst of flavor with my Blueberry Lemon Cookie Bars! This easy recipe combines the sweetness of blueberries with zesty lemon for a
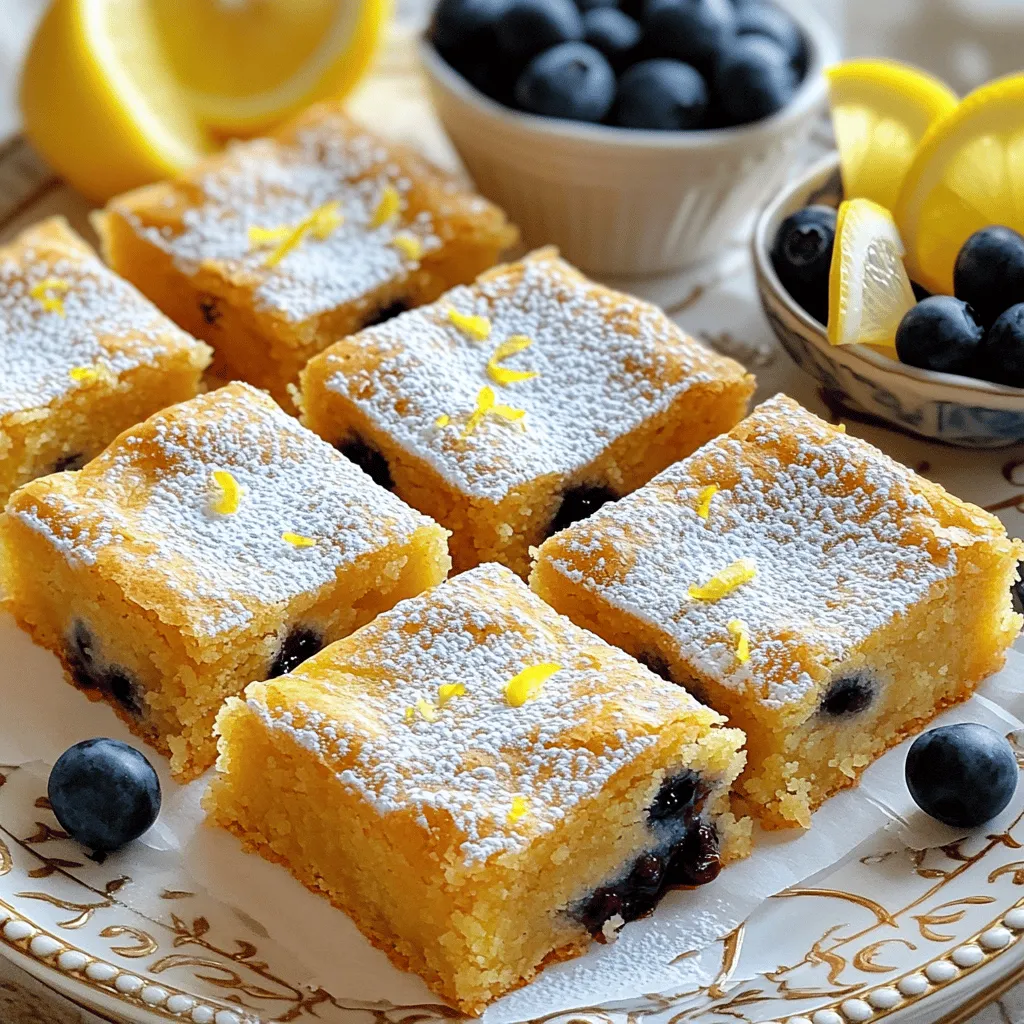
![To make the Blueberry Lemon Crème Cake, you need a mix of dry and wet ingredients. Here’s a detailed list: - Dry Ingredients - 1 ½ cups all-purpose flour - 1 teaspoon baking powder - ¼ teaspoon baking soda - ¼ teaspoon salt - Wet Ingredients - ½ cup unsalted butter, softened - 1 cup granulated sugar - 2 large eggs - 2 tablespoons lemon zest - ½ cup sour cream - 1 teaspoon vanilla extract - 1 cup fresh blueberries (plus extra for garnishing) - 1 tablespoon lemon juice - For the Crème Topping - 1 cup heavy whipping cream - 2 tablespoons powdered sugar - 1 teaspoon vanilla extract - 1 tablespoon lemon zest For the best results, I recommend using high-quality vanilla extract. It enhances the cake's flavor. Choose fresh blueberries for a burst of sweetness. They hold up better in baking. You can find sour cream at any grocery store. It adds moisture and richness to the cake. You can check the [Full Recipe] for more detailed guidance on making this delightful treat. First, preheat your oven to 350°F (175°C). This ensures even baking. Next, get a 9-inch round cake pan. Grease it with butter or line it with parchment paper. This helps the cake come out easily. Now it’s time to mix your dry ingredients. In a medium bowl, whisk together the flour, baking powder, baking soda, and salt. Set this aside for later. In a large bowl, cream the softened butter and granulated sugar. Use an electric mixer for about 3 to 4 minutes until it looks light and fluffy. Next, add each egg one at a time. Mix in the lemon zest, sour cream, and vanilla extract. Blend until fully combined. Now, slowly add the dry mixture to the wet mixture. Mix just until combined—this keeps your cake light. This is where the magic happens! Gently fold in the fresh blueberries and lemon juice. Be careful not to break the blueberries; you want them whole for bursts of flavor. Pour the batter into your prepared cake pan and spread it evenly. Bake in your preheated oven for 30 to 35 minutes. Check if the cake is done by inserting a toothpick into the center. If it comes out clean, it’s ready! Once baked, let the cake cool in the pan for about 10 minutes. This helps it set. Then, transfer it to a wire rack to cool completely. Cooling is key for the perfect texture. While the cake cools, let’s make the crème topping. Start with a chilled bowl to whip your heavy cream. Whip it until it starts to thicken. Gradually add the powdered sugar and vanilla extract. Keep whipping until you see stiff peaks. Finally, gently fold in the lemon zest. This adds a zesty kick. Be careful not to overmix; you want your cream light and airy. Now, once the cake is cool, spread the lemon crème over the top. This adds a smooth finish. Enjoy this delightful flavor burst! For the full recipe, check out the details above. To make your Blueberry Lemon Crème Cake perfect, avoid common mistakes. A frequent issue is overmixing the batter. This makes the cake tough. Mix just until you see no dry flour. Also, use fresh blueberries. Frozen ones may make the cake soggy. Use a light, non-stick cake pan. This helps the cake rise evenly. A good electric mixer is key for creaming butter and sugar well. For a lovely presentation, garnish your cake with whole blueberries. A sprinkle of lemon zest adds brightness. You can serve slices on white plates to make the colors pop. Pair the cake with a nice cup of tea or lemonade. These drinks enhance the cake’s fresh flavors. You can also add a scoop of vanilla ice cream for a fun twist. For the full recipe, check the earlier section. {{image_2}} You can easily change the taste of your Blueberry Lemon Crème Cake. Here are some fun ideas: - Substituting Fruits: Try raspberries or strawberries. They add a nice twist. You can also use peaches for a summer vibe. - Add-ins: Consider mixing in some chopped nuts. Walnuts or almonds add crunch and flavor. - Dietary Preferences: To make it gluten-free, swap regular flour for almond or coconut flour. For dairy-free, use coconut cream instead of heavy cream. Looking to make your cake stand out? Here are some simple tips: - Decorating the Cake: Dust the top with powdered sugar. You can also add lemon slices for a fresh look. Fresh mint leaves can add a nice touch, too. - Themed Variations: For holidays, use colored sprinkles that match the occasion. For weddings, use elegant flowers to decorate. A simple white cake can look stunning with a few fresh blooms. These variations let you create a cake that fits any occasion or taste! For the full recipe, check out the Blueberry Lemon Crème Cake 🫐. To keep your Blueberry Lemon Crème Cake fresh, store it in the fridge. Use an airtight container to prevent drying. You can keep it this way for up to five days. If you want to save it longer, wrap it tightly in plastic wrap and place it in the freezer. This cake can last up to three months in the freezer. To reheat your cake, slice it and place it in the microwave. Heat it in short bursts of about 10 seconds. This keeps the cake soft and moist. If your cake is stale, you can refresh it by adding a little milk or cream on top before reheating. This simple trick can bring back some of its original texture. Enjoy your cake even after a few days! For the full recipe, check out the detailed instructions above. What are the best blueberries to use? Use fresh blueberries for the best taste. Look for firm berries that are dark blue. They should be plump and free from wrinkles. Frozen blueberries can work too, but they may make the cake a bit soggy. Can I make this cake ahead of time? Yes, you can make the cake a day before. Wrap it in plastic wrap to keep it fresh. Just add the crème topping before serving. This helps keep the cake light and fluffy. How do I know when the cake is done baking? Check the cake at 30 minutes. Insert a toothpick in the center. If it comes out clean, the cake is ready. If it’s wet, bake for another 5 minutes and check again. What to do if the cake is too dry or too dense? If the cake turns out dry, it may have baked too long. Try reducing the baking time next time. You can also add a simple syrup to moisten each slice. To fix a dense cake, make sure to mix the batter gently. Overmixing can lead to density. How can I fix a buttercream that won’t whip? If your buttercream does not whip, check if your mixing bowl is cold. Make sure your cream is very cold too. If it still won’t whip, add a bit more cold cream and mix again until it thickens. To sum up, making a Blueberry Lemon Crème Cake is simple and fun. You learned about key ingredients, preparation steps, and baking tips to avoid common mistakes. The right tools help you get the best results. Personalizing your cake with different flavors or themes adds a special touch. Remember to store leftovers properly for freshness. Now, you’re ready to impress your friends and family with this delightful dessert. Enjoy your baking journey!](https://grilledflavors.com/wp-content/uploads/2025/05/baea06d0-4580-4a78-8393-f3a50c129798.webp)
Blueberry Lemon Crème Cake Delightful Flavor Burst
Are you ready to indulge in a sweet treat that perfectly balances tart and sweet? My Blueberry Lemon Crème Cake is a delightful flavor burst
Blueberry Lemon Blondies Delightful Sweet Treat Recipe
If you’re craving a sweet treat that balances fruity and bright flavors, you’ve come to the right place! My Blueberry Lemon Blondies are the perfect

Ultimate Blueberry Coffee Cake Simple and Tasty Treat
Craving something delicious? You’ve come to the right place! My Ultimate Blueberry Coffee Cake is simple and tasty. This cake offers a burst of flavor
![To make the perfect blueberry muffin cake, gather these ingredients: - 2 cups all-purpose flour - 1 cup granulated sugar - 1 tablespoon baking powder - 1/2 teaspoon salt - 1/2 cup unsalted butter, melted - 1 cup milk - 2 large eggs - 1 teaspoon vanilla extract - 2 cups fresh blueberries (or frozen, if available) - 1 teaspoon lemon zest - 1/2 teaspoon cinnamon - 1/4 cup coarse sugar for topping Using high-quality ingredients makes a big difference. Choose fresh blueberries for the best flavor. If you can’t find fresh, frozen blueberries work well. Make sure your baking powder is fresh; it helps the cake rise. Use unsalted butter for better control over salt levels. Always measure your flour correctly; too much can make the cake dense. If you need to make swaps, here are some ideas: - Flour: Use whole wheat flour for a healthier option. - Sugar: Coconut sugar or honey can replace granulated sugar. - Milk: Almond milk or oat milk works if you're dairy-free. - Eggs: For a vegan option, try flax eggs or unsweetened applesauce. - Blueberries: Try raspberries or chopped strawberries for a twist. Feel free to explore these substitutions based on what you have. You can find more details in the Full Recipe. Start by preheating your oven to 350°F (175°C). This step is key for even baking. Next, take a 9x13 inch baking pan. You can grease it with butter or line it with parchment paper. Both methods help the cake come out easily. In a large bowl, mix together the dry ingredients. Combine 2 cups of all-purpose flour, 1 cup of granulated sugar, 1 tablespoon of baking powder, 1/2 teaspoon of salt, and 1/2 teaspoon of cinnamon. Stir these until they blend well. In another bowl, whisk together the wet ingredients. Mix 1/2 cup of melted butter, 1 cup of milk, 2 large eggs, 1 teaspoon of vanilla extract, and the zest of 1 lemon. Combine these until smooth. Now, pour the wet mix into the dry mix. Stir gently until just combined. It’s fine if you see some lumps; don’t overmix! Next, fold in 2 cups of fresh blueberries. If you use frozen ones, they can be a bit softer but still tasty. Ensure the blueberries are evenly spread throughout the batter. Pour the batter into your prepared pan. Smooth the top with a spatula. Sprinkle 1/4 cup of coarse sugar on top. This gives a nice crunch. Bake for 40-45 minutes. Check if it’s done by inserting a toothpick into the center. If it comes out clean, it’s ready! Let the cake cool in the pan for 10 minutes. Then transfer it to a wire rack to cool fully. Enjoy the adventure in creating this blueberry muffin cake! For the complete recipe, check the Full Recipe section. To get that soft and moist texture, follow these simple tips: - Use room temperature ingredients. This helps the batter mix better. - Do not overmix. Stir just until the dry and wet ingredients combine. Some lumps are okay. - Add blueberries last. Gently fold them in to avoid breaking. This keeps the cake fluffy. Here are some mistakes that can ruin your cake: - Skipping the baking powder. This is key for a good rise. - Using cold ingredients. Cold butter or eggs can lead to dense cake. - Overbaking. Check your cake a few minutes early. A toothpick should come out clean but not dry. Want to make your cake even more delicious? Try these ideas: - Add zest. Lemon or orange zest brightens the flavor. - Sprinkle spices. A hint of nutmeg or ginger adds warmth. - Mix in nuts. Chopped walnuts or almonds give a nice crunch. These tips will elevate your blueberry muffin cake. For the complete recipe, check the [Full Recipe]. {{image_2}} You can make a gluten-free version of this muffin cake. Use a gluten-free flour blend. Many blends work well in baking. Just replace all-purpose flour with the blend in equal parts. This swap keeps the cake moist and tasty. Adding nuts can give your cake a nice crunch. Chopped walnuts or pecans work great. You can also add spices for extra flavor. Consider a pinch of nutmeg or more cinnamon. These additions can create a unique twist on the classic recipe. Blueberries are delicious, but other fruits can shine too. Try using raspberries, strawberries, or even peaches. Just make sure the fruit is ripe for the best taste. Each fruit will change the flavor, making the cake your own. To keep your blueberry muffin cake fresh, store it in an airtight container. This method helps retain moisture. Place it at room temperature for up to three days. If you want to keep it longer, refrigerate it. Just remember, refrigeration can change the cake's texture. You can freeze blueberry muffin cake for up to three months. First, let the cake cool completely. Then, wrap it tightly in plastic wrap. After that, place it in a freezer-safe bag or container. When ready to enjoy, remove it from the freezer and let it thaw in the fridge overnight. Reheat slices of blueberry muffin cake in a microwave for 15-20 seconds. This warms it up nicely without drying it out. If you prefer a crispy top, heat it in the oven at 350°F (175°C) for about 10 minutes. Enjoy your warm slice with a cup of coffee or tea! You can check if the cake is done by using a toothpick. Insert it into the center of the cake. If it comes out clean, the cake is ready. The edges may also look golden brown, and the top will spring back when you touch it lightly. Yes, you can use frozen blueberries in this recipe. They work well and save time. Just make sure to add them straight from the freezer. Do not thaw them first, as this keeps the batter from turning blue. They may sink a bit more, but they will still taste great. This cake is delicious on its own, but you can serve it with a few extras. Here are some ideas: - A dollop of whipped cream - A scoop of vanilla ice cream - A drizzle of fresh lemon glaze - A sprinkle of powdered sugar on top Yes, you can adjust this recipe easily. To make a smaller cake, halve the ingredients. Use a smaller baking dish, like an 8x8 inch pan. For a larger cake, double the ingredients and use a bigger pan, like a 9x13 inch pan. Just remember to adjust the baking time as needed. For the full recipe, check the detailed instructions above. This blueberry muffin cake is a joy to bake. It takes about 40 to 45 minutes in the oven. You’ll want to check with a toothpick; it should come out clean when ready. This recipe serves 12 people, making it perfect for a family treat or a gathering with friends. For more detailed steps, check the [Full Recipe](#). You’ll find everything you need to create this delicious dessert! This blog post covered all you need for blueberry muffin cake. We examined key ingredients, quality tips, and options for substitutes. I provided step-by-step baking instructions, along with common mistakes to avoid. We explored tasty variations and safe storage methods. Lastly, we answered common questions about baking times and serving suggestions. Enjoy your baking and feel free to make it your own. Happy cooking!](https://grilledflavors.com/wp-content/uploads/2025/05/7926ee30-1729-418e-8972-5c534d6f867f.webp)
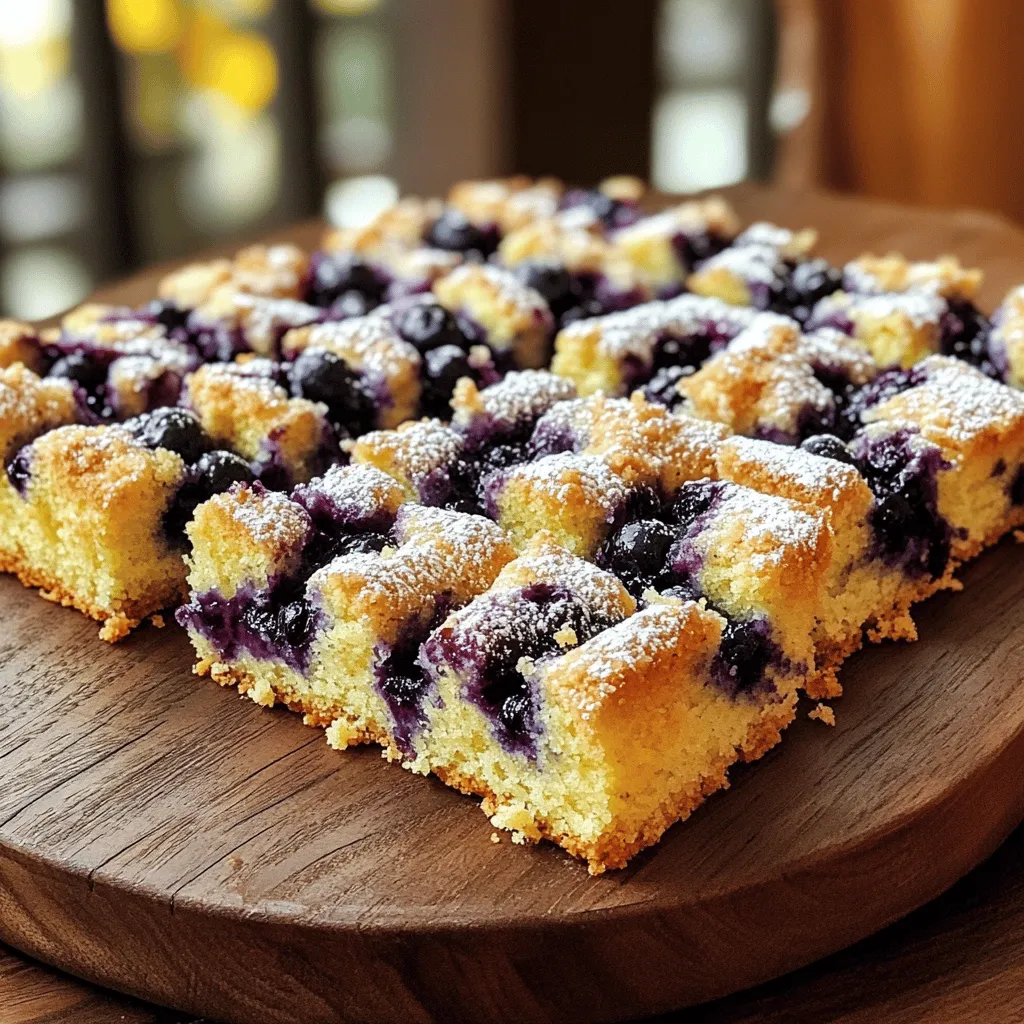
Blueberry Muffin Cake Deliciously Moist Recipe
Looking for a sweet treat that’s easy to make and bursting with flavor? This Blueberry Muffin Cake is your perfect solution! You’ll enjoy its deliciously
Irresistible Blueberry Sour Cream Coffee Cake Recipe
Are you ready to bake a coffee cake that will make your mornings special? This Blueberry Sour Cream Coffee Cake is moist, rich, and bursting
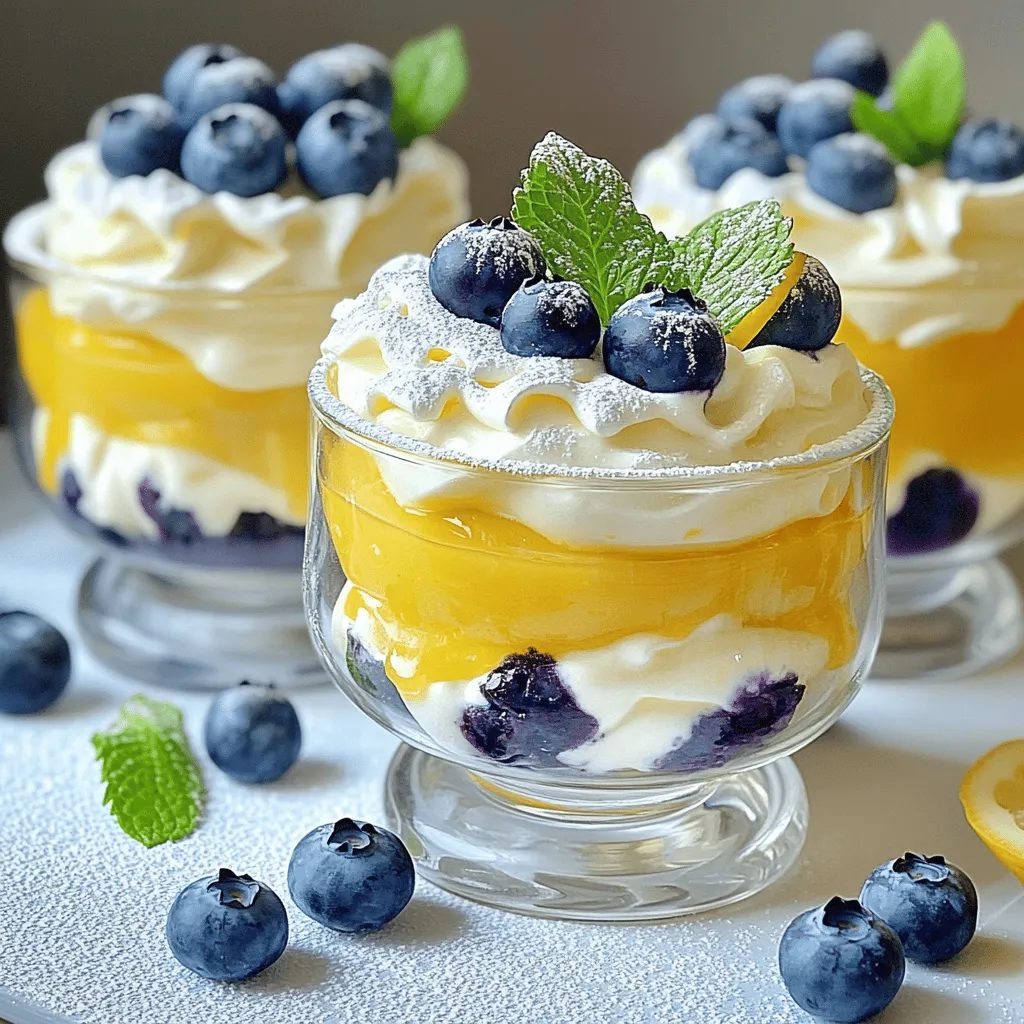
Lemon Blueberry Fluff Deliciously Light Dessert Treat
Are you craving a dessert that dances on your taste buds? Look no further! My Lemon Blueberry Fluff is a wonderfully light treat that combines
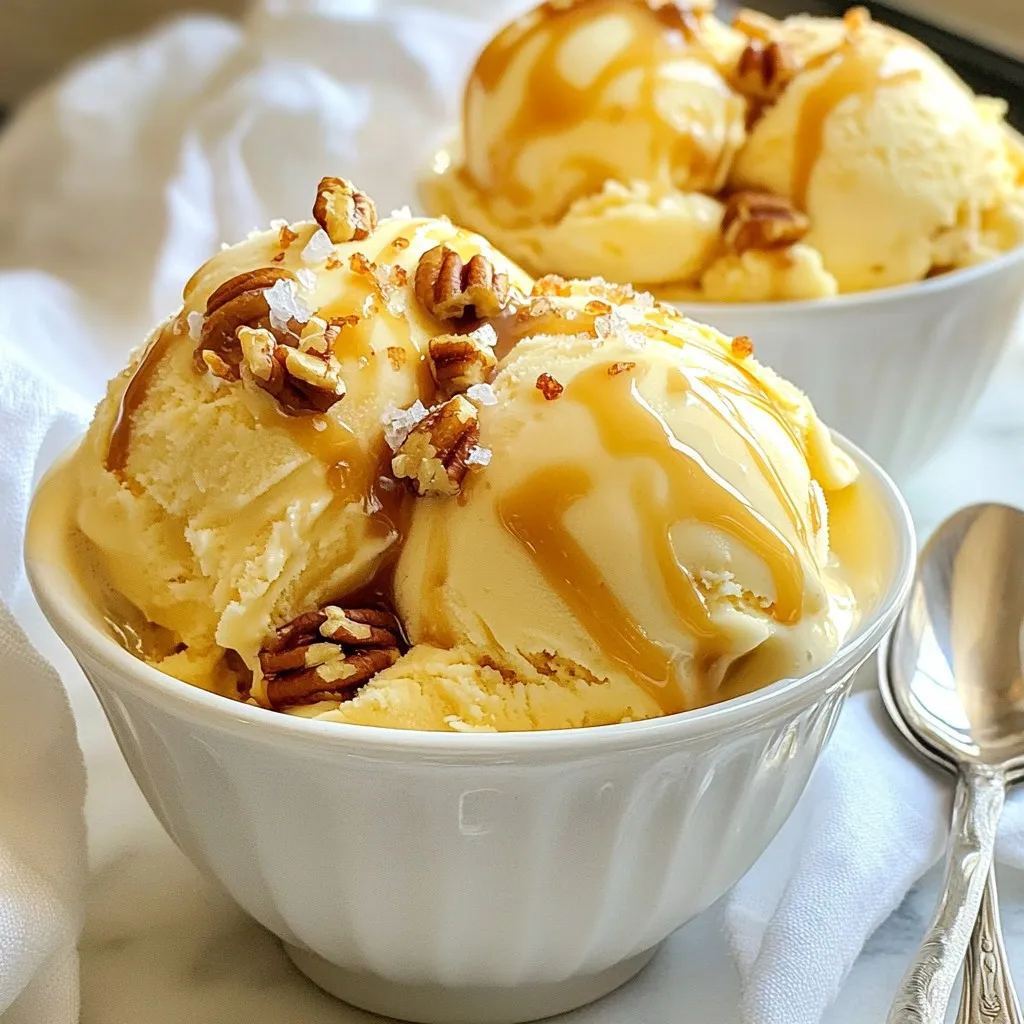
No-Churn Salted Caramel Ice Cream Delightful Treat
Craving a sweet, creamy treat without the hassle of an ice cream maker? You’re in luck! My No-Churn Salted Caramel Ice Cream is a simple