Desserts
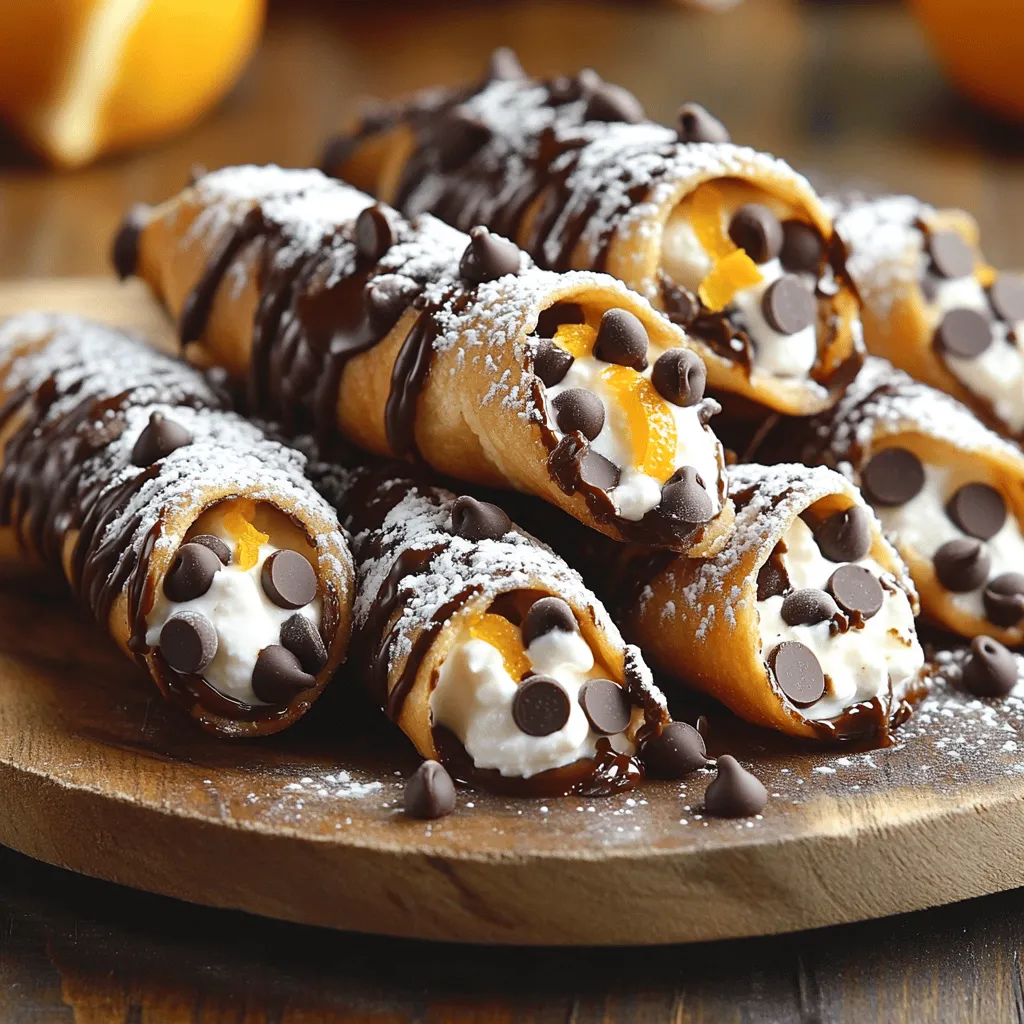
Cannoli with Mascarpone Filling Delightful Dessert Treat
Craving a sweet treat? Let’s elevate your dessert game with Cannoli filled with mascarpone! This delightful dessert is creamy and crunchy, offering a perfect blend
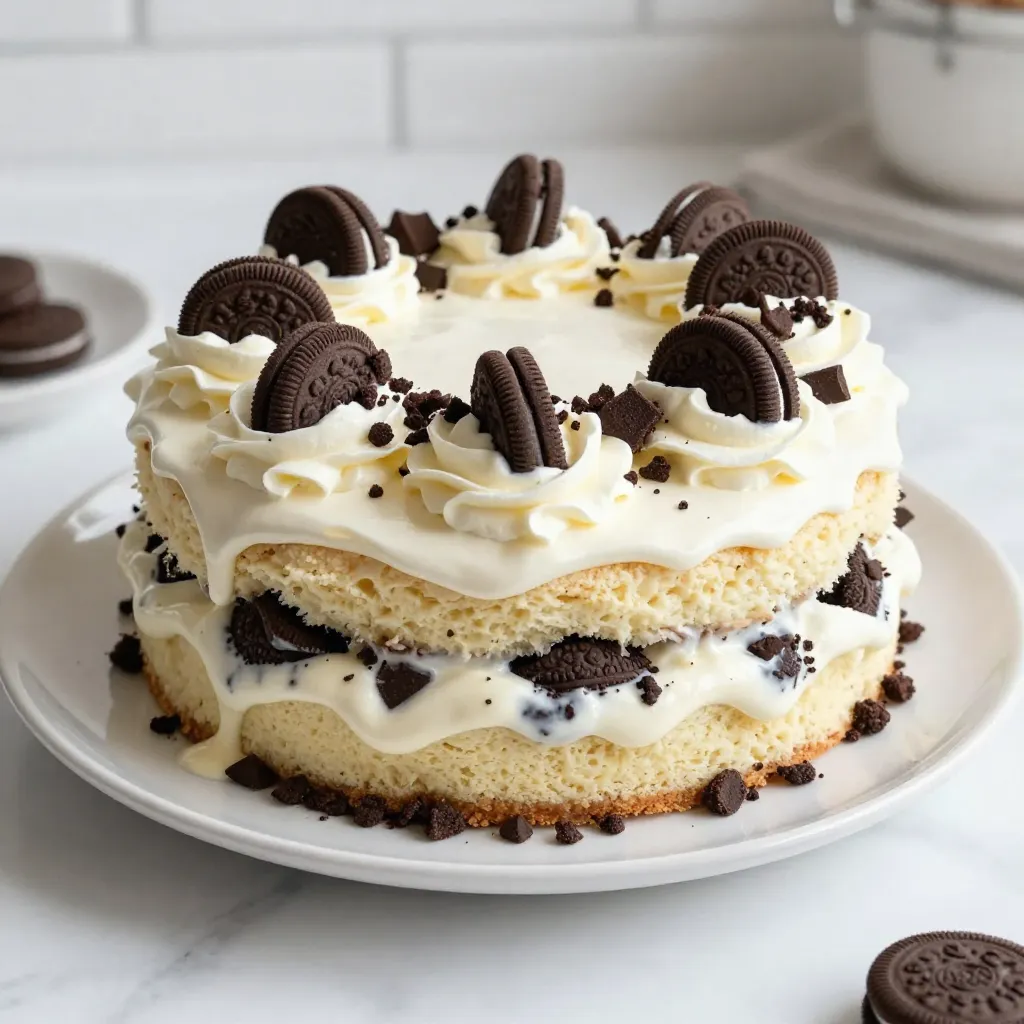
Cookies and Cream Poke Cake Delightful Dessert Recipe
Get ready to indulge in a sweet treat that will thrill your taste buds! My Cookies and Cream Poke Cake combines a soft vanilla cake
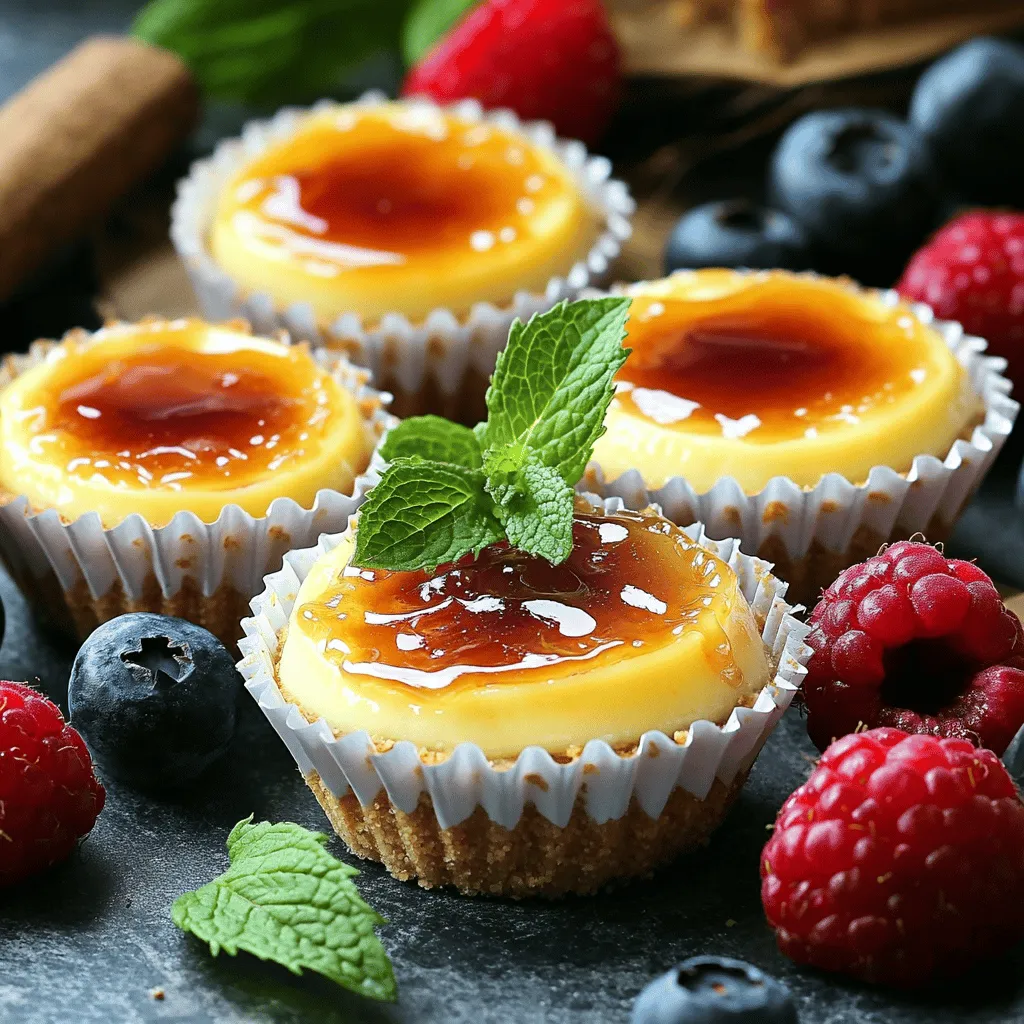
![To make Mini Crème Brûlée Cheesecakes, you need to gather the right ingredients. Here’s what you will need: - Mini Crème Brûlée Cheesecake crust components - 1 cup graham cracker crumbs - 2 tablespoons granulated sugar - 4 tablespoons unsalted butter, melted - Cream cheese filling essentials - 16 oz cream cheese, softened - 1 cup granulated sugar - 1 teaspoon vanilla extract - 2 large eggs - 1 cup heavy cream - Ingredients for caramelizing - Extra granulated sugar for caramelizing Gather these items to create a delicious treat. The crust gives a nice crunch, while the filling is creamy and rich. The sugar topping adds a delightful crisp that makes every bite special. For the full recipe, you can refer to the instructions provided above. Enjoy your cooking adventure! 1. Preheat your oven and prepare the muffin tin. Set your oven to 325°F (160°C). This is the perfect temperature for baking your mini cheesecakes. Line a muffin tin with cupcake liners to make easy serving. 2. Making the graham cracker crust. In a bowl, mix 1 cup of graham cracker crumbs, 2 tablespoons of sugar, and 4 tablespoons of melted butter. Stir until it’s combined well. Press about 1 tablespoon of this mixture into the bottom of each liner. Bake for 5-7 minutes until firm, then let them cool. 3. Preparing the cheesecake filling. In a large bowl, beat 16 oz of softened cream cheese until smooth. Slowly add 1 cup of sugar while mixing until creamy. Then, stir in 1 teaspoon of vanilla extract. Add 2 large eggs one at a time, mixing well after each. Finally, mix in 1 cup of heavy cream until it’s all smooth. 1. Pouring the batter and baking time. Pour the cheesecake batter over the cooled crusts in the muffin tin. Fill each one about 3/4 full. Bake for 20-25 minutes, or until the edges are set and the center is slightly jiggly. 2. Cooling processes. Turn off the oven and let the cheesecakes cool for about 1 hour inside. After that, take them out and let them cool to room temperature. Then, refrigerate them for at least 4 hours, or overnight is best. This helps them set completely. 1. How to caramelize sugar effectively. Before serving, sprinkle a thin layer of granulated sugar on top of the chilled cheesecakes. Use a kitchen torch to carefully caramelize the sugar until it turns golden and bubbly. 2. Tips for achieving the perfect crème brûlée finish. Keep the torch moving to avoid burning the sugar. Let it cool for a minute and watch as the sugar hardens into a perfect crispy layer. This adds a delightful crunch to your creamy cheesecakes. For a full recipe, you can refer to the [Full Recipe]. - Overmixing the cheesecake batter: Mix just until smooth. Overmixing makes the cheesecake dense and heavy. It can add too much air, causing cracks during baking. Aim for a creamy texture without overdoing it. - Not cooling properly: Letting the cheesecakes cool in the oven is key. This helps prevent sudden temperature changes, which can crack the tops. After baking, turn off the oven and let them sit for an hour. Then cool them to room temp before chilling in the fridge. - Presentation ideas for serving: Serve the mini cheesecakes on a beautiful platter. Add fresh berries like strawberries or blueberries for color. A sprig of mint can also enhance the look. It makes the dessert feel more special and inviting. - Best accompaniments to mini cheesecakes: Pair your cheesecakes with a dollop of whipped cream or a drizzle of caramel sauce. You can also serve them with a scoop of vanilla ice cream for a treat. Each bite will be a delight! - Essential kitchen tools for preparation: You will need a mixing bowl, a whisk, and a muffin tin. A kitchen torch is essential for caramelizing the sugar. Invest in quality tools to make your cooking easier. - Recommended baking dishes: Use a non-stick muffin tin for easy removal. Silicone molds can also work well, as they allow for easy popping out of the cheesecakes. For mixing, a hand mixer or stand mixer will save you time and effort. For the full recipe, check out [Full Recipe]. {{image_2}} You can change things up with fun flavors in your mini cheesecakes. Here are some ideas: - Chocolate: Add melted chocolate to the filling. It makes a rich treat. - Fruit: Mix in pureed strawberries or raspberries for a fruity twist. - Coffee: Blend brewed coffee into the batter for a coffee-flavored delight. - Lemon: Stir in lemon zest and juice for a fresh, zesty taste. You can also switch the topping. Instead of classic sugar, try these: - Chocolate Ganache: Spread a layer of smooth ganache on top. - Fruit Compote: Top with a warm fruit sauce for added sweetness. - Whipped Cream: Add a dollop of fresh whipped cream for a creamy finish. If you want to make vegan mini cheesecakes, here are some swaps: - Cream Cheese: Use vegan cream cheese for the filling. - Eggs: Replace eggs with flaxseed meal mixed with water. - Heavy Cream: Use coconut cream for a rich texture. For a gluten-free crust, try these options: - Almond Flour: Mix almond flour with melted butter for a nutty base. - Oats: Use crushed gluten-free oats mixed with coconut oil. - Rice Cracker Crumbs: Crush rice crackers for a crunchy crust. These variations make your mini crème brûlée cheesecakes fun and unique. Enjoy exploring different flavors and dietary needs! For the full recipe, check out the details above. To keep your mini crème brûlée cheesecakes fresh, store them properly in the fridge. Place them in an airtight container. This helps prevent them from drying out or absorbing other smells. You can stack them, but keep a layer of parchment paper between them. This will stop them from sticking together. If you want to freeze them, follow these tips. First, wrap each cheesecake tightly in plastic wrap. Then, place them in a freezer-safe container. They can last up to three months in the freezer. When ready to eat, thaw them in the fridge overnight. In the fridge, mini cheesecakes last about five days. After that, they may not taste as good. Always check for signs of spoilage. Look for any change in color or texture. If they smell bad or have an off taste, it’s best to throw them away. Proper storage helps keep your dessert tasting fresh and delicious! To make mini crème brûlée cheesecakes, follow these key steps: - Preheat your oven to 325°F (160°C). - Mix graham cracker crumbs, sugar, and melted butter in a bowl. - Press the mixture into cupcake liners to form a crust. - Bake for about 5-7 minutes. - Beat softened cream cheese until smooth, then add sugar gradually. - Mix in vanilla and eggs, one at a time. - Stir in heavy cream until well combined. - Pour the batter into the crusts, filling them 3/4 full. - Bake for 20-25 minutes until edges are set. - Cool in the oven for an hour, then refrigerate for at least 4 hours. - Just before serving, caramelize sugar on top with a torch. You can find the Full Recipe with all details mentioned above. Yes, you can prepare these mini cheesecakes ahead of time. Here are some tips: - Make the crust and filling a day in advance. - Store the cheesecakes covered in the fridge. - Caramelize the sugar right before serving for best results. This way, you save time and enjoy fresh treats! If you don't have a kitchen torch, here are some alternatives: - Use your oven's broiler. Sprinkle sugar on top and place it under the broiler. - Keep a close watch to avoid burning. - Another option is to use a cast-iron skillet. Heat it and press it on the sugar to caramelize. Both methods can work if done carefully. You can find mini crème brûlée cheesecakes at many bakeries and online. Consider these options: - Look for local bakeries that specialize in desserts. - Check online platforms that deliver gourmet treats. When buying, check for quality ingredients and customer reviews. This ensures you get a delightful treat! You've learned how to make mini crème brûlée cheesecakes from scratch. We covered ingredients, steps, and tips to avoid mistakes. With flavor variations and storage methods, you're ready to impress. Remember, practice makes perfect in the kitchen. Trust your skills, and enjoy your delicious creations!](https://grilledflavors.com/wp-content/uploads/2025/05/2a7da353-85d7-4c08-822a-b83df48d194c.webp)
Mini Crème Brûlée Cheesecakes Delightful Sweet Treat
Indulge in the perfect blend of creamy cheesecake and crispy caramel with my Mini Crème Brûlée Cheesecakes! These delightful treats are easy to make and
![- 1 cup graham cracker crumbs - 1/4 cup unsalted butter, melted - 16 oz cream cheese, softened - 1/2 cup granulated sugar - 1/4 cup sour cream - 1 tablespoon lemon zest - 2 tablespoons fresh lemon juice - 1 teaspoon vanilla extract - 2 large eggs - 1 cup fresh blueberries - Additional blueberries for topping These main ingredients create a rich, creamy base that shines with lemon and blueberry flavors. The graham cracker crumbs form a crunchy crust that balances the smooth cheesecake. Cream cheese gives this dessert its creamy texture. The sour cream adds softness, while the lemon zest and juice brighten the taste. Fresh blueberries bring natural sweetness and a pop of color. - 1 tablespoon cornstarch (for blueberry topping) - 1 tablespoon sugar (for blueberry topping) Using cornstarch thickens the blueberry topping, making it syrupy and delicious. The extra sugar enhances the blueberries’ natural sweetness. You can add these optional ingredients if you want to elevate your mini cheesecakes even more. If you want to explore more about how to make these delightful mini cheesecakes, check the Full Recipe for detailed steps. - Preheat the oven and prepare the muffin pan: Start by setting your oven to 325°F (160°C). This temperature is perfect for baking mini cheesecakes. Line a muffin pan with cupcake liners or grease it with non-stick spray. This step helps with easy removal later. - Combine graham cracker crumbs and melted butter: In a mixing bowl, take 1 cup of graham cracker crumbs and add 1/4 cup of melted unsalted butter. Stir well until the crumbs soak up the butter. This mixture forms a tasty base for your cheesecake. - Beat cream cheese and sugar until smooth: In a large bowl, use an electric mixer to beat 16 oz of softened cream cheese with 1/2 cup of granulated sugar. Mix until the mixture is smooth and creamy. This is key for a rich cheesecake. - Mix in sour cream, lemon zest, lemon juice, and vanilla extract: Next, add 1/4 cup of sour cream, 1 tablespoon of lemon zest, 2 tablespoons of fresh lemon juice, and 1 teaspoon of vanilla extract. Blend these ingredients until well mixed. The lemon adds a bright flavor that complements the blueberries. - Incorporate eggs into the mixture and fold in blueberries: Add 2 large eggs, one at a time. Mix well but avoid overmixing, as this can make the cheesecake dense. Gently fold in 1 cup of fresh blueberries. This step brings a burst of fruity flavor to each bite. - Bake mini cheesecakes and cool properly: Pour the cheesecake filling into each muffin liner, filling them about 3/4 full. Bake for 18-20 minutes. The centers should be set but still slightly jiggly. Turn off the oven and let them sit inside for an extra 10-15 minutes. This helps them cool gently. Afterward, let them cool at room temperature before chilling in the fridge for at least 2 hours. This process ensures your mini lemon blueberry cheesecakes come out perfectly creamy and delicious. For more detailed steps, check the Full Recipe. To create the perfect mini lemon blueberry cheesecake, avoid overmixing the batter. Overmixing can lead to a dense texture instead of the creamy delight we want. Mix just until the ingredients combine, and you’ll keep that luscious mouthfeel. Cooling is key for flavor. After baking, turn off the oven and let the cheesecakes cool inside for 10-15 minutes. This gentle cooling helps prevent cracks and keeps the texture smooth. Then, move them to the fridge to chill for at least 2 hours. Chilling helps the flavors deepen and blend nicely. Serving ideas add a touch of elegance. Place your mini cheesecakes on a lovely platter. You can sprinkle powdered sugar on top for a sweet touch. Fresh mint leaves add a pop of color and a hint of freshness. For garnishing, consider adding more blueberries on top. These add not only color but also a burst of flavor. You might even drizzle some blueberry syrup if you made it. This will enhance the visual appeal and make your dessert look like it came from a fancy restaurant. For the full recipe, you can check the section above. {{image_2}} You can easily change the flavor of these mini lemon blueberry cheesecakes. Try using different fruits like strawberries or raspberries. Each fruit brings a new taste. You can also add flavored creams or extracts. A hint of almond or coconut can add depth. For those needing gluten-free options, swap the graham cracker crust with gluten-free crumbs. This keeps the base tasty while fitting your needs. If you want a healthier treat, use sugar alternatives like honey or agave syrup. These swaps can make your mini cheesecakes even better for you. Explore these variations to find your favorite twist on the mini lemon blueberry cheesecakes. For a full recipe, refer to the [Full Recipe]. To store mini cheesecakes in the fridge, follow these steps: - Allow the cheesecakes to cool completely. - Place them in an airtight container. - Store them in the fridge for safe keeping. If you want to freeze mini cheesecakes for later, here’s what to do: - Wrap each cheesecake tightly in plastic wrap. - Place them in a freezer-safe bag or container. - These can be frozen for up to three months. Mini cheesecakes last about five days in the refrigerator. This keeps them fresh and tasty. To maintain freshness, follow these best practices: - Keep them in an airtight container. - Avoid leaving them out at room temperature for too long. - Always check for any signs of spoilage before serving. For the full recipe of these delightful treats, check the [Full Recipe]. How long do I bake mini cheesecakes? You bake mini cheesecakes for 18 to 20 minutes. They should be set but slightly jiggly in the center. This ensures a creamy texture. Overbaking can lead to dryness, so keep an eye on them. Can I use frozen blueberries instead of fresh? Yes, you can use frozen blueberries. They may release more juice, so adjust the sugar in the topping. This can add a pleasant twist to your cheesecakes. Just remember to thaw and drain them before mixing. How can I adjust for fewer servings? To adjust for fewer servings, halve the ingredients. Use a smaller muffin pan if you have one. You can also bake the remaining batter in a small dish for a mini cheesecake. This way, you still enjoy the recipe without waste. What can I substitute for sour cream? You can use Greek yogurt as a substitute for sour cream. It provides a similar tang and creaminess. You can also try cream cheese mixed with a bit of lemon juice for an extra flavor boost. This blog post walks you through making delicious mini cheesecakes with blueberries. You learned about the key ingredients, easy steps for preparation, and baking methods. I also shared useful tips to help you perfect your cheesecakes. Variations and storage options give you flexibility in your recipe. With these insights, you can whip up impressive treats. Baking at home is fun and tasty. Enjoy making your mini cheesecakes and sharing them with others!](https://grilledflavors.com/wp-content/uploads/2025/05/ca1f2e13-e795-4ea2-86db-4c9fa6bd9713.webp)
Mini Lemon Blueberry Cheesecakes Delightful and Easy
If you’re craving a sweet treat that’s both easy and delightful, look no further! These Mini Lemon Blueberry Cheesecakes pack a burst of flavor in
![For these Cherry Lime Mini Cheesecakes, you will need: - 1 cup graham cracker crumbs - 1/4 cup unsalted butter, melted - 2 cups cream cheese, softened - 1/2 cup granulated sugar - 1/2 cup sour cream - 2 large eggs - Zest of 2 limes - 1/4 cup fresh lime juice - 1 cup cherry pie filling These ingredients create a balanced flavor. The lime gives a bright taste, while the cherry topping adds sweetness. If you lack an ingredient, here are some great swaps: - For graham cracker crumbs, use crushed vanilla cookies. - Swap unsalted butter for coconut oil for a dairy-free option. - If you don’t have cream cheese, try mascarpone cheese instead. - For sour cream, Greek yogurt works well. - Use key lime juice if you want a stronger lime flavor. These swaps can change the taste slightly, but they’ll still be tasty! Choosing the right ingredients makes a big difference. Here’s what to look for: - Use fresh limes for zest and juice. They give the best flavor. - Look for full-fat cream cheese for a richer texture. - Buy high-quality cherry pie filling for a nice topping. - Check the expiration date on dairy products to ensure freshness. Quality ingredients lead to better cheesecakes. You’ll taste the difference in every bite! To start, gather all your ingredients. You’ll need graham cracker crumbs, butter, cream cheese, sugar, sour cream, eggs, lime zest, lime juice, and cherry pie filling. Preheat your oven to 325°F (160°C). This step is important for even baking. Line a muffin tin with cupcake liners or grease it with non-stick spray. This will help your cheesecakes come out easily. In a medium bowl, mix the graham cracker crumbs and melted butter. Stir until the crumbs are moist. Next, press about 1 tablespoon of this mixture into each muffin cup. This forms a crunchy crust. In a large bowl, beat the cream cheese until it’s smooth. Then, slowly add the sugar while mixing. This makes your filling sweet and creamy. Mix in the sour cream, lime zest, and lime juice. Make sure everything is well combined. Add the eggs one at a time. Mix well after each egg until the batter is smooth. Pour the cheesecake batter over the crusts, filling each cup about 3/4 full. Bake for 18-20 minutes. The centers should be set but still slightly jiggly. After baking, remove the cheesecakes from the oven. Let them cool to room temperature. Then, refrigerate them for at least 4 hours or overnight. This chilling time helps them firm up. Before serving, top each cheesecake with a spoonful of cherry pie filling. For extra flair, garnish with a slice of lime and some fresh cherries. These small touches make your mini cheesecakes look even more delightful. For the full recipe, check out the detailed instructions above. When making Cherry Lime Mini Cheesecakes, it’s easy to make a few common mistakes. First, don't skip softening the cream cheese. Cold cream cheese leads to lumps. Second, avoid overmixing. Too much mixing can add air and cause cracks. Lastly, don’t bake them too long. They should be set but still a little jiggly in the center. To get the best texture, mix your ingredients at room temperature. This helps them blend smoothly. When adding eggs, mix just until combined. Overmixing can make the texture dense. Bake at the right temperature, and let them cool gradually. Rapid cooling can create cracks in the cheesecake. For a beautiful presentation, top each mini cheesecake with cherry pie filling. Add a slice of lime on top for color. You can also place a few fresh cherries around the plate. Serve these on a nice platter. It makes them look fancy and fun. For the best effect, keep them chilled until you are ready to serve. Check the Full Recipe for all the details! {{image_2}} You can change the toppings on your mini cheesecakes. Instead of cherry pie filling, try fresh berries. Strawberries, blueberries, or raspberries add great color and flavor. You can also use whipped cream for a light touch. A drizzle of chocolate or caramel sauce makes it extra special. Experiment with different fruits for a fun twist. Feel free to mix up the flavors in your mini cheesecakes. You can swap lime juice for lemon or orange juice. This small change will give a new taste. Adding a few drops of vanilla extract can enhance the flavor. For a richer bite, fold in some chocolate chips or crushed cookies into the batter. The options are endless! If you need gluten-free options, use gluten-free graham crackers for the crust. You can also make a nut crust with almonds or walnuts. For a dairy-free version, try vegan cream cheese and coconut yogurt. They work well and taste great. Always check labels to ensure all ingredients meet your dietary needs. Enjoy these cheesecakes without worry! You can find the full recipe and make your own Cherry Lime Mini Cheesecakes. To keep your Cherry Lime Mini Cheesecakes fresh, store them in the fridge. Use an airtight container to prevent them from drying out. Place parchment paper between layers to avoid sticking. If you have leftovers, make sure to cover them well to keep them tasty. These mini cheesecakes last about five days in the fridge. You can freeze them for up to three months. To freeze, wrap each cheesecake in plastic wrap. Then, place them in a freezer-safe bag or container. When you want to enjoy one, just thaw it in the fridge overnight. You don’t need to reheat these cheesecakes. They taste best cold. If you want to serve them at room temperature, take them out of the fridge for about 30 minutes before serving. This will bring out the flavors without losing that creamy texture. For the full recipe, check out the details above. Yes, you can make these cherry lime mini cheesecakes ahead of time. I often prepare them a day before serving. This method allows the flavors to blend well. After baking, let them cool and chill in the fridge. They taste even better after sitting overnight. To prevent cracks, avoid overmixing the batter. Mix just until smooth. Also, make sure your cream cheese is soft. This helps create a creamy texture. Bake at a lower temperature, and don’t open the oven door while baking. A water bath can help, too. It keeps the heat even and moist. If you want a change, use fresh or frozen cherries. Cook them down with sugar and a bit of lime juice. You can also try blueberry or strawberry fillings. For a fun twist, use chocolate sauce or caramel. The options are endless! For the complete recipe, check out [Full Recipe]. This post covered how to make mini cheesecakes with ease. We explored ingredients, step-by-step instructions, and helpful tips. You learned about common mistakes to avoid and how to achieve the best texture. We shared fun variations, toppings, and storage tips for your treats. Remember, practice makes perfect. Each cheesecake is a chance to improve your skills. With these tips, you can create delicious mini cheesecakes that impress and delight. Enjoy your baking journey!](https://grilledflavors.com/wp-content/uploads/2025/05/72f39162-3f0c-4fee-b77f-907cda1ddf38.webp)
Cherry Lime Mini Cheesecakes Delightful and Easy Treat
Are you ready to whip up a sweet sensation that’s both delightful and simple? These Cherry Lime Mini Cheesecakes are your answer! With a zesty

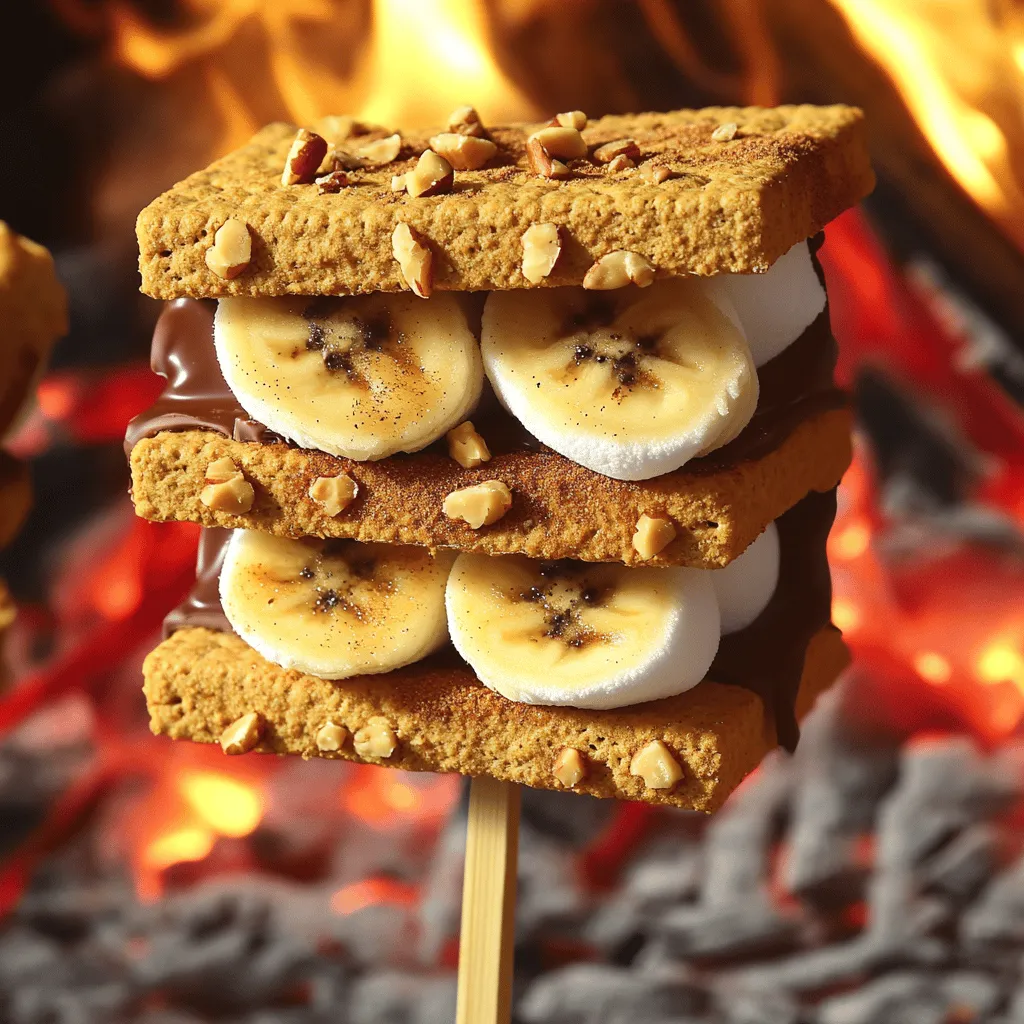
Oven-Baked S’mores Irresistible Dessert Delight
Craving a sweet treat that’s easy to make and hard to resist? Oven-baked s’mores are the answer! This dessert combines gooey marshmallows, melted chocolate, and
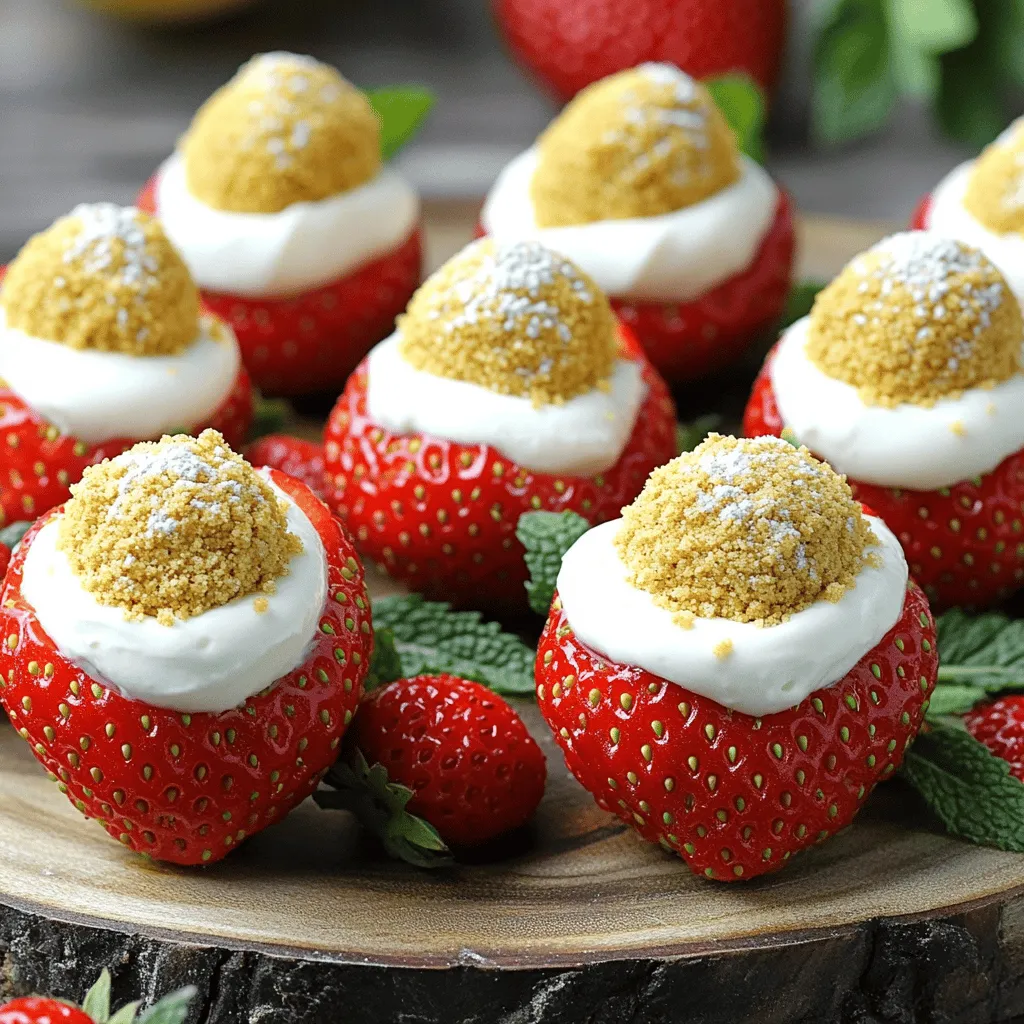
Cheesecake Deviled Strawberries Simple and Delicious Treat
If you love a sweet treat, you’ll adore Cheesecake Deviled Strawberries! This simple dessert combines fresh strawberries with a creamy cheesecake filling. It’s an easy
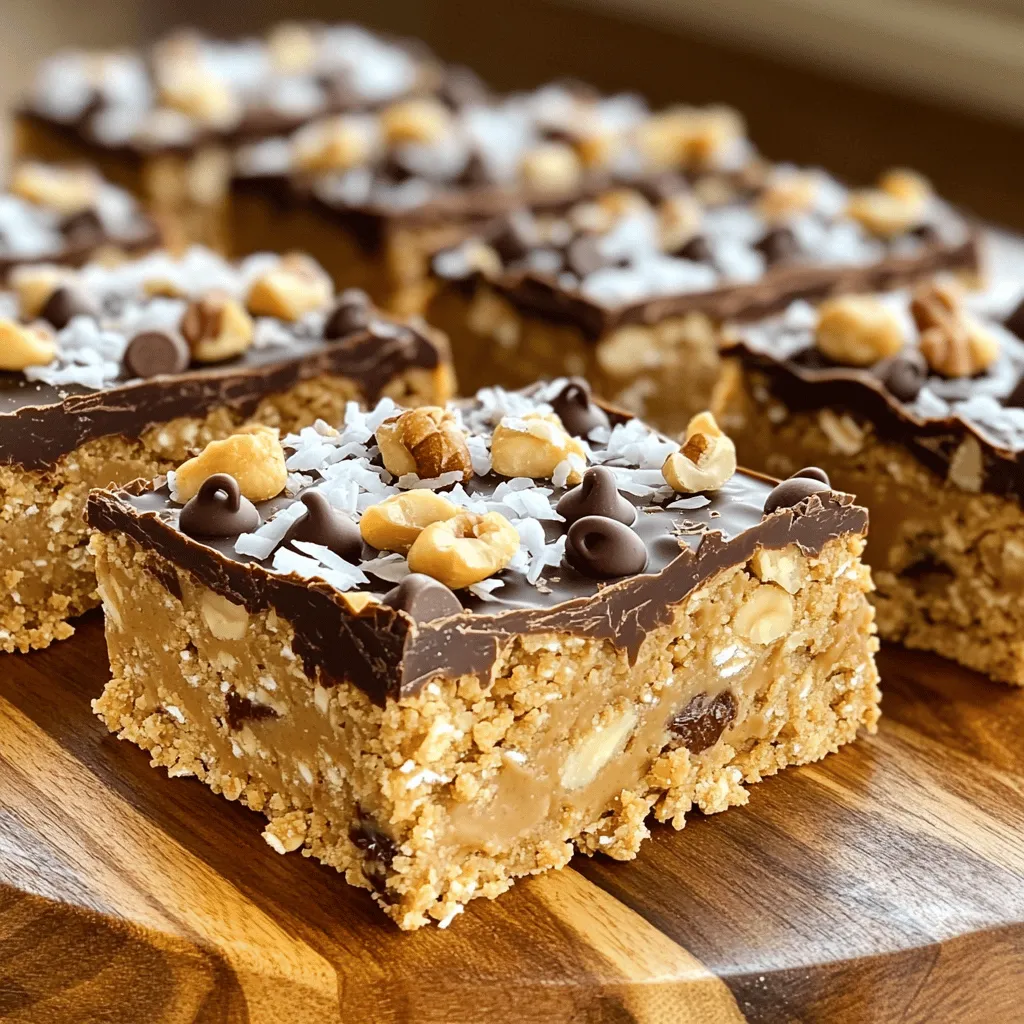
No-Bake Peanut Butter Bars Irresistible Treat Recipe
Are you ready for a sweet treat that requires no baking? My No-Bake Peanut Butter Bars are easy to make and delicious. With just a
Mini Crème Brûlée Cheesecakes Tasty and Simple Treat
Are you ready to impress your friends with a sweet treat? Mini Crème Brûlée Cheesecakes offer a delightful blend of creamy cheesecake and a crunchy
Campfire S’mores Delightful Treat for Everyone
Nothing brings joy like sinking your teeth into a gooey s’more by the campfire. With just three key ingredients—graham crackers, marshmallows, and chocolate—you can create