Desserts

- 1/2 cup chia seeds - 2 cups coconut milk (full-fat for creaminess) - 1 tablespoon maple syrup (or to taste) - 1 ripe mango, diced - 1 teaspoon vanilla extract - Fresh mint leaves for garnish For this Mango Coconut Chia Pudding, you need a few simple ingredients. Chia seeds are the star here. They soak up liquid and turn into a gel-like texture. This gives your pudding a nice, thick feel. Coconut milk adds creaminess and a tropical flavor. I prefer full-fat coconut milk for the best taste. You can use maple syrup to sweeten the pudding. Adjust the amount to fit your taste. For optional ingredients, a ripe mango is a must. It adds a sweet and juicy layer to your pudding. Vanilla extract enhances the flavor too. If you like, you can add fresh mint leaves for a pop of color and flavor. These ingredients make your dessert not just tasty but also fun to look at. {{ingredient_image_1}} To start, gather your ingredients. You need chia seeds, coconut milk, maple syrup, vanilla, and a pinch of salt. In a mixing bowl, add all these items. 1. Combine 1/2 cup chia seeds with 2 cups of coconut milk. 2. Add 1 tablespoon of maple syrup and 1 teaspoon of vanilla extract. 3. Don’t forget to sprinkle in a pinch of salt. Now, stir well. This helps prevent clumps. After mixing, cover the bowl with plastic wrap. Place it in the fridge for at least 4 hours. Overnight is even better. This waiting allows the chia seeds to swell. They will create a creamy, pudding-like texture. Once the time is up, check your pudding. Stir it a bit to see how it feels. If it seems too thick, add a splash of coconut milk. This will loosen it up. Next, it’s time to serve! Grab some clear glasses or bowls. Layer the chia pudding into each glass. Then, add a layer of diced mango on top. This gives a nice contrast and adds fresh flavor. For a beautiful look, use clear glass cups. This way, you can see the lovely layers. To finish, add a sprinkle of mango on top. You can also garnish with fresh mint leaves. This adds color and a fresh taste. Enjoy your tasty and healthy treat! To get the right texture for your mango coconut chia pudding, focus on consistency. Start by mixing the chia seeds and coconut milk well. Stir until the seeds are fully combined. This helps avoid clumps. After mixing, cover the bowl and chill it. I recommend a chilling time of at least 4 hours. For the best pudding, let it sit overnight. This allows the seeds to soak up the milk and expand fully. After chilling, check the pudding. If it is too thick, add a little more coconut milk. Stir it in until you reach your desired creaminess. This small step makes a big difference in your pudding's texture. You can easily change the flavor of your pudding. Adding spices can elevate the taste. Try adding a pinch of cinnamon or nutmeg for warmth. You can also add cardamom for a unique twist. These spices blend well with mango and coconut. For sweetness, maple syrup works great, but there are other options. You can use honey or agave syrup if you prefer. If you want a sugar-free option, try mashed ripe bananas or dates. These alternatives add sweetness and nutrition. Feel free to mix and match these ideas to create your perfect pudding! Pro Tips Perfect Consistency: If you prefer a creamier texture, use full-fat coconut milk. It enhances the richness of the pudding. Sweetness Adjustment: Taste the pudding before serving; you can always add more maple syrup if you like it sweeter. Layering Presentation: For an eye-catching display, layer the pudding and mango in clear glasses, allowing guests to see the beautiful colors. Garnish Ideas: Fresh mint adds a burst of flavor and color. You can also sprinkle toasted coconut flakes on top for added texture. {{image_2}} You can add many fruits to your mango coconut chia pudding. Berries, bananas, or kiwi work well. Each fruit brings its own taste and color. For a fun twist, mix fruits. Try mango with pineapple or berries with banana. This mix creates a burst of flavors. You can even layer different fruits for a colorful look. If you want a dairy-free version, use nut milks. Almond milk, cashew milk, or oat milk are great choices. Each nut milk adds a unique flavor. Almond milk is light, while oat milk is creamy. You can choose based on what you like best. Using nut milk keeps the pudding healthy and tasty. Plus, it caters to different diets, making it a win-win! You can store leftover mango coconut chia pudding in a glass jar or a plastic container. Make sure the lid is tight. This helps keep it fresh. The pudding lasts in the fridge for up to five days. Check for any off smell before eating. If it smells okay, enjoy! To freeze chia pudding, first portion it into small containers. Make sure to leave space at the top because it expands. Wrap the containers well with plastic wrap or a lid. You can freeze it for about one month. When you want to eat it, take a container from the freezer. Let it thaw in the fridge overnight. You can also speed up thawing by placing it in warm water. Once it's soft, stir it well. If it seems too thick, add a splash of coconut milk to bring it back to life! What is chia pudding? Chia pudding is a creamy dessert made with chia seeds. When mixed with liquid, these tiny seeds soak it up and swell. This creates a pudding-like texture. You can use different liquids, like coconut milk, almond milk, or dairy milk. I love coconut milk for its rich taste. You can add sweeteners and flavors to make it even better. How long does chia pudding last? Chia pudding can last up to five days in the fridge. Store it in a sealed container to keep it fresh. If you see any changes in texture or smell, it is best to throw it out. Enjoy your pudding within this time for the best taste. Why is my chia pudding too thick? If your chia pudding is too thick, you can easily fix it. Just add a splash of coconut milk or water and stir well. This will loosen the pudding. The chia seeds absorb liquid, so always check the thickness before serving. How do I make it sweeter? To make your chia pudding sweeter, add more maple syrup or honey. Start with just a little, then taste it. You can mix in a bit more until it reaches your desired sweetness. Remember, you can always add, but you can't take away! Chia pudding is simple and fun to make. You mix chia seeds, coconut milk, and maple syrup, chilling them for a tasty treat. You can customize it with fresh fruits and spices for extra flavor. Remember to check the pudding's consistency and layer it nicely for a great look. In the end, chia pudding is versatile and healthy. Experiment with different fruits and storage options. Enjoy this delightful dish whenever you want!
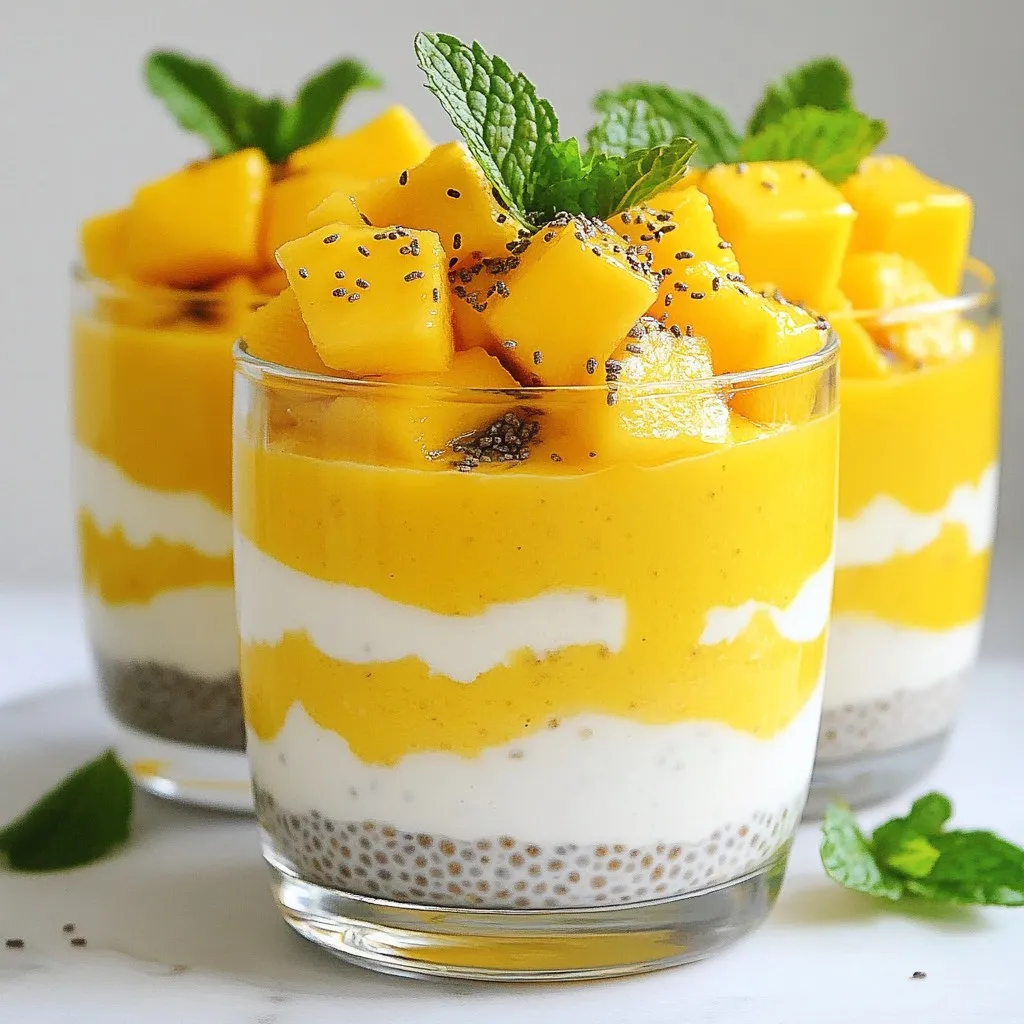
Mango Coconut Chia Pudding Refreshing and Healthy Treat
Are you ready for a cool, creamy treat that’s both refreshing and healthy? My Mango Coconut Chia Pudding is just what you need! Packed with
To make these delightful muffins, gather the following ingredients: - 1 cup apple cider - 1 ½ cups all-purpose flour - 1 teaspoon baking powder - ½ teaspoon baking soda - ½ teaspoon salt - 1 teaspoon ground cinnamon - ½ teaspoon ground nutmeg - ¾ cup granulated sugar - 2 large eggs - ½ cup unsweetened applesauce - ½ cup vegetable oil - 1 teaspoon vanilla extract - ½ cup granulated sugar (for coating) - 1 teaspoon ground cinnamon (for coating) Each ingredient plays a key role in flavor and texture. The apple cider gives a rich taste. The spices add warmth and depth. You can add a few optional ingredients to make these muffins even better: - Chopped nuts: Walnuts or pecans add crunch. - Raisins or dried apples: These bring a sweet, chewy element. - Zest of an orange: This adds a citrusy zing. These extras can elevate your muffins to a new level of deliciousness. Feel free to experiment! Sometimes, you may need to swap ingredients. Here are some great substitutions: - All-purpose flour: Use whole wheat flour for a nuttier taste. - Granulated sugar: Try brown sugar for a richer flavor. - Vegetable oil: Substitute with melted coconut oil for a tropical twist. These swaps can help you customize your muffins while keeping them tasty. Enjoy the process of making these treats! {{ingredient_image_1}} Start by preheating your oven to 350°F (175°C). Lightly grease your muffin tin so the muffins don’t stick. Next, pour 1 cup of apple cider into a small saucepan. Heat it on medium until it boils. Then, lower the heat and let it simmer for about 10 to 15 minutes. You want it to reduce to about half a cup. Once done, set it aside to cool. In a mixing bowl, whisk together 1 ½ cups of flour, 1 teaspoon of baking powder, ½ teaspoon of baking soda, ½ teaspoon of salt, 1 teaspoon of ground cinnamon, and ½ teaspoon of ground nutmeg. In another large bowl, beat ¾ cup of sugar and 2 large eggs until they are light and fluffy. Slowly mix in the cooled apple cider, ½ cup of unsweetened applesauce, ½ cup of vegetable oil, and 1 teaspoon of vanilla extract. Combine these well. Now, add the dry ingredients to the wet mix. Stir gently until just combined; be careful not to over-mix. It’s okay if there are some lumps. Next, fill each muffin cup about two-thirds full with this batter. Place your filled muffin tin in the preheated oven. Bake for 18 to 20 minutes. Check if they are ready by inserting a toothpick in the center. If it comes out clean, they are done! Once baked, remove the muffins from the oven and let them cool in the pan for 5 minutes. Then, transfer them to a wire rack to cool completely. While your muffins cool, mix ½ cup of granulated sugar with 1 teaspoon of ground cinnamon in a shallow dish. This will be your coating. When the muffins are still warm, roll each one in the cinnamon-sugar mix until fully coated. This adds a delightful sweetness and a lovely crunch. For a beautiful display, arrange the muffins on a platter and sprinkle some extra cinnamon-sugar over the top. You can also serve them with fresh apple slices for a tasty touch! Enjoy your warm, fragrant apple cider doughnut muffins. To get the best muffin texture, you must mix the batter correctly. Start by reducing the apple cider to concentrate its flavor. This step adds moisture and richness. In your mixing bowls, use one for dry ingredients and another for wet ingredients. When combining them, stir gently. Over-mixing leads to tough muffins. You want light and fluffy muffins, not dense bricks. Here are some common mistakes to steer clear of while baking: - Skipping the Apple Cider Reduction: This step boosts flavor. Don’t skip it. - Over-mixing the Batter: This makes your muffins dense. Mix just until combined. - Not Preheating the Oven: Muffins need a hot oven to rise properly. Always preheat first. - Using Freshly Ground Spices: Old spices lose flavor. Fresh is best for taste. The right tools make baking easy and fun. Here are my top recommendations: - Muffin Tin: A non-stick tin is best for easy release. - Mixing Bowls: Use at least two bowls, one for wet and one for dry. - Whisk and Spatula: A whisk combines ingredients well, and a spatula helps with folding. - Cooling Rack: This lets the muffins cool evenly, keeping them soft. With these tips, your apple cider doughnut muffins will be a hit! Pro Tips Use Fresh Apple Cider: Fresh apple cider will impart a richer flavor to your muffins compared to processed varieties. Don’t Overmix: To keep your muffins light and fluffy, mix the batter until just combined. Overmixing can lead to dense muffins. Adjust Cinnamon to Taste: Feel free to add more or less cinnamon based on your preference for spice; it truly enhances the autumn flavor. Cool Before Coating: Allow the muffins to cool slightly before rolling them in the cinnamon-sugar mixture to ensure the coating sticks well. {{image_2}} You can make these muffins vegan by swapping some ingredients. Use flax eggs instead of regular eggs. Mix one tablespoon of ground flaxseed with three tablespoons of water for each egg. Replace the applesauce with more apple cider if needed. Use a plant-based oil in place of vegetable oil. These small changes keep the muffins moist and tasty. For a gluten-free version, switch to a gluten-free all-purpose flour blend. Check that it contains xanthan gum, which helps with texture. Keep the rest of the ingredients the same. The muffins will still rise and taste great. You might need to bake them a bit longer, so keep an eye on them. You can add fun flavors to your muffins. Here are some great options: - Nuts: Chopped walnuts or pecans add a nice crunch. - Chocolate chips: Dark or milk chocolate chips make the muffins sweet and rich. - Dried fruit: Adding raisins or cranberries can bring a fruity twist. Feel free to mix and match these ideas. You can create a unique flavor each time you bake! Store leftover muffins in an airtight container. Keep them at room temperature. They stay fresh for up to three days. If you want them to last longer, consider freezing. To freeze, wrap each muffin tightly in plastic wrap. Place the wrapped muffins in a freezer bag. They can last up to three months in the freezer. Make sure to label the bag with the date. This helps you keep track of freshness. To reheat, take a muffin out of the freezer. Let it thaw in the fridge overnight. You can also heat it in the microwave for about 15-20 seconds. For a crispier top, warm it in the oven at 350°F (175°C) for 5-10 minutes. Enjoy your warm apple cider doughnut muffins! Yes, you can make these muffins ahead of time. Bake them, then cool completely. Store them in an airtight container at room temperature. They stay fresh for up to three days. If you want to keep them longer, freeze them. Just wrap each muffin well and place them in a freezer bag. They last for about three months. Thaw them overnight in the fridge when you're ready to eat. The best way to serve these muffins is warm. Roll them in cinnamon-sugar right after they cool. This adds a sweet crunch. You can also serve them with apple slices. They pair perfectly with hot cider or coffee. For a fun twist, drizzle some caramel sauce on top. This adds extra flavor and a nice touch for guests. You can find premade apple cider doughnut muffins at local bakeries or farmers' markets. Many grocery stores also sell them in the fall. Check the bakery section for fresh options. If you want a specific brand, look online at specialty food shops. They often ship directly to your home, making it easy to enjoy these treats anytime. In this post, we explored how to make apple cider doughnut muffins. We covered the main ingredients and optional ones for extra flavor. You learned step-by-step instructions to prep, bake, and finish your muffins. The tips shared will help you avoid common mistakes. We also looked at fun variations, storage tips, and answered some FAQs. Now you can create delicious muffins with ease. Enjoy baking these treats and sharing them with others!
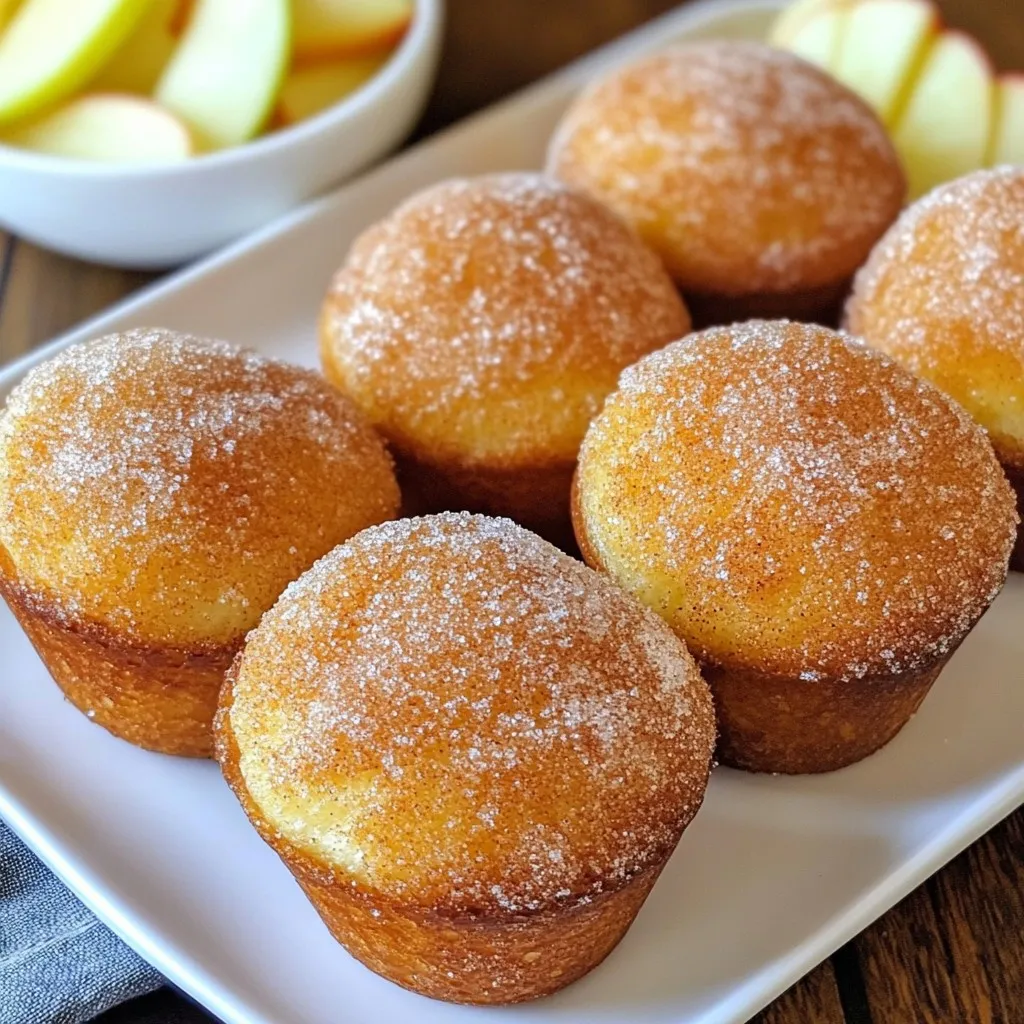
Apple Cider Doughnut Muffins Delightful and Easy Treat
If you crave a warm, sweet treat, you’ve found your new favorite! These Apple Cider Doughnut Muffins are simple to make and bursting with autumn
To make zesty lemon blueberry yogurt parfaits, gather these simple ingredients: - 2 cups Greek yogurt (plain or vanilla) - 1 cup fresh blueberries - 1 medium lemon (zested and juiced) - 1 tablespoon honey (adjust to taste) - 1 cup granola (your choice) - 2 tablespoons chia seeds (optional) - Fresh mint leaves for garnish You can easily swap some ingredients if needed. Try these options: - Use coconut yogurt for a dairy-free version. - Swap honey for maple syrup or agave for vegan options. - If you don't have fresh blueberries, try raspberries or strawberries. - Use low-fat yogurt if you prefer a lighter option. Each ingredient in this recipe offers health benefits: - Greek yogurt is high in protein and good for digestion. - Blueberries are rich in antioxidants and may boost brain health. - Lemon adds vitamin C and aids in hydration. - Chia seeds provide fiber and omega-3 fatty acids. - Granola adds crunch and can offer whole grains, but watch the sugar. These ingredients not only make the parfait tasty, but they also support your health. {{ingredient_image_1}} 1. Grab a medium bowl. 2. Add 2 cups of Greek yogurt to the bowl. 3. Zest and juice 1 medium lemon. 4. Mix the lemon zest, juice, and 1 tablespoon of honey into the yogurt. 5. Stir until the mix is smooth and creamy. 6. Taste it. Add more honey if you want it sweeter. 7. In another bowl, gently fold in 1 cup of fresh blueberries. 1. Get your serving glasses or bowls ready. 2. Scoop a layer of the lemon yogurt mix into the bottom. 3. Add a layer of granola on top of the yogurt. 4. Next, spoon in a layer of the blueberry mix. 5. Repeat these layers until the glasses are full. 6. Finish with a dollop of yogurt and some granola on top. 7. If you want, sprinkle 2 tablespoons of chia seeds on the last yogurt layer. 8. Add fresh mint leaves for a nice touch. - Use clear glasses to show off the layers. - Make sure to spoon gently to keep layers separate. - Start with yogurt for a strong base. - Keep the granola crunchy by adding it last. - Experiment with the order of layers for fun! Start with one tablespoon of honey. This adds a nice touch of sweetness. Taste the yogurt mix. If you like it sweeter, add more honey. You can adjust the sweetness based on your taste. Remember, the blueberries also add natural sugar. So, balance the flavors as you go. Use plain or vanilla Greek yogurt for creaminess. This type of yogurt is thick and rich. Mix in the lemon juice and zest well. This helps create a smooth texture. If you want a lighter feel, try regular yogurt instead. Just know it will be less thick. Use clear glasses or bowls to show off the layers. Start with yogurt, then granola, and blueberries. Repeat these layers until you reach the top. For a fun twist, add fresh mint leaves on top. They add color and a fresh taste. Serve right away for the best texture, or chill briefly before serving. Pro Tips Choose Quality Yogurt: Opt for high-quality Greek yogurt for a creamier texture and better flavor. Fresh Ingredients Matter: Using fresh blueberries and mint will enhance the overall taste of your parfait. Layering is Key: Make sure to layer your ingredients carefully for a beautiful presentation and balanced flavor in every bite. Chill Before Serving: Allowing the parfaits to chill in the fridge for a bit can help the flavors meld beautifully. {{image_2}} You can switch up the flavors in your parfaits. Try adding other fruits like strawberries, raspberries, or peaches. These fruits pair well with lemon and add a fun twist. You can even mix in some tropical flavors, like mango or pineapple. You can create a berry medley by combining blueberries with blackberries or strawberries. The options are endless, so get creative! If you want to change the sweetness, try different sweeteners. Maple syrup or agave nectar works well. You can also use stevia or monk fruit for a lower-calorie option. Each sweetener has a unique taste, so experiment until you find your favorite. Just remember to adjust the amount based on how sweet you want your parfaits. Making dairy-free or vegan parfaits is easy. Use coconut yogurt or almond yogurt as a base. These options are rich and creamy. You can also use plant-based granola, ensuring it has no honey or dairy. For added flavor, try adding a splash of vanilla extract to your yogurt. Enjoying a tasty parfait is possible for everyone, no matter their diet. After enjoying your lemon blueberry yogurt parfaits, store any leftovers in the fridge. Use an airtight container to keep them fresh. This helps the yogurt and fruit stay tasty. If you see any liquid, just stir it back in before eating. Aim to eat leftovers within two days for the best flavor. To keep your ingredients fresh, store your yogurt in the coldest part of the fridge. Keep blueberries in their original container or a breathable bag. This lets air flow while keeping them from getting mushy. Store granola in a sealed bag or container to avoid moisture. This keeps it crunchy. Assembled parfaits are best eaten fresh. If you must store them, eat within one day. The yogurt can separate, and the granola will get soggy. If you want to prepare in advance, layer only yogurt and blueberries. Add granola just before serving to keep it crispy. Yes, you can make Lemon Blueberry Yogurt Parfaits ahead of time. Prepare the yogurt mixture and store it in the fridge. Keep the granola separate to stay crunchy. Layer the parfaits just before serving for the best texture. If you assemble them too early, the granola can get soggy. This dish is best enjoyed fresh for full flavor. For this recipe, Greek yogurt is my top choice. It is thick, creamy, and rich in protein. You can use plain or vanilla-flavored yogurt. Plain yogurt allows the lemon flavor to shine through. If you want a lighter option, try regular yogurt. For a dairy-free alternative, coconut or almond yogurt works well too. To lower the calories in this recipe, use low-fat or non-fat yogurt. You can also reduce the amount of honey or use a sugar substitute. Try adding more fruit to enhance sweetness without extra calories. Granola can be high in calories, so use a light sprinkle instead. Lastly, skip the chia seeds if you want to cut back on calories. This blog post covered key aspects of making Lemon Blueberry Yogurt Parfaits. We explored ingredients and their healthy benefits, step-by-step instructions for preparation and assembly, and tips for balancing sweetness and consistency. We also discussed variations for flavors and dietary needs, plus storage tips to keep your parfaits fresh. Remember, you can personalize this recipe to suit your taste. Mixing flavors and trying new ingredients makes it fun. Enjoy making and sharing your parfaits!
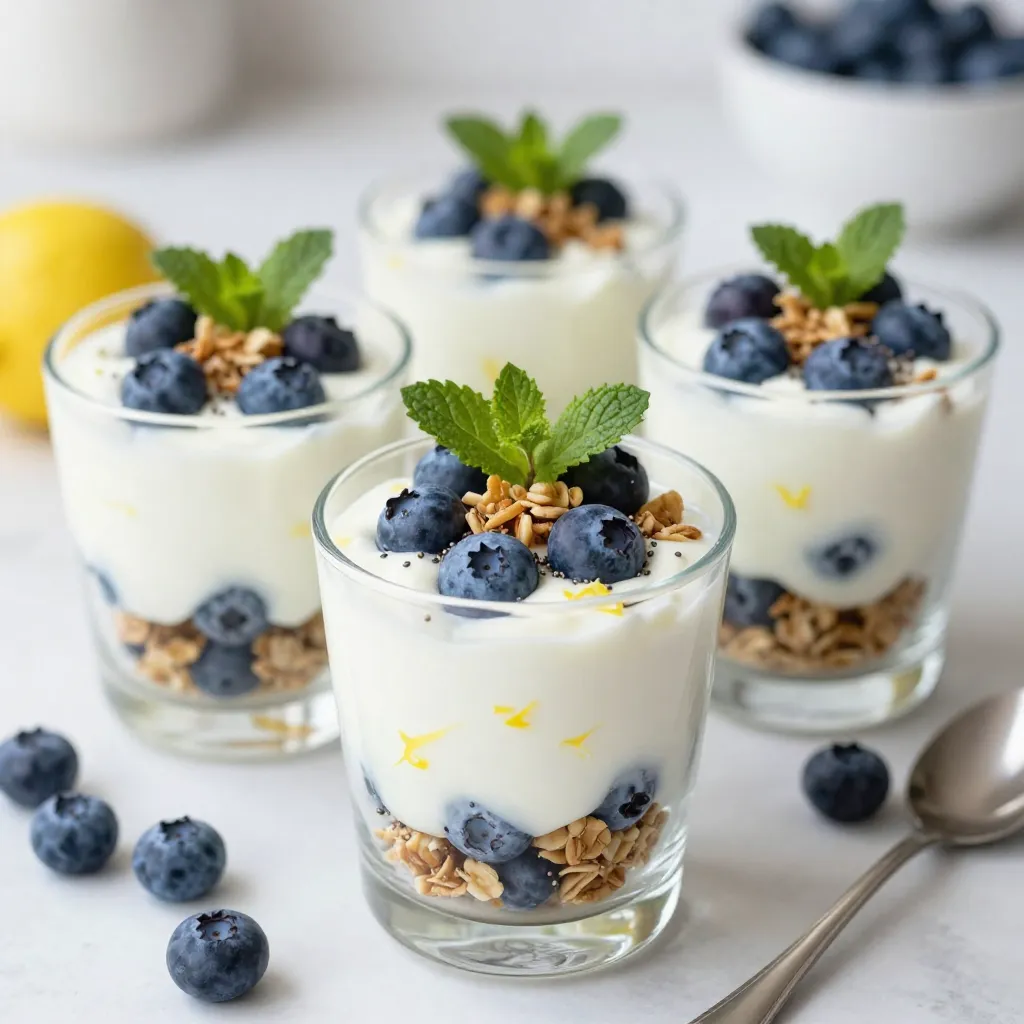
Lemon Blueberry Yogurt Parfaits Simple and Tasty Treat
If you’re looking for a quick, tasty treat, you’ve come to the right place! Lemon Blueberry Yogurt Parfaits are a simple way to delight your
- 1 cup all-purpose flour - ½ teaspoon baking soda - ½ teaspoon salt - ½ cup unsalted butter, softened - ¾ cup brown sugar - ¼ cup granulated sugar - 2 teaspoons vanilla extract - 2 tablespoons milk (more if needed) - 1 cup mini chocolate chips - 1 cup semisweet chocolate chips (for coating) - 1 tablespoon coconut oil (optional, for smoother coating) When making Chocolate Chip Cookie Dough Truffles, you need several key ingredients. The all-purpose flour serves as the base for the dough. Baking soda and salt balance the sweetness and create a nice rise. Butter gives the truffle a rich taste and creamy texture. Brown sugar adds moisture and a deep flavor, while granulated sugar keeps the dough sweet. Vanilla extract brings warmth to the flavor, and milk is crucial for softening the dough. The mini chocolate chips add bursts of chocolate in every bite. Finally, you coat the truffles in semisweet chocolate, which adds a lovely crunch. If you want a smoother coating, coconut oil can help achieve that silky finish. These ingredients work together to create a treat that is both delicious and satisfying. Each bite will melt in your mouth, making you crave more! {{ingredient_image_1}} First, grab a mixing bowl. Whisk together 1 cup of all-purpose flour, ½ teaspoon of baking soda, and ½ teaspoon of salt. This mix is key for texture. Set it aside to use later. Now, take another large bowl. Beat ½ cup of softened unsalted butter with ¾ cup of brown sugar and ¼ cup of granulated sugar. Mix until it’s fluffy, about 2-3 minutes. Then, add 2 teaspoons of vanilla extract and 2 tablespoons of milk. Make sure everything blends well. Next, gradually mix the dry ingredients into the wet mix. Do this gently until just combined. Be careful not to overmix! Now, fold in 1 cup of mini chocolate chips. This adds sweet bites of chocolate. Scoop out tablespoon-sized portions of the dough. Roll them into balls with your hands. Place these balls on a parchment-lined baking sheet. Once done, chill them in the fridge for at least 30 minutes. This makes them firm and easier to coat. While the truffles chill, melt 1 cup of semisweet chocolate chips in a microwave-safe bowl. Heat in 30-second increments, stirring until smooth. If you want a smoother coating, stir in 1 tablespoon of coconut oil. Dip each truffle into the melted chocolate. Use a fork to let excess chocolate drip off. Place the coated truffles back on the parchment paper. After coating, chill them for another 15 minutes to let the chocolate set. To get the best texture for your truffles, follow a few simple steps. - Use softened butter. It helps mix well with sugars. - Mix slowly when adding flour. Overmixing can make them tough. - Adjust milk as needed. The dough should be soft but not sticky. - Chill the dough for at least 30 minutes. This helps them hold shape. Melting chocolate can be tricky. Follow these tips to avoid burning it. - Use a microwave-safe bowl. Make sure it’s dry and clean. - Heat in short bursts of 30 seconds. Stir in between each burst. - If using coconut oil, add it after the chocolate melts. This makes a smoother coat. - If you see steam or a strong smell, stop heating. Burnt chocolate is not tasty. How you present your truffles can make them even more special. - Arrange them on a nice dessert platter. It makes them look fancy. - Use decorative boxes or bags for gifts. They add a personal touch. - Dust with cocoa powder or sea salt for flair. It enhances the look and taste. - Consider adding colorful sprinkles or drizzles if you want extra fun. Pro Tips Chill the Dough: Chilling the cookie dough truffles not only helps them maintain their shape but also enhances the flavors as they meld together. Use Quality Chocolate: For the coating, choose high-quality semisweet chocolate for a richer taste that complements the sweetness of the truffles. Consistency Matters: If the dough is too dry, add a little more milk, one teaspoon at a time, until you reach the right consistency for rolling. Decorative Touches: Consider drizzling melted chocolate over the truffles after coating them for an elegant presentation or sprinkle with sea salt for a flavor contrast. {{image_2}} You can customize your truffles with fun flavors. Try adding nuts, like walnuts or pecans, for a nice crunch. You can also use different extracts. Almond or hazelnut extracts add great depth. Just a teaspoon can change the whole taste! Want a gluten-free treat? Use gluten-free flour in place of all-purpose flour. If you need a dairy-free option, swap the butter for coconut oil or vegan butter. Use dairy-free chocolate chips for coating. These changes make it easy for everyone to enjoy! Coatings can really change the look and taste of your truffles. Instead of semisweet chocolate, consider white chocolate. It's sweet and creamy! You can also roll the truffles in crushed cookies, like Oreos or graham crackers. This adds fun texture and flavor! To keep your Chocolate Chip Cookie Dough Truffles fresh, store them in an airtight container. If you put them in the fridge, they stay good for a week. For longer storage, use the freezer. Just place them in a freezer-safe bag or container. They can last up to three months in the freezer. Make sure to separate layers with parchment paper to avoid sticking. When stored properly, these truffles can last: - In the fridge: up to 7 days - In the freezer: up to 3 months This helps you enjoy your treats for longer. Always check for any off smells or changes in texture before eating. If your truffles lose their smooth texture after freezing, don't fret. You can revive them! Let them sit at room temperature for about 10 minutes. This helps soften them. If they still feel hard, you can gently warm them in the microwave. Use a low setting and heat for just a few seconds. Be careful not to melt the chocolate coating. Enjoy your truffles at their best! Yes, you can use heat-treated flour. Heat-treated flour is safe for eating raw. It kills harmful bacteria that may be in regular flour. You can find heat-treated flour in stores or make it at home. To do this, spread flour on a baking sheet and bake at 350°F for five minutes. Make sure to let it cool before using it in your truffles. This step ensures your cookie dough is safe and still delicious. If your truffles don't set, check the temperature. They may need more time in the fridge. If the chocolate coat is too thick, it may not harden well. Make sure to use a fork and let excess chocolate drip off. You can also try chilling the truffles for longer, up to an hour. If they still won’t set, you can place them in the freezer for about 10 minutes. This quick chill can help firm them up. You can make these truffles ahead of time. After forming the balls, chill them as instructed. Then, you can store them in an airtight container in the fridge. They will stay fresh for up to one week. If you want to keep them longer, freeze the uncoated truffles. Just let them thaw in the fridge before dipping in chocolate. This way, you can enjoy them any time! Yes, there are nut-free options for these truffles. Just make sure the chocolate chips you use are nut-free. You can also swap the butter for a nut-free margarine or shortening. For some extra flavor, add a few drops of almond extract. This gives a nice taste without nuts. Always check labels for allergens to keep your treats safe for everyone. These chocolate truffles are simple to make and a joy to enjoy. We covered the essential ingredients, mixing techniques, and tips for perfect texture. You learned how to store them and even explore flavor variations. With these steps, anyone can create delicious, homemade treats. Give it a try! Your friends and family will love your tasty creations. Remember, the key is to have fun while making them. Enjoy every bite!
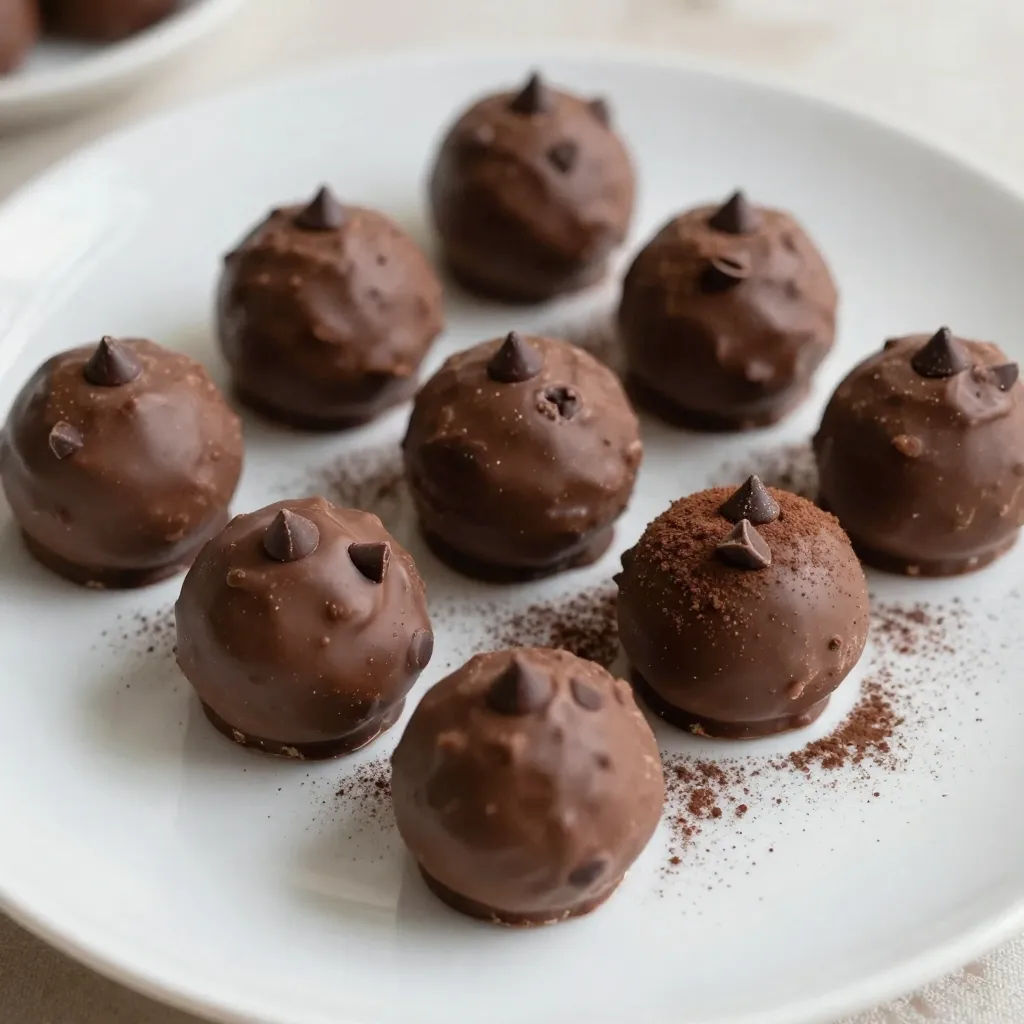
Chocolate Chip Cookie Dough Truffles Delightful Treat
If you love chocolate and cookie dough, you’re in for a treat! Chocolate Chip Cookie Dough Truffles are delicious and fun to make. These sweet
To make a creamy and delicious caramel apple dip, you need simple ingredients. Here’s what you will need: - 4 medium-sized apples (Granny Smith or Honeycrisp) - 1 cup caramel sauce (store-bought or homemade) - ½ cup cream cheese, softened - ¼ cup powdered sugar - 1 teaspoon vanilla extract - ¼ teaspoon cinnamon - Optional toppings: chopped nuts, mini chocolate chips, or toffee bits These ingredients come together to create a fun and tasty treat. The apples provide crunch and freshness. The caramel sauce adds sweetness, while the cream cheese gives a rich and creamy flavor. You can customize this dip by adding your favorite toppings, like nuts or chocolate chips. This makes it a perfect snack for parties or family gatherings. {{ingredient_image_1}} To start, gather your ingredients. In a medium bowl, combine: - ½ cup cream cheese, softened - ¼ cup powdered sugar - 1 teaspoon vanilla extract - ¼ teaspoon cinnamon Beat these together with a mixer or a whisk. Keep mixing until the texture is smooth and creamy. This mix forms the base of your dip. Next, take your cream cheese mixture and spread it evenly on a serving platter. Use a spatula to create a nice layer. Once that's done, generously drizzle the caramel sauce over the cream cheese. You want to create a lovely marbled look. Now, let’s make it pop! If you want, sprinkle chopped nuts on top. You could also add mini chocolate chips or toffee bits for extra sweetness. Arrange apple slices around the dip. This makes it easy for everyone to grab and enjoy. Serve right away or chill for up to 30 minutes to enhance the flavors. To get a creamy consistency, start with softened cream cheese. Beat it well with powdered sugar and vanilla. This helps it blend smoothly. If it feels too thick, add a splash of milk. Mix again until it’s nice and creamy. For the caramel drizzle, warm it slightly before using. This makes it easier to pour over the dip. Drizzle in a zigzag pattern for a pretty look. You can also swirl it into the cream cheese for a marbled effect. Pair this dip with other fresh fruits too. Sliced pears or bananas work great. You can also use pretzels for a salty crunch. For serving, use a shallow dish or platter. This lets everyone reach the dip easily. You can even use small bowls for each fruit type. It makes the table look nice and organized. Store leftover dip in an airtight container. It stays fresh in the fridge for up to three days. Just make sure to cover it well. If you chill the dip, let it sit for about 30 minutes. This helps the flavors mix together. Enjoy it cold or at room temperature! Pro Tips Choose the Right Apples: For the best flavor and texture, use a mix of tart and sweet apples like Granny Smith and Honeycrisp. Make Your Own Caramel: If you have time, homemade caramel sauce can elevate the dish with a richer flavor compared to store-bought options. Chill Before Serving: Allowing the dish to chill for about 30 minutes will help the flavors meld together, enhancing the overall taste. Customize Your Toppings: Experiment with different nuts, mini chocolate chips, or toffee bits to create a unique flavor combination that suits your taste. {{image_2}} You can use more fruits with caramel dip. Sliced pears and bananas taste great. Berries like strawberries and raspberries also work well. Seasonal fruits add fun twists too. In fall, try adding slices of fresh figs. In summer, peaches and nectarines bring a juicy bite. To change the flavor, add spices or extracts. A pinch of nutmeg or a dash of ginger can boost the taste. You can also stir in some cocoa powder for a chocolate twist. If you love toffee, sprinkle toffee bits into the dip. This adds a sweet crunch. For low-sugar options, look for sugar-free caramel sauce. You can also use Greek yogurt instead of cream cheese. This keeps things creamy with less fat. For a vegan version, swap the cream cheese for cashew cream. It’s rich and tasty while being plant-based! Each serving of caramel apple dip has about 150 calories. This dip is rich due to cream cheese and caramel. Here’s a look at the macronutrients: - Fat: 8g - Carbohydrates: 20g - Protein: 2g You can make small changes to lower the calories. Here are a few swaps: - Use Greek yogurt instead of cream cheese for less fat. - Choose sugar-free caramel sauce to cut down on sugar. - Add less powdered sugar for sweetness without extra calories. These swaps can help keep the dip tasty while making it lighter. For gatherings, I suggest serving about 1/4 cup of dip per person. This amount lets everyone enjoy without overdoing it. If you have a crowd, you can easily double or triple the recipe. Each batch serves about 8 people. Adjust the number of apples and cream cheese as needed. To keep your dip fresh, store it in an airtight container. This helps prevent it from drying out. You can keep it in the fridge for up to three days. Make sure to cover it tightly. If you see any liquid, just give it a stir before serving again. Yes, you can make this dip a day ahead. Prepare the cream cheese mixture and store it in the fridge. Add the caramel sauce and toppings right before you serve. This keeps everything fresh. Your guests will love the taste! I recommend using Granny Smith or Honeycrisp apples. Granny Smith adds a nice tartness to balance the sweet caramel. Honeycrisp gives a sweet crunch. Both types hold up well and taste great with the dip. You can even mix them for fun flavor combinations! This blog post covered a delicious caramel apple dip recipe. We explored the key ingredients, step-by-step instructions, and tips to enhance your dip. You learned about variations to cater to different tastes and dietary needs. Remember, you can customize the dip and make it your own. So, gather your friends and enjoy this tasty treat. Don’t forget to share your creations!
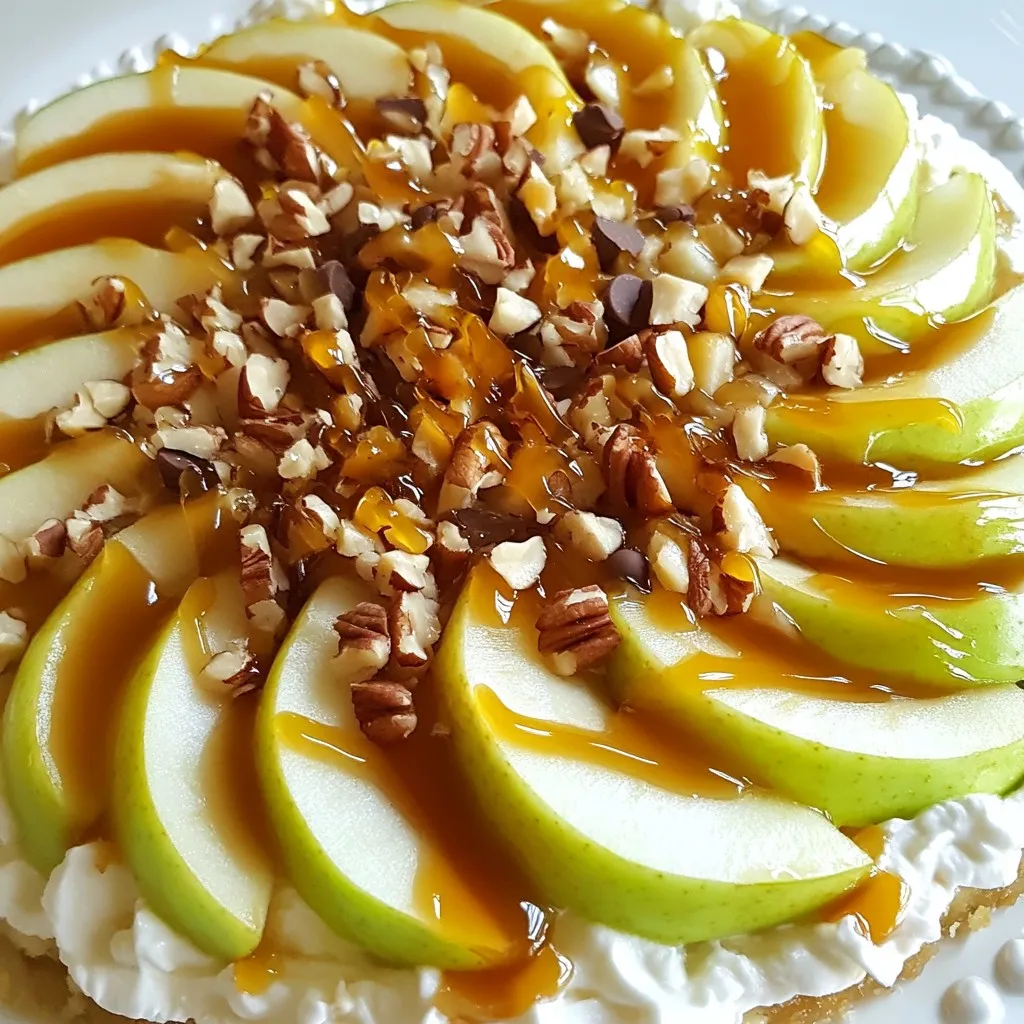
Caramel Apple Dip Creamy and Delicious Treat
If you love a sweet, creamy treat, you’re in for a delight! This Caramel Apple Dip is the perfect way to enjoy apples, whether for
To make the best white chocolate cranberry cookies, you need a few key ingredients. Each one plays a big role in flavor and texture. Here’s what you’ll need: - 1 cup unsalted butter, softened - 1 cup brown sugar, packed - 1/2 cup granulated sugar - 2 large eggs - 1 teaspoon vanilla extract - 3 cups all-purpose flour - 1 teaspoon baking soda - 1/2 teaspoon salt - 1 cup dried cranberries - 1 cup white chocolate chips - 1/2 cup chopped pecans (optional) Using unsalted butter helps control the saltiness. The brown sugar adds moisture, while granulated sugar gives a nice crunch. Eggs bind everything together, and vanilla enhances the flavor. The flour builds the cookie's structure. Baking soda makes them rise, and salt balances the sweetness. Dried cranberries add tartness, while white chocolate brings creamy sweetness. Chopped pecans are optional, but they add a great crunch. Gather these ingredients, and you’re ready to create a delightful treat! {{ingredient_image_1}} 1. Preheating the oven: Start by preheating your oven to 350°F (175°C). This step is key to baking the cookies evenly. While it heats, line your baking sheets with parchment paper. This helps the cookies not stick. 2. Creaming butter and sugars: In a large bowl, add 1 cup of softened unsalted butter, 1 cup of packed brown sugar, and 1/2 cup of granulated sugar. Use a mixer to cream these together until the mixture is light and fluffy. This should take about 3-4 minutes. Creaming adds air and makes the cookies tender. 3. Adding eggs and vanilla: Next, beat in 2 large eggs one at a time. After that, stir in 1 teaspoon of vanilla extract. The eggs add moisture and help bind the cookie dough together. 1. Combining flour, baking soda, and salt: In another bowl, mix together 3 cups of all-purpose flour, 1 teaspoon of baking soda, and 1/2 teaspoon of salt. This step ensures that the baking soda is evenly distributed in the dough. 2. Gradual incorporation into the wet mixture: Slowly add the dry mixture to the wet ingredients. Mix until just combined. Be careful not to overmix, as this can make the cookies tough. 1. Folding in cranberries, chocolate chips, and pecans: Now, gently fold in 1 cup of dried cranberries, 1 cup of white chocolate chips, and 1/2 cup of chopped pecans if you choose to use them. Make sure they are evenly distributed throughout the dough for the best flavor. 2. Portioning and placing on baking sheets: Using a cookie scoop or a tablespoon, drop rounded balls of dough onto the prepared baking sheets. Leave some space between each cookie, as they will spread while baking. 1. Baking time and checking for doneness: Bake the cookies in your preheated oven for 10-12 minutes. Look for lightly golden edges while the centers remain soft. This gives you that perfect chewy texture. 2. Cooling instructions: Once baked, remove the cookies from the oven. Let them cool on the baking sheets for about 5 minutes. After that, transfer the cookies to a wire rack to cool completely. This helps them set properly. To achieve the best texture, use room temperature butter. It helps the dough mix well. Cream the butter and sugars until fluffy, about three to four minutes. This step adds air, leading to soft cookies. For even baking, space the cookies on the sheet. Leave about two inches apart. This allows heat to circulate. Rotate the baking sheet halfway through to promote uniform cooking. Store cookies in an airtight container. They stay fresh for a week at room temperature. For longer storage, freeze them for up to three months. To reheat, warm cookies in the oven at 350°F for about five minutes. This restores their soft texture and makes them taste fresh again. Arrange the cookies on a decorative plate for visual appeal. You can sprinkle some chopped pecans on top for a nice touch. Drizzling extra melted white chocolate enhances the look and taste. It creates a beautiful finish that makes your cookies stand out. Enjoy them with a glass of milk for the perfect treat! Pro Tips Chill the Dough: For thicker cookies, chill the dough for at least 30 minutes before baking. This helps prevent them from spreading too much in the oven. Use Fresh Ingredients: Ensure your baking soda is fresh for optimal rise and texture. Old baking soda can result in flat cookies. Customize Your Mix-Ins: Feel free to swap out cranberries and pecans for your favorite dried fruits or nuts, like cherries or walnuts, to create your own unique flavor. Storage Tips: Store cookies in an airtight container at room temperature for up to a week, or freeze them for longer storage. Just make sure to layer them with parchment paper to prevent sticking. {{image_2}} You can change the flavors in your white chocolate cranberry cookies. Try using dark chocolate instead of white chocolate. Dark chocolate gives a rich taste that balances the sweetness. You can also use milk chocolate for a creamier flavor. Adding spices can make your cookies unique. A pinch of cinnamon adds warmth. Nutmeg gives a cozy touch too. Just a little can change the whole cookie. If you want to swap out butter, try coconut oil or applesauce. These options can make the cookies lighter. You can also use brown sugar alone for a deeper flavor. For gluten-free cookies, use almond flour or a gluten-free mix. This keeps the taste and texture similar to the original. Always check the labels to ensure they are safe. You can add other dried fruits to your dough. Dried cherries or apricots add a nice twist. They pair well with the tart cranberries. Nuts can enhance the crunch in your cookies. Chopped walnuts or almonds work well. You can even try pumpkin seeds for a different texture. Mix and match to find your favorite combination! How long do the cookies last? These cookies last about a week when stored in an airtight container. They taste best within the first few days. Can I freeze the cookie dough? Yes, you can freeze the dough! Just scoop the dough into balls and freeze on a baking sheet. Once frozen, store them in a freezer bag. What can I use instead of pecans? If you don't have pecans, use walnuts or almonds. You can also skip nuts entirely if you prefer. How to adjust for smaller or larger batches To make a smaller batch, cut the recipe in half. For a larger batch, double the ingredients. This way, you can bake just the right amount. Modifying for dietary restrictions For gluten-free cookies, swap all-purpose flour with a gluten-free blend. You can also use dairy-free chocolate to make it vegan. What to do if cookies spread too much If your cookies spread too much, chill the dough for 30 minutes before baking. This helps them hold their shape better. Fixing dry or crumbly cookies If your cookies are dry, try adding a tablespoon of milk or more butter. This will help make them softer and chewier. Each cookie has about 150 calories. This number may change a bit based on size. Key nutrients in these cookies include: - Fat: 7 grams - Carbohydrates: 21 grams - Protein: 2 grams - Fiber: 1 gram - Sugars: 10 grams These cookies bring a mix of taste and energy, thanks to the sugars and fats. The dried cranberries add some fiber and antioxidants, which are great for your body. These cookies may not be for everyone. They contain gluten from flour and sugar. If you have nut allergies, be careful with the optional pecans. For portion control, enjoy one or two cookies. Sharing is also a good way to enjoy these treats without overindulging. Remember, moderation is key! You've learned about cookie-making. We covered all the must-have ingredients and how to prepare them. You now know the steps for mixing, baking, and perfecting your cookies. I shared tips for storage, serving, and flavor twists. With this guide, you can enjoy cookies fresh from your oven. Remember, small changes can lead to big flavors. Now, it's time to bake, taste, and have fun with your creations!
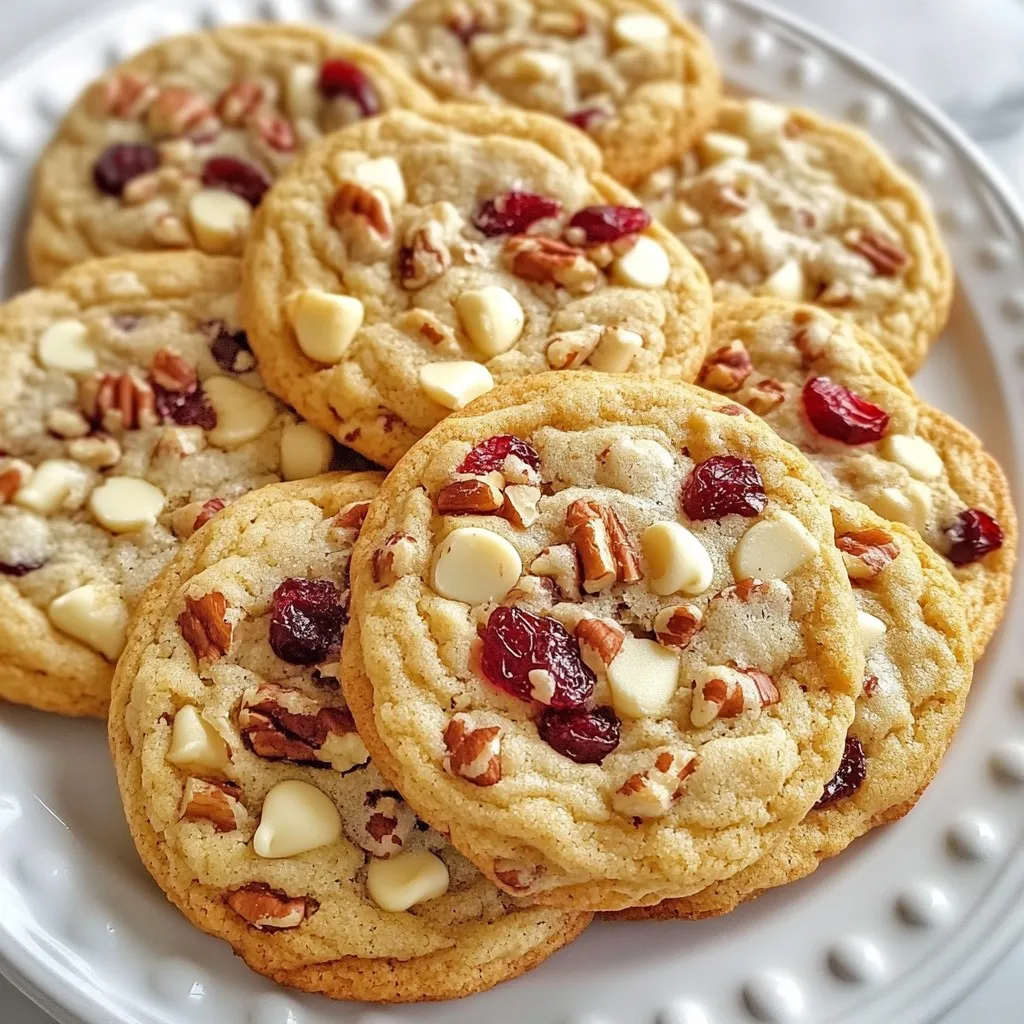
White Chocolate Cranberry Cookies Delightful Treat
Ready for a sweet adventure? These White Chocolate Cranberry Cookies will steal your heart! With rich white chocolate, tart cranberries, and just the right crunch,
- Graham crackers - Milk - Heavy cream - Chocolate syrup - Instant chocolate pudding mix - Cream cheese - Powdered sugar - Vanilla extract - Mini marshmallows - Whipped cream - Grated chocolate or chocolate shavings for garnish To make hot chocolate lasagna, gather these simple ingredients. Start with graham crackers. They form the base of the dessert. You will also need two cups of milk. This helps make the pudding layer creamy. Next, get one cup of heavy cream. This adds richness and a light texture. For sweetness, grab one cup of chocolate syrup. It brings deep chocolate flavor. You will need one package of instant chocolate pudding mix, too. This thickens the pudding layer quickly. Don't forget the cream cheese! You need one package, softened to mix well. To sweeten the cream cheese layer, use one cup of powdered sugar. A teaspoon of vanilla extract adds warmth to the flavors. For a fun touch, grab two cups of mini marshmallows. They give that classic hot chocolate vibe. Finally, have whipped cream on hand for topping. Grated chocolate or chocolate shavings will add a nice finish to your dessert. With these ingredients, you can create a wonderful dessert. Each layer brings its own flavor and texture. Enjoy gathering your supplies! {{ingredient_image_1}} To start, take your softened cream cheese and place it in a large mixing bowl. Beat the cream cheese with a mixer until it becomes smooth. This step is key for a creamy texture. Next, gradually add in the powdered sugar. Mix well until it blends perfectly. Then, pour in the vanilla extract and mix again. Once done, set this creamy layer aside. In another bowl, open your package of instant chocolate pudding mix. Whisk it with 2 cups of cold milk. Follow the package directions to ensure it thickens well. After it thickens, gently fold in 1 cup of heavy cream. This will give your pudding a light and airy feel. Make sure to mix carefully so you don’t lose that fluffiness. Now, grab your 9x13 inch dish. Start by placing a layer of graham crackers at the bottom. Spread half of the cream cheese mixture over the crackers. Then, layer half of the chocolate pudding on top. Sprinkle a layer of mini marshmallows evenly over the pudding. Repeat this process. Add another layer of graham crackers, the rest of the cream cheese mixture, the remaining chocolate pudding, and more mini marshmallows. Finish with a top layer of graham crackers. Once assembled, cover the dish with plastic wrap. Refrigerate for at least 4 hours or overnight. This chilling time helps set the layers perfectly. When you’re ready to serve, spread whipped cream on top. Garnish with grated chocolate or chocolate shavings for a beautiful finish. Enjoy this sweet treat! For a stunning look, slice the hot chocolate lasagna into neat squares. Serve each square on a plate. Drizzle some chocolate syrup over each piece for that extra touch of sweetness. You can also add a handful of mini marshmallows on the side. This makes the dish fun and adds a pop of color. If you want to switch things up, use ricotta cheese instead of cream cheese. It gives a nice texture and taste. For those who are dairy-free, swap the heavy cream with coconut cream. It still adds a creamy feel without the dairy. You can also use almond milk in place of regular milk for a lighter version. One common mistake is overmixing the layers. Mix just enough to combine, and don't beat too long. Overmixing can make the texture less smooth. Another mistake is not chilling the lasagna long enough. Always chill it for at least 4 hours. This helps the layers set properly, making each bite a delight. If you skip this step, the layers might not hold together when you cut into them. Pro Tips Chill for Best Results: Make sure to chill the lasagna for at least 4 hours, or overnight if possible. This allows the layers to meld together, enhancing the flavor and texture. Use Fresh Ingredients: Opt for fresh, high-quality cream cheese and heavy cream. This will significantly improve the overall taste and creaminess of your layers. Layering Technique: When layering, ensure each layer is spread evenly. This helps in achieving a balanced flavor in each bite and prevents any layer from overpowering the others. Garnish Creatively: Don’t just stop at chocolate shavings! Consider adding crushed cookies or a sprinkle of cocoa powder on top for an extra touch of flavor and visual appeal. {{image_2}} You can make hot chocolate lasagna even more special. Try adding peppermint extract. This gives a refreshing twist, perfect for winter. Just a teaspoon adds a lot of flavor. You can also use different types of chocolate. Dark chocolate adds richness, while white chocolate gives sweetness. Mix and match your favorite chocolates for fun flavors. Pair your hot chocolate lasagna with drinks. Milk or hot cocoa works well. For adults, try coffee or a rich dessert wine. Add seasonal toppings for fun. Use crushed candy canes for a festive touch or sprinkle cinnamon for warmth. Fresh berries can bring a splash of color and taste. Mini hot chocolate lasagna is cute and fun. You can use small cups or dishes. This way, each person gets their own. Just layer the same way, but in smaller sizes. They’re great for parties or gatherings. Plus, they look adorable on any table! To keep your hot chocolate lasagna fresh, store it in the fridge. Cover the dish tightly with plastic wrap. This step prevents air from getting in and keeps the layers moist. You can also use a lid if your dish has one. Make sure it stays in the fridge until you're ready to serve. You can freeze hot chocolate lasagna for later enjoyment. First, cover the dish tightly with plastic wrap, then wrap it in aluminum foil. This double layer helps protect it from freezer burn. When you're ready to eat, move the lasagna to the fridge to thaw overnight. Once thawed, serve it cold or let it sit at room temperature for a bit. Then, add whipped cream and chocolate shavings before serving. Enjoy your delicious treat! You can keep hot chocolate lasagna in the fridge for up to five days. Store it in an airtight container to keep it fresh. This dessert tastes great cold, so it is perfect for leftovers. Yes, you can make hot chocolate lasagna a day before you serve it. Prepare all the layers, then assemble them in your dish. Cover it with plastic wrap and chill overnight. This gives the layers time to set and meld together for better flavor. If you want to switch it up, use cookies like Oreos or Digestive biscuits. You can also try vanilla wafers for a lighter taste. Just crush them into crumbs and use them as a crust. Each option adds its own unique flavor to your hot chocolate lasagna. In this post, I shared how to make a delicious hot chocolate lasagna. We talked about simple ingredients like graham crackers, cream cheese, and chocolate pudding. I provided step-by-step instructions for each layer and tips for great presentation. Remember to avoid common pitfalls, like overmixing. You can also customize flavors or make mini versions! Enjoy bringing this treat to your table, and don’t forget to store it right. Making this dessert can be a fun way to create sweet memories. Enjoy every bite and get ready for compliments!
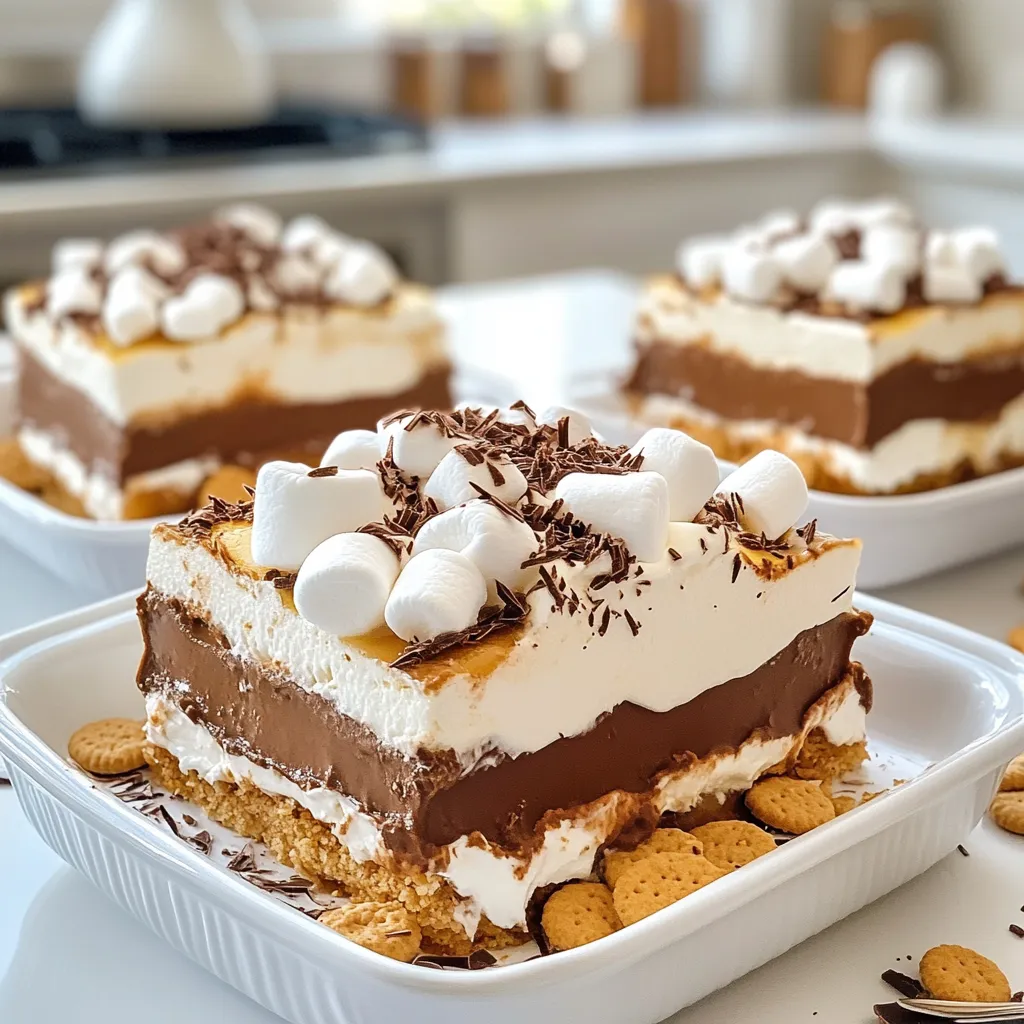
Hot Chocolate Lasagna Irresistible Dessert Delight
Craving a decadent dessert that combines all your favorite treats? Say hello to Hot Chocolate Lasagna! This simple yet rich layered dessert brings together creamy