Desserts

Blueberry Danish Delight Simple and Tasty Recipe
Are you craving a sweet treat that’s easy to make? Look no further than this Blueberry Danish Delight! This simple recipe combines flaky puff pastry
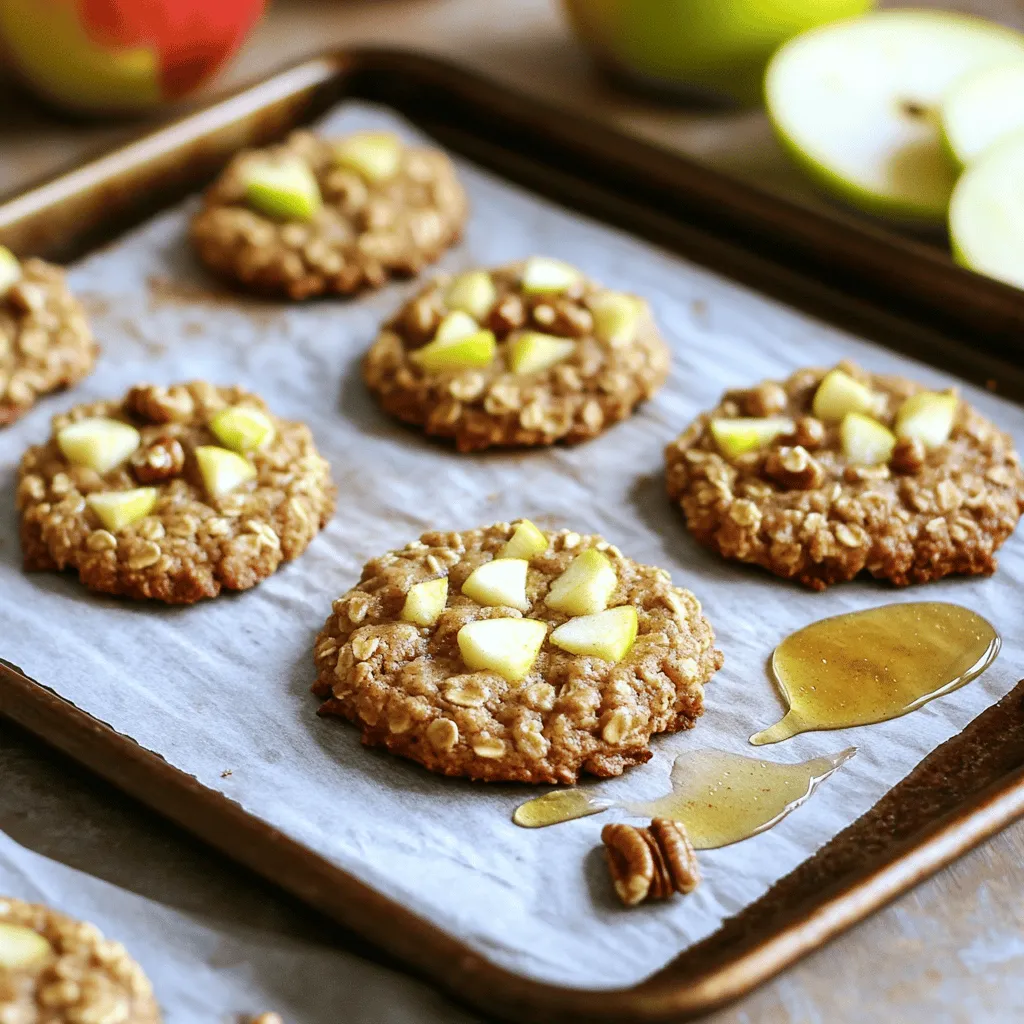
Healthy Apple Pie Oatmeal Cookies Delightful Snack
Craving a sweet snack that won’t derail your healthy eating plan? Try my Healthy Apple Pie Oatmeal Cookies! They bring the cozy flavor of apple
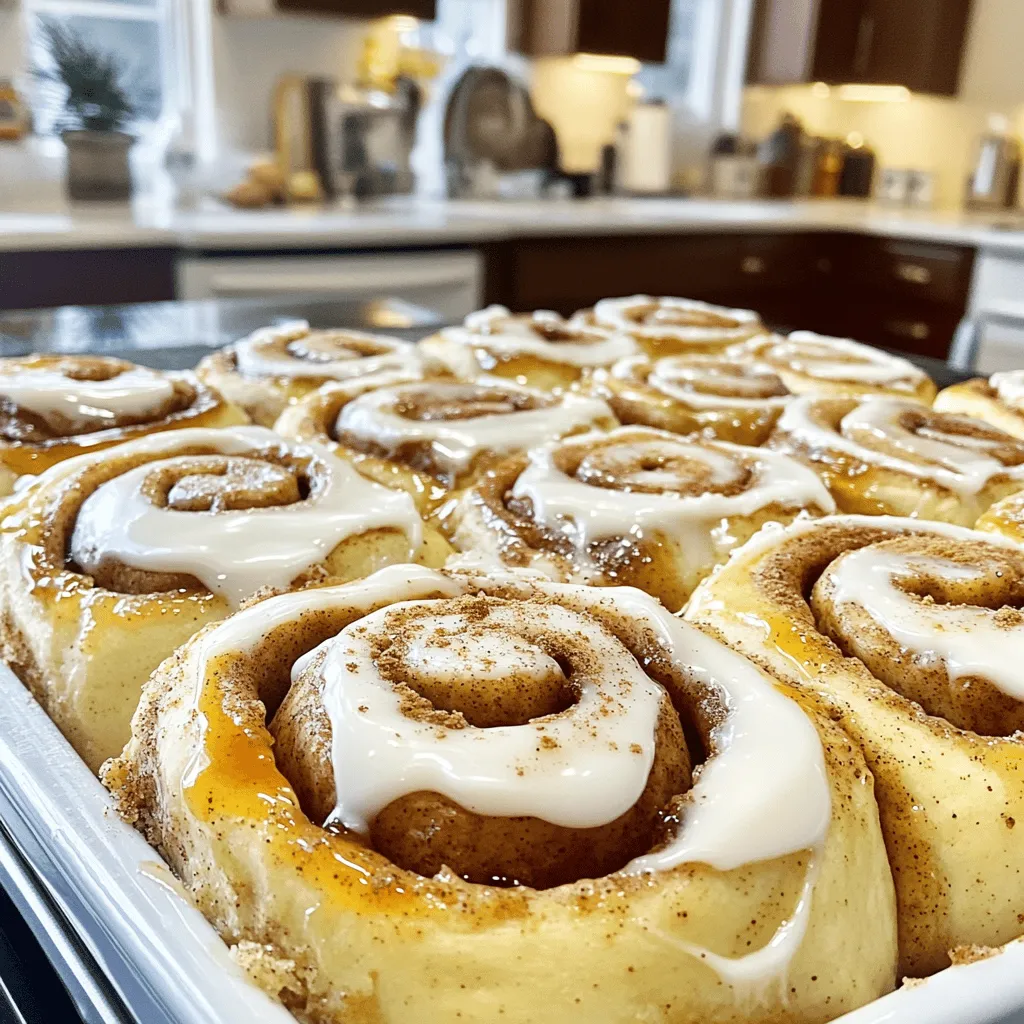
Apple Cider Cinnamon Rolls Irresistible Sweet Treat
Get ready for a sweet fall treat! These Apple Cider Cinnamon Rolls combine warm, spiced flavors and gooey sweetness. They’re perfect for cozy mornings or
![- 2 medium apples (Granny Smith or Honeycrisp work well) - 1 cup caramel sauce (store-bought or homemade) - 1 tablespoon butter - 1/2 teaspoon cinnamon - 1/2 cup mini chocolate chips - 1/4 cup finely chopped nuts (e.g., pecans or walnuts) - Sea salt for garnish When you make Easy Caramel Apple Slices, start with fresh apples. I love Granny Smith for their tartness or Honeycrisp for their sweetness. They both hold up well to the caramel. For the caramel, you can use store-bought or make your own. If you choose to make it, be careful to keep it smooth. Add butter to make it rich. Optional ingredients can really enhance your treat. A sprinkle of cinnamon adds warmth. Mini chocolate chips or nuts give extra crunch. Sea salt can bring out the sweet flavor. These easy caramel apple slices are fun to make. You’ll enjoy every bite, especially with the tasty toppings! Check the [Full Recipe] for more details. - Wash and dry the apples. - Core and slice apples into wedges. Start by washing your apples well. Clean them under cool water to remove any dirt or wax. Then, dry them with a towel. Next, use an apple corer to remove the core. If you do not have one, a small knife works too. After that, slice the apples into wedges about a quarter-inch thick. You can leave the skin on for extra flavor and color. - Combine caramel sauce and butter in a saucepan. - Stir until melted and smooth. In a small saucepan, add one cup of caramel sauce and one tablespoon of butter. Heat the mixture over low heat. Stir it gently with a spoon. Keep stirring until the caramel and butter blend together and become smooth. Be careful not to let it boil. If you want extra flavor, you can add half a teaspoon of cinnamon here. - Dip apple slices into caramel. - Set on a parchment-lined baking sheet. - Chill in the refrigerator. Once your caramel is ready, it’s time to dip! Take each apple slice and dip it into the warm caramel. Make sure to coat it well. Let any extra caramel drip off before placing the slice on a parchment-lined baking sheet. If you like, sprinkle mini chocolate chips or chopped nuts on top of the warm caramel. Repeat this with all the apple slices. Place the baking sheet in the fridge for about thirty minutes. This helps the caramel set up nicely. Enjoy your easy caramel apple slices! For the full recipe, check the earlier section. Choose apples that balance sweet and tart. I recommend Granny Smith or Honeycrisp. These apples have crisp textures that hold up well when dipped in caramel. Leaving the skin on adds color and a bit of texture. Plus, it gives you extra nutrients. To make your caramel smooth, heat it slowly. Combine the caramel sauce and butter in a saucepan. Stir gently until it melts and blends well. Avoid boiling the mixture. Boiling can cause the caramel to burn. Watch it closely. Make your caramel apple slices stand out. Arrange them on a platter in a fan shape. You can add toppings for extra flair. Mini chocolate chips or chopped nuts work great. Sprinkle a little sea salt on top for a fun twist! {{image_2}} You can make your caramel apple slices even better with fun toppings. Nuts are a great choice. Try chopped pecans, walnuts, or even almonds. Mix and match them for different tastes. You can also add mini chocolate chips for a sweet crunch. Right after dipping, sprinkle these on the warm caramel. The heat helps them stick well. Want to change the flavor? Add spices to the caramel! A sprinkle of nutmeg or a dash of vanilla extract makes a big difference. These spices bring warmth and depth to the taste. You might also think about using flavored caramel sauces. Salted caramel adds a nice twist. Each option lets you create a new favorite. Get creative with how you dip your apple slices. You can cover them in chocolate instead of caramel. Melt dark or milk chocolate and dip the apple slices in it. They will look and taste amazing. Another fun idea is to mix peanut butter with caramel. It adds a creamy texture and a nutty flavor that is hard to resist. For the full recipe, check out the section above. To keep your caramel apple slices fresh, follow these tips: - Store them in an airtight container. - Use parchment paper to separate layers. - Avoid stacking them to prevent sticking. For best results, use a shallow container. This helps maintain the texture. A glass or plastic container works well. Caramel apple slices last about 3 to 5 days in the fridge. Always check for signs of spoilage. - Look for any discoloration of the apples. - If the caramel appears hard or grainy, it may be time to toss them. If you want a fresh taste, reheat the caramel before serving. Place it in a microwave-safe bowl. Heat for 10 to 15 seconds. Stir until smooth. For serving, arrange slices on a nice platter. You can add a drizzle of extra caramel for flair. Consider serving with a scoop of ice cream for a fun treat! For the full recipe, check the earlier section. Making homemade caramel sauce is easy and fun. Here’s a simple recipe: - Ingredients: - 1 cup sugar - 6 tablespoons butter - 1/2 cup heavy cream - Instructions: 1. In a saucepan, heat sugar over medium heat. 2. Stir until it melts and turns amber. 3. Add butter and stir until melted. 4. Slowly pour in heavy cream and mix well. 5. Let it cool before using. For more tips, check out [Full Recipe]. Yes, you can use many other fruits! Here are some great options: - Pears: They are sweet and soft. - Bananas: They add a creamy texture. - Strawberries: Perfect for bite-sized treats. - Pineapple: Offers a tropical twist. These fruits will pair well with caramel, making tasty snacks. To keep caramel smooth, follow these tips: - Use low heat when melting. High heat can cause quick hardening. - Stir constantly to keep it smooth. - Work fast when dipping fruits. - If it hardens, reheat gently on low heat. These steps will help you enjoy your caramel treats longer. You now know how to make delicious caramel apple slices. We covered key ingredients and easy steps for preparation. You learned about tips for choosing apples, making smooth caramel, and creative toppings. We also explored storage methods to keep your treats fresh and questions many ask. Now you can enjoy this tasty treat any time. Get creative with flavors and toppings. Have fun experimenting and sharing with friends!](https://grilledflavors.com/wp-content/uploads/2025/08/b41ab472-e5bf-40d3-82a3-0797db663eec.webp)
Easy Caramel Apple Slices Tasty Fall Treats
Fall is here, and what better way to celebrate than with Easy Caramel Apple Slices? These sweet treats are simple to make and perfect for
![To make perfect Pumpkin Spice Snickerdoodles, you need these main ingredients: - 1 cup unsalted butter, softened - 1 cup granulated sugar - 1/2 cup brown sugar, packed - 1 cup pumpkin puree (not pumpkin pie filling) - 2 large eggs - 3 1/4 cups all-purpose flour - 1 teaspoon baking soda - 1 teaspoon cream of tartar - 1 teaspoon cinnamon - 1/2 teaspoon nutmeg - 1/2 teaspoon ginger - 1/4 teaspoon allspice - 1/4 teaspoon salt - 1/4 cup granulated sugar (for rolling) - 2 teaspoons pumpkin pie spice (for rolling) These ingredients create a soft, flavorful cookie that warms the soul. The pumpkin puree adds moisture and a lovely taste. Each spice brings a touch of fall to your kitchen. If you want to get creative, consider adding some mix-ins. Here are some ideas: - Chocolate chips - Chopped nuts - Dried cranberries You can also top your cookies with a drizzle of icing or a sprinkle of sea salt. Each choice adds a new twist to the classic recipe. To bake these cookies, you'll need a few tools: - Mixing bowls - Measuring cups and spoons - Baking sheet - Parchment paper - Electric mixer or whisk - Cookie scoop or tablespoon These tools help you mix, scoop, and bake your cookies evenly. With the right equipment, you'll make this recipe a breeze. For the full recipe, check out the detailed instructions above. Start by preheating your oven to 350°F (175°C). Line a baking sheet with parchment paper. In a large bowl, mix the softened butter, granulated sugar, and brown sugar. You want this mixture to be light and fluffy. Next, add the pumpkin puree. Mix well until it is smooth. Beat in the eggs one at a time. Make sure each egg is mixed in fully before adding the next. In another bowl, whisk together the flour, baking soda, cream of tartar, cinnamon, nutmeg, ginger, allspice, and salt. Gradually add this dry mix to the wet mixture. Mix until just combined. Be careful not to overmix, as this can change the texture. In a small bowl, combine the 1/4 cup of sugar with the pumpkin pie spice for rolling. Scoop out tablespoon-sized portions of the dough. Roll each portion into a ball. Roll these balls in the spiced sugar mixture to coat them evenly. Place the dough balls on the prepared baking sheet, leaving about 2 inches between each. Bake for 10-12 minutes. The edges should look lightly golden, and the centers should look set. Once baked, remove the cookies from the oven. Let them cool on the baking sheet for 5 minutes. After that, transfer them to a wire rack to cool completely. To store, keep the cookies in an airtight container. They will stay fresh for several days. If you want to save some for later, you can freeze them. Enjoy these warm and cozy treats! For a full recipe, refer to the [Full Recipe] section. To get the right texture, start with softened butter. It helps create a light, fluffy mix. Cream the butter and sugars well. This step adds air and gives your cookies a nice rise. Be gentle when mixing in the flour. Overmixing can make them tough. Aim for a soft dough that holds its shape but isn’t sticky. One big mistake is using pumpkin pie filling instead of pumpkin puree. The filling has extra sugar and spices that change the cookie’s flavor. Another mistake is not measuring flour correctly. Too much flour can make your cookies dry. Always spoon flour into the cup and level it off. Lastly, don’t skip chilling the dough if it’s too soft. This helps your cookies hold their shape. Watch the edges closely. When they turn lightly golden, it’s time to remove them. The centers should look a bit soft but not wet. They will continue to cook slightly as they cool. Let them cool on the baking sheet for about five minutes. This helps them firm up but stay soft inside. Enjoy your warm and cozy Pumpkin Spice Snickerdoodles! For the full recipe, check out the detailed instructions above. {{image_2}} You can easily make gluten-free Pumpkin Spice Snickerdoodles. Use a gluten-free flour blend instead of all-purpose flour. Look for a blend that has a good mix of starches and whole grains. This will give your cookies the best texture. If you use almond flour, add a little extra baking soda. This helps the cookies rise and stay soft. To make vegan Pumpkin Spice Snickerdoodles, switch out the eggs for flax eggs. Mix one tablespoon of ground flaxseed with three tablespoons of water. Let it sit for five minutes. Use this mix for each egg. Replace the butter with coconut oil or a vegan butter spread. This keeps the cookies rich and tasty without dairy. Feel free to play with spices. You can swap in cardamom for the nutmeg for a fun twist. Try adding a pinch of cayenne for a warm kick. Want more texture? Add chopped nuts or chocolate chips. Mixing in dried cranberries or white chocolate can add a sweet touch. These small changes can make each batch special and fun! For the complete recipe, refer to the Full Recipe section. Store your Pumpkin Spice Snickerdoodles in an airtight container. This keeps them fresh and soft. You can stack them in a single layer or use parchment paper between layers. Keep the cookies at room temperature for up to one week. If you want to enjoy them longer, consider freezing. You can freeze both the dough and the baked cookies. For dough, scoop out balls and place them on a baking sheet. Freeze until solid, then transfer them to a freezer bag. They will last up to three months. When you're ready to bake, just add a few extra minutes to the baking time. For baked cookies, let them cool completely. Place them in an airtight container and freeze. They can also last for up to three months. To keep your cookies fresh, avoid exposing them to air. Always use an airtight container. If you live in a humid area, add a slice of bread to the container. This helps absorb moisture and keeps cookies soft. When serving, warm them slightly in the oven for a cozy touch. Enjoy your warm Pumpkin Spice Snickerdoodles anytime! For the full recipe, check the link provided. No, you should not use pumpkin pie filling. Pumpkin pie filling has extra sugar and spices. This changes the taste and texture of your cookies. Stick with pure pumpkin puree for the best flavor. It keeps your cookies soft and rich. To make your cookies softer, try these tips: - Use more brown sugar. It adds moisture and chewiness. - Slightly underbake the cookies. Take them out when they are just set. - Chill the dough before baking. This helps the cookies stay thick and soft. If you don't have cream of tartar, you can use baking powder. Use 1 1/2 teaspoons of baking powder for each teaspoon of cream of tartar. Another option is to use lemon juice or vinegar. Substitute 1 teaspoon of cream of tartar with 1 teaspoon of either. This helps the cookies rise and keeps them fluffy. For the full recipe, check out the section above. In this article, we explored how to make delicious Pumpkin Spice Snickerdoodles. You learned about key ingredients, helpful tips, and different variations to try. We also covered storage methods to keep your cookies fresh. Remember, avoiding common mistakes ensures perfect cookies every time. Don’t hesitate to experiment with flavors and mixes. Enjoy baking these treats! They'll be a hit in your home.](https://grilledflavors.com/wp-content/uploads/2025/08/8b2a32d4-ea9d-445a-9166-69fff292a0e2.webp)
Pumpkin Spice Snickerdoodles Warm and Cozy Treat
Cozy up with a warm plate of Pumpkin Spice Snickerdoodles! This easy recipe blends the classic snickerdoodle with delightful pumpkin spice flavors. Whether you’re making
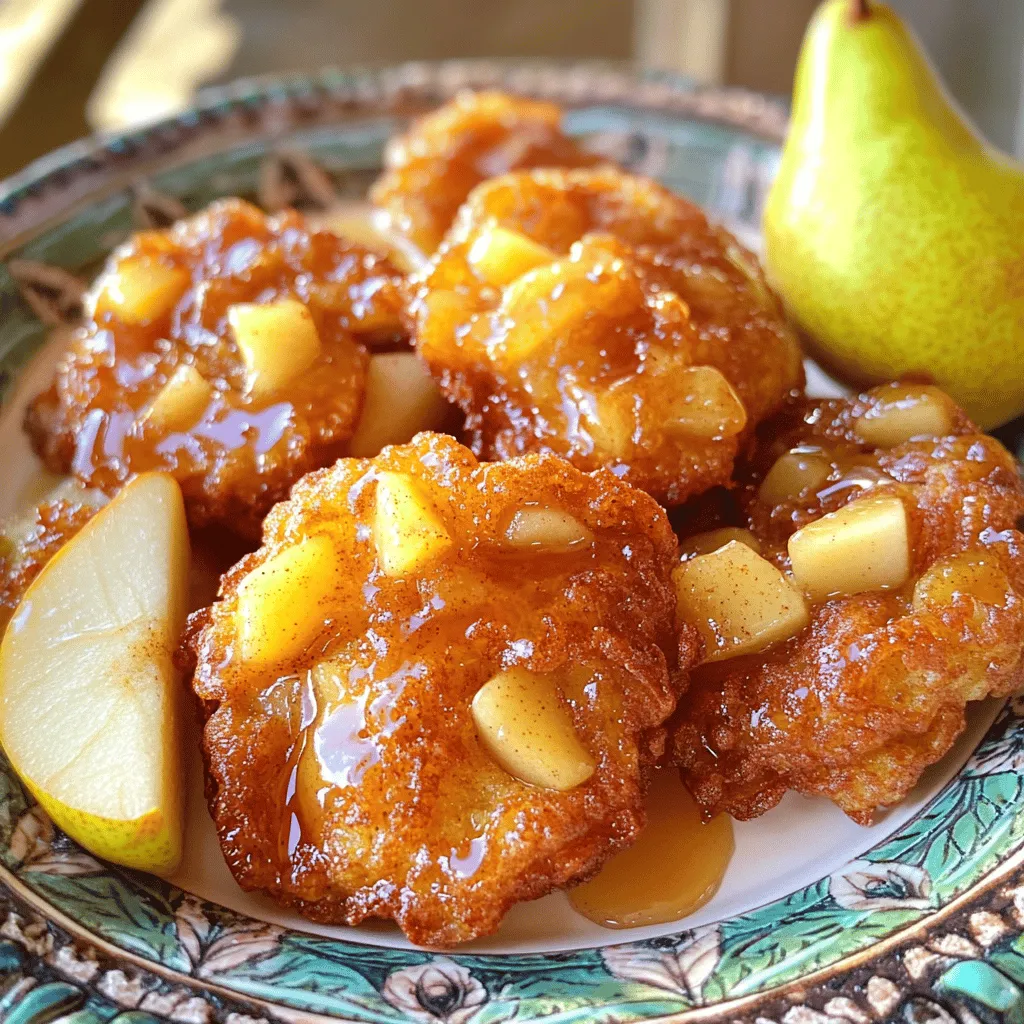
Pear Fritters with Maple-Honey Glaze Irresistible Treat
Craving a sweet treat that’s both warm and crispy? You’ll love these pear fritters with a maple-honey glaze. Imagine biting into soft pears nestled in
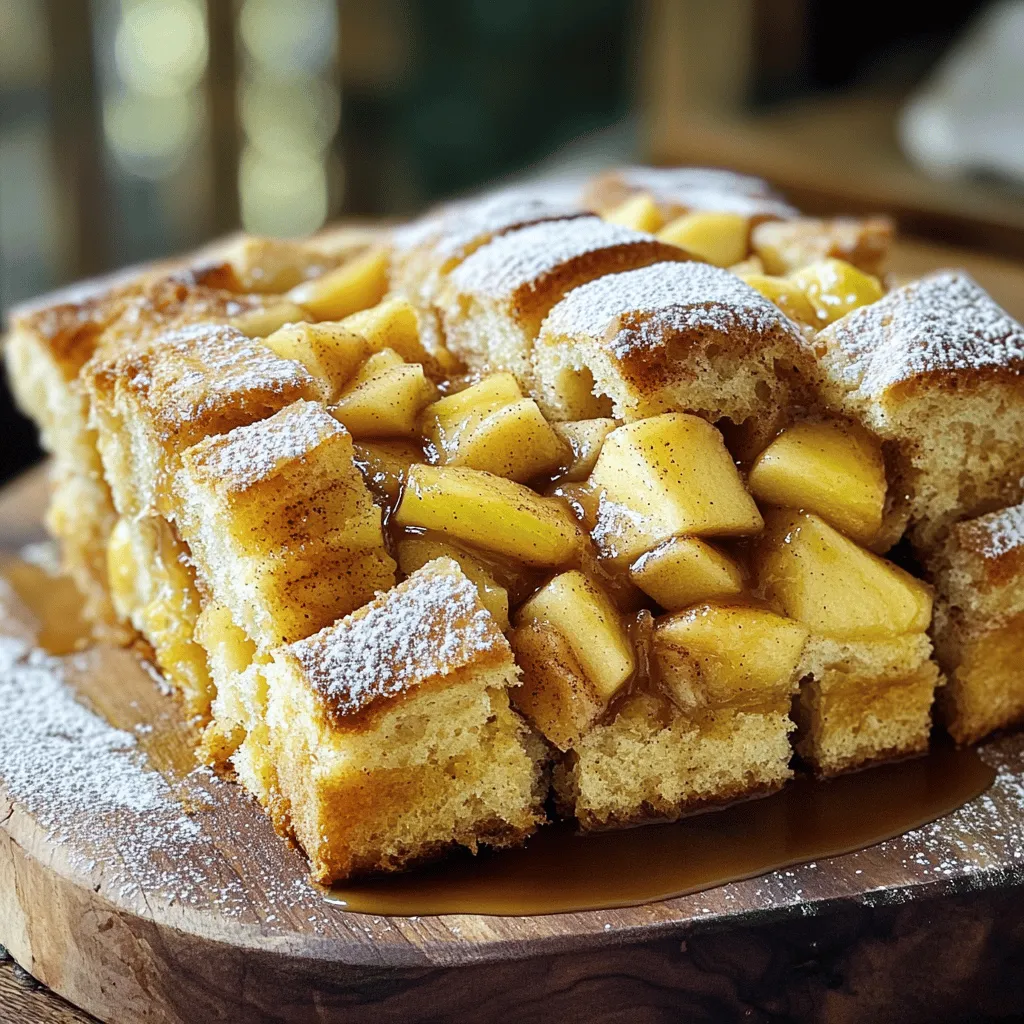
Apple Cider Pull-Apart Bread Simple and Soft Delight
If you crave a soft, comforting treat that’s perfect for sharing, you’re in the right place! Today, I’ll guide you through making Apple Cider Pull-Apart
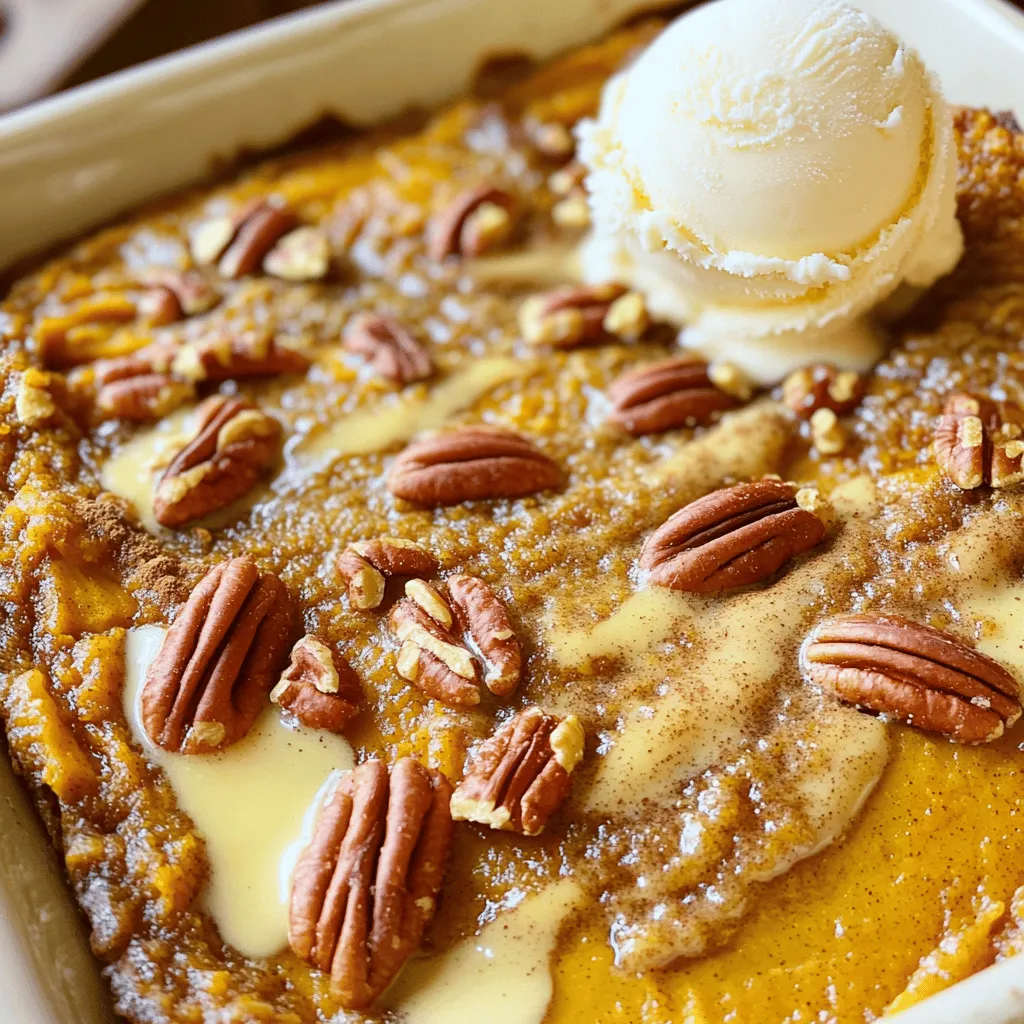
Savory Pumpkin Pecan Cobbler Warm and Comforting Treat
Pumpkin Pecan Cobbler is the perfect blend of warm spices and sweet nuts. As the leaves turn, this cozy dessert brings comfort to your table.
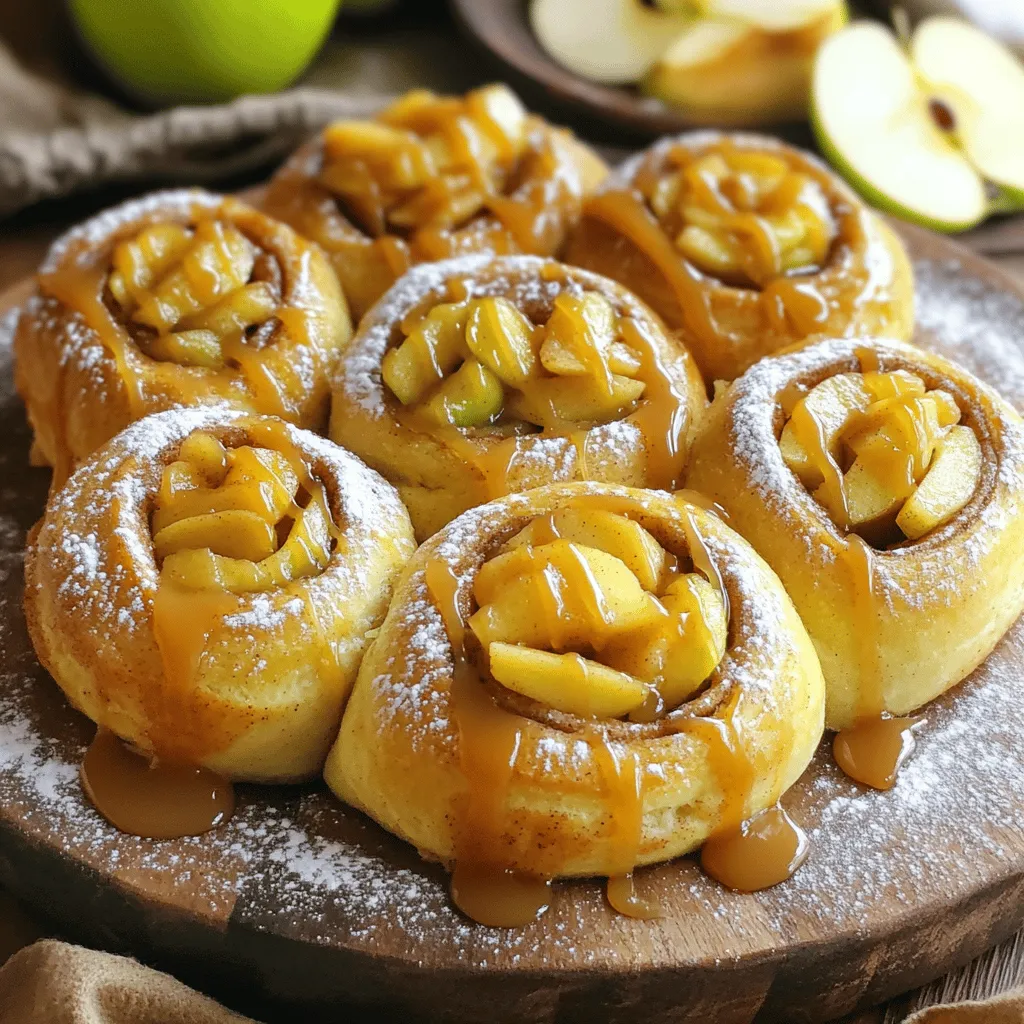
Easy Caramel Apple Cinnamon Rolls Tasty Fall Delight
Ready to dive into fall flavors? These Easy Caramel Apple Cinnamon Rolls will make your taste buds sing! With soft dough, sweet apples, and luscious
![- 1 cup all-purpose flour - 1/2 cup unsweetened cocoa powder - 1 cup granulated sugar - 1/2 cup unsalted butter, softened - 3 large eggs The Neapolitan Rose Cake shines with its simple yet key ingredients. Each one plays an important role in the cake's flavor and texture. All-Purpose Flour provides the main structure. It gives the cake a soft and airy feel. It's the base that holds everything together. Unsweetened Cocoa Powder infuses the cake with rich chocolate flavor. This cocoa adds depth without being too sweet. It complements the other flavors well. Granulated Sugar sweetens the cake. It also helps create a lovely, tender crumb. Don't skip this; it balances the cocoa's bitterness. Unsalted Butter adds moisture and richness. Softened butter helps to create a light and fluffy batter. It also enhances the overall taste. Eggs are crucial for binding. They add moisture and help the cake rise. Each egg adds a bit of structure and flavor. Using these ingredients, you can create a delicious Neapolitan Rose Cake. The combination leads to a treat that is not only beautiful but also delightful to eat. For the complete recipe, check out the Full Recipe. Preheat Oven and Prepare Cake Pan Start by preheating your oven to 350°F (175°C). Grab a round 9-inch cake pan. Grease it well with butter and sprinkle some flour to prevent sticking. Mixing Dry Ingredients In a mixing bowl, sift together the all-purpose flour, unsweetened cocoa powder, baking soda, baking powder, and salt. This helps the cake rise and gives it a nice texture. Set this bowl aside for now. Creaming Butter and Sugar In another large bowl, add the softened unsalted butter and granulated sugar. Use a mixer to cream them together until the mixture is light and fluffy. This takes about 3-4 minutes. It is a key step for a soft cake. Combining Wet and Dry Ingredients Now, add the eggs one at a time to the butter and sugar mixture. Mix well after each egg. Next, stir in the vanilla extract. Gradually mix in the dry ingredients, alternating with the milk. Start and end with the dry mix for the best results. Just mix until combined. Pouring and Smoothing the Batter Carefully pour the batter into the prepared cake pan. Use a spatula to smooth the top. This will help the cake rise evenly. Baking Time and Cooling Tips Place the cake in the oven and bake for 25-30 minutes. Check if it’s done by inserting a toothpick in the center. If it comes out clean, your cake is ready. Let it cool in the pan for 10 minutes. After that, transfer it to a wire rack to cool completely. Slicing the Layers Once the cake is cool, carefully slice it into two equal layers. A serrated knife works best for this. Applying Whipped Cream and Strawberries In a separate bowl, whip the heavy cream with powdered sugar until stiff peaks form. Spread a layer of whipped cream on the first cake layer. Add thinly sliced fresh strawberries on top, then place the second layer on top. Frosting the Cake Use the remaining whipped cream to frost the top and sides of the cake. Make it smooth and pretty. Finally, decorate your cake with more strawberries and edible rose petals for that lovely touch. For a detailed guide, check the Full Recipe. - Ensuring Moisture and Flavor: To keep your cake moist, use room-temperature ingredients. This helps the batter mix well. Also, don’t skip the milk. It adds flavor and keeps the cake soft. - Decorating Techniques Using Fresh Ingredients: Fresh strawberries and edible rose petals make a stunning look. Use thin slices of strawberries to create a beautiful pattern. Place rose petals around the cake for a touch of elegance. - Making the Perfect Whipped Cream: Chill your bowl and beaters before whipping cream. This helps it whip faster. Use heavy cream for the best results. Sweeten it with powdered sugar to enhance the flavor. - Overmixing the Batter: Mix just until combined. Overmixing can make the cake dense. A light touch gives a fluffy texture. - Poor Layering Techniques: When slicing the cake, use a serrated knife. This ensures even layers. Spread whipped cream evenly between layers for balance. - Baking Time Discrepancies: Always check the cake a few minutes early. Ovens can vary. Insert a toothpick into the center. If it comes out clean, your cake is ready. {{image_2}} - Adding Different Fruits: You can use many fruits in your Neapolitan Rose Cake. Try fresh raspberries, blueberries, or peaches. These fruits add bright flavors and color. Just layer them between the cake and whipped cream. - Using Alternate Cake Flavors: While chocolate and vanilla are classic, you can switch up the cake flavor. Use lemon zest for a zesty twist. Almond or coconut cake mixes work well too. Just follow the same steps in the recipe. - Infusing with Different Extracts: You can change the taste by using different extracts. Try almond or lemon extract instead of vanilla. A few drops can change the whole cake’s flavor. Experiment to find your favorite mix. - Gluten-Free Alternatives: If you need a gluten-free cake, swap all-purpose flour for a gluten-free blend. Make sure it has xanthan gum for good texture. This way, everyone can enjoy your cake. - Dairy-Free Options: For a dairy-free version, replace butter with coconut oil. Use almond milk or soy milk instead of regular milk. Coconut cream can be a great substitute for whipped cream. - Vegan Adaptations: To make this cake vegan, replace eggs with flaxseed meal mixed with water. Use plant-based butter and milk. You can still enjoy a delicious cake without animal products. For the complete recipe, check out the [Full Recipe]. - Keeping the Cake Fresh: To keep your Neapolitan Rose Cake fresh, wrap it tightly in plastic wrap. This shields it from air and moisture. You can also use aluminum foil for extra protection. - Refrigeration vs. Freezing: Store your cake in the fridge if you plan to eat it in a few days. If you want it to last longer, freeze it. Just slice the cake first. This makes it easier to thaw later. - Recommended Storage Containers: Use an airtight container for the fridge. For the freezer, a freezer-safe bag or container works best. This helps keep the cake moist. - How Long Does it Last?: The cake lasts about 3-5 days in the fridge. If frozen, it can stay good for up to 3 months. - Signs of Spoilage: Look for changes in texture or smell. If the cake feels dry or smells off, it’s time to toss it. - Reviving Leftover Cake: If your cake seems dry, you can revive it. Try adding a layer of fresh whipped cream or a drizzle of simple syrup. This can bring back some moisture and flavor. For complete details on making this delightful treat, check out the Full Recipe. A Neapolitan Rose Cake is a delightful dessert that combines rich chocolate and light cream. It features layers of chocolate cake, whipped cream, and fresh strawberries. This cake is not just tasty; it’s beautiful too, thanks to the edible rose petals that add a touch of elegance. The key ingredients in this cake include: - All-purpose flour - Unsweetened cocoa powder - Granulated sugar - Unsalted butter - Eggs Historically, the Neapolitan Rose Cake has roots in Italy, where cakes often use local ingredients and flavors. The name "Neapolitan" reflects its origins, capturing the essence of Italian baking. It’s a cake made for special occasions, often seen at birthday parties and celebrations. Yes, you can make this cake in advance! Preparing it ahead saves time and helps flavors blend. You can bake the cake layers a day or two early. Just make sure to cool them completely before storing. For proper storage: - Wrap each cake layer in plastic wrap. - Store them in the fridge to keep them fresh. - You can also freeze the layers for up to three months. When you’re ready to serve, simply thaw them and follow the assembly instructions from the Full Recipe. Serving Neapolitan Rose Cake can be as fun as making it! Here are some great tips: - Add a few fresh strawberries on top for a pop of color. - Garnish with edible rose petals for that stunning look. - Dust with cocoa powder for a rich touch. The cake is best served chilled. It pairs wonderfully with coffee or tea. Enjoying it with a scoop of vanilla ice cream also adds a delightful twist! Making a Neapolitan Rose Cake is fun and rewarding. You learned about key ingredients like flour, cocoa, and fresh fruits. I showed you step-by-step instructions to prepare, bake, and assemble the cake. Tips helped you avoid common mistakes and explore tasty variations. By storing it right, you’ll keep it fresh longer. Enjoy creating and sharing this beautiful cake with friends and family. Your baking skills will shine, and every bite will be delicious. Happy baking!](https://grilledflavors.com/wp-content/uploads/2025/07/7bc4f51c-e381-4f20-8631-6fe6712b634e.webp)
Neapolitan Rose Cake Delightful and Easy Recipe
Are you ready to make a stunning dessert that impresses everyone? The Neapolitan Rose Cake is not only beautiful but also easy to bake! With