Desserts
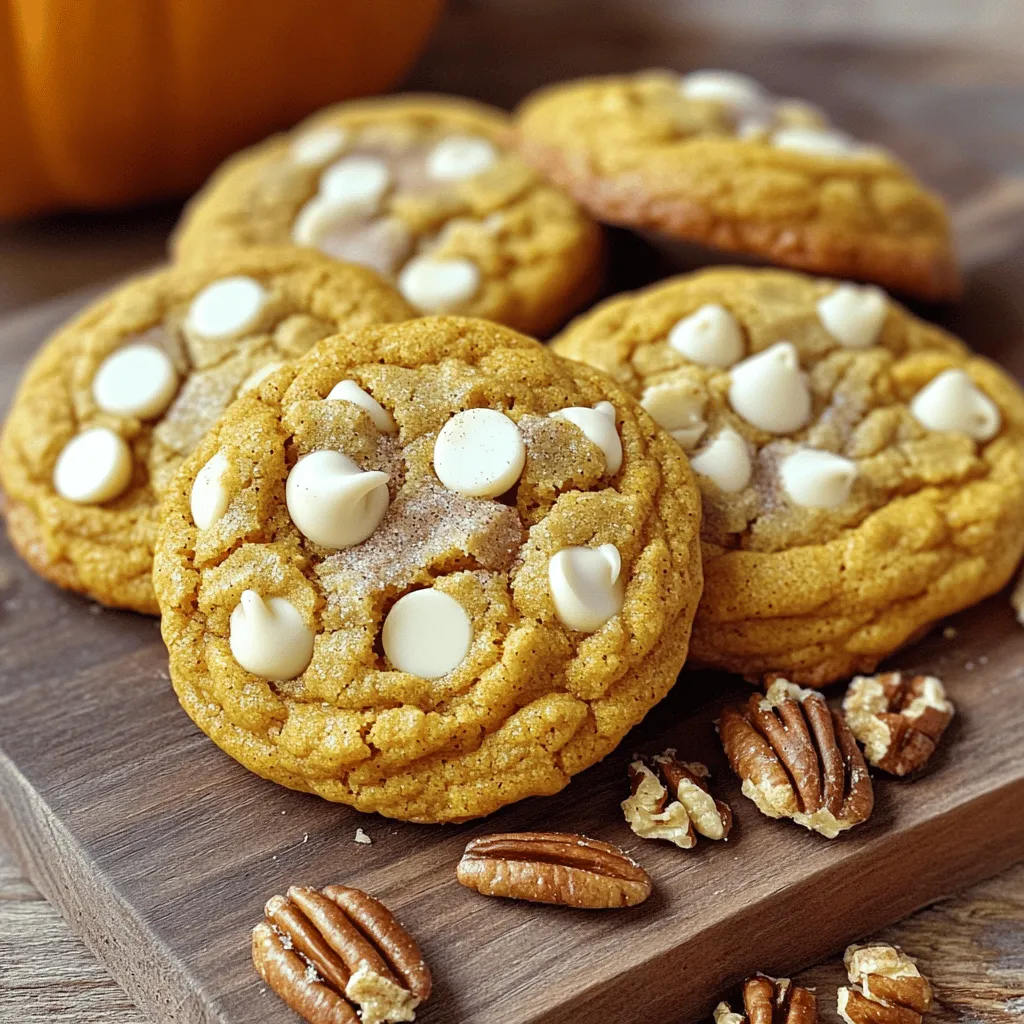
Pumpkin White Chocolate Chip Cookies Soft and Chewy
Pumpkin White Chocolate Chip Cookies are a fall favorite that combines cozy flavors with a delightful twist. Imagine soft, chewy cookies filled with creamy white
![- Apples: Types and optimal choices I recommend using Granny Smith or Honeycrisp apples. Both hold up well when cooked. Granny Smith gives a nice tart flavor. Honeycrisp is sweet and juicy. You can mix them for more depth. - Sweeteners: Brown sugar vs. alternatives Brown sugar is the star here. It adds a rich, caramel flavor. If you want, you can use coconut sugar or maple syrup as alternatives. They will change the taste a bit but still work. - Spices: Essential spices for the perfect filling Ground cinnamon is a must. It gives warmth to the filling. Nutmeg adds depth with just a hint. Together, they create a classic apple pie taste. - Additional Optional Ingredients You can add a splash of vanilla extract for extra flavor. Chopped nuts, like walnuts or pecans, also add crunch. If you like, a bit of caramel sauce can take it to the next level. For the full recipe, check out the [Full Recipe]. First, I cook the apples. I use two medium apples, like Granny Smith or Honeycrisp. These types give a nice balance of sweet and tart. Peel, core, and dice the apples before cooking. In a medium saucepan over medium heat, I melt one tablespoon of unsalted butter. Then, I add the diced apples, a quarter cup of brown sugar, one tablespoon of lemon juice, one teaspoon of ground cinnamon, and one-eighth teaspoon of ground nutmeg. I cook this mix for about 5 to 7 minutes. I stir it often, so the apples become tender but not mushy. After cooking, I remove the pan from heat and let it cool slightly. Now it's time to wrap the egg rolls. I take an egg roll wrapper and lay it flat on a clean surface. I point one corner towards me, making it look like a diamond. Next, I place 2 to 3 tablespoons of the apple filling near the bottom corner. I fold the bottom corner over the filling. After that, I fold in the sides. Then, I roll it tightly towards the top corner. To seal the egg rolls, I use a little water on the edges. I repeat this with the remaining wrappers and filling. For frying, I need to heat the oil first. I pour enough vegetable oil into a deep skillet or frying pan to cover the bottom by about an inch. I heat the oil over medium-high heat until it reaches 350°F (175°C). Once the oil is hot, I carefully place 2 to 3 egg rolls in the oil. I make sure not to overcrowd the pan. I fry them for 2 to 3 minutes on each side. I look for a golden brown color and crispy texture. When they are done, I use a slotted spoon to remove them and drain them on paper towels. Enjoy these crispy apple pie egg rolls warm. They pair nicely with powdered sugar or a scoop of vanilla ice cream. For the full recipe, check out the details above. To make the best apple pie egg rolls, focus on avoiding soggy wrappers. Here are some key points to keep in mind: - Dry Filling: Make sure the apple filling is not too wet. If it is, the wrappers will get soggy. Cook the filling until the apples soften, but not too soft. - Cool Filling: Let the apple filling cool before wrapping. A hot filling can steam the wrappers, making them soggy. For that perfect golden-brown finish, follow these tips: - Heat the Oil: Ensure your oil is hot enough, around 350°F (175°C). This helps the egg rolls fry quickly and evenly. - Fry in Batches: Do not overcrowd the pan. Fry only 2-3 egg rolls at a time. This keeps the oil hot and gives a crisp texture. When it comes to serving your egg rolls, think about tasty accompaniments: - Desserts and Toppings: A sprinkle of powdered sugar adds a sweet touch. For an extra treat, serve with a scoop of vanilla ice cream. The cold ice cream pairs well with the warm egg rolls. - Presentation Ideas: Arrange your egg rolls on a nice plate. You can even drizzle some caramel or chocolate sauce over them for a fancy look. Adding fresh mint leaves can enhance the dish's color and flavor. These simple tips help you create delicious apple pie egg rolls that impress everyone! For the full recipe, check out the detailed steps. {{image_2}} You can change the flavor of apple pie egg rolls easily. Seasonal fruits make a great swap. Try using pears or peaches when they are fresh. These fruits offer a new taste and keep the recipe fun. You can also mix in nuts like walnuts or pecans for crunch. They add a nice texture. Drizzling caramel sauce over the egg rolls gives them a sweet twist. Just be careful not to add too much, as it can make them messy. You can choose to bake or fry your egg rolls. Frying gives a crispy texture, but it adds more oil. Baking is a healthier option, but it may not be as crunchy. If you decide to bake, preheat your oven to 400°F (200°C). Place the rolls on a baking sheet and brush them lightly with oil. Bake for about 15-20 minutes until golden. Using an air fryer is another great way to make these egg rolls. Air frying cooks them quickly and uses less oil. Set your air fryer to 350°F (175°C). Place a few egg rolls in the basket and cook for about 8-10 minutes. This method keeps them crispy without deep frying. For the full recipe, refer to the earlier section. Store leftover egg rolls in an airtight container. Keep them in the fridge for up to three days. To keep them crispy, place a paper towel in the container. It absorbs moisture and helps maintain texture. To reheat, use an oven or air fryer. Preheat the oven to 375°F (190°C). Place the egg rolls on a baking sheet and heat for about 10-15 minutes. This method keeps them crispy. If you use the air fryer, set it to 350°F (175°C) and cook for 5-7 minutes. You can freeze egg rolls before or after frying. If you freeze them before frying, place them on a baking sheet. Make sure they are not touching each other. Freeze for 1-2 hours, then transfer them to a freezer bag. They can stay frozen for up to three months. To fry frozen egg rolls, do not thaw them first. Heat the oil to 350°F (175°C) and fry for an extra minute or two. If you prefer to freeze them after frying, let them cool completely first. Then, store them in an airtight container or freezer bag. Can I make the filling in advance? Yes, you can prepare the apple filling a day early. Just store it in an airtight container in the fridge. This saves you time on the day you want to fry the egg rolls. The flavors will blend nicely, making it even tastier. How do I make the egg rolls without frying? You can bake the egg rolls instead of frying. Preheat your oven to 400°F (200°C). Place the filled egg rolls on a baking sheet lined with parchment paper. Spray them lightly with cooking spray. Bake for about 15-20 minutes until they’re golden brown and crispy. What dipping sauces pair well with apple pie egg rolls? A few great options include caramel sauce, vanilla yogurt, or a simple vanilla glaze. You can also try a scoop of vanilla ice cream on the side for a classic touch. What to do if the egg rolls burst during frying? If your egg rolls burst, don’t worry! Simply turn down the heat to avoid further issues. If they burst, you can still enjoy the filling. Just serve it with some ice cream or as a topping for pancakes. How can I make the apple filling less sweet? To reduce sweetness, cut back on the brown sugar. You can also add a bit more lemon juice for a tart taste. Using tart apples like Granny Smith will help balance the flavors too. This blog post covered the key ingredients for apple pie egg rolls and how to prepare them. I shared tips for cooking the filling, wrapping the rolls, and frying them perfectly. We also explored variations and storage options to keep your egg rolls fresh. In the end, making these treats is fun and easy! With these guidelines, you can create tasty egg rolls that impress. Enjoy experimenting with flavors and techniques to find your favorite. Happy cooking!](https://grilledflavors.com/wp-content/uploads/2025/07/83531d27-5e3d-45f5-9476-6b2c2ee3b494.webp)
Easy Apple Pie Egg Rolls Delightful and Simple Treat
If you crave a quick and tasty treat, these Easy Apple Pie Egg Rolls are your answer! With a crispy shell and warm apple filling,
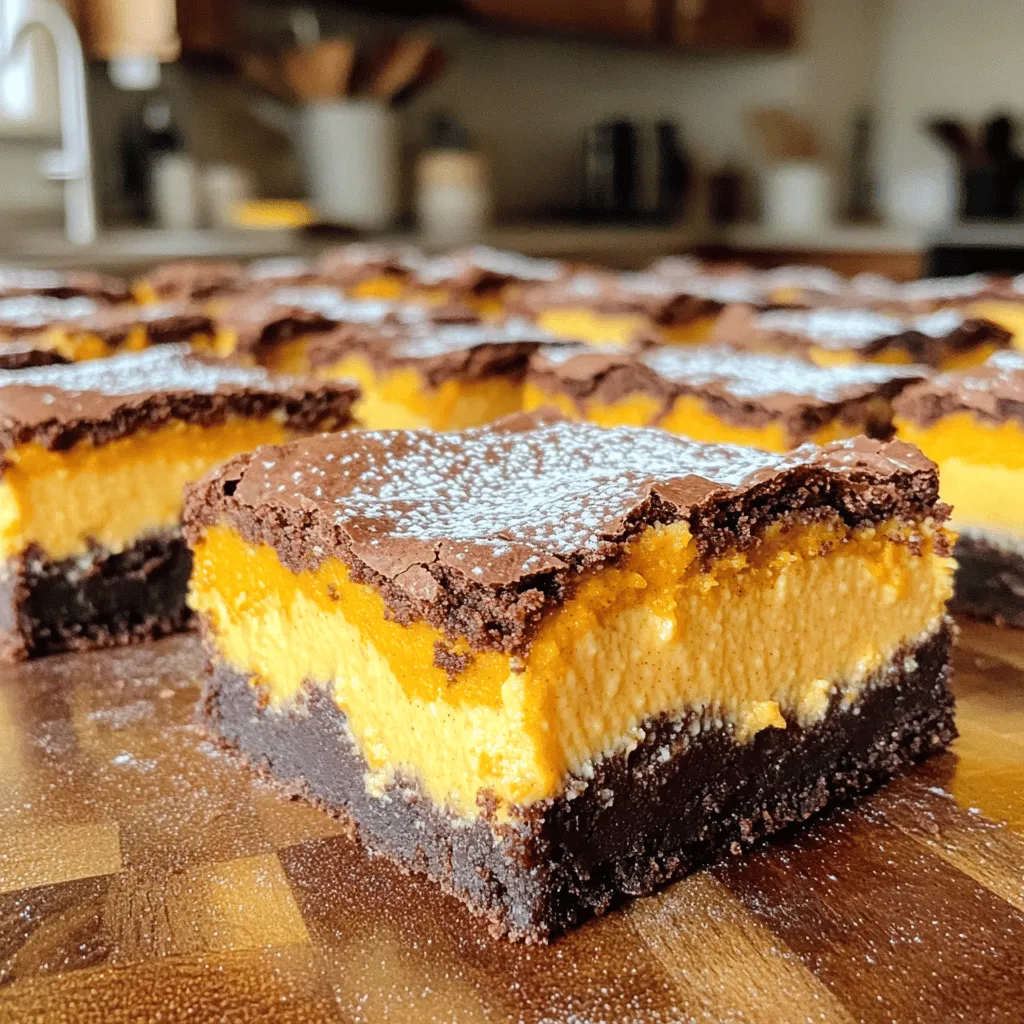
Pumpkin Cheesecake Brownies Delightful Fall Treat
Are you ready to embrace fall with a sweet twist? These Pumpkin Cheesecake Brownies blend the rich flavors of fall with creamy cheesecake goodness. I’ll
![- 2 cups dark chocolate chips - 1 cup white chocolate chips - 1 teaspoon pumpkin spice blend - 1/2 cup brewed espresso or strong coffee, cooled - 1/4 cup crushed graham crackers - 1/4 cup mini marshmallows - 1 tablespoon coconut oil - 1/4 cup chopped pecans (optional) When I make Pumpkin Spice Latte Bark, I focus on quality ingredients. This ensures each bite is rich and tasty. Use dark chocolate chips that are at least 60% cocoa for a deeper flavor. The white chocolate should be creamy and smooth. Include images of each ingredient to help you pick the best ones. Look for glossy chocolate chips and fresh graham crackers. When choosing coffee, opt for a strong brew that you enjoy drinking. Correct measuring is key in baking. Use dry measuring cups for solids and liquid measuring cups for liquids. If you don’t have espresso, strong brewed coffee works well. You can also use non-dairy chocolate chips for a vegan option. If you want a nut-free bark, skip the pecans. - Line the baking sheet with parchment paper. - In a microwave-safe bowl, combine dark chocolate chips and coconut oil. First, you take your baking sheet. Line it with parchment paper. This step helps the bark come off easily later. Next, grab a microwave-safe bowl. Add the dark chocolate chips and coconut oil into the bowl. - Microwave melting technique for dark chocolate. - Creating an even chocolate layer. Now, you need to melt the chocolate. Microwave it in 30-second bursts. After each burst, stir the chocolate. Repeat this until it is smooth. Be careful not to overheat it, or it will burn. Once melted, pour it onto the lined baking sheet. Use a spatula to spread it evenly. Aim for about a 1/4 inch thick layer. - Pouring white chocolate and toppings. - Setting the pumpkin spice latte bark. Next, it's time for the white chocolate. In another bowl, melt the white chocolate chips the same way as before. Then, mix in the brewed espresso and pumpkin spice blend. Pour this white chocolate over the dark layer. Use your spatula again to spread it evenly. Now, sprinkle the crushed graham crackers, mini marshmallows, and chopped pecans on top. Press them down lightly so they stick. Finally, return the baking sheet to the fridge. Let it chill for about 30 minutes or until fully set. After setting, you can break the bark into pieces. Enjoy your treat! For the full recipe, you can check [Full Recipe]. To get a smooth chocolate layer, start by using good quality chocolate chips. Melt the dark chocolate and coconut oil together in the microwave. Stir every 30 seconds until smooth. This helps avoid lumps. For even topping distribution, pour the white chocolate mixture gently over the dark layer. Use a spatula to spread it out evenly. Sprinkle your toppings while the chocolate is still warm. This helps them stick well. One common mistake is overheating chocolate. If you heat it too long, it can seize up. Always use short bursts in the microwave. Stir often for the best results. Another mistake is not cooling the coffee enough. If the coffee is hot, it can cause the white chocolate to melt too much. Make sure it is cooled before mixing with the chocolate. To serve the bark, break it into uneven pieces. This gives it a rustic look. Place it on a nice platter or in a jar for a fun display. Pair your pumpkin spice latte bark with warm drinks. It goes well with coffee or hot cocoa. You can also enjoy it with a scoop of vanilla ice cream for a tasty treat. For the full recipe, check out the steps to create this delightful fall dessert. {{image_2}} You can make pumpkin spice latte bark your own with different flavors. Try adding spices like nutmeg or cinnamon for a warm kick. You can also mix in some vanilla extract for a sweet twist. Want to add some crunch? Toss in nuts like almonds or walnuts. Dried fruits like cranberries or cherries can add a chewy texture. These small changes can make a big impact. If you need a vegan option, switch the chocolate to dairy-free chips. Use coconut milk instead of regular milk in the espresso. This way, everyone can enjoy the bark. Need a gluten-free version? Just skip the graham crackers or use gluten-free ones. You can still have a delicious treat without the gluten. Make your bark festive by adding holiday-themed toppings. You could use red and green sprinkles for Christmas. Try adding crushed peppermint for a fresh flavor. For fall, switch to chai spice or apple pie spice for a new taste. These seasonal spices can add a fun twist to your pumpkin spice latte bark. For the complete recipe, check out the [Full Recipe]. To keep your pumpkin spice latte bark fresh, use an airtight container. This will lock in flavors and keep it tasty. Line the container with parchment paper for extra protection. Avoid storing it in a warm place. Heat can melt the chocolate and ruin the texture. In the fridge, your pumpkin spice latte bark lasts about a week. After that, it may lose flavor and texture. Watch for signs of spoilage. If you see any white spots or it smells off, it’s time to toss it. You can freeze pumpkin spice latte bark for longer storage. Cut it into pieces before freezing. Place the pieces in a single layer on a baking sheet. Once frozen, transfer them to an airtight container. For the best taste, thaw it in the fridge overnight before serving. This keeps the texture smooth and creamy. What is pumpkin spice latte bark? Pumpkin spice latte bark is a sweet treat that blends chocolate and coffee flavors. It has layers of dark and white chocolate, mixed with pumpkin spice. This bark is perfect for fall and brings cozy vibes with every bite. Where can I buy pre-made Pumpkin Spice Latte Bark? You can find pre-made pumpkin spice latte bark at specialty candy shops or local bakeries. Some online retailers also sell it during the fall season. Look for brands that focus on seasonal treats for the best options. What to do if the chocolate won’t melt smoothly? If your chocolate doesn't melt smoothly, try two things. First, check your microwave power. Heat it in shorter intervals. Second, add a tiny bit of coconut oil to help it melt better. This will keep the chocolate creamy. How to fix bark that didn’t set correctly? If your bark didn't set, it may need more chill time. Place it in the fridge for another 15 to 30 minutes. If still soft, it may need more chocolate or a thicker layer. Ensure even layers for better results next time. How to serve pumpkin spice latte bark at gatherings? For gatherings, break the bark into pieces and arrange them on a nice platter. Add small labels if desired. You can also serve it with coffee or warm drinks to enhance the pumpkin spice flavor. Can I make this recipe ahead of time for events? Yes, you can make pumpkin spice latte bark ahead of time. It stays fresh in an airtight container for up to a week. Just make sure it is completely set before storing. This way, you can enjoy more time with your guests. This blog post covered how to make delicious pumpkin spice latte bark. You learned about the right ingredients, measuring techniques, and step-by-step instructions. We also talked about tips to avoid common mistakes and creative variations. Proper storage methods and answers to FAQs help you enjoy your bark longer. Now, you can dive into making this treat. With your new skills, impress your friends or enjoy it yourself. Have fun creating and sharing your pumpkin spice latte bark!](https://grilledflavors.com/wp-content/uploads/2025/07/438d4345-613b-4be2-831f-a528c32411ec.webp)
Pumpkin Spice Latte Bark Irresistible Fall Treat
Are you ready to dive into fall flavors? This Pumpkin Spice Latte Bark is the perfect treat! With rich dark chocolate, creamy white chocolate, and
![- 2 cups all-purpose flour - 1 teaspoon baking powder - 1/2 teaspoon baking soda - 1 teaspoon ground cinnamon - 1/2 teaspoon ground nutmeg - 1/4 teaspoon ground ginger - 1/4 teaspoon salt - 1/2 cup unsalted butter, softened - 3/4 cup brown sugar, packed - 2 large eggs - 1 cup apple cider, reduced to 1/2 cup - 1 teaspoon vanilla extract - 1/2 cup granulated sugar (for topping) - 1 teaspoon cinnamon (for topping) To make the Spiced Apple Cider Donut Loaf, you need quality ingredients. I choose fresh, local apple cider for the best flavor. The spices bring warmth, making this loaf perfect for chilly days. - You can use whole wheat flour for a heartier loaf. - Swap brown sugar for coconut sugar for a different taste. - For a dairy-free option, use coconut oil or vegan butter. These options help you customize the recipe. Feel free to experiment and find what you like best. Using different ingredients can change the flavor, so have fun with it! For the complete recipe, check out the Full Recipe link. - Preheat the oven (350°F/175°C) and prepare the loaf pan Start by preheating your oven to 350°F (175°C). This step is key for even baking. Grease a 9x5 inch loaf pan or line it with parchment paper to prevent sticking. - Reduce the apple cider Pour 1 cup of apple cider into a small saucepan. Heat it over medium heat until it simmers. Stir occasionally and let it cook down to 1/2 cup. This usually takes about 10-15 minutes. Set it aside to cool slightly. - Combine dry ingredients in a bowl In a medium bowl, whisk together the dry ingredients. This includes 2 cups of all-purpose flour, 1 teaspoon of baking powder, 1/2 teaspoon of baking soda, 1 teaspoon of ground cinnamon, 1/2 teaspoon of ground nutmeg, 1/4 teaspoon of ground ginger, and 1/4 teaspoon of salt. Make sure everything is well mixed. - Cream butter and brown sugar In a large mixing bowl, take 1/2 cup of softened unsalted butter and 3/4 cup of packed brown sugar. Use an electric mixer to blend these until they are light and fluffy. This should take about 3 minutes. - Combine wet and dry mixtures Next, beat in 2 large eggs, one at a time, mixing well after each addition. Pour in the reduced apple cider and 1 teaspoon of vanilla extract, mixing until just combined. Slowly add the dry mixture to the wet mixture. Stir gently with a spatula until combined, but don't overmix; a few lumps are okay. - Baking time and tips for checking doneness Now, pour the batter into your prepared loaf pan. Smooth the top if needed. Bake it in your preheated oven for about 50-60 minutes. To check if it's done, insert a toothpick into the center. If it comes out clean, your loaf is ready to cool. To make a great Spiced Apple Cider Donut Loaf, avoid over-mixing. When you combine the wet and dry ingredients, mix gently. Lumps are okay; they help keep the loaf light. Over-mixing can lead to a dense loaf, which we want to avoid. Using room temperature ingredients is also key. They blend better and create a smooth batter. Take your butter and eggs out of the fridge ahead of time. This small step makes a big difference in texture. To boost the flavor, think about adding nuts or dried fruits. Chopped walnuts or pecans add a nice crunch. Dried apples or raisins bring extra sweetness and texture. Mix them in right before you pour the batter into the pan. For a stronger spice flavor, try adding a touch more cinnamon or nutmeg. A half teaspoon more can really enhance the taste. If you like a kick, a pinch of ground cloves gives a warm, cozy flavor. Creating a beautiful cinnamon-sugar topping is easy. After baking, brush the warm loaf with melted butter. Then, mix granulated sugar and cinnamon together in a bowl. Sprinkle this mixture over the top. It adds sweetness and a lovely look. When serving, slice the loaf and arrange it on a nice plate. You can serve it warm or at room temperature. It pairs well with coffee or tea for a perfect snack. For an extra treat, add a scoop of vanilla ice cream on the side. For the full recipe, check out the [Full Recipe]. Enjoy making your Spiced Apple Cider Donut Loaf! {{image_2}} You can easily change the flavor of your Spiced Apple Cider Donut Loaf. Here are two fun ideas: - Pumpkin spice addition: Mix in one teaspoon of pumpkin spice for a warm twist. This spice blend adds a cozy depth that pairs well with apple cider. - Maple syrup variation: Swap out some brown sugar for maple syrup. One-third cup of maple syrup adds a rich sweetness and enhances the autumn vibe. If you need to adjust for dietary needs, there are great options: - Gluten-free option using almond flour: Replace all-purpose flour with almond flour for a gluten-free loaf. You may need to add a bit more moisture since almond flour can be drier. - Vegan alternatives: Use flax eggs instead of regular eggs. Mix one tablespoon of ground flaxseed with three tablespoons of water to replace one egg. Also, use coconut oil or a vegan butter for a dairy-free option. How you serve your Spiced Apple Cider Donut Loaf can make it even better: - Serving with a glaze or icing: Drizzle a simple glaze made with powdered sugar and apple cider on top. It adds a sweet touch that contrasts with the spiced loaf. - Pairing with ice cream or whipped cream: Enjoy the loaf warm with a scoop of vanilla ice cream or a dollop of whipped cream. The creaminess balances the spices perfectly. For more details, refer to the Full Recipe. To keep your Spiced Apple Cider Donut Loaf fresh, store it at room temperature for short-term use. Place it in an airtight container to lock in moisture. If you want it to last longer, the fridge is a good option, but it can dry out. Freezing your loaf is easy. First, let it cool completely. Then, wrap it tightly in plastic wrap. For extra protection, place it in a freezer bag or a freezer-safe container. When you want to enjoy it, thaw it overnight in the fridge. You can also leave it out at room temperature for a few hours. At room temperature, the loaf stays fresh for about three to four days. If you keep it in the fridge, it can last up to a week. Watch for signs of spoilage, like a dry texture or mold. If it looks or smells off, it's best to toss it. For the best taste, enjoy it fresh! Bake your loaf for about 50 to 60 minutes. Set your oven to 350°F (175°C). Start checking for doneness at 50 minutes. Insert a toothpick into the center. If it comes out clean, your loaf is ready! Yes, you can cut back on sugar if you want. Use less brown sugar or replace it with coconut sugar. Keep in mind, reducing sugar may change the loaf's texture and flavor. A sunken loaf can happen for a few reasons. First, check your oven's temperature with an oven thermometer. Next, avoid over-mixing your batter. Lastly, ensure you properly measure all ingredients. You can easily make mini loaves! Use a mini loaf pan instead of a regular one. Bake for about 25 to 30 minutes. Check with a toothpick, just like the larger loaf. You can find the full recipe [here](#). Enjoy making your Spiced Apple Cider Donut Loaf! This blog post covers everything you need to know to bake a delicious Spiced Apple Cider Donut Loaf. We discussed key ingredients, how to prepare your loaf, and tips for success. You can even try variations to suit your taste. Remember, storage matters too for keeping your loaf fresh. Baking can be simple and fun. So grab your ingredients and start mixing! Your kitchen will smell amazing, and you’ll have a treat that everyone loves. Enjoy the process and make it your own!](https://grilledflavors.com/wp-content/uploads/2025/07/fa745028-8811-4431-9b3a-fe50f8ac5eb4.webp)
Spiced Apple Cider Donut Loaf Irresistible Flavor Treat
Get ready for a cozy baking adventure with my Spiced Apple Cider Donut Loaf! This delicious treat combines warm spices and rich apple cider to
![When I make Jamie Oliver's Apple Pie Cake, I love how simple the ingredients are. Each one plays a key role in creating a delicious treat that everyone enjoys. Here’s what you will need: - 3 cups Granny Smith apples, peeled, cored, and chopped - 1 cup granulated sugar - ½ cup brown sugar, packed - 1 cup unsalted butter, softened - 4 large eggs - 1 teaspoon vanilla extract - 2 cups all-purpose flour - 1 tablespoon baking powder - 1 teaspoon ground cinnamon - ½ teaspoon nutmeg - ¼ teaspoon salt - 1 cup chopped walnuts (optional) - Powdered sugar for dusting Granny Smith apples bring a nice tartness, which balances the sweetness of the sugars. The butter makes the cake rich and moist. I add eggs for structure and vanilla for warmth. The flour and baking powder work together to create a lovely rise. Cinnamon and nutmeg add warmth and spice, while the walnuts give a nice crunch. Don't forget to dust the top with powdered sugar just before serving. It adds a beautiful touch! This list makes gathering your ingredients easy and fun. For the full recipe, check out the complete instructions. - Preheat your oven to 350°F (175°C). Grease and flour a 9x13 inch cake pan. - In a large bowl, cream together the softened butter, granulated sugar, and brown sugar. Mix until light and fluffy. - Add in the eggs one at a time, mixing well after each addition. Stir in the vanilla extract. - In another bowl, sift together the flour, baking powder, cinnamon, nutmeg, and salt. Gradually add these dry ingredients to the wet mixture. Mix until just combined. - Fold in the chopped apples and walnuts if you like. Make sure they are evenly mixed into the batter. - Pour the batter into the prepared cake pan. Smooth out the top with a spatula. - Bake in the preheated oven for 40-45 minutes. Insert a toothpick into the center; it should come out clean. - Once baked, remove the cake from the oven. Let it cool in the pan for about 10 minutes. - Carefully transfer the cake to a wire rack to cool completely. - After cooling, dust the top with powdered sugar before serving. This step-by-step guide makes this delicious Jamie Oliver Apple Pie Cake easy to follow. Enjoy your baking adventure! You can find the full recipe above. - Proper apple selection: Choose Granny Smith apples for a tart and firm texture. They hold up well when baked, giving your cake a great flavor and structure. - Mixing techniques for fluffy cake texture: Cream your butter and sugars until light and fluffy. This adds air into the batter, which helps the cake rise. Mix in eggs one by one for a smooth blend. - Avoiding common baking pitfalls: Make sure your oven is preheated. Check your cake with a toothpick to see if it’s done. If it comes out clean, your cake is ready. - Creative serving suggestions: Cut the cake into squares. Serve it on a rustic wooden board for a charming look. - Garnishing ideas for a beautiful presentation: Top with thin apple slices and a sprinkle of cinnamon. Dust with powdered sugar for a sweet finish. These simple touches make your cake eye-catching and tasty. Feel free to explore the [Full Recipe] for more details on making this delightful cake. {{image_2}} You can add fun flavors to Jamie Oliver's Apple Pie Cake. Using vanilla extract gives a warm taste. Almond extract adds a nutty twist. Try both and see which one you like more. You can also switch up nuts or add dried fruits. Walnuts add crunch and flavor. Almonds or pecans can also work well. Dried fruits like raisins or cranberries add sweetness and chewiness. If you need a gluten-free option, you can swap all-purpose flour. Use almond flour or a gluten-free blend. This change keeps the cake moist and tasty. Want to cut back on sugar? You can use honey or maple syrup instead. These natural sweeteners can keep the flavor strong without all the sugar. To keep your Jamie Oliver Apple Pie Cake fresh, store it in an airtight container. This helps prevent it from drying out. You can also wrap it in plastic wrap. If you have a slice or two left, put those in the fridge. For long-term storage, freezing is a great option. Cut the cake into slices, then wrap each slice tightly in plastic wrap. Place all the wrapped slices in a freezer bag. This way, you can enjoy a piece whenever you want! When stored properly, the cake stays fresh for about 3 to 5 days in the fridge. If you freeze it, it can last up to 3 months. Watch for signs that the cake has gone bad. If you see mold or notice a strange smell, it's best to throw it away. A dry texture also means it's time to say goodbye to that cake. What type of apples are best for apple pie cake? Granny Smith apples work best. They are tart and hold their shape well. This gives your cake a nice texture and flavor. You can also mix in Honeycrisp for a bit of sweetness. Can I make this cake in advance? Yes, you can make this cake a day ahead. Just store it in an airtight container. This allows the flavors to blend even more. It tastes great served the next day. How do I know when the cake is done baking? Insert a toothpick into the center of the cake. If it comes out clean, the cake is done. If it has batter on it, bake for a few more minutes. Can I substitute butter with oil? Yes, you can use oil instead of butter. Use a bit less than the butter amount. Oil makes the cake moist but may change the flavor slightly. What to do if the cake sinks in the middle? If your cake sinks, it might be due to overmixing or too much moisture. Next time, mix gently and check the oven temperature. How to rectify a dry cake? If your cake is dry, you can add simple syrup while it's warm. Mix equal parts sugar and water, then brush it on. This adds moisture and flavor. You have learned how to make a delicious apple pie cake. We covered the ingredients, step-by-step instructions, and some handy tips. You now know how to mix flavors, present your cake well, and store it for freshness. Remember, using the right apples is key. Don't be afraid to try new flavors or tweak the recipe. Baking should be fun and creative. Enjoy your baking journey and savor every bite of your delightful creation!](https://grilledflavors.com/wp-content/uploads/2025/07/2ee34c05-0750-4384-a7fe-c2506be6fc35.webp)
Jamie Oliver Apple Pie Cake Flavorful and Easy Recipe
If you love apples and cake, I have a treat for you! Jamie Oliver’s Apple Pie Cake is a simple and tasty delight that anyone
![- 1 cup apple cider - 1/4 cup almond milk (or preferred non-dairy milk) - 1/4 cup unsweetened applesauce - 1/4 cup coconut oil, melted - 1 teaspoon vanilla extract - 2 cups gluten-free all-purpose flour - 1 cup coconut sugar (or brown sugar) - 1 teaspoon baking powder - 1/2 teaspoon baking soda - 1/2 teaspoon salt - 1 teaspoon ground cinnamon - 1/2 teaspoon nutmeg - 1/4 teaspoon allspice (optional) These ingredients make the perfect blend for gluten-free apple cider donuts. The apple cider gives them a sweet and tangy taste. Almond milk keeps them moist and adds creaminess. Unsweetened applesauce adds natural sweetness and helps with texture. Coconut oil is a great fat choice. It gives a light flavor and helps with browning. Vanilla extract rounds out the sweet notes. The gluten-free flour is key for texture but works well with the other flavors. The coconut sugar adds a deep, rich sweetness. Baking powder and baking soda help the donuts rise and become fluffy. Salt balances all the flavors. Ground cinnamon, nutmeg, and allspice bring warmth and spice to each bite. You can swap almond milk with any other non-dairy milk. Try oat milk for creaminess or soy milk for protein. If you need to avoid coconut, use vegetable oil instead of coconut oil. For a lower sugar option, you can use a sugar substitute. Applesauce can be replaced with mashed banana for a unique flavor. If you want more spice, add more cinnamon or nutmeg. These donuts are a tasty treat that can fit into a balanced diet. Each donut has about 150 calories. They provide some fiber from applesauce and the gluten-free flour. The healthy fats from coconut oil help keep you full. Feel free to enjoy them as a fun snack or breakfast. For the full recipe, check the section above! Start by preheating your oven to 350°F (175°C). Grease your donut pan with coconut oil or spray. This helps the donuts come out easily. Take a small saucepan and pour in 1 cup of apple cider. Heat it on medium-high until it boils. Then, lower the heat and let it simmer. You want it to reduce to about 1/2 cup. This step boosts the flavor! Once it cools, set it aside. In a large bowl, mix together 1/4 cup melted coconut oil, 1/4 cup almond milk, 1/4 cup unsweetened applesauce, and 1 teaspoon vanilla extract. Add the cooled apple cider to this mix. In another bowl, whisk together 2 cups gluten-free all-purpose flour, 1 cup coconut sugar, 1 teaspoon baking powder, 1/2 teaspoon baking soda, 1/2 teaspoon salt, 1 teaspoon ground cinnamon, 1/2 teaspoon nutmeg, and optional 1/4 teaspoon allspice. Combine the dry and wet mixes, folding gently. Avoid overmixing to keep the donuts light. Now, spoon the batter into the donut pan. Fill each donut cavity about 2/3 full. This allows space for the donuts to rise. Place the pan in the oven and bake for 12-15 minutes. To check if they’re done, insert a toothpick in the center. If it comes out clean, they are ready. Remove the pan from the oven and let the donuts cool for 5 minutes. Then, gently transfer them to a wire rack. This cooling step helps keep them fluffy. Once the donuts are cool, consider tossing them in a mix of coconut sugar and cinnamon. This adds a sweet touch. For a pretty presentation, stack the donuts on a decorative plate. Dust them with more cinnamon sugar for a festive look. Everyone will love how they taste and see! Enjoy this delightful recipe for gluten-free apple cider donuts. Check the Full Recipe for more details. Making gluten-free apple cider donuts can be tricky. Here are some common mistakes to watch for: - Not measuring flour correctly: Always spoon the flour into the cup, then level it off. - Overmixing the batter: Mix just until combined. This keeps the donuts light and fluffy. - Ignoring the cooling time: Letting the donuts cool too quickly can make them dense. You can boost flavor and texture in your donuts. Here are some tips: - Use fresh apple cider: Fresh cider gives the best taste. - Add spices: Consider adding ginger or cloves for warmth. - Try different oils: Swap coconut oil with light olive oil for a different flavor. Serve your donuts in fun ways. Here are some creative ideas: - Dust with cinnamon sugar: This adds a sweet touch. - Pair with coffee or tea: The warm drinks balance the sweetness. - Add a glaze: A simple glaze made from powdered sugar and apple cider can elevate your donuts. For the full recipe and detailed steps, check out the [Full Recipe]. {{image_2}} Adding pumpkin to apple cider donuts creates a warm, cozy treat. This mix brings fall flavors together. You can replace half of the applesauce with pure pumpkin puree. This adds moisture and a rich taste. The spices blend well, enhancing both the pumpkin and apple flavors. You can also sprinkle in some pumpkin spice for extra warmth. If you want a healthier version, try using maple syrup instead of coconut sugar. It adds sweetness without refined sugar. For oils, use unsweetened applesauce or mashed bananas. These swaps keep the donuts moist while lowering fat content. Another option is to use Greek yogurt to replace some oil. This adds protein and keeps the donuts fluffy. To make these donuts vegan, swap almond milk for any plant-based milk. Use flaxseed meal mixed with water as an egg substitute. One tablespoon of flaxseed meal with three tablespoons of water works well. For fun add-ins, consider chocolate chips or chopped nuts. These extras add texture and a burst of flavor. You can also mix in dried cranberries or raisins for a chewy surprise. For the full recipe, check the details above. Finding gluten-free apple cider donuts can be easy if you know where to look. Many local bakeries now offer gluten-free options. These shops often have fresh, tasty treats made from quality ingredients. I recommend calling ahead to check if they have donuts in stock. You can also ask about their baking practices to ensure they avoid cross-contamination. If you prefer shopping online, several retailers sell gluten-free donuts. Websites like Amazon and specialty food stores often have a good selection. Look for brands that focus on quality ingredients. You can also check local grocery stores that cater to gluten-free diets. They may have a frozen section with ready-to-eat donuts. Here are some popular gluten-free brands to consider: - Goodie Girl - Katz Gluten Free - Glutino These brands often receive positive reviews for their taste and texture. Many customers love how these donuts mimic traditional recipes. You can find reviews online to help you decide which brand to try. For a hands-on approach, you can also make your own gluten-free apple cider donuts at home. The full recipe is simple and uses common ingredients. Plus, homemade donuts can be fresher and tastier. Enjoy the fun of baking while creating a delicious treat! Yes, you can! Use almond milk or any non-dairy milk. This works perfectly in the recipe. Store them in an airtight container. Keep the container at room temperature for up to three days. These donuts pair well with coffee or chai tea. You can also serve them with a dollop of whipped coconut cream. Homemade gluten-free donuts stay fresh for about three days. After that, they may become dry. Yes, you can freeze them! Wrap each donut in plastic wrap and place them in a freezer bag. They last for up to three months. To reheat, use a microwave for about 10-15 seconds. You can also warm them in the oven at 350°F for 5-7 minutes. This will keep them soft and tasty. For the complete recipe, check out the Full Recipe section. This blog post gives you a clear guide to making gluten-free apple cider donuts. You have the ingredients, step-by-step instructions, and tips for perfecting your donuts. Remember, you can swap ingredients to fit your needs. Whether you choose to buy or make your donuts, enjoy every bite. These treats bring warmth to any occasion. Happy baking!](https://grilledflavors.com/wp-content/uploads/2025/07/4450ac1d-eb7b-4fb9-b3b0-ac2fb6b7fb7a.webp)
Gluten Free Apple Cider Donuts Irresistible Treat
Are you ready to indulge in a tasty treat without the gluten? My Gluten Free Apple Cider Donuts are the answer! With warm spices and
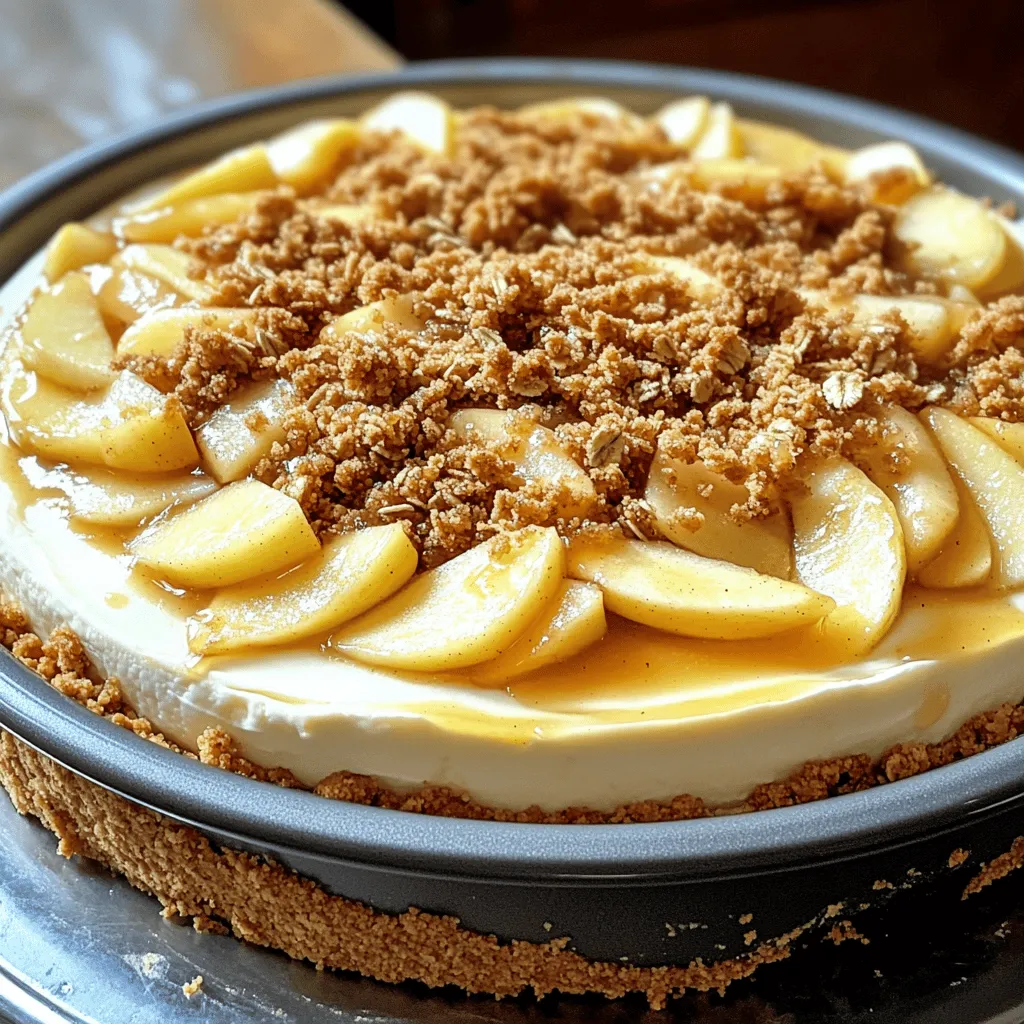
Apple Crisp Cheesecake Tasty and Easy Dessert Recipe
Looking for a dessert that’s both creamy and crunchy? You’ve found it! This Apple Crisp Cheesecake combines rich cheesecake with a delicious apple topping and
![To make soft blueberry cookies, you will need a few simple ingredients. Here’s the list you will need: - 1 cup fresh blueberries - 1 ½ cups all-purpose flour - ½ teaspoon baking soda - ½ teaspoon baking powder - ¼ teaspoon salt - ½ cup unsalted butter, softened - ½ cup granulated sugar - ½ cup packed brown sugar - 1 large egg - 1 teaspoon vanilla extract - ½ teaspoon almond extract (optional for an extra layer of flavor) - ½ cup powdered sugar (for dusting, optional) Each ingredient plays an important role. The fresh blueberries add sweetness and moisture. The flour gives structure to your cookies, while the baking soda and baking powder help them rise. Butter adds richness and flavor, helping to keep the cookies soft. Both sugars sweeten the cookies and create a lovely texture. The egg binds everything together. The vanilla extract gives a warm, classic flavor. If you want to try something different, almond extract can add a nice twist. Lastly, you can dust with powdered sugar for a sweet finish. For the full recipe, check out the detailed instructions to create these delightful cookies! 1. Preheat your oven to 350°F (175°C). This helps the cookies bake evenly. 2. Line two baking sheets with parchment paper. This keeps the cookies from sticking. 3. In a medium bowl, mix 1 ½ cups of all-purpose flour, ½ teaspoon baking soda, ½ teaspoon baking powder, and ¼ teaspoon salt. Set this bowl aside. 4. In a large mixing bowl, cream together ½ cup of softened unsalted butter, ½ cup of granulated sugar, and ½ cup of packed brown sugar. Mix until it looks light and fluffy, about 2-3 minutes. 1. Add 1 large egg, 1 teaspoon vanilla extract, and ½ teaspoon almond extract (if you want) to the butter mixture. Mix until everything is well blended. 2. Gradually stir in the dry mixture from the other bowl. Be gentle and don’t overmix; you want a soft dough. 3. Carefully fold in the 1 cup of fresh blueberries. Make sure they are spread out in the dough. 1. Use a cookie scoop or a tablespoon to drop rounded balls of dough onto the prepared baking sheets. Leave about 2 inches between each ball. 2. Bake in your preheated oven for 10-12 minutes. The edges should be lightly golden, and the tops will look set. 3. Once baked, take the sheets out and let the cookies cool for 5 minutes. Then, move them to wire racks to cool completely. 4. If you like, dust the cookies with powdered sugar before serving. This adds a nice touch to your delightful treat. For the full recipe, check out the recipe card! To get the best soft blueberry cookies, avoid overmixing. When you mix too much, the cookies can become tough. Mix just until you see no dry flour. Temperature matters too. Use room temperature butter and egg. This helps the butter cream smoothly and makes a nice dough. Cold ingredients can lead to uneven mixing. For a great taste, I suggest using vanilla extract. It pairs well with blueberries. You can also try almond extract for a unique twist. Just a little gives a nice touch! You can use different sugars for flavor. Brown sugar adds moisture and a hint of caramel. Granulated sugar keeps the cookies light and fluffy. Mixing them gives a nice balance. Presentation is key for soft blueberry cookies. Serve them on a bright platter. Adding extra blueberries on top makes a lovely touch. You can also drizzle blueberry sauce for a sweet finish. Dusting with powdered sugar adds a final elegant look. Enjoy your delightful treat! {{image_2}} You can make soft blueberry cookies even more fun! Try adding citrus flavors. A splash of lemon juice or zest can brighten the taste. The tartness of the citrus pairs nicely with the sweet blueberries. You can also mix in white chocolate chips or nuts. White chocolate adds creaminess, while nuts give a nice crunch. Choose your favorite type, like walnuts or pecans, for added texture. If you need gluten-free options, use a 1:1 gluten-free flour blend. This swap keeps the cookies soft and delicious. Check the label to ensure it contains xanthan gum for the best results. For vegan substitutes, replace the egg with a flax egg. Mix 1 tablespoon of ground flaxseed with 2.5 tablespoons of water. Let it sit for a few minutes until it thickens. Use a dairy-free butter for a vegan version of these cookies. You can switch up the fruits based on the season. In summer, add peaches or raspberries. In autumn, consider adding chopped apples or even pumpkin puree. Each fruit brings a unique flavor and texture. For holiday-themed cookies, add spices like cinnamon or nutmeg. You can even decorate them with festive icing. This makes your cookies perfect for any gathering. For the complete recipe, check the [Full Recipe]. You can store soft blueberry cookies at room temperature or in the fridge. If you keep them at room temperature, use an airtight container. This keeps them fresh and soft. If you prefer, you can put them in the fridge. This can help the cookies last longer. To freeze cookies, place them in a single layer on a baking sheet. Freeze them for about an hour. Once they are firm, move them to a freezer-safe bag. Make sure to squeeze out all the air. When it’s time to enjoy, just take them out. Let them thaw at room temperature. You can also reheat them in the oven at 350°F for a few minutes. Soft blueberry cookies stay fresh for about a week at room temperature. If you store them in the fridge, they can last up to two weeks. When frozen, they can keep their taste for up to three months. Enjoy your cookies while they are fresh for the best flavor! For the full recipe, refer to the previous section. How do you make soft blueberry cookies fluffy? To make your soft blueberry cookies fluffy, use room-temperature butter. Cream it well with the sugars until light and airy. This adds air to the dough. Also, avoid overmixing once you add the dry ingredients. Too much mixing can make the cookies dense. Can I use frozen blueberries instead of fresh? Yes, you can use frozen blueberries! Just add them directly to the dough without thawing. This keeps the cookies moist. However, be aware that frozen blueberries can bleed color into the dough, making it look different. What can I substitute for brown sugar in this recipe? If you need a substitute for brown sugar, try using granulated sugar with a little bit of molasses. Mix 1 cup of granulated sugar with 1 tablespoon of molasses to get a similar flavor and texture. Why are my cookies spreading too much? Cookies can spread too much if the butter is too warm. Ensure your butter is softened but not melted. Also, if you don’t chill the dough before baking, that can cause spreading. A quick chill for 30 minutes can help. How do I know when the cookies are done baking? You will know the cookies are done when the edges turn lightly golden. The tops should look set and not shiny. If you gently touch a cookie, it should feel soft but not doughy. This blog post detailed how to make soft blueberry cookies from scratch. We covered key ingredients and preparation steps. You now know tips to perfect texture, flavor, and presentation. Plus, I shared variations to suit different diets and seasons. In closing, these cookies are fun to make and delicious to eat. You can impress friends and family with your baking skills. Happy baking!](https://grilledflavors.com/wp-content/uploads/2025/07/12b0e2f7-c1be-499a-b5ab-bb0b9045e706.webp)
Soft Blueberry Cookies Delightful and Easy Recipe
Are you ready to indulge in a sweet treat that’s simple and delicious? Let’s dive into making soft blueberry cookies! These cookies are not only
![- Cream cheese and pumpkin balance: The base of this recipe is cream cheese and canned pumpkin puree. The cream cheese gives a rich, smooth texture. The pumpkin adds flavor and moisture. Together, they create a lovely balance. - Spices and their contributions: We use ground cinnamon, nutmeg, and ginger in this recipe. Cinnamon brings warmth and sweetness. Nutmeg adds a hint of earthiness. Ginger gives a spicy kick. These spices make the flavor pop. - Optional ingredients for texture and flavor: You can add chopped pecans for a nice crunch. These nuts also add a nutty flavor. If you want to coat the balls, you can use white or dark chocolate chips. This adds sweetness and a lovely finish to each bite. For the full recipe, check out the details above. Let's dive into how to make these no-bake pumpkin cheesecake balls. This recipe is simple and fun! Mixing the base ingredients Start by gathering your ingredients. You'll need cream cheese and canned pumpkin. In a large mixing bowl, add 1 cup of softened cream cheese and 1 cup of canned pumpkin puree. Use a hand mixer on medium speed to blend them. Mix until the mixture is smooth and creamy. Next, add 1/2 cup of powdered sugar, 1 teaspoon of vanilla extract, 1 teaspoon of ground cinnamon, 1/2 teaspoon of ground nutmeg, and 1/4 teaspoon of ground ginger. Continue mixing until everything is fluffy and well combined. Forming the pumpkin cheesecake balls Now, it’s time to make the balls! Gradually mix in 1 cup of graham cracker crumbs. Stir until the mixture is thick enough to form into balls. If you like, you can fold in 1/3 cup of chopped pecans for extra crunch. Use your hands to scoop out about a tablespoon of the mixture and roll it into a ball. Place each ball onto a baking sheet lined with parchment paper. Do this for all the mixture. Coating process with chocolate Once all your balls are formed, pop the baking sheet in the freezer for about 30 minutes. This helps them firm up nicely. Meanwhile, melt 1/2 cup of white or dark chocolate chips in a microwave-safe bowl. Heat in 30-second intervals, stirring in between until it’s smooth. After chilling, take the pumpkin cheesecake balls from the freezer. Dip each one into the melted chocolate, letting the excess drip off. Place them back on the baking sheet. If you want, sprinkle some extra graham cracker crumbs on top before the chocolate hardens. Finally, return the balls to the fridge for at least 15 minutes to let the chocolate set completely. For the complete recipe, check out the [Full Recipe]. Enjoy the delightful taste of fall in every bite! To make great no-bake pumpkin cheesecake balls, start with softened cream cheese. Softened cream cheese blends easier and gives a creamy texture. If it's cold, it will be lumpy and hard to mix. Next, chilling time is key for a good consistency. Once you form the balls, chill them in the freezer for 30 minutes. This helps them firm up, making them easier to coat in chocolate. The cold helps maintain their shape, so they won't fall apart when you dip them. For a fun presentation, arrange the cheesecake balls on a nice platter. Drizzle extra melted chocolate over the top. You can also sprinkle some cinnamon on them for a festive touch. Pair these delicious bites with a cup of warm cider or coffee. The spice flavors from the cheesecake balls and these drinks complement each other well. You can find the full recipe for more details on making these treats. {{image_2}} You can change the taste of your no-bake pumpkin cheesecake balls by adding different spices. Try cardamom for a warmer flavor. You can also use allspice for a more intense spice mix. If you love vanilla, a few drops of vanilla extract can enhance the sweetness. You might want to change the nuts as well. Chopped walnuts or almonds can add a nice crunch. If you prefer no nuts at all, just skip them. The base flavor still shines without them. For those who need gluten-free options, use gluten-free graham cracker crumbs. They work just as well and keep the taste intact. You can also make these balls vegan. Replace cream cheese with a vegan cream cheese. Use maple syrup instead of powdered sugar for a natural sweetener. These swaps let everyone enjoy this tasty treat. For the coating, use dairy-free chocolate chips instead of regular chocolate. This keeps the recipe friendly for all diets. You can find these options in most grocery stores now. To keep your no-bake pumpkin cheesecake balls fresh, store them in the fridge. Use an airtight container to prevent them from drying out. You can also freeze them for longer storage. Just place them in a single layer on a baking sheet. Once frozen, transfer them to a freezer bag. This method helps maintain their creamy texture and rich flavor. These delightful bites stay fresh for up to five days in the fridge. If frozen, they can last up to three months. Always check for signs of spoilage. If you notice any off smell or a change in texture, it’s best to toss them. Keeping an eye on their appearance ensures you enjoy your treats at their best! Can I make these ahead of time? Yes, you can make these pumpkin cheesecake balls ahead of time. They taste great after chilling in the fridge for a day. Just store them in an airtight container. How to adjust sweetness levels? To adjust sweetness, you can add more or less powdered sugar. Start with half a cup and taste as you mix. You can always add more if needed. What can I use instead of chocolate for coating? If you don’t want to use chocolate, try using yogurt or a glaze made from maple syrup. They both add a nice flavor without chocolate. Can I use fresh pumpkin instead of canned? Yes, you can use fresh pumpkin. Just cook and puree it until smooth. Make sure it is thick to avoid a watery mix. Are there any common mistakes to avoid when making these? One common mistake is not softening the cream cheese enough. Soft cream cheese mixes well. Also, avoid overmixing the batter, as it can make the balls too soft. For the full recipe, check the section above to gather all the details! This post covered how to make delicious pumpkin cheesecake balls. We detailed the key ingredients, mixing steps, and coating techniques. I shared tips on texture and serving, plus fun flavor variations and dietary swaps. Don’t forget best practices for storage and how to identify spoilage. Making these treats can be fun and rewarding. Enjoy sharing them with friends and family!](https://grilledflavors.com/wp-content/uploads/2025/07/c951cbdd-d9e8-4d3b-bc45-384edb7690cd.webp)
No-Bake Pumpkin Cheesecake Balls Simple and Delicious
Looking for a tasty treat that’s simple to make? No-Bake Pumpkin Cheesecake Balls are here to save the day! These creamy bites blend the flavors