Dinner

Mediterranean Stuffed Zucchini Flavorful and Healthy Dish
Looking for a delicious and healthy meal? Mediterranean Stuffed Zucchini is your answer! This colorful dish combines fresh ingredients like zucchini, quinoa, and feta cheese,
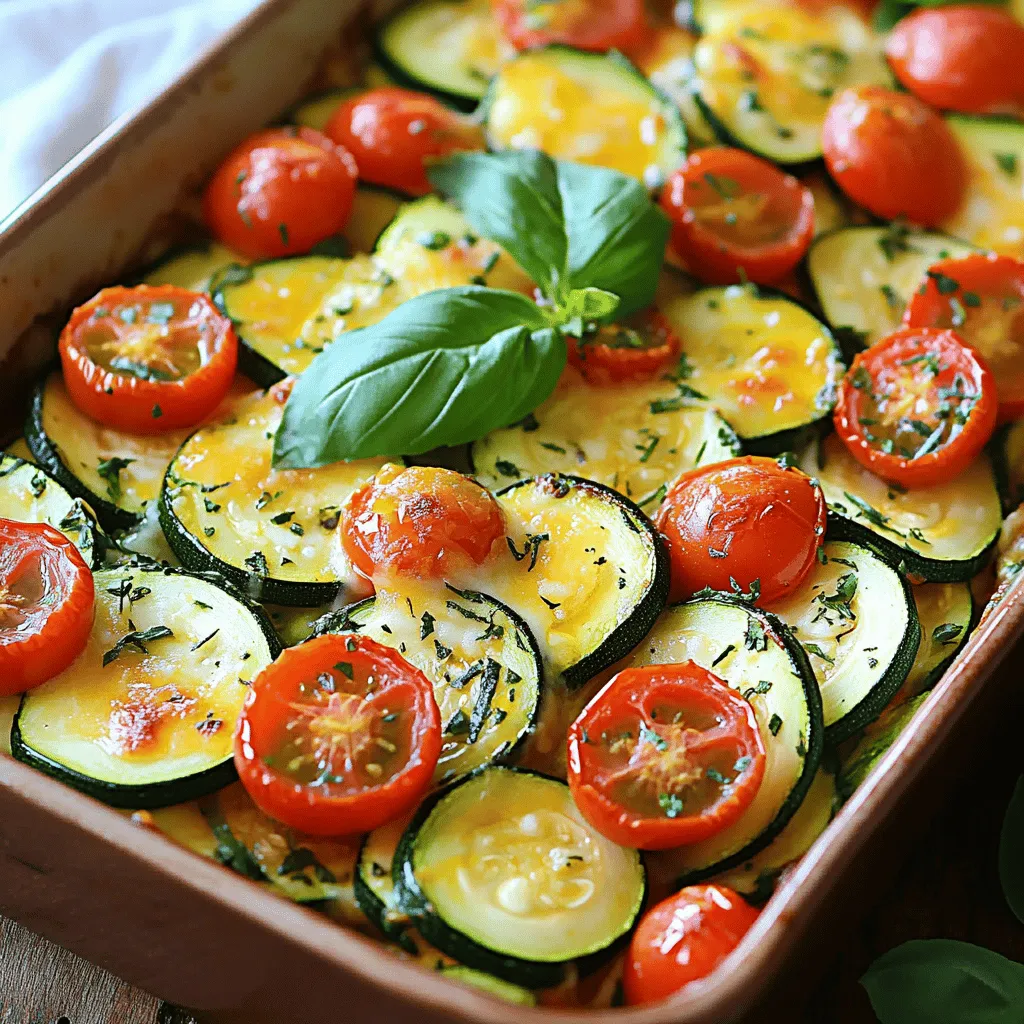
Healthy Zucchini Tomato Bake Flavorful Dinner Idea
Looking for a simple, healthy dish that bursts with flavor? Try my Healthy Zucchini Tomato Bake! This easy-to-make recipe combines fresh veggies for a vibrant
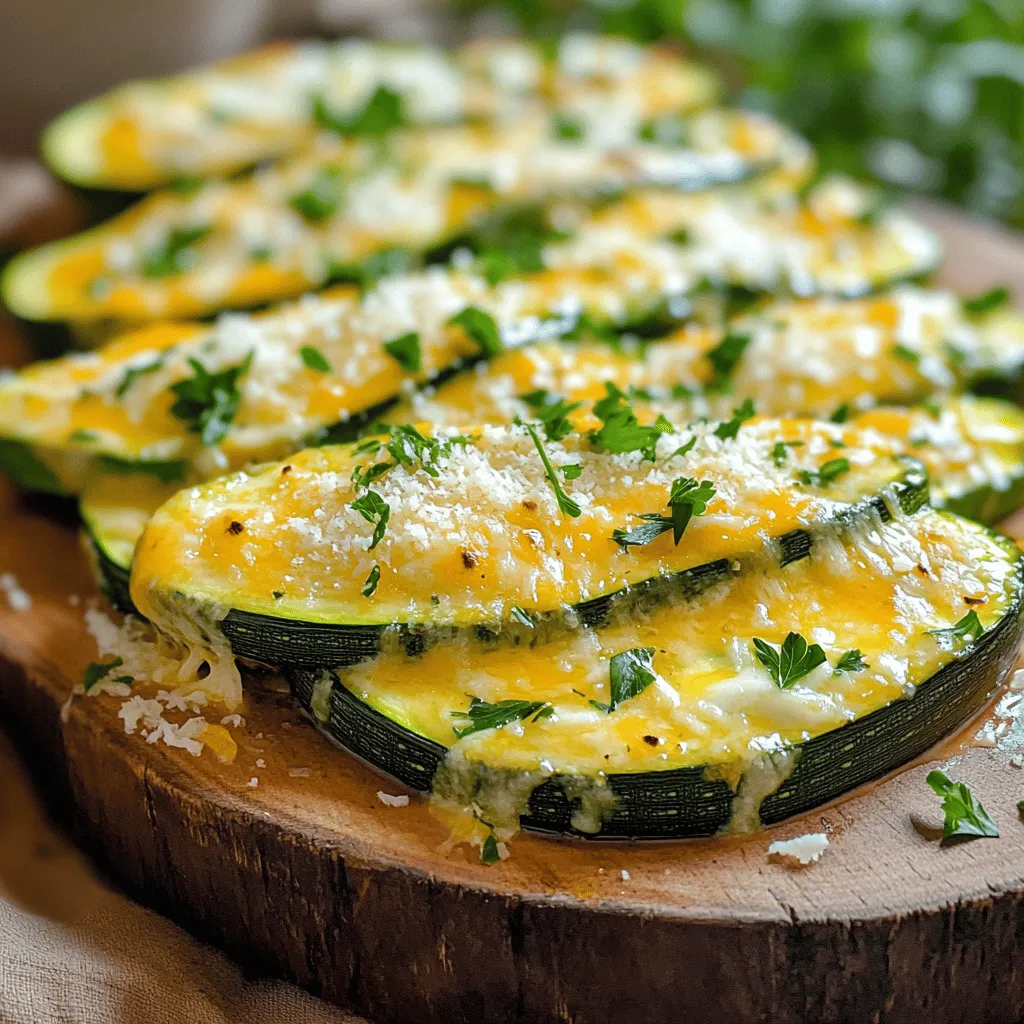
Cheesy Garlic Zucchini Steaks Tasty and Simple Dish
Are you looking for a quick, delicious meal that impresses? Look no further! My Cheesy Garlic Zucchini Steaks are the perfect blend of flavors you’ll

Refreshing Peach Iced Tea Delightful Summer Beverage
Looking for a tasty way to cool down this summer? Let me introduce you to Refreshing Peach Iced Tea! This drink combines ripe peaches and
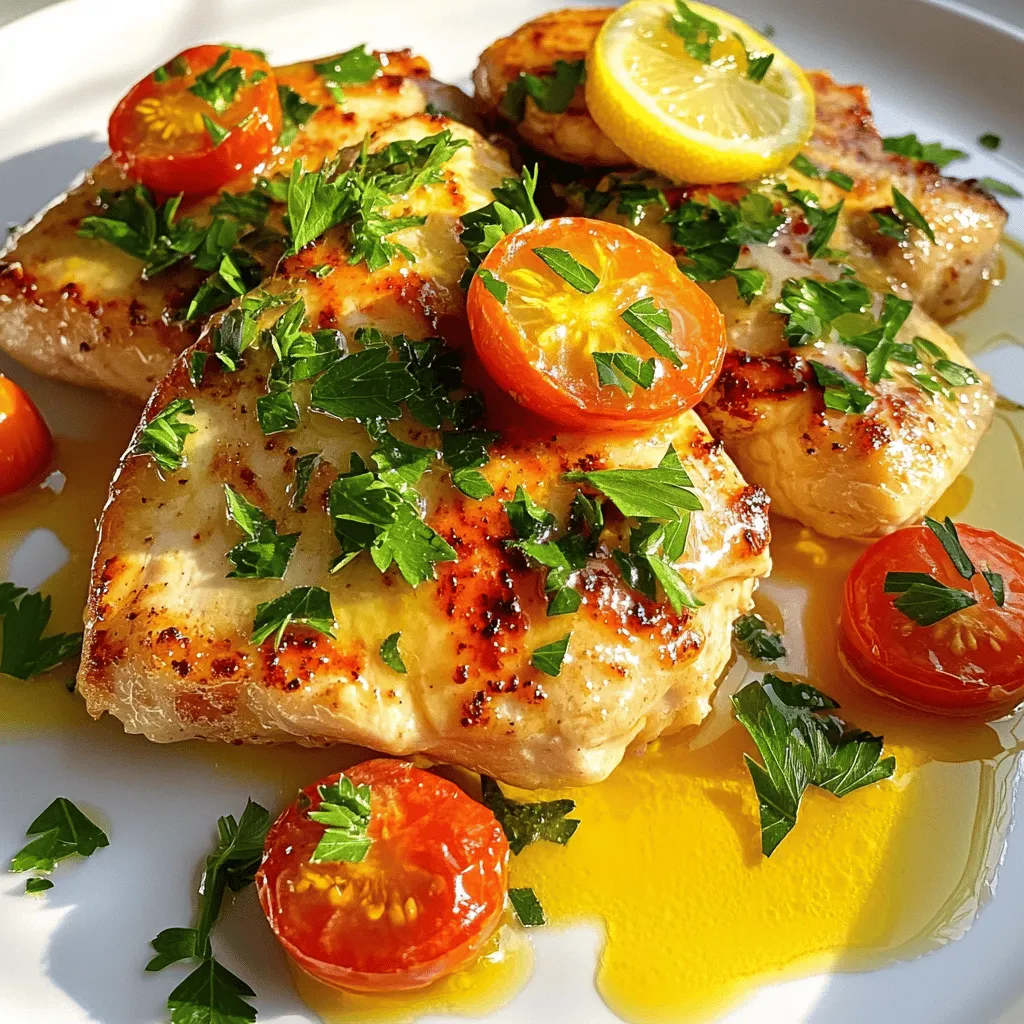
Garlic Butter Chicken Flavorful and Simple Dinner
Looking for a quick and tasty dinner? Garlic Butter Chicken is here to save the day! This dish packs rich flavors and is simple to
 for all the details on preparing this dish. First, gather all your ingredients. You will need cooked, shredded chicken, whole wheat pasta, and marinara sauce. Also, grab ricotta, mozzarella, Parmesan cheese, and spinach. Don't forget the Italian seasoning, garlic powder, salt, and pepper. 1. Preheat your oven to 375°F (190°C). 2. Cook the whole wheat pasta as directed on the package. You want it al dente. After cooking, drain the pasta and set it aside. 3. In a large bowl, mix the shredded chicken, pasta, marinara sauce, ricotta cheese, and chopped spinach. Add Italian seasoning, garlic powder, salt, and pepper. Stir everything well. 4. Transfer the chicken mixture into a greased 9x13 inch casserole dish. Spread it out evenly. 5. Now, sprinkle the shredded mozzarella and grated Parmesan cheese over the top. 6. Cover the dish with aluminum foil and bake for 25 minutes. 7. After 25 minutes, take off the foil. Bake for another 10-15 minutes until the cheese looks bubbly and golden. 8. Once finished, let it sit for about 5 minutes. This helps it set. When layering, start with the chicken mixture at the bottom. This keeps everything moist. Make sure your cheeses are even across the top. You can add more cheese if you love it cheesy! If you want extra flavor, try adding herbs or spices between layers. Enjoy your cooking! To boost protein in your casserole, try adding beans or lentils. These add texture and flavor. You can also use Greek yogurt instead of ricotta. It has more protein and keeps the dish creamy. Consider using chicken thighs instead of breast; they have higher protein and flavor. For a great cheese melt, use fresh mozzarella. It melts better than pre-shredded cheese. Mix the mozzarella with some Parmesan for a nice crust. When baking, cover the casserole for the first half. This keeps the moisture in. Uncover it later to let the cheese bubble and brown. If you need gluten-free, swap whole wheat pasta with rice or chickpea pasta. For a dairy-free option, use nut-based cheese or leave out the cheese. You can also use cashew cream for a creamy texture. Just remember to check labels for hidden dairy or gluten. {{image_2}} You can swap chicken for turkey breast. Turkey is lean and full of protein. You can also use shredded rotisserie chicken for a quick option. If you want more flavor, try using grilled chicken thighs. They add great taste and keep it juicy. To make this casserole vegetarian, replace chicken with cooked lentils. Lentils are high in protein and fiber. You can also use chickpeas for a nutty flavor. Add extra veggies like zucchini and bell peppers to boost nutrition and taste. For a spicy kick, add red pepper flakes to the sauce. You can also use spicy marinara for a bolder flavor. If you prefer herbs, mix in fresh herbs like thyme or rosemary. These herbs will enhance the taste and aroma of the dish. For a tangy twist, squeeze some lemon juice before serving. These variations make the high protein chicken parmesan casserole fun and flexible. You can enjoy it your way! For the full recipe, check out the section above. To store leftovers, let the casserole cool. Place it in an airtight container. You can also cover it tightly with plastic wrap or aluminum foil. This way, the flavors stay fresh. Store it in the fridge for up to three days. If you want to freeze your casserole, use a freezer-safe container. Wrap the dish tightly in plastic wrap first, then in foil. This helps prevent freezer burn. You can freeze it for up to three months. To reheat, let it thaw overnight in the fridge. Preheat your oven to 350°F (175°C). Bake it covered for about 25 minutes. Check if it’s heated through before serving. The casserole can last in the fridge for about three days. If you freeze it, it stays good for about three months. Always check for signs of spoilage before eating. If it smells off or looks strange, it’s best to throw it away. Enjoy the full recipe to make sure you have a delicious dish ready to go! Each serving of High Protein Chicken Parmesan Casserole has about 30 grams of protein. This comes from the chicken, ricotta, and mozzarella cheese. Chicken breast is high in protein, making it a great choice for this dish. The whole wheat pasta also adds some protein, though it is lower than the chicken and cheese. Yes, you can use different types of pasta in this casserole. Whole wheat pasta is best for added fiber. You can try gluten-free pasta if you wish. Other options include spiralized zucchini or spaghetti squash for a low-carb choice. Just make sure the pasta is cooked al dente to hold up in the casserole. To lower the calories, you can use less cheese or low-fat cheese. You can also swap the ricotta cheese with cottage cheese for fewer calories. Another option is to add more veggies to replace some pasta. For example, use extra spinach or add bell peppers and mushrooms. You can serve this casserole with a simple green salad. A side of steamed broccoli or roasted vegetables pairs well too. Garlic bread is a tasty option for a carb boost. A light vinaigrette can enhance the salad, balancing the rich flavors of the casserole. For more ideas, check out the Full Recipe! This blog post covered how to make a High Protein Chicken Parmesan Casserole. We explored its ingredients, health benefits, alternative options, and detailed cooking steps. I shared tips on enhancing protein and achieving the perfect cheese melt. We also looked at variations and proper storage methods. In summary, this dish is versatile, nutritious, and delicious. You can make it fit your needs while still keeping it flavorful and satisfying. Enjoy creating this dish for your meals!](https://grilledflavors.com/wp-content/uploads/2025/07/4b861595-0fed-4979-9d99-46618133763a.webp)
High Protein Chicken Parmesan Casserole Delight
Welcome to my kitchen! Today, I’m excited to share my recipe for High Protein Chicken Parmesan Casserole Delight. This dish combines savory chicken with gooey

Low Carb Zucchini Bread Healthy and Simple Recipe
Looking for a tasty treat that won’t ruin your low-carb diet? I’ve got just the solution: Low Carb Zucchini Bread! This healthy and simple recipe
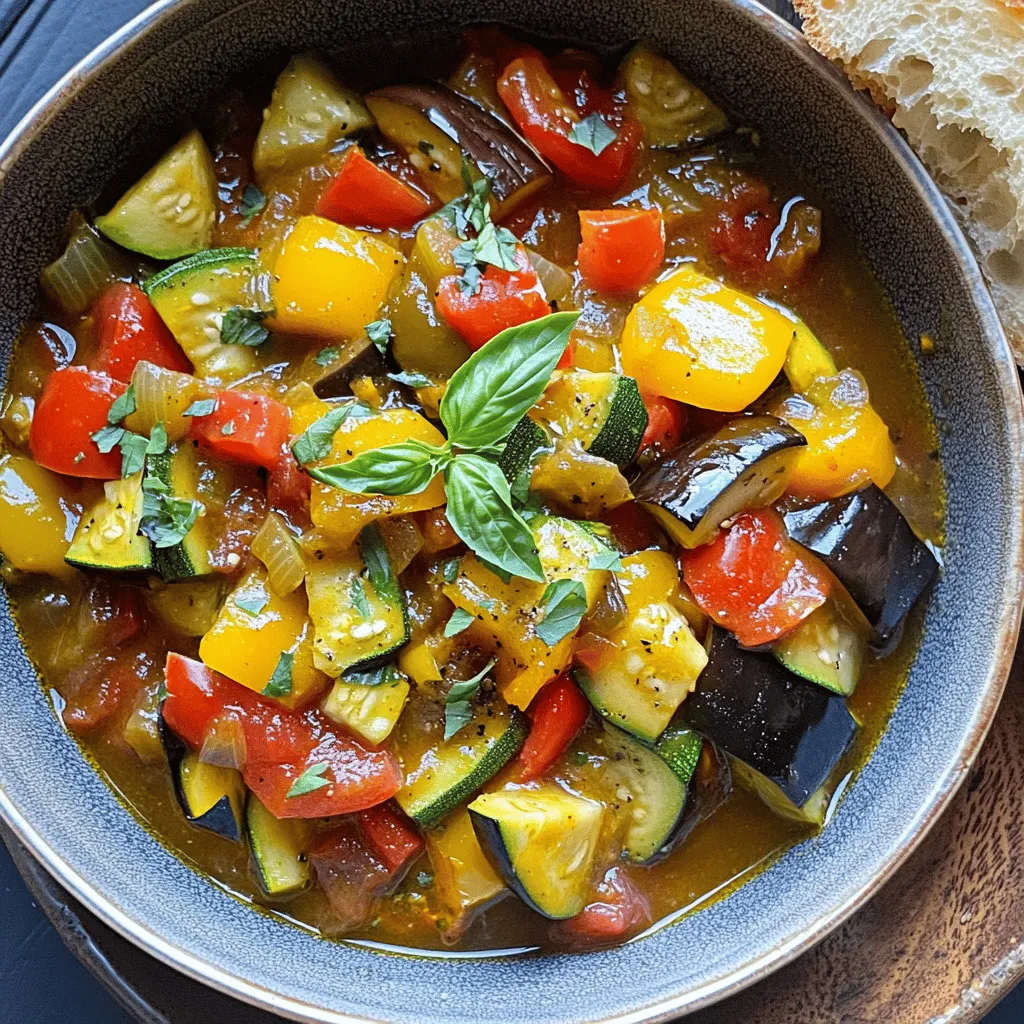
Homemade Ratatouille Flavorful and Easy Vegetable Dish
Are you ready to savor a taste of the French countryside? My homemade ratatouille is the perfect dish for you! It’s bursting with flavor and
![- 4 boneless, skinless chicken breasts - 1 tablespoon olive oil - 1 teaspoon garlic powder - 1 teaspoon smoked paprika - 1 teaspoon onion powder - 1 teaspoon dried thyme - 1 teaspoon salt - ½ teaspoon black pepper - 1 cup chicken broth - 2 tablespoons lemon juice - 1 tablespoon fresh parsley, chopped (for garnish) When cooking, it helps to know how to convert measurements. Here are some tips: - Tablespoons to Teaspoons: 1 tablespoon equals 3 teaspoons. - Cups to Ounces: 1 cup equals 8 ounces. - Pounds to Ounces: 1 pound equals 16 ounces. This can help you when you may need to adjust the recipe based on what you have. You can swap ingredients based on what you have at home. Here are some great options: - Olive Oil: Use avocado oil or vegetable oil instead. - Garlic Powder: Fresh minced garlic works too. Use 1 clove for each teaspoon. - Smoked Paprika: Regular paprika can replace it if you prefer less smoke. - Chicken Broth: Vegetable broth works well for a lighter flavor. - Lemon Juice: Lime juice is a nice alternative for a twist. Feel free to mix and match these ingredients to suit your taste! You can find the full recipe in the article. First, you need to prepare the chicken. Pat the chicken breasts dry with paper towels. This step is key. Dry chicken will sear better. Next, mix your spices in a small bowl. Use garlic powder, smoked paprika, onion powder, dried thyme, salt, and black pepper. Rub this spice mix all over the chicken breasts. Make sure they are evenly coated. This will add flavor as you cook. Now, let's sear the chicken. Heat a large skillet over medium-high heat and add olive oil. Wait until the oil shimmers. Carefully place the chicken breasts in the skillet. Sear each side for about 5-7 minutes. You want them golden brown. Check the internal temperature; it should hit 165°F or 75°C. If your skillet is small, cook in batches. This prevents overcrowding and ensures even cooking. After searing, remove the chicken and set it aside. In that same skillet, add chicken broth and lemon juice. Scrape the bottom of the skillet with a wooden spoon. This helps lift all the tasty bits stuck to the pan. Let the mixture simmer for about 3-4 minutes. It should reduce slightly. Finally, return the chicken to the skillet. Spoon some sauce over it and let it cook for 2 more minutes. This helps the chicken soak up the sauce's rich flavor. You can find the full recipe in the earlier sections. Enjoy your delicious skillet chicken! To keep your chicken juicy, start with good quality chicken breasts. Always pat them dry before cooking. This helps them brown better. Use a meat thermometer to check the internal temperature. Aim for 165°F (75°C). Let the chicken rest for a few minutes after cooking. This allows the juices to settle back in. You need a few key tools for this recipe: - A large, heavy skillet: This helps with even heat. - A meat thermometer: This ensures your chicken cooks perfectly. - Tongs: Use these to flip the chicken without piercing it. - A cutting board: Always good for resting your chicken after cooking. Don’t hesitate to mix up the flavors! Here are some ideas: - Add cayenne pepper for heat. - Use fresh herbs like rosemary or basil. - Swap lemon juice for lime juice for a different zest. - Try using honey for a sweet touch in the sauce. For the full recipe, check out the details provided above. {{image_2}} To make herb-infused chicken, choose fresh herbs. You can use rosemary, thyme, or basil. Chop them finely and mix them into the spice blend. This adds a bright flavor and a nice aroma. You will love the fresh taste! For a spicy kick, add cayenne pepper to your spice mix. Start with a small amount, like 1/4 teaspoon. You can always add more if you love heat. This will give your chicken a nice, bold flavor that packs a punch! For a zesty twist, use extra lemon juice and minced garlic. Add the garlic to the skillet just before deglazing with chicken broth. This will make your sauce rich and fragrant. It pairs well with any side dish. Plus, it’s a great way to brighten up your meal! Try these variations to change things up. They keep the recipe fresh and exciting. The best juicy skillet chicken breasts can be your canvas for flavor! For the complete method, check the Full Recipe. To keep your juicy skillet chicken breasts fresh, let them cool down first. Place the chicken in an airtight container. Make sure to store the chicken in the fridge if you plan to eat it within three days. For longer storage, wrap the chicken tightly in plastic wrap before placing it in the container. This helps prevent freezer burn and keeps it tasty. When you want to enjoy your leftovers, heat the chicken gently. Preheat your skillet over medium heat. Add a splash of chicken broth or water to keep it moist. Place the chicken in the skillet and cover it with a lid. Heat for about 5-7 minutes, flipping halfway through. Check until it reaches a warm center. You can also use a microwave, but be sure to cover it with a damp paper towel to prevent drying. If you want to save some chicken for later, freezing is a great option. First, let the chicken cool completely. Wrap each piece in plastic wrap, then place them in a freezer bag. Remove as much air as you can. Label the bag with the date, so you know when you froze it. The chicken can stay in the freezer for up to three months. To thaw, place it in the fridge overnight before reheating. This method keeps the chicken juicy and delicious. For the full recipe, check out The Best Juicy Skillet Chicken Breasts. You can check if chicken is cooked by using a meat thermometer. Insert it into the thickest part of the breast. The safe cooking temperature is 165°F (75°C). If you don't have a thermometer, cut into the chicken. The juice should run clear, and the meat should not be pink. Yes, you can use frozen chicken breasts. However, you need to thaw them first. Thaw overnight in the fridge or use the microwave. Cooking frozen chicken directly in the skillet can lead to uneven cooking. It is best to ensure they are fully thawed for the best results. Some great side dishes include: - Steamed vegetables like broccoli or green beans - Mashed potatoes or roasted potatoes - Quinoa or rice - A fresh garden salad These sides pair well and make your meal more balanced. You can also add a slice of crusty bread to soak up the flavorful sauce from the chicken. For the full recipe, check out [Full Recipe]. You now have all the tools to create delicious skillet chicken. We covered key ingredients, preparation steps, and helpful tips to keep your chicken juicy. Remember to explore variations like herb-infused options for extra flavor. Lastly, follow our storage tips to enjoy leftovers safely. With these guidelines, you can make a satisfying meal anytime. Happy cooking!](https://grilledflavors.com/wp-content/uploads/2025/07/87407bd6-61c3-4b72-b755-2ca4a4706945.webp)
The Best Juicy Skillet Chicken Breasts Delight Recipe
Are you ready to cook the best juicy skillet chicken breasts that’ll impress everyone? This recipe is simple, quick, and packed with flavor. You will
![- Zucchini and Yellow Squash Zucchini and yellow squash are the stars of this dish. They bring a mild taste and great texture. Slicing them thinly helps them cook evenly. This also ensures that they soak up all the cheesy goodness. - Cheese Varieties and Their Roles Cheese is key to making this casserole creamy and rich. I use sharp cheddar for its bold flavor, mozzarella for stretchiness, and Parmesan for a salty kick. Together, they create a delightful cheese blend. This mix melts perfectly and forms a golden crust. - Essential Seasonings and Condiments The right seasonings make all the difference. I add garlic for depth and thyme for an earthy touch. Salt and black pepper enhance the flavors. Heavy cream adds creaminess, while eggs bind everything together. These ingredients work in harmony to create a comforting dish. For the full recipe, check out the detailed preparation steps. Slicing the Vegetables Start by washing the zucchinis and yellow squashes. Next, slice them thinly. Thin slices cook evenly and blend well. Aim for about 1/4 inch thick. Sautéing Onion and Garlic In a large skillet, heat 2 tablespoons of olive oil over medium heat. Add the finely chopped onion and cook for about 5 minutes. Wait until it turns soft and clear. Then, toss in 3 minced garlic cloves. Sauté for another minute until you smell that nice aroma. Mixing the Casserole Components In a big bowl, combine the sliced zucchinis and yellow squashes. Add the sautéed onion and garlic. Pour in 1 cup of heavy cream and crack in 2 large eggs. Sprinkle in 1 teaspoon salt, 1/2 teaspoon black pepper, 1 teaspoon dried thyme, and 1 teaspoon garlic powder. Mix in half of the shredded cheddar and mozzarella cheeses. Stir everything until well combined. Greasing the Casserole Dish Grab a 9x13-inch casserole dish and grease it lightly with some olive oil. This step helps prevent sticking and makes serving easier. Layering the Mixtures Pour the vegetable mixture into the greased dish. Spread it out evenly with a spatula. Make sure the mix is level for even baking. Adding the Topping In a separate bowl, mix the remaining cheeses with 1 cup of breadcrumbs. Sprinkle this crunchy topping evenly over your casserole. It adds a great texture and flavor. Optimal Oven Temperature Preheat your oven to 375°F (190°C). This temperature ensures a nice golden crust. Cooking Time for Perfect Texture Bake the casserole for 30 to 35 minutes. Look for a golden brown top and bubbling edges. Cooling and Serving Tips Once it’s done, take it out and let it cool for about 10 minutes. This cooling time helps the casserole set. Garnish with fresh parsley before serving to add color and a fresh taste. For the complete recipe, check out the [Full Recipe]. To make your Cheesy Zucchini Squash Casserole shine, focus on texture and flavor. Here are some tips: - Texture and Flavor Enhancements: For a creamier texture, use heavy cream. Mix in a bit of sour cream for a tangy twist. Toast breadcrumbs in olive oil before topping for crunch. - Common Mistakes to Avoid: Don’t skip the cooling step after baking. Letting it cool helps the casserole set. Avoid overcooking the vegetables. They should be tender, not mushy. - Using Fresh vs. Frozen Ingredients: Fresh zucchini and squash give the best flavor. Frozen options work in a pinch, but may release more water. If using frozen, thaw and drain them well. Pair your casserole with simple sides for a full meal: - What to Serve with Cheesy Zucchini Squash Casserole: A fresh green salad or roasted chicken works great. Grilled fish or crusty bread also complements it well. - Plate Presentation Ideas: Serve in a bright dish to enhance colors. Garnish with fresh parsley for a pop of green. A sprinkle of extra cheese on top before serving looks appealing. - Pairing with Wines or Beverages: A light white wine, like Sauvignon Blanc, pairs well. For non-alcoholic options, try sparkling water with lemon. Both enhance the dish’s flavors beautifully. For the full recipe, refer to the section above. Enjoy your cooking! {{image_2}} You can make this casserole lighter. Try low-fat cheese options like part-skim mozzarella. It still melts well and tastes great. Another way is to swap heavy cream for Greek yogurt. This change cuts fat but keeps the creamy texture. Want to add protein? You can mix in cooked chicken or tofu. Both options make the dish heartier. You can also add other veggies. Try bell peppers, spinach, or mushrooms for extra flavor and nutrition. To enjoy this dish in summer, use fresh zucchinis and yellow squashes from local markets. In winter, consider using winter squash like butternut or acorn. These squashes add a sweet and nutty flavor, making it perfect for colder months. For the full recipe, visit the Full Recipe section. After making your cheesy zucchini squash casserole, let it cool down. Place it in a dish that seals tight. I recommend using a glass or plastic container with a lid. This keeps moisture in and helps it stay fresh. Store it in the fridge right away. You can keep it there for up to three days. To freeze your casserole, first cool it completely. Then, cut it into serving-sized pieces. Wrap each piece in plastic wrap, then place them in a freezer-safe bag. This helps keep the flavors locked in. When you're ready to eat, thaw it in the fridge overnight. To reheat, place it in the oven at 350°F (175°C) for about 20 minutes. You can also microwave it for a quick meal. In the fridge, your casserole lasts about three days. If you freeze it, it can stay good for up to three months. Always check for signs of spoilage. If it smells sour or looks off, toss it out. Trust your senses to keep your meals safe and tasty. You can use several options if you want a creamy texture. Whole milk mixed with butter works well. You can also try unsweetened almond milk with a bit of cornstarch. For a dairy-free option, coconut cream is great. It adds a nice flavor and richness. Each of these options keeps the dish creamy without heavy cream. Yes, you can prepare this casserole ahead of time. Just follow all the steps up to baking. Cover the dish tightly with plastic wrap. You can store it in the fridge for one day. When ready, just bake it without thawing. It may need a few extra minutes in the oven. Look for a golden brown top. The edges should be bubbling. You can also test it with a knife. Insert it into the center; if it comes out clean, it is ready. Let it rest for about ten minutes after baking. This helps it set up before serving. Yes, you can make this casserole gluten-free. Just swap regular breadcrumbs for gluten-free ones. Many brands offer good options that taste great. Always check labels to ensure there is no gluten in the cheese or other ingredients. With these changes, you can enjoy a delicious gluten-free meal. For the full recipe, check the link. This blog post shared the key ingredients, step-by-step instructions, and helpful tips for making a Cheesy Zucchini Squash Casserole. You learned about essential components, how to prep and bake, and ways to enhance flavor and texture. Remember to experiment with variations and storage tips to suit your needs. This dish is all about fun and creativity in the kitchen. Enjoy every bite and feel proud of your tasty creation.](https://grilledflavors.com/wp-content/uploads/2025/07/f9f8aad7-5171-40ca-928c-ca6803b2c2cf.webp)
Cheesy Zucchini Squash Casserole Simple and Flavorful
Looking for a dish that’s both cheesy and healthy? Look no further! My Cheesy Zucchini Squash Casserole is simple and packed with flavor. Featuring fresh