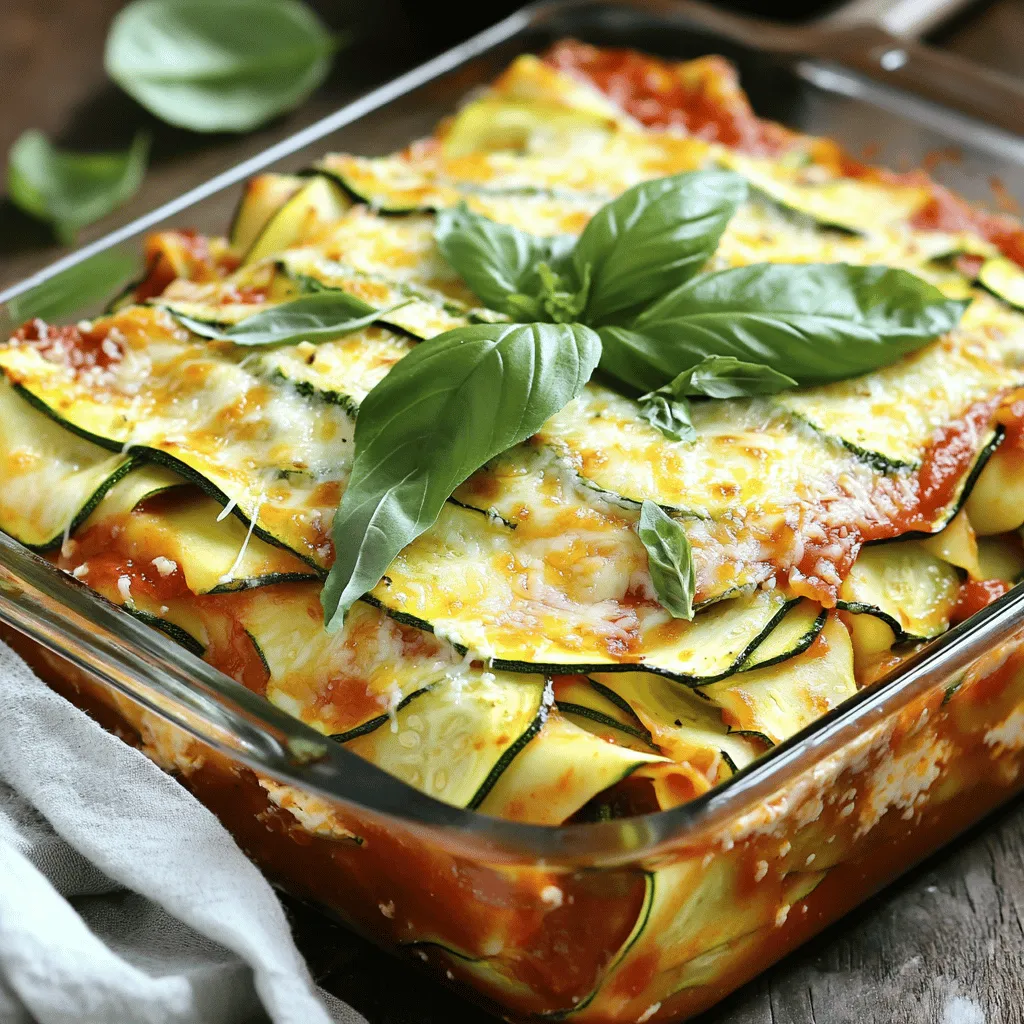
Dinner

- 1 lb large shrimp, peeled and deveined - 2 cups baby potatoes, halved - 2 ears corn, cut into 1-inch pieces - 4 cloves garlic, minced - 1 lemon, juiced and zested - 3 tablespoons Old Bay seasoning - 2 tablespoons olive oil - Salt and pepper to taste - Fresh parsley, chopped (for garnish) - Lemon wedges (for serving) When I make shrimp boil foil packs, I love to use fresh ingredients. The large shrimp give a sweet flavor that pairs well with the potatoes and corn. Baby potatoes add a nice bite, while corn adds sweetness. Garlic brings a punch of flavor and zest from lemon brightens the dish. Old Bay seasoning is key for that classic seafood taste. I use olive oil to help everything cook well and keep it moist. Salt and pepper enhance all the flavors, and fresh parsley makes it look pretty. Lemon wedges add a zesty finish when serving. Each ingredient plays a role in creating a delicious meal. You can find the full recipe here for more detailed steps and tips! First, preheat your grill to medium-high heat. If you prefer, you can use your oven set to 400°F (200°C). This step is key for getting perfectly cooked shrimp. Next, prepare your aluminum foil. Cut four large pieces, each about 12x12 inches. This size is perfect for holding all the tasty ingredients. Now, let’s mix the vegetables and seasoning. In a large bowl, combine: - 2 cups baby potatoes, halved - 2 ears corn, cut into 1-inch pieces - 4 cloves garlic, minced - 1 lemon, juiced and zested - 3 tablespoons Old Bay seasoning - 2 tablespoons olive oil - Salt and pepper to taste Toss everything together until well coated. This ensures every bite bursts with flavor. It’s time to assemble the packs! Divide the vegetable mixture evenly among the four pieces of foil. Make sure each pack has a good amount of veggies. Next, add shrimp on top of each portion. Use 1 lb of large shrimp, peeled and deveined. This step adds protein and flavor to your meal. Now, it’s time to cook! Place the foil packs on the grill or in the oven. Cook for about 15-20 minutes. You want the shrimp to be pink and cooked through. The potatoes should be tender. To check for doneness, carefully open one pack. If the shrimp are pink and the potatoes are fork-tender, they are ready. Be cautious when removing the packs from the grill or oven. Allow them to cool slightly, as steam will escape when you open them. For the final touch, garnish with freshly chopped parsley and serve with lemon wedges for a burst of added flavor. To take your shrimp boil foil packs to the next level, consider adding extra spices or herbs. Some great options include: - Cajun seasoning for a kick - Fresh dill for a bright note - Smoked paprika for depth Marinating shrimp before cooking also helps. A simple blend of olive oil, lemon juice, and your favorite herbs works wonders. Let the shrimp sit for about 30 minutes. This makes them more flavorful and tender. You can cook your foil packs in different ways. Using a grill adds a nice smoky flavor. Preheat your grill to medium-high heat for best results. Alternatively, you can use an oven at 400°F (200°C). If you want a fun outdoor experience, try cooking on a campfire. Just wrap the packs tightly in foil and place them near hot coals. Check them after about 15-20 minutes to ensure they cook evenly. Pair your shrimp boil foil packs with tasty side dishes. Cornbread or a fresh green salad complements them well. You can also serve some crusty bread to soak up the juices. For a fun twist, try serving the packs directly on a big platter. Let everyone dig in! You can also add lemon wedges on the side for an extra zing. {{image_2}} You can change up the shrimp in your foil packs. Other seafood works great too! Try using scallops or crab for a different taste. Just remember to adjust cooking times as needed. Using chicken or sausage is another option. Chicken thighs or breasts can add a hearty flavor. Slice the sausage into pieces and mix them in for a savory twist. Cooking times may vary, so check for doneness. Seasonal vegetable swaps can brighten your meal. In summer, use zucchini or bell peppers. In fall, consider butternut squash or carrots. These swaps keep your dish fresh and exciting. Adding more variety helps keep things interesting. Mix in some green beans or asparagus for a crunchy bite. You can even toss in sliced mushrooms for extra flavor. Just make sure to cut them small for even cooking. For plant-based protein substitutes, try tofu or tempeh. Both absorb flavors well and add a nice texture. Marinate them like you would shrimp for the best taste. Vegetable-only foil packs are also a great choice. Use any mix of your favorite veggies. Think of broccoli, cauliflower, and sweet potatoes. These packs can be a colorful and tasty meal option. Don't forget to season well! To store cooked foil packs, let them cool first. Place the packs in an airtight container. You can also wrap them tightly in plastic wrap. This keeps the shrimp and veggies fresh. - Ideal storage containers include: - Glass containers with lids - Plastic containers that seal well For reheating, I recommend using the oven or a skillet. Both methods work well for keeping the shrimp tender. - Best methods for reheating: - Preheat the oven to 350°F (175°C). Place the foil packs on a baking sheet. - Heat in a skillet over low heat, stirring gently. - Tips for maintaining texture: - Add a splash of water to the packs before reheating. - Cover them to trap steam and keep shrimp moist. You can freeze both uncooked and cooked foil packs. Freezing raw packs is great for meal prep. Cooked packs can be a quick meal later. - Freezing uncooked vs. cooked: - Uncooked packs last about 3 months in the freezer. - Cooked packs are best eaten within 2 months. - How to properly freeze for later use: - Wrap uncooked packs tightly in foil and place in a freezer bag. - For cooked packs, let them cool completely, then store in airtight containers. You can use a variety of seasonings to change the flavor. Some great options include: - Cajun seasoning for a spicy kick - Lemon pepper for a zesty touch - Italian herbs for a fresh taste - Garlic powder for extra depth Mix and match these seasonings to find your perfect blend. Yes, you can prepare the packs a few hours in advance. Just keep them in the fridge until you are ready to cook them. This makes meal prep easier and saves time on busy days. Shrimp cooks quickly. It is done when it turns pink and opaque. A good rule is to look for a firm texture. If they curl tightly, they are likely overcooked. Definitely! You can assemble the packs ahead of time. Store them in the fridge until your guests arrive. This way, you can spend more time with your friends and less time in the kitchen. Here are some tasty sides that pair well: - Coleslaw for crunch - Garlic bread for dipping - Cornbread for a Southern twist - A fresh green salad for balance These sides can complement the shrimp boil and add to your meal. You can find the full recipe for Shrimp Boil Foil Packs in the main article. This will guide you through every step of making this delicious dish. This post outlines a tasty shrimp boil foil pack recipe. You learned about the key ingredients and steps for prepping, assembling, and cooking. I shared tips for boosting flavor and cooking method variations. You can also explore alternatives for proteins and vegetables. With these ideas, you can make a great meal for any occasion. Enjoy trying new recipes and sharing with friends!
Savory Shrimp Boil Foil Packs Easy and Flavorful Meal
Are you ready for a meal that’s packed with flavor and super easy to make? Shrimp boil foil packs are the perfect solution! You get
- 1 pound ground turkey - 4 medium bell peppers (mixed colors) - 1 cup cooked quinoa - 1 small onion, finely chopped - 2 cloves garlic, minced - 1 can (14 oz) black beans, rinsed and drained - 1 teaspoon chili powder - 1 teaspoon cumin - ½ teaspoon paprika - Salt and pepper to taste - 1 cup shredded cheese (cheddar or Mexican blend) - Fresh cilantro for garnish (optional) - Lime wedges for serving When you choose these ingredients, you get a mix of flavors and nutrition. Ground turkey is lean and full of protein. Bell peppers add color and crunch. Quinoa packs in whole grains, while black beans bring fiber and heartiness. The spices create a warm, inviting taste. Chili powder and cumin add depth, while paprika gives a nice color. Salt and pepper enhance all these flavors, making each bite delightful. For the toppings, cheese melts beautifully over the peppers. Fresh cilantro adds a burst of freshness. Lime wedges bring a zesty kick, lifting the dish to new heights. With this ingredient list, you are ready to make a delicious family meal. For the full recipe, check out the Turkey Fiesta Stuffed Peppers . Enjoy cooking! - Preheat the oven to 375°F (190°C). - Wash, slice, and seed the bell peppers. Arrange in a baking dish. Start by washing the bell peppers under cool water. This step ensures they are clean. Next, slice off the tops of the peppers. Remove the seeds and any white parts inside. These parts can taste bitter. Place the peppers upright in a baking dish. This setup helps keep them stable when you fill them. - Sauté onion and garlic until translucent. - Add ground turkey and cook until no longer pink. In a large skillet, heat a drizzle of olive oil. Add the finely chopped onion and minced garlic. Cook them over medium heat. Stir often until the onion turns translucent, about 3 to 4 minutes. This brings out their sweet flavor. Then add the ground turkey. Break it apart with a spoon and cook until it is no longer pink, about 5 to 7 minutes. This step ensures the meat is safe to eat. - Stir in quinoa, black beans, corn, and spices. - Mix well and heat through. Once the turkey is cooked, it’s time to add more flavor. Stir in the cooked quinoa, black beans, and corn. These ingredients add texture and nutrients. Then add the chili powder, cumin, and paprika. Season with salt and pepper to taste. Mix everything well and heat through for about 3 to 4 minutes. This step lets all the flavors blend nicely. - Fill each bell pepper generously with the turkey mixture. - Top with shredded cheese. Now, grab the prepared bell peppers. Spoon the turkey mixture into each pepper. Don’t be shy; fill them generously! Press down gently to pack in the filling. This ensures each bite is full of flavor. Once filled, top each pepper with shredded cheese. This will melt and create a delicious crust. - Cover with foil and bake for 25 minutes. - Remove foil and bake for an additional 10 minutes. Cover the baking dish with aluminum foil. This helps steam the peppers while baking. Bake them in the preheated oven for 25 minutes. After that, remove the foil to let the cheese brown. Bake for another 10 minutes. The cheese should be bubbly and golden brown. Let them cool for a few minutes before serving. Enjoy your delicious family meal! For the full recipe, check out the details provided. To make sure your ground turkey is safe to eat, use a meat thermometer. The turkey should reach 165°F (74°C). This keeps your meal healthy and tasty. Also, avoid overcooking the bell peppers. Cook them just until they are tender. This gives them a great texture and taste. You can make your meal even better by pairing it with a fresh side salad. Crusty bread also complements stuffed peppers well. For extra creaminess, serve with sour cream or avocado. These toppings add flavor and richness to each bite. Ground turkey is a great source of lean protein. It helps you feel full without many calories. Peppers are not just colorful; they are also packed with vitamins A and C. These vitamins support your immune system and keep your skin healthy. Enjoy this dish, knowing it is good for you! For more details, check out the Full Recipe. {{image_2}} You can easily swap ground turkey for other meats. Try ground chicken for a lighter taste. Ground beef also works well if you prefer a richer flavor. If you want a plant-based dish, use plant-based meat. It cooks similarly and tastes great. Add extra veggies to boost nutrition. Diced zucchini or fresh spinach blend nicely into the filling. They add color and texture. You can also top the stuffed peppers with sliced olives or jalapeños. These toppings add zest and a kick of spice. If you want a different cheese taste, try feta or goat cheese. They give a tangy flavor that pairs well with the filling. For a dairy-free option, vegan cheese works great too. It melts well and keeps the dish creamy. For the full recipe, check out Turkey Fiesta Stuffed Peppers. Store leftovers in an airtight container in the refrigerator. This keeps the dish fresh. Leftovers can be kept for up to 4 days. Enjoy them for a quick meal later! To freeze, wrap stuffed peppers individually in plastic wrap. This makes reheating easy. They’re best if consumed within 3 months when frozen. Label the bags for easy tracking. You can microwave for quick reheating. For a crispier texture, bake in the oven. Cover with foil to prevent drying out. This keeps your meal moist and tasty. Yes, you can prep them and store before baking. This makes dinner easy. Just fill the peppers, cover them, and refrigerate. Bake them when you’re ready. Use a meat thermometer; the internal temperature should reach 165°F (74°C). This ensures it is safe to eat. Always check the thickest part of the meat. Yes, they're a balanced meal with protein, veggies, and whole grains. Ground turkey is lean and full of nutrients. The peppers add vitamins and fiber. It’s best to use fresh peppers, but thawed frozen peppers can work too. Just make sure to drain them well. This helps maintain the filling's texture. Stuffed peppers offer a tasty and healthy meal option. We explored simple steps to prepare them with turkey, quinoa, and spices. You can swap ingredients for variety, ensuring you enjoy different flavors. Remember, they’re easy to store and reheat. Feel free to customize your stuffed peppers to fit your taste or diet needs. Enjoy making and sharing this dish! It’s a fun and wholesome way to nourish yourself and others. Plus, it’s a smart choice for a balanced meal.
Ground Turkey and Peppers Delicious Family Meal
Looking for a simple yet tasty dinner? Ground Turkey and Peppers is the answer! This delicious meal is packed with lean protein and colorful veggies,
- 1 pound ground beef or turkey - 1 cup fresh spinach, finely chopped - 3 cloves garlic, minced - 1/2 cup breadcrumbs - 1/4 cup grated Parmesan cheese - 1 large egg - 1 teaspoon dried oregano - 1 teaspoon salt - 1/2 teaspoon black pepper - 1 cup mozzarella cheese, cut into small cubes - 2 cups marinara sauce (for serving) - Fresh basil leaves (for garnish) The heart of these Spinach Garlic Meatballs lies in the ingredients. You want to start with fresh, high-quality products. Ground beef or turkey serves as the base. Both add great flavor and texture. I prefer turkey for a lighter option, but beef adds a rich taste. Spinach brings a burst of color and nutrients. Make sure to chop it finely. This helps it mix well without dominating the meatball. Garlic adds a strong, savory flavor. Use fresh cloves for the best taste. Breadcrumbs are crucial for binding. They help keep the meatballs tender. I like to use plain breadcrumbs, but seasoned ones can add extra flavor. Parmesan cheese brings in a salty bite. It pairs beautifully with the meat and spinach. Next, the additional ingredients enhance the mix. The egg acts as a binder. Dried oregano adds an earthy taste. Salt and black pepper are essential for seasoning. Cheese is the fun part! Mozzarella adds a creamy surprise inside. It melts when cooked, creating a delicious center. For serving, a good marinara sauce complements the meatballs perfectly. Lastly, garnish with fresh basil leaves for a pop of color and flavor. Check the full recipe for all steps and tips. Enjoy making these meatballs! - Set temperature to 400°F (200°C) - Prepare a baking sheet with parchment paper Start by preheating your oven. This helps cook the meatballs evenly. While the oven heats, line a baking sheet with parchment paper. This will keep the meatballs from sticking. - Combine ground meat and vegetables - Mix in breadcrumbs, cheese, and seasonings In a big bowl, mix the ground meat with the chopped spinach and minced garlic. Add breadcrumbs, grated Parmesan cheese, the egg, oregano, salt, and black pepper. Use your hands to mix well. Make sure all the ingredients blend together. This step is key for good flavor. - Form meatballs around mozzarella cubes - Ensure cheese is completely enclosed Take a small amount of meat mixture and flatten it in your palm. Place a cube of mozzarella in the center. Fold the meat around the cheese and roll it into a ball. Make sure the cheese is fully covered. This keeps the gooey cheese inside when cooking. - Arrange on a baking sheet - Bake for 20-25 minutes Place the stuffed meatballs on the prepared baking sheet. Make sure they are spaced out. Bake them in the preheated oven for 20 to 25 minutes. Check that they are cooked through and nicely browned. - Warm sauce in a saucepan over medium heat While the meatballs bake, grab a saucepan. Pour in the marinara sauce and heat it over medium. Stir occasionally until the sauce is warm. This will complement the meatballs perfectly. - Plate meatballs and pour sauce over - Garnish with fresh basil leaves Once the meatballs are ready, place them on a plate. Pour the warm marinara sauce over them. Sprinkle fresh basil leaves on top for a nice touch. For the full recipe, you can refer back to the ingredients section. Enjoy! To avoid dry meatballs, use a good mix of meat and fat. Ground beef has more fat than turkey, which helps keep the meatballs moist. Adding fresh spinach also adds moisture. Binding agents like breadcrumbs and eggs help hold everything together. Use enough breadcrumbs to keep the meatballs from falling apart. For extra flavor, try adding crushed red pepper for heat or Italian herbs like thyme. You can also mix in some chopped sun-dried tomatoes for a tangy twist. As for cheese, while mozzarella is classic, you could use provolone or even feta for a unique taste. Mixing different cheeses can create a delightful surprise in every bite. These meatballs pair beautifully with spaghetti or crusty bread. Serve them as a main dish or as tasty appetizers at a party. You can arrange them on a platter and pour marinara sauce over the top for a stunning presentation. Garnish with fresh basil for color and aroma. For the full recipe, check the earlier section. {{image_2}} You can switch up the meat in these meatballs. Ground chicken is a lighter choice. It pairs well with spinach and garlic. Plus, it's just as tasty! For a vegetarian twist, use plant-based meat. Many brands offer great flavors and textures. You won’t miss the beef or turkey at all! Mozzarella is fantastic, but other cheeses can shine too. Try using provolone for a bolder taste. Ricotta offers a creamy texture that’s delightful. Mixing cheeses can create a unique flavor profile. Imagine mozzarella with a hint of sharp cheddar. This combo can surprise your taste buds in the best way! While marinara is classic, it’s not your only option. You can serve these meatballs with pesto for a fresh twist. The herbal notes of pesto complement the garlic well. A white sauce can also work wonders, adding a rich creaminess. Explore different sauces to find your favorite match! For the full recipe, check out the complete guide. To keep your spinach garlic meatballs fresh, let them cool first. Place them in an airtight container. You can store them in the refrigerator for up to 3 days. Make sure to seal the container well to avoid any odors from other foods. If you want to save some for later, freezing is a great option. Place the cooked meatballs in a freezer-safe bag. Make sure to remove as much air as possible before sealing. They will last in the freezer for about 3 months. When ready to eat, thaw them in the fridge overnight. Reheat in the oven at 350°F (175°C) for 15-20 minutes, or until heated through. In the fridge, your meatballs will stay good for about 3 days. If you notice any off smells or changes in color, it's best to throw them away. Always trust your senses to check for spoilage. Yes, you can make spinach garlic meatballs ahead of time. To meal prep, follow these tips: - Mix the meatball mixture: Combine your ingredients and form the meatballs. - Store raw meatballs: Place them in a sealed container in the fridge for up to a day. - Freeze for later: You can freeze the raw meatballs for up to three months. Just freeze them in a single layer, then transfer to a bag. - Cook when ready: Bake them directly from the freezer. Just add a few extra minutes to the cook time. If you need a substitute for breadcrumbs, you have several options: - Crushed crackers: Use crushed gluten-free crackers for a similar texture. - Oats: Ground oats work well as a binder. Just pulse them in a blender. - Cornmeal: This gives a nice crunch and is gluten-free. - Almond flour: It’s low-carb and adds a nutty flavor. To ensure your meatballs are fully cooked, follow these guidelines: - Internal temperature: Use a meat thermometer. The center should reach 165°F (74°C). - Visual cues: Look for a golden brown color on the outside and no pink inside. Yes, you can use frozen spinach. Here’s how: - Thawing: Place the frozen spinach in the fridge overnight. - Draining excess liquid: Squeeze out moisture using a clean kitchen towel. This helps your meatballs stay firm. - Mixing in: Add the thawed spinach to your meatball mixture as you would fresh. To reheat leftover meatballs while keeping their texture and flavor, try these methods: - Oven: Preheat to 350°F (175°C). Place meatballs on a baking sheet and heat for 10-15 minutes. - Stovetop: Warm them in a skillet over medium heat. Add a splash of marinara sauce for moisture. - Microwave: Heat in short bursts, checking often. This method can make them a bit soggy, so use it as a last resort. For the complete recipe, refer to the [Full Recipe]. These stuffed meatballs blend ground meat and fresh spinach for a tasty meal. You can customize them with different cheeses and sauces to match your taste. Remember to store leftovers properly for later enjoyment. Whether you serve them with pasta or as an appetizer, these meatballs promise satisfaction. Experiment with variations to find your favorite combination. Enjoy the cooking process and let your creativity shine!
Spinach Garlic Meatballs Stuffed with Mozzarella Delight
Craving a dish that’s savory, cheesy, and easy to make? Look no further! In this post, I’ll show you how to whip up Spinach Garlic
To make this delicious soup, gather these ingredients: - 4 ears of corn, shucked and kernels removed - 1 tablespoon olive oil - 1 small onion, diced - 2 cloves garlic, minced - 1 jalapeño, seeded and diced - 4 cups vegetable broth - 1 cup coconut milk - 1 teaspoon cumin - 1 teaspoon smoked paprika - Salt and pepper to taste - 1/4 cup fresh cilantro, chopped - 1 lime, juiced - 1/2 cup feta cheese, crumbled (optional) - 1 avocado, diced (for garnish) You will need a few tools to make this soup: - Large pot - Cutting board - Chef's knife - Ladle - Immersion blender (or countertop blender) - Measuring cups and spoons - Serving bowls You can swap some ingredients based on taste or availability: - Corn: Use frozen corn if fresh corn is not in season. - Olive oil: Any cooking oil can work, like canola or avocado oil. - Coconut milk: Swap for heavy cream for a richer texture. - Vegetable broth: Chicken broth adds more flavor if you're not vegetarian. - Jalapeño: Use a milder pepper like a green bell pepper for less heat. - Feta cheese: Skip it for a dairy-free option or use vegan cheese. Feel free to get creative with your choices to suit your taste! If you want the full recipe, check out the link for step-by-step instructions. To make Mexican Street Corn Soup, start by heating 1 tablespoon of olive oil in a large pot over medium heat. Add 1 small diced onion and 2 minced garlic cloves. Sauté until the onion looks clear, which should take about 5 minutes. Next, add 1 diced jalapeño and the kernels from 4 ears of corn. Cook this for 3-4 minutes until the corn is soft. Then, stir in 1 teaspoon of cumin and 1 teaspoon of smoked paprika. This helps the spices release their flavor for 1 minute. Pour in 4 cups of vegetable broth and bring it to a boil. Once boiling, lower the heat and let it simmer for 10 minutes. Now it’s time to blend the soup. Use an immersion blender to blend it until smooth. If you don’t have one, carefully transfer it in batches to a countertop blender. Just be careful with the hot liquid. Once blended, stir in 1 cup of coconut milk and the juice from 1 lime. Season with salt and pepper to taste. Let it heat through for another 5 minutes. When blending, an immersion blender is a great tool. It’s easy and mess-free since you blend right in the pot. If you use a countertop blender, be cautious. Always allow the soup to cool a bit. Hot soup can splash and cause burns. Blend in small batches, filling the blender halfway for safety. Serve the soup hot. Top it with a sprinkle of fresh cilantro, diced avocado, and crumbled feta cheese for extra flavor. You can also add a lime wedge on the side for a zesty kick. This makes the meal bright and fresh. For the full recipe, check out the details above. Enjoy your cooking! To make your Mexican Street Corn Soup pop, focus on fresh ingredients. Use sweet corn that is in season for the best taste. Roasting the corn before adding it to the soup can add a nice char flavor. You can also try adding a bit of chili powder for extra heat. A squeeze of lime juice at the end brightens the flavors. Don’t forget to taste as you go. Adjust the salt and pepper to your liking for the perfect finish. One common mistake is overcooking the corn. This can make it mushy and lose its sweetness. Another mistake is forgetting to sauté the onion and garlic first. This step builds a strong flavor base. Be careful not to blend the soup too long. It should be smooth but not watery. Lastly, always check the seasoning before serving. You want a balanced flavor to shine through. This soup pairs well with crunchy tortilla chips or warm corn tortillas. You can serve it with a fresh salad for a complete meal. For drinks, try a light beer or a refreshing agua fresca. If you want a heartier meal, add grilled shrimp or chicken on top. This soup also shines when served with a dollop of sour cream or yogurt on top. For the full recipe, check it out here. {{image_2}} You can tweak the recipe to fit your taste. For a vegan soup, replace the feta cheese with a plant-based alternative. You can also skip the coconut milk and use almond milk or soy milk instead. If you love heat, add more jalapeños or a pinch of cayenne pepper. This will give your soup an extra kick. You can make this soup on the stovetop or in a slow cooker. The stovetop method is quick and easy. You can have it ready in about 30 minutes. If you use a slow cooker, add all the ingredients in the morning. Let it cook on low for 6 to 8 hours. This method lets the flavors blend nicely, making the soup taste even better. Each region in Mexico has its own style of street corn. You can bring those flavors into your soup. For example, in some areas, they add lime zest and chili powder. This adds a zesty twist. In others, they might use queso fresco instead of feta. You can even experiment with different herbs, like epazote or oregano, for a unique taste. After you enjoy your Mexican Street Corn Soup, store leftovers in an airtight container. Let the soup cool first. Refrigerate it within two hours of cooking. It will stay fresh for up to three days. If you want to keep it longer, consider freezing it. When you reheat the soup, do it gently. Pour the soup into a pot and heat on low. Stir it often to prevent sticking. You can also microwave it in a safe bowl. Heat for one minute, then stir and check the temperature. Make sure it is hot all the way through before serving. Freezing is a great option for this soup. Pour the cooled soup into freezer-safe containers. Leave some space at the top for expansion. Seal tightly to prevent freezer burn. Label the containers with the date. This soup can last up to three months in the freezer. To eat it later, thaw it overnight in the fridge before reheating. Enjoy your flavorful meal anytime! For the full recipe, check out the details above. You can use heavy cream or whole milk instead of coconut milk. Both will add a rich taste. If you want a dairy-free option, almond milk or oat milk work well too. Each choice changes the flavor a bit, so pick what you like best. Yes, you can make this soup ahead of time. Just cook it and let it cool. Store it in an airtight container in the fridge. It will stay fresh for about three days. When you are ready to eat, just reheat it on the stove. Add a splash of broth if it thickens too much. This recipe is already vegetarian! It uses vegetable broth and no meat products. To keep it vegetarian, just skip the optional feta cheese or use a plant-based cheese instead. You will still enjoy all the great flavors. If you want a vegan option, remember to avoid dairy in garnishes as well. Mexican Street Corn Soup is a tasty and fun dish to make. We covered the ingredients you need, kitchen tools, and tasty substitutions. I shared step-by-step cooking steps and tips for blending. We explored ways to boost flavor and avoid common mistakes. You can also try different versions, from vegan to spicy. Storing leftovers or freezing the soup keeps it fresh for later. I hope you feel ready to make this delicious soup and enjoy every bite!
Mexican Street Corn Soup Flavorful and Simple Recipe
If you’re craving something warm, tasty, and easy, try Mexican Street Corn Soup! This cozy dish bursts with the classic flavors of street corn, like
- Ground beef specifics Use 1 lb of ground beef with an 80/20 blend. This mix keeps the meat juicy. - Tortilla options I like large flour tortillas for wraps. They hold everything well. You can also try whole wheat or corn tortillas for a twist. - Cheese varieties Shredded cheddar cheese is my go-to. It melts nicely and gives great flavor. You can also use Monterey Jack or pepper jack for extra zest. - Recommended spices for flavor Add 1 teaspoon each of garlic powder, onion powder, and smoked paprika. These spices boost the taste of the beef. Don’t forget salt and pepper to season. - Recommended extras Ketchup and mustard are classic choices. I recommend 1/4 cup of each for that cheeseburger taste. You can also add BBQ sauce for a smoky flavor. - Garnishing options Diced tomatoes and pickles add crunch and freshness. Try adding fresh lettuce or sliced cucumbers on the side for extra color. 1. Mixing the beef and spices Start by taking a large bowl. Add 1 pound of ground beef. Then, sprinkle in 1 teaspoon each of garlic powder, onion powder, and smoked paprika. Add salt and pepper to taste. Use your hands to mix everything well. This blend makes the beef tasty. 2. Preheating the air fryer Next, set your air fryer to 400°F (200°C). Let it heat for about 5 minutes. This step helps cook the patties evenly. 3. Shaping the patties Take a portion of your beef mix, about 1/4 pound. Flatten it into a small patty. Repeat this for the rest of the beef. You should have 4 nice patties ready to go. 1. Initial cooking of patties Place the patties in the air fryer basket. Cook for 10-12 minutes. Flip them halfway through. This gives them a golden crust. They should be fully cooked when done. 2. Assembling the wraps Once the patties cool a bit, grab a tortilla. Place one patty in the center. Top it with 1/4 cup of shredded cheddar cheese, diced tomatoes, and pickles. Drizzle with ketchup and mustard. Roll the tortilla tightly and fold in the sides. 3. Final air frying for crispiness Spray the outside of each wrap with cooking spray or olive oil. Place them back in the air fryer in a single layer. Cook at 400°F (200°C) for 5-6 minutes. They will turn golden and crispy. Enjoy your delicious wraps! Check out the Full Recipe for more details. To ensure even cooking, use small, uniform patties. This helps them cook at the same rate. Flip the patties halfway through cooking. It gives both sides a nice golden color. To avoid soggy wraps, let the cooked patties cool slightly before wrapping. This keeps the tortillas crisp. Also, use a light spray of oil on the outside. It helps achieve a crunchy finish in the air fryer. Adjust cooking times based on your air fryer model. Not all air fryers cook the same. You may need to check your wraps a few minutes early or add extra time if needed. You can add more toppings for extra flavor. Try adding lettuce, onions, or avocado. These can make the wraps more exciting and tasty. If you like heat, adjust the spices. You can add a pinch of cayenne or chili powder. This will give your wraps a nice kick. For cheese variation, try different types like pepper jack or gouda. Each adds a unique taste to the wraps. Experimenting with cheese can lead to delicious results. {{image_2}} You can change the meat in your wraps for a healthier taste. Using turkey or chicken works great. Both options are leaner but still juicy. If you want a gluten-free option, try a corn or rice tortilla. These alternatives are easy to find. For a meatless wrap, use black beans or lentils. They add protein and flavor without the meat. Add fun flavors from different regions! For a Southwestern twist, toss in some jalapeños. They give your wraps a nice kick. If you crave a Mediterranean touch, sprinkle some feta cheese inside. This cheese adds a creamy texture and tangy taste. Want something unique? Try BBQ sauce and coleslaw in your wraps. This twist gives a sweet and savory flavor that will impress everyone. For the full recipe, check out the details above. To keep your Air Fryer cheeseburger wraps fresh, store them in the fridge. Wrap each one in foil or plastic wrap. This helps keep moisture in and prevents them from drying out. Place the wrapped wraps in an airtight container. They will last for up to three days. When you are ready to eat the leftovers, reheat them in the air fryer. Set it to 350°F (175°C) for about 5 minutes. This will help the wraps regain their crispiness. You can also use a microwave if you are in a hurry. However, the microwave will not give the same crunchy texture. If you want to save some wraps for later, you can freeze them. First, let the wraps cool completely. Then, wrap each one tightly in plastic wrap. You can also use freezer bags. Make sure to remove as much air as possible. This prevents freezer burn. Frozen wraps can last up to two months. When you want to enjoy a frozen wrap, take it out of the freezer. Let it thaw in the fridge overnight. Once thawed, reheat in the air fryer at 350°F (175°C) for about 8-10 minutes. This ensures they heat evenly and stay crispy. How to prevent wraps from getting soggy? To keep your wraps crispy, use a light hand with sauces. Too much ketchup or mustard can make them wet. Also, make sure to cook the patties until they are brown and not too juicy. After cooking, let the patties cool a bit before adding them to the wrap. This helps reduce moisture. Can I make these wraps ahead of time? You can make the patties ahead. Cook and cool them, then store in the fridge. When you’re ready to eat, just assemble the wraps and air fry them for a quick meal. If you want to make the full wrap ahead, store them in the fridge but use them within a day for best taste. What type of air fryer is best for this recipe? Most air fryers work well for this recipe. A basket-style air fryer is great for even cooking. Make sure your air fryer has enough space for four wraps to cook at once. If needed, you can cook in batches. Calorie count per serving Each serving has about 500 calories. This can vary based on the beef and cheese you use. If you want to cut calories, use leaner beef or less cheese. Healthier modifications available You can use ground turkey or chicken instead of beef. Whole wheat tortillas are a great swap. Adding more veggies like lettuce or bell peppers boosts nutrition without many calories. Protein content details Each wrap packs about 30 grams of protein. The beef and cheese give a good protein boost. If you choose turkey or add beans, protein stays high while cutting fat. In this blog post, we explored how to make delicious air fryer wraps. We covered the main ingredients like beef, tortillas, and cheese options. You learned step-by-step instructions for preparing, cooking, and assembling your wraps. With tips on even cooking and flavor boosts, you can create the best wraps at home. Finally, we discussed variations, storage, and answered your burning questions. Making these wraps is fun and easy, so enjoy your cooking journey!
Air Fryer Cheeseburger Wraps Delightful and Simple Meal
Looking for a fun and easy meal? You’re in the right place! My Air Fryer Cheeseburger Wraps pack all the classic burger flavors into a
To make Zesty Citrus Chicken Tenderloin Skewers, you need some key ingredients. Here is a simple list: - 1 lb chicken tenderloins - 2 tablespoons olive oil - Zest and juice of 1 orange - Zest and juice of 1 lemon - 2 cloves garlic, minced - 1 teaspoon paprika - 1 teaspoon cumin - 1 teaspoon honey - Salt and pepper to taste - Fresh parsley for garnish - Wooden skewers (soaked in water for 30 minutes) These ingredients bring great flavor to your dish. The citrus adds a bright taste that pairs well with chicken. You can change the marinade to mix things up. Here are a few ideas: - Herb Marinade: Use thyme, rosemary, or oregano. These herbs add depth. - Spicy Kick: Add red pepper flakes or hot sauce for heat. - Sweet and Sour: Mix in some soy sauce and brown sugar for a different twist. Each option brings unique flavors to your skewers. Feel free to experiment with what you enjoy most. Garnishing your skewers makes them look pretty and adds flavor. Here are some tasty ideas: - Fresh parsley: Adds a pop of green and freshness. - Lemon and orange wedges: Serve them on the side for extra zest. - A drizzle of extra marinade: Enhances the taste and gives a shiny look. These garnishes not only look great but also enhance the overall flavor of your dish. For the full recipe, check out the details above. Enjoy cooking and sharing these delicious skewers! In a large mixing bowl, start by adding the olive oil. Next, include the zest and juice of one orange and one lemon. Then, add minced garlic, paprika, cumin, honey, salt, and pepper. Use a whisk to mix everything well until it becomes a smooth marinade. This blend brings bright flavors to the chicken, making it tasty and fresh. Now it’s time to add the chicken tenderloins. Toss them in the marinade until they are fully coated. Cover the bowl with plastic wrap. Place it in the fridge for at least 30 minutes, or up to 2 hours for more flavor. This step helps the chicken absorb all those delicious tastes. Preheat your grill or grill pan to medium-high heat. While it heats, take wooden skewers that have soaked in water for 30 minutes. Thread the marinated chicken tenderloins onto the skewers. Make sure they are secure and not too crowded. Grill the skewers for about 4-5 minutes on each side. Cook until the chicken is no longer pink and has nice grill marks. Once done, take the skewers off the grill and let them rest for a few minutes. Garnish with freshly chopped parsley before serving. This step adds a pop of color and flavor. You can find the full recipe for these Zesty Citrus Chicken Tenderloin Skewers to enjoy with your family and friends. To make sure your chicken is tender, marinate it well. Use a mix of acid and oil. This helps break down the fibers of the meat. A good time for marinating is at least 30 minutes. For even better flavor, marinate for up to 2 hours. Always remember to let the chicken rest after cooking. This keeps the juices inside, making each bite juicy. Grilling gives chicken a smoky flavor and nice grill marks. It cooks quickly and adds a crispy texture. Use medium-high heat for grilling. On the other hand, cooking in the oven is easier for larger batches. Set your oven to 400°F for even cooking. Both methods work well, but choose based on your taste and time. You can boost the flavor of your marinade with simple additions. Try adding fresh herbs like thyme or rosemary. They add a lovely aroma. You can also use spices like cayenne or chili powder for heat. A splash of soy sauce or Worcestershire sauce can add depth. Experiment with flavors to find what you love best. Check the [Full Recipe] to see how to use these tips in your cooking! {{image_2}} You can easily switch up the flavors in your chicken skewers. Instead of orange and lemon, try using lime juice and zest. This gives a bold twist. You can also use different herbs. Fresh cilantro or basil can add a fresh taste. If you like spicy food, add some chili powder or cayenne pepper to the marinade. For a smoky flavor, try smoked paprika. You will love how these small changes make a big difference. These chicken skewers work for many occasions. For a summer barbecue, serve them with grilled veggies. You can also pair them with a light salad for a fresh meal. If it’s a family dinner, place the skewers on a big platter. Add colorful sides like rice or couscous. For a picnic, pack them in wraps with fresh greens. They are easy to eat and full of flavor, perfect for any setting. You can make a great plant-based version of these skewers. Use tofu or tempeh instead of chicken. Marinate them the same way to soak up those flavors. You can also try using mushrooms, zucchini, or bell peppers. These veggies grill well and taste amazing. For a heartier option, use chickpeas or seitan. They add protein and texture. Check out the Full Recipe for more ideas on how to create delicious meals for everyone. Store leftover chicken skewers in an airtight container. Make sure they cool first. Keep them in the fridge for up to three days. If you want them fresh longer, freezing is a great option. To freeze chicken tenderloins, wrap them tightly in plastic wrap. Then, place them in a freezer bag. Remove as much air as possible before sealing. They can last up to three months in the freezer. Thaw them in the fridge overnight before cooking. When reheating chicken skewers, use an oven or stovetop for best results. Preheat the oven to 350°F (175°C). Place the skewers on a baking sheet and cover with foil. Heat for about 10-15 minutes. You can also reheat in a skillet over medium heat. Flip them gently to warm evenly. This helps keep them juicy and tasty. You should marinate chicken tenderloins for at least 30 minutes. This lets the flavors soak in. For even more taste, try marinating them for up to 2 hours. Just don’t go longer than that, as it can change the texture. Marinating helps keep the chicken juicy and adds a burst of flavor. Yes, you can use chicken breast instead of tenderloins. Chicken breast works well in many recipes. Just remember, chicken breasts take longer to cook. Slice them into thinner pieces to match the tenderloins. This helps them cook evenly and stay moist, just like the tenderloins do. For chicken skewers, grill them for about 4-5 minutes on each side. This timing works well for tenderloins. You want the chicken to reach an internal temperature of 165°F. Use a meat thermometer to check. This ensures your chicken is safe to eat and still juicy. In this post, I shared how to make zesty chicken skewers. You learned about key ingredients, marinade options, and ways to cook the skewers. I provided tips to keep the chicken tender and suggested fun variations for all diets. Cooking can be simple and enjoyable. Remember to experiment with flavors and garnishes. Enjoy the joy of grilling or baking. You’ll create tasty meals every time.
Delicious Chicken Tenderloin Meals You’ll Love
Are you ready to spice up your dinner routine? In this post, I’m sharing mouthwatering chicken tenderloin meals you’ll love. These zesty citrus chicken skewers
- 4 boneless, skinless chicken breasts - 1/2 cup unsalted butter, softened - 4 cloves garlic, minced - 1 tablespoon Dijon mustard - 1 tablespoon Worcestershire sauce - 2 tablespoons fresh parsley, chopped - 2 teaspoons smoked paprika - 1 teaspoon onion powder - 1 teaspoon cayenne pepper (adjust for spice level) - Salt and pepper, to taste - Juice of 1 lemon - Optional: Lemon wedges for serving To make Flavorful Cowboy Butter Chicken, you need simple ingredients. The chicken breasts serve as the main part of this dish. You also need butter. This makes the chicken rich and tasty. Garlic adds a nice kick. Dijon mustard and Worcestershire sauce give extra depth. For even more flavor, we add fresh parsley. It adds a bright touch. Smoked paprika gives it a warm, smoky taste. Onion powder adds sweetness. Cayenne pepper brings heat, but you can adjust it. Season with salt and pepper to enhance all these flavors. A squeeze of lemon juice brightens everything up. You can also serve with lemon wedges for a fresh twist. All these ingredients blend together to create a delicious meal. For the full recipe, check the instructions section. - Combine the cowboy butter mixture ingredients in a bowl. - Pat chicken breasts dry and season with salt and pepper. Start by mixing the cowboy butter in a bowl. You will need softened butter, minced garlic, Dijon mustard, Worcestershire sauce, smoked paprika, onion powder, cayenne pepper, lemon juice, and a pinch of salt and pepper. Stir until well-blended and smooth. Next, take your chicken breasts. Pat them dry with paper towels. This step helps the chicken brown better. Then, season both sides with salt and pepper. This simple seasoning adds great flavor. - Preheat the skillet and add prepared cowboy butter. - Cook chicken breasts until golden brown. Now, heat a large skillet over medium heat. It's important to let the skillet get hot. Once it’s warm, add a tablespoon of the cowboy butter mixture to the skillet. Carefully place the seasoned chicken breasts into the skillet. Cook each side for about 6-7 minutes. You want them golden brown and cooked through. This cooking step locks in the flavors from the cowboy butter. - Baste chicken with extra cowboy butter. - Let chicken rest before serving. As the chicken cooks, spoon extra cowboy butter over the breasts. This basting adds even more flavor and keeps the chicken moist. Once done, remove the chicken from the skillet. Let it rest for a couple of minutes. Resting allows the juices to settle. Serve the chicken drizzled with any remaining cowboy butter. Garnish with fresh parsley for a pop of color. For the Full Recipe, you can find the complete details and tips. Enjoy every bite! To cook your flavorful cowboy butter chicken evenly, I suggest using a heavy skillet. A cast iron or stainless steel skillet works great. These materials hold heat well, giving you an even cook every time. To get that perfect golden crust, make sure to pat your chicken dry. This helps the butter mix stick better. Also, don’t rush it! Cook the chicken over medium heat. This will help it brown nicely without burning. You can adjust the spice level to fit your taste. If you like it hot, add more cayenne pepper. For a milder flavor, use less or leave it out. Pair your cowboy butter chicken with simple sides. Creamy mashed potatoes or a fresh salad makes a great match. You can also serve it with rice or steamed veggies. These sides soak up the delicious butter sauce well. For more cooking ideas, check out the Full Recipe to explore all the flavors. {{image_2}} You can change the protein for a new taste. Instead of chicken, try shrimp or tofu. Both of these options soak up the cowboy butter well. This swap keeps the dish flavorful and exciting. For herbs, you can use basil or cilantro. These herbs add a fresh twist. If you want more depth, try rosemary. Each herb changes the dish’s taste and makes it unique. You can grill or pan-sear your chicken. Grilling gives it a smoky flavor. It also cooks quickly. Just make sure to baste it with cowboy butter while grilling. If you prefer pan-searing, follow the original recipe. Heat your skillet, add butter, and cook the chicken. It gets crispy on the outside and juicy inside. You can also bake cowboy butter chicken in the oven. Preheat to 400°F (200°C). Place the chicken in a baking dish and cover it with the cowboy butter. Bake for about 25-30 minutes. This method is easy and keeps the chicken moist. For the full recipe, check back to the main recipe section. To keep your cowboy butter chicken fresh, store leftovers in a proper way. First, let the chicken cool down at room temperature. Once cool, place it in an airtight container. This helps keep it moist and tasty. Use a glass or plastic container with a secure lid. You can also wrap the chicken in foil or plastic wrap before putting it in a container. This extra layer protects the chicken. To reheat your delicious cowboy butter chicken, use the oven or a skillet. Both methods keep the chicken juicy. If using the oven, preheat it to 350°F (175°C). Place the chicken on a baking dish, cover it with foil, and heat for about 15-20 minutes. If you prefer a skillet, add a little butter over medium heat. Cook the chicken for about 5-7 minutes, turning it to heat evenly. This method helps the chicken stay flavorful and moist. Enjoy your leftovers just as much as the first time! What is the best way to serve Cowboy Butter Chicken? Serve Cowboy Butter Chicken hot. Drizzle the extra cowboy butter on top. Add lemon wedges for a fresh touch. This dish pairs well with rice, potatoes, or a green salad. Can I make this recipe ahead of time? Yes, you can prepare the cowboy butter mixture ahead. Store it in the fridge for up to three days. Cook the chicken right before serving for the best taste. Is there a vegetarian version of Cowboy Butter Chicken? You can make a vegetarian version using firm tofu or mushrooms. Just replace the chicken with your choice of protein. Follow the same cooking steps for great flavor. What should I do if the chicken is dry? If the chicken is dry, try using a meat thermometer next time. Chicken should be cooked to 165°F. Basting with the cowboy butter while cooking helps keep it moist. How to replace ingredients if I run out? If you run out of an ingredient, here are some swaps: - Use olive oil instead of butter. - Substitute garlic powder for fresh garlic. - Try apple cider vinegar if you lack Worcestershire sauce. These swaps can still give you tasty results! You learned how to make Cowboy Butter Chicken with great flavor and simple steps. We covered the key ingredients, preparation, and cooking tips. Remember, adjust spices to fit your taste and try different proteins if you want a change. Storing and reheating leftovers keeps your meal fresh and delicious. Enjoy making this dish to impress family and friends. Cook with confidence and have fun in the kitchen!
Flavorful Cowboy Butter Chicken Quick and Easy Recipe
Are you ready to spice up your dinner routine? This Flavorful Cowboy Butter Chicken recipe is quick, easy, and full of rich taste. With just
- 2 boneless, skinless chicken breasts - Salt and pepper to taste - 1 cup all-purpose flour - 2 large eggs, beaten - 1 cup panko breadcrumbs - Vegetable oil for frying - 1 tablespoon sesame oil - 1 tablespoon soy sauce - 1 tablespoon mirin (optional, can substitute with a bit more soy sauce) - 1 cup tonkatsu sauce (store-bought or homemade) - Chopped green onions and toasted sesame seeds for garnish For a great Chicken Katsu, you need fresh and simple ingredients. Start with two boneless chicken breasts. These give you that juicy center. Don’t forget salt and pepper to bring out the flavor. Next, you need flour for coating. It makes the chicken crisp. Beat two large eggs in a bowl. This helps the breadcrumbs stick. Panko breadcrumbs are key for that perfect crunch. They are light and airy. You will fry in vegetable oil. A mix of sesame oil adds a nice flavor. For dipping, soy sauce and mirin blend well. If you like, tonkatsu sauce adds a sweet touch. To finish, chopped green onions and toasted sesame seeds make great garnishes. They add color and crunch. These ingredients work together to make your Chicken Katsu tasty and fun. For the full recipe, check the section above. To start, you need to pound and season the chicken breasts. Place each chicken breast between two sheets of plastic wrap. Use a meat mallet or a rolling pin to pound them. Aim for about 1/2 inch thick. This helps them cook evenly. After that, season both sides with salt and pepper. Next, set up the breading station. You’ll need three shallow dishes. In the first dish, add flour. In the second, beat the eggs. In the third dish, place panko breadcrumbs. This setup makes the breading process easy. Now, let’s move on to dredging the chicken. Take one chicken breast and coat it in flour. Make sure to cover it completely and shake off any extra flour. Then, dip it into the beaten eggs. Let any excess drip off. Finally, coat it with panko breadcrumbs. Press gently to help them stick. Repeat this process with the second chicken breast. Make sure both breasts are well-coated and ready for frying. Heat about 1/2 inch of vegetable oil in a large skillet. Add a tablespoon of sesame oil for flavor. Set the heat to medium. You’ll know it’s ready when it sizzles after dropping in a breadcrumb. Carefully place the breaded chicken breasts in the hot oil. Fry each side for about 4-5 minutes until they turn golden brown and crispy. If your pan is small, cook in batches. Overcrowding can lead to soggy chicken. Once cooked, transfer the chicken katsu to a paper towel-lined plate. This helps drain any excess oil. Let them rest for a couple of minutes before slicing. For a tangy touch, mix soy sauce and mirin in a small bowl. This sauce pairs well with the katsu. Drizzle tonkatsu sauce over the sliced chicken and garnish with green onions and toasted sesame seeds. Enjoy your crispy chicken katsu! You can find the full recipe above. To get that perfect crispy texture, you need the right oil temperature. Aim for about 350°F (175°C). You can check this by dropping a breadcrumb in the oil; it should sizzle right away. Avoid frying at too low a heat, as this will make the chicken soggy. To prevent sogginess, make sure you drain the chicken well after frying. Use paper towels to soak up any excess oil. This helps keep your katsu crispy. One big mistake is overcrowding the frying pan. When you add too much chicken, the oil cools down. This leads to less crispy katsu. Fry in batches if needed. Another mistake is using the wrong breading technique. Make sure to coat the chicken fully in flour first. Then, dip it in egg, and finally press the panko breadcrumbs on firmly. This helps the coating stick well while cooking. Before you bread the chicken, try adding some spices to the flour. Garlic powder, paprika, or even a pinch of cayenne can boost the flavor. Feel free to experiment with these seasoning variations. For dipping sauce, you can mix soy sauce with a bit of mirin. This adds a nice touch. You can also serve it with tonkatsu sauce for a classic taste. Don't forget to garnish your katsu with green onions and sesame seeds for extra flavor. For the full recipe, check out the earlier section. {{image_2}} You can switch out chicken for pork. Use boneless pork chops for a tasty change. It has a similar texture and flavor. For a vegetarian version, try eggplant or tofu. Slice the eggplant into thick pieces and bread it just like the chicken. Tofu provides a nice, soft center. Press it to firm it up before breading for the best results. Want to spice things up? Add some paprika or garlic powder to the breading. This gives the katsu a nice kick. For dipping sauces, think outside the box. Spicy mayo or ponzu sauce pairs well with the crispy texture. These sauces add a burst of flavor that makes every bite special. Chicken katsu shines with a few tasty side dishes. Try serving it with steamed rice and a simple salad. A fresh cabbage slaw adds crunch and balances the meal. For a special touch, arrange the katsu on a colorful plate with a drizzle of sauce. Garnish with green onions and sesame seeds for a beautiful look. This way, you impress your guests before they even take a bite! For the full recipe, check out the [Full Recipe]. To keep your Chicken Katsu fresh, store it in the fridge. Place it in an airtight container. This will prevent moisture loss and keep it crispy. You can keep Chicken Katsu in the fridge for about 3 days. After that, the texture may change and it may not taste as good. When you reheat Chicken Katsu, you want to keep it crispy. The best way is to use an oven. Preheat your oven to 375°F (190°C). Place the chicken on a baking sheet and heat for about 10-15 minutes. This method helps restore the crispiness. If you use a microwave, the chicken may become soggy. You can freeze Chicken Katsu before or after cooking. If freezing before cooking, wrap each piece in plastic wrap. Then, place them in a freezer bag. For cooked Chicken Katsu, let it cool first. Then, wrap and store it in a freezer bag. When you are ready to eat, thaw it overnight in the fridge. Cook it in the oven to keep it crispy. This method works well for maintaining great flavor and texture. Chicken Katsu is a popular Japanese dish. It features breaded and deep-fried chicken. The origins trace back to the late 19th century. It became popular during the Meiji era. Chicken Katsu has cultural significance as comfort food. Many enjoy it for its crispy texture and savory flavor. Yes, you can make Chicken Katsu ahead of time. Prepare the chicken and bread it. Store the breaded chicken in the fridge for up to 24 hours. For longer storage, freeze it for up to three months. When ready, fry it straight from the fridge or freezer. Just add a few extra minutes to the cooking time. Chicken Katsu pairs well with many sides. Here are some popular options: - Steamed rice - Cabbage salad - Miso soup - Pickled vegetables - Japanese curry These sides enhance the meal and add flavor. Chicken Katsu has both pros and cons. It contains protein from chicken, which is good for muscle. However, frying adds extra fat and calories. A serving can have around 400-500 calories. For a healthier version, bake instead of fry. You can also use whole grain breadcrumbs. Tonkatsu sauce is easy to make at home. Mix these ingredients: - 1/4 cup ketchup - 2 tablespoons soy sauce - 1 tablespoon Worcestershire sauce - 1 tablespoon sugar - 1 teaspoon Dijon mustard Stir well until blended. You can also use store-bought tonkatsu sauce for convenience. This sauce adds a sweet and tangy flavor to your Chicken Katsu. For the full recipe, check the detailed instructions above. In this blog post, I covered how to make crispy Chicken Katsu. We explored essential ingredients, step-by-step instructions, and tips for perfect texture. You learned about variations like using different proteins and flavor profiles. I also shared storage and reheating tips to keep your dish fresh. Chicken Katsu is more than a meal; it's an experience. With practice, you will impress everyone at your table. Enjoy your cooking journey!
Crispy Chicken Katsu Delightful and Easy Recipe
Are you ready to impress your family and friends with a crispy Chicken Katsu that’s simple yet delightful? This dish is a crowd-pleaser, boasting juicy
The Savory Slow Cooker Spaghetti Casserole is a hearty dish. It mixes pasta, meat, sauce, and cheese. You can enjoy it any night of the week. This dish is simple to make and even easier to love. Here’s what you need for this recipe: - 12 ounces spaghetti, uncooked - 1 pound ground beef or turkey - 1 onion, finely diced - 2 cloves garlic, minced - 1 bell pepper (any color), diced - 24 ounces marinara sauce - 1 can (15 ounces) diced tomatoes (with juices) - 2 cups shredded mozzarella cheese - 1 cup ricotta cheese - 1 teaspoon dried Italian herbs (oregano, basil, thyme) - Salt and pepper to taste - Fresh basil for garnish (optional) Feel free to customize your casserole. You can add: - Sliced mushrooms for extra flavor - Spinach for a healthy boost - Zucchini for added texture - Red pepper flakes for some heat Experiment and find what you love! Start by heating a skillet over medium heat. Add the ground beef or turkey to the pan. Cook it until it turns brown. This should take about 5 to 7 minutes. As the meat cooks, add in the finely diced onion, minced garlic, and diced bell pepper. Stir these together, letting the flavors mix. Once the meat is no longer pink and the veggies are soft, drain any extra fat from the pan. In a large bowl, combine the cooked meat mixture with the marinara sauce. Next, add the canned diced tomatoes along with their juices. Toss in the dried Italian herbs, salt, and pepper. Use a spoon to mix everything well. This step is key. It helps blend all the tastes together, making the dish more flavorful. Now it’s time to build the layers in your slow cooker. Start with a layer of uncooked spaghetti at the bottom. Pour half of the meat sauce mixture over the spaghetti. Then, dollop half of the ricotta cheese on top. Repeat these layers with the remaining spaghetti and meat sauce. Finish by adding the leftover ricotta cheese on top. This layering keeps the flavors moving throughout the dish. Cover the slow cooker and set it to low. Cook for 4 to 5 hours. Check the spaghetti around the 4-hour mark. It should be tender and full of flavor. About 30 minutes before it is done, sprinkle shredded mozzarella cheese on top. Cover the slow cooker again to let the cheese melt and bubble. After it’s ready, carefully scoop servings from the slow cooker and enjoy! To get the best texture for your casserole, cook it on low heat. This method gives the spaghetti time to soak up the sauce. Keep an eye on the cooking time. If you cook it too long, the pasta might become mushy. To avoid this, check the spaghetti for doneness around the 4-hour mark. It should be tender but still hold its shape. Adding cheese is one of my favorite parts! About 30 minutes before serving, sprinkle mozzarella cheese on top. Cover the slow cooker to trap the heat. This action helps the cheese melt evenly. If you want a crispy top, you can briefly broil it in your oven. Just watch it closely to prevent burning. Serve the casserole hot in deep bowls. This makes it easy to scoop and enjoy. For a pop of color, garnish each bowl with fresh basil leaves. The bright green makes the dish look stunning. You can also add a sprinkle of grated Parmesan cheese on top. This extra touch adds flavor and makes it even more inviting. For a complete meal, pair it with a simple salad or garlic bread. You can find the full recipe above to guide you through each step. {{image_2}} If you want a vegetarian dish, swap the meat for veggies. Use mushrooms, zucchini, or spinach. These veggies add great flavor and nutrition. You can also add beans for protein. Black beans or chickpeas work well. This makes the dish hearty without meat. You’ll still get a rich taste with marinara sauce. You can switch the protein in this casserole for variety. Ground turkey or chicken are great substitutes. If you prefer a richer flavor, try Italian sausage. Just make sure to cook it first. For a fun twist, use shredded rotisserie chicken. Each option gives a unique taste. Experiment with what you enjoy most! Adjust the flavor to suit your taste. Add a pinch of red pepper flakes for heat. If you like it tangy, mix in some balsamic vinegar. Fresh herbs can brighten the dish. Try adding parsley or thyme to enhance the flavor. You can also play with cheese. Parmesan or feta can add a nice touch. My favorite way to do this is by using a mix of cheeses. It makes every bite a new delight. For the detailed recipe and ingredient list, check the Full Recipe. After you finish your Savory Slow Cooker Spaghetti Casserole, let it cool. Store it in an airtight container. It stays fresh in the fridge for up to three days. Make sure to label the container with the date. This helps you keep track of how long it has been there. If you want to save some for later, freezing is a great option. Place the cooled casserole in a freezer-safe container. You can also use a heavy-duty freezer bag. It will last for up to three months in the freezer. Remember to remove as much air as possible before sealing. This prevents freezer burn and keeps the flavor intact. To reheat, you can use the oven or microwave. If using the oven, set it to 350°F (175°C). Cover the casserole with foil to keep it moist. Heat for about 30 minutes, or until warmed through. If you're in a hurry, the microwave works well too. Just heat in short bursts, stirring in between. Enjoy your casserole just like it was fresh! For the full recipe, check out the details above. You should cook spaghetti in a slow cooker for about 4 to 5 hours on low. This allows the pasta to soak up the sauce and flavors. If you prefer a firmer texture, check it at 4 hours. If you want it softer, let it cook longer. Yes, you can use whole wheat spaghetti. It adds a nutty flavor and more fiber. Keep in mind that whole wheat pasta may cook a bit faster than regular pasta. Check it a little earlier to avoid mushiness. To prevent mushy spaghetti, avoid overcooking it. Layer uncooked spaghetti at the bottom, and don’t stir it too much. The slow cooker will cook it gently in the sauce. You can also add more sauce if needed, as this keeps the texture just right. Yes, you can make this casserole ahead of time. Prepare it the night before and store it in the fridge. When ready to cook, just pop it in the slow cooker. This makes dinner easy and stress-free! For the full recipe, check out the main article. This blog post covered how to make an easy slow cooker casserole. We explored each ingredient, from meat to optional add-ins. Then, I shared step-by-step cooking methods and tips for perfect results. We also looked at variations for different diets and how to store leftovers. Think of this casserole as a canvas. You can customize it however you like. Enjoy trying new flavors and textures. Happy cooking!
Savory Slow Cooker Spaghetti Casserole Delight
Are you looking for a cozy meal that cooks itself? The Savory Slow Cooker Spaghetti Casserole Delight is your answer! This easy recipe will make
To make a tasty burrito, gather these main items: - 1 lb boneless, skinless chicken thighs - 2 cups cooked rice (white or brown) - 1 can black beans, drained and rinsed - 1 cup corn (fresh, frozen, or canned) - 1 cup shredded cheddar cheese - 1 cup fresh salsa (store-bought or homemade) - 1 cup sour cream or Greek yogurt - 4 large flour tortillas - Fresh cilantro, chopped (for garnish) These ingredients form the heart of your burrito. The chicken thighs give a juicy base. The rice and beans add bulk and flavor. The salsa and cheese bring zest to each bite. For that Chipotle flair, use this marinade: - 2 tablespoons olive oil - 2 tablespoons lime juice - 1 tablespoon smoked paprika - 1 teaspoon ground cumin - 1 teaspoon garlic powder - 1 teaspoon onion powder - ½ teaspoon cayenne pepper (adjust for spice preference) - Salt and pepper to taste This marinade is key. It helps the chicken soak up all the great flavors. The lime juice gives it a fresh kick, while the spices add depth. Feel free to add these extras for more flavor: - Extra salsa - Sliced jalapeños - Avocado or guacamole - Extra cheese These optional items can elevate your burrito. They add more taste and texture. You can mix and match based on your preference. Enjoy customizing your meal! For the complete recipe, check out the Full Recipe. To start, gather your ingredients. You will need olive oil, lime juice, smoked paprika, ground cumin, garlic powder, onion powder, cayenne pepper, salt, and pepper. In a large bowl, mix the olive oil and lime juice first. Then, add the smoked paprika, cumin, garlic powder, onion powder, cayenne pepper, salt, and pepper. Stir everything together until it forms a smooth marinade. Now, add the chicken thighs. Make sure each piece is well coated in the marinade. Cover the bowl and place it in the fridge for at least 30 minutes. If you have time, letting it sit for up to 2 hours will give better flavor. Next, preheat your grill or grill pan to medium-high heat. While it heats up, take the chicken out of the marinade. Place the chicken on the grill and cook for about 6-7 minutes on each side. The chicken should reach an internal temperature of 165°F to be fully cooked. Once done, remove the chicken from the grill and let it rest for 5 minutes. This helps keep the chicken juicy. After resting, slice the grilled chicken into strips. Now it’s time to put your burrito together. Warm your flour tortillas in a dry skillet for about 30 seconds on each side. This step makes them easier to roll. Lay a warm tortilla flat on a clean surface. Start by adding a scoop of cooked rice. Next, layer on some black beans, corn, and a few slices of grilled chicken. Then, sprinkle on shredded cheese, add salsa, and finish with a dollop of sour cream. Carefully fold in the sides of the tortilla. Roll it tightly from the bottom up to form a burrito. Repeat this process for the remaining tortillas. If you want a crispy finish, grill the assembled burritos for an extra 2-3 minutes on each side. Serve them warm, and enjoy every bite! To get great flavor, you need a solid marinade. Start with good olive oil and fresh lime juice. The oil keeps the chicken moist while the lime juice adds zing. Use smoked paprika for that smoky taste. Adjust the cayenne pepper based on your spice level. Marinate the chicken for at least 30 minutes. If you can wait, two hours brings better flavor. Grilling chicken can be tricky. Preheat your grill to medium-high heat. This helps sear the chicken and lock in juices. Grill the chicken thighs for about 6-7 minutes on each side. Check that the inside reaches 165°F to ensure it’s safe to eat. After grilling, let the chicken rest for 5 minutes. This keeps it juicy when you slice it. Burritos are fun because you can make them your way! Start with rice and beans, then add your grilled chicken. You can mix in corn, cheese, and salsa. For extra flavor, try adding guacamole or jalapeños. Don’t forget fresh cilantro for garnish! Each bite can be different, making your meal exciting. You can find the full recipe in the earlier section. {{image_2}} You can easily make a vegetarian burrito. Start by swapping the chicken for grilled veggies. Use zucchini, bell peppers, and onions. These add a nice crunch and flavor. You can also replace the meat with beans. Black beans or pinto beans work great. For added protein, try lentils or chickpeas. You have many protein choices for your burrito. If you want something different, try steak or shrimp. Season them like you would the chicken. For a lighter option, use turkey or tofu. Just marinate the tofu in the same spices. It absorbs all the great flavors. This way, you can enjoy a tasty burrito no matter your protein preference. The rice and beans can change the taste of your burrito. For a zesty twist, add lime juice and cilantro to the rice. You can also mix in some corn for sweetness. For the beans, try adding spices like chili powder or cumin. This gives them a nice kick. Use different types of rice, too. Brown rice adds more fiber, while cilantro-lime rice brings fresh flavor. Ready to spice up your burrito? Check out the Full Recipe for more ideas! To store leftover burritos, wrap them tightly in plastic wrap or foil. This keeps them fresh and prevents drying out. You can also place them in an airtight container. Store them in the fridge for up to three days. If you want to save them longer, consider freezing. When ready to eat, unwrap the burrito. Place it on a plate and cover it with a damp paper towel. Microwave it on high for about 1-2 minutes. This method helps keep the tortilla soft. If you prefer the crispy texture, heat it in a skillet over medium heat for about 3-5 minutes, flipping once. To freeze your burritos, let them cool completely first. Wrap each burrito in plastic wrap, then place them in a freezer bag. Squeeze out any air before sealing. You can freeze them for up to three months. When you’re ready to eat, thaw them in the fridge overnight and reheat using the guidelines above. Enjoy your tasty burritos anytime! For the complete recipe, check out the Full Recipe. This burrito is a "Copycat" recipe because it mimics the famous Chipotle flavors. I use similar spices and cooking methods to recreate that beloved taste. By marinating the chicken in lime juice and spices, I bring out the fresh flavors you love. The ingredients match closely with what Chipotle uses, giving you a taste of the restaurant at home. Yes, you can make this burrito gluten-free! Simply swap the flour tortillas for gluten-free tortillas. Many brands offer great options that taste good and hold well. Check the labels to ensure they are certified gluten-free. You can enjoy all the flavors without the gluten. You can easily adjust the spice level to fit your taste. If you prefer less heat, reduce the cayenne pepper or leave it out. For more spice, add extra cayenne or include sliced jalapeños in the burrito. You can also use a spicy salsa to kick things up a notch. Taste as you go and find your perfect balance! In this article, I shared how to make a great burrito. We covered key ingredients, marinade, grilling tips, and assembling. You also learned about tasty variations, storage tips, and answers to common questions. Burritos are flexible and fun. You can make them your way. Enjoy creating, sharing, and tasting your own version of this dish!
Copycat Chipotle Grilled Chicken Burrito Recipe
Are you craving a Chipotle grilled chicken burrito but want to make it at home? You’re in luck! This Copycat Chipotle Grilled Chicken Burrito recipe