Dinner
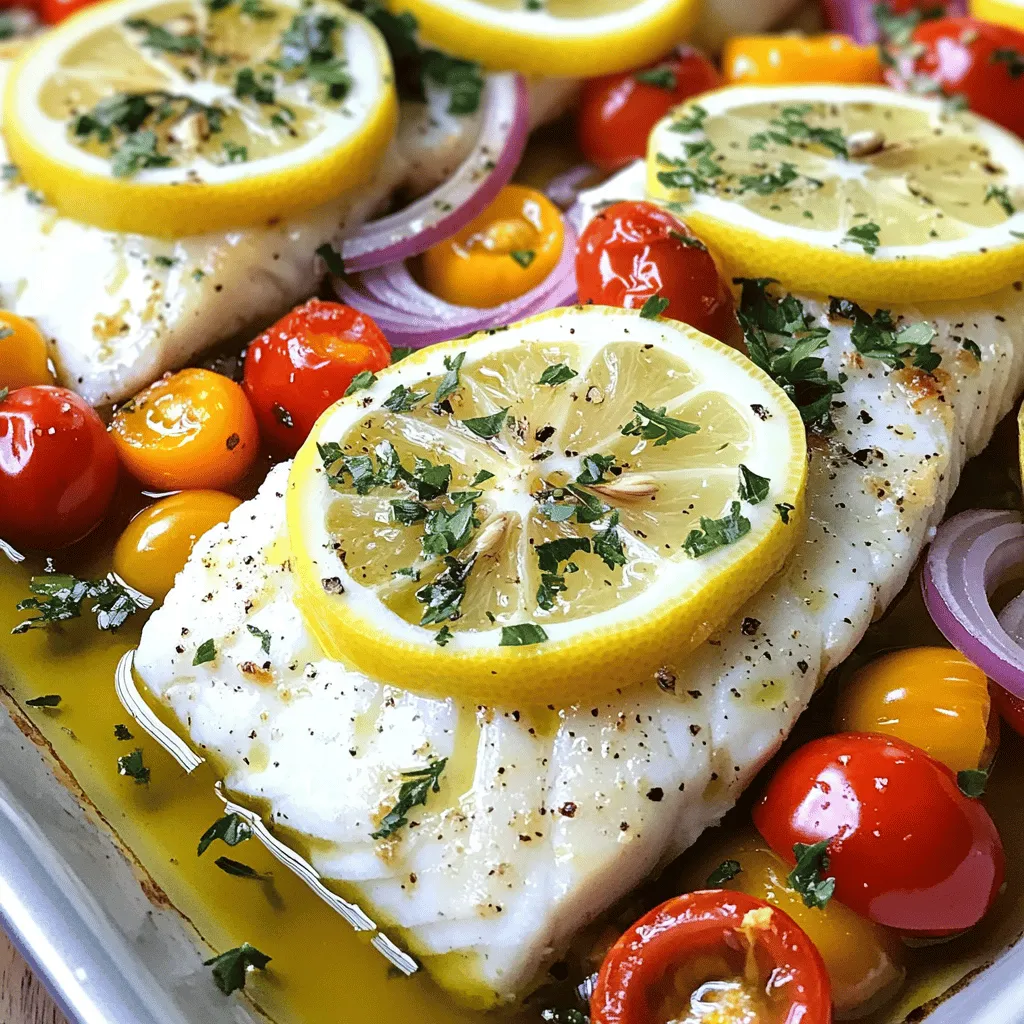
Easy Mediterranean Baked Fish Tasty and Healthy Recipe
Looking for a quick and tasty meal? You’ll love this Easy Mediterranean Baked Fish recipe! It’s healthy, packed with flavor, and perfect for busy weeknights.
![- 4 salmon fillets (6 oz each) - 2 tablespoons olive oil - 1 teaspoon garlic powder - 1 teaspoon paprika - Salt and pepper, to taste - Juice of 1 lime - 1 ripe mango, diced - 1 avocado, diced - 1 small red onion, finely chopped - 1 red bell pepper, diced - 1 small jalapeño, deseeded and minced - ¼ cup fresh cilantro, chopped When cooking, accurate measurements help keep flavors balanced. For this recipe: - Use 6 oz salmon fillets. This size cooks well on the grill. - Measure 2 tablespoons of olive oil for a good marinade base. - Use 1 teaspoon each of garlic powder and paprika. These add depth. - Salt and pepper should be to your taste. Start with a pinch. - Lime juice from 1 lime adds brightness to the dish. - For the salsa, 1 ripe mango and 1 avocado provide creaminess and sweetness. - Use 1 small red onion for a mild bite, and 1 red bell pepper for color. - Add a small jalapeño for some heat. Adjust based on your spice level. - ¼ cup fresh cilantro gives a fresh finish. Fresh salmon offers the best taste and texture. Look for fillets with bright color and a clean smell. If fresh isn’t available, frozen salmon is a great option. It locks in flavor and nutrients. Just ensure it is properly thawed before cooking. Using fresh or frozen salmon works for this recipe. Both will taste good when grilled and topped with mango salsa. If you use frozen salmon, remember to check for ice crystals. This can mean it was thawed and refrozen. For the best flavor, I recommend sticking with fresh salmon when possible. However, frozen salmon can be just as tasty if handled right. To start, mix your marinade. In a small bowl, combine 2 tablespoons of olive oil, 1 teaspoon of garlic powder, and 1 teaspoon of paprika. Add the juice of 1 lime, along with salt and pepper to taste. Stir until it blends well. This marinade will add rich flavor to your salmon. Next, take your salmon fillets. You will have 4 fillets, each weighing 6 ounces. Coat them with the marinade you just made. Make sure each fillet is well covered. Let them sit for 15 to 20 minutes. This step is vital for flavor. The longer they marinate, the better they taste. While the salmon marinates, it's time for the mango salsa. Grab a mixing bowl and add 1 ripe diced mango, 1 diced avocado, and 1 finely chopped small red onion. Then, add 1 diced red bell pepper and a minced jalapeño. Don't forget to include ¼ cup of fresh chopped cilantro. Gently toss these ingredients. Season them with a pinch of salt and pepper. Set the salsa aside to let the flavors mix. Now, we grill the salmon. Preheat your grill to medium-high heat. If you use a grill pan, heat it on your stovetop. Once hot, place the salmon fillets skin-side down on the grill. Grill for about 4 to 5 minutes on each side. Look for nice grill marks and ensure the salmon cooks through. Once done, take it off the grill and let it rest for a couple of minutes. Serve the salmon topped with your fresh mango salsa. Enjoy this tasty summer meal! For the complete recipe, check the [Full Recipe]. To get those perfect grill marks on your salmon, start with a hot grill. Preheat it to medium-high heat. Place the salmon skin-side down first. This helps the fish stay intact. Don’t move it around too much. After about 4-5 minutes, gently lift a corner to check. If it releases easily, flip it over. You should see nice marks. Grill for another 4-5 minutes. This method gives you both flavor and a pretty look. You can adjust the spice levels in the marinade. If you prefer a milder taste, skip the jalapeño in the mango salsa. For more heat, add an extra jalapeño or some red pepper flakes. Taste the salsa before serving. You can always add a pinch of salt or lime juice for balance. Remember, you want the flavors to shine without overwhelming the salmon. Using the right tools makes grilling easier. A good pair of tongs helps you flip the salmon without breaking it. A fish spatula is also great for delicate fillets. Use a grill basket if you're worried about sticking. It keeps the fish safe and intact. Don't forget a meat thermometer to check for doneness. Salmon is perfect at 145°F. These tools help you achieve great results every time. You can find the full recipe for this dish, which includes all the tips and tricks needed to make it a success! {{image_2}} You can change up the mango salsa to fit your taste. Try adding: - Pineapple for a sweet twist - Kiwi for a tangy zing - Coconut flakes for a tropical feel These fruits can add new flavors. You can also swap fresh herbs. Instead of cilantro, use mint or basil for a fresh taste. While salmon is a star, you can use other fish. Some great options are: - Mahi-mahi - Tilapia - Trout These fish grill well and soak up flavor. Each option brings its own unique taste and texture. So, feel free to experiment! Serve your grilled salmon with fun sides. Here are some ideas: - Coconut rice for a tropical theme - Grilled veggies like zucchini and bell peppers - A fresh green salad with lime vinaigrette These sides keep your meal light and bright. Enjoy this dish outside on warm days. For the full recipe, check the main article. If you have leftover salmon, store it in an airtight container. Place it in the fridge right away. Salmon stays fresh for up to three days. Make sure to keep it cool and dry. Keeping it in small portions helps with reheating later. Mango salsa is best in a covered bowl. You can also use a jar with a lid. Keep it in the fridge for up to two days. If it gets too watery, just drain off the excess liquid. For the best taste, eat it fresh. But if you have some left, enjoy it in a day or two. To reheat salmon, preheat your oven to 350°F. Place the salmon on a baking sheet. Cover it with foil to keep it moist. Heat it for about 10-15 minutes. Check it often so it doesn't overcook. For mango salsa, it’s best to eat it cold. Adding fresh lime juice can perk it up again. Enjoy your Tropical Grilled Salmon with Mango Salsa any time! For the full recipe, refer back to the beginning. You should marinate the salmon for 15-20 minutes. This time lets the flavors soak in well. If you marinate for too long, the fish can become mushy. A short marinate gives you tasty salmon with a nice texture. Yes, you can use other fruits for the salsa. Pineapple, peaches, or kiwi work great. These fruits add a sweet twist. Just make sure they are ripe. Chop them up like you would with mango. Mix them with the other salsa ingredients for a fresh taste. Grilled salmon pairs well with many sides. Consider a fresh green salad or steamed veggies. Quinoa or rice also make great choices. You can even serve it with grilled corn on the cob. Each of these sides adds flavor and texture to your meal. For more ideas, check out the Full Recipe. We explored how to create a tasty grilled salmon dish with a fresh mango salsa. I shared key ingredients, including tips on measuring and choosing between fresh and frozen salmon. You learned step-by-step instructions for marinating and grilling your salmon. By following my tips, you can get perfect grill marks and adjust spice levels to your taste. Remember, you can tweak this recipe with different fruits or fish. Store leftovers properly to enjoy them later. Enjoy your cooking adventures, and have fun experimenting!](https://grilledflavors.com/wp-content/uploads/2025/06/65c035aa-002f-4e41-91ab-eec612e234da.webp)
Grilled Salmon with Mango Salsa Flavorful Summer Meal
Summer is here, and there’s no better way to celebrate than with grilled salmon and fresh mango salsa. This dish is bright, healthy, and bursting
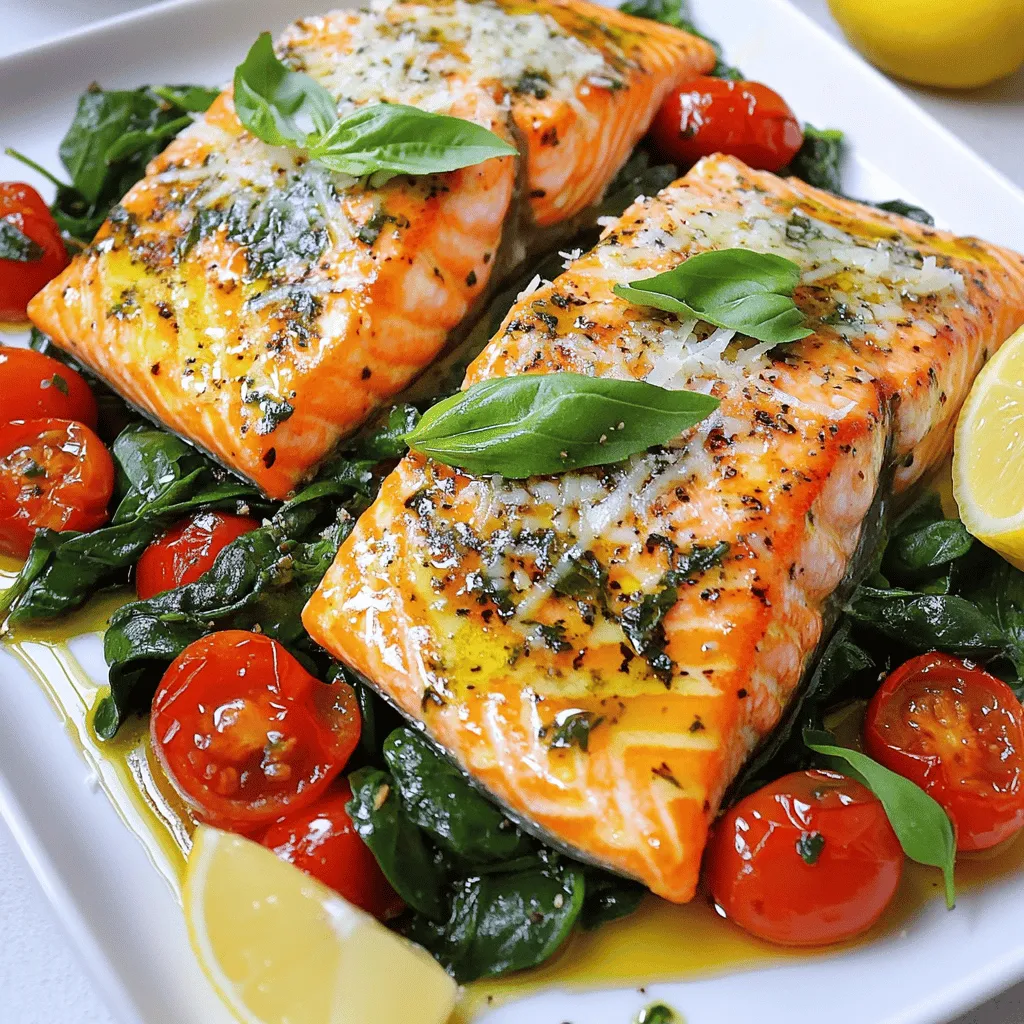
Tuscan Garlic Salmon Flavorsome and Simple Recipe
Are you ready to impress your taste buds with an easy, delicious dish? This Tuscan Garlic Salmon recipe is the perfect blend of fresh flavors
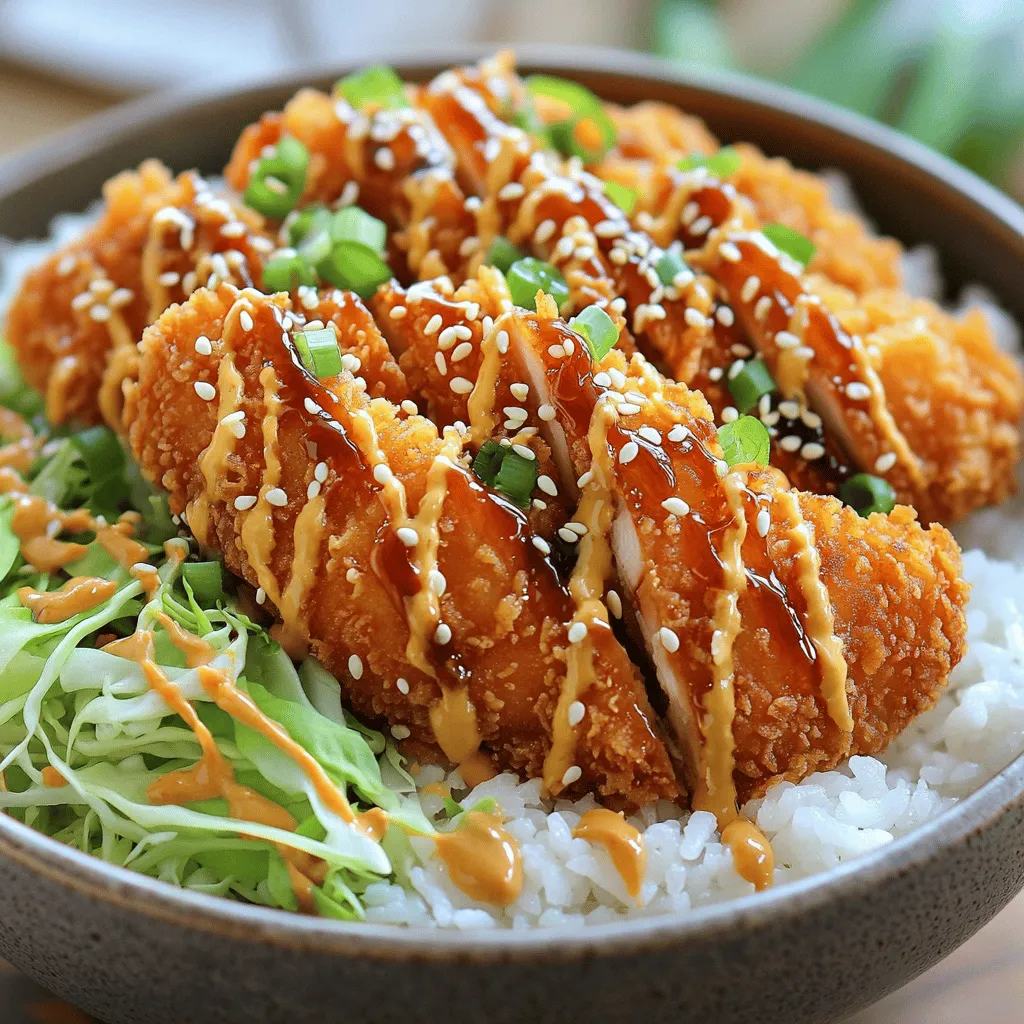
Japanese Katsu Bowls Tasty and Simple Recipe Guide
If you’ve ever craved a delicious, crispy Japanese Katsu Bowl, you’re in the right place! In this guide, I’ll share a tasty and simple recipe
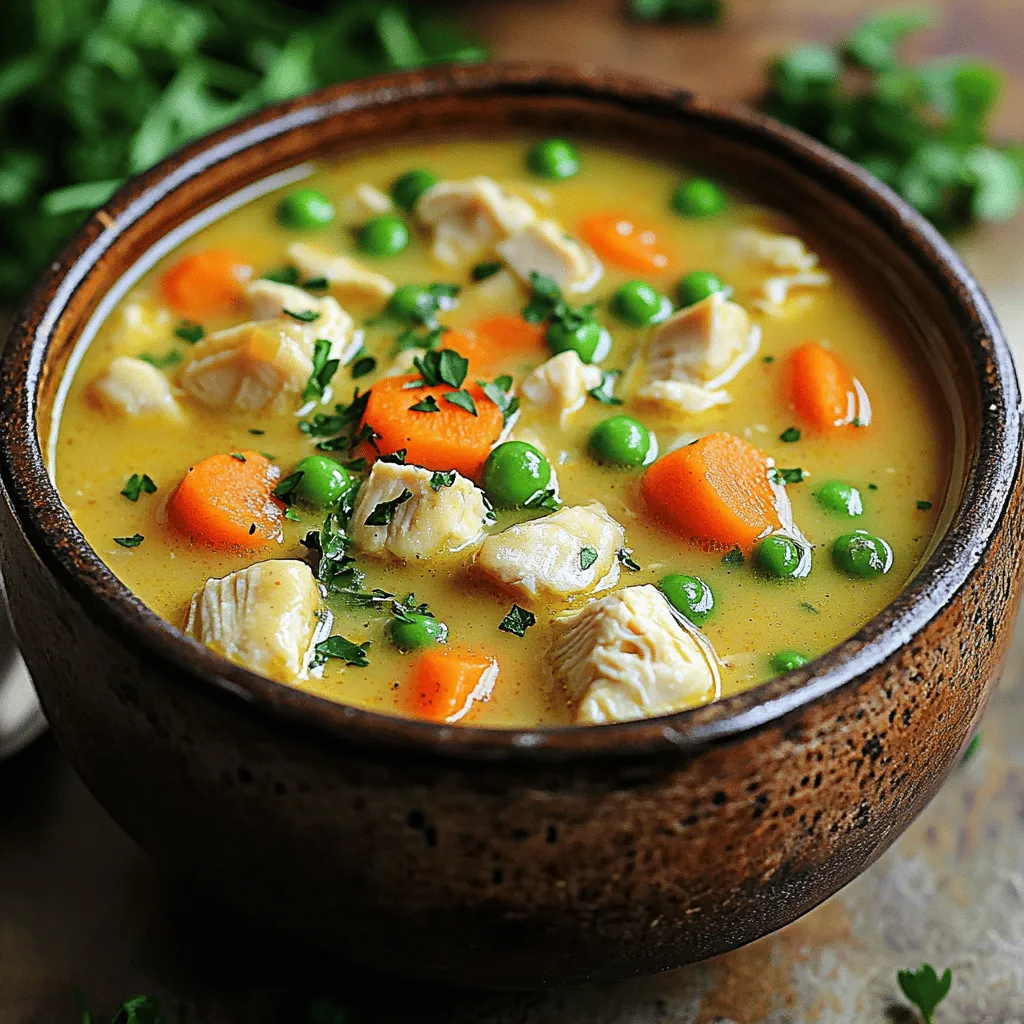
Healthy Chicken Pot Pie Soup Comforting and Nourishing
Are you ready to enjoy a warm bowl of comfort? This Healthy Chicken Pot Pie Soup is both nourishing and delicious. Packed with fresh veggies,
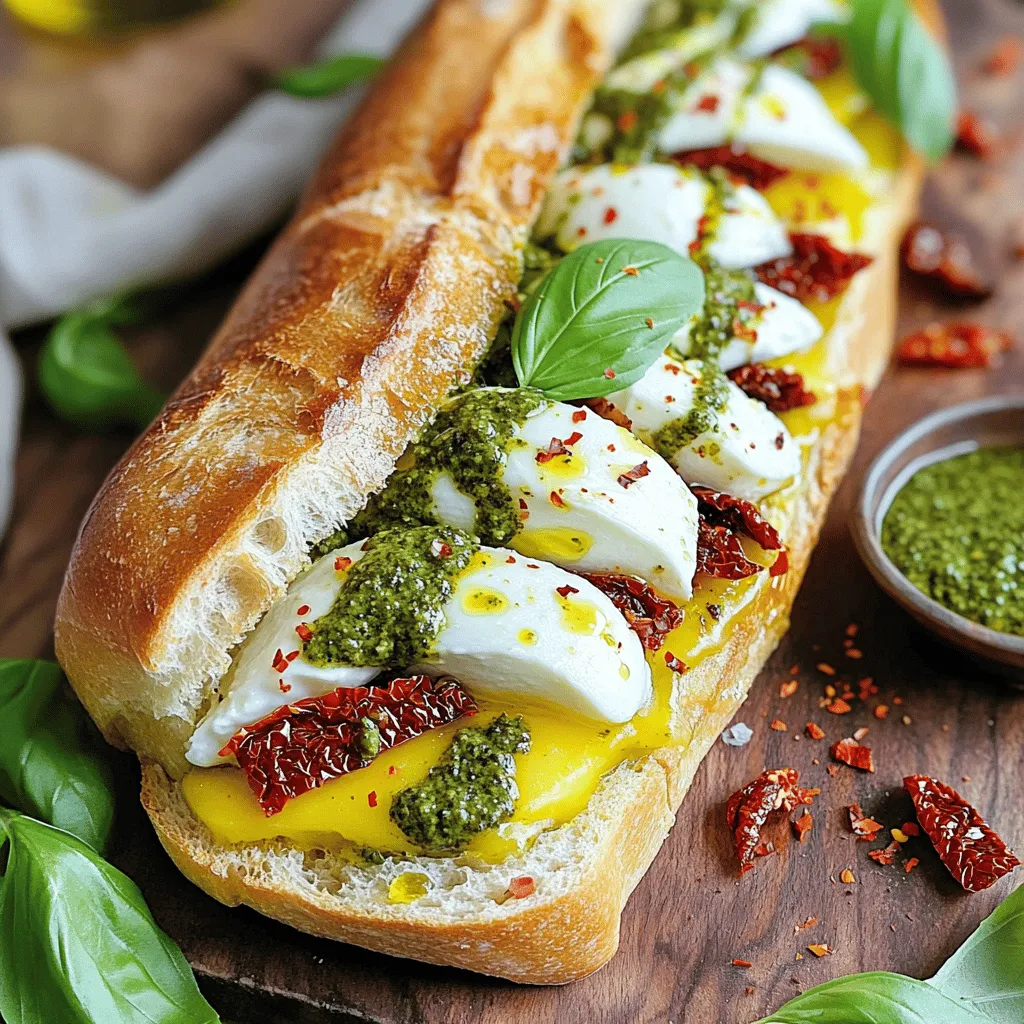
Grilled Mozzarella Sandwich Delight in Every Bite
Are you ready to transform your lunch into a flavor-packed adventure? In this post, I will show you how to make a Grilled Mozzarella Sandwich
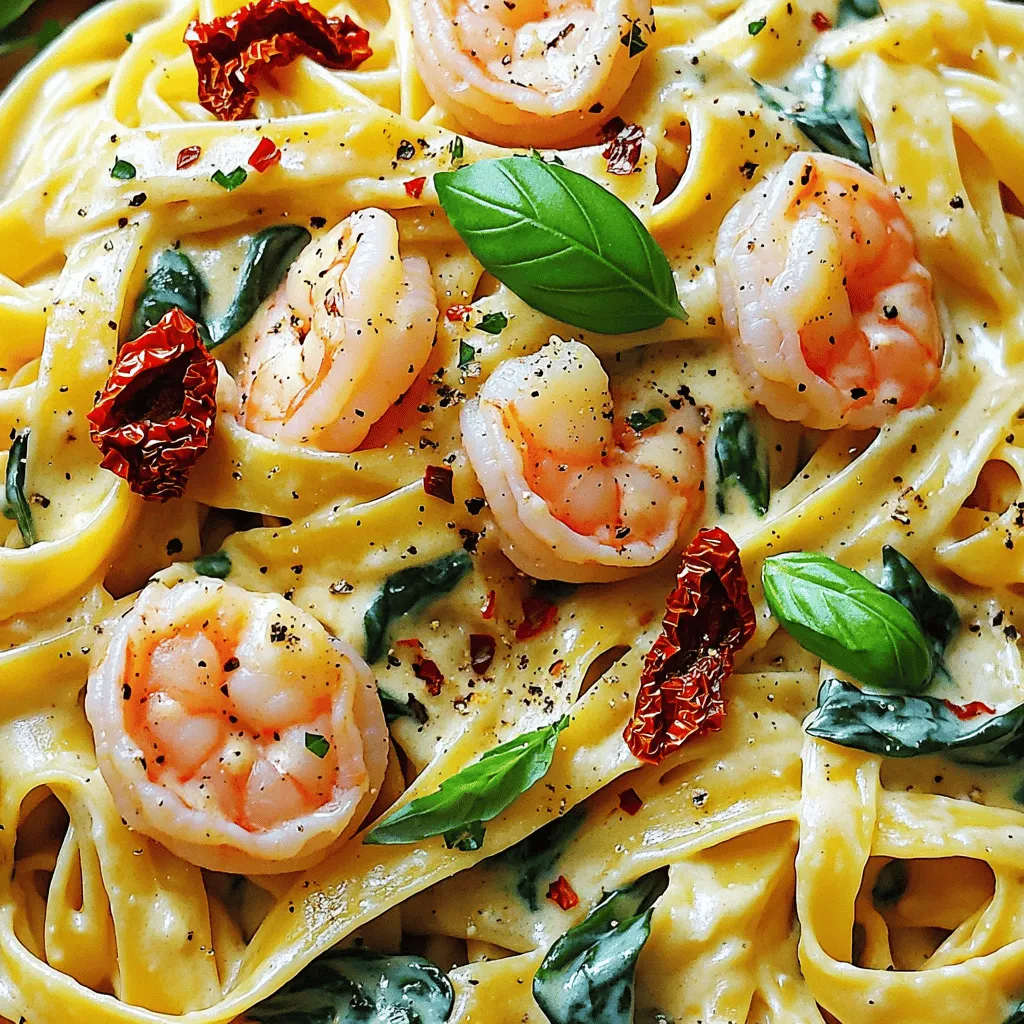
Creamy Marry Me Shrimp Pasta Irresistible Delight
Looking to impress with a delicious meal? My Creamy Marry Me Shrimp Pasta is just the ticket! This dish brings rich flavors and creamy goodness
![- 4 boneless, skinless chicken breasts - 1 cup fresh basil leaves, chopped - 1/2 cup grated Parmesan cheese - 1 cup breadcrumbs (panko for extra crunch) - 2 large eggs - 1/4 cup all-purpose flour - 2 cloves garlic, minced - 1 teaspoon dried oregano - Salt and pepper to taste - Olive oil, for frying - Lemon wedges, for serving These ingredients create a simple and tasty dish. Fresh basil gives a bright flavor. The chicken stays juicy, while the Parmesan adds richness. Breadcrumbs give a nice crunch. For more detailed steps, be sure to check the Full Recipe. When you gather these items, the fun begins. Use fresh basil for the best taste. Grated cheese melts well and adds a savory touch. Garlic brings a warm aroma. Each ingredient plays a role in the final dish. Cooking with these fresh items makes your meal feel special. It’s easy to make, and you will love the flavors! First, prep the chicken. Place each chicken breast between two sheets of plastic wrap. This helps to keep the mess down. Using a meat mallet or a rolling pin, gently pound the chicken. Aim for an even thickness of about 1/2 inch. This step is key for even cooking. If the chicken is uneven, some parts may cook faster than others. Next, set up your breading stations. You will need three bowls. In the first bowl, mix flour with a pinch of salt and pepper. This adds flavor to the chicken. In the second bowl, crack the eggs and whisk them until smooth. This will help the breadcrumbs stick. In the third bowl, mix breadcrumbs with grated Parmesan cheese, chopped basil, minced garlic, and oregano. This blend gives the cutlets a tasty crust. Now it's time to coat the chicken. Take one cutlet and dip it into the flour, shaking off any extra. Then, dip it into the egg mixture. Make sure it is well-coated. Finally, press it into the breadcrumb mix, so it sticks nicely. Repeat this for all the cutlets. Heat about 1/4 inch deep of olive oil in a large skillet over medium heat. To check if the oil is hot, drop in a piece of breadcrumb. It should sizzle. Carefully add the breaded chicken cutlets to the pan. Cook them for about 4-5 minutes on each side. Look for a golden brown color and ensure they are cooked through. If the pan feels crowded, work in batches to avoid soggy cutlets. These steps will help you make Italian Basil Chicken Cutlets that are crispy and full of flavor. For the full recipe, check the details above. Using fresh herbs like basil makes a big difference. Fresh basil gives a bright taste. You can also add more herbs if you want. Adjust seasoning to your taste. Taste the mixture before breading the chicken. A little extra salt or pepper can really help. Panko breadcrumbs are key for a crunchy finish. They give a light and crispy texture. Be sure to coat the chicken well. The right oil temperature matters too. Heat the oil until it sizzles when you add a breadcrumb. This means it’s hot enough for frying. Garnish your cutlets with more chopped basil for color. A squeeze of lemon adds a nice zing. For side dishes, consider a fresh salad or roasted veggies. These pair well and add balance to the meal. Check the Full Recipe for more details on serving. {{image_2}} You can easily adjust this recipe for different diets. If you want a vegan option, use tofu or tempeh instead of chicken. Marinate it in a mix of soy sauce, lemon juice, and basil for great flavor. For a gluten-free meal, swap regular breadcrumbs for gluten-free panko. You can also use almond flour as a coating. Both options keep the dish tasty and enjoyable. You have choices when it comes to cooking these cutlets. Baking is a great way to make them healthier. Simply preheat your oven to 400°F. Place the breaded cutlets on a baking sheet lined with parchment paper. Bake for 20-25 minutes, flipping halfway through. If you prefer air frying, set your air fryer to 375°F. Cook the cutlets for about 12-15 minutes, flipping them halfway. This method gives you a nice crisp without much oil. Adding different herbs can change the whole dish. Try using parsley, thyme, or even rosemary for a fresh twist. You can also spice things up. Adding red pepper flakes gives your cutlets a kick. For a zesty touch, mix in some lemon zest with the breadcrumbs. These small changes can make a big difference in flavor. To keep your Italian Basil Chicken Cutlets fresh, place them in an airtight container. This helps prevent moisture loss. Store them in the fridge right after they cool down. You can keep them in the fridge for up to three days. The chicken may lose some crispiness over time, but it will still taste great. When reheating, you want to keep that crunch. I recommend using an oven or an air fryer. Preheat your oven to 375°F (190°C). Place the cutlets on a baking sheet and heat for about 10 minutes. Check them halfway through to ensure even heating. If using a microwave, cover the cutlets with a damp paper towel. This helps avoid dryness, but they may not stay crispy. Always check that the chicken is hot in the center before eating. If you want to save some for later, freezing is a good option. Let the cutlets cool completely before freezing. Wrap each cutlet tightly in plastic wrap, then place them in a freezer bag. This prevents freezer burn. You can freeze them for up to three months. When you're ready to eat, thaw them in the fridge overnight. Reheat them using the oven or air fryer for best results. Enjoy your flavorful cutlets anytime! For the full recipe, check out the [Full Recipe]. To boost flavor, use fresh herbs and spices. You can add thyme or rosemary for depth. A pinch of crushed red pepper gives a nice kick. Mix in lemon zest for brightness. You can also try a splash of balsamic vinegar for sweetness. These simple tweaks make a big difference. Yes, you can use chicken thighs. They are juicier and more flavorful. However, they take a bit longer to cook. Chicken breasts are leaner and cook faster. If you want a richer taste, go for thighs. For a lighter meal, stick with breasts. Great sides include roasted veggies or a fresh salad. Garlic mashed potatoes add creaminess. Pasta with olive oil and herbs is another tasty choice. You might also serve it with a slice of crusty bread to soak up juices. These sides balance the dish well. To make this gluten-free, swap out the all-purpose flour for a gluten-free blend. Use gluten-free breadcrumbs instead of regular ones. Many brands offer tasty options. Always check the label to ensure it's certified gluten-free. This way, you can enjoy the dish without worry. In this blog post, we covered how to make delicious Italian Basil Chicken Cutlets. We discussed the key ingredients, preparation steps, and effective frying methods. I shared tips for enhancing flavors and achieving a crispy texture. We also explored storage options and answered common questions. In conclusion, you can create a tasty meal with easy steps and options. Enjoy experimenting with this recipe to make it your own!](https://grilledflavors.com/wp-content/uploads/2025/06/5546fd64-b506-49ba-a904-d867323d3736.webp)
Italian Basil Chicken Cutlets Flavorful and Simple Meal
Looking for a quick and tasty meal? Try my Italian Basil Chicken Cutlets! This dish is packed with flavor, thanks to fresh basil and Parmesan
![- 2 boneless, skinless chicken breasts - 2 cups broccoli florets - 1 cup quinoa, rinsed - 2 cups chicken broth or vegetable broth - 2 tablespoons olive oil - 1 teaspoon garlic powder - 1 teaspoon onion powder - 1 teaspoon smoked paprika - Salt and pepper to taste - Zest of 1 lemon - Juice of 1 lemon - Sliced scallions - Sesame seeds - Red pepper flakes When I make my Grilled Chicken & Broccoli Bowls, I focus on freshness and flavor. Each ingredient plays a role in making this dish satisfying and healthy. First, I use two boneless, skinless chicken breasts. They grill beautifully and stay juicy. Next, I add two cups of broccoli florets. Broccoli adds color and crunch. I always rinse one cup of quinoa before cooking. It gives the base a nutty taste. For the broth, I choose either chicken or vegetable. It brings extra flavor to the quinoa. Next, I mix the seasonings. I use two tablespoons of olive oil to help the spices stick. Garlic powder and onion powder make the chicken taste great. Smoked paprika adds a subtle smokiness. I season with salt and pepper to my liking. The zest and juice of one lemon brighten the dish. I also think about optional toppings. Sliced scallions add a fresh kick. Sesame seeds bring a nice crunch. A sprinkle of red pepper flakes can spice things up if you like heat. This combination of ingredients creates a tasty, healthy meal. You can find the full recipe with all the steps to make this dish. Enjoy every bite! To start, I make a simple marinade. I mix 1 tablespoon of olive oil with garlic powder, onion powder, smoked paprika, salt, and pepper. This blend brings great flavor to the chicken. I then take the boneless, skinless chicken breasts and coat them well in this marinade. Once coated, I place the chicken in the fridge for at least 30 minutes. If I have time, I let it marinate for up to 2 hours. This step really enhances the taste. Next, I focus on the quinoa. I grab a medium saucepan and bring 2 cups of chicken or vegetable broth to a boil. Once boiling, I add 1 cup of rinsed quinoa. I reduce the heat to low, cover the pot, and let it simmer. After about 15 minutes, all the liquid should be absorbed. I remove the pot from heat and let it sit for another 5 minutes. This resting time helps the quinoa fluff up nicely. Now it’s time to grill the chicken. I preheat my grill to medium-high heat. Once it's hot, I place the marinated chicken on the grill. I cook each side for about 6-7 minutes. I use a meat thermometer to check that the internal temperature reaches 165°F (75°C). After grilling, I let the chicken rest for a few minutes before slicing. While the chicken is grilling, I prepare the broccoli. I bring a pot of water to a boil. Then, I add the broccoli florets and blanch them for 2-3 minutes. This keeps them bright green and tender-crisp. After blanching, I drain the broccoli and rinse it under cold water. This stops the cooking process and keeps the color vibrant. Now for the fun part: assembling the bowls! In a serving bowl, I start with a layer of quinoa as the base. On top of the quinoa, I add the sliced grilled chicken and the blanched broccoli. To finish, I drizzle some leftover olive oil, lemon zest, and lemon juice over everything. This adds a fresh, zesty flavor. For a pop of color and extra flavor, I like to garnish my bowls. I sprinkle some sliced scallions, sesame seeds, and a pinch of red pepper flakes. These toppings not only enhance taste but also make the dish look beautiful. Follow these steps, and you'll have a delicious meal ready in no time! You can find the complete instructions in the Full Recipe. To get the best flavor from your chicken, marinate it for at least 30 minutes. If you have more time, aim for 2 hours in the fridge. This lets the spices soak in well. Here are some tasty marinades you can try: - Lemon Herb Marinade: Use lemon juice, olive oil, and mixed herbs. - Teriyaki Marinade: Mix soy sauce, ginger, and brown sugar for a sweet twist. To avoid mushy quinoa, rinse it well before cooking. This removes excess starch. Cook it in chicken or vegetable broth for more flavor. Here’s how to enhance quinoa’s taste: - Add a bay leaf or garlic clove while it cooks. - Stir in a splash of lemon juice after it's done. To keep chicken from sticking to the grill, oil the grates before heating. Preheat the grill to medium-high. Follow these tips for perfect grill marks: - Place chicken at a 45-degree angle on the grill. - Don’t move it around; let it sear for 6-7 minutes per side. By using these tips, your Grilled Chicken & Broccoli Bowls will shine. Enjoy the flavors and the healthy boost! For the complete recipe, check the Full Recipe section. {{image_2}} You can boost your Grilled Chicken & Broccoli Bowls by adding more veggies. Seasonal vegetables work best. Think about using zucchini, carrots, or asparagus. These veggies add color and nutrients. To incorporate bell peppers, slice them thin. You can add them to the grill with the chicken. Snap peas are also great. Just toss them in during the last minute of blanching. This keeps them crisp and bright. If you want to change the protein, chicken is not your only option. You can use tofu for a vegetarian dish. Firm tofu holds up well during grilling. Just marinate it like chicken for great flavor. Shrimp is another tasty choice. It cooks quickly and absorbs flavors well. For those who want more plant-based options, chickpeas are a great alternative. They are packed with protein and add a nice texture. You can switch up the flavors to make this dish exciting. For a taste of Asia, try teriyaki sauce. Just brush it on the chicken before grilling. It adds a sweet and savory touch. If you want something spicier, use curry powder. Mix it into the marinade for a bold kick. You can also add coconut milk for a creamy texture. Each of these options gives you a new dish each time. For the complete recipe, check the Full Recipe. To keep your Grilled Chicken & Broccoli Bowls fresh, use airtight containers. Glass or BPA-free plastic containers work best. Make sure the food is cool before sealing. This helps prevent moisture buildup. For longer storage, you can freeze the bowls. Use freezer-safe containers and leave space for expansion. In the fridge, leftovers can last for 3 to 4 days. If you freeze them, they remain good for about 2 to 3 months. Always check for signs of spoilage. Look for off smells, changes in color, or mold. If you see any of these, it’s best to throw the dish away. When reheating, use the microwave or oven. For the microwave, heat in short bursts to avoid uneven cooking. Stir in between to help with even heat. If using the oven, preheat to 350°F (175°C) and cover with foil to keep moisture. Avoid soggy broccoli by reheating it separately for a few minutes. This way, your meal stays tasty and fresh! For the complete Grilled Chicken & Broccoli Bowls recipe, check out the Full Recipe. Yes, you can use frozen broccoli. Frozen broccoli is picked at its peak. It is then blanched and frozen, keeping its nutrients. However, it can be softer than fresh broccoli. If you want a crunch, cook it less. Just remember to thaw it first. Drain excess water for the best texture. You can swap quinoa with brown rice, farro, or couscous. These grains give a nice base. Brown rice is chewy and hearty. Farro has a nutty flavor. Couscous cooks quickly and soaks up flavors well. Each choice will change the taste a bit, so pick what you like! To make it dairy-free, skip cheese and cream. Instead, use creamy avocado or tahini. These options add richness. You can also blend soaked cashews with lemon juice. This creates a creamy sauce. It keeps the dish rich without using dairy. Yes, this recipe is great for meal prep! Cook a larger batch for the week. Store servings in airtight containers. Keep chicken, quinoa, and broccoli separate until you eat. This way, everything stays fresh. Reheat in the microwave or on the stove. Each serving has about 400 calories. It has 30 grams of protein and 15 grams of fat. You’ll get fiber from quinoa and broccoli. This dish is rich in vitamins A and C. It helps keep your immune system strong. For the complete recipe details and instructions, check out the [Full Recipe]. Grilled Chicken and Broccoli Bowls offer a healthy, tasty meal. We explored ingredients like chicken, quinoa, and fresh broccoli. I walked you through marinating, cooking, and grilling. A few simple tips helped ensure great flavor. You learned about storage and variations to keep meals exciting. Remember, feel free to customize flavors and ingredients. Enjoying healthy meals can be both easy and fun. Start making your own delicious bowls today!](https://grilledflavors.com/wp-content/uploads/2025/06/8c925742-160c-472e-888b-4ddf40d8df58.webp)
Grilled Chicken & Broccoli Bowls Flavorful Healthy Meal
Looking for a tasty and healthy meal that’s easy to make? Grilled Chicken & Broccoli Bowls are not only flavorful, but they’re also packed with
![- 12 oz ziti pasta - 2 tablespoons olive oil - 1 medium onion, diced - 3 cloves garlic, minced - 1 bell pepper, diced (any color) - 1 zucchini, diced - 1 jar (24 oz) marinara sauce - 1 teaspoon dried oregano - 1 teaspoon dried basil - 1/2 teaspoon red pepper flakes (optional) - 1 cup ricotta cheese - 1 cup shredded mozzarella cheese - 1/2 cup grated Parmesan cheese - Fresh basil leaves for garnish - Salt and pepper to taste When I cook baked ziti, I love to gather all my ingredients first. This makes the process smooth and fun. You start with ziti pasta, which is perfect for holding sauces. I use olive oil to sauté my veggies and give them flavor. Onions and garlic are a must. They add a sweet taste and great aroma. I pick any color bell pepper, as they all work well. Zucchini adds a nice crunch and color to the dish. The marinara sauce is the heart of this meal. I always choose a good quality jar for rich flavor. Dried oregano and basil give it that classic Italian taste, while red pepper flakes can add a little heat. For that creamy texture, I use ricotta cheese. Then, I load it with mozzarella and Parmesan for cheesy goodness. Finally, I top it with fresh basil leaves for a pop of color. Don’t forget to season with salt and pepper to make every bite delicious. You can find the full recipe for these tasty ingredients and instructions in the [Full Recipe]. - Preheat the oven to 375°F (190°C). - Cook ziti pasta until al dente; drain and set aside. - In a large skillet, heat 2 tablespoons of olive oil. - Add 1 diced onion and sauté until soft, about 3-4 minutes. - Stir in 3 minced garlic cloves, 1 diced bell pepper, and 1 diced zucchini. - Cook for 5-7 minutes until the veggies are tender. - Pour in 1 jar of marinara sauce and mix in seasoning. - Add 1 teaspoon of dried oregano, 1 teaspoon of dried basil, and salt. - If you like heat, add 1/2 teaspoon of red pepper flakes. - Let it simmer for 5 minutes for the flavors to blend. - In a large bowl, mix the cooked ziti with the vegetable sauce and 1 cup of ricotta cheese. - Layer half of this mixture in a greased 9x13 inch baking dish. - Sprinkle half of 1 cup shredded mozzarella cheese over it. - Add the rest of the ziti mixture and top with more mozzarella cheese and 1/2 cup grated Parmesan cheese. - Cover the dish with foil and bake for 25 minutes. - Uncover and bake for an additional 15-20 minutes until the cheese is golden and bubbly. - Let it cool for a few minutes, then garnish with fresh basil leaves. - For the full recipe, check the ingredients section. For a tasty baked ziti, fresh herbs make a big difference. Use basil or oregano to elevate your dish. They add bright flavors that dry herbs can't match. Also, be careful not to overcook the pasta. Cook it just until al dente. It will finish cooking in the oven and stay firm. You can switch up the cheese for a fun twist. Fontina or Gouda can add a unique taste. Both melt well and offer different flavors. To make your baked ziti cheesier, mix different cheeses. Try adding more mozzarella or a sprinkle of cream cheese for a rich texture. You can prep your baked ziti in advance. Just assemble it and cover it tightly. Store it in the fridge for up to 24 hours. When ready to eat, bake it straight from the fridge. This helps keep the layers intact. To reheat, cover it with foil. This keeps the cheese from burning while warming. {{image_2}} For a meat-free meal, swap out meat for hearty mushrooms or lentils. These ingredients add a rich taste. You can also use eggplant or spinach to boost flavor and nutrition. To add more veggies, consider mixing in diced carrots, broccoli, or peas. These choices not only add color but also make your baked ziti healthier. If you love meat, consider adding ground beef, sausage, or turkey. Brown the meat before mixing it with the sauce. This step enhances the flavor. You can also add diced pepperoni or cooked chicken for extra zest. Mixing meats can give a rich, varied taste. Just ensure the meat is fully cooked before layering it in the dish. For a gluten-free option, use gluten-free ziti or another gluten-free pasta. Quinoa or rice noodles can work well too. Adjust the cooking time as needed to get the right texture. When baking, cover the dish tightly to keep moisture in. This helps the pasta cook evenly and stay tender. To keep your baked ziti fresh, store it in an airtight container. This helps avoid moisture loss and keeps flavors intact. Baked ziti lasts about 3 to 5 days in the fridge. Make sure to cool it completely before sealing. This way, you prevent condensation from making it soggy. Freezing baked ziti is easy and great for meal prep. First, let it cool down. Then, cut it into portions for easier thawing. Wrap each piece tightly in plastic wrap and then in foil. This helps protect it from freezer burn. When you’re ready to eat, thaw it in the fridge overnight. Reheat in the oven at 350°F (175°C) until hot. This keeps the cheese melty and the pasta tender. You can serve baked ziti as a main dish or at parties. It pairs well with a fresh salad or garlic bread. For a special touch, add a sprinkle of fresh parsley or basil on top. A side of roasted veggies can also make for a colorful plate. Baked ziti is great for family dinners or gatherings, making it a crowd-pleaser. Baked ziti is quick and easy. You spend about 15 minutes to prep. The cooking time is around 25 minutes covered and 15 to 20 minutes uncovered. This means you can serve a delicious meal in about 50 minutes. Yes, you can skip the ricotta. Cream cheese or cottage cheese works well instead. You can also mix in some sour cream for creaminess. These options keep your baked ziti tasty and rich without missing out. Ziti pasta is the classic choice. It has a smooth surface that holds sauce well. You can also use penne or rigatoni. These shapes add fun to your dish and also work great. Absolutely! You can add ground beef, sausage, or turkey. Just cook the meat before mixing it in. For a smokier flavor, try adding bacon or pancetta. Meat brings protein and heartiness to your baked ziti. If you want the full recipe, check it out for more tips! Baked ziti is a simple, tasty dish. You can make it with fresh veggies or meats. Use different cheeses for fun flavors. Remember to store leftovers properly for later. Cooking can be easy and enjoyable. With these steps, you can impress friends and family. So, grab your ingredients and start cooking! Enjoy the warm, cheesy goodness of baked ziti!](https://grilledflavors.com/wp-content/uploads/2025/06/e29a5b84-e84e-46ca-8550-28401efe6a4a.webp)
Baked Ziti Flavorful and Simple Dinner Delight
Are you ready for a cozy dinner that packs a punch of flavor? My Baked Ziti is not only simple to make, but it’s also